大家好,我是Edison。
上一篇我们学习了Semantic Kernel中的并发编排模式,它非常适合并行分析、独立子任务并集成决策的任务场景。今天,我们学习新的模式:顺序编排。
顺序编排模式简介
在顺序编排模式中,各个Agent被组成一个流程,每个Agent都会处理任务,并将执行结果输出传递给下一个待执行的Agent。可以看出,对于每个基于上一步骤构建的工作流(Workflow)来说,这是比较适合的模式。
目前,像文档审阅、工作流、数据处理管道、多阶段推理等,是比较常见的应用场景。
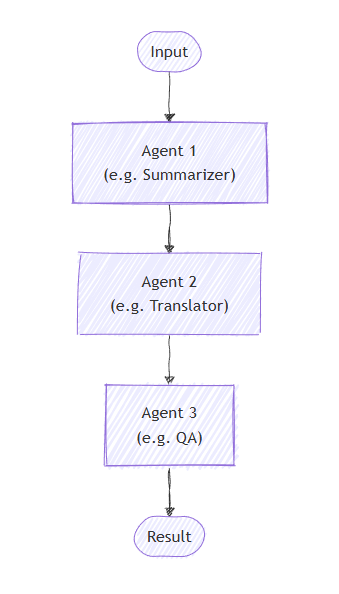
下图展示了一个文档翻译的用例,文档先通过Agent1生成摘要,然后通过Agent2执行翻译,最后通过Agent3进行审阅和质量保证,最终生成最后的翻译结果。可以看到,每个Agent都在基于上一个步骤的处理结果进行构建,这就是一个典型的顺序编排用例。
实现顺序编排模式
这里我们来实现一个DEMO,我们定义3个Agent:分析师(Analyst)、广告文案写手(CopyWriter) 和 编辑/审稿人(Editor),假设他们是一个小Team,在承接广告文案的创作。
那么我们这个DEMO的目标,就是可以让他们可以来接客,只要客户分配一个广告文案创作的任务,它们就可以配合来生成最终的文案:首先由分析师分析要介绍产品的亮点和宣传思路,再由写手生成一个文案草稿,最后由审稿人进行评估给出最终文案,这就是一个典型的工作流处理。
为了简单地实现这个功能,我们创建一个.NET控制台项目,然后安装以下包:
Microsoft.SemanticKernel.Agents.Core
Microsoft.SemanticKernel.Agents.OpenAI (Preview版本)
Microsoft.SemanticKernel.Agents.Orchestration (Preview版本)
Microsoft.SemanticKernel.Agents.Runtime.InProcess (Preview版本)
需要注意的是,由于Semantic Kernel的较多功能目前还处于实验预览阶段,所以建议在该项目的csproj文件中加入以下配置,统一取消警告:
<PropertyGroup>
  <NoWarn>$(NoWarn);CA2007;IDE1006;SKEXP0001;SKEXP0110;OPENAI001</NoWarn>
</PropertyGroup>
创建一个appsettings.json配置文件,填入以下关于LLM API的配置,其中API_KEY请输入你自己的:
{
  "LLM": {
    "BASE_URL": "https://api.siliconflow.cn",
    "API_KEY": "******************************",
    "MODEL_ID": "Qwen/Qwen2.5-32B-Instruct"
  }
}
这里我们使用SiliconCloud提供的 Qwen2.5-32B-Instruct 模型,你可以通过这个URL注册账号:https://cloud.siliconflow.cn/i/DomqCefW 获取大量免费的Token来进行本次实验。
有了LLM API,我们可以创建一个Kernel供后续使用,这也是老面孔了:
Console.WriteLine("Now loading the configuration...");
var config = new ConfigurationBuilder()
    .AddJsonFile($"appsettings.json", optional: false, reloadOnChange: true)
    .Build();
Console.WriteLine("Now loading the chat client...");
var chattingApiConfiguration = new OpenAiConfiguration(
    config.GetSection("LLM:MODEL_ID").Value,
    config.GetSection("LLM:BASE_URL").Value,
    config.GetSection("LLM:API_KEY").Value);
var openAiChattingClient = new HttpClient(new OpenAiHttpHandler(chattingApiConfiguration.EndPoint));
var kernel = Kernel.CreateBuilder()
    .AddOpenAIChatCompletion(chattingApiConfiguration.ModelId, chattingApiConfiguration.ApiKey, httpClient: openAiChattingClient)
    .Build();
接下来,我们就一步一步地来看看核心的代码。
定义3个Agent
这里我们来定义3个Agent:Analyst,Writer,Editor
(1)Analyst 分析师
var analystAgent = new ChatCompletionAgent()
{
    Name = "Analyst",
    Instructions = """
                You are a marketing analyst. Given a product description, identify:
                - Key features
                - Target audience
                - Unique selling points
                """,
    Description = "A agent that extracts key concepts from a product description.",
    Kernel = kernel
};(2)Writer 文案写手
var writerAgent = new ChatCompletionAgent()
{
    Name = "CopyWriter",
    Instructions = """
                You are a marketing copywriter. Given a block of text describing features, audience, and USPs,
                compose a compelling marketing copy (like a newsletter section) that highlights these points.
                Output should be short (around 150 words), output just the copy as a single text block.
                """,
    Description = "An agent that writes a marketing copy based on the extracted concepts.",
    Kernel = kernel
};(3)Editor 编辑/审稿人
var editorAgent = new ChatCompletionAgent()
{
    Name = "Editor",
    Instructions = """
                You are an editor. Given the draft copy, correct grammar, improve clarity, ensure consistent tone,
                give format and make it polished. Output the final improved copy as a single text block.
                """,
    Description = "An agent that formats and proofreads the marketing copy.",
    Kernel = kernel
};
选择编排模式
这里我们选择的是顺序编排模式:SequentialOrchestration,将需要编排的3个Agent作为参数传递给它。
需要注意的是:这里为了能够显示每个Agent的执行结果,我们定一个了一个自定义的回调方法 responseCallback,帮助显示每个Agent的输出记录供参考 。
// Set up the Sequential Orchestration
ChatHistory history = [];
ValueTask responseCallback(ChatMessageContent response)
{
    history.Add(response);
    return ValueTask.CompletedTask;
}
var orchestration = new SequentialOrchestration(analystAgent, writerAgent, editorAgent)
{
    ResponseCallback = responseCallback
};
启动运行时
在Semantic Kernel中,需要运行时(Runtime)才能管理Agent的执行,因此这里我们需要在正式开始前使用InProcessRuntime并启动起来。
// Start the Runtime
var runtime = new InProcessRuntime();
await runtime.StartAsync();
调用编排 并 收集结果
准备工作差不多了,现在我们可以开始调用编排了。这也是老面孔代码了,不过多解释。
// Start the Chat
Console.WriteLine("----------Agents are Ready. Let's Start Working!----------");
while (true)
{
    Console.WriteLine("User> ");
    var input = Console.ReadLine();
    if (string.IsNullOrWhiteSpace(input))
        continue;
    input = input.Trim();
    if (input.Equals("EXIT", StringComparison.OrdinalIgnoreCase))
    {
        // Stop the Runtime
        await runtime.RunUntilIdleAsync();
        break;
    }
    try
    {
        // Invoke the Orchestration
        var result = await orchestration.InvokeAsync(input, runtime);
        // Collect Results from multi Agents
        var output = await result.GetValueAsync(TimeSpan.FromSeconds(10 * 2));
        // Print the Results
        Console.WriteLine($"{Environment.NewLine}# RESULT: {output}");
        Console.WriteLine($"{Environment.NewLine}ORCHESTRATION HISTORY");
        foreach (var message in history)
        {
            Console.WriteLine($"#{message.Role} - {message.AuthorName}:");
            Console.WriteLine($"{message.Content.Replace("---", string.Empty)}{Environment.NewLine}");
        }
    }
    catch (HttpOperationException ex)
    {
        Console.WriteLine($"Exception: {ex.Message}");
    }
    finally
    {
        Console.ResetColor();
        Console.WriteLine();
    }
}需要注意的是:上面的代码示例中我主动输出了编排过程中每个Agent的生成结果历史记录 ,便于我们一会儿查看。
效果展示
用户输入问题:"Please help to introduce our new product: An eco-friendly stainless steel water bottle that keeps drinks cold for 24 hours."
假设客户公司有一个新产品:一个环保的不锈钢水瓶,可以让饮料保持24小时的低温,需要帮忙创作一个广告文案。
最终经过3个Agent的顺序合作,结果显示如下:

可以看到,它们合作写出了一段适合宣传的广告文案。
那么,它们到底是如何合作的呢?刚刚我们主动输出了历史记录,可以看看:
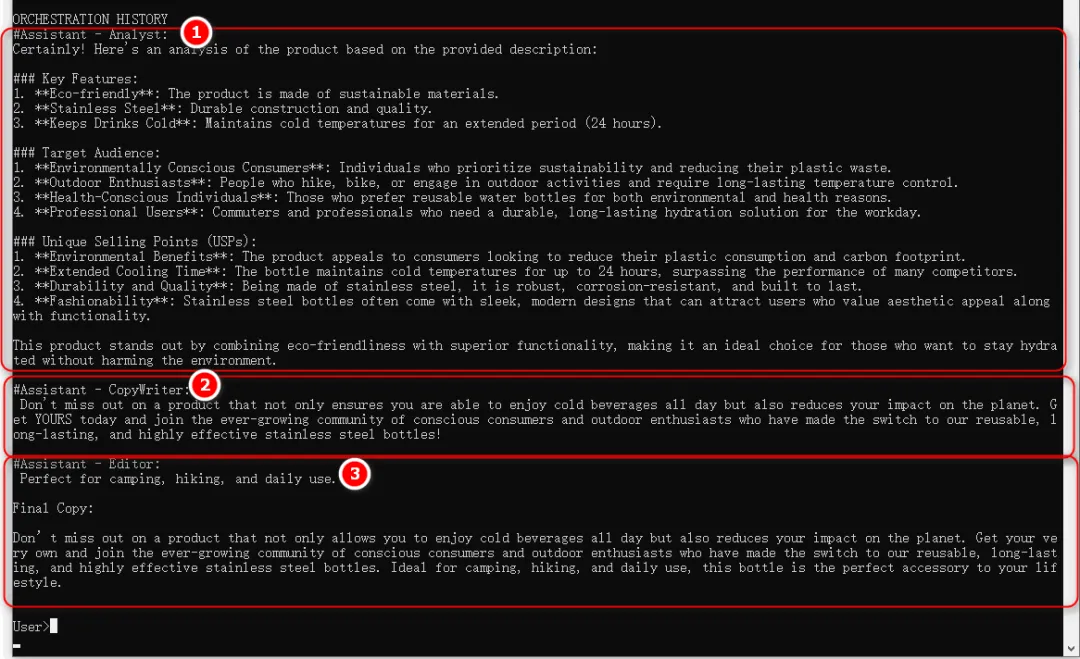
可以看到,Agent1-分析师对产品介绍生成了很多关键卖点和受众群体的分析结果,Agent2-写手便基于分析结果写了一个文案草稿,最终Agent3-编辑对文案进行了审核,最终发布广告文案。
小结
本文介绍了顺序编排模式的基本概念,然后通过一个案例介绍了如何实现一个顺序编排模式,相信通过这个案例你能够有个感性的认识。
下一篇,我们将再次学习群聊编排模式,并通过自定义群组聊天管理器(GroupChatManager)来自定义群聊流程。
参考资料
Microsoft Learn: https://learn.microsoft.com/zh-cn/semantic-kernel/frameworks/agent/agent-orchestration
推荐学习
圣杰:《.NET+AI | Semantic Kernel入门到精通》

作者:爱迪生
出处:https://edisontalk.cnblogs.com
本文版权归作者和博客园共有,欢迎转载,但未经作者同意必须保留此段声明,且在文章页面明显位置给出原文链接。