源码地址
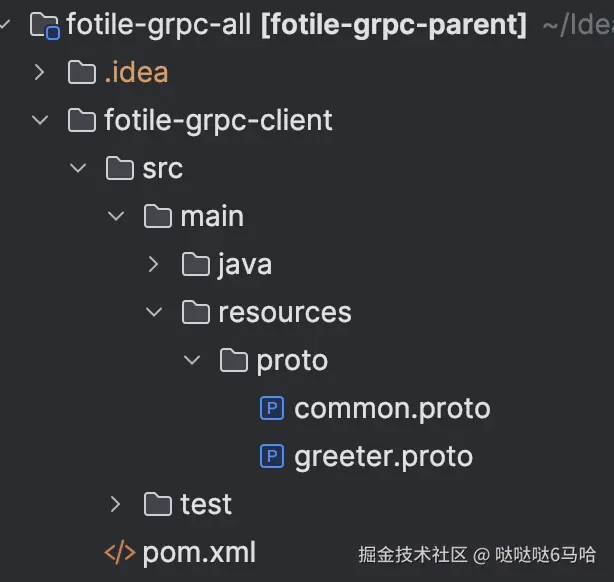
client包
因为client包一般都需要给多个工程共享,所以最好独立一个项目/工程。这采用的是独立一个工程。
同时在pom.xml文件里 的 build设置参数上需要注意使用:
xml
<configuration>
    <classifier>proto</classifier>  <!-- point:mark as proto source package -->
    <includes>
        <include>**/*.proto</include>  <!-- only include proto files -->
    </includes>
    <!-- exclude other files ,like java class files -->
    <excludes>
        <exclude>**/*.class</exclude>
        <exclude>META-INF/maven/**</exclude>
    </excludes>
</configuration>
完成后,使用命令打包并放到本地maven仓库 mvn clean install
server 部分
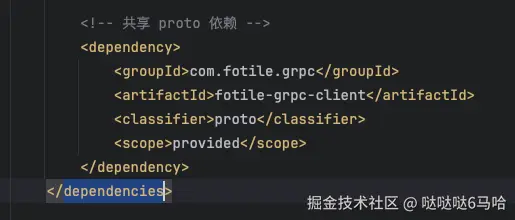
server端,如果需要引用client,需要注意client需要声明classifier为proto 如图:
完整pom依赖:
xml
<dependencies>
    <dependency>
        <groupId>org.springframework.boot</groupId>
        <artifactId>spring-boot-starter</artifactId>
    </dependency>
    <dependency>
        <groupId>net.devh</groupId>
        <artifactId>grpc-server-spring-boot-starter</artifactId>
    </dependency>

    <!-- Protobuf 核心依赖 -->
    <dependency>
        <groupId>com.google.protobuf</groupId>
        <artifactId>protobuf-java</artifactId>
    </dependency>
    <!-- gRPC 依赖 -->
    <dependency>
        <groupId>io.grpc</groupId>
        <artifactId>grpc-stub</artifactId>
    </dependency>
    <dependency>
        <groupId>io.grpc</groupId>
        <artifactId>grpc-protobuf</artifactId>
    </dependency>

    <!-- 共享 proto 依赖 -->
    <dependency>
        <groupId>com.fotile.grpc</groupId>
        <artifactId>fotile-grpc-client</artifactId>
        <classifier>proto</classifier>
        <scope>provided</scope>
    </dependency>
</dependencies>
在构建模块时,需要注意,通过jar引入的共享proto,需要通过下列插件先解压
xml
<groupId>org.apache.maven.plugins</groupId>
<artifactId>maven-dependency-plugin</artifactId>
然后对解压的内容进行编译
xml
<plugin>
    <groupId>org.xolstice.maven.plugins</groupId>
    <artifactId>protobuf-maven-plugin</artifactId>
</plugin>
最后把编译后的java代码加入到编译的路径里
xml
<plugin>
    <groupId>org.codehaus.mojo</groupId>
    <artifactId>build-helper-maven-plugin</artifactId>
</plugin>
关于具体对于解压的proto文件怎么配置编译的,我们后面单独讲解。
具体server的具体java代码,其实就是一个普通的springboot应用,对于client实现,只需要在这个service类上注解@GrpcService,同时继承 *Grpc.*ImplBase ,如下面代码
scala
@GrpcService
public class GreeterServiceGrpcImpl extends GreeterServiceGrpc.GreeterServiceImplBase {
}
一般来说,.proto 文件都是在 src/main/proto文件夹下, 参考我们的java文件都是在 src/main/java目录下。
最后需要注意的是需要配置下grpc服务端口:
yaml
grpc:
  server:
    port: 9092
这个端口和一般的java应用端口(server.port)不一样
invoker 调用gRPC
因为这里为了测试gRPC的调用,暴露了Http接口,所以引用了
xml
<dependency>
    <groupId>org.springframework.boot</groupId>
    <artifactId>spring-boot-starter-web</artifactId>
</dependency>
如果要自动装配gRPC client,直接引用
xml
<dependency>
    <groupId>net.devh</groupId>
    <artifactId>grpc-client-spring-boot-starter</artifactId>
</dependency>
我们需要使用的业务client
xml
<dependency>
    <groupId>com.fotile.grpc</groupId>
    <artifactId>fotile-grpc-client</artifactId>
    <classifier>proto</classifier>
    <scope>provided</scope>
</dependency>
然后build部分,因为要解压和把.proto文件编译成java代码,和server部分是类似的,只是没有自己的proto文件部分,所以少一些,完整代码可以拉取github里的代码工程。 需要注意,yml配置文件里需要配置client对应的server信息
yaml
grpc.client:
  grpc-server:
    address: static://localhost:9092
    enableKeepAlive: true
    keepAliveWithoutCalls: true
    # 因为gRPC默认是走的https,所以这里为了能支持不用TLS,加上这个配置
    negotiationType: plaintext
这里的 grpc-server需要与代码里的
kotlin
@GrpcClient("grpc-server")注解里的value值对应上,不然会有问题。 注意,注入的client其实都是 *Grpc.*BlockingStub 这样的形式,剩下的就是正常的类方法调用。
总结
本文主要提供了一个gRPC的server和invoker应用的基本调用示范,并演示如何利用公用jar里包含.proto文件来实现公用gRPC接口的定义。
后续会有专门章节来讲述关于maven打包,编译、实际业务代码,源码等细节。