在各类安全事故中,火灾因其突发性强、破坏力大,一直是威胁人们生命财产安全的重大隐患。传统的火灾检测方式多依赖烟雾传感器、温度传感器等,存在响应滞后、易受环境干扰等问题。随着深度学习技术的飞速发展,基于计算机视觉的火灾检测方法凭借其实时性强、检测范围广等优势,逐渐成为研究热点。本文将简单介绍一款基于深度学习的火灾智能检测系统的设计与实现过程。
一、系统整体设计
本火灾智能检测系统旨在通过深度学习技术实现对火灾的精准、快速响应,并及时发出报警信息。系统主要由数据采集模块、模型训练模块、火灾检测模块、报警模块和可视化界面模块五部分组成,各模块协同工作,形成一个完整的火灾检测闭环。
数据采集模块负责获取监测场景的图像或视频数据,支持摄像头实时拍摄、视频文件导入以及静态图片上传三种方式,确保系统能适应不同的应用场景。模型训练模块是系统的核心,通过大量的火灾图像数据训练深度学习模型,使其具备准确识别火焰的能力。火灾检测模块利用训练好的模型对采集到的数据进行分析处理,判断是否存在火情。一旦检测到火灾,报警模块立即触发语音报警,连续播报三次 "发生火情",同时可视化界面模块会展示检测结果,包括火情位置、检测时间等信息,方便用户及时了解情况并采取相应措施。
二、关键技术实现
(一)数据集构建
高质量的数据集是训练出高性能深度学习模型的基础。为了让模型能够准确识别不同场景、不同光照条件下的火焰,我们收集了大量的火灾图像数据,包括从公开数据集(如 FIRE-SMOKE Dataset、UCF101 中的火灾相关视频帧)中获取的样本,以及通过模拟火灾场景拍摄的图像。
在数据预处理阶段,我们对收集到的图像进行了一系列操作。首先进行图像去噪,去除图像中的噪声干扰,提高图像质量;然后进行尺寸统一,将所有图像调整为固定的尺寸(如 224×224),以便输入到模型中进行训练;最后进行数据增强,通过旋转、缩放、翻转、亮度调整等方式扩充数据集,增加样本的多样性,避免模型过拟合。
(二)深度学习模型选择与训练
经过对比多种深度学习模型在火灾检测任务上的性能,我们最终选择了YOLOv8 模型作为本系统的核心检测模型。YOLOv8 模型具有检测速度快、精度高的特点,能够满足实时检测的需求。、
python
【从训练集划分验证集】
import shutil
import os

def handle(src_detect_dir, dst_detect_dir, freq=5):
    src_detect_images_dir = os.path.join(src_detect_dir, "images")
    src_detect_labels_dir = os.path.join(src_detect_dir, "labels")

    dst_detect_images_dir = os.path.join(dst_detect_dir, "images")
    dst_detect_labels_dir = os.path.join(dst_detect_dir, "labels")

    if not os.path.exists(dst_detect_images_dir):
        os.makedirs(dst_detect_images_dir)
    if not os.path.exists(dst_detect_labels_dir):
        os.makedirs(dst_detect_labels_dir)

    i = 0
    filenames = os.listdir(src_detect_images_dir)
    print(len(filenames),filenames)

    for filename in filenames:
        if i % freq == 0:
            name = None
            names = filename.split(".")

            if len(names) == 2:
                name = names[0]
                print("parse1:", len(names), "name=", name)
            else:
                if filename.endswith(".jpg"):
                    name = filename[0:-4]
                print("parse2:", len(names), "name=", name)

            if name:
                src_image_path = os.path.join(src_detect_images_dir, name+".jpg")
                src_label_path = os.path.join(src_detect_labels_dir, name+".txt")

                dst_image_path = os.path.join(dst_detect_images_dir, name+".jpg")
                dst_label_path = os.path.join(dst_detect_labels_dir, name+".txt")

                try:
                    shutil.copyfile(src_image_path, dst_image_path)
                    shutil.copyfile(src_label_path, dst_label_path)

                    print("--------%d---------" % i)
                    print("src_image_path=", src_image_path)
                    print("src_label_path=", src_label_path)
                    os.remove(src_image_path)
                    os.remove(src_label_path)
                except Exception as e:
                    print("copy失败:",e,src_image_path)
                    try:
                        os.remove(src_image_path)
                    except: pass
                    try:
                        os.remove(src_label_path)
                    except: pass
                    try:
                        os.remove(dst_image_path)
                    except: pass
                    try:
                        os.remove(dst_label_path)
                    except: pass
            else:
                print("filename=%s format error" % str(filename))

        i += 1

if __name__ == '__main__':
    # 将训练样本按照指定频率拆分一部分到测试样本
    handle(
        src_detect_dir=r"C:\Users\dell\OneDrive\桌面\Project_YOLO\yolo_dataset\all_train\train",
        dst_detect_dir=r"C:\Users\dell\OneDrive\桌面\Project_YOLO\yolo_dataset\all_train\valid",
        freq=10 #表示每10张拆一张
    )
在模型训练过程中,我们使用 PyTorch 框架搭建训练环境。首先将数据集按照 8:2 的比例划分为训练集和验证集,训练集用于模型参数的学习,验证集用于评估模型的性能并调整超参数。设置初始学习率为 0.001,采用 SGD 优化器,训练轮次为 100 轮。在训练过程中,通过监控损失函数的变化和验证集上的准确率,适时调整学习率和其他超参数,以提高模型的性能。
python
【模型训练】
from ultralytics import YOLO
# 1.加载训练路径
data_path = './signs.yaml'

# 加载预训练模型
# model = YOLO('./yolov8n.pt')  # 模型文件路径
model = YOLO('./runs/detect/train/weights/last.pt')
# 配置模型的训练参数
model.train(
    data=data_path, #指定训练数据的配置文件路径
    epochs=300, #训练总次数    要300次以上
    imgsz=640,  #输入模型的图片尺寸
    batch=2,  #此时每一轮10图片分成5次 每次让你训练2次 每两张结束 拿验证集验证一下
    device='cpu', # 设备
    workers=0,  #模型训练的线程
    patience=30,
    resume=True
)
print("训练完成")
训练完成后,对模型进行评估,主要评估指标包括准确率、召回率和 F1 值。经过多次训练和优化,模型在测试集上的准确率达到了 95% 以上,能够满足实际应用的需求。
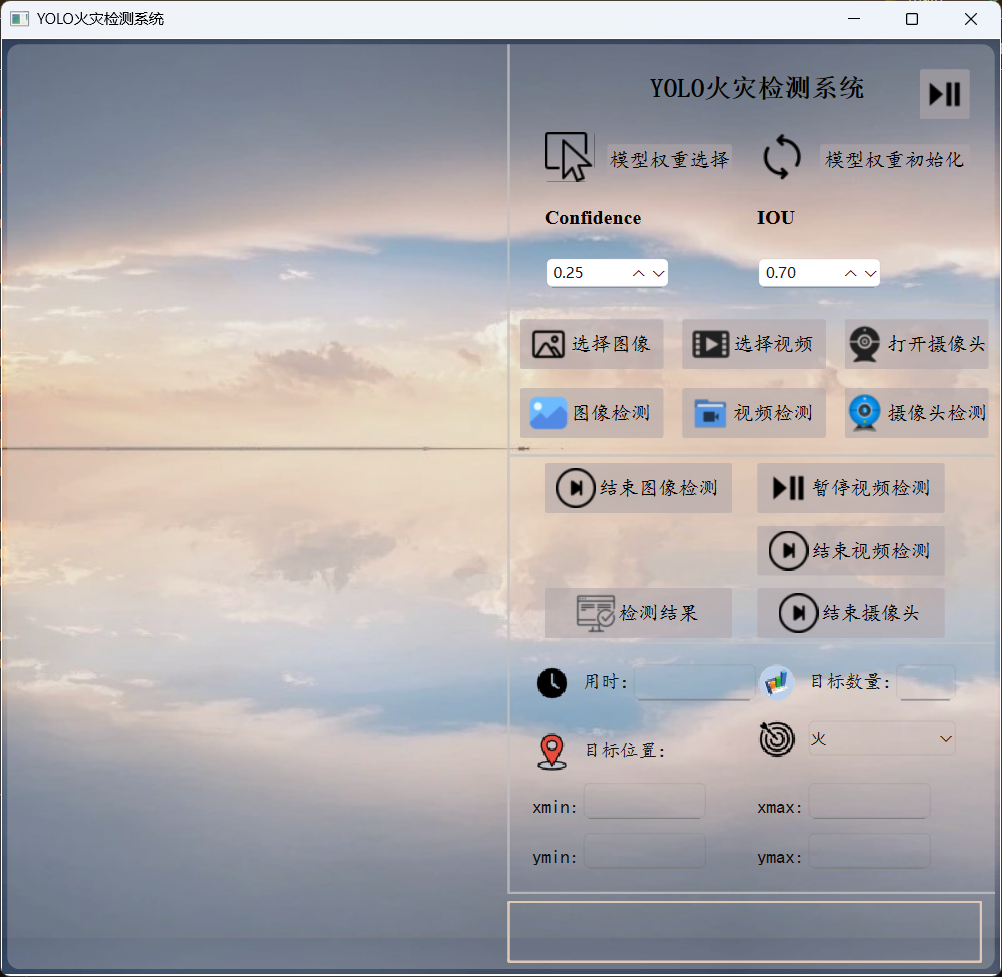
(三)可视化界面设计【PyQt6】
为了方便用户操作和查看检测结果,我们设计了一个简洁直观的可视化界面。界面主要包含以下几个部分:
- 数据输入区域:用户可以选择摄像头实时监测、导入视频文件或上传静态图片。
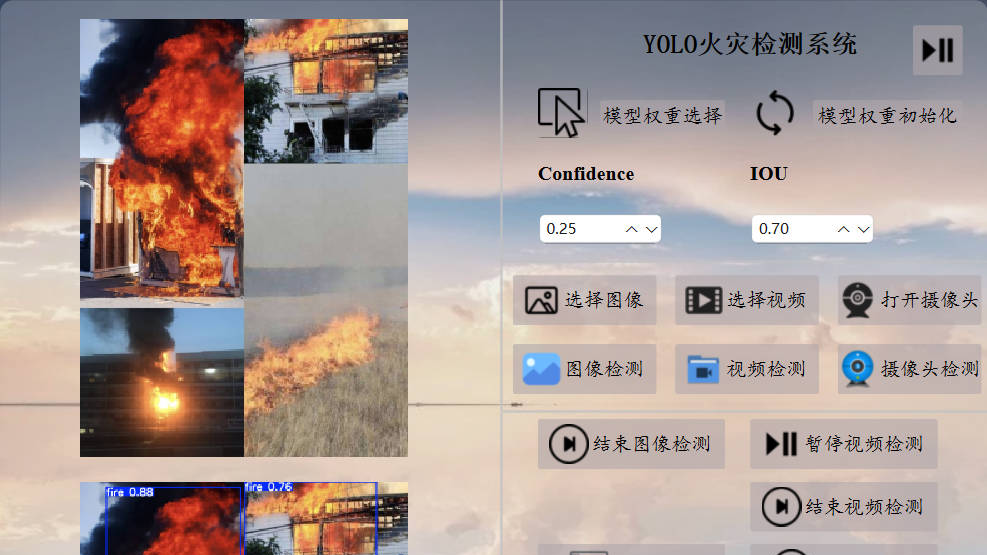
- 检测结果展示区域:实时显示处理后的图像或视频,并用红色边界框标记出检测到的火焰位置。
- 信息提示区域:显示火情发生的时间、位置等信息,以及系统的运行状态。
- 操作按钮区域:提供开始检测、停止检测、保存检测结果等功能按钮。
需要在终端使用命令将ui文件转为py文件才能继续下面的操作。
(四)火灾检测与报警实现
火灾检测模块通过调用训练好的 YOLOv5 模型,对采集到的图像或视频帧进行处理。对于实时视频流,系统每隔一定时间(如 300ms)截取一帧图像进行检测;对于视频文件和静态图片,则直接进行检测。
模型检测到火焰后,会返回火焰在图像中的位置坐标(以边界框的形式表示)。系统根据这些坐标信息,判断是否存在火情。当检测到火情时,报警模块立即启动,通过调用语音合成接口,连续播报三次 "发生火情"。同时,系统会记录火情发生的时间和位置信息,以便后续查询和分析。
python
【AI分析火情】
import os
from dashscope import MultiModalConversation
def ai_analysis(self,local_path):
# 将xxxx/test.jpg替换为你本地图像的绝对路径
# local_path = r"C:\Users\dell\OneDrive\桌面\Project_YOLO\test\images\1.jpg"
image_path = f"file://{local_path}"
messages = [{'role':'user',
'content': [{'image': image_path},
{'text': '请分析视频内容,判断是否为真实火灾场景,'
'需考虑以下因素:1. 火焰形态 2. 烟雾特征 3. 环境背景 4. 潜在干扰源"'
'如果你认为极有可能是火灾请输出:发生火情;否则输出:未检测到火情'}]}]
response = MultiModalConversation.call(
# 若没有配置环境变量,请用百炼API Key将下行替换为:api_key="sk-xxx",
api_key='sk-ef17891e64364da887c6a3ff1a12d89d',
model="qvq-max", # 此处以qvq-max为例,可按需更换模型名称。
messages=messages,
stream=True,
)
# 定义完整思考过程
reasoning_content = ""
# 定义完整回复
answer_content = ""
# 判断是否结束思考过程并开始回复
is_answering = False
print("=" * 20 + "思考过程" + "=" * 20)
for chunk in response:
# 如果思考过程与回复皆为空,则忽略
message = chunk.output.choices[0].message
reasoning_content_chunk = message.get("reasoning_content", None)
if (chunk.output.choices[0].message.content == [] and
reasoning_content_chunk == ""):
pass
else:
# 如果当前为思考过程
if reasoning_content_chunk != None and chunk.output.choices[0].message.content == []:
print(chunk.output.choices[0].message.reasoning_content, end="")
reasoning_content += chunk.output.choices[0].message.reasoning_content
# 如果当前为回复
elif chunk.output.choices[0].message.content != []:
if not is_answering:
print("\n" + "=" * 20 + "完整回复" + "=" * 20)
is_answering = True
print(chunk.output.choices[0].message.content[0]["text"], end="")
answer_content += chunk.output.choices[0].message.content[0]["text"]
# return f'{"="*5}思考过程{"="*5}\n{reasoning_content}\n{"="*5}分析结果{"="*5}\n{answer_content}'
return answer_content
# 需要打印完整思考过程与完整回复,请将以下代码解除注释后运行
# print("=" * 20 + "完整思考过程" + "=" * 20 + "\n")
# print(f"{reasoning_content}")
# print("=" * 20 + "完整回复" + "=" * 20 + "\n")
# print(f"{answer_content}")
【主文件】
# 保存为临时文件
import os
import tempfile
import uuid
from PySide6.QtTextToSpeech import QTextToSpeech
from analysis import ai_analysis
import sys
from pathlib import Path
import cv2
from PIL import Image
from PIL.ImageOps import exif_transpose
from PySide6 import QtCore
from PySide6.QtGui import QPixmap, QImage, Qt
from PySide6.QtWidgets import (QWidget, QApplication, QPushButton, QFileDialog,
QMessageBox, QLabel, QLineEdit, QComboBox, QDoubleSpinBox, QTextEdit)
from fire_pre import Ui_Form
from ultralytics import YOLO
# 封装一个我的窗口
class Fire(QWidget,Ui_Form):
def __init__(self):
super().__init__()
self.model_pt=''
self.image_pth=''
self.video_path = ''
# 加载自己的窗口
self.setupUi(self)
# 找到ui界面的组件
self.original_view:QLabel=self.original_view
self.tested_view:QLabel=self.tested_view
self.btn1:QPushButton=self.btn1
self.btn2:QPushButton=self.btn2
# 检测图像
self.btn4_1:QPushButton=self.btn4_1
self.btn4_4: QPushButton = self.btn4_4
# 检测视频
self.is_video_paused = False # 视频播放状态
self.is_video_detecting = False # 视频检测状态
self.btn4_2: QPushButton = self.btn4_2 # 选择视频
self.btn4_5: QPushButton = self.btn4_5 # 检测视频
self.btn6_2:QPushButton=self.btn6_2 # 暂停检测
self.btn6_3:QPushButton=self.btn6_3 # 结束检测
# 摄像头实时检测
self.btn4_3:QPushButton=self.btn4_3 # 打开摄像头
self.btn4_6:QPushButton=self.btn4_6 # 实时检测
self.btn6_4:QPushButton=self.btn6_4 # 关闭摄像头,结束检测
# 查看任意检测结果
self.btn6_5:QPushButton=self.btn6_5
# 检测结果详情显示
self.edit1:QLineEdit=self.edit1 # 检测用时
self.edit2: QLineEdit = self.edit2 # 检测到的目标数量
self.edit3: QLineEdit = self.edit3 # 目标位置xmin
self.edit4: QLineEdit = self.edit4 # xmax
self.edit5: QLineEdit = self.edit5 # ymin
self.edit6: QLineEdit = self.edit6 # ymax
# 检测目标
self.cbb:QComboBox=self.cbb
self.cbb.addItem('火')
self.cbb.setCurrentText('火')
# 置信度/阈值
self.ds1:QDoubleSpinBox=self.ds1
self.ds2:QDoubleSpinBox=self.ds2
# 设置初始值和范围
self.ds1.setRange(0.0, 1.0) # 置信度范围0-1
self.ds1.setValue(0.25) # 默认值0.25
self.ds2.setRange(0.0, 1.0) # IOU范围0-1
self.ds2.setValue(0.7) # 默认值0.7
# ai分析
self.textedit:QLabel=self.textedit
# 新增火灾分析定时器
self.analysis_timer = QtCore.QTimer(self)
self.analysis_timer.setInterval(30000) # 30秒间隔
self.analysis_timer.timeout.connect(self.analyze_fire_risk)
# 实例化一个语音播报者 QTextToSpeech
self.engine=None
engines=QTextToSpeech.availableEngines()
if engines:
self.engine = engines[0]
self.speaker = QTextToSpeech(self.engine, self)
else:
self.speaker = QTextToSpeech(self)
# 检查语音引擎是否成功初始化
if len(self.speaker.availableVoices())==0:
QMessageBox.warning(self, "语音功能", "未找到可用的语音引擎,语音播报功能将无法使用")
else:
# 设置默认语音
if not self.engine: # 如果没有指定引擎,尝试设置第一个可用语音
voices = self.speaker.availableVoices()
if voices:
self.speaker.setVoice(voices[0])
self.speaker.stateChanged.connect(self.on_speech_state_changed)
# 播放次数计数器
self.play_cont = 0
# 是否已触发
self.alarm_triggered = False
# 槽函数
self.btn1.clicked.connect(self.model_weights)
self.btn2.clicked.connect(self.model_init)
self.btn4_1.clicked.connect(self.read_image)
self.btn4_4.clicked.connect(self.test_image)
self.btn4_2.clicked.connect(self.open_vidio)
self.btn4_5.clicked.connect(self.start_video_detection)
self.btn4_3.clicked.connect(self.open_camera)
self.btn4_6.clicked.connect(self.start_continuous_detection)
self.btn6_2.clicked.connect(self.toggle_video_play) # 暂停/继续视频
self.btn6_3.clicked.connect(self.stop_video_detection) # 停止视频检测
self.btn6_4.clicked.connect(self.close_camera)
self.btn6_5.clicked.connect(self.view_history)
# 文件框选择模型权重
def model_weights(self):
# 弹出文件对话框 【绝对路径】
file_path,_=QFileDialog.getOpenFileName(self,'选择文件','./','所有文件(*)')
if file_path:
QMessageBox.information(self,'模型权重',f'已选择文件:\n{file_path}')
self.model_pt=file_path
# 模型初始化权重
def model_init(self):
file_path = r'C:\Users\dell\OneDrive\桌面\07 AI neural network\08 Project_YOLO\runs\detect\train\weights\best.pt'
QMessageBox.information(self, '模型权重', f'已选择文件:\n{file_path}')
self.model_pt=file_path
"""
图像检测
"""
# 加载图像
def read_image(self):
file_path, _ = QFileDialog.getOpenFileName(self, '选择文件', './', '所有文件(*)')
if not file_path:
return
try:
# 使用pathlib处理路径
image_path = Path(file_path)
self.image_pth=image_path
# 打开并预处理图像
with Image.open(image_path) as img:
# 自动修正EXIF方向信息
img = exif_transpose(img)
# 转换为RGB模式
if img.mode != 'RGB':
img = img.convert('RGB')
# 转换为QImage
qt_image = QImage(
img.tobytes(),
img.width,
img.height,
img.width * 3,
QImage.Format.Format_RGB888
)
# 创建QPixmap并缩放
pixmap = QPixmap.fromImage(qt_image)
scaled_pixmap = pixmap.scaled(
self.original_view.size(),
Qt.AspectRatioMode.KeepAspectRatio,
Qt.TransformationMode.SmoothTransformation
)
# 显示图像
self.original_view.setPixmap(scaled_pixmap)
self.original_view.setAlignment(Qt.AlignmentFlag.AlignCenter)
except Exception as e:
QMessageBox.critical(self,"图像加载失败",f"无法加载图像文件:\n{str(e)}")
# 图像检测
def test_image(self):
conf=float(self.ds1.value())
iou=float(self.ds2.value())
model_rec=YOLO(self.model_pt)
# 检测照片 自动保存结果到runs/detect/exp目录
results=model_rec(self.image_pth,show=False,save=True,conf=conf,iou=iou)
# 在tested_view上显示出检测后的图像
# 获取保存路径(YOLOv8默认保存路径)
save_dir = Path(results[0].save_dir)
output_path = save_dir / self.image_pth.name
# 验证输出文件是否存在
if not output_path.exists():
raise FileNotFoundError(f"未找到预测结果文件:{output_path}")
# 加载处理后的图像
with Image.open(output_path) as img:
# 自动修正EXIF方向信息
img = exif_transpose(img)
# 转换为RGB模式
if img.mode != 'RGB':
img = img.convert('RGB')
# 转换为QImage
qt_image = QImage(
img.tobytes(),
img.width,
img.height,
img.width * 3,
QImage.Format.Format_RGB888
)
# 创建QPixmap并缩放
pixmap = QPixmap.fromImage(qt_image)
scaled_pixmap = pixmap.scaled(
self.tested_view.size(),
Qt.AspectRatioMode.KeepAspectRatio,
Qt.TransformationMode.SmoothTransformation
)
# 显示检测结果
self.tested_view.setPixmap(scaled_pixmap)
self.tested_view.setAlignment(Qt.AlignmentFlag.AlignCenter)
"""
视频检测
"""
# 打开视频
def open_vidio(self):
file_path, _ = QFileDialog.getOpenFileName(self, "选择视频文件", "./", "视频文件 (*.mp4 *.avi *.mov *.mkv)")
if not file_path:
return
try:
self.video_path = file_path # 保存视频路径
self.video_cap = cv2.VideoCapture(str(Path(file_path)))
if not self.video_cap.isOpened():
raise ValueError("无法打开视频文件")
QMessageBox.information(self, "视频加载成功", f"已加载视频:{Path(file_path).name}\n"
f"分辨率:{int(self.video_cap.get(3))}x{int(self.video_cap.get(4))}")
# 创建视频定时器
self.video_timer = QtCore.QTimer(self)
self.video_timer.timeout.connect(self.update_video_frame)
self.video_timer.start(30) # 每30毫秒更新一次画面
self.is_video_paused = False # 初始状态为播放
self.btn6_2.setText("暂停播放") # 更新按钮文本
except Exception as e:
QMessageBox.critical(self, "视频加载失败", f"无法加载视频文件:\n{str(e)}")
# 更新视频帧(支持循环播放)
def update_video_frame(self):
if not hasattr(self, 'video_cap') or not self.video_cap.isOpened() or self.is_video_paused:
return
ret, frame = self.video_cap.read()
if not ret:
# 视频播放完毕,重新开始播放
self.video_cap.release()
self.video_cap = cv2.VideoCapture(str(Path(self.video_path)))
if self.video_cap.isOpened():
ret, frame = self.video_cap.read()
if ret:
# 转换颜色空间:BGR -> RGB
rgb_frame = cv2.cvtColor(frame, cv2.COLOR_BGR2RGB)
# 转换为QImage
h, w, ch = rgb_frame.shape
bytes_per_line = ch * w
q_img = QImage(rgb_frame.data, w, h, bytes_per_line, QImage.Format_RGB888)
# 缩放并显示
pixmap = QPixmap.fromImage(q_img)
scaled_pixmap = pixmap.scaled(
self.original_view.size(),
Qt.AspectRatioMode.KeepAspectRatio,
Qt.TransformationMode.SmoothTransformation
)
self.original_view.setPixmap(scaled_pixmap)
else:
QMessageBox.warning(self, "视频错误", "无法重新打开视频进行循环播放")
self.video_timer.stop()
return
# 转换颜色空间:BGR -> RGB
rgb_frame = cv2.cvtColor(frame, cv2.COLOR_BGR2RGB)
# 转换为QImage
h, w, ch = rgb_frame.shape
bytes_per_line = ch * w
q_img = QImage(rgb_frame.data, w, h, bytes_per_line, QImage.Format_RGB888)
# 缩放并显示在original_view上
pixmap = QPixmap.fromImage(q_img)
scaled_pixmap = pixmap.scaled(
self.original_view.size(),
Qt.AspectRatioMode.KeepAspectRatio,
Qt.TransformationMode.SmoothTransformation
)
self.original_view.setPixmap(scaled_pixmap)
self.original_view.setAlignment(Qt.AlignmentFlag.AlignCenter)
# 暂停/继续视频播放
def toggle_video_play(self):
if not hasattr(self, 'video_timer'):
return
self.is_video_paused = not self.is_video_paused # 切换播放状态
if self.is_video_paused:
self.video_timer.stop()
self.btn6_2.setText("继续播放")
else:
self.video_timer.start(30)
self.btn6_2.setText("暂停播放")
# 开始视频检测
def start_video_detection(self):
if not hasattr(self, 'video_cap') or not self.video_cap.isOpened():
QMessageBox.warning(self, '视频', '请先选择并加载视频')
return
if not self.model_pt:
QMessageBox.warning(self, '模型', '请先选择模型权重')
return
try:
# 加载模型
if not hasattr(self, 'model'):
self.model = YOLO(self.model_pt)
# 创建视频检测定时器
if not hasattr(self, 'video_detection_timer'):
self.video_detection_timer = QtCore.QTimer(self)
self.video_detection_timer.timeout.connect(self.detect_video_frame)
if not self.video_detection_timer.isActive():
self.is_video_detecting = True
self.video_detection_timer.start(30) # 每30ms检测一次
self.btn4_5.setText("停止检测")
self.btn4_5.clicked.disconnect()
self.btn4_5.clicked.connect(self.stop_video_detection)
except Exception as e:
QMessageBox.critical(self, "检测失败", f"执行检测时出错:\n{str(e)}")
# 停止视频检测
def stop_video_detection(self):
if hasattr(self, 'video_detection_timer') and self.video_detection_timer.isActive():
self.is_video_detecting = False
self.video_detection_timer.stop()
self.btn4_5.setText("开始检测")
self.btn4_5.clicked.disconnect()
self.btn4_5.clicked.connect(self.start_video_detection)
# 检测视频帧
def detect_video_frame(self):
if not hasattr(self, 'video_cap') or not self.video_cap.isOpened() or self.is_video_paused:
return
ret, frame = self.video_cap.read()
if not ret:
# 视频播放完毕,重新开始播放
self.video_cap.release()
self.video_cap = cv2.VideoCapture(str(Path(self.video_path)))
if self.video_cap.isOpened():
ret, frame = self.video_cap.read()
if not ret:
return
else:
self.stop_video_detection()
return
# 执行检测
results = self.model(frame, show=False, conf=0.5)
# 渲染检测结果
annotated_frame = results[0].plot()
# 转换为RGB(确保颜色正确)
rgb_annotated_frame = cv2.cvtColor(annotated_frame, cv2.COLOR_BGR2RGB)
# 转换为QImage
h, w, ch = rgb_annotated_frame.shape
bytes_per_line = ch * w
q_img = QImage(rgb_annotated_frame.data, w, h, bytes_per_line, QImage.Format_RGB888)
# 缩放并显示在tested_view上
pixmap = QPixmap.fromImage(q_img)
scaled_pixmap = pixmap.scaled(
self.tested_view.size(),
Qt.AspectRatioMode.KeepAspectRatio,
Qt.TransformationMode.SmoothTransformation
)
self.tested_view.setPixmap(scaled_pixmap)
self.tested_view.setAlignment(Qt.AlignmentFlag.AlignCenter)
# 显示检测信息
self.edit1.setText(f"{results[0].speed['inference']:.2f}ms") # 检测用时
self.edit2.setText(str(len(results[0].boxes))) # 检测到的目标数量
if len(results[0].boxes) > 0:
# 显示第一个检测框的位置
box = results[0].boxes[0]
xmin, ymin, xmax, ymax = box.xyxy[0].cpu().numpy().astype(int)
self.edit3.setText(str(xmin))
self.edit4.setText(str(xmax))
self.edit5.setText(str(ymin))
self.edit6.setText(str(ymax))
"""
摄像头实时检测
"""
# 打开摄像头
def open_camera(self):
self.cap=cv2.VideoCapture(0)
if not self.cap.isOpened():
QMessageBox.warning(self,'摄像头','打开摄像头失败,请检查摄像头')
return
# 创建定时器,用于定时捕获画面
self.timer = QtCore.QTimer(self)
self.timer.timeout.connect(self.update_camera_frame)
self.timer.start(30) # 每30毫秒更新一次画面
# 启动火灾定时器
self.analysis_timer.start() # 启动分析定时器
# 更新画面
def update_camera_frame(self):
if not hasattr(self, 'cap') or not self.cap.isOpened():
return
ret,frame=self.cap.read()
if not ret:
QMessageBox.warning(self, '摄像头', '摄像头捕获画面失败,请检查摄像头')
self.cap.release()
# 显示图像
# 正确转换颜色空间:BGR -> RGB
rgb_frame = cv2.cvtColor(frame, cv2.COLOR_BGR2RGB)
# 将OpenCV帧转换为QImage
h, w, ch = rgb_frame.shape
bytes_per_line = ch * w
q_img = QImage(rgb_frame.data, w, h, bytes_per_line, QImage.Format_RGB888)
# 缩放并显示在original_view上
pixmap = QPixmap.fromImage(q_img)
scaled_pixmap = pixmap.scaled(
self.original_view.size(),
Qt.AspectRatioMode.KeepAspectRatio,
Qt.TransformationMode.SmoothTransformation
)
self.original_view.setPixmap(scaled_pixmap)
self.original_view.setAlignment(Qt.AlignmentFlag.AlignCenter)
# 新增关闭摄像头的方法
def close_camera(self):
if hasattr(self, 'cap') and self.cap.isOpened():
self.cap.release()
if hasattr(self, 'timer'):
self.timer.stop()
# 关闭火灾定时器
self.analysis_timer.stop()
# 实时检测摄像头内容 显示在tested_view()上
def test_camara(self):
if not hasattr(self, 'cap') or not self.cap.isOpened():
QMessageBox.warning(self, '摄像头', '请先打开摄像头')
return
if not self.model_pt:
QMessageBox.warning(self, '模型', '请先选择模型权重')
return
try:
# 加载模型
if not hasattr(self, 'model'):
self.model = YOLO(self.model_pt)
# 读取当前帧
ret, frame = self.cap.read()
if not ret:
QMessageBox.warning(self, '摄像头', '无法获取当前帧')
return
# 执行检测
results = self.model(frame, show=False, conf=0.5)
# 渲染检测结果
annotated_frame = results[0].plot()
# 转换为RGB(确保颜色正确)
rgb_annotated_frame = cv2.cvtColor(annotated_frame, cv2.COLOR_BGR2RGB)
# 转换为QImage
h, w, ch = rgb_annotated_frame.shape
bytes_per_line = ch * w
q_img = QImage(rgb_annotated_frame.data, w, h, bytes_per_line, QImage.Format_RGB888)
# 缩放并显示在tested_view上
pixmap = QPixmap.fromImage(q_img)
scaled_pixmap = pixmap.scaled(
self.tested_view.size(),
Qt.AspectRatioMode.KeepAspectRatio,
Qt.TransformationMode.SmoothTransformation
)
self.tested_view.setPixmap(scaled_pixmap)
self.tested_view.setAlignment(Qt.AlignmentFlag.AlignCenter)
# 显示检测信息
self.edit1.setText(f"{results[0].speed['inference']:.2f}ms") # 检测用时
self.edit2.setText(str(len(results[0].boxes))) # 检测到的目标数量
if len(results[0].boxes) > 0:
# 显示第一个检测框的位置
box = results[0].boxes[0]
xmin, ymin, xmax, ymax = box.xyxy[0].cpu().numpy().astype(int)
self.edit3.setText(str(xmin))
self.edit4.setText(str(xmax))
self.edit5.setText(str(ymin))
self.edit6.setText(str(ymax))
except Exception as e:
QMessageBox.critical(self, "检测失败", f"执行检测时出错:\n{str(e)}")
def start_continuous_detection(self):
if not hasattr(self, 'detection_timer'):
self.detection_timer = QtCore.QTimer(self)
self.detection_timer.timeout.connect(self.test_camara)
if not self.detection_timer.isActive():
self.detection_timer.start(30) # 每30ms检测一次(约30FPS)
self.btn4_6.setText("停止检测")
self.btn4_6.clicked.disconnect()
self.btn4_6.clicked.connect(self.stop_continuous_detection)
def stop_continuous_detection(self):
if hasattr(self, 'detection_timer') and self.detection_timer.isActive():
self.detection_timer.stop()
self.btn4_6.setText("开始检测")
self.btn4_6.clicked.disconnect()
self.btn4_6.clicked.connect(self.start_continuous_detection)
# 火灾分析
def analyze_fire_risk(self):
if not hasattr(self, 'cap') or not self.cap.isOpened():
return
# 获取当前帧
ret, frame = self.cap.read()
if not ret:
return
temp_dir = tempfile.gettempdir()
temp_path = os.path.join(temp_dir, f'fire_analysis_{uuid.uuid4().hex}.jpg')
cv2.imwrite(temp_path, frame)
try:
# 调用AI分析函数
result = ai_analysis(self,temp_path)
# 更新UI(保持QLabel不变)
self.textedit.setText(result)
# 改进的火情检测逻辑
if result=='发生火情':
# 触发 播放 初始化播放次数
self.alarm_triggered = True
self.play_cont = 0
# 启动语音模块
self.speaker.say(self.textedit.text())
except Exception as e:
QMessageBox.critical(self, "分析错误", f"火灾分析失败:{str(e)}")
finally:
if os.path.exists(temp_path):
os.remove(temp_path)
# 语音状态变化处理
def on_speech_state_changed(self, state):
print(f"当前语音状态:{state}") # 添加调试输出
if state == QTextToSpeech.State.Ready and self.alarm_triggered:
self.play_cont += 1
if self.play_cont < 3:
self.speaker.say(self.textedit.text())
else:
# 重置触发状态
self.alarm_triggered = False
self.play_cont = 0
# 查看所有历史预测结果
def view_history(self):
file_path,_=QFileDialog.getOpenFileName(self,'选择文件','./','所有文件(*)')
if not file_path:
return
try:
# 使用pathlib处理路径
image_path = Path(file_path)
self.image_pth=image_path
# 打开并预处理图像
with Image.open(image_path) as img:
# 自动修正EXIF方向信息
img = exif_transpose(img)
# 转换为RGB模式
if img.mode != 'RGB':
img = img.convert('RGB')
# 转换为QImage
qt_image = QImage(
img.tobytes(),
img.width,
img.height,
img.width * 3,
QImage.Format.Format_RGB888
)
# 创建QPixmap并缩放
pixmap = QPixmap.fromImage(qt_image)
scaled_pixmap = pixmap.scaled(
self.tested_view.size(),
Qt.AspectRatioMode.KeepAspectRatio,
Qt.TransformationMode.SmoothTransformation
)
# 显示图像
self.tested_view.setPixmap(scaled_pixmap)
self.tested_view.setAlignment(Qt.AlignmentFlag.AlignCenter)
except Exception as e:
QMessageBox.critical(self,"图像加载失败",f"无法加载图像文件:\n{str(e)}")
if __name__ == '__main__':
app=QApplication(sys.argv)
fire_win=Fire()
fire_win.show()
sys.exit(app.exec())三、系统测试【视频演示】
简单火灾检测系统演示
四、部署
一、准备工作
-
确认依赖完整性
你的
requirements.txt需包含项目所有依赖(如torch、opencv-python、PyQt5等),可通过pip list --format=freeze > requirements.txt重新生成(确保覆盖全)。 -
处理资源文件
- 若
icons.qrc等 Qt 资源文件未编译,先确保icons_rc.py已正确生成(若用pyrcc5编译过则无需处理)。 - 确认
models文件夹、fire_pre.ui等资源路径在代码中是相对路径或可动态加载,避免打包后路径失效。
- 若
二、使用 PyInstaller 打包
1. 安装 PyInstaller
pip install pyinstaller2. 编写.spec 文件(关键配置,可选但推荐)
进入项目根目录(YOLO 文件夹),执行:
pyi-makespec --onefile --windowed --name your_app_name ui.py--onefile:打包成单个 EXE 文件(简洁,适合分发)。--windowed:隐藏命令行黑框(若为 GUI 程序,如 PyQt 项目,必选)。--name:指定最终 EXE 名称(替换your_app_name)。ui.py:假设ui.py是程序入口(若入口是其他文件,替换为实际入口脚本,比如fire_pre.py等,需确保入口逻辑完整)。
执行后会生成 your_app_name.spec 文件,打开编辑关键配置:
# your_app_name.spec
block_cipher = None

a = Analysis(['ui.py'],  # 入口脚本,替换为实际入口
             pathex=['C:\\Users\\dell\\OneDrive\\桌面\\YOLO'],  # 项目根路径
             binaries=[],
             datas=[
                 # 打包额外资源:models 文件夹、ui 文件、图标等
                 ('models', 'models'),
                 ('fire_pre.ui', '.'),
                 ('icons_rc.py', '.'),
                 # 若有其他资源(如 requirements.txt 想一起打包也可加)
             ],
             hiddenimports=[
                 # 手动补充 PyInstaller 未自动检测到的依赖
                 'torch', 'torchvision', 'cv2',  # 示例,根据实际依赖补充
                 'PyQt5', 'PyQt5.QtWidgets'  # 若用 PyQt,需确保此类导入被识别
             ],
             hookspath=[],
             hooksconfig={},
             runtime_hooks=[],
             excludes=[],
             win_no_prefer_redirects=False,
             win_private_assemblies=False,
             cipher=block_cipher,
             noarchive=False)

pyz = PYZ(a.pure, a.zipped_data, cipher=block_cipher)

exe = EXE(pyz,
          a.scripts,
          a.binaries,
          a.zipfiles,
          a.datas,
          [],
          name='your_app_name',  # EXE 名称
          debug=False,
          bootloader_ignore_signals=False,
          strip=False,
          upx=True,  # 压缩 EXE,可选
          upx_exclude=[],
          runtime_tmpdir=None,
          console=False,  # 同 --windowed,隐藏命令行
          disable_windowed_traceback=False,
          argv_emulation=False,
          target_arch=None,
          codesign_identity=None,
entitlements_file=None )关键配置说明:
datas:列出需打包的非代码资源(文件夹、UI 文件等),格式(原路径, 打包后路径)。hiddenimports:补充 PyInstaller 未自动发现的模块(如 PyTorch、PyQt 的深层依赖),缺啥补啥,否则运行时会报ModuleNotFoundError。
3. 执行打包
在项目根目录执行:
pyinstaller your_app_name.specPyInstaller 会根据 .spec 配置,收集依赖、打包资源,最终在 dist 文件夹生成 your_app_name.exe。
三、测试与排坑
-
运行测试
把
dist里的your_app_name.exe单独复制出来,双击运行,测试功能是否正常(如 YOLO 检测、UI 交互等)。 -
常见问题处理
- 依赖缺失 :运行报错
ModuleNotFoundError,补充到.spec的hiddenimports或requirements.txt。 - 资源路径错误 :代码中用
os.path.join动态拼接路径,避免硬编码(如os.path.join(os.path.dirname(__file__), 'models'))。 - PyTorch 体积大 :若嫌 EXE 太大,可尝试精简模型(如用更小的 YOLO 权重),或用
upx压缩(spec中upx=True)。
- 依赖缺失 :运行报错
四、最终分发
将 dist 中的 your_app_name.exe 单独发给他人,若依赖复杂(如 PyTorch 等大库),EXE 体积可能较大,属于正常现象。
五、总结与展望
本文设计并实现了一款基于深度学习的火灾智能检测系统,该系统通过 YOLOv8 模型实现了对火焰的精准检测,支持多种数据输入方式,具备实时报警和可视化展示功能。测试结果表明,系统具有较高的检测准确率和实时性,能够满足实际火灾检测的需求。
然而,系统仍存在一些不足之处。例如,在复杂环境下(如强光照、大雾天气),模型的检测性能可能会受到一定影响;对于一些与火焰外观相似的物体(如红色灯光),可能会出现误检的情况;嵌入的大模型进行火情分析受配置限制,响应时间比较长。
未来,可以从以下几个方面对系统进行改进和优化:
- 进一步扩充数据集,增加复杂环境下的火灾样本和易混淆样本,提高模型的泛化能力。
- 尝试使用更先进的深度学习模型,进一步提高系统的检测精度和速度。
- 增加火灾蔓延预测功能,根据火灾的发展趋势,提前预测火灾的蔓延路径和范围,为火灾扑救提供更有力的支持。
- 加强系统的稳定性和可靠性,提高系统在恶劣环境下的工作能力。
总之,基于深度学习的火灾智能检测系统具有广阔的应用前景。随着技术的不断发展和完善,相信该系统能够在火灾预防和扑救工作中发挥更大的作用,为人们的生命财产安全提供更有力的保障。