写在前面
在 Android 显示框架中,GraphicBuffer 是一个重要的基础概念,它代表了一块内存,可以被 GPU/CPU 读写。无论是 App UI 的绘制,还是 SurfaceFlinger 的合成,本质上都是对 GraphicBuffer 的读写。
GraphicBuffer 的使用场景
App UI 绘制
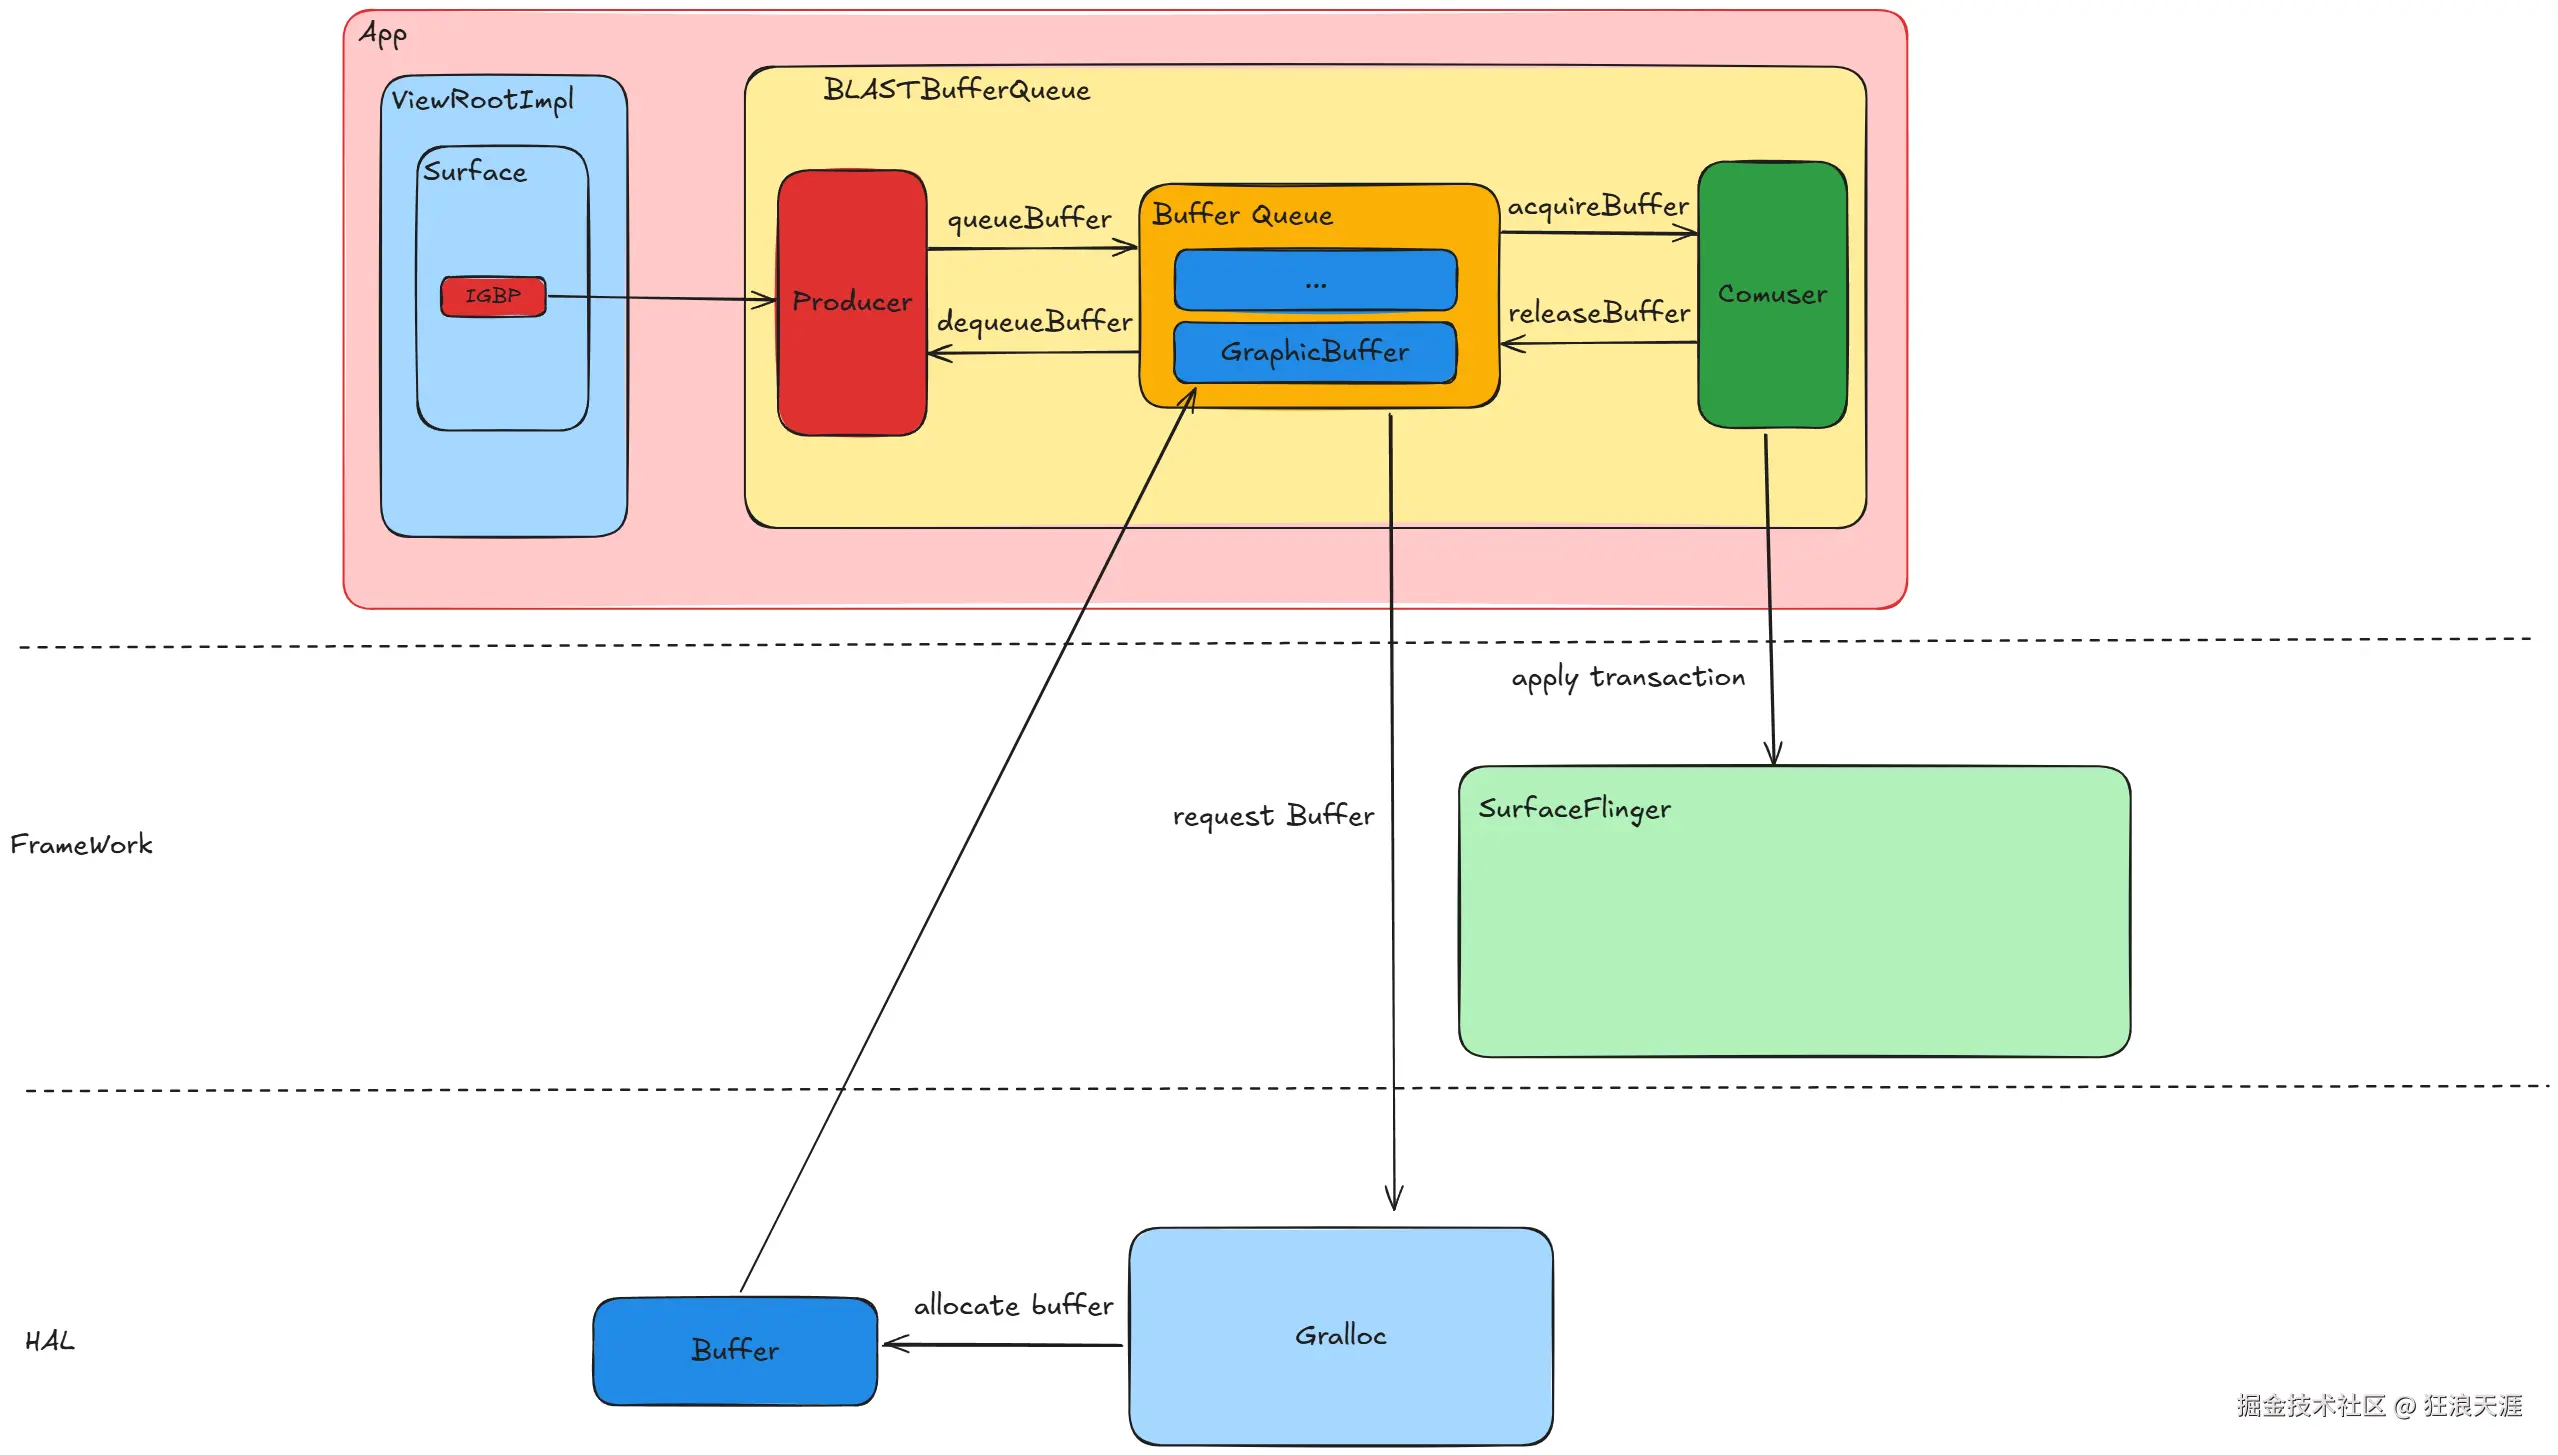
当 App 需要进行 UI 绘制的时候,需要通过 Surface 的 IGraphicBufferProducer (IGBP) 从 BLASTBufferQueue 中申请一块 GraphicBuffer,如果 BLASTBufferQueue 中没有可用的内存,那么就会通过 Gralloc 分配一块 Buffer, 然后把 App 把 UI 绘制到这一块 GraphicBuffer 中,再提交给 SurfaceFlinger 去做进一步合成。
SurfaceFlinger 合成
SurfaceFlinger 会从每一个 Layer(图层) 获取到最新的 GraphicBuffer,然后通过硬件或者 GPU 进行合成,如果 SurfaceFlinger 是使用 GPU 合成,那么合成的结果也是一块新的 GraphicBuffer。
所以,GraphicBuffer 在 Android 显示框架中是图像帧的通用载体,无论是渲染还是合成都离不开 GraphicBuffer 这个最基础的载体。
GraphicBuffer 定义
kotlin
// frameworks/native/libs/ui/include/ui/GraphicBuffer.h
class GraphicBuffer
    : public ANativeObjectBase<ANativeWindowBuffer, GraphicBuffer, RefBase>,
      public Flattenable<GraphicBuffer>
{
    ...
}
GraphicBuffer 继承于 ANativeObjectBase 和 Flattenable
Flattenable :继承于 Flattenable 支持 GraphicBuffer 序列化,所以可以使用 Binder 跨进程传递 GraphicBuffer
ANativeObjectBase :ANativeObjectBase 是一个模版类,ANativeObjectBase 又会继承于 ANativeWindowBuffer, 在 ANativeWindowBuffer 中有一个成员变量 native_handle_t
ini
// external/swiftshader/include/Android/nativebase/nativebase.h
struct ANativeWindowBuffer {
    ANativeWindowBuffer() {
        common.magic = ANDROID_NATIVE_BUFFER_MAGIC;
        common.version = sizeof(ANativeWindowBuffer);
        memset(common.reserved, 0, sizeof(common.reserved));
    }
    ...
    const native_handle_t* handle;
};
native_handle_t 是 Android 图形系统底层 Buffer 内存的真实"句柄", 而这个一块 Buffer 是由 Gralloc 分配。
所以,从 GraphicBuffer 源码的定义来看,有两点需要了解:
- 继承了
Flattenable,所以GraphicBuffer支持跨进程 - 持有
native_handle_t,所以GraphicBuffer间接持有一块底层真实的 Buffer
GraphicBuffer 的创建和初始化
最典型,GraphicBuffer 的创建时机发生在:当一个 App 需要绘制 UI 的时候,会通过 Surface 从 BLASTBufferQueue 中申请一块内存
arduino
// frameworks/native/libs/gui/BufferQueueProducer.cpp
status_t BufferQueueProducer::dequeueBuffer(int* outSlot, sp<android::Fence>* outFence,
                                            uint32_t width, uint32_t height, PixelFormat format,
                                            uint64_t usage, uint64_t* outBufferAge,
                                            FrameEventHistoryDelta* outTimestamps) {

   ...
   sp<GraphicBuffer> graphicBuffer =
        sp<GraphicBuffer>::make(width, height, format, BQ_LAYER_COUNT, usage, std::string{mConsumerName.c_str(), mConsumerName.size()});
   ...
}
接下来调用 GraphicBuffer 的构造函数
c
GraphicBuffer::GraphicBuffer(uint32_t inWidth, uint32_t inHeight, PixelFormat inFormat,
                             uint32_t inLayerCount, uint64_t inUsage, std::string requestorName)
      : GraphicBuffer() {
    mInitCheck = initWithSize(inWidth, inHeight, inFormat, inLayerCount, inUsage,
                              std::move(requestorName));
}- 先执行
GraphicBuffer无参构造函数 - 执行
initWithSize,从函数名字来看,可以猜出应该是通过HAL来真正分配一块Buffer
GraphicBuffer 创建
ini
GraphicBuffer::GraphicBuffer()
    : BASE(), mOwner(ownData), mBufferMapper(GraphicBufferMapper::get()),
      mInitCheck(NO_ERROR), mId(getUniqueId()), mGenerationNumber(0)
{
    width  =
    height =
    stride =
    format =
    usage_deprecated = 0;
    usage  = 0;
    layerCount = 0;
    handle = nullptr;
    mDependencyMonitor.setToken(std::to_string(mId));
}
在无参构造函数中,主要是初始化变量,其中包括 mBufferMapper = GraphicBufferMapper::get(), GraphicBufferMapper::get() 会创建一个 GraphicBufferMapper,构造函数如下
ini
// frameworks/native/libs/ui/GraphicBufferMapper.cpp
GraphicBufferMapper::GraphicBufferMapper() {
    mMapper = std::make_unique<const Gralloc5Mapper>();
    if (mMapper->isLoaded()) {
        mMapperVersion = Version::GRALLOC_5;
        return;
    }
    mMapper = std::make_unique<const Gralloc4Mapper>();
    if (mMapper->isLoaded()) {
        mMapperVersion = Version::GRALLOC_4;
        return;
    }
    mMapper = std::make_unique<const Gralloc3Mapper>();
    if (mMapper->isLoaded()) {
        mMapperVersion = Version::GRALLOC_3;
        return;
    }
    mMapper = std::make_unique<const Gralloc2Mapper>();
    if (mMapper->isLoaded()) {
        mMapperVersion = Version::GRALLOC_2;
        return;
    }

    LOG_ALWAYS_FATAL("gralloc-mapper is missing");
}
这里会优先创建 Gralloc5Mapper, 构造函数如下
scss
// frameworks/native/libs/ui/Gralloc5.cpp
Gralloc5Mapper::Gralloc5Mapper() {
    mMapper = getInstance().mapper;
}


static const Gralloc5 &getInstance() {
    static Gralloc5 instance = []() {
        // 拿到 IAllocator 的 Binder 句柄
        auto allocator = waitForAllocator();
        if (!allocator) {
            return Gralloc5{};
        }
        // 通过 dlopen 加载 Gralloc 相关的动态库
        void *so = loadIMapperLibrary();
        if (!so) {
            return Gralloc5{};
        }
        // 拿到 AIMapper_loadIMapperFn 这个函数指针
        auto loadIMapper = (AIMapper_loadIMapperFn)dlsym(so, "AIMapper_loadIMapper");
        AIMapper *mapper = nullptr;
        AIMapper_Error error = loadIMapper(&mapper);
        if (error != AIMAPPER_ERROR_NONE) {
            ALOGE("AIMapper_loadIMapper failed %d", error);
            return Gralloc5{};
        }
        return Gralloc5{std::move(allocator), mapper};
    }();
    return instance;
}
Gralloc5Mapper 在创建过程中,会创建两个非常重要的对象,allocator 和 mapper
allocator
allocate 的创建在 waitForAllocator()
css
static std::shared_ptr<IAllocator> waitForAllocator() {

        auto allocator = IAllocator::fromBinder(
                ndk::SpAIBinder(AServiceManager_waitForService(kIAllocatorServiceName.c_str())));
        ...
        return allocator;

    }
}
这里就很明显了,通过 AServiceManager_waitForService 拿到了名为 kIAllocatorServiceName 这个 Binder Service 的句柄,也就意味着 allocator 能通过这个句柄调用这个 Binder Service 的方法,具体有哪些方法,我们可以查看对应的 aidl 文件
java
interface IAllocator {
 AllocationResult allocate(in byte[] descriptor, in int count);
 AllocationResult allocate2(in BufferDescriptorInfo descriptor, in int count);
 boolean isSupported(in BufferDescriptorInfo descriptor);
}
可以看到这个 aidl 提供了 allocate 和 allocate2 等方法, 这些方法运行在 Binder Service 所在进程,并且具体的实现由手机厂商来提供。
mapper
首先通过 loadIMapperLibrary() 加载 .so 库,
ini
static void *loadIMapperLibrary() {
    static void *imapperLibrary = []() -> void * {
        ...
        void* so = nullptr;
        if (__builtin_available(android __ANDROID_API_V__, *)) {
            so = AServiceManager_openDeclaredPassthroughHal("mapper", mapperSuffix.c_str(),
                                                            RTLD_LOCAL | RTLD_NOW);
        } else {
            std::string lib_name = "mapper." + mapperSuffix + ".so";
            so = android_load_sphal_library(lib_name.c_str(), RTLD_LOCAL | RTLD_NOW);
        }
        return so;
    }();
    return imapperLibrary;
}
这里设计非常巧妙,相比于 allocate 通过 Binder 实现跨进程通信,mapper 使用的是 SPHal(Same-Process HAL), 通过 dlopen 直接把 .so 加载到本进程来调用相关的方法,相比于通 Binder,SPHAL 的效率会更高。
加载了 mapper 相关的 so 之后,通过 (AIMapper_loadIMapperFn)dlsym(so, "AIMapper_loadIMapper") 拿到 AIMapper_loadIMapperFn 这个函数指针,通过这个函数指针就可以拿到真正的"主角" AIMapper 接口,AIMapper 接口提供的方法如下:
arduino
...
AIMapper_Error (*_Nonnull importBuffer)(const native_handle_t* _Nonnull handle,
                                            buffer_handle_t _Nullable* _Nonnull outBufferHandle);

AIMapper_Error (*_Nonnull freeBuffer)(buffer_handle_t _Nonnull buffer);
AIMapper_Error (*_Nonnull flushLockedBuffer)(buffer_handle_t _Nonnull buffer);
...
AIMapper 接口对外暴露了 importBuffer freeBuffer 等多个操作内存的方法,而这些方法的实现也是由厂商提供。
到这里为止,GraphicBuffer 的构造函数就执行完了,在构造函数中
- 初始化了
allocator用于后续的内存分配 (通过 Binder方式) - 初始化了
Mapper,用于后续对分配内存的操作 (通过 SP-HAL方式)
接下来继续分析 GraphicBuffer 的初始化
GraphicBuffer 初始化
在前面的源码中,GraphicBuffer 的无参构造函数执行之后,会调用 initWithSize执行初始化
ini
status_t GraphicBuffer::initWithSize(uint32_t inWidth, uint32_t inHeight,
        PixelFormat inFormat, uint32_t inLayerCount, uint64_t inUsage,
        std::string requestorName)
{
    // 这个 allocator 就是上面一步创建的 allocator
    GraphicBufferAllocator& allocator = GraphicBufferAllocator::get();
    uint32_t outStride = 0;
    // 通过 Binder Server 分配一块内存,并且返回这块内存的地址由 handle 持有
    status_t err = allocator.allocate(inWidth, inHeight, inFormat, inLayerCount,inUsage, &handle, &outStride, mId,std::move(requestorName));
    if (err == NO_ERROR) {
        mBufferMapper.getTransportSize(handle, &mTransportNumFds, &mTransportNumInts);
        width = static_cast<int>(inWidth);
        height = static_cast<int>(inHeight);
        format = inFormat;
        layerCount = inLayerCount;
        usage = inUsage;
        usage_deprecated = int(usage);
        stride = static_cast<int>(outStride);
        mDependencyMonitor.setToken(requestorName.append(":").append(std::to_string(mId)));
    }
    return err;
}
了解了 GraphicBuffer 的创建之后,初始化的理解就很简单了,无非就是通过 Binder IPC 调用 Binder Server 来分配一块内存,并且这块内存的 fd 由 GraphicBuffer 持有。