前言
对于Java开发来说,天天都在用SpringBoot,每次启动都执行了main方法,该方法应该是最容易让人忽视的地方之一,不过几行代码,为什么执行完后JVM不结束呢?
本文以内嵌tomcat为例进行说明,并分享一些debug和画图的技巧。
原因
先说结论,是因为main方法启动了一个线程,这个线程是非daemon的,并且run方法执行的任务是TomcatWebServer.this.tomcat.getServer().await();(死循环),即非daemon线程+任务不停止=程序不退出。
debug源码
技巧
在debug时,有的源码是抽象方法,我们可以用快捷键F7跳转到具体正在执行的实现类方法,另外Alt+F9可以强制到达光标的位置。
流程
下面将debug对应的源码,有兴趣的朋友可以跟着动手试试。
SpringBoot启动入口,调用静态run方法。
java
/** 一般demo
 * @date 2021/9/12 9:09
 * @author www.cnblogs.com/theRhyme
 */
@SpringBootApplication
public class CommonDemoApplication {
    public static void main(String[] args) {
        SpringApplication.run(CommonDemoApplication.class, args);
    }
}调用重载的run方法
java
public static ConfigurableApplicationContext run(Class<?> primarySource, String... args) {
		return run(new Class<?>[] { primarySource }, args);
}创建SpringApplication对象调用run方法
java
public static ConfigurableApplicationContext run(Class<?>[] primarySources, String[] args) {
		return new SpringApplication(primarySources).run(args);
}由于该run方法很长,这里只贴到与本文main方法结束为何程序不退出的代码,对整个启动流程有兴趣的可以去看这篇:SpringBoot启动原理(基于2.3.9.RELEASE版本)。这里我们注意refreshContext。
java
public ConfigurableApplicationContext run(String... args) {
		StopWatch stopWatch = new StopWatch();
		stopWatch.start();
		DefaultBootstrapContext bootstrapContext = createBootstrapContext();
		ConfigurableApplicationContext context = null;
		configureHeadlessProperty();
		SpringApplicationRunListeners listeners = getRunListeners(args);
		listeners.starting(bootstrapContext, this.mainApplicationClass);
		try {
			ApplicationArguments applicationArguments = new DefaultApplicationArguments(args);
			ConfigurableEnvironment environment = prepareEnvironment(listeners, bootstrapContext, applicationArguments);
			configureIgnoreBeanInfo(environment);
			Banner printedBanner = printBanner(environment);
			context = createApplicationContext();
			context.setApplicationStartup(this.applicationStartup);
			prepareContext(bootstrapContext, context, environment, listeners, applicationArguments, printedBanner);
			refreshContext(context);
......refreshContext调用了一个抽象方法,我们在debug模式使用F7进入具体的实现类。
java
protected void refresh(ConfigurableApplicationContext applicationContext) {
		applicationContext.refresh();
}这里就初始化一些资源(placeholder,beanFactory,BeanPostProcessor,MessageSource,ApplicationEventMulticaster),注意onRefresh方法。
java
@Override
	public void refresh() throws BeansException, IllegalStateException {
		synchronized (this.startupShutdownMonitor) {
			StartupStep contextRefresh = this.applicationStartup.start("spring.context.refresh");

			// Prepare this context for refreshing.
			prepareRefresh();

			// Tell the subclass to refresh the internal bean factory.
			ConfigurableListableBeanFactory beanFactory = obtainFreshBeanFactory();

			// Prepare the bean factory for use in this context.
			prepareBeanFactory(beanFactory);

			try {
				// Allows post-processing of the bean factory in context subclasses.
				postProcessBeanFactory(beanFactory);

				StartupStep beanPostProcess = this.applicationStartup.start("spring.context.beans.post-process");
				// Invoke factory processors registered as beans in the context.
				invokeBeanFactoryPostProcessors(beanFactory);

				// Register bean processors that intercept bean creation.
				registerBeanPostProcessors(beanFactory);
				beanPostProcess.end();

				// Initialize message source for this context.
				initMessageSource();

				// Initialize event multicaster for this context.
				initApplicationEventMulticaster();

				// Initialize other special beans in specific context subclasses.
				onRefresh();
......进入onRefresh,这里会创建WebServer:
java
@Override
	protected void onRefresh() {
		super.onRefresh();
		try {
			createWebServer();
		}
		catch (Throwable ex) {
			throw new ApplicationContextException("Unable to start web server", ex);
		}
}这里是具体创建webServer的步骤,注意getTomcatWebServer。
java
@Override
	public WebServer getWebServer(ServletContextInitializer... initializers) {
		if (this.disableMBeanRegistry) {
			Registry.disableRegistry();
		}
		Tomcat tomcat = new Tomcat();
		File baseDir = (this.baseDirectory != null) ? this.baseDirectory : createTempDir("tomcat");
		tomcat.setBaseDir(baseDir.getAbsolutePath());
		Connector connector = new Connector(this.protocol);
		connector.setThrowOnFailure(true);
		tomcat.getService().addConnector(connector);
		customizeConnector(connector);
		tomcat.setConnector(connector);
		tomcat.getHost().setAutoDeploy(false);
		configureEngine(tomcat.getEngine());
		for (Connector additionalConnector : this.additionalTomcatConnectors) {
			tomcat.getService().addConnector(additionalConnector);
		}
		prepareContext(tomcat.getHost(), initializers);
		return getTomcatWebServer(tomcat);
}创建TomcatWebServer对象。
java
protected TomcatWebServer getTomcatWebServer(Tomcat tomcat) {
		return new TomcatWebServer(tomcat, getPort() >= 0, getShutdown());
}设置一些属性,并执行initialize方法。
java
public TomcatWebServer(Tomcat tomcat, boolean autoStart, Shutdown shutdown) {
		Assert.notNull(tomcat, "Tomcat Server must not be null");
		this.tomcat = tomcat;
		this.autoStart = autoStart;
		this.gracefulShutdown = (shutdown == Shutdown.GRACEFUL) ? new GracefulShutdown(tomcat) : null;
		initialize();
	}
初始化并启动tomcat容器,然后就开起非daemon await线程。
java
private void initialize() throws WebServerException {
		logger.info("Tomcat initialized with port(s): " + getPortsDescription(false));
		synchronized (this.monitor) {
			try {
				addInstanceIdToEngineName();

				Context context = findContext();
				context.addLifecycleListener((event) -> {
					if (context.equals(event.getSource()) && Lifecycle.START_EVENT.equals(event.getType())) {
						// Remove service connectors so that protocol binding doesn't
						// happen when the service is started.
						removeServiceConnectors();
					}
				});

				// Start the server to trigger initialization listeners
				this.tomcat.start();

				// We can re-throw failure exception directly in the main thread
				rethrowDeferredStartupExceptions();

				try {
					ContextBindings.bindClassLoader(context, context.getNamingToken(), getClass().getClassLoader());
				}
				catch (NamingException ex) {
					// Naming is not enabled. Continue
				}

				// Unlike Jetty, all Tomcat threads are daemon threads. We create a
				// blocking non-daemon to stop immediate shutdown
				startDaemonAwaitThread();
			}
			catch (Exception ex) {
				stopSilently();
				destroySilently();
				throw new WebServerException("Unable to start embedded Tomcat", ex);
			}
		}
	}
创建非daemon线程设置线程名等参数并启动。
java
private void startDaemonAwaitThread() {
		Thread awaitThread = new Thread("container-" + (containerCounter.get())) {

			@Override
			public void run() {
				TomcatWebServer.this.tomcat.getServer().await();
			}

		};
		awaitThread.setContextClassLoader(getClass().getClassLoader());
		awaitThread.setDaemon(false);
		awaitThread.start();
}至此由于awaitThread.setDaemon(false);和TomcatWebServer.this.tomcat.getServer().await();,启动该线程awaitThread后,main方法后续虽然执行完毕,但是程序不会退出。
https://www.cnblogs.com/theRhyme/p/-/springboot-not-stop-after-main
await方法
这里单独看一下TomcatWebServer.this.tomcat.getServer().await();。
该方法的Java doc:
/**

 * Wait until a proper shutdown command is received, then return.

 * This keeps the main thread alive - the thread pool listening for http

 * connections is daemon threads.

 */
指的是通过等候关闭命令这个动作来保持main线程存活,而HTTP线程作为daemon线程会在main线程结束时终止。
任务一直运行的原因:源码如下,debug会进入getPortWithOffset()的值是-1的分支(注意这里不是server.port端口号),然后会不断循环Thread.sleep( 10000 )直到发出关机指令修改stopAwait的值为true。
java
@Override
    public void await() {
        // Negative values - don't wait on port - tomcat is embedded or we just don't like ports
        if (getPortWithOffset() == -2) {
            // undocumented yet - for embedding apps that are around, alive.
            return;
        }
        if (getPortWithOffset() == -1) {
            try {
                awaitThread = Thread.currentThread();
                while(!stopAwait) {
                    try {
                        Thread.sleep( 10000 );
                    } catch( InterruptedException ex ) {
                        // continue and check the flag
                    }
                }
            } finally {
                awaitThread = null;
            }
            return;
        }

......stopAwait的值只会在org.apache.catalina.core.StandardServer#stopAwait中被修改,源码如下:
java
public void stopAwait() {
        stopAwait=true;
        Thread t = awaitThread;
        if (t != null) {
            ServerSocket s = awaitSocket;
            if (s != null) {
                awaitSocket = null;
                try {
                    s.close();
                } catch (IOException e) {
                    // Ignored
                }
            }
            t.interrupt();
            try {
                t.join(1000);
            } catch (InterruptedException e) {
                // Ignored
            }
        }
}而该方法会在容器生命周期结束方法org.apache.catalina.core.StandardServer#stopInternal中被调用。
非daemon线程的意义
setDaemon介绍
上面将线程设置为非daemon线程:awaitThread.setDaemon(false)。
java.lang.Thread#setDaemon源码如下:
java
/**
     * Marks this thread as either a {@linkplain #isDaemon daemon} thread
     * or a user thread. The Java Virtual Machine exits when the only
     * threads running are all daemon threads.
     *
     * <p> This method must be invoked before the thread is started.
     *
     * @param  on
     *         if {@code true}, marks this thread as a daemon thread
     *
     * @throws  IllegalThreadStateException
     *          if this thread is {@linkplain #isAlive alive}
     *
     * @throws  SecurityException
     *          if {@link #checkAccess} determines that the current
     *          thread cannot modify this thread
     */
public final void setDaemon(boolean on) {
    checkAccess();
    if (isAlive()) {
        throw new IllegalThreadStateException();
    }
    daemon = on;
}
根据上面的Java doc注释可知:标记该线程是否是daemon线程,而JVM退出仅当只剩下daemon线程。
所以非daemon线程存活,JVM是不会退出的。
例子
如下代码,我们在main方法中启动了一个非daemon线程,并且调用了阻塞方法java.io.InputStream#read()。
java
// https://www.cnblogs.com/theRhyme/p/-/springboot-not-stop-after-main
public static void main(String[] args) {
        System.out.println(Thread.currentThread().getName() + ": start");
        Thread awaitThread =
                new Thread("non-daemon") {
                    @Override
                    public void run() {
                        try {
                            System.out.println(Thread.currentThread().getName() + ": start");
                            System.in.read();
                            System.out.println(Thread.currentThread().getName() + ": end");
                        } catch (IOException e) {
                            e.printStackTrace();
                        }
                    }
                };
        awaitThread.setDaemon(false);
        awaitThread.start();
        System.out.println(Thread.currentThread().getName() + ": end");
    }
启动程序后,再不进行键盘输入的情况下,程序不会停止,运行结果如下:
java
main: start
main: end
non-daemon: startmain线程结束,但是程序不退出。
-1的原因
上面留了个问题,为什么getPortWithOffset()的返回值是-1。
如下getPort()的值为-1,此时相当于直接调用了getPort()方法。
java
https://www.cnblogs.com/theRhyme/p/-/springboot-not-stop-after-main
@Override
    public int getPortWithOffset() {
        // Non-positive port values have special meanings and the offset should
        // not apply.
        int port = getPort();
        if (port > 0) {
            return port + getPortOffset();
        } else {
            return port;
        }
}而getPort直接取的是port属性。
java
@Override
    public int getPort() {
        return this.port;
}注意这里的port不是我们指定的server.port这个属性,而是关闭命令监听的端口。
java
    /**
     * The port number on which we wait for shutdown commands.
     */
    private int port = 8005;
为什么是8005而不是-1呢?那是在哪被修改了呢?
port属性提供的修改方式是setPort(),而使用Alt+F7找到在getServer中被修改为-1。
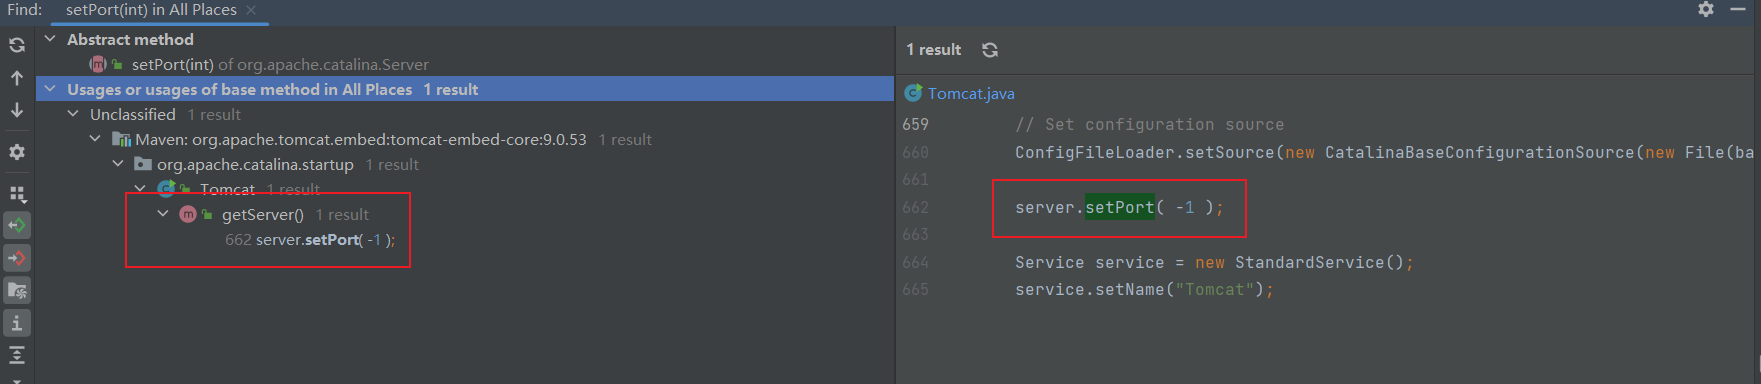
在server.setPort( -1 );打一个断点,重新debug,可以知道具体修改的时机。
之前我们debug过方法createWebServer,是具体创建webServer的步骤,但是我们这里要进入getWebServer。
java
private void createWebServer() {
		WebServer webServer = this.webServer;
		ServletContext servletContext = getServletContext();
		if (webServer == null && servletContext == null) {
			StartupStep createWebServer = this.getApplicationStartup().start("spring.boot.webserver.create");
			ServletWebServerFactory factory = getWebServerFactory();
			createWebServer.tag("factory", factory.getClass().toString());
			this.webServer = factory.getWebServer(getSelfInitializer());
......配置tomca实例参数,但是要注意这里的tomcat.getService()方法。
java
public WebServer getWebServer(ServletContextInitializer... initializers) {
		if (this.disableMBeanRegistry) {
			Registry.disableRegistry();
		}
		Tomcat tomcat = new Tomcat();
		File baseDir = (this.baseDirectory != null) ? this.baseDirectory : createTempDir("tomcat");
		tomcat.setBaseDir(baseDir.getAbsolutePath());
		Connector connector = new Connector(this.protocol);
		connector.setThrowOnFailure(true);
		tomcat.getService().addConnector(connector);
		customizeConnector(connector);
		tomcat.setConnector(connector);
		tomcat.getHost().setAutoDeploy(false);
		configureEngine(tomcat.getEngine());
		for (Connector additionalConnector : this.additionalTomcatConnectors) {
			tomcat.getService().addConnector(additionalConnector);
		}
		prepareContext(tomcat.getHost(), initializers);
		return getTomcatWebServer(tomcat);
}内部调用getServer()。
java
public Service getService() {
        return getServer().findServices()[0];
}至此,就是这里就将server.setPort( -1 );。
java
public Server getServer() {

        if (server != null) {
            return server;
        }

        System.setProperty("catalina.useNaming", "false");

        server = new StandardServer();

        initBaseDir();

        // Set configuration source
        ConfigFileLoader.setSource(new CatalinaBaseConfigurationSource(new File(basedir), null));

        // https://www.cnblogs.com/theRhyme/p/-/springboot-not-stop-after-main
        server.setPort( -1 );

        Service service = new StandardService();
        service.setName("Tomcat");
        server.addService(service);
        return server;
    }
调用链
技巧
如果我们想画一个方法本次被调用(线程内部) 的流程图,那么我们可以debug进入该方法,Alt+F8执行如下代码,打印出方法调用栈对应的mermaid js 内容,然后使用文本绘图工具进行渲染。
java
// https://www.cnblogs.com/theRhyme
StackTraceElement[] stackTrace = Thread.currentThread().getStackTrace();
List<String> methodChain = Arrays.stream(stackTrace)
        .filter(e -> !e.getClassName().startsWith("java.") && !e.getClassName().startsWith("jdk.") && !e.getMethodName().contains("<"))
        .map(e -> e.getClassName() + "." + e.getMethodName())
        .collect(Collectors.toList());
StringBuilder mermaidCode = new StringBuilder("graph TD\n");
for (int i = methodChain.size() - 1; i > 0; i--) {
    mermaidCode.append(String.format("    %s --> %s\n",
            methodChain.get(i),
            methodChain.get(i-1)));
}
System.out.println(mermaidCode);这种方式比较适合线程内部 展示具体方法的被调用关系,可以自定义根据包名等条件过滤掉不想要展示的类,但是对于跨线程的调用却不起作用,因为原理是线程自身的调用栈。
具体内容
如图,debug到org.springframework.boot.web.embedded.tomcat.TomcatWebServer#startDaemonAwaitThread内部,执行上面的代码。
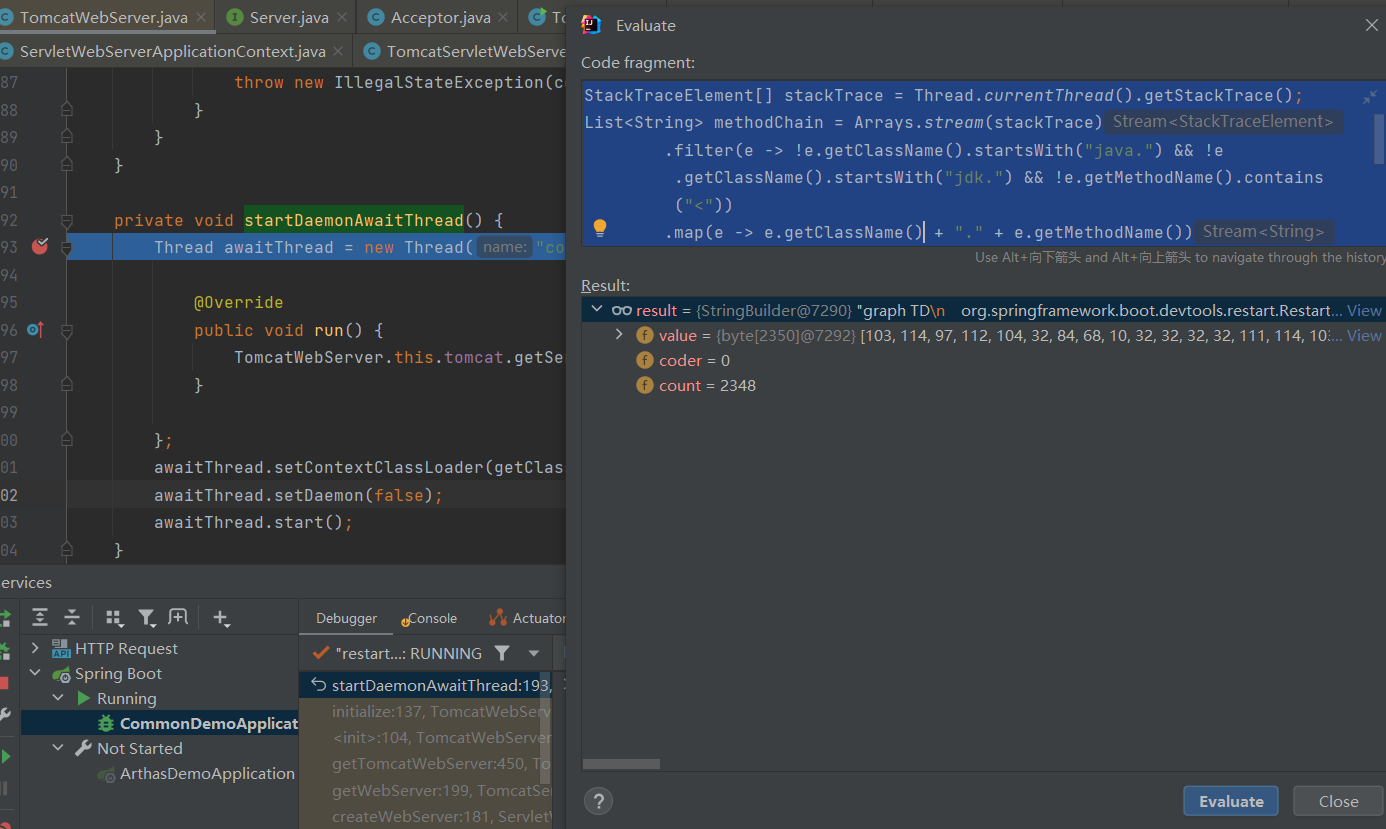
输出内容:
plain
graph TD
    org.springframework.boot.devtools.restart.RestartLauncher.run --> cnblogscomtheRhyme.infrastructure.demos.common.CommonDemoApplication.main
    cnblogscomtheRhyme.infrastructure.demos.common.CommonDemoApplication.main --> org.springframework.boot.SpringApplication.run
    org.springframework.boot.SpringApplication.run --> org.springframework.boot.SpringApplication.run
    org.springframework.boot.SpringApplication.run --> org.springframework.boot.SpringApplication.run
    org.springframework.boot.SpringApplication.run --> org.springframework.boot.SpringApplication.refreshContext
    org.springframework.boot.SpringApplication.refreshContext --> org.springframework.boot.SpringApplication.refresh
    org.springframework.boot.SpringApplication.refresh --> org.springframework.boot.SpringApplication.refresh
    org.springframework.boot.SpringApplication.refresh --> org.springframework.boot.web.servlet.context.ServletWebServerApplicationContext.refresh
    org.springframework.boot.web.servlet.context.ServletWebServerApplicationContext.refresh --> org.springframework.context.support.AbstractApplicationContext.refresh
    org.springframework.context.support.AbstractApplicationContext.refresh --> org.springframework.boot.web.servlet.context.ServletWebServerApplicationContext.onRefresh
    org.springframework.boot.web.servlet.context.ServletWebServerApplicationContext.onRefresh --> org.springframework.boot.web.servlet.context.ServletWebServerApplicationContext.createWebServer
    org.springframework.boot.web.servlet.context.ServletWebServerApplicationContext.createWebServer --> org.springframework.boot.web.embedded.tomcat.TomcatServletWebServerFactory.getWebServer
    org.springframework.boot.web.embedded.tomcat.TomcatServletWebServerFactory.getWebServer --> org.springframework.boot.web.embedded.tomcat.TomcatServletWebServerFactory.getTomcatWebServer
    org.springframework.boot.web.embedded.tomcat.TomcatServletWebServerFactory.getTomcatWebServer --> org.springframework.boot.web.embedded.tomcat.TomcatWebServer.initialize
    org.springframework.boot.web.embedded.tomcat.TomcatWebServer.initialize --> org.springframework.boot.web.embedded.tomcat.TomcatWebServer.startDaemonAwaitThread
    org.springframework.boot.web.embedded.tomcat.TomcatWebServer.startDaemonAwaitThread --> idea.debugger.rt.GeneratedEvaluationClass.invoke
把内容放入文本绘图中,即可得到如下流程图:
