MGRE综合实验

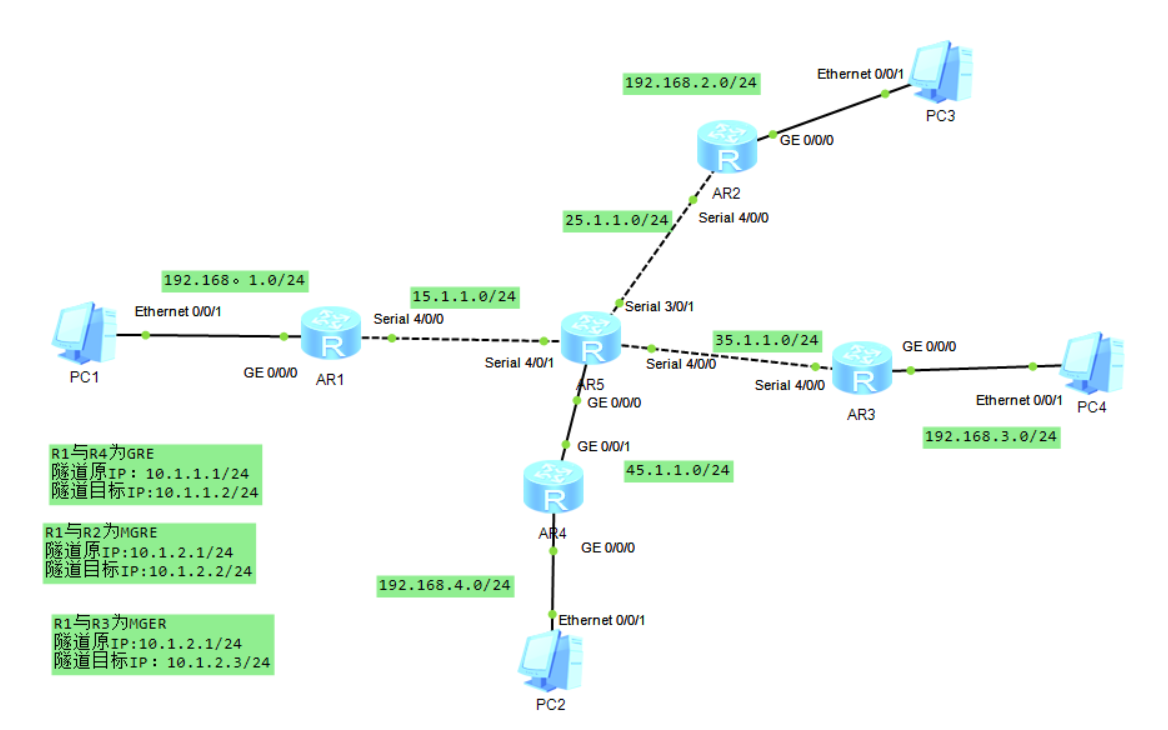
一、实验拓扑

二、实验要求

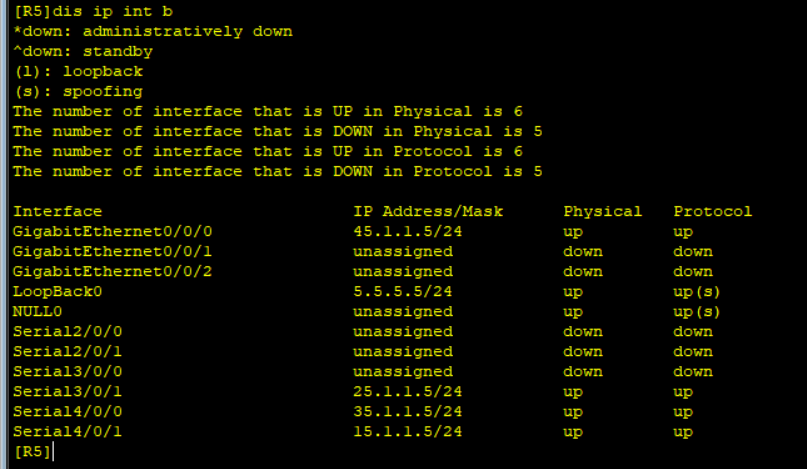
1、R5为ISP,只能进行IP地址配置,其所有地址均配为公有IP地址;

2、R1和R5间使用PPP的PAP认证,R5为主认证方;

R2与R5之间使用ppp的CHAP认证,R5为主认证方;

R3与R5之间使用HDLC封装;

3、R1、B2、R3构建一个MGRE环境,R1为中心站点,R1、R4间为点到点的GRE;

4、 整个私有网络基本RIP全网可达;

5 、所有PC设置私有IP为源IP,可以访问R5环回。

三、实验步骤及结果

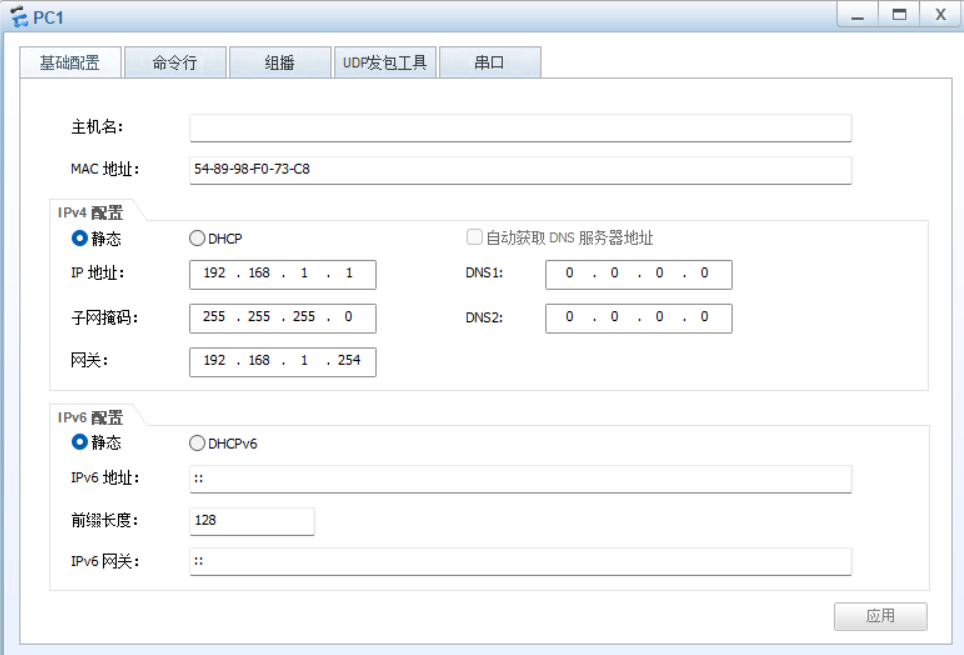
1.首先配置路由器和PC的IP地址(仅展示R5各个接口的地址以及PC1地址,网关地址均以254结尾)
2.在R1、R2、R3、R4路由器上配置静态路由,以达到公网通

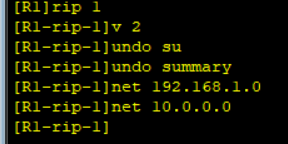
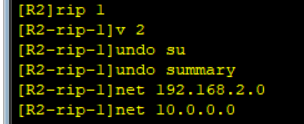
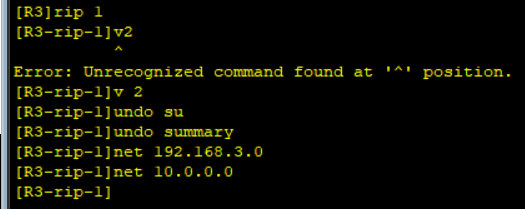
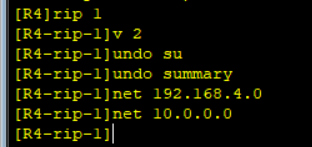
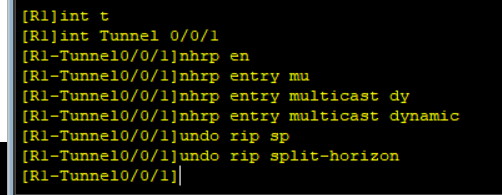
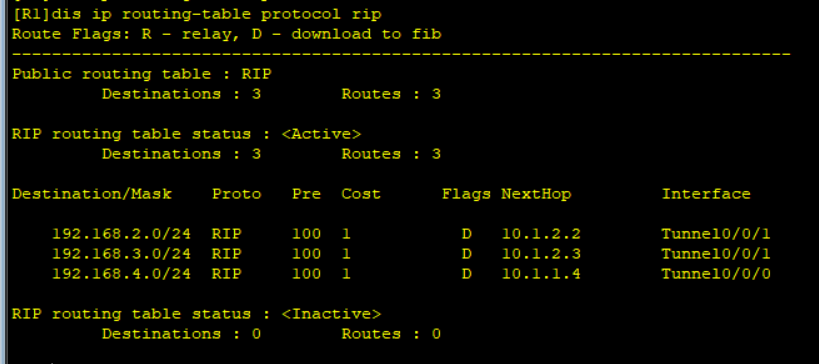
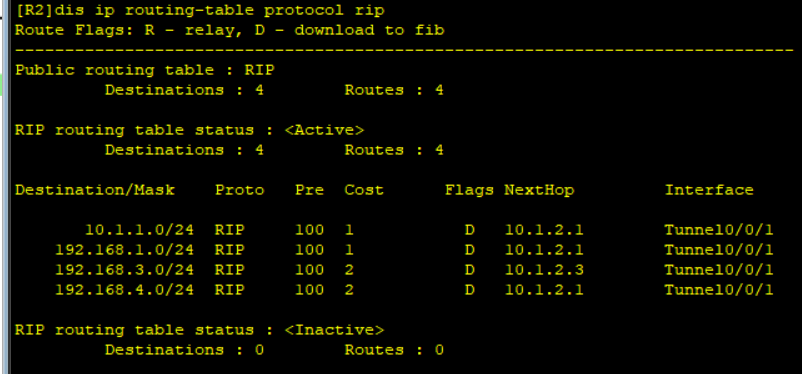
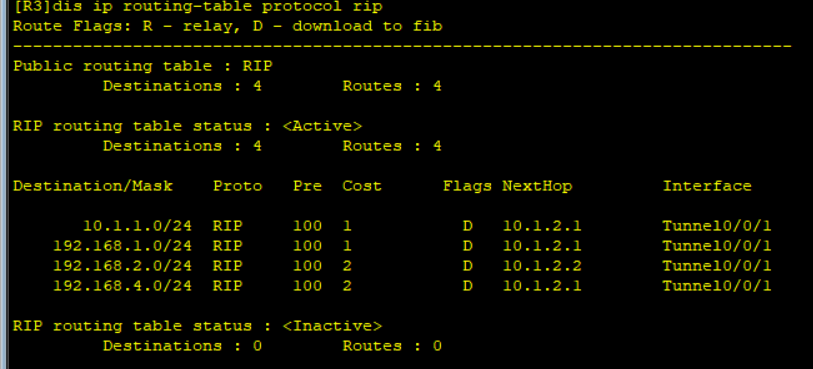
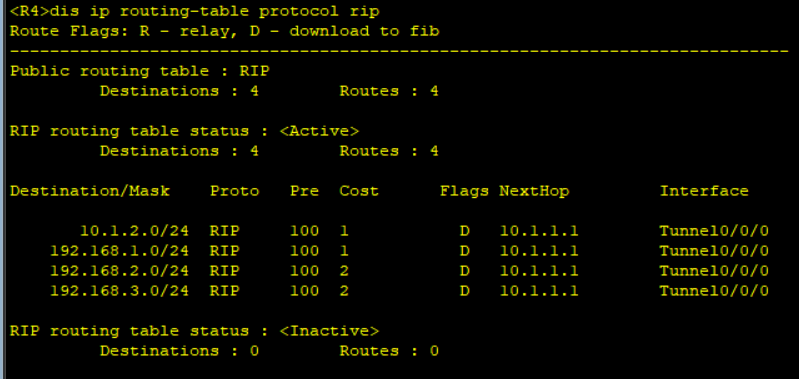
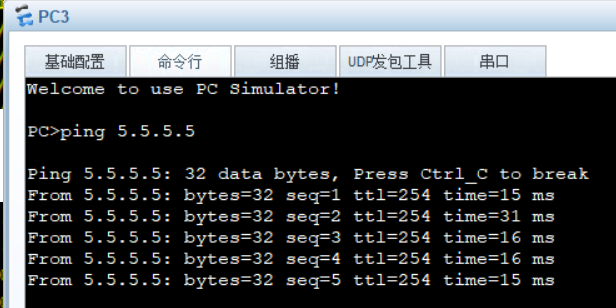
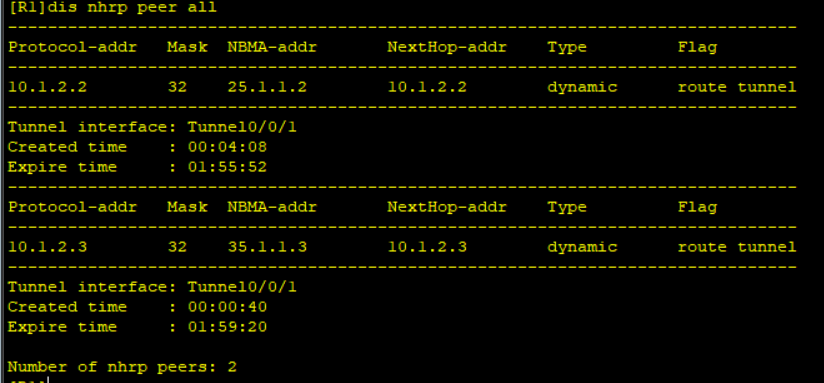
R1\]ip route-static 0.0.0.0 0 15.1.1.5 \[R2\]ip route-static 0.0.0.0 0 25.1.1.5 \[R3\]ip route-static 0.0.0.0 0 35.1.1.5 \[R4\]ip route-static 0.0.0.0 0 45.1.1.5 测试公网各个接口是否能ping通 ![](https://i-blog.csdnimg.cn/direct/8c56dcd03b4044d5bc17bec32ea1b882.png) ![](https://i-blog.csdnimg.cn/direct/6b1e3737af5146899903bac295bb2625.png) ![](https://i-blog.csdnimg.cn/direct/89d52e6ce2b54700bffa574e8d4b18f2.png) 3.R1和R5间使用PPP的PAP认证,R5为主认证方(实验要求2第一条) 在主认证方下创建被验证方用于登录的用户名和密码 R5-aaa\]local-user wangdaye password cipher wdy12345 privilege level 15 设置服务类型 \[R5-aaa\]local-user wangdaye service-type ppp 设置客户端登录验证的方式 \[R5-Serial4/0/1\]ppp authentication-mode pap 进入被验证方,告诉用户名,密码以及验证方式 \[R1-Serial4/0/0\]ppp pap local-user wangdaye password cipher wdy12345 验证(在UNDO SHUTDOWN之后出现PPP的两个up,则配置成功) \[R1-Serial4/0/0\]shutdown \[R1-Serial4/0/0\]undo shutdown ![](https://i-blog.csdnimg.cn/direct/1fd9f23d4b9e4eeda7b6ad33321f054c.png) 4.R2与R5之间使用ppp的CHAP认证,R5为主认证方(实验要求2第二条) 继续使用上一条配置的用户名和密码,只需设置认证方式 \[R5-Serial3/0/1\]ppp authentication-mode chap 告知R2 \[R2-Serial4/0/0\]ppp chap user wangdaye \[R2-Serial4/0/0\]ppp chap password cipher wdy12345 验证(shutdown和undo shutdown) ![](https://i-blog.csdnimg.cn/direct/25e6f163cd97492abd5c559b5a61c692.png) 5.R3与R5之间使用HDLC封装; ![](https://i-blog.csdnimg.cn/direct/81d95e1c1be64011b7d8a59a53a9b910.png) ![](https://i-blog.csdnimg.cn/direct/ec50f271fd6646b3bea964acbf298e60.png) 6.构建R1.R4间点到点的GRE \[R1\]int Tunnel 0/0/0(随便哪个接口都行) \[R1-Tunnel0/0/0\]ip ad 10.1.1.1 24 \[R1-Tunnel0/0/0\]tunnel-protocol gre \[R1-Tunnel0/0/0\]source 15.1.1.1 \[R1-Tunnel0/0/0\]destination 45.1.1.4 \[R4\]int Tunnel 0/0/0 \[R4-Tunnel0/0/0\]ip ad 10.1.1.4 24 \[R4-Tunnel0/0/0\]source 45.1.1.4 \[R4-Tunnel0/0/0\]destination 15.1.1.1 7.构建MGRE \[R1\]int Tunnel 0/0/1 \[R1-Tunnel0/0/1\]tunnel-protocol gre p2mp \[R1-Tunnel0/0/1\]source 15.1.1.1 \[R1-Tunnel0/0/1\]nhrp network-id 100 \[R2\]int Tunnel 0/0/1 \[R2-Tunnel0/0/1\]ip ad 10.1.2.2 24 \[R2-Tunnel0/0/1\]tunnel-protocol gre p2mp \[R2-Tunnel0/0/1\]nhrp network-id 100 \[R2-Tunnel0/0/1\]nhrp entry 10.1.2.1 15.1.1.1 register \[R3\]int Tunnel 0/0/1 \[R3-Tunnel0/0/1\]ip ad 10.1.2.3 24 \[R3-Tunnel0/0/1\]tunnel-protocol gre p2mp \[R3-Tunnel0/0/1\]nhrp network-id 100 \[R3-Tunnel0/0/1\]nhrp entry 10.1.2.1 15.1.1.1 register ![](https://i-blog.csdnimg.cn/direct/f806f65c8d804b40b45766c693069134.png) ![](https://i-blog.csdnimg.cn/direct/f096d65ff77c4e289a762a62aa710509.png) ![](https://i-blog.csdnimg.cn/direct/ec0460916e9e4dbc8123fc06d9547e9b.png) 7.配置rip ![](https://i-blog.csdnimg.cn/direct/02332da8e6234865b2b10e51a152462d.png)![](https://i-blog.csdnimg.cn/direct/c2cdca30e4a44bbeba9d69e10a35ce52.png) ![](https://i-blog.csdnimg.cn/direct/40e1a739e3ff4d54af57e7744c67bbb7.png)![](https://i-blog.csdnimg.cn/direct/f045da9215244621a670c54762c32a9d.png) 关闭接口水平分割机制,开启中心隧道口的广播功能 ![](https://i-blog.csdnimg.cn/direct/b0b728ac9dd0427a902b3a96a321e769.png) ![](https://i-blog.csdnimg.cn/direct/2d3f307a0ede47678f30ee423f7733cf.png) ![](https://i-blog.csdnimg.cn/direct/6f98073897d04aa88dce8d6f019cc50b.png) 检查 ![](https://i-blog.csdnimg.cn/direct/4e3f00b66de741769fa28c61c26e8d79.png) ![](https://i-blog.csdnimg.cn/direct/3c3fa849db0d4dc5abd2f393b35848f3.png) ![](https://i-blog.csdnimg.cn/direct/bd8f905e2294411fb4a5d35ba5e95237.png) ![](https://i-blog.csdnimg.cn/direct/1bcf209f71a844aea87f8ee6bcd96a4a.png) 测试(仅展示一个,其余都能ping通) ![](https://i-blog.csdnimg.cn/direct/5f195628ba4a4d62b7038148141a61b7.png) 8.配置要求五,配置nat,达到全网通(R1-R4的配置一样,只用换一下source网段) (![](https://i-blog.csdnimg.cn/direct/8fc4160b53314a4981992c075bbceb95.png) 测试(仅展示部分) ![](https://i-blog.csdnimg.cn/direct/c33ee0f213fa4915997a5a53e0727e2c.png) ![](https://i-blog.csdnimg.cn/direct/e47949c190544da786b5c0e2cf1d409b.png) ![](https://i-blog.csdnimg.cn/direct/c394b4d68b04407f83cf65fbdf0b9795.png) 至此,所有要求均已完成。
相关推荐
路由侠内网穿透.15 小时前
外网访问可视化工具 Grafana (Linux版本)
linux·运维·服务器·grafana·远程工作
睿本云15 小时前
产品月报|睿本云10月产品功能迭代
运维·服务器·apache
oe101915 小时前
好文与笔记分享 A Survey of Context Engineering for Large Language Models(中)
人工智能·笔记·语言模型·agent开发
白榆!16 小时前
Linux 基本指令入门:从基础操作到实战应用
linux·运维·服务器
kyle~16 小时前
CPU调度---协程
java·linux·服务器·数据库·c++20
IDOlaoluo16 小时前
SQL Server 2017 Developer 中文版安装教程(64位 ISO 文件详细步骤)
服务器·数据库·负载均衡
余生皆假期-16 小时前
IIC 通讯详解——以 OSI 模型分析 物理层、数据链路层和应用层
网络
许长安16 小时前
C++中指针和引用的区别
c++·经验分享·笔记
李辉200316 小时前
Python逻辑运算符
java·网络·python
摇滚侠16 小时前
Spring Boot3零基础教程,StreamAPI 介绍,笔记98
java·spring boot·笔记