1.props完整校验
1.1 App.vue
html
<template>
  <div>
    <!-- 子组件渲染 -->
     <!-- 父传子 -->
      <!-- 加冒号的意思是变量 -->
    <Son
    str="hello"
    :age='age',
    :visible="visible"
    :list="list"
    :user="user"
    :say="say"
    >
    </Son>
  </div>
</template>
<script>
import Son from './components/Son.vue'
export default {
  data () {
    return {
      age: 20,
      visible: true,
      list: ['a', 'b', 'c'],
      user: { name: '张三', sex: '男' }
    }
  },
  methods: {
    say() {
      console.log('hello')
    },
    hi() {
      console.log(456)
    }
  },
  components: {
    Son
  }
}
</script>
1.2 Son.vue
html
<template>
<div>
<p> {{str}}</p>
<p> {{lsit}}</p>
</div>
</template>
<script>
export default {
name: 'SonPage',
created(){
this.say()
},
//props 写成数组格式
//props:['str','age','visible']
//props 写成对象格式
// props:['str','age','visible','lsit','user','say']
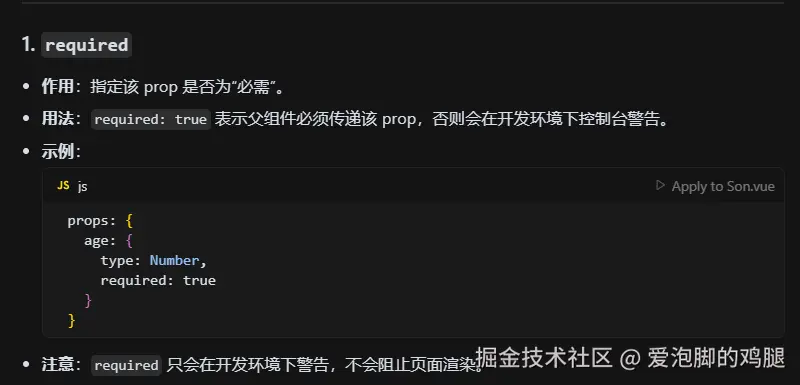
// 1.required:true:表示父组件,必须传递这个值
// 2.type:String|Number|Boolean|Object|Array|Function
// 3.type:[String,Number]
props:{
// 对接收到的数据进行校验
str:{
required:true
},
age:{
default:18, //如果父组件没有传递age,则让age等于100
type:[Number,String]//传递过来的数据,可以是数据或者字符串
},
visible:{},
lsit:Array, //表示只校验类型,类型只要是数组即可
user:{
default:() => {
return {name:'张三'}
//对于默认值是数组或者对象的情况,默认值要写一个函数,函数中返回默认值
}
},
say:Function //表示只校验类型,类型只要是函数即可
},
}
</script>
<style lang="less" scoped></style>1.3 props结论
1.3.1 required:需要传参值
1.3.2 default:默认值
注意:如果props类型是对象或者数组,default必须是一个函数,返回一个对象或者数组 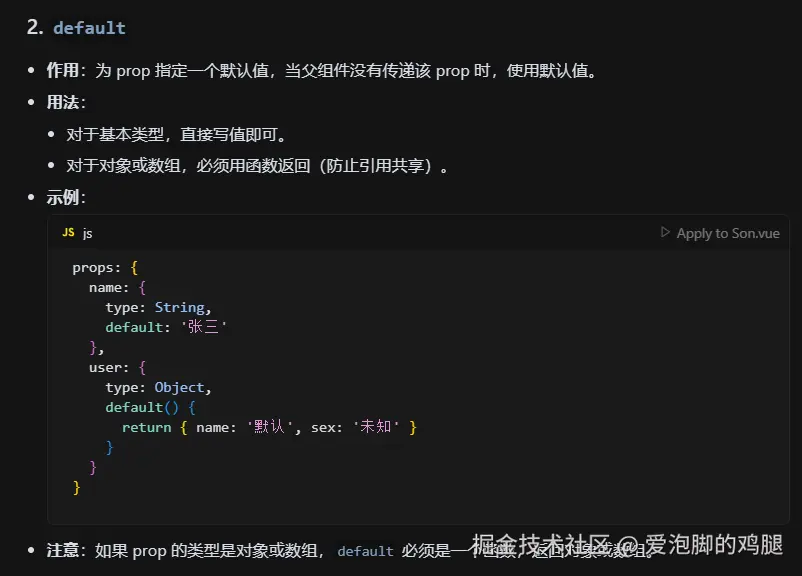
2. v-model
2.1 不用v-model实现双向绑定
- v-model 等价于 :value="xxx" @input="xxx = $event.target.value"
html
<template>
  <div>
    <h3>需求1:不用v-model实现双向绑定</h3>
    <input type="text" :value="uname" @input="changeValue"/>
    <p>结论:v-model可以拆分成 :value+@input</p>
    <hr />

    <h3>需求2:实现输入框组件的v-model</h3>
    <MyInput></MyInput>
    <hr />

    <h3>需求3:实现下拉框组件的v-model</h3>
    <MySelect></MySelect>
  </div>
</template>

<script>
import MyInput from './components/MyInput.vue'
import MySelect from './components/MySelect.vue'
export default {
  data () {
    return {
      uname: '张三'
    }
  },
  components: {
    MyInput,
    MySelect
  },
  methods: {
    changeValue(e){
      //把输入框的值赋给uname
      // e.target就是输入框
      this.uname = e.target.value;
    }
  }
}
</script>

<style lang="less" scoped></style>
2.2 实现输入框组件的v-model
2.2.1 App.vue
html
<template>
  <div>
    <h3>需求1:不用v-model实现双向绑定</h3>
    <input type="text" :value="uname" @input="changeValue"/>
    <p>结论:v-model可以拆分成 :value+@input</p>
    <hr />

    <h3>需求2:实现输入框组件的v-model</h3>
    <MyInput :value="age" @input="changeAge"></MyInput>
    <hr />

    <h3>需求3:实现下拉框组件的v-model</h3>
    <MySelect></MySelect>
  </div>
</template>

<script>
import MyInput from './components/MyInput.vue'
import MySelect from './components/MySelect.vue'
export default {
  data () {
    return {
      uname: '张三',
      age:18
    }
  },
  components: {
    MyInput,
    MySelect
  },
  methods: {
    changeValue(e){
      //把输入框的值赋给uname
      // e.target就是输入框
      this.uname = e.target.value;
    },
    changeAge(val){
      this.age = val;
    }
  }
}
</script>

<style lang="less" scoped></style>
2.2.2 MyInput.vue
html
<template>
  <!-- 使用value属性,实现双向绑定 -->
  <!-- 作用是把组件的 value 属性(通常是 props 传进来的)绑定到 input 输入框的 value 属性上。 -->
  <input type="text"
  :value="value"
  @input="$emit('input',$event.target.value)"/>
</template>

<script>
export default {
  name: 'MyInput',
  // 从父组件的得到的value属性
  props:['value']

}
</script>

<style lang="less" scoped></style>
2.3 实现下拉框的v-model
2.3.1 app.vue
html
<template>
<div>
<h3>需求1:不用v-model实现双向绑定</h3>
<input type="text" :value="uname" @input="changeValue"/>
<p>结论:v-model可以拆分成 :value+@input</p>
<p>当前用户名:{{ uname }}</p>
<hr />
<h3>需求2:实现输入框组件的v-model</h3>
<MyInput :value="age" @input="changeAge"></MyInput>
<p>当前年龄:{{ age }}</p>
<hr />
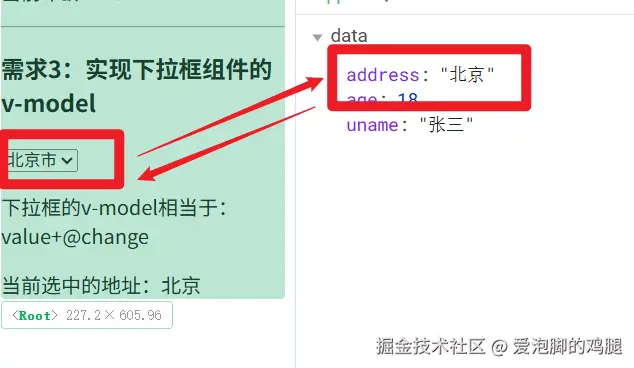
<h3>需求3:实现下拉框组件的v-model</h3>
<!-- <MySelect v-model="address"></MySelect> -->
<!-- <MySelect :value="address" @change="changeAddress"></MySelect> -->
<MySelect :value="address" @change="changeAddress" />
<p>下拉框的v-model相当于:value+@change</p>
<p>当前选中的地址:{{ address }}</p>
</div>
</template>
<script>
import MyInput from './components/MyInput.vue'
import MySelect from './components/MySelect.vue'
export default {
data () {
return {
address: '北京',
uname: '张三',
age:18
}
},
components: {
MyInput,
MySelect
},
methods: {
changeValue(e){
//把输入框的值赋给uname
// e.target就是输入框
console.log('changeValue被调用,新值:', e.target.value);
this.uname = e.target.value;
},
changeAge(val){
console.log('changeAge被调用,新值:', val);
this.age = val;
},
changeAddress(val){
console.log('changeAddress被调用,新值:', val);
this.address = val;
}
}
}
</script>
<style lang="less" scoped></style>2.3.2 myselect.vue
html
<template>
  <select :value="value" @change="$emit('change', $event.target.value)">
    <option value="北京">北京市</option>
    <option value="上海">上海市</option>
    <option value="广州">广州市</option>
    <option value="深圳">深圳市</option>
  </select>
</template>

<script>
export default {
  name: 'MySelect',
  props:['value']
}
</script>

<style lang="less" scoped></style>
结果:
2. sync修饰符的原理
案例:使用sync和update:visible实现弹窗的显示和隐藏
2.1 App.vue
html
<template>
  <div>
    <button @click="visible=true">删除</button>
    <MyDialog :visible.sync="visible"></MyDialog>
    <!-- :属性.sync='变量' -->
     <!-- 等同于 :属性='变量' + @update:属性='方法' -->
  </div>
</template>

<script>
import MyDialog from './components/MyDialog.vue'
export default {
  data () {
    return {
      // 默认初始值
      visible: false //控制弹窗显示隐藏
    }
  },
  components: {
    MyDialog
  }
}
</script>

<style>
body {
  background-color: #b3b3b3;
}
</style>
2.2 MyDialog.vue
html
<template>
  <!-- 通过对布尔值的修改,实现弹窗的隐藏和显示 -->
  <div class="dialog" v-show="visible">
    <div class="dialog-header">
      <h3>友情提示</h3>
      <span class="close" @click="close">✖️</span>
    </div>
    <div class="dialog-content">我是文本内容</div>
    <div class="dialog-footer">
      <button>取消</button>
      <button>确认</button>
    </div>
  </div>
</template>

<script>
export default {
  props:['visible'],
  methods: {
  close() {
    this.$emit('update:visible', false)
    }
  }
}
</script>

<style scoped>
* {
  margin: 0;
  padding: 0;
}
.dialog {
  width: 470px;
  height: 230px;
  padding: 0 25px;
  background-color: #ffffff;
  margin: 40px;
  border-radius: 5px;
}
.dialog-header {
  height: 70px;
  line-height: 70px;
  font-size: 20px;
  border-bottom: 1px solid #ccc;
  position: relative;
}
.dialog-header .close {
  position: absolute;
  right: 0px;
  top: 0px;
  cursor: pointer;
}
.dialog-content {
  height: 80px;
  font-size: 18px;
  padding: 15px 0;
}
.dialog-footer {
  display: flex;
  justify-content: flex-end;
}
.dialog-footer button {
  width: 65px;
  height: 35px;
  background-color: #ffffff;
  border: 1px solid #e1e3e9;
  cursor: pointer;
  outline: none;
  margin-left: 10px;
  border-radius: 3px;
}
.dialog-footer button:last-child {
  background-color: #007acc;
  color: #fff;
}
</style>
3. 非父子组件通信-EventBus
3.1 第一步-bus.js
JavaScript
// 这行代码的意思是从 node_modules 目录中引入 Vue 框架的核心库。
// 这样你就可以在这个文件中使用 Vue 提供的功能了。
import Vue from  'vue'
// 这行代码的意思是创建一个新的 Vue 实例,并将其作为默认导出(export default)
// 暴露出去。这样,其他文件在引入这个模块时,拿到的就是这个 Vue 实例。
export default new Vue()
3.2 -发送方和接收方
3.2.1 发送方-AnyOne
html
<template>
  <div>
    <h2>随便一个组件-1</h2>
    <button @click="send">发送数据</button>
  </div>
</template>

<script>
import bus from '@/bus'  //代表src文件夹
export default {
  methods:{
    send(){  //只要send函数被调用,就会触发bus.$emit('abc',{name:'张三'})
      bus.$emit('abc',{name:'张三'})
    }
  }
}
</script>

<style lang="less" scoped></style>
3.2.2 接收方
html
<template>
  <div>
    <h2>随便一个组件-2</h2>
  </div>
</template>

<script>
// 1.1 导入
import bus from '../bus.js'
export default {
  created(){
    bus.$on('abc',val=>{
      console.log('接收到了数据',val);  //val就是接收到的数据

    })
  }
}
</script>

<style lang="less" scoped></style>
4. 依赖注入
可将输出组件的数据传递到子组件、孙组件等的后代组件
输出组件格式
export default{
    //把要传递的数据,放到provide中
    provide:{
        user:{...共享的数据},
        XXXX:{......}
     }
   }
子组件格式
export default{
    inject:['user','XXXX']
    }
孙组件格式
export default{
    inject:['user','XXXX']
    }
5.ref和refs
作用:查找页面标签
基本格式-找标签
<h2 ref='hhh'>这是标题</h2>

export default{
    mounted(){
        //希望找到组件中的h2 ===> this.$refs.hhh
5.2 基本使用格式-在目标标签中添加ref='test'
作用:找到组件可以通过(this.refs.test.方法())调用组件中的方法或者使用组件的数据
基本格式-找组件
<MyTest ref='test'></MyTest>

export default{
    mounted(){
        //希望找到test组件 ===> this.$refs.test
5.3 与 document.querySelector的区别
5.3.1Vue开发中不建议使用 document.querySelector,因为Vue最终网页显示的时候会把所有组件整合到一个页面中,此时使用document.querySelector的时候就会选中错误
所以要用ref,因为ref只会找当前组件中的元素,不会选中错误