张量
常数张量
python
import tensorflow as tf
import numpy as np
#全一张量,
tf.ones(shape=(2,1))
np.ones(shape=(2,1))

# 全0张量
tf.zeros(shape=(2, 1))
np.zeros(shape=(2, 1))

# 随机张量
# 从均值为 0、标准差为 1 的正态分布中抽取的随机张量
tf.random.normal(shape=(3, 1), mean=0., stddev=1.)
np.random.normal(size=(3, 1), loc=0., scale=1.)

# 从 0 和 1 之间的均匀分布中抽取的随机张量
tf.random.uniform(shape=(3, 1), minval=0., maxval=1.)
np.random.uniform(size=(3, 1), low=0., high=1.)
Numpy 数组和 Tensorflow 张量的不同:NumPy 数组是可赋值的, TensorFlow 张量是不可赋值的
变量
要训练模型,我们需要更新其状态,而模型状态是一组张量。
tf.Variable 是一个类,其作用是管理 TensorFlow 中的可变状态。
python
import tensorflow as tf

# 创建一个 TensorFlow 变量
x = tf.Variable(initial_value=tf.random.normal(shape=(3, 1)))
# <tf.Variable 'UnreadVariable' shape=(3, 1) dtype=float32, numpy=
# array([[ 1.7707386 ],
#        [-0.29716542],
#        [-0.8635539 ]], dtype=float32)>

# 为 TensorFlow 变量赋值
x.assign(tf.ones((3, 1)))
# <tf.Variable 'UnreadVariable' shape=(3, 1) dtype=float32, numpy=
# array([[1.],
#        [1.],
#        [1.]], dtype=float32)>

# 为 TensorFlow 变量的子集赋值
x[0, 0].assign(3.)
# <tf.Variable 'UnreadVariable' shape=(3, 1) dtype=float32, numpy=
# array([[3.],
#        [1.],
#        [1.]], dtype=float32)>
与此类似,
assign_add()等同于+=assign_sub()等同于-=
一些基本的数学运算
python
a = tf.ones((2, 2))

b = tf.square(a)    # 求平方
c = tf.sqrt(a)      # 求平方根
d = b + c           # 两个张量(逐元素)相加
e = tf.matmul(a, b) # 计算两个张量的积
e *= d              # 两个张量(逐元素)相乘
梯度带
梯度带是一个非常强大的工具,它甚至能够计算二阶梯度(梯度的梯度)。举例来说,物体位置相对于时间的梯度是这个物体的速度,二阶梯度则是它的加速度。
例如:求 y=4.9x2y = 4.9x^2y=4.9x2 的一阶导函数和二阶导函数
一阶导函数:f′(x)=9.8xf'(x) = 9.8xf′(x)=9.8x
二阶导函数:f′′(x)=9.8f''(x)=9.8f′′(x)=9.8
python
# 利用嵌套的梯度带计算二阶梯度
time = tf.Variable(0.)
with tf.GradientTape() as outer_tape:
  with tf.GradientTape() as inner_tape:
    tape.watch(time)
    position = 4.9 * time ** 2
  speed = inner_tape.gradient(position, time)
acceleration = outer_tape.gradient(speed, time)
tape.gradient() 的输入张量是 TensorFlow 变量,默认情况下只会监视可训练变量 。如果要监视常数张量,那么必须对其调用 tap.watch(),手动将其标记为被监视的张量。
用 TensorFlow 编写线性分类器
python
# 用 TensorFlow 编写线性分类器
num_samples_per_class = 1000
# 1000 个二维随机点。协方差矩阵为 [[1, 0.5], [0.5, 1]],对应于一个从左下方到右上方的椭圆形点云
negative_samples = np.random.multivariate_normal(mean=[0, 3], cov=[[1, 0.5],[0.5, 1]], size=num_samples_per_class)
# 生成第二个类别的点,协方差矩阵相同,均值不同
positive_samples = np.random.multivariate_normal(mean=[3, 0], cov=[[1, 0.5],[0.5, 1]], size=num_samples_per_class)
# 将两个类别堆叠成一个形状为 (2000, 2) 的数组
inputs = np.vstack((negative_samples, positive_samples)).astype(np.float32)
# 生成对应的目标标签,即一个形状为 (2000, 1) 的数组,其元素都是 0 或 1:
# 如果输入 inputs[i] 属于类别 0,则目标 targets[i, 0] 为 0;
# 如果 inputs[i] 属于类别 1,则 targets[i, 0] 为 1。
targets = np.vstack((np.zeros((num_samples_per_class, 1), dtype="float32"), np.ones((num_samples_per_class, 1), dtype="float32")))


# 线性分类器采用仿射变换 (prediction = W • input + b),我们对其进行训练,使预测值与目标值之差的平方最小化。
# 创建线性分类器的变量
input_dim = 2
output_dim = 1
W = tf.Variable(initial_value=tf.random.uniform(shape=(input_dim, output_dim)))
b = tf.Variable(initial_value=tf.zeros(shape=(output_dim,)))


""" 前向传播函数 """
def model(inputs):
    return tf.matmul(inputs, W) + b


""" 均方误差损失函数 """
def square_loss(targets, predictions):
    return tf.reduce_mean(tf.square(targets - predictions))


""" 训练步骤函数 """
def training_step(inputs, targets, learning_rate=0.1):
  with tf.GradientTape() as tape:
    # 在一个梯度带作用域内进行一次前向传播
    predictions = model(inputs)
    loss = square_loss(targets, predictions)
  grad_loss_wrt_W, grad_loss_wrt_b = tape.gradient(loss, [W, b])
  # 更新权重
  W.assign_sub(grad_loss_wrt_W * learning_rate)
  b.assign_sub(grad_loss_wrt_b * learning_rate)
  return loss


# 批量训练循环
for step in range(40):
  loss = training_step(inputs, targets)
  print(f"Loss at step {step}: {loss:.4f}")

predictions = model(inputs)
# 绘制线性分类器、绘制两个点类的图像
x = np.linspace(-1, 4, 100)               # 在 −1 和 4 之间生成 100 个等间距的数字,用于绘制直线
y = - W[0] / W[1] * x + (0.5 - b) / W[1]  # 直线方程
plt.plot(x, y, "-r")                      # 绘制直线("-r" 的含义是"将图像绘制为红色的线")
# plt.scatter(inputs[:, 0], inputs[:, 1], c=targets[:, 0])
plt.scatter(inputs[:, 0], inputs[:, 1], c=predictions[:, 0] > 0.5)
plt.show()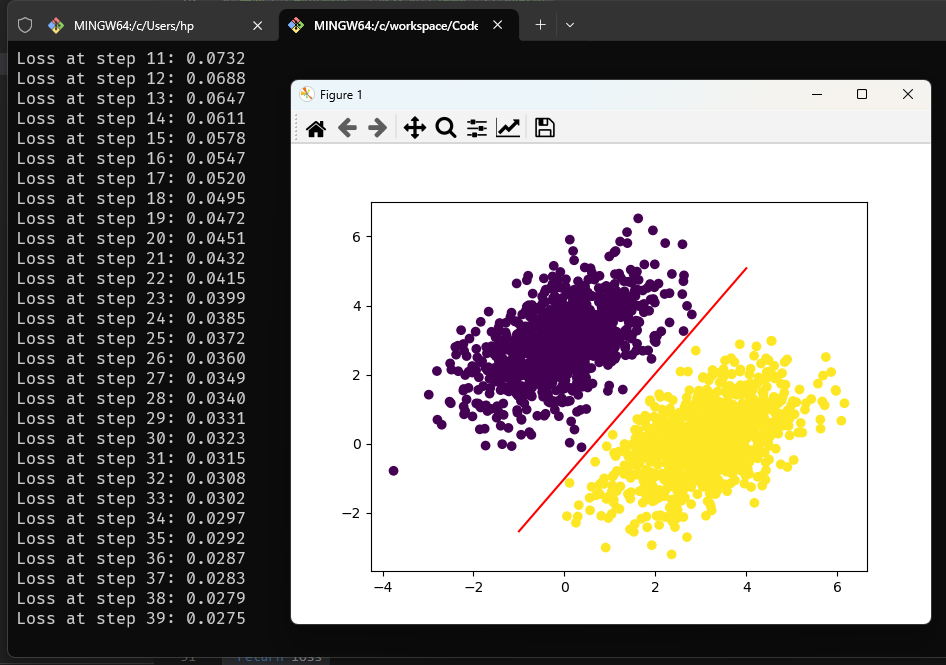
配置学习过程
python
# 定义一个线性分类器
model = keras.Sequential([keras.layers.Dense(1)])

# 配置训练过程
model.compile(optimizer="rmsprop", loss="mean_squared_error", metrics=["accuracy"])
# model.compile(optimizer=keras.optimizers.RMSprop(), loss=keras.losses.MeanSquaredError(), metrics=[keras.metrics.BinaryAccuracy()])
# model.compile(optimizer=keras.optimizers.RMSprop(learning_rate=1e-4), loss=my_custom_loss, metrics=[my_custom_metric_1, my_custom_metric_2])
优化器
决定如何基于损失函数对神经网络进行更新。它执行的是随机梯度下降(SGD)的某个变体。
- SGD
- RMSprop
- Adam
- Adagrad
- ...
损失函数
在训练过程中需要将其最小化。它衡量的是当前任务是否成功
- CategoricalCrossentropy
- SparseCategoricalCrossentropy
- BinaryCrossentropy
- MeanSquaredError
- KLDivergence
- CosineSimilarity
- ...
指标
---衡量成功的标准,在训练和验证过程中需要对其进行监控,如分类精度。与损失不同,训练不会直接对这些指标进行优化。因此,指标不需要是可微的。
- CategoricalAccuracy
- SparseCategoricalAccuracy
- BinaryAccuracy
- AUC
- Precision
- Recall
- ...
验证模型
要想查看模型在新数据上的性能,标准做法是保留训练数据的一个子集作为验证数据(validation data)。你不会在这部分数据上训练模型,但会用它来计算损失值和指标值。
python
# 验证模型
# 要想查看模型在新数据上的性能,标准做法是保留训练数据的一个子集作为验证数据(validation data)。你不会在这部分数据上训练模型,但会用它来计算损失值和指标值。
# 使用 validation_data 参数
model = keras.Sequential([keras.layers.Dense(1)])
model.compile(optimizer=keras.optimizers.RMSprop(learning_rate=0.1), loss=keras.losses.MeanSquaredError(), metrics=[keras.metrics.BinaryAccuracy()])
indices_permutation = np.random.permutation(len(inputs))
shuffled_inputs = inputs[indices_permutation]
shuffled_targets = targets[indices_permutation]


num_validation_samples = int(0.3 * len(inputs))
val_inputs = shuffled_inputs[:num_validation_samples]
val_targets = shuffled_targets[:num_validation_samples]
training_inputs = shuffled_inputs[num_validation_samples:]
training_targets = shuffled_targets[num_validation_samples:]
model.fit(training_inputs,training_targets,epochs=5,batch_size=16,validation_data=(val_inputs, val_targets))

# 如果想在训练完成后计算验证损失和指标,可以调用 evaluate() 方法。
# evaluate() 将对传入的数据进行批量迭代(批量大小为 batch_size),并返回一个标量列表,
# 其中第一个元素是验证损失,后面的元素是验证指标。如果模型没有指标,则只返回验证损失(不再是列表)。
loss_and_metrics = model.evaluate(val_inputs, val_targets, batch_size=128)
使用模型
一旦训练好了模型,就可以用它来对新的数据进行预测。这叫作推断(inference)
python
# 这种方法会一次性处理 new_inputs 中的所有输入,如果其中包含大量数据,那么这种方法可能是不可行的(尤其是,它可能需要比你的 GPU 更大的内存)
predictions = model(new_inputs)
# 它将小批量地迭代数据,并返回预测值组成的 NumPy 数组
predictions = model.predict(new_inputs, batch_size=128)