因语雀与csdn markdown 格式有区别,请查看原文:
https://www.yuque.com/dycloud/pss8ys
一、CubeFS 介绍
1.1 CubeFS 是什么
CubeFS 是新一代云原生存储产品,目前是云原生计算基金会(CNCF)托管的毕业开源项目, 兼容 S3、POSIX、HDFS 等多种访问协议,支持多副本与纠删码两种存储引擎,为用户提供多租户、 多 AZ 部署以及跨区域复制等多种特性,广泛应用于大数据、AI、容器平台、数据库、中间件存算分离、数据共享以及数据保护等场景。
1.2 CubeFS 特点
1.2.1 多协议
兼容 S3、POSIX、HDFS 等多种访问协议,协议间访问可互通
- POSIX 兼容:兼容 POSIX 接口,让上层应用的开发变得极其简单,就跟使用本地文件系统一样便捷。此外,CubeFS 在实现时放松了对 POSIX 语义的一致性要求来兼顾文件和元文件操作的性能。
- 对象存储兼容:兼容 AWS 的 S3 对象存储协议,用户可以使用原生的 Amazon S3 SDK 管理 CubeFS 中的资源。
- Hadoop 协议兼容:兼容 Hadoop FileSystem 接口协议,用户可以使用 CubeFS 来替换Hadoop 文件系统(HDFS),做到上层业务无感。
1.2.2 双引擎
支持多副本及纠删码两种引擎,用户可以根据业务场景灵活选择
- 多副本存储引擎 :副本之间的数据为镜像关系,通过强一致的复制协议来保证副本之间的数据一致性,用户可以根据应用场景灵活的配置不同副本数。
- 纠删码存储引擎:纠删码引擎具备高可靠、高可用、低成本、支持超大规模(EB)的特性,根据不同AZ模型可以灵活选择纠删码模式。
1.2.3 多租户
支持多租户管理,提供细粒度的租户隔离策略
1.2.4 可扩展
可以轻松构建PB或者EB级规模的分布式存储服务,各模块可水平扩展
1.2.5 高性能
支持多级缓存,针对小文件特定优化,支持多种高性能的复制协议
- 元数据管理:元数据集群为内存元数据存储,在设计上使用两个 B-Tree(inodeBTree 与 dentryBTree)来管理索引,进而提升元数据访问性能;
- 强一致副本协议 :CubeFS 根据文件写入方式的不同采用不同的复制协议来保证副本间的数据一致性。(如果文件按照顺序写入,则会使用主备复制协议来优化 IO 吞吐量;如果是随机写入覆盖现有文件内容时,则是采用一种基于 Multi-Raft 的复制协议,来确保数据的强一致性);
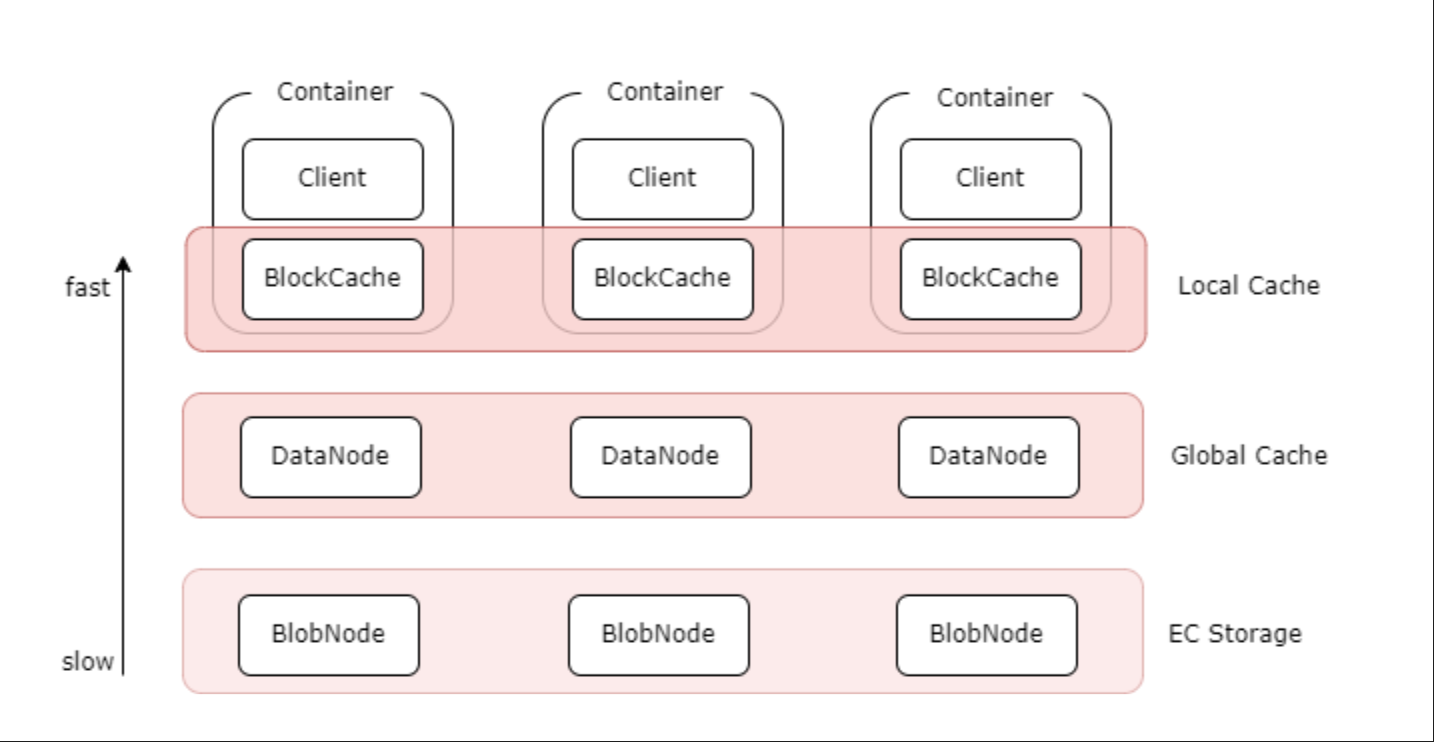
- 多级缓存 :纠删码卷支持多级缓存加速能力,针对热点数据,提供更高数据访问性能:
- 本地缓存 :可以在 Client 机器上同机部署
<font style="color:rgb(51, 51, 51);">BlockCache</font>组件,将本地磁盘作为本地缓存. 可以不经过网络直接读取本地 Cache, 但容量受本地磁盘限制; - 全局缓存 :使用副本组件
<font style="color:rgb(51, 51, 51);">DataNode</font>搭建的分布式全局 cache, 比如可以通过部署客户端同机房的 SSD 磁盘的<font style="color:rgb(51, 51, 51);">DataNode</font>作为全局 cache, 相对于本地 cache, 需要经过网络, 但是容量更大, 可动态扩缩容,副本数可调。
- 本地缓存 :可以在 Client 机器上同机部署
1.2.6 云原生
基于 CSI 插件可以快速地在 Kubernetes 上使用 CubeFS。
1.3 应用场景
CubeFS 作为一个云原生的分布式存储平台,提供了多种访问协议,因此其应用场景也非常广泛,下面简单介绍几种比较典型的应用场景
大数据分析
兼容 HDFS 协议,为 Hadoop 生态(如 Spark、Hive)提供统一存储底座,为计算引擎提供无限的存储空间以及大带宽的数据存储能力。
深度训练/机器学习
作为分布式并行文件系统,支撑 AI 训练、模型存储及分发、IO 加速等需求。
容器共享存储
容器集群可以将容器镜像的配置文件或初始化加载数据存储在 CubeFS 上,在容器批量加载时实时读取。多 POD 间通过 CubeFS 共享持久化数据,在 POD 故障时可以进行快速故障切换。
数据库&中间件
为数据库应用如 MySQL、ElasticSearch、ClickHouse 提供高并发、低时延云盘服务,实现彻底的存算分离。
在线服务
为在线业务(如广告、点击流、搜索)或终端用户的图、文、音视频等内容提供高可靠、低成本的对象存储服务。
传统 NAS 上云
替换线下传统本地存储及 NAS,助力 IT 业务上云。
1.4 技术架构
CubeFS 由元数据子系统 (Metadata Subsystem),数据子系统 (Data Subsystem)和资源管理节点 (Msaster)以及对象网关(Object Subsystem)组成,可以通过 POSIX/HDFS/S3 接口访问存储数据。
1.4.1 资源管理节点
由多个 Master 节点组成,负责异步处理不同类型的任务,如管理数据分片与元数据分片(包括创建、删除、更新以及一致性检查等),检查数据节点或者元数据节点的健康状态,维护管理卷信息等。
Master 节点可以有多个,节点之间通过 Raft 算法保证元数据的一致性,并且持久化到 RocksDB 中。
1.4.2 元数据子系统
由多个 Meta Node 节点组成,多个元数据分片(Meta Partition)和 Raft 实例(基于 Multi-Raft 复制协议)组成,每个元数据分片表示一个 Inode 范围元数据,其中包含两颗内存 B-Tree 树与 dentryBtree。
元数据实例最少需要3个,支持水平扩容。
1.4.3 数据子系统
分为副本子系统 和纠删码子系统,两种子系统可以同时存在,也可以单独存在:
- 副本子系统由
DataNode组成,每个节点管理一组数据分片,多个节点的数据分片构成一个副本组。 - 纠删码子系统(Blobstore)主要由
BlobNode模块组成,每个节点管理一组数据块,多个节点的数据块构成一个纠删码条带。
数据节点支持水平扩容
1.4.4 对象子系统
- 由对象节点(ObjectNode)组成,提供了兼容标准 S3 语义的访问协议,可以通过 Amazon S3 SDK 或者是 s3cmd 等工具访问存储资源。
1.4.5 卷
逻辑上的概念,由多个元数据和数据分片组成,从客户端的角度看,卷可以被看作是可被容器访问的文件系统实例。从对象存储的角度来看,一个卷对应着一个 bucket。一个卷可以在多个容器中挂载,使得文件可以被不同客户端同时访问。
二、CubeFS 安装及使用
CubeFS 支持多种安装方式,如 yum、k8s 部署等,这里我直接选择用 k8s 方式部署
2.1 生产环境部署建议
2.1.1 环境要求
| 文件系统 | 内核版本要求 |
|---|---|
| XFS | >=2.6.38 |
| ext4 | >=3.0 |
| Btrfs | >=3.7 |
| tmpfs(5) | >=3.5 |
| gfs2(5) | >=4.16 |
为了加快元数据读取速度,元数据都缓存在内存中,而 <font style="color:rgb(51, 51, 51);">DataNode</font> 数据主要占用磁盘资源,如果希望最大化利用节点资源,可以采用 <font style="color:rgb(51, 51, 51);">DataNode</font> 和 <font style="color:rgb(51, 51, 51);">MetaNode</font> 在同一节点混合部署的方式。
由于 DataNode 使用了 Linux 内核的 Punch Hole 功能,因此需要根据 DataNode 的文件系统,选择对应的内核版本
2.1.2 容量规划
首先你要预估集群在未来相当长的一段时间内,最高预期文件数量和存储容量。
其次你还要对目前拥有的机器资源有清晰地了解。知道每台机器的内存大小、CPU核心数、磁盘容量。
如果对以上数据了解清楚了,可以通过经验参考值来看看自己的当前环境属于哪一种规模,能承载怎样的文件体量,或者需要针对当前文件体验需求应该准备多少资源,以防止频繁扩充机器资源。
| 文件总数量 | 文件总储量 | 集群总内存 | 集群总磁盘空间 |
|---|---|---|---|
| 10亿 | 10PB | 2048 GB | 10PB |
大文件占比越高,MetaNode 压力会越大。
如果觉得目前的资源足够使用,不需要一次性满足容量增长需求,那么可以及时关注 <font style="color:rgb(51, 51, 51);">MetaNode</font>/<font style="color:rgb(51, 51, 51);">DataNode</font> 的容量预警信息。
当内存或者磁盘即将使用完时,动态增加 <font style="color:#DF2A3F;">MetaNode</font>/<font style="color:#DF2A3F;">DataNode</font> 进行容量的调整。也就是说,如果发现磁盘空间不够了,可以增加磁盘或者增加 <font style="color:#DF2A3F;">DataNode</font>,如果发现全部 <font style="color:#DF2A3F;">MetaNode</font> 内存过满,可以增加 <font style="color:#DF2A3F;">MetaNode</font> 来缓解内存压力。
2.1.3 多机房部署
如果希望集群需要支持机房容错性,可以部署跨机房的 CubeFS 集群。
同时需要注意一下几点:
- 由于机房之间的通信延迟高于单机房,所以如果对于高可用的要求大于低延迟,可以选择跨机房部署方案。
- 如果对性能要求更高,则建议单机房部署集群。
配置方案:在 <font style="color:rgb(51, 51, 51);">DataNode</font>/<font style="color:rgb(51, 51, 51);">MetaNode</font> 配置文件中修改 <font style="color:#DF2A3F;">zoneName</font> 参数,指定为所在机房名称,然后启动 <font style="color:rgb(51, 51, 51);">DataNode</font>/<font style="color:rgb(51, 51, 51);">MetaNode</font> 进程,则该机房会随着 <font style="color:rgb(51, 51, 51);">DataNode</font>/<font style="color:rgb(51, 51, 51);">MetaNode</font> 的注册而被 Master 存储并记录。
创建单机房 volume:
bash
$ cfs-cli volume create {name} --zone-name={zone}为了防止单机房 volume 初始化失败,请保证单个机房的 DataNode/MetaNode 不少于3。
创建跨机房volume:
bash
$ cfs-cli volume create {name} --cross-zone=true2.2 Kubernetes 部署
CubeFS 可以使用 helm 工具部署在 Kubernetes 集群中,各组件会直接使用宿主机网络,使用 hostPath 将磁盘映射到容器中。
2.2.1 部署架构
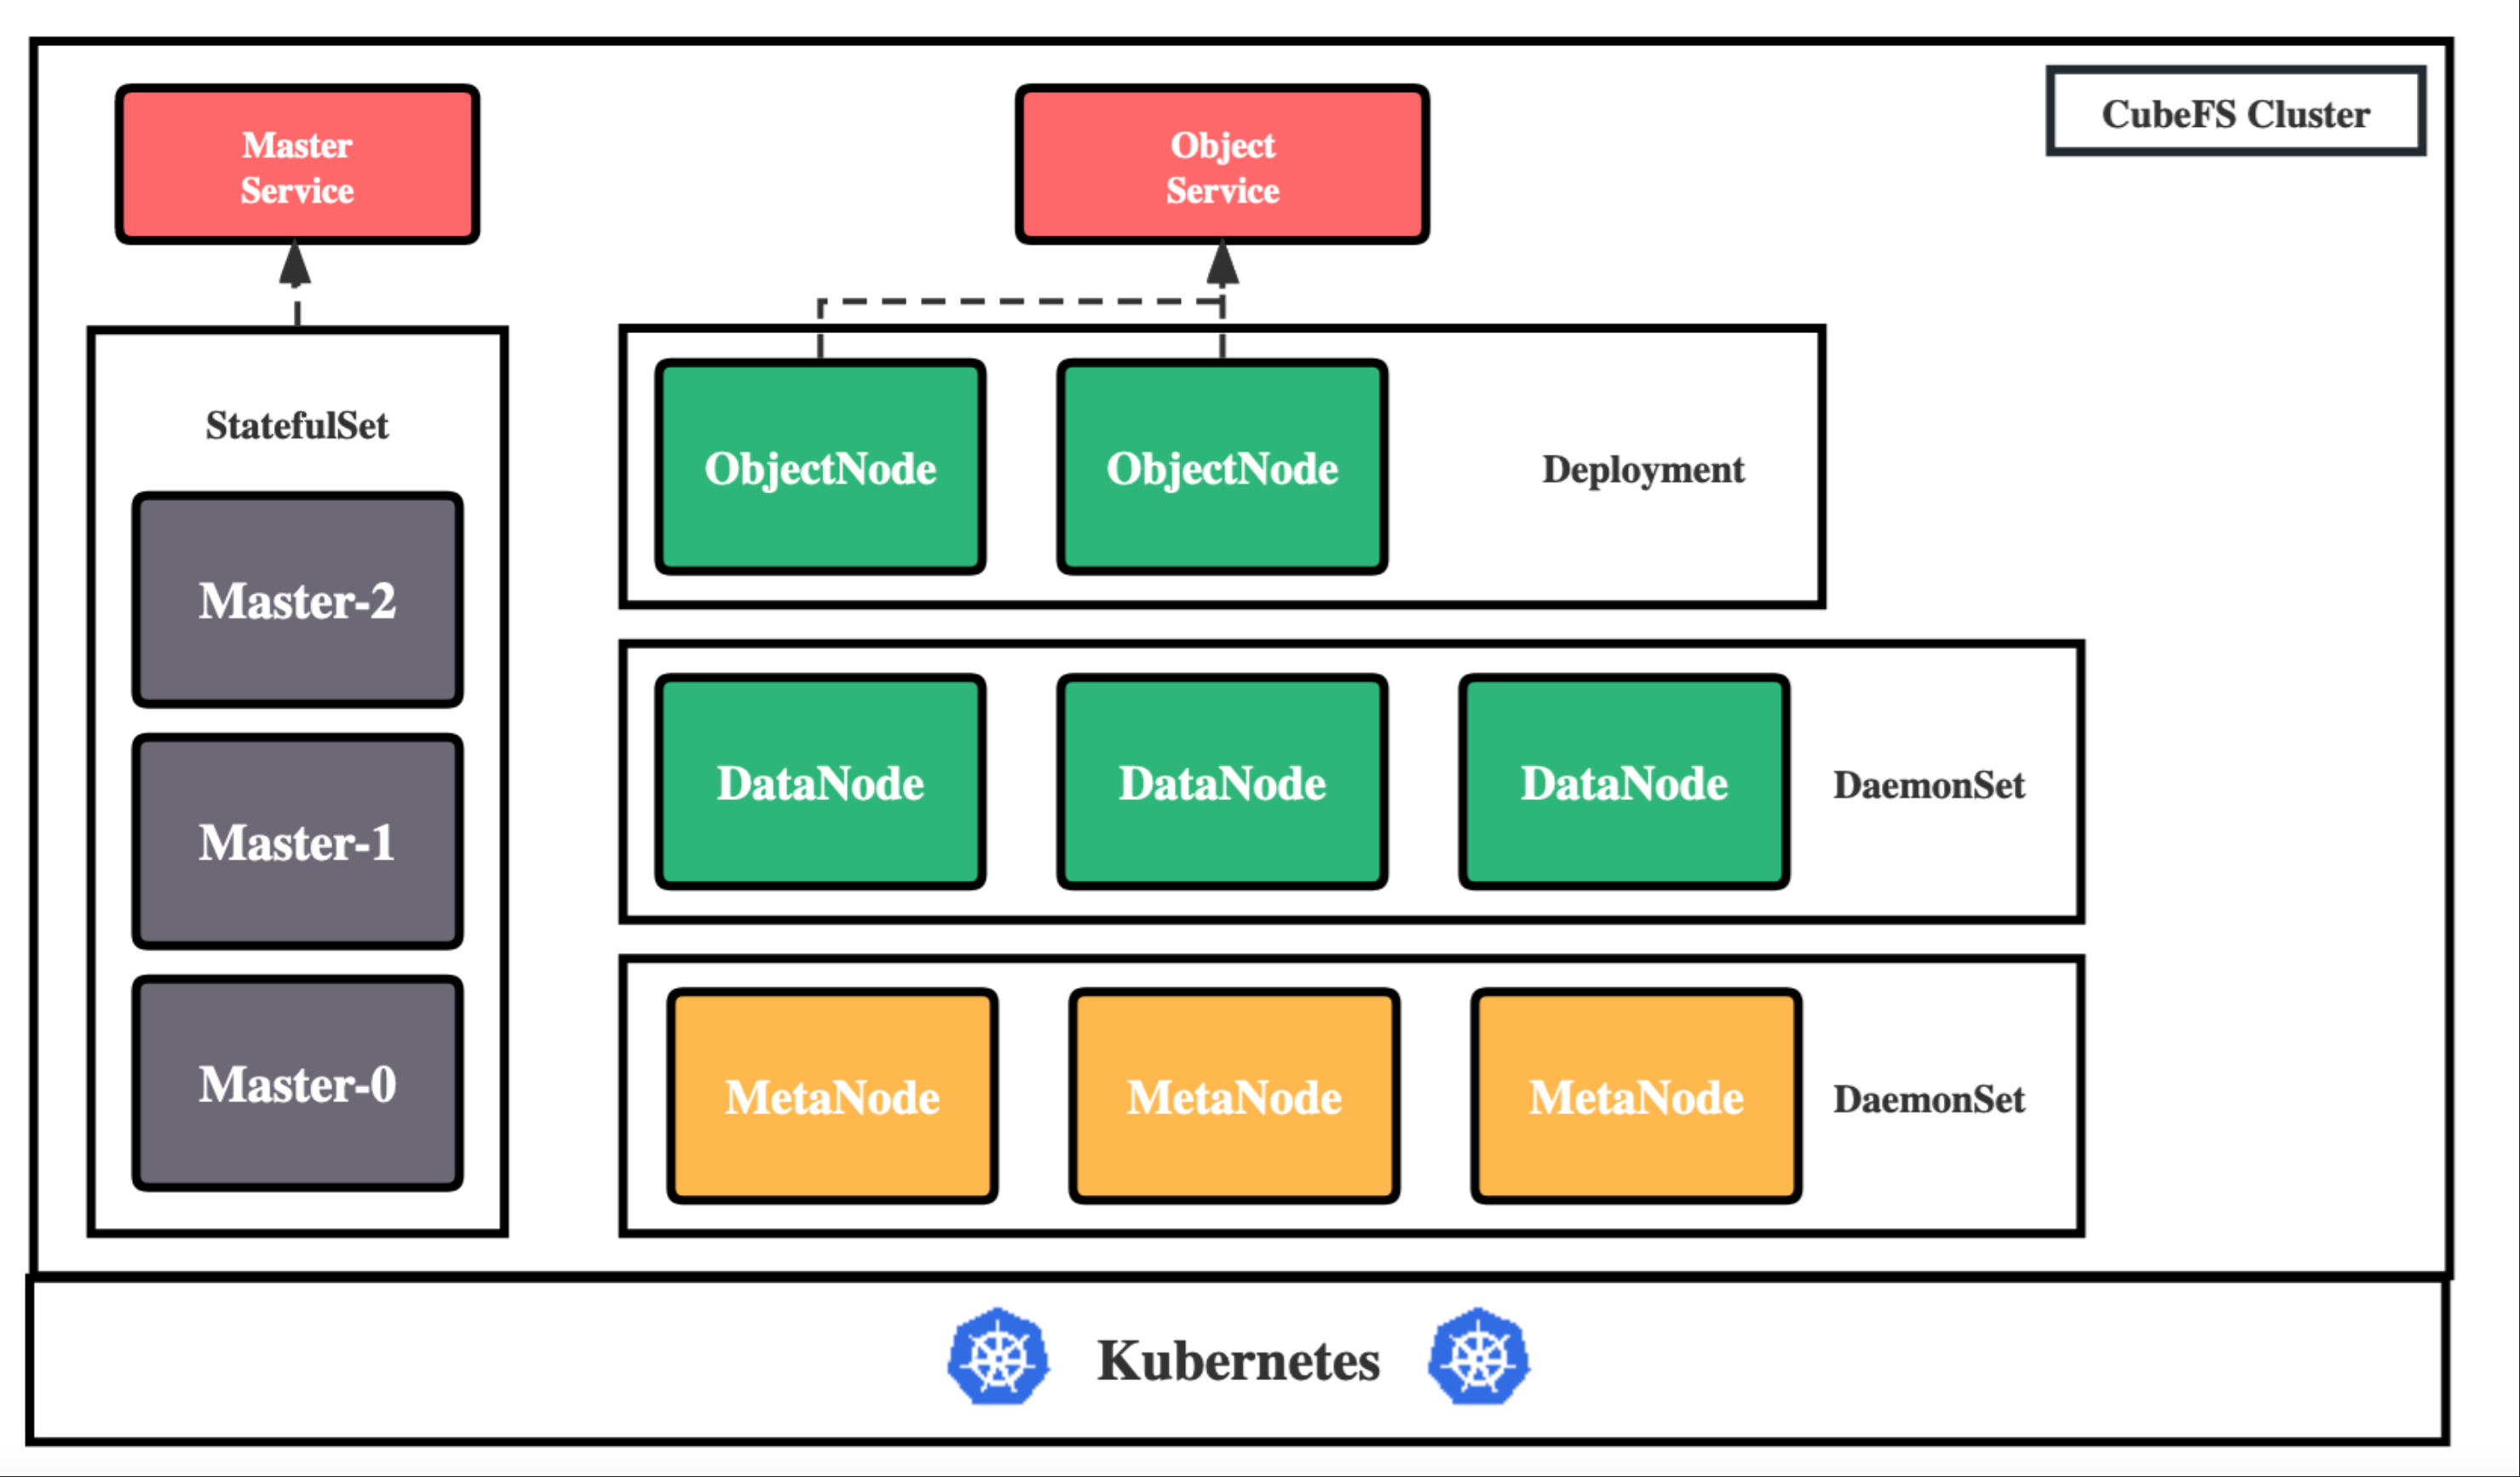
CubeFS 目前由这四部分组成:
<font style="color:rgb(78, 110, 142);background-color:rgb(243, 244, 245);">Master</font>:资源管理节点,负责维护整个集群的元信息,部署为 <font style="color:rgb(51, 51, 51);">StatefulSet</font> 资源。
<font style="color:rgb(78, 110, 142);background-color:rgb(243, 244, 245);">DataNode</font>:数据存储节点,需要挂载大量磁盘负责文件数据的实际存储,部署为 <font style="color:rgb(51, 51, 51);">DaemonSet</font> 资源。
<font style="color:rgb(78, 110, 142);background-color:rgb(243, 244, 245);">MetaNode</font>:元数据节点,负责存储所有的文件元信息,部署为 <font style="color:rgb(51, 51, 51);">DaemonSet</font> 资源。
<font style="color:rgb(78, 110, 142);background-color:rgb(243, 244, 245);">ObjectNode</font>:负责提供转换 S3 协议提供对象存储的能力,无状态服务,部署为 <font style="color:rgb(51, 51, 51);">Deployment</font> 资源。
2.2.2 机器准备
在开始部署之前,需要拥有一个至少有 3 个节点(最好 4 个以上,可以容灾)的 Kubernetes 集群,且版本大于等于 1.15。
接着开始规划机器,给机器打上各自的标签,标明这台机器要在 CubeFS 集群中承担的角色:
bash
# Master 节点,至少三个,建议为奇数个
kubectl label node <nodename> component.cubefs.io/master=enabled
# MetaNode 元数据节点,至少 3 个,奇偶无所谓
kubectl label node <nodename> component.cubefs.io/metanode=enabled
# Dataode 数据节点,至少 3 个,奇偶无所谓
kubectl label node <nodename> component.cubefs.io/datanode=enabled
# ObjectNode 对象存储节点,可以按需进行标记,不需要对象存储功能的话也可以不部署这个组件
kubectl label node <nodename> component.cubefs.io/objectnode=enabled
CubeFS 安装时会根据这些标签通过<font style="color:#DF2A3F;background-color:rgb(243, 244, 245);">nodeSelector</font>进行匹配,然后在机器创建起对应的<font style="color:#DF2A3F;background-color:rgb(243, 244, 245);">Pod</font>。
我的集群有 3 个 master5 个 node 节点,
- 10.122.24.116、10.122.24.134、10.122.24.143 是 master 节点 和元数据节点
- 10.122.24.28、10.122.24.50、10.122.24.53是数据节点
- 10.122.24.77 是对象存储节点
bash
[root@VM_24_119_tlinux ~]# kubectl get nodes
NAME            STATUS   ROLES    AGE     VERSION
10.122.24.116   Ready    <none>   43h     v1.22.5-tke.19
10.122.24.119   Ready    master   43h     v1.22.5-tke.19
10.122.24.134   Ready    <none>   43h     v1.22.5-tke.19
10.122.24.143   Ready    <none>   9m43s   v1.22.5-tke.19
10.122.24.28    Ready    <none>   9m48s   v1.22.5-tke.19
10.122.24.50    Ready    <none>   43h     v1.22.5-tke.19
10.122.24.53    Ready    <none>   43h     v1.22.5-tke.19
10.122.24.74    Ready    master   43h     v1.22.5-tke.19
10.122.24.77    Ready    <none>   43h     v1.22.5-tke.19
10.122.24.79    Ready    master   43h     v1.22.5-tke.19

#  打上master标签
[root@VM_24_119_tlinux jfs]# kubectl label node 10.122.24.116 10.122.24.134 10.122.24.143 component.cubefs.io/master=enabled
node/10.122.24.116 labeled
node/10.122.24.134 labeled
node/10.122.24.143 labeled
# 打上元数据节点标签
[root@VM_24_119_tlinux jfs]# kubectl label node 10.122.24.116 10.122.24.134 10.122.24.143 component.cubefs.io/metanode=enabled
node/10.122.24.116 labeled
node/10.122.24.134 labeled
node/10.122.24.143 labeled

# 打上数据节点标签
[root@VM_24_119_tlinux jfs]#kubectl label node 10.122.24.28 10.122.24.50 10.122.24.53 component.cubefs.io/datanode=enabled
node/10.122.24.28 labeled
node/10.122.24.50 labeled
node/10.122.24.53 labeled
# 打上对象存储节点标签
[root@VM_24_119_tlinux jfs]# kubectl label node  10.122.24.77 component.cubefs.io/objectnode=enabled
node/10.122.24.77 labeled

# 打上CSI组件,用于在 Kubernetes 中使用 CubeFS,需要在所有节点上部署:
[root@VM_24_119_tlinux jfs]# kubectl label node 10.122.24.119 10.122.24.74 10.122.24.79 10.122.24.116 10.122.24.134 10.122.24.143  10.122.24.28 10.122.24.50 10.122.24.77 10.122.24.53 component.cubefs.io/csi=enabled
node/10.122.24.116 labeled
node/10.122.24.134 labeled
2.2.3 挂载数据盘
在标志为 <font style="color:#DF2A3F;background-color:rgb(243, 244, 245);">component.cubefs.io/datanode=enabled</font> 的节点上进行挂载数据盘操作。
10.122.24.28、10.122.24.50、10.122.24.53三台数据节点添加三块磁盘,每块 200G
bash
[root@VM_24_50_tlinux ~]# fdisk -l
Disk /dev/vda: 200 GiB, 214748364800 bytes, 419430400 sectors
Units: sectors of 1 * 512 = 512 bytes
Sector size (logical/physical): 512 bytes / 512 bytes
I/O size (minimum/optimal): 512 bytes / 512 bytes
Disklabel type: dos
Disk identifier: 0x2f23efb4

Device     Boot Start       End   Sectors  Size Id Type
/dev/vda1        2048 419430366 419428319  200G 83 Linux


Disk /dev/vdb: 200 GiB, 214748364800 bytes, 419430400 sectors
Units: sectors of 1 * 512 = 512 bytes
Sector size (logical/physical): 512 bytes / 512 bytes
I/O size (minimum/optimal): 512 bytes / 512 bytes
2.2.3.1 格式化磁盘
bash
[root@VM_24_50_tlinux ~]# mkfs.xfs /dev/vdb
meta-data=/dev/vdb               isize=512    agcount=4, agsize=13107200 blks
         =                       sectsz=512   attr=2, projid32bit=1
         =                       crc=1        finobt=0, sparse=0
data     =                       bsize=4096   blocks=52428800, imaxpct=25
         =                       sunit=0      swidth=0 blks
naming   =version 2              bsize=4096   ascii-ci=0 ftype=1
log      =internal log           bsize=4096   blocks=25600, version=2
         =                       sectsz=512   sunit=0 blks, lazy-count=1
realtime =none                   extsz=4096   blocks=0, rtextents=0
2.2.3.2 创建挂载目录并挂载
bash
[root@VM_24_50_tlinux ~]# mkdir /data0
[root@VM_24_50_tlinux ~]# mount /dev/vdb /data0如果机器上存在多个需要挂载的数据磁盘,则每个磁盘按以上步骤进行格式化和挂载磁盘,挂载目录按照<font style="color:#DF2A3F;background-color:rgb(243, 244, 245);">data0/data1/../data999</font>的顺序命名。
2.2.4 拉取 CubeFS Helm 仓库
bash
[root@k8s-master01 jfs]# git clone https://github.com/cubefs/cubefs-helm.git
正克隆到 'cubefs-helm'...
remote: Enumerating objects: 854, done.
remote: Counting objects: 100% (58/58), done.
remote: Compressing objects: 100% (37/37), done.
remote: Total 854 (delta 25), reused 24 (delta 21), pack-reused 796 (from 1)
接收对象中: 100% (854/854), 502.92 KiB | 2.08 MiB/s, 完成.
处理 delta 中: 100% (542/542), 完成.
[root@k8s-master01 jfs]#
[root@k8s-master01 jfs]# cd cubefs-helm/
[root@k8s-master01 cubefs-helm]# ll
总用量 32
drwxr-xr-x 2 root root    63 7月  17 21:16 assets
drwxr-xr-x 2 root root   138 7月  17 21:16 build
-rw-r--r-- 1 root root   138 7月  17 21:16 CODE_OF_CONDUCT.md
drwxr-xr-x 4 root root    93 7月  17 21:16 cubefs
drwxr-xr-x 2 root root   110 7月  17 21:16 examples
-rw-r--r-- 1 root root 11351 7月  17 21:16 LICENSE
-rw-r--r-- 1 root root   155 7月  17 21:16 Makefile
-rw-r--r-- 1 root root   136 7月  17 21:16 OWNERS
-rw-r--r-- 1 root root  7388 7月  17 21:16 README.md
drwxr-xr-x 2 root root    33 7月  17 21:16 scripts
2.2.5 修改 helm 配置
部署 CubeFS 的 helm 存在大量的配置,所有的可配置项位于 helm 项目下的<font style="color:#DF2A3F;background-color:rgb(243, 244, 245);">cubefs/values.yaml</font>中,其中包含有详细的注释。
这里单独创建一个配置文件<font style="color:#DF2A3F;background-color:rgb(243, 244, 245);">cubefs-helm.yaml</font>,覆盖其中常见的关键配置项。
镜像源地址:
yaml
# 要安装哪些组件,如果只安装服务端的话保持下方配置即可,如果要安装客户端的话,把 csi 设置为 true
component:
  master: true
  datanode: true
  metanode: true
  objectnode: true
  client: false
  csi: true
  monitor: false
  ingress: true
image:
  # 3.3.0 版本之前会出现 /lib64/libstdc++.so.6: version `GLIBCXX_3.4.21' not found 错误
  server: harbor.test.com/cubefs/cfs-server:v3.3.0
  client: harbor.test.com/cubefs/cubefs/cfs-client:v3.3.0
  csi_driver: harbor.test.com/cubefs/cubefs-cfs-csi-driver:3.2.0.150.0
  csi_provisioner: harbor.test.com/cubefs/csi-provisioner:v2.2.2
  csi_attacher: harbor.test.com/cubefs/csi-attacher:v3.4.0
  csi_resizer: harbor.test.com/cubefs/csi-resizer:v1.3.0
  driver_registrar: harbor.test.com/cubefs/csi-node-driver-registrar:v2.5.0

# path.data: Master、MetaNode 的元数据存储路径,会以 hostPath 的方式存储在宿主机上,建议使用性能较高的底层磁盘
# path.log: 所有组件的日志在宿主机上的存储路径
path:
  data: /var/lib/cubefs
  log: /var/log/cubefs

master:
  tolerations:
    - key: "node-role.kubernetes.io/control-plane"
      operator: "Exists"
      effect: "NoSchedule"
  # Master 组件实例数量
  replicas: 3
  resources:
    enabled: true
    requests:
      memory: "512Mi"
      cpu: "500m"
    limits:
      memory: "512Mi"
      cpu: "500m"
  # Master Ingres 配置使用的域名,记得需要将该域名 DNS 解析到 Ingres Controller 的入口,当然也可以不配置,
  # 在客户端处直接将所有 Master 的 IP + 端口配置上
  host: master.cubefs.com

objectnode:
  # ObjectNode 组件实例数量
  replicas: 3
  resources:
    enabled: true
    requests:
      memory: "512Mi"
      cpu: "300m"
    limits:
      memory: "512Mi"
      cpu: "300m"

metanode:
  tolerations:
    - key: "node-role.kubernetes.io/control-plane"
      operator: "Exists"
      effect: "NoSchedule"
  # MetaNode 可以使用的总内存,单位字节,建议设置为机器可以内存的 80%,也可以按需减少
  total_mem: "26843545600"
  resources:
    enabled: true
    requests:
      memory: "512Mi"
      cpu: "500m"
    limits:
      memory: "512Mi"
      cpu: "500m"

datanode:
  tolerations:
    - key: "node-role.kubernetes.io/control-plane"
      operator: "Exists"
      effect: "NoSchedule"
  # DataNode 要使用的磁盘,可以挂载多块
  # 格式: 挂载点:保留的空间
  # 保留的空间: 单位字节,当磁盘剩余空间小于该值时将不会再在该磁盘上写入数据
  disks:
    - /data0:2147483648
  resources:
    enabled: true
    requests:
      memory: "512Mi"
      cpu: "500m"
    limits:
      memory: "512Mi"
      cpu: "500m"
csi:
  controller:
    tolerations: []
    nodeSelector:
      component.cubefs.io/csi: "enabled"
  node:
    tolerations: []
    nodeSelector:
      component.cubefs.io/csi: "enabled"
  driverName: csi.cubefs.com
  logLevel: error
  kubeletPath: /var/lib/kubelet
  node:
    resources:
      enabled: true
      requests:
        memory: "512Mi"
        cpu: "500m"
      limits:
        memory: "512Mi"
        cpu: "500m"
  storageClass:
    setToDefault: false
    reclaimPolicy: "Delete"
# CSI 客户端配置
provisioner:
  # Kubelet 的主目录
  kubelet_path: /var/lib/kubelet
镜像源地址:
yaml
  server: cubefs/cfs-server:v3.3.0
  client: cubefs/cfs-client:v3.3.0
  csi_driver: cnych/cubefs-cfs-csi-driver:3.2.0.150.0
  csi_provisioner: cnych/csi-provisioner:v2.2.2
  csi_attacher: cnych/csi-attacher:v3.4.0
  csi_resizer: cnych/csi-resizer:v1.3.0
  driver_registrar: cnych/csi-node-driver-registrar:v2.5.0
2.2.6 安装
bash
[root@k8s-master01 cubefs]# helm upgrade --install cubefs -n cubefs-system . -f cubefs-value.yaml --create-namespace如果报以下错误

bash
Error: template: cubefs/templates/statefulset-master.yaml:80:30: executing "cubefs/templates/statefulset-master.yaml" at <.Value.master.legacy_data_media_type>: nil pointer evaluating interface {}.master修改 template 文件:
找到legacy_data_media_type ,将 Value 改成 Values 即可
yaml
[root@k8s-master01 cubefs]# vim templates/statefulset-master.yaml
...
            - name: CBFS_LEGACY_DATA_MEDIA_TYPE
              value: {{ .Values.master.legacy_data_media_type | quote }}
yaml
[root@k8s-master01 cubefs]# helm upgrade --install cubefs -n cubefs-system . -f cubefs-value.yaml --create-namespace
Release "cubefs" does not exist. Installing it now.
NAME: cubefs
LAST DEPLOYED: Thu Jul 17 21:36:25 2025
NAMESPACE: cubefs-system
STATUS: deployed
REVISION: 1
TEST SUITE: None

[root@VM_24_119_tlinux /usr/local/src/cubefs-helm/cubefs]# kubectl get pods -n cubefs-system
NAME                                  READY   STATUS    RESTARTS   AGE
cfs-csi-controller-74bd99445b-8nk8v   4/4     Running   0          12m
cfs-csi-node-7rdt4                    2/2     Running   0          37s
cfs-csi-node-zlzwm                    2/2     Running   0          37s
datanode-94msr                        1/1     Running   0          12m
datanode-d26jb                        1/1     Running   0          4m59s
datanode-qt4xs                        1/1     Running   0          12m
master-0                              1/1     Running   0          12m
master-1                              1/1     Running   0          12m
master-2                              1/1     Running   0          4m13s
metanode-7ktlv                        1/1     Running   0          12m
metanode-pl4mb                        1/1     Running   0          12m
metanode-s4r8c                        1/1     Running   0          5m
objectnode-c9bfcd669-5dbfw            1/1     Running   0          12m
objectnode-c9bfcd669-9rkvc            1/1     Running   0          12m
objectnode-c9bfcd669-tr287            1/1     Running   0          12m
各个组件的关键日志会在容器标准输出中输出。
此外还会自动创建一个 <font style="color:#DF2A3F;">StorageClass</font> 对象<font style="color:#DF2A3F;"> cfs-sc</font>,可以通过 <font style="color:#DF2A3F;">kubectl get sc</font> 查看:
bash
[root@VM_24_119_tlinux /usr/local/src/cubefs-helm/cubefs]# kubectl get sc
NAME            PROVISIONER                 RECLAIMPOLICY   VOLUMEBINDINGMODE   ALLOWVOLUMEEXPANSION   AGE
cbs (default)   com.tencent.cloud.csi.cbs   Delete          Immediate           false                  44h
cbs-block       com.tencent.cloud.csi.cbs   Retain          Immediate           true                   43h
cfs             com.tencent.cloud.csi.cfs   Retain          Immediate           false                  43h
cfs-sc          csi.cubefs.com              Delete          Immediate           true                   13m
2.3 测试
创建一个 PVC
yaml
# cubefs-pvc.yaml
apiVersion: v1
kind: PersistentVolumeClaim
metadata:
  name: cubefs-pvc
  namespace: default
spec:
  accessModes:
    - ReadWriteOnce
  resources:
    requests:
      storage: 5Gi
  storageClassName: cfs-sc
yaml
[root@VM_24_119_tlinux /usr/local/src/cubefs-helm]# kubectl get pvc
NAME                         STATUS   VOLUME                                     CAPACITY   ACCESS MODES   STORAGECLASS   AGE
cubefs-pvc                   Bound    pvc-b43cc731-ff21-4bd3-a0d9-65449d604a55   5Gi        RWO            cfs-sc         3s
如果 PVC 的状态一直处于 Pending,可以通过命令查看原因:
yaml
kubectl describe pvc -n 命名空间 PVC 名称如果报错消息不明显或者看不出错误,则可以使用 <font style="color:#DF2A3F;">kubectl logs</font> 相关命令先查看 csi controller pod 里面的 <font style="color:#DF2A3F;">csi-provisioner</font> 容器的报错信息,<font style="color:#DF2A3F;">csi-provisioner</font> 是 k8s 与 csi driver 的中间桥梁,很多信息都可以在这里的日志查看。

如果 <font style="color:#DF2A3F;">csi-provisioner</font> 的日志还看不出具体问题,则使用 <font style="color:#DF2A3F;">kubectl exec</font> 相关命令查看 csi controller pod 里面的 <font style="color:#DF2A3F;">cfs-driver</font> 容器的日志,它的日志放在容器里面的 <font style="color:#DF2A3F;">/cfs/logs</font> 下。
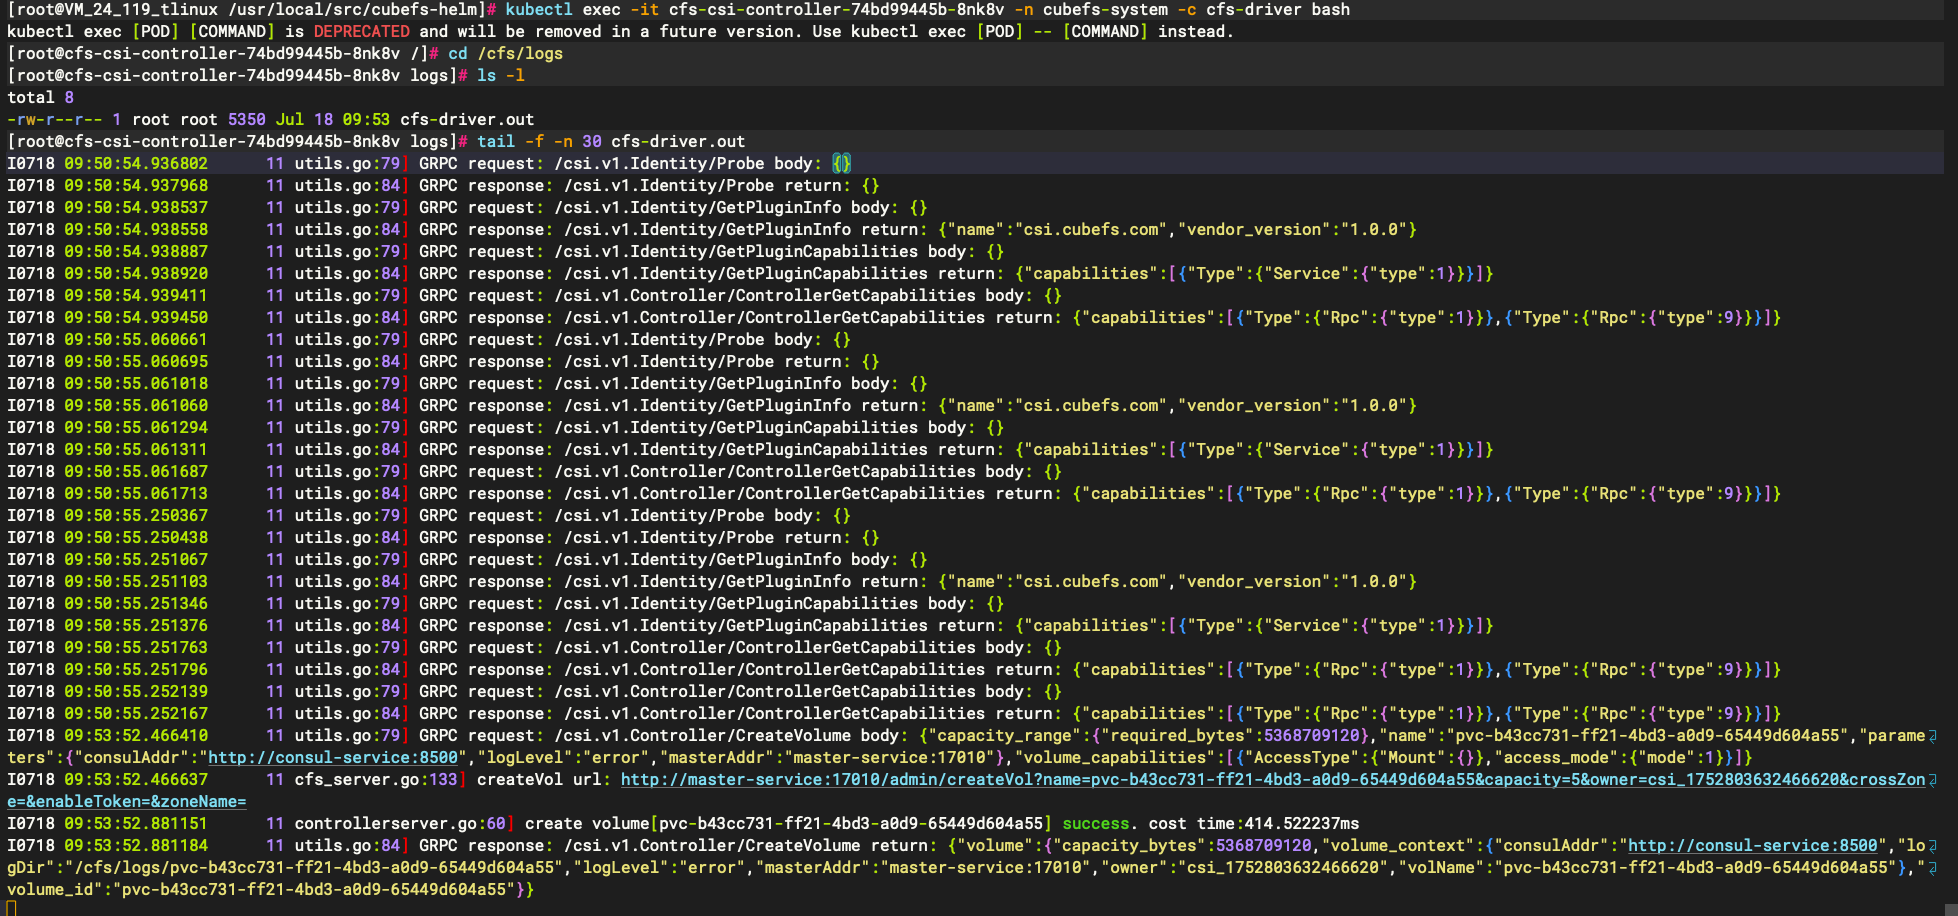
这里不能使用 Kubectl logs 相关命令是因为 cfs-driver 的日志并不是打印到标准输出,而其它几个类似 <font style="color:#DF2A3F;">csi-provisioner</font> 的 sidecar 容器的日志是打印到标准输出的,所以可以使用 <font style="color:#DF2A3F;">kubectl logs</font> 相关命令查看。
有了 PVC 则接下来就可以在应用中挂载到指定目录了,比如我们这里有一个如下所示的示例:
yaml
[root@VM_24_119_tlinux /usr/local/src/cubefs-helm]# cat deployment.yaml
apiVersion: apps/v1
kind: Deployment
metadata:
  name: cfs-csi-demo
  namespace: default
spec:
  selector:
    matchLabels:
      app: cfs-csi-demo-pod
  template:
    metadata:
      labels:
        app: cfs-csi-demo-pod
    spec:
      nodeSelector:
        component.cubefs.io/csi: enabled
      containers:
        - name: cfs-csi-demo
          image: harbor.test.com/cicd/nginx:latest
          imagePullPolicy: "IfNotPresent"
          ports:
            - containerPort: 80
              name: "http-server"
          volumeMounts:
            - mountPath: "/usr/share/nginx/html"
              mountPropagation: HostToContainer
              name: mypvc
      volumes:
        - name: mypvc
          persistentVolumeClaim:
            claimName: cubefs-pvc
yaml
[root@VM_24_119_tlinux /usr/local/src/cubefs-helm]# kubectl get pods
NAME                            READY   STATUS    RESTARTS      AGE
cfs-csi-demo-5dc698c445-mnwft   1/1     Running   0             10s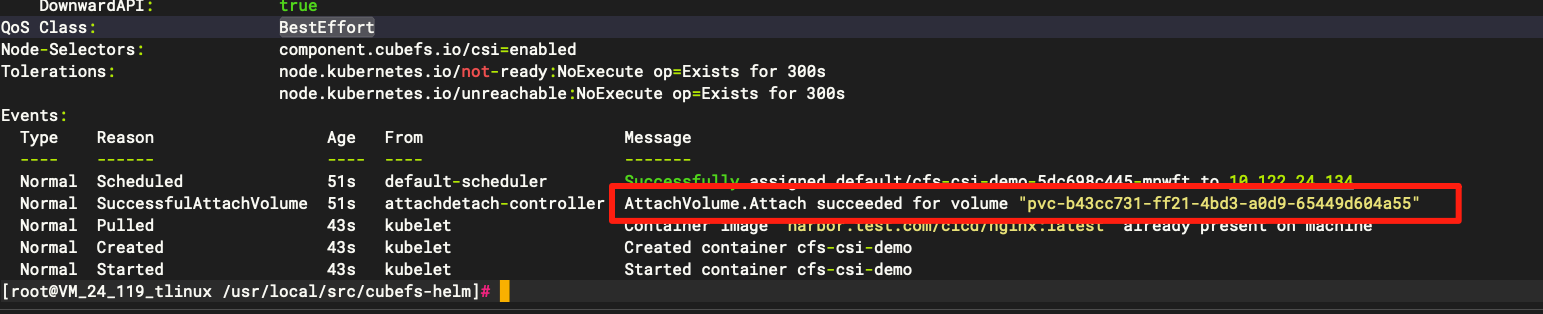
此时可以进入 pod 中生成一个 index.html,访问 nginx 测试
bash
[root@VM_24_119_tlinux /usr/local/src/cubefs-helm]# kubectl exec -it cfs-csi-demo-5dc698c445-mnwft bash
kubectl exec [POD] [COMMAND] is DEPRECATED and will be removed in a future version. Use kubectl exec [POD] -- [COMMAND] instead.
root@cfs-csi-demo-5dc698c445-mnwft:/#
root@cfs-csi-demo-5dc698c445-mnwft:/# cd /usr/share/nginx/html/
root@cfs-csi-demo-5dc698c445-mnwft:/usr/share/nginx/html# echo cubefs-test > index.html
root@cfs-csi-demo-5dc698c445-mnwft:/usr/share/nginx/html# curl localhost
cubefs-test
root@cfs-csi-demo-5dc698c445-mnwft:/usr/share/nginx/html# exit
exit
[root@VM_24_119_tlinux /usr/local/src/cubefs-helm]#
[root@VM_24_119_tlinux /usr/local/src/cubefs-helm]# kubectl get pods -o wide
NAME                            READY   STATUS    RESTARTS      AGE     IP             NODE            NOMINATED NODE   READINESS GATES
cfs-csi-demo-5dc698c445-mnwft   1/1     Running   0             2m19s   172.19.1.18    10.122.24.134   <none>           <none>
sample-data-2w84g               1/1     Running   0             41h     172.19.1.75    10.122.24.116   <none>           2/2
sample-data-9fpgd               1/1     Running   0             41h     172.19.1.13    10.122.24.134   <none>           2/2
sample-data-bs7rx               1/1     Running   0             41h     172.19.0.215   10.122.24.77    <none>           2/2
sample-data-ht9lg               1/1     Running   0             41h     172.19.1.74    10.122.24.116   <none>           2/2
sample-data-q879b               1/1     Running   0             41h     172.19.0.214   10.122.24.77    <none>           2/2
test-pod                        2/2     Running   1 (40h ago)   40h     172.19.1.143   10.122.24.53    <none>           <none>
[root@VM_24_119_tlinux /usr/local/src/cubefs-helm]# curl 172.19.1.18:80
cubefs-test
然后我们可以将这个 Pod 删除重建,然后查看是否还有这个文件:
bash
[root@VM_24_119_tlinux /usr/local/src/cubefs-helm]# kubectl delete pods cfs-csi-demo-5dc698c445-mnwft
pod "cfs-csi-demo-5dc698c445-mnwft" deleted
[root@VM_24_119_tlinux /usr/local/src/cubefs-helm]#
[root@VM_24_119_tlinux /usr/local/src/cubefs-helm]#
[root@VM_24_119_tlinux /usr/local/src/cubefs-helm]# ku^C
[root@VM_24_119_tlinux /usr/local/src/cubefs-helm]# kubectl get pods -o wide
NAME                            READY   STATUS    RESTARTS      AGE   IP             NODE            NOMINATED NODE   READINESS GATES
cfs-csi-demo-5dc698c445-mfzml   1/1     Running   0             5s    172.19.1.19    10.122.24.134   <none>           <none>
sample-data-2w84g               1/1     Running   0             41h   172.19.1.75    10.122.24.116   <none>           2/2
sample-data-9fpgd               1/1     Running   0             41h   172.19.1.13    10.122.24.134   <none>           2/2
sample-data-bs7rx               1/1     Running   0             41h   172.19.0.215   10.122.24.77    <none>           2/2
sample-data-ht9lg               1/1     Running   0             41h   172.19.1.74    10.122.24.116   <none>           2/2
sample-data-q879b               1/1     Running   0             41h   172.19.0.214   10.122.24.77    <none>           2/2
test-pod                        2/2     Running   1 (40h ago)   40h   172.19.1.143   10.122.24.53    <none>           <none>
[root@VM_24_119_tlinux /usr/local/src/cubefs-helm]#
[root@VM_24_119_tlinux /usr/local/src/cubefs-helm]# curl 172.19.1.19
cubefs-test
三、CubeFS 操作详解
3.1 客户端安装
3.1.1 下载软件包
bash
wget https://github.com/cubefs/cubefs/releases/download/v3.3.0/cubefs-3.3.0-linux-amd64.tar.gz3.1.2 创建 NodePort 类型的 master
yaml
apiVersion: v1
kind: Service
metadata:
  annotations:
    meta.helm.sh/release-name: cubefs
    meta.helm.sh/release-namespace: cubefs-system
  labels:
    app.kubernetes.io/managed-by: Helm
  name: master-service-np
  namespace: cubefs-system
spec:
  ports:
  - port: 17010
    protocol: TCP
    targetPort: 17010
  selector:
    app.kubernetes.io/component: master
    app.kubernetes.io/name: cubefs-system
    app.kubernetes.io/version: 3.2.0
  sessionAffinity: None
  type: NodePort
yaml
[root@VM_24_119_tlinux ~]# kubectl get svc -n cubefs-system
NAME                 TYPE        CLUSTER-IP       EXTERNAL-IP   PORT(S)           AGE
master-service       ClusterIP   172.19.253.131   <none>        17010/TCP         104m
master-service-np    NodePort    172.19.255.219   <none>        17010:32328/TCP   115s
objectnode-service   ClusterIP   172.19.253.251   <none>        1601/TCP          104m
3.1.3 配置客户端链接 master
bash
[root@VM_24_119_tlinux /usr/local/src/cubefs-helm/ec/cubefs-3.3.0]# ./cfs-cli config set  --addr=10.122.24.119:32328
Config has been set successfully!
3.1.4 集群管理
3.1.4.1 获取集群信息
包括集群名称、地址、卷数量、节点数量及使用率等
bash
[root@VM_24_119_tlinux /usr/local/src/cubefs-helm/ec/cubefs-3.3.0]# cfs-cli cluster info
[Cluster]
  Cluster name       : my-cluster
  Master leader      : master-0.master-service:17010
  Master-1           : master-0.master-service:17010
  Master-2           : master-1.master-service:17010
  Master-3           : master-2.master-service:17010
  Auto allocate      : Enabled
  MetaNode count     : 3
  MetaNode used      : 0 GB
  MetaNode total     : 75 GB
  DataNode count     : 3
  DataNode used      : 40 GB
  DataNode total     : 1159 GB
  Volume count       : 4
  Allow Mp Decomm    : Enabled
  EbsAddr            :
  LoadFactor         : 0
  BatchCount         : 0
  MarkDeleteRate     : 0
  DeleteWorkerSleepMs: 0
  AutoRepairRate     : 0
  MaxDpCntLimit      : 3000
3.1.4.2 获取集群状态
按区域获取元数据和数据节点的使用量、状态等
bash
[root@VM_24_119_tlinux /usr/local/src/cubefs-helm/ec/cubefs-3.3.0]# cfs-cli cluster stat
[Cluster Status]

DataNode Status:
    TOTAL/GB           USED/GB            INCREASED/GB       USED RATIO
    1159               40                 0                  0.035

MetaNode Status:
    TOTAL/GB           USED/GB            INCREASED/GB       USED RATIO
    75                 0                  0                  0.005

Zone List:
    ZONE NAME    ROLE        TOTAL/GB           USED/GB            AVAILABLE/GB       USED RATIO         TOTAL NODES    WRITEBLE NODES
    default      DATANODE    1159.91            40.12              1119.79            0.03               3             3
                 METANODE    75                 0.35               74.65              0                  3             3
3.1.5 元数据节点管理
3.1.5.1 列出所有元数据节点
获取所有元数据节点的信息,包括 id、地址、读写状态及存活状态
bash
[root@VM_24_119_tlinux /usr/local/src/cubefs-helm/ec/cubefs-3.3.0]# cfs-cli metanode list
[Meta nodes]
ID        ADDRESS                                                              WRITABLE    STATUS
3         10.122.24.134:17210(master-0.master-service.cubefs-system.svc.cluster.local:17210,10-122-24-134.master-service-np.cubefs-system.svc.cluster.local:17210)    Yes         Active
5         10.122.24.116:17210(master-1.master-service.cubefs-system.svc.cluster.local:17210,10-122-24-116.master-service-np.cubefs-system.svc.cluster.local:17210)    Yes         Active
7         10.122.24.143:17210(master-2.master-service.cubefs-system.svc.cluster.local:17210,10-122-24-143.master-service-np.cubefs-system.svc.cluster.local:17210)    Yes         Active
3.1.5.2 展示元数据节点基本信息
bash
[root@VM_24_119_tlinux /usr/local/src/cubefs-helm/ec/cubefs-3.3.0]# cfs-cli metanode info 10.122.24.134:17210
[Meta node info]
  ID                  : 3
  Address             : 10.122.24.134:17210(master-0.master-service.cubefs-system.svc.cluster.local:17210,10-122-24-134.master-service-np.cubefs-system.svc.cluster.local:17210)
  Carry               : 0.760997171042658
  Threshold           : 0.75
  MaxMemAvailWeight   : 24.88 GB
  Allocated           : 126.73 MB
  Total               : 25.00 GB
  Zone                : default
  IsActive            : Active
  Report time         : 2025-07-18 11:32:14
  Partition count     : 12
  Persist partitions  : [2 3 1 12 10 11 7 8 9 13 14 15]
3.1.5.3 下线元数据节点
将该元数据节点下线,该节点上的 partition 将自动转移至其他可用节点
bash
cfs-cli metanode decommission [Address]3.1.5.4 转移元数据节点上的 mp
bash
cfs-cli metanode migrate [srcAddress] [dstAddress] 3.1.6 数据节点管理
3.1.6.1 列出所有数据节点
bash
[root@VM_24_119_tlinux /usr/local/src/cubefs-helm/ec/cubefs-3.3.0]# cfs-cli datanode list
[Data nodes]
ID        ADDRESS                                                              WRITABLE    STATUS
2         10.122.24.50:17310(10-122-24-50.service-controller-readiness-gate.kube-system.svc.cluster.local:17310)    Yes         Active
4         10.122.24.53:17310                                                   Yes         Active
6         10.122.24.28:17310                                                   Yes         Active
3.1.6.2 展示数据节点基本信息
bash
[root@VM_24_119_tlinux /usr/local/src/cubefs-helm/ec/cubefs-3.3.0]# cfs-cli datanode info  10.122.24.50:17310
[Data node info]
  ID                  : 2
  Address             : 10.122.24.50:17310(10-122-24-50.service-controller-readiness-gate.kube-system.svc.cluster.local:17310)
  Carry               : 0.6405948133211536
  Allocated ratio     : 0.03834985874020437
  Allocated           : 14.83 GB
  Available           : 363.69 GB
  Total               : 386.64 GB
  Zone                : default
  IsActive            : Active
  Report time         : 2025-07-18 11:34:01
  Partition count     : 41
  Bad disks           : []
  Persist partitions  : [32 33 34 35 36 37 38 39 40 41 21 22 23 24 25 26 27 28 29 30 31 42 43 44 45 46 47 48 49 50 51 1 2 3 4 5 6 7 8 9 10]
3.1.6.3 下线数据节点
将该数据节点下线,该节点上的 data partition 将自动转移至其他可用节点
bash
cfs-cli datanode decommission [Address]3.1.6.4 转移数据节点上的 dp
将源数据节点上的 data partition 转移至目标数据节点
bash
cfs-cli datanode migrate [srcAddress] [dstAddress]3.1.7 卷管理
3.1.7.1 创建卷
bash
Create a new volume

Usage:
  cfs-cli volume create [VOLUME NAME] [USER ID] [flags]

Flags:
      --allowedStorageClass string         Specify which StorageClasses the vol will support,
                                           format is comma separated uint32:"StorageClass1, StorageClass2",
                                           1:SSD, 2:HDD, empty value means determine by master
      --cache-action int                   Specify low volume cacheAction (default 0)
      --cache-capacity int                 Specify low volume capacity[Unit: GB]
      --cache-high-water int                (default 80)
      --cache-low-water int                 (default 60)
      --cache-lru-interval int             Specify interval expiration time[Unit: min] (default 5)
      --cache-rule-key string              Anything that match this field will be written to the cache
      --cache-threshold int                Specify cache threshold[Unit: byte] (default 10485760)
      --cache-ttl int                      Specify cache expiration time[Unit: day] (default 30)
      --capacity uint                      Specify volume capacity (default 10)
      --clientIDKey string                 needed if cluster authentication is on
      --crossZone string                   Disable cross zone (default "false")
      --delete-lock-time int               Specify delete lock time[Unit: hour] for volume
      --description string                 Description
      --dp-count int                       Specify init data partition count (default 10)
      --dp-size int                        Specify data partition size[Unit: GB] (default 120)
      --ebs-blk-size int                   Specify ebsBlk Size[Unit: byte] (default 8388608)
      --enableQuota string                 Enable quota (default false) (default "false")
      --flashNodeTimeoutCount int          FlashNode timeout count, flashNode will be removed by client if it's timeout count exceeds this value (default 5)
      --follower-read string               Enable read form replica follower
  -h, --help                               help for create
      --maximally-read string              Enable read form mp follower, (true|false), default false
      --meta-follower-read string          Enable read form more hosts, (true|false), default false
      --mp-count int                       Specify init meta partition count (default 3)
      --normalZonesFirst string            Write to normal zone first (default "false")
      --readonly-when-full string          Enable volume becomes read only when it is full (default "false")
      --remoteCacheAutoPrepare string      Remote cache auto prepare, let flashnode read ahead when client append ek
      --remoteCacheEnable string           Remote cache enable
      --remoteCacheMaxFileSizeGB int       Remote cache max file size[Unit: GB](must > 0) (default 128)
      --remoteCacheMultiRead string        Remote cache follower read(true|false) (default "false")
      --remoteCacheOnlyForNotSSD string    Remote cache only for not ssd(true|false) (default "false")
      --remoteCachePath string             Remote cache path, split with (,)
      --remoteCacheReadTimeout int         Remote cache read timeout millisecond(must > 0) (default 100)
      --remoteCacheSameRegionTimeout int   Remote cache same region timeout millisecond(must > 0) (default 2)
      --remoteCacheSameZoneTimeout int     Remote cache same zone timeout microsecond(must > 0) (default 400)
      --remoteCacheTTL int                 Remote cache ttl[Unit: s](must >= 10min, default 5day) (default 432000)
      --replica-num string                 Specify data partition replicas number(default 3 for normal volume,1 for low volume)
      --transaction-mask string            Enable transaction for specified operation: "create|mkdir|remove|rename|mknod|symlink|link" or "off" or "all"
      --transaction-timeout uint32         Specify timeout[Unit: minute] for transaction [1-60] (default 1)
      --tx-conflict-retry-Interval int     Specify retry interval[Unit: ms] for transaction conflict [10-1000]
      --tx-conflict-retry-num int          Specify retry times for transaction conflict [1-100]
      --volStorageClass uint32             Specify which StorageClass the clients mounts this vol should write to: [1:SSD | 2:HDD | 3:Blobstore]
  -y, --yes                                Answer yes for all questions
      --zone-name string                   Specify volume zone name
3.1.7.2 删除指定卷
删除指定卷VOLUME NAME, ec卷大小为0才能删除。开启延迟删除后,volume将会在<font style="color:#DF2A3F;background-color:rgb(243, 244, 245);">volDeletionDelayTime</font>小时后被真正删除,在此期间可以通过<font style="color:#DF2A3F;background-color:rgb(243, 244, 245);">status=false</font>取消删除操作。
bash
[root@VM_24_119_tlinux /usr/local/src/cubefs-helm/ec/cubefs-3.3.0]# cfs-cli volume list
VOLUME                                                             OWNER                   USED        TOTAL       STATUS      CREATE TIME
pvc-b43cc731-ff21-4bd3-a0d9-65449d604a55                           csi_1752803632466620    4.00 KB     5.00 GB     Normal      Fri, 18 Jul 2025 09:53:52 CST
pvc-8146e998-ffc5-4976-943e-1bad05dedb07                           csi_1752807799196974    0.00 B      1.00 TB     Normal      Fri, 18 Jul 2025 11:03:19 CST
pvc-35e037cc-06f0-471e-b8dd-a1dec2edd0a5                           csi_1752805819055069    0.00 B      100.00 GB    Normal      Fri, 18 Jul 2025 10:30:19 CST
pvc-ebe82297-6a61-4f7c-b209-3803f33bd2fe                           csi_1752808184698436    0.00 B      5.00 TB     Normal      Fri, 18 Jul 2025 11:09:44 CST
[root@VM_24_119_tlinux /usr/local/src/cubefs-helm/ec/cubefs-3.3.0]#
[root@VM_24_119_tlinux /usr/local/src/cubefs-helm/ec/cubefs-3.3.0]# cfs-cli volume delete pvc-b43cc731-ff21-4bd3-a0d9-65449d604a55
Delete volume [pvc-b43cc731-ff21-4bd3-a0d9-65449d604a55] (yes/no)[no]:yes
Volume has been deleted successfully.
3.1.7.3 获取卷信息
bash
Flags:
    -d, --data-partition                                # 显示数据分片的详细信息
    -m, --meta-partition                                # 显示元数据分片的详细信息
bash
[root@VM_24_119_tlinux /usr/local/src/cubefs-helm/ec/cubefs-3.3.0]# cfs-cli volume info pvc-35e037cc-06f0-471e-b8dd-a1dec2edd0a5  -d
Summary:
  ID                              : 10
  Name                            : pvc-35e037cc-06f0-471e-b8dd-a1dec2edd0a5
  Owner                           : csi_1752805819055069
  Authenticate                    : Disabled
  Capacity                        : 100 GB
  Create time                     : 2025-07-18 10:30:19
  DeleteLockTime                  : 0
  Cross zone                      : Disabled
  DefaultPriority                 : false
  Dentry count                    : 0
  Description                     :
  DpCnt                           : 11
  DpReplicaNum                    : 3
  Follower read                   : Disabled
  Inode count                     : 1
  Max metaPartition ID            : 9
  MpCnt                           : 3
  MpReplicaNum                    : 3
  NeedToLowerReplica              : Disabled
  RwDpCnt                         : 11
  Status                          : Normal
  ZoneName                        : default
  VolType                         : 0
  DpReadOnlyWhenVolFull           : false
  Transaction Mask                : off
  Transaction timeout             : 1
  Tx conflict retry num           : 10
  Tx conflict retry interval(ms)  : 20
  Tx limit interval(s)            : 0
  Quota                           : Disabled

Data partitions:
ID          REPLICAS    STATUS        ISRECOVER      LEADER                MEMBERS
21          3           Writable      false          10.122.24.53:17310    10.122.24.28:17310,10.122.24.50:17310,10.122.24.53:17310
22          3           Writable      false          10.122.24.50:17310    10.122.24.53:17310,10.122.24.28:17310,10.122.24.50:17310
23          3           Writable      false          10.122.24.28:17310    10.122.24.50:17310,10.122.24.53:17310,10.122.24.28:17310
24          3           Writable      false          10.122.24.28:17310    10.122.24.53:17310,10.122.24.28:17310,10.122.24.50:17310
25          3           Writable      false          10.122.24.53:17310    10.122.24.28:17310,10.122.24.53:17310,10.122.24.50:17310
26          3           Writable      false          10.122.24.53:17310    10.122.24.50:17310,10.122.24.28:17310,10.122.24.53:17310
27          3           Writable      false          10.122.24.50:17310    10.122.24.28:17310,10.122.24.53:17310,10.122.24.50:17310
28          3           Writable      false          10.122.24.28:17310    10.122.24.28:17310,10.122.24.53:17310,10.122.24.50:17310
29          3           Writable      false          10.122.24.28:17310    10.122.24.50:17310,10.122.24.28:17310,10.122.24.53:17310
30          3           Writable      false          10.122.24.53:17310    10.122.24.28:17310,10.122.24.50:17310,10.122.24.53:17310
31          3           Writable      false          10.122.24.53:17310    10.122.24.53:17310,10.122.24.50:17310,10.122.24.28:17310
3.1.7.4 创建并添加的数据分配至卷
创建并添加个数为 NUMBER 的数据分片至卷 VOLUME
bash
cfs-cli volume add-dp [VOLUME] [NUMBER]3.1.7.5 将卷转交给其他用户
将卷 VOLUME NAME 转交给其他用户 USER ID
bash
cfs-cli volume transfer [VOLUME NAME] [USER ID] [flags]
bash
Flags:
    -f, --force                                         # 强制转交
    -y, --yes                                           # 跳过所有问题并设置回答为"yes"
3.1.8 用户管理
3.1.8.1 创建用户
bash
cfs-cli user create [USER ID] [flags]
bash
Flags:
    --access-key string                     # 指定用户用于对象存储功能的 access key
    --secret-key string                     # 指定用户用于对象存储功能的 secret key
    --password string                       # 指定用户密码
    --user-type string                      # 指定用户类型,可选项为 normal 或 admin(默认为normal)
    -y, --yes                               # 跳过所有问题并设置回答为"yes"
3.1.8.2 删除用户
bash
cfs-cli user delete [USER ID] [flags]
bash
Flags:
    -y, --yes                               # 跳过所有问题并设置回答为"yes"
3.1.8.3 获取用户信息
bash
cfs-cli user info [USER ID]3.1.8.4 列出所有用户
bash
cfs-cli user list3.1.8.5 更新用户对某个卷的权限
PERM可选项为"只读"(READONLY/RO)、"读写"(READWRITE/RW)、"删除授权"(NONE)
bash
cfs-cli user perm [USER ID] [VOLUME] [PERM]3.1.8.6 更新用户信息
bash
cfs-cli user update [USER ID] [flags]
bash
Flags:
    --access-key string                     # 更新后的 access key 取值
    --secret-key string                     # 更新后的 secret key 取值
    --user-type string                      # 更新后的用户类型,可选项为 normal 或 admin
    -y, --yes                               # 跳过所有问题并设置回答为"yes"
3.2 卷操作
在CubeFS中,卷(Volume) 是存储系统的基本管理单位,类似于传统文件系统中的"分区"。每个卷可以独立配置存储策略(副本数、纠删码策略)、容量配额、数据压缩等属性。
创建卷,并分配一组数据分片和元数据分片. 在创建新卷时,默认分配10个数据分片和3个元数据分片。
CubeFS以 Owner 参数作为用户ID。
- 在创建卷时,如果集群中没有与该卷的 Owner 同名的用户,会自动创建一个用户 ID 为 Owner 的用户
- 如果集群中已存在用户 ID 为 Owner 的用户,则会自动将该卷的所有权归属于该用户。
3.2.1 副本卷(Replicated Volume)
副本卷通过**数据复制(Replication)**实现冗余,当写入数据时,同一份数据会被复制多份(通常 3 副本),存储在不同节点/机架上。
特点:
- 高可用性:允许部分节点故障(N副本容忍N-1故障)
- 强一致性:所有副本写入成功才返回成功
- 低延迟:读操作可从最近副本读取
- 空间利用率低:存储开销为原始数据的N倍(如3副本需3倍空间)
适用于高 IOPS 要求(如数据库)、小文件频繁读写、低延迟访问场景。
3.2.1.1 创建副本卷 StorageClass
查看 cubeFS master 的 service
yaml
[root@VM_24_119_tlinux /usr/local/src/cubefs-helm]# kubectl get svc -n cubefs-system
NAME                 TYPE        CLUSTER-IP       EXTERNAL-IP   PORT(S)     AGE
master-service       ClusterIP   172.19.253.131   <none>        17010/TCP   44m
objectnode-service   ClusterIP   172.19.253.251   <none>        1601/TCP    44m
yaml
apiVersion: storage.k8s.io/v1
kind: StorageClass
metadata:
  name: cubefs-replica
  annotations:
    meta.helm.sh/release-name: cubefs
    meta.helm.sh/release-namespace: cubefs-system
provisioner: csi.cubefs.com
parameters:
  # 关键参数:指定副本数
  replicas: "3"
  # 其他可选参数
  logLevel: "error"
  masterAddr: master-service:17010
allowVolumeExpansion: true
reclaimPolicy: Delete
volumeBindingMode: Immediate
3.2.1.2 创建 pvc
yaml
apiVersion: v1
kind: PersistentVolumeClaim
metadata:
  name: pvc-replica
spec:
  storageClassName: cubefs-replica
  accessModes:
    - ReadWriteOnce
  resources:
    requests:
      storage: 100Gi
3.2.1.3 挂载到应用
yaml
apiVersion: v1
kind: Pod
metadata:
  name: app-with-replica-vol
spec:
  containers:
  - name: app
    image: harbor.test.com/cicd/nginx:latest
    volumeMounts:
    - name: data
      mountPath: /data
  volumes:
  - name: data
    persistentVolumeClaim:
      claimName: pvc-replica
3.2.2 纠删码卷(EC Volume)
纠删码解释:https://en.wikipedia.org/wiki/Erasure_code
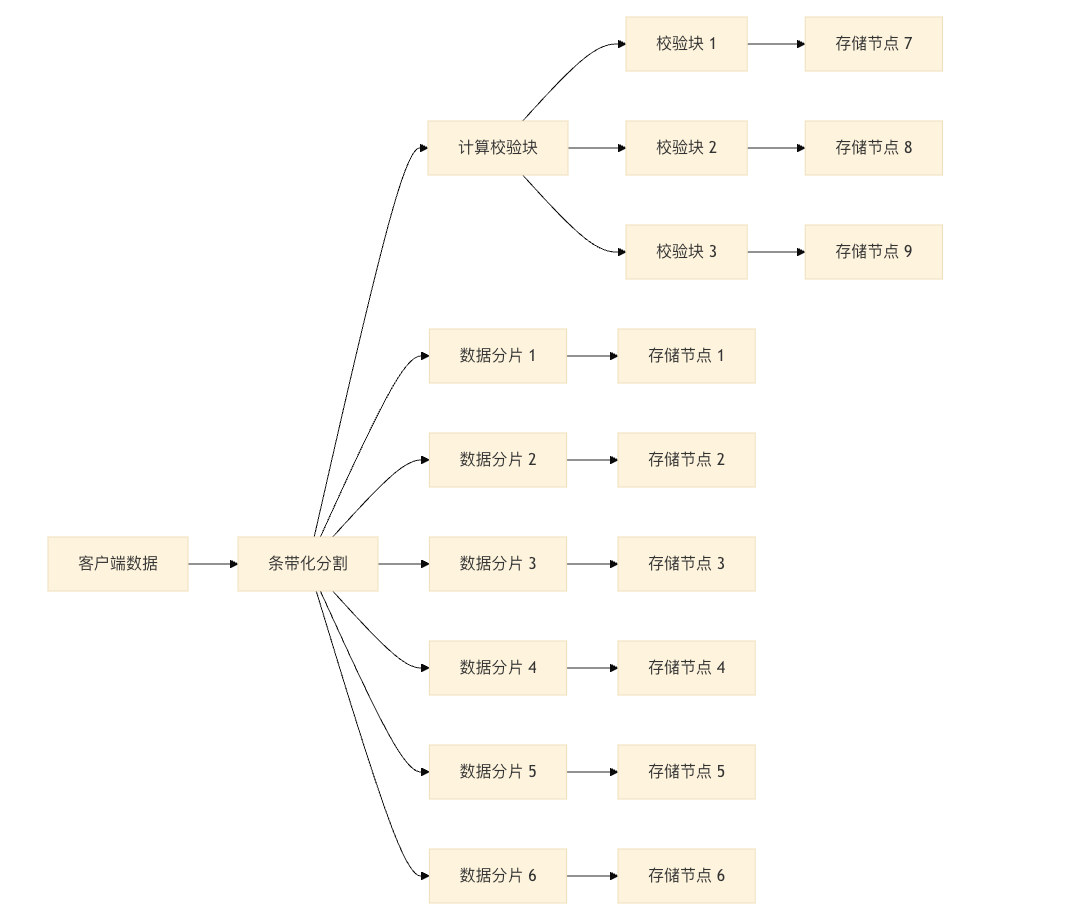
纠删码是一种现代的数据容错与冗余技术,用于分布式存储系统。它将一份原始数据经过编码,分割成多个数据块和校验块,分布在不同节点上------在丢失部分块(节点)后,仍然能完整还原原始数据。
CubeFS 支持的 EC 模型一般是 (k, m) 模型:
- 将每一份原始数据分成
<font style="color:rgb(251, 71, 135);">k</font>个数据块,再"编码"出<font style="color:rgb(251, 71, 135);">m</font>个冗余校验块 - 对总的
<font style="color:rgb(251, 71, 135);">k+m</font>个块,存放在不同机器或节点上 - 只要收到任意
<font style="color:rgb(251, 71, 135);">k</font>个块,就可以恢复出完整原始数据 - 常见举例:EC(8, 2)
8个数据块+2个校验块=分布10份,任意丢2份(节点坏、断网、磁盘坏等)都不怕
3.2.2.1 创建纠删码卷 StorageClass
yaml
apiVersion: storage.k8s.io/v1
kind: StorageClass
metadata:
  name: cubefs-ec
  annotations:
    meta.helm.sh/release-name: cubefs
    meta.helm.sh/release-namespace: cubefs-system
provisioner: csi.cubefs.com
parameters:
  # 启用EC模式
  volumeType: "ec"
  # 配置EC策略 (6数据块+3校验块)
  ecCodeMode: "6,3"  # 格式:数据块数,校验块数
  # 条带大小 (单位字节)
  ecBlockSize: "1048576"  # 1MB
  # 调优参数
  logLevel: "error"
  writeCache: "true"
  readCache: "true"
  cacheSize: "2048"  # 2GB
  masterAddr: master-service:17010
allowVolumeExpansion: true
reclaimPolicy: Delete
volumeBindingMode: Immediate
参数:
| 参数 | 必填 | 示例值 | 说明 |
|---|---|---|---|
**<font style="color:rgb(251, 71, 135);">volumeType</font>** |
是 | <font style="color:rgb(251, 71, 135);">"ec"</font> |
<font style="color:rgb(251, 71, 135);">ec</font>:纠删码模式 <font style="color:rgb(251, 71, 135);">replica</font>:副本模式(默认) |
**<font style="color:rgb(251, 71, 135);">ecCodeMode</font>** |
是 | <font style="color:rgb(251, 71, 135);">"6,3"</font> |
EC 编码方案: 格式:<font style="color:rgb(251, 71, 135);"><数据块数>,<校验块数></font> 示例 <font style="color:rgb(251, 71, 135);">6,3</font>= 6个数据块 + 3个校验块(可容忍3个节点故障) |
**<font style="color:rgb(251, 71, 135);">ecBlockSize</font>** |
是 | <font style="color:rgb(251, 71, 135);">"1048576"</font> |
条带化块大小(字节): 必须是 2 的幂次方(64K/128K/1M) 推荐值:<font style="color:rgb(251, 71, 135);">1048576</font>(1MB) |
**<font style="color:rgb(251, 71, 135);">masterAddr</font>** |
是 | <font style="color:rgb(251, 71, 135);">"master1:port,master2:port"</font> |
CubeFS Master 服务地址(逗号分隔) |
**<font style="color:rgb(251, 71, 135);">logLevel</font>** |
否 | <font style="color:rgb(251, 71, 135);">error</font> |
日志级别(debug/info/error/warn) |
**<font style="color:rgb(251, 71, 135);">readCache</font>** |
否 | <font style="color:rgb(251, 71, 135);">"true"</font> |
启用读缓存 |
**<font style="color:rgb(251, 71, 135);">writeCache</font>** |
否 | <font style="color:rgb(251, 71, 135);">"true"</font> |
启用写缓存 |
**<font style="color:rgb(251, 71, 135);">cacheSize</font>** |
否 | <font style="color:rgb(251, 71, 135);">"2048"</font> |
客户端缓存大小(MB) |
3.2.2.2 创建 PVC
yaml
# pvc-ec.yaml
apiVersion: v1
kind: PersistentVolumeClaim
metadata:
  name: pvc-ec
spec:
  storageClassName: cubefs-ec
  accessModes:
    - ReadWriteOnce
  resources:
    requests:
      storage: 1Ti  # EC卷适合大容量
3.2.2.3 挂载到应用
创建无头服务
yaml
[root@VM_24_119_tlinux /usr/local/src/cubefs-helm/ec]# kubectl create svc clusterip bigdata-svc   --clusterip="None"
service/bigdata-svc created
yaml
apiVersion: apps/v1
kind: StatefulSet
metadata:
  name: bigdata-app
spec:
  selector:
    matchLabels:
      app: bigdata-app
  serviceName: bigdata-svc
  replicas: 1
  template:
    metadata:
      labels:
        app: bigdata-app
    spec:
      containers:
      - name: app
        image: harbor.test.com/cicd/nginx:latest
        volumeMounts:
        - name: data
          mountPath: /dataset
  volumeClaimTemplates:
  - metadata:
      name: data
    spec:
      storageClassName: cubefs-ec
      accessModes: [ "ReadWriteOnce" ]
      resources:
        requests:
          storage: 5Ti
bash
[root@VM_24_119_tlinux /usr/local/src/cubefs-helm/ec]# kubectl get pvc
NAME                         STATUS   VOLUME                                     CAPACITY   ACCESS MODES   STORAGECLASS     AGE
data-bigdata-app-0           Bound    pvc-ebe82297-6a61-4f7c-b209-3803f33bd2fe   5Ti        RWO            cubefs-ec        73s
3.3 对象存储
我们上边通过 helm 部署时已经开启了 objectnode,可以查看下
bash
[root@VM_24_119_tlinux /usr/local/src/cubefs-helm/cubefs]# kubectl get pods -n cubefs-system -l app.kubernetes.io/component=objectnode
NAME                         READY   STATUS    RESTARTS   AGE
objectnode-c9bfcd669-5dbfw   1/1     Running   0          3h25m
objectnode-c9bfcd669-9rkvc   1/1     Running   0          3h25m
objectnode-c9bfcd669-tr287   1/1     Running   0          3h25m

[root@VM_24_119_tlinux /usr/local/src/cubefs-helm/cubefs]# kubectl get svc -n cubefs-system
NAME                 TYPE        CLUSTER-IP       EXTERNAL-IP   PORT(S)           AGE
master-service       ClusterIP   172.19.253.131   <none>        17010/TCP         3h26m
master-service-np    NodePort    172.19.255.219   <none>        17010:32328/TCP   103m
objectnode-service   ClusterIP   172.19.253.251   <none>        1601/TCP          3h26m
还需要先创建一个 NodePort 类型的 objectnode-service,后面会用一个 go 代码演示如何操作 cubefs 对象存储
yaml
apiVersion: v1
kind: Service
metadata:
  annotations:
    meta.helm.sh/release-name: cubefs
    meta.helm.sh/release-namespace: cubefs-system
  labels:
    app.kubernetes.io/managed-by: Helm
  name: objectnode-service-np
  namespace: cubefs-system
spec:
  ports:
  - port: 1601
    protocol: TCP
    targetPort: 1601
  selector:
    app.kubernetes.io/component: objectnode
    app.kubernetes.io/name: cubefs-system
    app.kubernetes.io/version: 3.2.0
  sessionAffinity: None
  type: NodePort
yaml
[root@VM_24_119_tlinux /usr/local/src/cubefs-helm/ec/cubefs-3.3.0]# kubectl get ep -n cubefs-system
NAME                    ENDPOINTS                                                     AGE
master-service          10.122.24.116:17010,10.122.24.134:17010,10.122.24.143:17010   4h6m
master-service-np       10.122.24.116:17010,10.122.24.134:17010,10.122.24.143:17010   144m
objectnode-service      172.19.0.222:1601,172.19.0.223:1601,172.19.0.224:1601         4h6m
objectnode-service-np   172.19.0.222:1601,172.19.0.223:1601,172.19.0.224:1601         7s
3.3.1 创建 S3 用户
AccessKey 必须是 16 为数字+字母组合
SecretKey 必须是 32 位数字+字母组合
bash
[root@VM_24_119_tlinux /usr/local/src/cubefs-helm/ec/cubefs-3.3.0]# cfs-cli user create  dujie --access-key "LTAI5tAtWNWQSB7y" --secret-key "mgjsngnqeifjsudn246s762sfmko08S2" --password "DUjie123" --user-type=admin -y
Create user success:
[Summary]
  User ID    : dujie
  Access Key : LTAI5tAtWNWQSB7y
  Secret Key : mgjsngnqeifjsudn246s762sfmko08S2
  Type       : admin
  Create Time: 2025-07-18 13:22:31
[Volumes]
VOLUME                  PERMISSION
3.3.2 Go 操作存储桶
这里我写了一个 go demo 对存储桶做增删改查,下面的代码实现了基于 CubeFS 对象存储接口的 RESTful 管理 API 服务,主要包括了存储桶的创建、删除、查询,文件对象的上传、下载、查询列表和删除
go
package main

import (
	"bytes"
	"context"
	"encoding/json"
	"fmt"
	"io"
	"log"
	"net/http"
	"os"
	"time"

	"github.com/aws/aws-sdk-go-v2/aws"
	"github.com/aws/aws-sdk-go-v2/config"
	"github.com/aws/aws-sdk-go-v2/credentials"
	"github.com/aws/aws-sdk-go-v2/service/s3"
	"github.com/gorilla/mux"
)

// 配置结构体
type Config struct {
	Endpoint  string `json:"endpoint"`
	AccessKey string `json:"access_key"`
	SecretKey string `json:"secret_key"`
	Region    string `json:"region"`
}

// 请求结构体
type CreateBucketRequest struct {
	Bucket string `json:"bucket_name"`
}

type UploadRequest struct {
	BucketName string `json:"bucket_name"`
	ObjectKey  string `json:"object_key"`
}

type DeleteRequest struct {
	BucketName string `json:"bucket_name"`
	ObjectKey  string `json:"object_key,omitempty"`
}

// 响应结构体
type Response struct {
	Success bool   `json:"success"`
	Message string `json:"message"`
	Data    any    `json:"data,omitempty"`
}

var (
	s3Client  *s3.Client
	appConfig Config
)

func main() {
	// 加载配置
	loadConfig()

	// 初始化S3客户端
	initS3Client()

	// 创建路由
	router := mux.NewRouter()

	// 存储桶管理
	router.HandleFunc("/buckets", createBucketHandler).Methods("POST")
	router.HandleFunc("/buckets", listBucketsHandler).Methods("GET")
	router.HandleFunc("/buckets/{bucket}", deleteBucketHandler).Methods("DELETE")

	// 对象管理
	router.HandleFunc("/objects", uploadObjectHandler).Methods("POST")
	router.HandleFunc("/buckets/{bucket}/objects/{key}", downloadObjectHandler).Methods("GET")
	router.HandleFunc("/buckets/{bucket}/objects/{key}", deleteObjectHandler).Methods("DELETE")
	router.HandleFunc("/buckets/{bucket}/objects", listObjectsHandler).Methods("GET")

	// 启动服务
	port := ":8080"
	log.Printf("CubeFS管理服务启动,监听端口 %s", port)
	log.Fatal(http.ListenAndServe(port, router))
}

// 加载配置
func loadConfig() {
	// 从环境变量获取配置
	appConfig = Config{
		Endpoint:  getEnv("CUBEFS_ENDPOINT", "http://10.122.24.119:31636"),
		AccessKey: getEnv("CUBEFS_ACCESS_KEY", "LTAI5tAtWNWQSB7y"),
		SecretKey: getEnv("CUBEFS_SECRET_KEY", "mgjsngnqeifjsudn246s762sfmko08S2"),
		Region:    getEnv("CUBEFS_REGION", "us-east-1"),
	}
}

func getEnv(key, defaultValue string) string {
	if value, exists := os.LookupEnv(key); exists {
		return value
	}
	return defaultValue
}

// 初始化S3客户端
func initS3Client() {
	// 确保区域不为空
	if appConfig.Region == "" {
		appConfig.Region = "us-east-1" // 设置默认区域
		log.Println("使用默认区域: us-east-1")
	}

	customResolver := aws.EndpointResolverWithOptionsFunc(func(service, region string, options ...interface{}) (aws.Endpoint, error) {
		return aws.Endpoint{
			URL:           appConfig.Endpoint,
			SigningRegion: appConfig.Region,
		}, nil
	})

	cfg, err := config.LoadDefaultConfig(context.TODO(),
		config.WithEndpointResolverWithOptions(customResolver),
		config.WithCredentialsProvider(credentials.NewStaticCredentialsProvider(
			appConfig.AccessKey,
			appConfig.SecretKey,
			"",
		)),
		config.WithDefaultRegion(appConfig.Region),
	)

	if err != nil {
		log.Fatalf("无法创建S3配置: %v", err)
	}

	s3Client = s3.NewFromConfig(cfg, func(o *s3.Options) {
		// 强制使用路径样式(适用于CubeFS)
		o.UsePathStyle = true
	})
	log.Println("S3客户端初始化成功")
}


// 创建存储桶
func createBucketHandler(w http.ResponseWriter, r *http.Request) {
	var req CreateBucketRequest
	if err := json.NewDecoder(r.Body).Decode(&req); err != nil {
		respondError(w, http.StatusBadRequest, "无效的请求体")
		return
	}

	if req.Bucket == "" {
		respondError(w, http.StatusBadRequest, "存储桶名称不能为空")
		return
	}

	_, err := s3Client.CreateBucket(context.TODO(), &s3.CreateBucketInput{
		Bucket: aws.String(req.Bucket),
	})

	if err != nil {
		respondError(w, http.StatusInternalServerError, fmt.Sprintf("创建存储桶失败: %v", err))
		return
	}

	respondJSON(w, http.StatusCreated, Response{
		Success: true,
		Message: "存储桶创建成功",
		Data:    req.Bucket,
	})
}

// 列出存储桶
func listBucketsHandler(w http.ResponseWriter, r *http.Request) {
	result, err := s3Client.ListBuckets(context.TODO(), &s3.ListBucketsInput{
		BucketRegion: &appConfig.Region,
	})
	if err != nil {
		respondError(w, http.StatusInternalServerError, fmt.Sprintf("获取存储桶列表失败: %v", err))
		return
	}

	buckets := make([]string, 0, len(result.Buckets))
	for _, b := range result.Buckets {
		buckets = append(buckets, *b.Name)
	}

	respondJSON(w, http.StatusOK, Response{
		Success: true,
		Message: "存储桶列表获取成功",
		Data:    buckets,
	})
}

// 删除存储桶
func deleteBucketHandler(w http.ResponseWriter, r *http.Request) {
	vars := mux.Vars(r)
	bucket := vars["bucket"]

	// 先清空存储桶
	paginator := s3.NewListObjectsV2Paginator(s3Client, &s3.ListObjectsV2Input{
		Bucket: aws.String(bucket),
	})

	for paginator.HasMorePages() {
		page, err := paginator.NextPage(context.TODO())
		if err != nil {
			respondError(w, http.StatusInternalServerError, fmt.Sprintf("列出对象失败: %v", err))
			return
		}

		for _, obj := range page.Contents {
			_, err := s3Client.DeleteObject(context.TODO(), &s3.DeleteObjectInput{
				Bucket: aws.String(bucket),
				Key:    obj.Key,
			})
			if err != nil {
				respondError(w, http.StatusInternalServerError, fmt.Sprintf("删除对象失败: %v", err))
				return
			}
		}
	}

	// 删除存储桶
	_, err := s3Client.DeleteBucket(context.TODO(), &s3.DeleteBucketInput{
		Bucket: aws.String(bucket),
	})

	if err != nil {
		respondError(w, http.StatusInternalServerError, fmt.Sprintf("删除存储桶失败: %v", err))
		return
	}

	respondJSON(w, http.StatusOK, Response{
		Success: true,
		Message: "存储桶删除成功",
	})
}

// 上传对象
func uploadObjectHandler(w http.ResponseWriter, r *http.Request) {
	// 解析表单数据 (最大10MB)
	if err := r.ParseMultipartForm(10 << 20); err != nil {
		respondError(w, http.StatusBadRequest, "文件大小超过10MB限制")
		return
	}

	// 获取表单字段
	bucket := r.FormValue("bucket")
	key := r.FormValue("key")
	file, header, err := r.FormFile("file")
	if err != nil {
		respondError(w, http.StatusBadRequest, "获取文件失败")
		return
	}
	defer file.Close()

	// 如果未提供key,使用文件名
	if key == "" {
		key = header.Filename
	}

	// 读取文件内容
	fileContent, err := io.ReadAll(file)
	if err != nil {
		respondError(w, http.StatusInternalServerError, "读取文件内容失败")
		return
	}

	// 上传到S3
	_, err = s3Client.PutObject(context.TODO(), &s3.PutObjectInput{
		Bucket: aws.String(bucket),
		Key:    aws.String(key),
		Body:   bytes.NewReader(fileContent),
	})

	if err != nil {
		respondError(w, http.StatusInternalServerError, fmt.Sprintf("文件上传失败: %v", err))
		return
	}

	respondJSON(w, http.StatusCreated, Response{
		Success: true,
		Message: "文件上传成功",
		Data: map[string]string{
			"bucket": bucket,
			"key":    key,
		},
	})
}

// 下载对象
// 下载对象
func downloadObjectHandler(w http.ResponseWriter, r *http.Request) {
	vars := mux.Vars(r)
	bucket := vars["bucket"]
	key := vars["key"]

	result, err := s3Client.GetObject(context.TODO(), &s3.GetObjectInput{
		Bucket: aws.String(bucket),
		Key:    aws.String(key),
	})

	if err != nil {
		respondError(w, http.StatusNotFound, "文件不存在或获取失败")
		return
	}
	defer result.Body.Close()

	// 设置响应头
	if result.ContentType != nil {
		w.Header().Set("Content-Type", *result.ContentType)
	}

	// 如果未设置Content-Disposition,则设置默认下载文件名
	if w.Header().Get("Content-Disposition") == "" {
		w.Header().Set("Content-Disposition", fmt.Sprintf("attachment; filename=\"%s\"", key))
	}

	// 流式传输文件内容
	if _, err := io.Copy(w, result.Body); err != nil {
		log.Printf("文件下载失败: %v", err)
	}
}

// 删除对象
func deleteObjectHandler(w http.ResponseWriter, r *http.Request) {
	vars := mux.Vars(r)
	bucket := vars["bucket"]
	key := vars["key"]

	_, err := s3Client.DeleteObject(context.TODO(), &s3.DeleteObjectInput{
		Bucket: aws.String(bucket),
		Key:    aws.String(key),
	})

	if err != nil {
		respondError(w, http.StatusInternalServerError, fmt.Sprintf("删除文件失败: %v", err))
		return
	}

	respondJSON(w, http.StatusOK, Response{
		Success: true,
		Message: "文件删除成功",
	})
}

// 列出对象
func listObjectsHandler(w http.ResponseWriter, r *http.Request) {
	vars := mux.Vars(r)
	bucket := vars["bucket"]
	prefix := r.URL.Query().Get("prefix")

	input := &s3.ListObjectsV2Input{
		Bucket: aws.String(bucket),
	}
	if prefix != "" {
		input.Prefix = aws.String(prefix)
	}

	result, err := s3Client.ListObjectsV2(context.TODO(), input)
	if err != nil {
		respondError(w, http.StatusInternalServerError, fmt.Sprintf("列出对象失败: %v", err))
		return
	}

	objects := make([]map[string]string, 0, len(result.Contents))
	for _, obj := range result.Contents {
		objects = append(objects, map[string]string{
			"key":           *obj.Key,
			"size":          fmt.Sprintf("%d", obj.Size),
			"last_modified": obj.LastModified.Format(time.RFC3339),
		})
	}

	respondJSON(w, http.StatusOK, Response{
		Success: true,
		Message: "对象列表获取成功",
		Data:    objects,
	})
}

// 响应JSON
func respondJSON(w http.ResponseWriter, status int, data interface{}) {
	w.Header().Set("Content-Type", "application/json")
	w.WriteHeader(status)
	json.NewEncoder(w).Encode(data)
}

// 响应错误
func respondError(w http.ResponseWriter, status int, message string) {
	respondJSON(w, status, Response{
		Success: false,
		Message: message,
	})
}
3.3.3 代码测试
可以将代码运行后进行测试,我这里使用 postman 测试
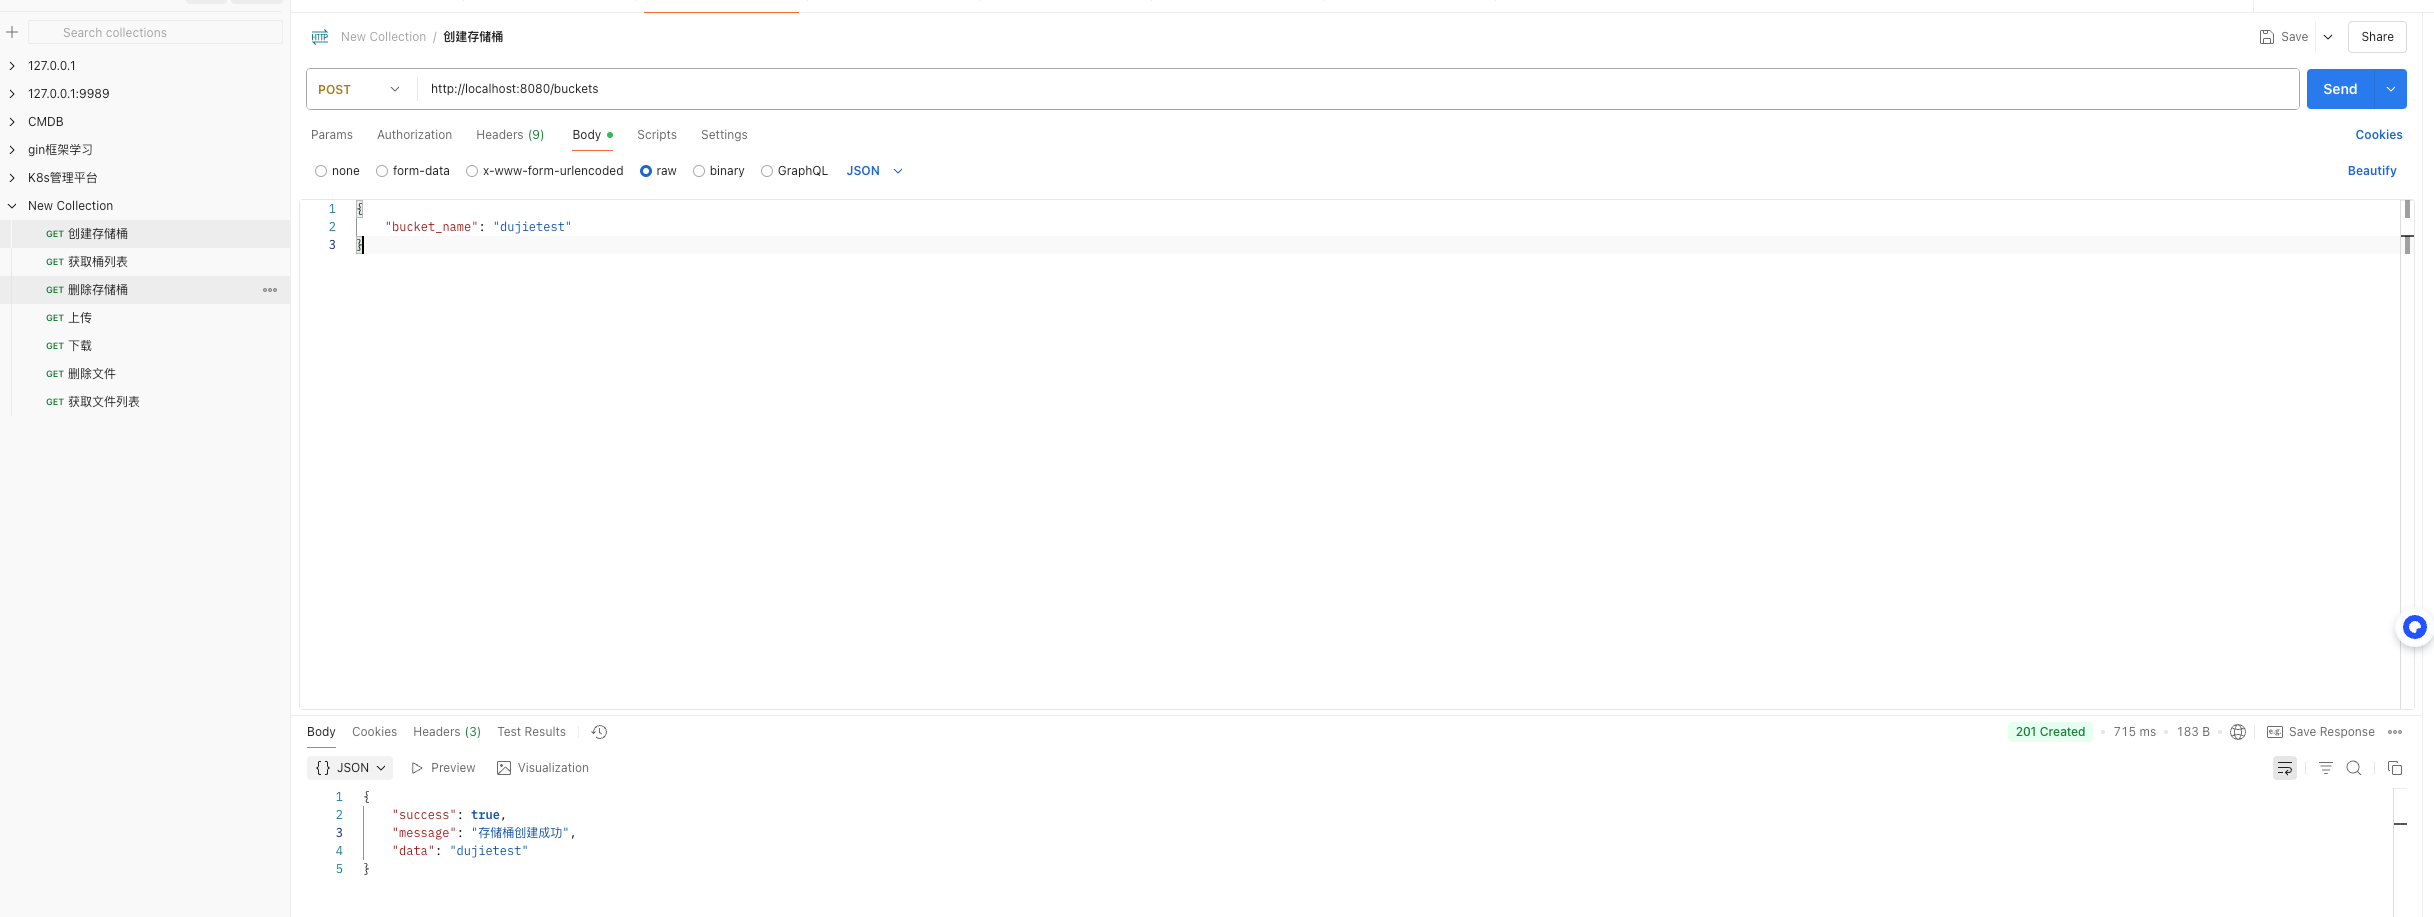
3.3.3.1 创建存储桶测试
接口地址为:http://localhost:8080/buckets
<font style="color:#DF2A3F;">POST /buckets</font>
需要在请求体中传入 <font style="color:#DF2A3F;">bucket_name</font> 参数,上面代码 中的<font style="color:#DF2A3F;">CreateBucketRequest</font> 结构体定义的
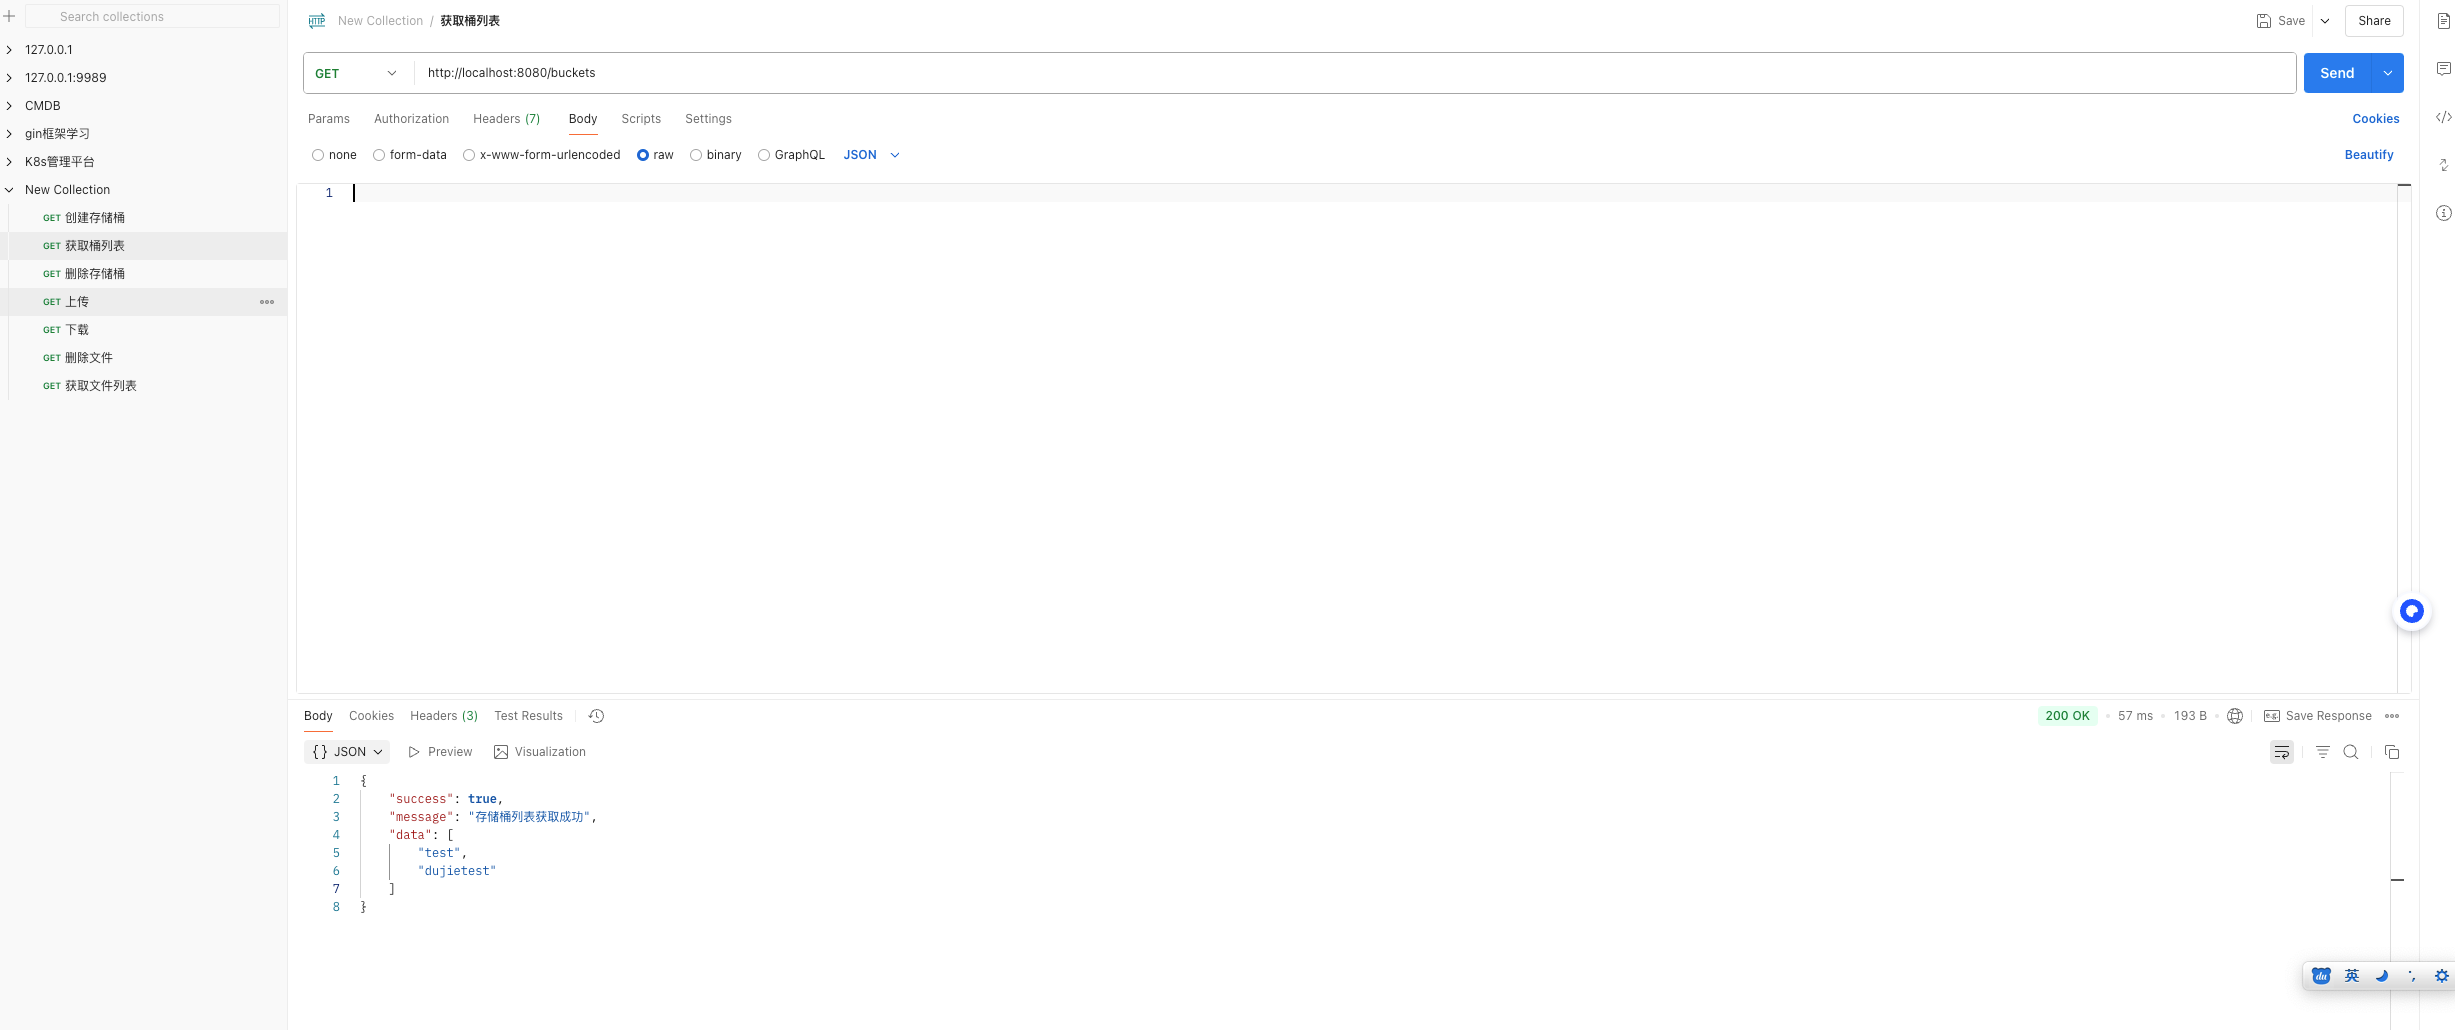
3.3.3.2 获取桶列表测试
接口地址为:http://localhost:8080/buckets
<font style="color:#DF2A3F;">GET /buckets</font>
获取桶列表
3.3.3.3 删除存储桶
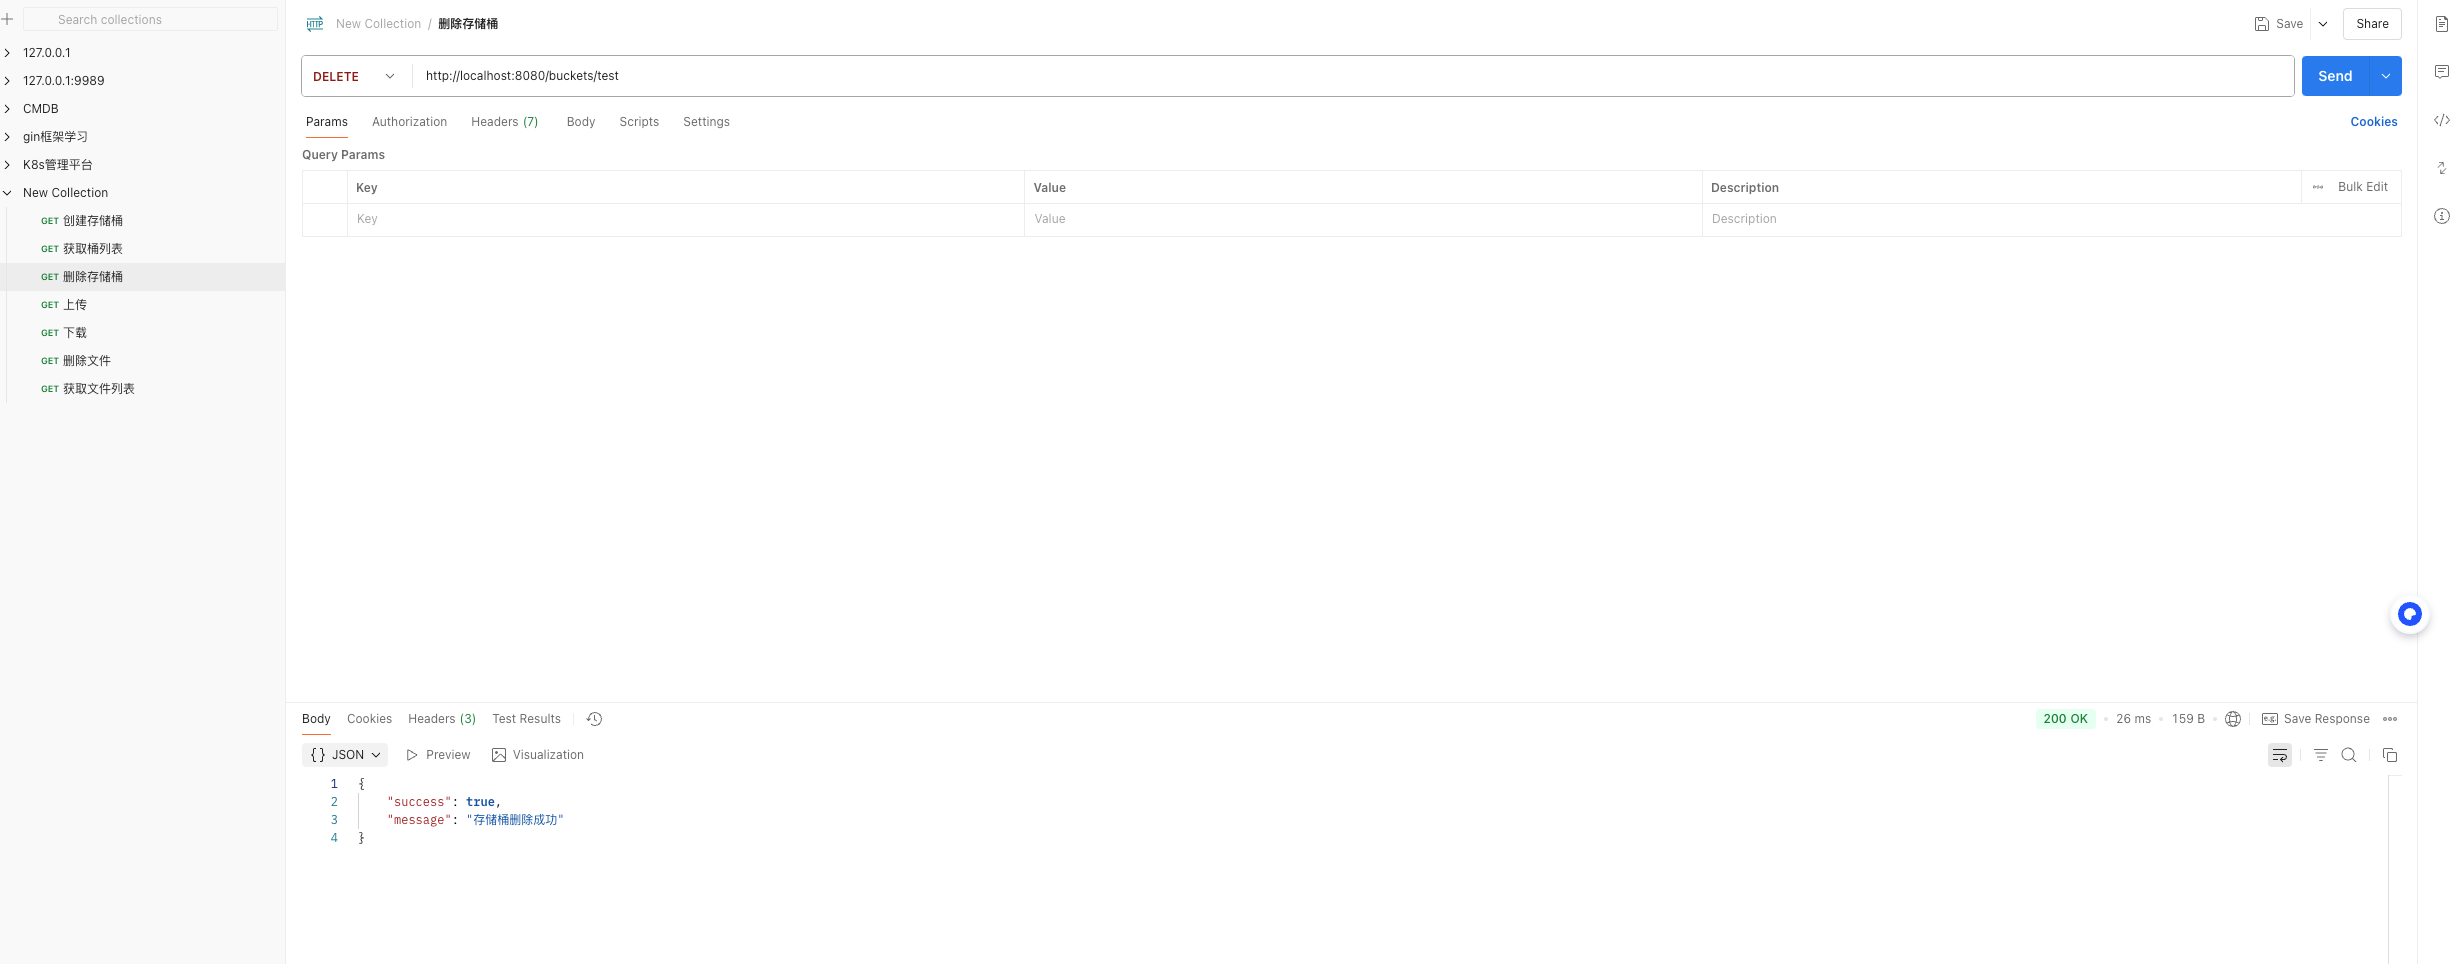
接口地址:http://localhost:8080/buckets/{bucket}
<font style="color:#DF2A3F;">DELETE /buckets/{bucket}</font>
删除指定的存储桶,通过路径参数的方式传入要删除的桶名
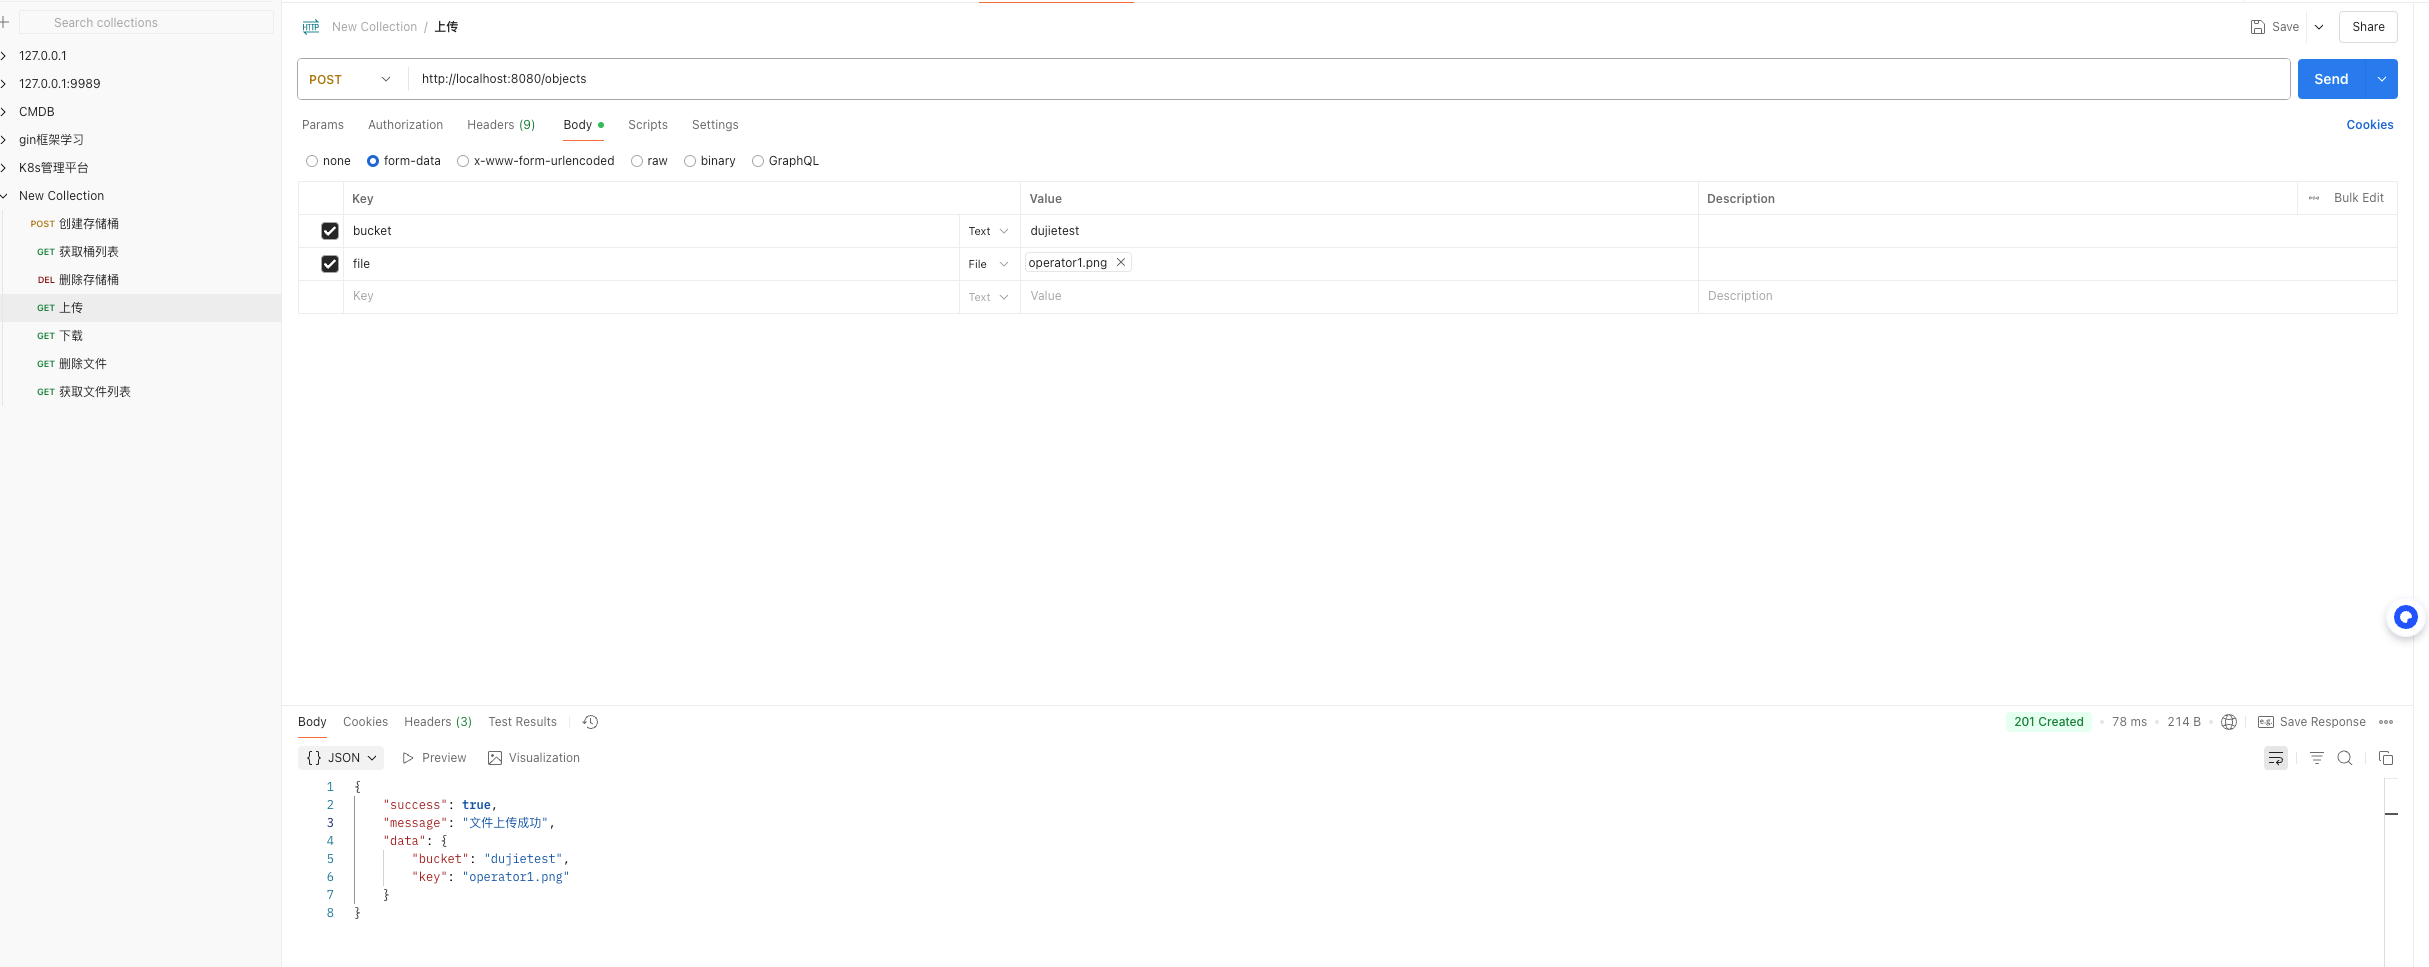
3.3.3.4 文件上传
接口地址:http://localhost:8080/objects
<font style="color:#DF2A3F;">POST /objects</font>
通过表单方式传入三个字段:
- bucket:桶名
- key:对象的 key 名,不填默认为文件名
- file:上传的文件
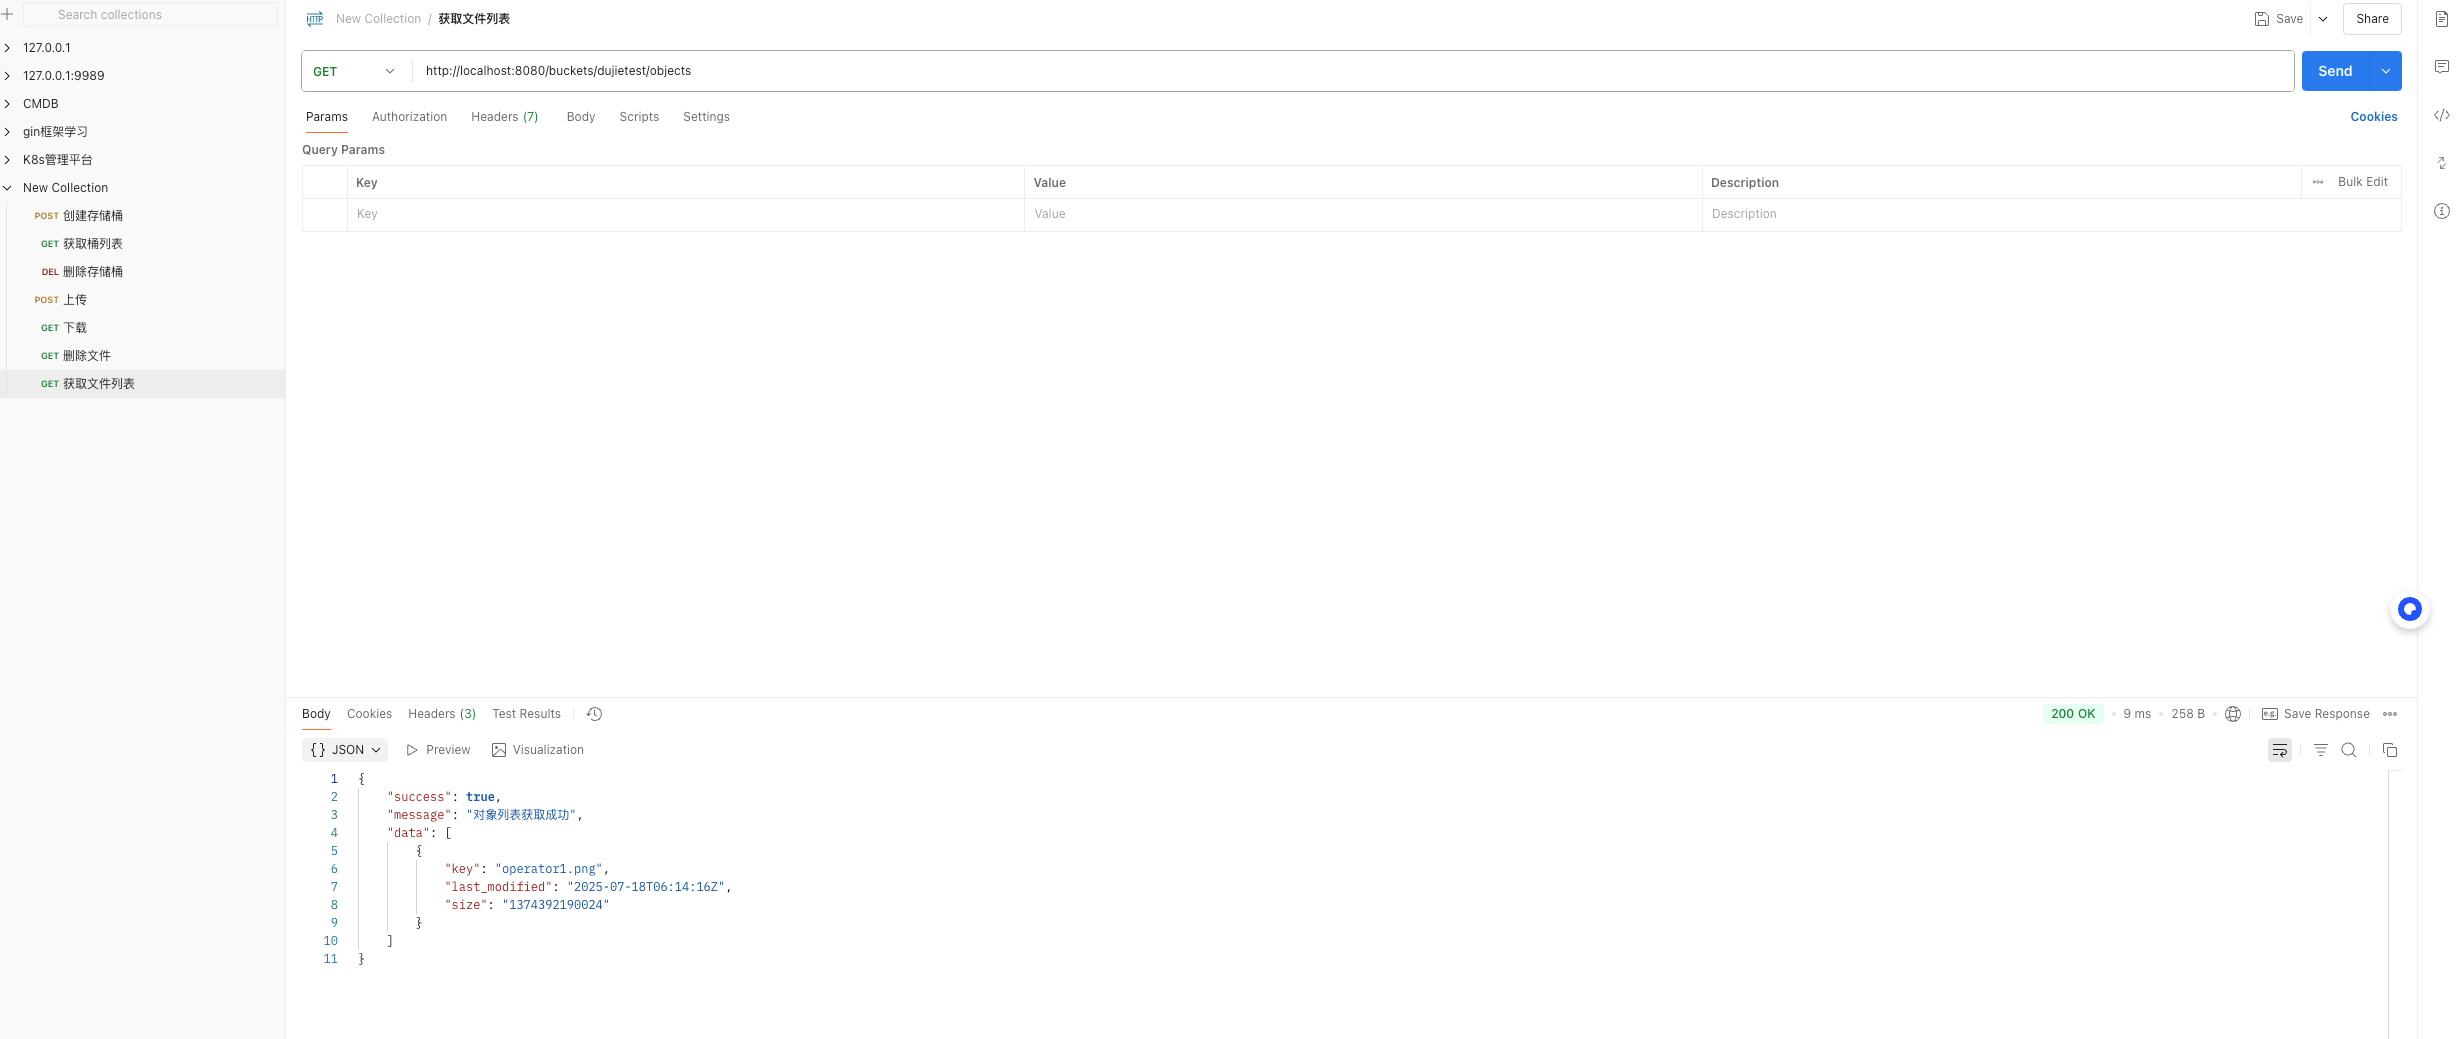
3.3.3.5 查询文件列表
接口地址:http://localhost:8080/buckets/{bucket}/objects
<font style="color:#DF2A3F;">GET /buckets/{bucket}/objects</font>
根据 bucket 名获取文件列表,在路径参数中传入 bucket 名即可
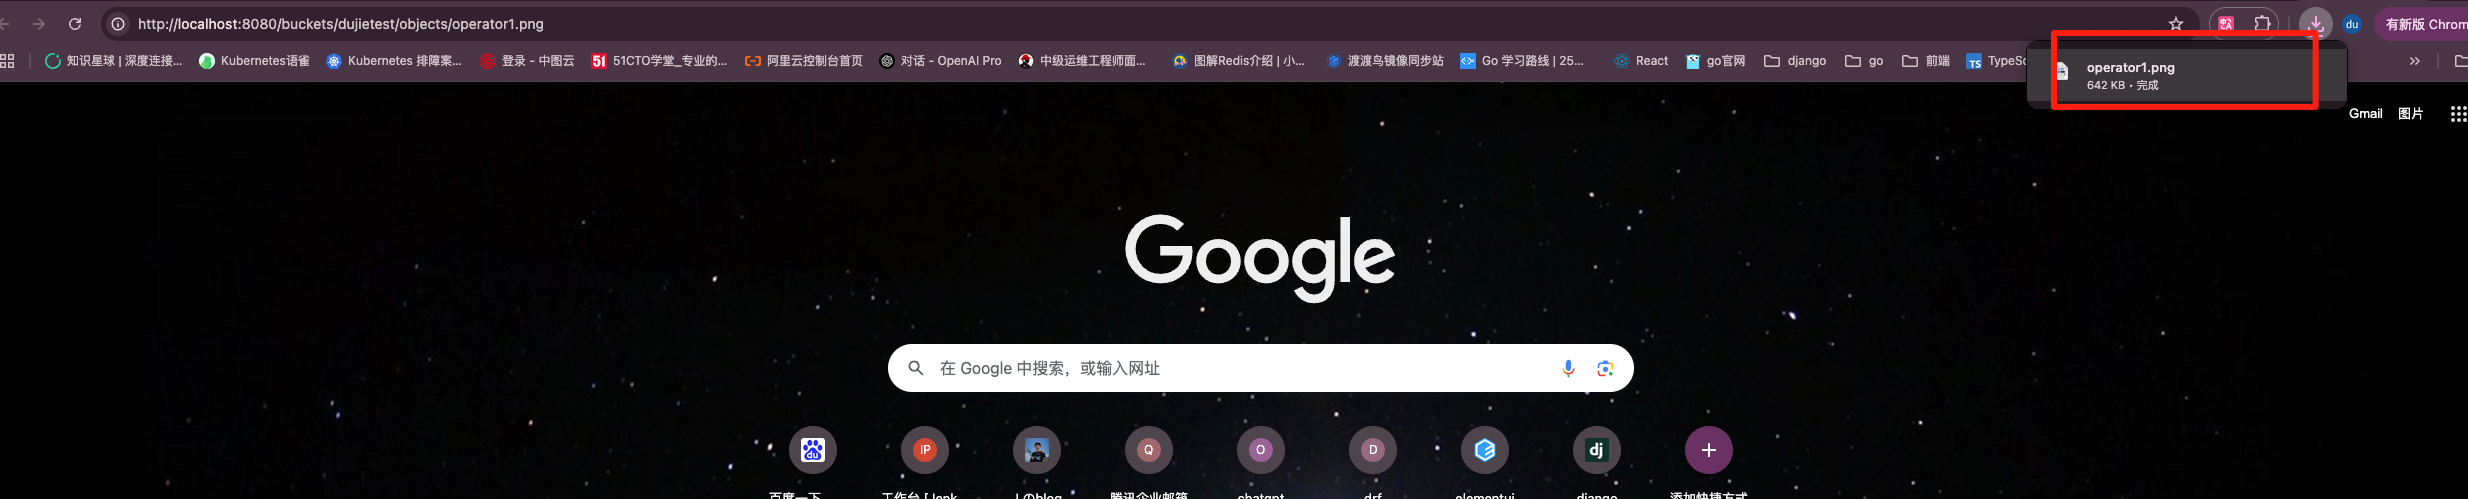
3.3.3.6 文件下载
接口地址:http://localhost:8080/{bucket}/objects/{key}
<font style="color:#DF2A3F;">GET /{bucket}/objects/{key}</font>
文件下载,在路径参数中传入 bucket 桶名、文件 key 名即可
3.3.3.7 文件删除
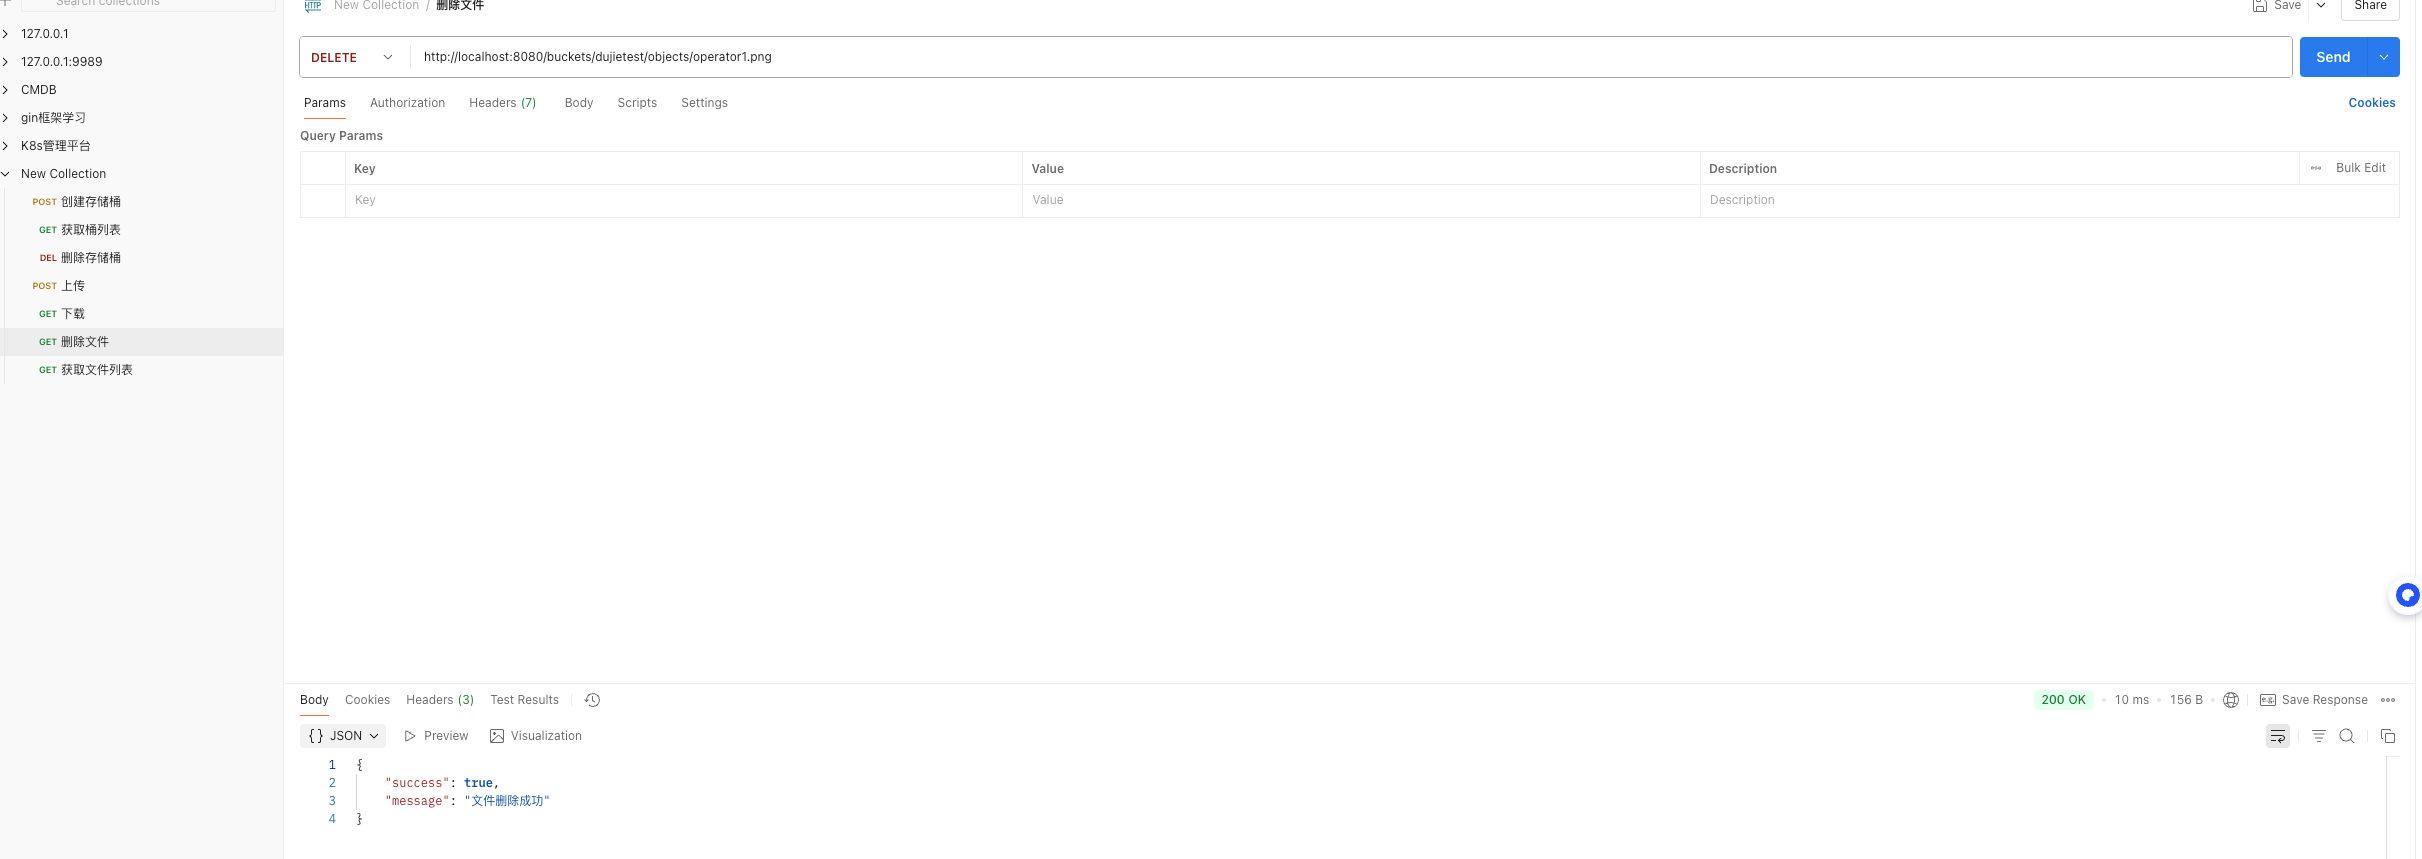
接口地址:http://localhost:8080/{bucket}/objects/{key}
<font style="color:#DF2A3F;">DELETE /{bucket}/objects/{key}</font>
文件删除,在路径参数中传入 bucket 桶名、文件 key 名即可
3.3.4 aws 客户端验证代码结果
上面代码实现了针对存储桶和文件的增删改查,那么也可以通过 aws 客户端来验证上面的代码结果是否正常
3.3.4.1 安装 AWS CLI
bash
pip install awscli3.3.4.2 配置 CubeFS 访问
bash
[root@VM_24_119_tlinux /usr/local/src/cubefs-helm/ec/cubefs-3.3.0]# aws configure set aws_access_key_id LTAI5tAtWNWQSB7y
[root@VM_24_119_tlinux /usr/local/src/cubefs-helm/ec/cubefs-3.3.0]# aws configure set aws_secret_access_key mgjsngnqeifjsudn246s762sfmko08S2
[root@VM_24_119_tlinux /usr/local/src/cubefs-helm/ec/cubefs-3.3.0]# aws configure set default.region us-east-1
[root@VM_24_119_tlinux /usr/local/src/cubefs-helm/ec/cubefs-3.3.0]# aws configure set default.s3.endpoint_url http://http://10.122.24.119:31636
3.3.4.3 验证配置
bash
[root@VM_24_119_tlinux /usr/local/src/cubefs-helm/ec/cubefs-3.3.0]# aws s3 ls --endpoint-url http://10.122.24.119:31636
2025-07-18 14:03:59 dujietest
常用对象存储命令
bash
# 列出所有存储桶
aws s3 ls --endpoint-url http://10.122.24.119:31636

# 创建存储桶
aws s3 mb s3://my-bucket --endpoint-url http://your-cubefs-endpoint

# 上传文件
aws s3 cp local-file.txt s3://my-bucket/ --endpoint-url http://your-cubefs-endpoint

# 下载文件
aws s3 cp s3://my-bucket/remote-file.txt . --endpoint-url http://your-cubefs-endpoint

# 删除文件
aws s3 rm s3://my-bucket/remote-file.txt --endpoint-url http://your-cubefs-endpoint