AI 编程已经不是新鲜事了。
从 ChatGPT 到 Cursor,开发者已经习惯了用 AI 辅助写代码------但现实很骨感:
- 有的工具对中文指令理解不够精准,要不断翻译成英文
prompt - 有的擅长写代码片段,却不擅长一次性完成一个可运行的项目
- 有的集成在
IDE里很方便,但对Vue3、Pinia这类中文生态的细节支持并不完美
这次,我盯上了一个新工具 ------ Trae。
它的官方定位是"AI 工程师",卖点是:
- 中文友好:直接用自然中文对话
- 任务驱动:按任务卡片一步步推进
- 多模型支持 :
Claude、GPT-4o等随时切换
于是我给它定了一个小目标:
挑战任务
在 30 分钟 内,用
Trae从零实现一个Vue3+Vite+Pinia+Vitest的倒计时应用,要求:
- 可运行
- 有状态管理
- 附带单元测试
- 还能自动修
Bug
最终结果?
超出我的预期,但过程并不是一路平坦,中间还差点翻车。
接下来就是我完整的实测和踩坑记录。
一、为什么使用 Trae
我平时主要做前端,开发节奏其实很紧凑:
我平时是开发(前端开发为主,也写 Python 脚本),日常遇到的痛点:
- 重复造轮子(组件搭建 & 状态管理)浪费时间
- 临时加需求要改很多地方,容易出错
- 用
ChatGPT生成代码,Vue3语法偶尔不准,还得手改 Cursor虽然集成VSCode,但中文需求细节经常被忽略
Trae 吸引我的有三点:
- 中文友好 :自然中文指令,不用写复杂英文
prompt - 任务驱动:按任务卡片一步步完成
- 多模型切换 :
Claude、GPT-4o可随时切换
于是我定了个小目标:在 30 分钟内,做出一个可运行、带测试的倒计时应用。
功能要求:
- 可以设置初始秒数
- 支持开始、暂停、重置
- 切换页面状态不丢失
- 有基础样式
- 附带单元测试
二、安装与配置 Trae
1. 下载
Trae 目前有国内版和国际版:
- 国内版:下载快、登录顺畅,模型少一些
- 国际版 :支持
Claude 3.5、GPT-4o,英文资料引用更好
我选了国际版,并开启中文模式。
小贴士:第一次安装最好记录版本号,方便后续复盘。

三、30 分钟挑战实录
步骤 1:创建项目骨架
目标 :生成一个 Vue3 + Vite + Pinia 的基础项目结构。
我在 Trae 输入:
markdown
请用 Vue3 + Vite 创建一个倒计时组件 Countdown.vue,
要求:
1. 接收初始时间(秒)作为 prop
2. 支持开始、暂停、重置
3. 显示剩余时间 mm:ss 格式
4. 使用 Pinia 管理状态,切换组件时状态保持
5. 样式简洁
本地执行:
bash
npm create vue@latest . -- --typescript --router --pinia --eslint
npm install
npm run dev
生成的目录:
css
src/
  components/
    __tests__/
      Countdown.test.ts
    Countdown.vue
  store/
    countdown.ts
  App.vue
  main.ts
Trae 根据提示生成的功能与技术要点
实现功能:
✅ 接收初始时间 prop --- 组件通过 initialTime 属性(秒)接收倒计时初始值
✅ 开始 / 暂停 / 重置 --- 三个按钮精准控制倒计时进程
✅ mm:ss 格式显示 --- 剩余时间自动格式化为分钟:秒,并补零
✅ Pinia 状态管理 --- 使用 Pinia 持久化倒计时状态,组件切换不丢失数据
✅ 简洁美观的 UI:
- 大号数字显示剩余时间
- 彩色按钮(绿色=开始,黄色=暂停,红色=重置)
- 卡片式布局,视觉层次清晰
- 响应式设计,兼容桌面和移动端
技术特点:
Vue3 Composition API--- 更灵活的响应式语法TypeScript全面支持 --- 类型安全、可读性高Pinia状态持久化 --- 数据跨组件、跨页面保留- 自动清理定时器 --- 避免内存泄漏
- 智能按钮状态 --- 根据当前倒计时状态自动启用/禁用按钮,防止无效操作
步骤 2:实现 Countdown.vue 组件
目标:实现倒计时显示与按钮控制。
javascript
<template>
<div class="countdown-container">
<div class="countdown-display">
{{ countdownStore.formattedTime }}
</div>
<div class="countdown-controls">
<button
@click="countdownStore.start()"
:disabled="countdownStore.isRunning || countdownStore.currentTime <= 0"
class="btn btn-start"
>
开始
</button>
<button
@click="countdownStore.pause()"
:disabled="!countdownStore.isRunning"
class="btn btn-pause"
>
暂停
</button>
<button
@click="countdownStore.reset()"
class="btn btn-reset"
>
重置
</button>
</div>
</div>
</template>
<script setup lang="ts">
import { onMounted, onUnmounted } from 'vue'
import { useCountdownStore } from '@/stores/countdown'
interface Props {
initialTime: number // 初始时间(秒)
}
const props = defineProps<Props>()
const countdownStore = useCountdownStore()
// 组件挂载时设置初始时间
onMounted(() => {
countdownStore.setInitialTime(props.initialTime)
})
// 组件卸载时清理定时器
onUnmounted(() => {
countdownStore.pause()
})
</script>
<style scoped>
.countdown-container {
display: flex;
flex-direction: column;
align-items: center;
gap: 20px;
padding: 30px;
background: #f8f9fa;
border-radius: 12px;
box-shadow: 0 4px 6px rgba(0, 0, 0, 0.1);
max-width: 300px;
margin: 0 auto;
}
.countdown-display {
font-size: 3rem;
font-weight: bold;
color: #2c3e50;
font-family: 'Courier New', monospace;
background: #fff;
padding: 20px 30px;
border-radius: 8px;
border: 2px solid #e9ecef;
min-width: 150px;
text-align: center;
}
.countdown-controls {
display: flex;
gap: 10px;
}
.btn {
padding: 10px 20px;
border: none;
border-radius: 6px;
font-size: 14px;
font-weight: 500;
cursor: pointer;
transition: all 0.2s ease;
min-width: 70px;
}
.btn:disabled {
opacity: 0.5;
cursor: not-allowed;
}
.btn-start {
background: #28a745;
color: white;
}
.btn-start:hover:not(:disabled) {
background: #218838;
}
.btn-pause {
background: #ffc107;
color: #212529;
}
.btn-pause:hover:not(:disabled) {
background: #e0a800;
}
.btn-reset {
background: #dc3545;
color: white;
}
.btn-reset:hover:not(:disabled) {
background: #c82333;
}
</style>步骤 3:Pinia 状态管理
src/store/countdown.ts:
javascript
import { ref, computed } from 'vue'
import { defineStore } from 'pinia'
export const useCountdownStore = defineStore('countdown', () => {
const initialTime = ref(0) // 初始时间(秒)
const currentTime = ref(0) // 当前剩余时间(秒)
const isRunning = ref(false) // 是否正在运行
const intervalId = ref<number | null>(null) // 定时器ID
// 格式化时间为 mm:ss
const formattedTime = computed(() => {
const minutes = Math.floor(currentTime.value / 60)
const seconds = currentTime.value % 60
return `${minutes.toString().padStart(2, '0')}:${seconds.toString().padStart(2, '0')}`
})
// 设置初始时间
function setInitialTime(time: number) {
initialTime.value = time
currentTime.value = time
}
// 开始倒计时
function start() {
if (isRunning.value || currentTime.value <= 0) return
isRunning.value = true
intervalId.value = window.setInterval(() => {
if (currentTime.value > 0) {
currentTime.value--
} else {
pause()
}
}, 1000)
}
// 暂停倒计时
function pause() {
isRunning.value = false
if (intervalId.value) {
clearInterval(intervalId.value)
intervalId.value = null
}
}
// 重置倒计时
function reset() {
pause()
currentTime.value = initialTime.value
}
return {
initialTime,
currentTime,
isRunning,
formattedTime,
setInitialTime,
start,
pause,
reset
}
})步骤 4:App.vue 挂载
javascript
<script setup lang="ts">
import Countdown from './components/Countdown.vue'
</script>
<template>
<header>
<h1>Vue3 倒计时组件演示</h1>
</header>
<main>
<div class="countdown-demo">
<h2>倒计时组件</h2>
<p>初始时间:5分钟(300秒)</p>
<Countdown :initial-time="300" />
</div>
</main>
</template>
<style scoped>
header {
text-align: center;
padding: 2rem 0;
background: #f8f9fa;
border-bottom: 1px solid #e9ecef;
}
header h1 {
margin: 0;
color: #2c3e50;
font-size: 2rem;
}
main {
padding: 2rem;
min-height: calc(100vh - 120px);
}
.countdown-demo {
text-align: center;
}
.countdown-demo h2 {
color: #2c3e50;
margin-bottom: 1rem;
}
.countdown-demo p {
color: #6c757d;
margin-bottom: 2rem;
}
</style>运行效果:

步骤 5:生成单元测试
markdown
请为 Countdown.vue 编写 3 个 Vitest 单测:
1. 倒计时能正确开始
2. 暂停功能有效
3. 重置功能有效
检查项目中是否配置 Vitest,需要安装 Vitest 相关依赖。如果没有依赖,则:
bash
npm install -D vitest @vue/test-utils jsdom @vitest/ui__tests__/Countdown.test.ts:
javascript
import { describe, it, expect, beforeEach, vi } from 'vitest'
import { mount } from '@vue/test-utils'
import { createPinia, setActivePinia } from 'pinia'
import { nextTick } from 'vue'
import Countdown from '../Countdown.vue'
import { useCountdownStore } from '@/stores/countdown'
// Mock timers
vi.useFakeTimers()
describe('Countdown.vue', () => {
let wrapper: any
let store: any
beforeEach(() => {
// 创建新的 Pinia 实例
const pinia = createPinia()
setActivePinia(pinia)
// 挂载组件
wrapper = mount(Countdown, {
props: {
initialTime: 60 // 60秒
},
global: {
plugins: [pinia]
}
})
store = useCountdownStore()
})
it('倒计时能正确开始', async () => {
// 验证初始状态
expect(store.currentTime).toBe(60)
expect(store.isRunning).toBe(false)
expect(store.formattedTime).toBe('01:00')
// 点击开始按钮
const startButton = wrapper.find('.btn-start')
expect(startButton.exists()).toBe(true)
expect(startButton.attributes('disabled')).toBeUndefined()
await startButton.trigger('click')
// 验证倒计时开始
expect(store.isRunning).toBe(true)
// 模拟时间流逝1秒
vi.advanceTimersByTime(1000)
// 验证时间减少了1秒
expect(store.currentTime).toBe(59)
expect(store.formattedTime).toBe('00:59')
// 再模拟2秒
vi.advanceTimersByTime(2000)
expect(store.currentTime).toBe(57)
expect(store.formattedTime).toBe('00:57')
})
it('暂停功能有效', async () => {
// 先开始倒计时
store.start()
expect(store.isRunning).toBe(true)
// 模拟时间流逝
vi.advanceTimersByTime(3000)
expect(store.currentTime).toBe(57)
// 直接调用store的pause方法
store.pause()
// 验证暂停状态
expect(store.isRunning).toBe(false)
// 记录暂停时的时间
const pausedTime = store.currentTime
// 模拟时间继续流逝
vi.advanceTimersByTime(5000)
// 验证时间没有继续减少
expect(store.currentTime).toBe(pausedTime)
expect(store.isRunning).toBe(false)
})
it('重置功能有效', async () => {
// 先开始倒计时并让时间流逝
store.start()
vi.advanceTimersByTime(10000) // 10秒
expect(store.currentTime).toBe(50)
expect(store.isRunning).toBe(true)
// 点击重置按钮
const resetButton = wrapper.find('.btn-reset')
expect(resetButton.exists()).toBe(true)
await resetButton.trigger('click')
// 验证重置后的状态
expect(store.currentTime).toBe(60) // 回到初始时间
expect(store.isRunning).toBe(false) // 停止运行
expect(store.formattedTime).toBe('01:00') // 显示格式正确
// 验证重置后可以重新开始
await wrapper.find('.btn-start').trigger('click')
expect(store.isRunning).toBe(true)
vi.advanceTimersByTime(1000)
expect(store.currentTime).toBe(59)
})
it('按钮状态正确控制', async () => {
const startButton = wrapper.find('.btn-start')
const pauseButton = wrapper.find('.btn-pause')
const resetButton = wrapper.find('.btn-reset')
// 初始状态:开始按钮可用,暂停按钮禁用
expect(startButton.attributes('disabled')).toBeUndefined()
expect(pauseButton.attributes('disabled')).toBeDefined()
// 开始后:开始按钮禁用,暂停按钮可用
await startButton.trigger('click')
expect(startButton.attributes('disabled')).toBeDefined()
expect(pauseButton.attributes('disabled')).toBeUndefined()
// 暂停后:开始按钮可用,暂停按钮禁用
await pauseButton.trigger('click')
expect(startButton.attributes('disabled')).toBeUndefined()
expect(pauseButton.attributes('disabled')).toBeDefined()
// 重置按钮始终可用
expect(resetButton.attributes('disabled')).toBeUndefined()
})
it('倒计时结束时自动停止', async () => {
// 设置一个很短的初始时间
store.setInitialTime(2)
// 开始倒计时
store.start()
expect(store.isRunning).toBe(true)
// 模拟时间流逝直到结束
vi.advanceTimersByTime(3000) // 多给一点时间确保完全结束
// 等待下一个tick确保状态更新
await vi.runAllTimersAsync()
// 验证倒计时自动停止
expect(store.currentTime).toBe(0)
expect(store.isRunning).toBe(false)
expect(store.formattedTime).toBe('00:00')
})
})运行:
bash
npm run test:run步骤6:调试与修复 Bug
在跑单元测试的过程中,我遇到了 三次不同的报错 ,每次都会导致用例直接挂掉。 令人惊喜的是,Trae 不只是提示我"出错了",而是会主动分析错误原因 ,并给出针对性的修复方案。
整个过程大致是这样:
- 测试失败 →
Trae自动读取报错信息 - 分析可能的原因(包括代码逻辑、状态初始化、依赖引用等)
- 给出修改方案,并在我确认后直接帮我改代码
- 重新运行测试,直到全部通过
最终,所有用例顺利跑通,应用功能完全可用。 这个"测试失败 → 自动诊断 → 自动修复"的闭环体验,让我有点像是在和一位不抱怨的结对编程搭档合作。

四、进阶优化
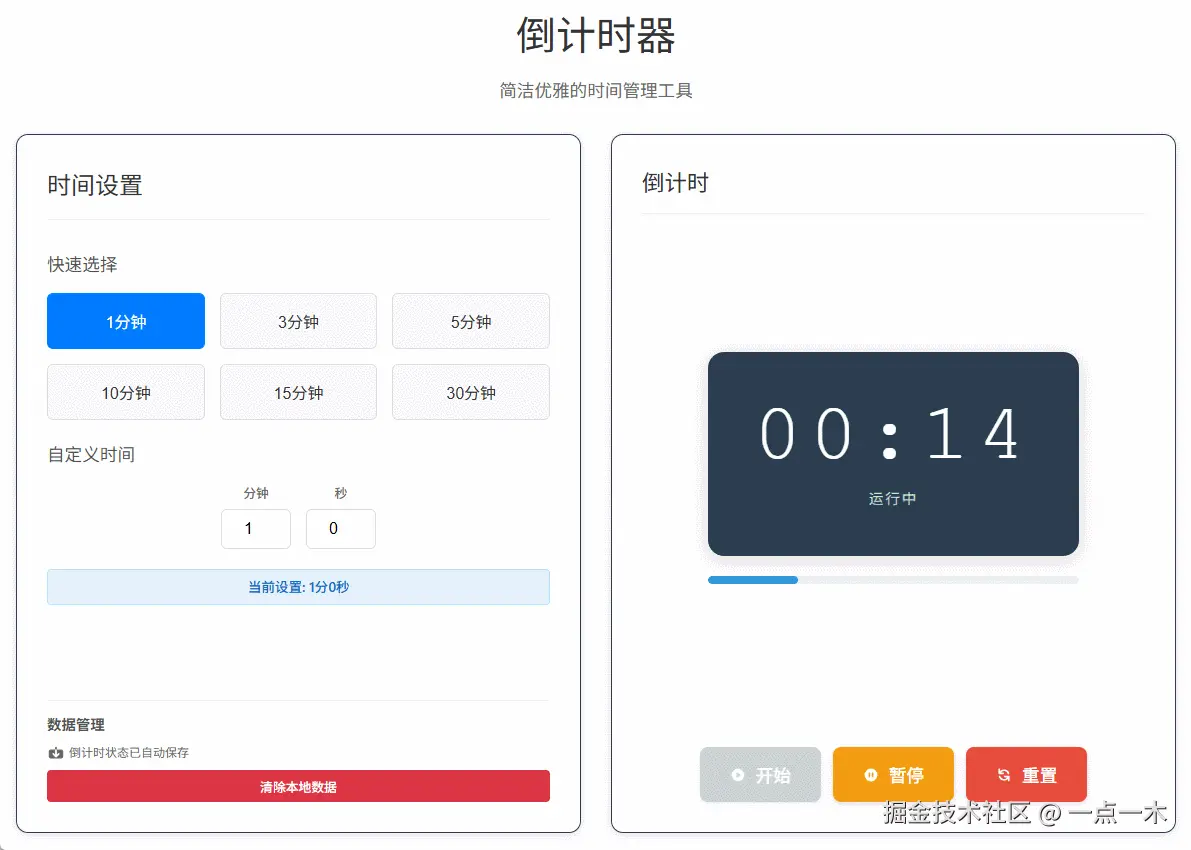
1. 自定义初始时间
Trae 根据我的提示词理解的内容如下:
markdown
## 新增功能
### 快速选择预设时间
- 提供了6个常用时间选项:1分钟、3分钟、5分钟、10分钟、15分钟、30分钟
- 点击按钮即可快速设置对应的初始时间
- 当前选中的预设时间会高亮显示
### 自定义时间输入
- 分别提供分钟和秒的数字输入框
- 分钟范围:0-99,秒范围:0-59
- 实时更新倒计时的初始时间
### 界面优化
- 添加了美观的卡片式布局
- 响应式设计,支持移动端显示
- 实时显示当前设置的时间(格式化显示和总秒数)
- 使用 :key 属性确保倒计时组件在初始时间改变时重新初始化
💬 点评 :这个需求 Trae 一次性理解到位,还自动帮我做了高亮显示当前选中的时间。
2. 本地持久化
Trae 根据我的提示词理解的内容如下:
markdown
## 核心功能
### 自动状态保存
- 倒计时的初始时间、当前时间、运行状态都会自动保存到浏览器的localStorage
- 使用watch监听器实时保存状态变化
- 在开始、暂停、重置操作时同步更新本地存储
### 智能状态恢复
- 页面刷新或重新打开时自动恢复之前的倒计时状态
- 如果倒计时在运行中被意外关闭,重新打开时会根据时间差自动计算剩余时间
- 支持跨浏览器会话的状态持久化
### 数据管理界面
- 添加了"数据管理"区域,显示持久化状态提示
- 提供"清除本地数据"按钮,可以一键清除所有存储的倒计时数据
- 清除数据时会弹出确认对话框,防止误操作
## 技术实现
- 使用localStorage API进行数据持久化
- 实现了错误处理机制,确保存储失败不影响功能
- 添加了时间差计算逻辑,准确恢复运行中的倒计时
- 提供了数据清理功能,方便用户管理本地数据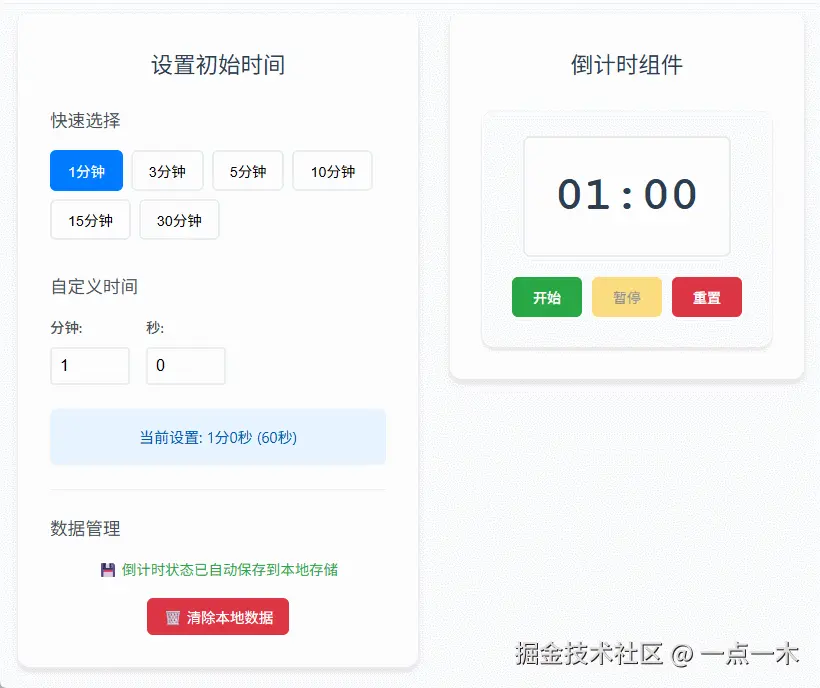
3. 样式增强(Tailwind)
检查项目中有没有安装 Tailwind CSS,安装并配置 Tailwind CSS:
bash
npm install -D tailwindcss postcss autoprefixer
npx tailwindcss init -ptailwind.config.js:
javascript
export default {
  content: [
    "./index.html",
    "./src/**/*.{vue,js,ts,jsx,tsx}"
  ]
}
💬 吐槽 :第一次切换到 Tailwind 时它直接把我原来的 CSS 全删了,还没生效,最后经过多轮对话才修好。
效果图:
五、体验总结
优点:
- 中文需求理解精准
Vue3代码结构清晰,状态管理到位- 单测生成实用,能跑通
Bug修复响应快
不足:
- 样式生成偏普通,复杂
UI需多轮交互 - 初次生成偶有遗漏,需要人工检查
Tailwind等前端工具链集成易出小坑
六、下一步挑战
这次只是一个小型组件挑战。
下一篇预告:用 Trae 一天完成一个交互式数据可视化大屏(Vue3 + ECharts) ,不仅要生成组件,还要自动对接 API、做动态交互,看看它能不能胜任前后端"一条龙"开发。
如果你也对 Trae 好奇,可以在评论区留言想让我试的功能,我会挑几个一起测!