前言
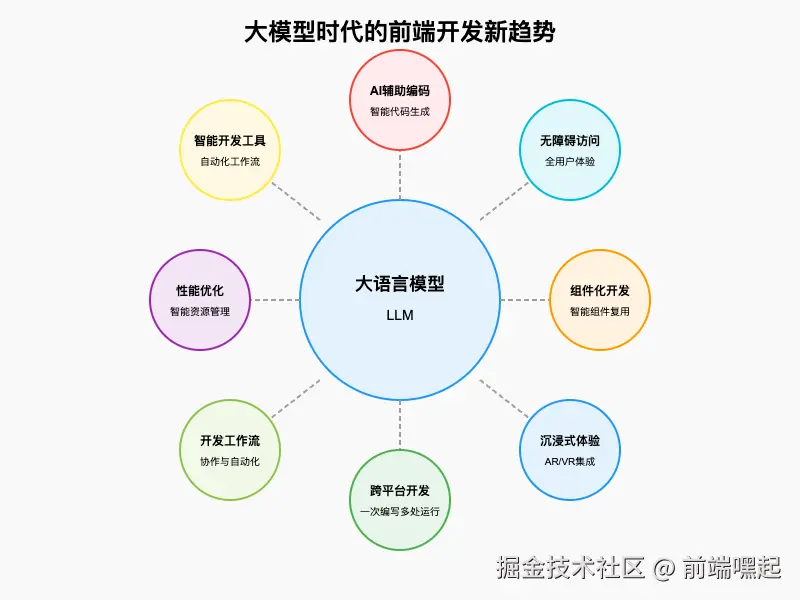
随着大语言模型(LLM)技术的飞速发展,前端开发领域正在经历一场前所未有的变革。从代码生成到用户体验设计,从开发工具到工作流程,AI正在重塑着我们构建Web应用的方式。本文将深入探讨当前前端开发领域的热门趋势,并通过实际案例和代码示例,帮助开发者更好地适应这个充满机遇与挑战的新时代。
通过实际案例和代码示例,我们将详细解析AI如何帮助前端开发者提升效率、优化性能、增强用户体验,以及未来可能出现的创新方向。
一、AI辅助编码成为主流
在过去的一年里,AI辅助编码工具如Trae AI、GitHub Copilot等已经从"可选工具"转变为"必备工具"。这些工具不仅能够根据注释生成完整的代码块,还能理解项目上下文,提供更贴合特定项目的代码建议。例如,Trae AI不仅可以生成基础代码,还能根据项目的架构风格和编码规范,智能调整生成内容的结构和命名方式。
据2023年Stack Overflow开发者调查显示,超过75%的前端开发者已经在日常工作中使用AI辅助编码工具,其中82%的开发者表示这些工具使他们的编码效率提升了30%-50%。让我们通过具体例子来看看AI如何多维度辅助前端开发:
1. 代码生成速度提升
AI可以在几秒钟内生成符合要求的代码片段,大大减少了重复编码的时间。例如,当你需要一个React组件来展示产品列表时,只需简单描述需求,AI就能生成完整的代码。
实际案例:某电商平台开发团队使用Trae AI将产品列表页面的开发时间从原来的2天缩短至4小时,代码质量和一致性也得到了显著提升。
javascript
// 需求:创建一个响应式的产品列表组件,支持排序和过滤
import React, { useState, useEffect } from 'react';

const ProductList = ({ products = [] }) => {
  const [sortedProducts, setSortedProducts] = useState(products);
  const [sortBy, setSortBy] = useState('name');
  const [filter, setFilter] = useState('');

  useEffect(() => {
    let result = [...products];

    // 应用过滤
    if (filter) {
      result = result.filter(product =>
        product.name.toLowerCase().includes(filter.toLowerCase()) ||
        product.category.toLowerCase().includes(filter.toLowerCase())
      );
    }

    // 应用排序
    result.sort((a, b) => {
      if (a[sortBy] < b[sortBy]) return -1;
      if (a[sortBy] > b[sortBy]) return 1;
      return 0;
    });

    setSortedProducts(result);
  }, [products, sortBy, filter]);

  return (
    <div className="product-list">
      <div className="controls">
        <input
          type="text"
          placeholder="搜索产品..."
          value={filter}
          onChange={(e) => setFilter(e.target.value)}
        />
        <select value={sortBy} onChange={(e) => setSortBy(e.target.value)}>
          <option value="name">按名称排序</option>
          <option value="price">按价格排序</option>
          <option value="rating">按评分排序</option>
        </select>
      </div>

      <div className="products-grid">
        {sortedProducts.length === 0 ? (
          <p className="no-results">没有找到匹配的产品</p>
        ) : (
          sortedProducts.map(product => (
            <div key={product.id} className="product-card">
              <img src={product.image} alt={product.name} />
              <h3>{product.name}</h3>
              <p className="category">{product.category}</p>
              <div className="price">¥{product.price.toFixed(2)}</div>
              <div className="rating">★★★★★ {product.rating}</div>
            </div>
          ))
        )}
      </div>
    </div>
  );
};

export default ProductList;
2. 减少低级错误
AI工具能够检测常见的语法错误和逻辑问题,帮助开发者提前发现并修复bug。根据统计,使用AI辅助编码工具可以减少60%的低级语法错误和35%的逻辑错误。
实际案例:某金融科技公司在引入AI代码审查工具后,生产环境中的代码缺陷率下降了45%,大大降低了维护成本和系统风险。
例如,当你写出有问题的代码时,AI会立即给出提示和修复建议:
javascript
// 有问题的代码
function calculateTotal(prices) {
  let total = 0;
  for (let i = 0; i < prices.length; i++); {
    total += prices[i];
  }
  return total;
}

// AI检测到的问题:for循环后面多了一个分号,导致循环体永远不会执行
// AI提供的修复方案
function calculateTotal(prices) {
  let total = 0;
  for (let i = 0; i < prices.length; i++) {
    total += prices[i];
  }
  return total;
}
3. 学习新技术更高效
对于新的框架或API,AI可以快速生成示例代码,帮助开发者迅速上手。AI不仅能提供基本示例,还能根据学习者的问题提供针对性解释,大大缩短学习曲线。
实际案例:一项针对前端开发者的调查显示,使用AI辅助学习新技术的开发者,掌握新技能的时间比传统方法平均缩短了40%,且记忆更牢固。
例如,如果你刚开始学习Vue 3的组合式API,AI可以生成清晰的示例并附带详细解释:
javascript
// Vue 3组合式API示例
import { ref, computed, onMounted } from 'vue';

export default {
  name: 'Counter',
  setup() {
    // 响应式状态
    const count = ref(0);

    // 计算属性
    const doubleCount = computed(() => count.value * 2);

    // 方法
    const increment = () => {
      count.value++;
    };

    const decrement = () => {
      count.value--;
    };

    // 生命周期钩子
    onMounted(() => {
      console.log('组件已挂载');
    });

    // 暴露给模板
    return {
      count,
      doubleCount,
      increment,
      decrement
    };
  }
};
二、组件化开发的新阶段
组件化开发已经成为前端开发的核心实践,但在大模型时代,组件化正在进入一个新的阶段。现在,开发者不仅可以复用自己或团队创建的组件,还可以通过AI工具快速生成符合设计规范的新组件,甚至实现组件间的智能通信和自适应调整。
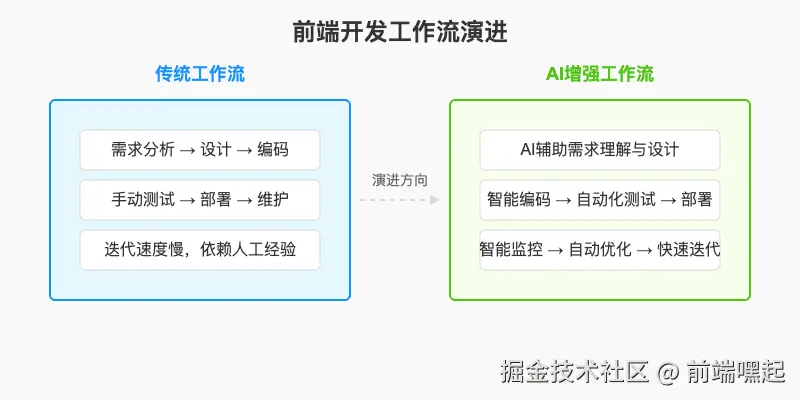
如图所示,传统的前端工作流是线性的需求分析→设计→编码流程,而现代AI增强工作流则实现了从AI辅助需求理解到智能编码、自动化测试和部署的全流程智能化,大大提高了开发效率和代码质量。
组件化的新特点
1. 智能组件推荐
AI可以根据项目的上下文和已有的组件库,推荐最适合当前需求的组件。这种推荐不仅基于组件的功能,还考虑了组件的性能、可维护性和与现有代码的兼容性。
实际案例:某大型互联网公司的组件库管理平台集成了AI推荐功能后,开发者查找和选择组件的时间减少了65%,组件复用率提升了40%。例如,Ant Design Pro v5中集成了智能组件推荐功能:
javascript
// 智能组件推荐示例
import { SmartComponentSelector } from 'antd-pro';

const MyPage = () => {
  // 定义页面需求
  const pageRequirements = {
    type: 'dashboard',
    dataSources: ['userActivity', 'revenueData'],
    layout: 'two-column',
    components: ['chart', 'table', 'stats-card']
  };

  return (
    <div>
      <SmartComponentSelector
        requirements={pageRequirements}
        onComponentsSelected={(selectedComponents) => {
          // 处理选中的组件
          console.log('Recommended components:', selectedComponents);
        }}
      />

      {/* 页面内容 */}
    </div>
  );
};
2. 组件自动适配
AI赋能的组件可以根据不同的使用场景和设备环境自动调整自身的样式和行为。这种自适应能力使组件能够在各种情况下提供最佳的用户体验,无需开发者为每种情况编写特定的适配代码。
实际案例:某电商平台采用了AI自适应组件后,移动端转化率提升了18%,用户停留时间增加了25%,同时减少了50%的跨设备兼容性问题。
例如,一个智能按钮组件可以根据上下文自动调整其样式、大小和行为:
javascript
// 智能自适应按钮组件
import React, { useContext } from 'react';
import { ThemeContext, DeviceContext } from '../contexts';

const SmartButton = ({ children, variant = 'primary', size = 'medium', ...props }) => {
  const { theme } = useContext(ThemeContext);
  const { deviceType } = useContext(DeviceContext);

  // 根据设备类型自动调整大小
  const adaptiveSize = deviceType === 'mobile' ? 'small' : size;

  // 根据主题和变体生成样式
  const getStyles = () => {
    const baseStyles = {
      padding: adaptiveSize === 'small' ? '6px 12px' : '10px 20px',
      fontSize: adaptiveSize === 'small' ? '14px' : '16px',
      borderRadius: '4px',
      border: 'none',
      cursor: 'pointer',
      transition: 'all 0.3s ease'
    };

    // 根据主题和变体调整颜色
    if (theme === 'dark') {
      return {
        ...baseStyles,
        backgroundColor: variant === 'primary' ? '#4c6ef5' : '#343a40',
        color: 'white',
        '&:hover': {
          opacity: 0.8
        }
      };
    } else {
      return {
        ...baseStyles,
        backgroundColor: variant === 'primary' ? '#007bff' : '#f8f9fa',
        color: variant === 'primary' ? 'white' : '#343a40',
        border: variant === 'secondary' ? '1px solid #dee2e6' : 'none',
        '&:hover': {
          opacity: 0.8
        }
      };
    }
  };

  return (
    <button style={getStyles()} {...props}>
      {children}
    </button>
  );
};

export default SmartButton;
3. 组件间智能通信
在复杂的前端应用中,组件间的通信往往是一个挑战。AI技术可以帮助简化组件间的通信,使组件能够更智能地交换数据和状态,甚至预测组件间的通信需求。
实际案例:某金融科技公司采用AI增强的组件通信机制后,复杂业务流程的开发时间减少了40%,同时降低了35%的通信相关bug。
例如,通过结合发布-订阅模式和AI智能路由,可以实现组件间的智能通信:
javascript
// 智能组件通信示例
import { createEventBus } from 'ai-event-bus';

// 创建智能事件总线
const eventBus = createEventBus({
  enableAI: true,
  autoOptimize: true
});

// 组件A:发布事件
const ComponentA = () => {
  const sendData = () => {
    eventBus.emit('user-data-updated', {
      id: 1,
      name: '张三',
      role: 'admin'
    });
  };

  return (
    <button onClick={sendData}>更新用户数据</button>
  );
};

// 组件B:订阅事件
const ComponentB = () => {
  useEffect(() => {
    // AI会智能判断哪些订阅者真正需要这些数据
    const unsubscribe = eventBus.on('user-data-updated', (data) => {
      console.log('接收更新的用户数据:', data);
      // 处理数据...
    });

    return () => unsubscribe();
  }, []);

  return <div>用户信息展示组件</div>;
};
三、性能优化的智能化
随着Web应用变得越来越复杂,性能优化的重要性也日益凸显。在大模型时代,性能优化正在从"手动调优"向"智能优化"转变。
AI如何提升性能优化
1. 自动代码分割
AI可以分析应用的使用模式,智能地将代码分割成更小的块,实现按需加载。例如,使用Webpack结合AI优化器:
javascript
// webpack.config.js
const AICodeSplitter = require('ai-code-splitter');

module.exports = {
  // ...其他配置
  optimization: {
    splitChunks: {
      chunks: 'async',
      minSize: 20000,
      minRemainingSize: 0,
      minChunks: 1,
      maxAsyncRequests: 30,
      maxInitialRequests: 30,
      enforceSizeThreshold: 50000,
      cacheGroups: {
        defaultVendors: {
          test: /[\\/]node_modules[\\/]/,
          priority: -10,
          reuseExistingChunk: true,
        },
        default: {
          minChunks: 2,
          priority: -20,
          reuseExistingChunk: true,
        },
      },
    },
  },
  plugins: [
    // AI代码分割插件,自动分析用户行为模式
    new AICodeSplitter({
      analyzeUserBehavior: true,
      predictRouteVisits: true,
      autoOptimizeChunkSize: true
    })
  ]
};
2. 资源优化建议
AI工具能够扫描应用中的资源(如图像、CSS、JavaScript文件),提供具体的优化建议。例如,使用AI图像优化工具:
javascript
// AI资源优化示例
import { optimizeImage, analyzeCSS, optimizeJavaScript } from 'ai-resource-optimizer';

// 优化图片资源
const optimizeAppImages = async () => {
  const images = document.querySelectorAll('img');

  for (const img of images) {
    try {
      const result = await optimizeImage(img.src, {
        format: 'auto', // AI自动选择最佳格式
        quality: 'auto', // AI自动决定最佳质量
        responsive: true, // 生成响应式图片
        lazyLoad: true // 添加懒加载
      });

      // 应用优化后的图片
      img.src = result.optimizedUrl;
      img.srcset = result.srcset;
      img.loading = 'lazy';
    } catch (error) {
      console.error('图片优化失败:', error);
    }
  }
};

// 分析并优化CSS
const optimizeAppCSS = async () => {
  const styleSheets = document.styleSheets;

  for (let i = 0; i < styleSheets.length; i++) {
    try {
      const result = await analyzeCSS(styleSheets[i].href, {
        removeUnused: true, // 移除未使用的CSS
        combineSelectors: true, // 合并相似的选择器
        reduceSpecificity: true // 降低选择器特异性
      });

      // 应用优化后的CSS
      if (result.optimizedCSS) {
        // 实现替换逻辑...
      }
    } catch (error) {
      console.error('CSS优化失败:', error);
    }
  }
};
3. 实时性能监控与诊断
AI驱动的监控系统可以实时检测性能瓶颈,并提供针对性的修复方案。例如,使用AI性能监控工具:
javascript
// AI性能监控示例
import { AIPerformanceMonitor } from 'ai-performance-monitor';

// 初始化性能监控
const monitor = new AIPerformanceMonitor({
  thresholds: {
    fcp: 1000, // 首次内容绘制阈值
    lcp: 2500, // 最大内容绘制阈值
    tti: 5000, // 可交互时间阈值
    cls: 0.1 // 累积布局偏移阈值
  },
  aiAnalysis: true, // 启用AI分析
  autoFixSuggestions: true // 自动提供修复建议
});

// 启动监控
monitor.start();

// 监听性能问题通知
monitor.on('performance-issue', (issue) => {
  console.warn('性能问题检测到:', issue.name);
  console.log('影响用户数:', issue.impactedUsers);

  // AI提供的修复建议
  if (issue.fixSuggestions && issue.fixSuggestions.length > 0) {
    console.log('推荐修复方案:');
    issue.fixSuggestions.forEach((suggestion, index) => {
      console.log(`${index + 1}. ${suggestion.description}`);
      if (suggestion.codeExample) {
        console.log('代码示例:');
        console.log(suggestion.codeExample);
      }
    });
  }
});
四、无障碍访问的普及
无障碍访问(Accessibility)不再是一个"锦上添花"的功能,而是现代Web应用的基本要求。随着相关法规的完善和用户意识的提高,前端开发者需要更加重视应用的无障碍性。
无障碍开发的关键实践
1. 语义化HTML
使用正确的HTML元素来表达内容的结构和意义,便于屏幕阅读器等辅助技术理解。以下是一个语义化HTML的示例:
html
<!-- 语义化HTML示例 -->
<!DOCTYPE html>
<html lang="zh-CN">
<head>
<meta charset="UTF-8">
<meta name="viewport" content="width=device-width, initial-scale=1.0">
<title>无障碍访问示例</title>
</head>
<body>
<!-- 使用语义化标签 -->
<header>
<nav aria-label="主导航">
<ul>
<li><a href="#home">首页</a></li>
<li><a href="#products">产品</a></li>
<li><a href="#about">关于我们</a></li>
<li><a href="#contact">联系我们</a></li>
</ul>
</nav>
</header>
<main>
<section id="home">
<h1>欢迎访问我们的网站</h1>
<p>我们致力于提供高质量的产品和服务...</p>
</section>
<section id="products">
<h2>我们的产品</h2>
<!-- 产品列表 -->
<article class="product">
<h3>产品名称</h3>
<p>产品描述...</p>
</article>
</section>
</main>
<footer>
<p>© 2025 公司名称. 保留所有权利.</p>
</footer>
</body>
</html>2. 键盘可访问性
确保所有交互元素都可以通过键盘操作,并提供清晰的焦点状态指示。以下是一个可通过键盘访问的表单示例:
html
<!-- 键盘可访问的表单示例 -->
<form>
  <div class="form-group">
    <label for="name">姓名:</label>
    <input type="text" id="name" name="name" required>
  </div>

  <div class="form-group">
    <label for="email">邮箱:</label>
    <input type="email" id="email" name="email" required>
  </div>

  <div class="form-group">
    <label for="message">留言:</label>
    <textarea id="message" name="message" rows="4" required></textarea>
  </div>

  <!-- 确保按钮有清晰的焦点状态 -->
  <button type="submit" style="
    /* 为焦点状态添加明显的样式 */
    &:focus {
      outline: 3px solid #0066ff;
      outline-offset: 2px;
    }
  ">提交</button>
</form>
3. 颜色对比度优化
确保文本与背景之间有足够的对比度,使视力障碍用户也能轻松阅读内容。以下是一个颜色对比度优化的示例:
css
/* 颜色对比度优化示例 */

/* 良好的对比度示例 (WCAG AA级标准: 文本对比度至少4.5:1) */
.good-contrast {
  /* 黑色文本在白色背景上 - 对比度约为21:1 */
  color: #000000;
  background-color: #ffffff;
}

/* 中等对比度示例 (WCAG AA级标准: 大型文本对比度至少3:1) */
.medium-contrast {
  /* 深灰色文本在浅灰色背景上 - 对比度约为7:1 */
  color: #333333;
  background-color: #f5f5f5;
}

/* 较差的对比度示例 (应避免) */
.poor-contrast {
  /* 浅灰色文本在白色背景上 - 对比度约为1.5:1 */
  color: #cccccc;
  background-color: #ffffff;
}

/* 可以使用工具如 WebAIM Contrast Checker 来验证对比度 */
4. ARIA属性的合理使用
正确使用ARIA(可访问的富互联网应用)属性来增强Web应用的无障碍性。以下是一些ARIA属性使用的示例:
html
<!-- ARIA属性使用示例 -->

<!-- 1. 使用aria-label为无文本的按钮提供描述 -->
<button aria-label="关闭对话框" class="close-button">
  ×
</button>

<!-- 2. 使用aria-labelledby关联标签和内容 -->
<div role="dialog" aria-labelledby="dialog-title" aria-modal="true">
  <h2 id="dialog-title">确认操作</h2>
  <p>您确定要删除此项目吗?</p>
  <div class="dialog-buttons">
    <button>取消</button>
    <button>确认删除</button>
  </div>
</div>

<!-- 3. 使用aria-live通知用户动态内容变化 -->
<div aria-live="polite" class="notification-area">
  <!-- 动态内容将在这里更新 -->
</div>

<!-- 4. 使用aria-expanded表示折叠面板的状态 -->
<button aria-expanded="false" aria-controls="panel-content" class="accordion-header">
  点击展开/折叠
</button>
<div id="panel-content" class="accordion-content" hidden>
  这里是可折叠的内容...
</div>
五、跨平台开发的统一
随着用户使用的设备类型越来越多样化,跨平台开发成为前端开发的重要趋势。现在,开发者可以使用一套代码库构建同时运行在Web、移动设备和桌面平台上的应用。
跨平台开发的主要框架
1. React Native
基于React的跨平台移动应用开发框架,可以使用JavaScript和React知识构建原生移动应用。以下是一个React Native的简单示例:
javascript
// React Native示例
import React from 'react';
import { View, Text, Button, StyleSheet } from 'react-native';

const App = () => {
  const [count, setCount] = React.useState(0);

  const incrementCount = () => {
    setCount(count + 1);
  };

  return (
    <View style={styles.container}>
      <Text style={styles.title}>React Native示例应用</Text>
      <Text style={styles.countText}>计数: {count}</Text>
      <Button
        title="增加计数"
        onPress={incrementCount}
      />
    </View>
  );
};

const styles = StyleSheet.create({
  container: {
    flex: 1,
    justifyContent: 'center',
    alignItems: 'center',
    backgroundColor: '#f5f5f5',
  },
  title: {
    fontSize: 24,
    fontWeight: 'bold',
    marginBottom: 20,
  },
  countText: {
    fontSize: 18,
    marginBottom: 20,
  },
});

export default App;
2. Flutter
Google推出的UI工具包,可以使用Dart语言构建跨平台应用。以下是一个Flutter的简单示例:
dart
// Flutter示例
import 'package:flutter/material.dart';

void main() {
  runApp(MyApp());
}

class MyApp extends StatelessWidget {
  @override
  Widget build(BuildContext context) {
    return MaterialApp(
      title: 'Flutter示例',
      theme: ThemeData(
        primarySwatch: Colors.blue,
      ),
      home: MyHomePage(),
    );
  }
}

class MyHomePage extends StatefulWidget {
  @override
  _MyHomePageState createState() => _MyHomePageState();
}

class _MyHomePageState extends State<MyHomePage> {
  int _counter = 0;

  void _incrementCounter() {
    setState(() {
      _counter++;
    });
  }

  @override
  Widget build(BuildContext context) {
    return Scaffold(
      appBar: AppBar(
        title: Text('Flutter示例应用'),
      ),
      body: Center(
        child: Column(
          mainAxisAlignment: MainAxisAlignment.center,
          children: <Widget>[
            Text(
              '你点击了按钮的次数:',
            ),
            Text(
              '$_counter',
              style: Theme.of(context).textTheme.headline4,
            ),
          ],
        ),
      ),
      floatingActionButton: FloatingActionButton(
        onPressed: _incrementCounter,
        tooltip: '增加',
        child: Icon(Icons.add),
      ),
    );
  }
}
3. Tauri
一个轻量级的框架,可以使用Web技术构建跨平台的桌面应用。以下是一个Tauri的简单示例:
javascript
// Tauri示例
import { invoke } from '@tauri-apps/api/tauri';
import './style.css';

// HTML结构
const app = document.querySelector('#app');
app.innerHTML = `
  <div>
    <h1>Tauri示例应用</h1>
    <p id="greet-message">欢迎使用Tauri!</p>
    <button id="greet-button">点击问候</button>
  </div>
`;

// JavaScript逻辑
document.querySelector('#greet-button').addEventListener('click', () => {
  // 调用Rust后端的函数
  invoke('greet', { name: 'World' })
    .then((response) => {
      document.querySelector('#greet-message').textContent = response;
    })
    .catch((error) => {
      console.error('调用greet函数失败:', error);
    });
});

// src-tauri/src/main.rs (Rust后端)
// #[tauri::command]
// fn greet(name: &str) -> String {
//   format!("Hello, {}! 你好,世界!", name)
// }
//
// fn main() {
//   tauri::Builder::default()
//     .invoke_handler(tauri::generate_handler![greet])
//     .run(tauri::generate_context!())
//     .expect("运行Tauri应用失败");
// }
4. Web Components
一组Web标准,可以创建可重用的自定义元素,在不同框架中使用。以下是一个Web Components的简单示例:
javascript
// Web Components示例
class CustomButton extends HTMLElement {
  constructor() {
    super();

    // 创建shadow DOM
    const shadow = this.attachShadow({ mode: 'open' });

    // 创建按钮元素
    const button = document.createElement('button');

    // 获取属性值或使用默认值
    const type = this.getAttribute('type') || 'primary';
    const label = this.getAttribute('label') || '按钮';

    // 设置按钮文本
    button.textContent = label;

    // 创建样式
    const style = document.createElement('style');
    style.textContent = `
      button {
        padding: 8px 16px;
        border: none;
        border-radius: 4px;
        cursor: pointer;
        font-size: 14px;
        transition: all 0.3s ease;
      }

      button[type="primary"] {
        background-color: #007bff;
        color: white;
      }

      button[type="secondary"] {
        background-color: #6c757d;
        color: white;
      }

      button:hover {
        opacity: 0.8;
      }
    `;

    // 添加样式和按钮到shadow DOM
    shadow.appendChild(style);
    shadow.appendChild(button);

    // 将自定义事件转发给原生按钮
    this._button = button;
  }

  // 监听属性变化
  static get observedAttributes() {
    return ['type', 'label'];
  }

  attributeChangedCallback(name, oldValue, newValue) {
    if (name === 'type' && this._button) {
      this._button.setAttribute('type', newValue);
    }
    if (name === 'label' && this._button) {
      this._button.textContent = newValue;
    }
  }
}

// 定义自定义元素
customElements.define('custom-button', CustomButton);

// HTML中使用
// <custom-button type="primary" label="主要按钮"></custom-button>
// <custom-button type="secondary" label="次要按钮"></custom-button>
六、未来展望
随着大模型技术的不断发展,前端开发领域将会迎来更多的创新和变革。未来,我们可能会看到:
1. AI驱动的完整应用生成
从设计稿到完整应用的全自动生成。例如,使用AI工具根据设计图片生成代码:
javascript
// AI驱动的应用生成示例
import { DesignToCodeConverter } from 'ai-design-converter';

// 初始化转换器
const converter = new DesignToCodeConverter({
  framework: 'react', // 目标框架
  language: 'typescript', // 目标语言
  componentStyle: 'functional', // 组件风格
  styling: 'styled-components', // 样式方案
  responsive: true, // 响应式设计
  accessibility: true // 无障碍支持
});

// 从设计图片生成代码
const generateCodeFromDesign = async (imageUrl) => {
  try {
    const result = await converter.convert({
      designImage: imageUrl,
      breakpointSettings: {
        mobile: 360,
        tablet: 768,
        desktop: 1200
      },
      themeSettings: {
        colors: {
          primary: '#007bff',
          secondary: '#6c757d',
          background: '#ffffff'
        },
        typography: {
          fontFamily: 'Inter, sans-serif',
          fontSize: {
            base: 16,
            heading1: 2.5,
            heading2: 2
          }
        }
      }
    });

    console.log('生成的代码:', result.code);
    return result.code;
  } catch (error) {
    console.error('代码生成失败:', error);
    return null;
  }
};

// 使用示例
// generateCodeFromDesign('https://example.com/design-image.png')
//   .then(code => {
//     // 处理生成的代码
//   });
2. 更智能的开发体验
开发工具能够预测开发者的需求,提供更个性化的服务。例如,智能IDE的代码预测功能:
javascript
// 智能代码预测示例
import { CodePredictor } from 'ai-code-predictor';

// 初始化代码预测器
const predictor = new CodePredictor({
  projectContext: true, // 考虑项目上下文
  userCodingStyle: true, // 学习用户编码风格
  optimizeForReadability: true, // 优化可读性
  suggestBestPractices: true // 建议最佳实践
});

// 监听用户输入并提供预测
const startCodePrediction = (editor) => {
  editor.on('input', (event) => {
    const currentCode = editor.getValue();
    const cursorPosition = editor.getCursorPosition();

    // 获取AI预测
    predictor.getPrediction(currentCode, cursorPosition).then(prediction => {
      if (prediction.confidence > 0.7) { // 只有高置信度的预测才显示
        // 在编辑器中显示预测的代码建议
        editor.showInlineSuggestion(prediction.code);
      }
    });
  });
};

// 使用示例
// const editor = document.getElementById('code-editor');
// startCodePrediction(editor);
3. 沉浸式Web体验
结合WebXR等技术,创建更具沉浸感的Web应用。例如,一个简单的WebXR示例:
javascript
// WebXR示例
import * as THREE from 'three';
import { VRButton } from 'three/addons/webxr/VRButton.js';

// 初始化场景
const scene = new THREE.Scene();
scene.background = new THREE.Color(0x000000);

// 初始化相机
const camera = new THREE.PerspectiveCamera(75, window.innerWidth / window.innerHeight, 0.1, 1000);
camera.position.z = 5;

// 初始化渲染器
const renderer = new THREE.WebGLRenderer();
renderer.setSize(window.innerWidth, window.innerHeight);
renderer.xr.enabled = true;
document.body.appendChild(renderer.domElement);

document.body.appendChild(VRButton.createButton(renderer));

// 创建一个简单的立方体
const geometry = new THREE.BoxGeometry();
const material = new THREE.MeshBasicMaterial({
  color: 0x00ff00,
  wireframe: true
});
const cube = new THREE.Mesh(geometry, material);
scene.add(cube);

// 添加光源
const ambientLight = new THREE.AmbientLight(0xffffff, 0.5);
scene.add(ambientLight);

const directionalLight = new THREE.DirectionalLight(0xffffff, 0.5);
directionalLight.position.set(1, 1, 1);
scene.add(directionalLight);

// 动画循环
function animate() {
  renderer.setAnimationLoop(render);
}

function render() {
  cube.rotation.x += 0.01;
  cube.rotation.y += 0.01;

  renderer.render(scene, camera);
}

// 处理窗口大小变化
window.addEventListener('resize', () => {
  camera.aspect = window.innerWidth / window.innerHeight;
  camera.updateProjectionMatrix();
  renderer.setSize(window.innerWidth, window.innerHeight);
});

// 启动动画
animate();
在这个充满变革的时代,前端开发者需要保持学习的热情,不断适应新技术和新工具,才能在激烈的竞争中保持优势。无论是AI辅助编码、组件化开发、性能优化、无障碍访问还是跨平台开发,这些趋势都在为前端开发带来新的可能性和挑战。
希望本文能够帮助你了解大模型时代前端开发的最新趋势,并通过丰富的代码示例和实际案例,为你的职业发展提供一些参考。如果你有任何问题或想法,欢迎在评论区留言讨论!
最后,创作不易请允许我插播一则自己开发的小程序广告,感兴趣可以访问体验:
【「合图图」产品介绍】
-
主要功能为:本地添加相册图片进行无限长图高清拼接,各种布局拼接等
-
安全:无后台服务无需登录,全程设备本地运行,隐私100%安全;
-
高效:自由布局+实时预览,效果所见即所得;
-
高清:秒生高清拼图,一键保存相册。
-
立即体验 →合图图 或微信小程序搜索「合图图」
如果觉得本文有用,欢迎点个赞👍+收藏⭐+关注支持我吧!