文章标题
- 一、OpenCV
-
- 1.关于
- 2.根因
- 二、Java版
-
- 1.java-opencv(不支持中文,需要编译,支持版本为4.9.0)
-
- 1.1 pom依赖
- 1.2 demo代码
- 1.3 OpenCV库文件
-
- 1.3.1 Windows平台下载安装
- 1.3.2 Linux平台编译
- 1.3.3 验证是否更新
- 1.3.4 so有哪些依赖
- 1.4 docker打包上线
- 1.5 测试结果
-
- javacv(不支持中文,不需要编译,支持版本为4.11.0)
-
- 2.1 pom依赖
- 2.2 demo代码
- 2.3 maven打包
- 2.4 docker打包上线
- 2.5 测试结果
- 3.java-native版(不支持中文,不需要编译,不需要pom依赖)
-
- 3.1 demo代码
- 3.2 docker打包上线
- 3.3 测试结果
- 三、python版
-
-
- opencv-python不支持中文(我想大多数人都遇到过)
-
- opencv-python-rolling支持中文(我想大多数人都没想到过)
-
- demo代码
-
- 参考
一、OpenCV
Open Source Computer Vision Library
开源的计算机视觉库
https://opencv.org/
https://github.com/opencv/opencv
1.关于
OpenCV(开源计算机视觉库)是一个开源计算机视觉和机器学习软件库。由C++编写,其他语言可以通过动态链接库调用
它拥有 C++、Python、Java 和 MATLAB 接口,并支持 Windows、Linux、 Android 和 Mac OS。
2.根因
cv2.putText 基于 OpenCV 的底层绘制函数,这些函数通常只支持单字节的 ASCII 字符集,无法识别和处理像中文这样的多字节字符。
二、Java版
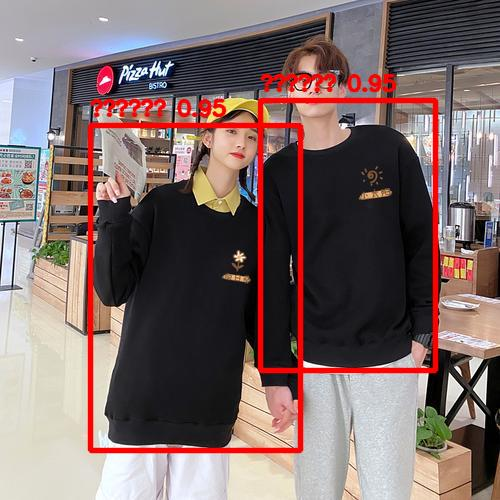
需求描述:在一张图片里面画框,并在框上面添加标签和置信度。具体数据结构如下:
java
public class Detection {
    private String label;
    private float[] bbox; // 边界框坐标 [x1, y1, x2, y2](归一化)
    private float confidence; // 置信度

    public String getLabel() {
        return label;
    }

    public void setLabel(String label) {
        this.label = label;
    }

    public float[] getBbox() {
        return bbox;
    }

    public void setBbox(float[] bbox) {
        this.bbox = bbox;
    }

    public float getConfidence() {
        return confidence;
    }

    public void setConfidence(float confidence) {
        this.confidence = confidence;
    }
}
测试图片如下:

测试数据如下:
json
[
    {
        "label": "卫衣",
        "bbox": [
            0.18,
            0.25,
            0.60,
            0.90
        ],
        "confidence": 0.95,
        "description": "左侧人物穿着黑色卫衣,上半身从肩膀到腰部清晰可见。锚框紧密包围其上半身区域,置信度高因为图像清晰且无遮挡。"
    },
    {
        "label": "卫衣",
        "bbox": [
            0.52,
            0.20,
            0.87,
            0.74
        ],
        "confidence": 0.95,
        "description": "右侧人物同样穿着黑色卫衣,上半身从肩膀到腰部也清晰可见。锚框紧密包围其上半身区域,置信度高因为图像清晰且无遮挡。处理多人场景时,按照从左到右的顺序进行标注。"
    }
]
1.java-opencv(不支持中文,需要编译,支持版本为4.9.0)
起初参见了这篇文章:Intro to OpenCV with Java
1.1 pom依赖
xml
<!-- https://mvnrepository.com/artifact/org.openpnp/opencv -->
<dependency>
    <groupId>org.openpnp</groupId>
    <artifactId>opencv</artifactId>
    <version>4.9.0-0</version>
</dependency>
1.2 demo代码
java
	// 静态代码块加载OpenCV库
    static {
        System.loadLibrary(Core.NATIVE_LIBRARY_NAME);
    }

    public String bbox(byte[] fileBytes, List<Detection> detections) {
        // 1. 读取图像文件
        Mat img = Imgcodecs.imdecode(new MatOfByte(fileBytes), Imgcodecs.IMREAD_COLOR);
        if (img.empty()) {
            throw new IllegalArgumentException("无法读取图像");
        }

        // 2. 获取图像尺寸
        int h = img.rows();
        int w = img.cols();

        // 3. 绘制边界框和置信度
        for (Detection detection : detections) {
            float[] bbox = detection.getBbox();
            float confidence = detection.getConfidence();

            // 转换归一化坐标到绝对坐标
            int x1 = (int) (bbox[0] * w);
            int y1 = (int) (bbox[1] * h);
            int x2 = (int) (bbox[2] * w);
            int y2 = (int) (bbox[3] * h);

            // 绘制红色矩形框(OpenCV中颜色通道为BGR,红色为(0,0,255))
            Imgproc.rectangle(
                    img,
                    new Point(x1, y1),
                    new Point(x2, y2),
                    new Scalar(0, 0, 255), // BGR颜色
                    3 // 线宽
            );

            // 添加置信度标签
            String label = detection.getLabel() + String.format(" %.2f", confidence);
            Imgproc.putText(
                    img,
                    label,
                    new Point(x1, y1 - 10), // 文本位置
                    Imgproc.FONT_HERSHEY_SIMPLEX, // 字体
                    0.7, // 字体大小
                    new Scalar(0, 0, 255), // 文本颜色(红色)
                    2 // 文本线宽
            );
        }

        // 4. 将Mat转换为Base64
        MatOfByte matOfByte = new MatOfByte();
        Imgcodecs.imencode(".jpg", img, matOfByte);
        byte[] byteArray = matOfByte.toArray();

        // 5. 编码为Base64字符串
        return Base64.getEncoder().encodeToString(byteArray);
    }
1.3 OpenCV库文件
1.3.1 Windows平台下载安装
下载opencv:https://github.com/opencv/opencv/releases/download/4.9.0/opencv-4.9.0-windows.exe
将opencv_java490.dll 放到:C:\Windows\System32中
或可以制定路径:-Djava.library.path=/nfs/opencv
1.3.2 Linux平台编译
bash
docker build -t dockerdance/java-opencv:17.0.16_8-jdk-noble-4.9.0 . -f Dockerfile-opencv
bash
# https://whichjdk.com/
# https://adoptium.net/zh-CN/temurin/releases?version=8&os=any&arch=any  Temurin 8.0.462+8
# https://adoptium.net/zh-CN/temurin/releases?version=17&os=any&arch=any Temurin 17.0.16+8
# https://releases.ubuntu.com/ noble Ubuntu 24.04.2 LTS
# https://hub.docker.com/layers/library/eclipse-temurin/8u462-b08-jdk-noble/images/sha256-8a5c518422bbf3017338bd7ee3da6ae8a7f7643f266f2367d41a737f6fa4c51a
# https://hub.docker.com/layers/library/eclipse-temurin/17.0.16_8-jdk-noble/images/sha256-bdc4fab96f2ebc23fb7014023e22d522f1e765253876cc60ec896156a10cf01c
FROM eclipse-temurin:17.0.16_8-jdk-noble
LABEL authors="d"

# 创建工作目录
WORKDIR /usr/src/opencv_build

# 下载 OpenCV 4.9.0 源码
COPY opencv-4.9.0.tar.gz .
#RUN wget https://github.com/opencv/opencv/archive/4.9.0.tar.gz -O opencv-4.9.0.tar.gz

# 解压
RUN tar -zxvf opencv-4.9.0.tar.gz

# 更新包索引
RUN apt update
# 安装编译工具
RUN apt install -y build-essential cmake git
# 安装 OpenCV 依赖的图像/视频处理库
RUN apt install -y libjpeg-dev libpng-dev libtiff-dev libwebp-dev \
                   libavcodec-dev libavformat-dev libswscale-dev \
                   libv4l-dev libxvidcore-dev libx264-dev \
                   libgtk-3-dev libatlas-base-dev gfortran
RUN apt install -y libfreetype6 libfreetype6-dev  libharfbuzz0b libharfbuzz-dev
# 创建编译目录
WORKDIR /usr/src/opencv_build/opencv-4.9.0/build
# 配置 CMake(关键:启用 Java 绑定)
RUN cmake -DCMAKE_BUILD_TYPE=RELEASE \
          -DCMAKE_INSTALL_PREFIX=/usr/local \
          -DBUILD_SHARED_LIBS=OFF \
          -DBUILD_opencv_java=ON \
          -DOPENCV_GENERATE_PKGCONFIG=ON \
          -DWITH_FREETYPE=ON \
          -DWITH_JPEG=ON \
          -DWITH_PNG=ON  \
          ..

# 编译(根据 CPU 核心数调整 -j 参数,如 4 核用 -j4)
RUN make -j$(nproc)
# 安装到系统
RUN make install
# 更新动态链接库缓存
RUN ldconfig

WORKDIR /app

ENTRYPOINT ["top", "-b"]
运行docker并将里面编译好的so复制出来:
bash
docker run -d dockerdance/java-opencv:17.0.16_8-jdk-noble-4.9.0
docker cp  ea254c5cb3c5:/usr/src/opencv_build/opencv-4.9.0/build/lib/* /usr/local/lib
libopencv_java490.so 放到:/usr/local/lib中
也可以制定路径:-Djava.library.path=/nfs/opencv
1.3.3 验证是否更新
bash
ldconfig -p | grep libopencv_ml.so.4091.3.4 so有哪些依赖
bash
readelf -d libopencv_java490.so|grep NEED1.4 docker打包上线
bash
docker build -t dockerdance/annotation_opencv:1.0.0 .
bash
# https://whichjdk.com/
# https://adoptium.net/zh-CN/temurin/releases?version=8&os=any&arch=any  Temurin 8.0.462+8
# https://adoptium.net/zh-CN/temurin/releases?version=17&os=any&arch=any Temurin 17.0.16+8
# https://releases.ubuntu.com/ noble Ubuntu 24.04.2 LTS
# https://hub.docker.com/layers/library/eclipse-temurin/8u462-b08-jdk-noble/images/sha256-8a5c518422bbf3017338bd7ee3da6ae8a7f7643f266f2367d41a737f6fa4c51a
# https://hub.docker.com/layers/library/eclipse-temurin/17.0.16_8-jdk-noble/images/sha256-bdc4fab96f2ebc23fb7014023e22d522f1e765253876cc60ec896156a10cf01c
FROM eclipse-temurin:17.0.16_8-jdk-noble
LABEL authors="d"

# 更新包索引
RUN apt update
# 安装 OpenCV 依赖的图像/视频处理库
RUN apt install -y ffmpeg

WORKDIR /usr/local/lib
COPY src/main/resources/lib/libopencv_*.so /usr/local/lib

WORKDIR /app
COPY target/*.jar app.jar
ENTRYPOINT ["/bin/sh", "-c", "ldconfig && ldconfig -p | grep libopencv_ml.so.409 && java -Djava.library.path=/usr/local/lib -jar app.jar"]
bash
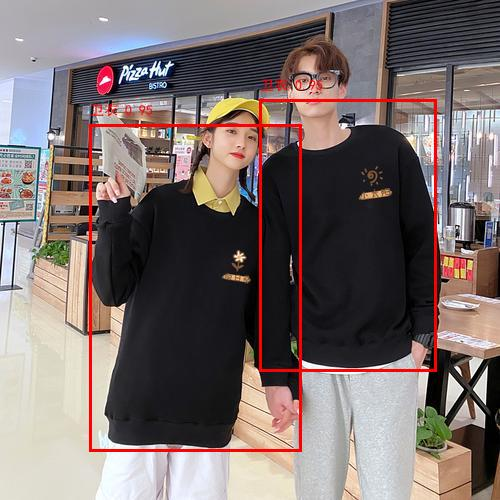
docker run -d -p 8080:8080 dockerdance/annotation_opencv:1.0.01.5 测试结果
bash
curl -O "https://i-blog.csdnimg.cn/direct/ceda80935d124108ad3394641ebe5aa4.jpeg"
curl --location --request POST 'http://localhost:8080/draw-bboxes' \
--header 'User-Agent: Mozilla/5.0 (Windows NT 10.0; Win64; x64) AppleWebKit/537.36 (KHTML, like Gecko) Chrome/124.0.0.0 Safari/537.36' \
--header 'Content-Type: multipart/form-data' \
--form 'file=@"ceda80935d124108ad3394641ebe5aa4.jpeg"' \
--form 'detections="[ { \"label\": \"卫衣\", \"bbox\": [0.18, 0.25, 0.60, 0.90], \"confidence\": 0.95, \"description\": \"左侧人物穿着黑色卫衣,上半身从肩膀到腰部清晰可见。锚框紧密包围其上半身区域,置信度高因为图像清晰且无遮挡。\" }, { \"label\": \"卫衣\", \"bbox\": [0.52, 0.20, 0.87, 0.74], \"confidence\": 0.95, \"description\": \"右侧人物同样穿着黑色卫衣,上半身从肩膀到腰部也清晰可见。锚框紧密包围其上半身区域,置信度高因为图像清晰且无遮挡。处理多人场景时,按照从左到右的顺序进行标注。\" } ]"'将生成的base64转为图片:https://base64.guru/converter/decode/image
| origin | result |
|---|---|
|
 |
2. javacv(不支持中文,不需要编译,支持版本为4.11.0)
2.1 pom依赖
xml
<!-- https://mvnrepository.com/artifact/org.bytedeco/javacv-platform -->
<dependency>
    <groupId>org.bytedeco</groupId>
    <artifactId>javacv-platform</artifactId>
    <version>1.5.12</version>
</dependency>
2.2 demo代码
java
public String bbox(byte[] fileBytes, List<Detection> detections) throws Exception {

        try {
            // 将字节数据转换为Mat对象
            Mat img = opencv_imgcodecs.imdecode(new Mat(fileBytes), opencv_imgcodecs.IMREAD_COLOR);
            if (img.empty()) {
                throw new Exception("无法读取图像");
            }

            // 获取图像尺寸
            int h = img.rows();
            int w = img.cols();


            // 遍历所有检测结果并绘制边界框
            for (Detection detection : detections) {
                float[] bbox = detection.getBbox();
                float confidence = detection.getConfidence();

                // 转换归一化坐标到绝对坐标
                int x1 = (int) (bbox[0] * w);
                int y1 = (int) (bbox[1] * h);
                int x2 = (int) (bbox[2] * w);
                int y2 = (int) (bbox[3] * h);

                // 绘制红色矩形框 (OpenCV中颜色是BGR格式)
                opencv_imgproc.rectangle(img, new Point(x1, y1), new Point(x2, y2),
                        new Scalar(0, 0, 255, 0), 3, opencv_imgproc.LINE_AA, 0);

                // 准备置信度标签
                String label = detection.getLabel() + String.format(" %.2f", confidence);

                // 绘制标签
                opencv_imgproc.putText(img, label, new Point(x1, y1 - 10),
                        opencv_imgproc.FONT_HERSHEY_SIMPLEX, 0.7,
                        new Scalar(0, 0, 255, 0), 2, opencv_imgproc.LINE_AA, false);
            }

            // 将Mat编码为JPEG
            ByteArrayOutputStream outputStream = new ByteArrayOutputStream();
            try (Java2DFrameConverter converter = new Java2DFrameConverter();
                 FrameConverter<Mat> frameConverter = new OpenCVFrameConverter.ToMat()) {

                Frame frame = frameConverter.convert(img);
                BufferedImage bufferedImage = converter.convert(frame);
                javax.imageio.ImageIO.write(bufferedImage, "jpg", outputStream);
            }

            // 转换为Base64字符串
            return Base64.getEncoder().encodeToString(outputStream.toByteArray());

        } catch (Exception e) {
            throw new Exception("无法读取图像");
        }
    }
2.3 maven打包
原生二进制文件本身就很大,我们需要为每个支持的平台使用不同的库。但是,如果您的应用程序不依赖所有这些库,或者不需要支持所有这些平台,那么除了手动逐个排除依赖项或从超级 JAR 中删除文件之外,还有一些方法可以轻松减少依赖项的数量。
https://github.com/bytedeco/javacpp-presets/wiki/Reducing-the-Number-of-Dependencies
指定平台可以减少jar的大小
bash
mvn clean package -Dmaven.test.skip=true -Djavacpp.platform=linux-x86_642.4 docker打包上线
bash
docker build -t dockerdance/annotation_javacv:1.0.0 .
bash
# https://whichjdk.com/
# https://adoptium.net/zh-CN/temurin/releases?version=8&os=any&arch=any  Temurin 8.0.462+8
# https://adoptium.net/zh-CN/temurin/releases?version=17&os=any&arch=any Temurin 17.0.16+8
# https://releases.ubuntu.com/ noble Ubuntu 24.04.2 LTS
# https://hub.docker.com/layers/library/eclipse-temurin/8u462-b08-jdk-noble/images/sha256-8a5c518422bbf3017338bd7ee3da6ae8a7f7643f266f2367d41a737f6fa4c51a
# https://hub.docker.com/layers/library/eclipse-temurin/17.0.16_8-jdk-noble/images/sha256-bdc4fab96f2ebc23fb7014023e22d522f1e765253876cc60ec896156a10cf01c
FROM eclipse-temurin:17.0.16_8-jdk-noble
LABEL authors="duhongming"

WORKDIR /app
COPY target/*.jar app.jar
ENTRYPOINT ["java", "-jar","app.jar"]
bash
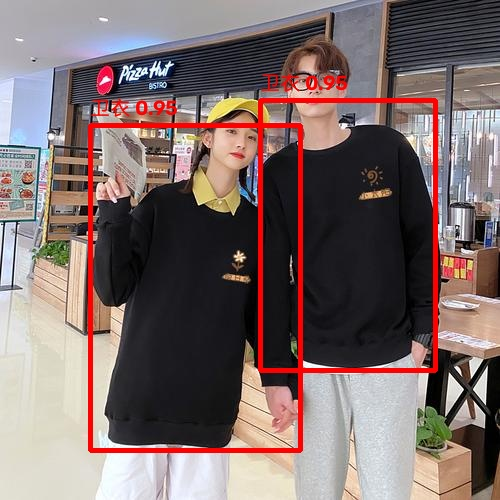
docker run -d -p 8080:8080 dockerdance/annotation_javacv:1.0.02.5 测试结果
bash
curl -O "https://i-blog.csdnimg.cn/direct/ceda80935d124108ad3394641ebe5aa4.jpeg"
curl --location --request POST 'http://localhost:8080/draw-bboxes' \
--header 'User-Agent: Mozilla/5.0 (Windows NT 10.0; Win64; x64) AppleWebKit/537.36 (KHTML, like Gecko) Chrome/124.0.0.0 Safari/537.36' \
--header 'Content-Type: multipart/form-data' \
--form 'file=@"ceda80935d124108ad3394641ebe5aa4.jpeg"' \
--form 'detections="[ { \"label\": \"卫衣\", \"bbox\": [0.18, 0.25, 0.60, 0.90], \"confidence\": 0.95, \"description\": \"左侧人物穿着黑色卫衣,上半身从肩膀到腰部清晰可见。锚框紧密包围其上半身区域,置信度高因为图像清晰且无遮挡。\" }, { \"label\": \"卫衣\", \"bbox\": [0.52, 0.20, 0.87, 0.74], \"confidence\": 0.95, \"description\": \"右侧人物同样穿着黑色卫衣,上半身从肩膀到腰部也清晰可见。锚框紧密包围其上半身区域,置信度高因为图像清晰且无遮挡。处理多人场景时,按照从左到右的顺序进行标注。\" } ]"'将生成的base64转为图片:https://base64.guru/converter/decode/image
| origin | result |
|---|---|
|
|
3.java-native版(不支持中文,不需要编译,不需要pom依赖)
3.1 demo代码
java
// 中文字体
    private static Font chineseFont;

    static {
        // 初始化支持中文的字体
        try {
            // 尝试加载系统中的中文字体,可根据实际情况修改字体名称
//            chineseFont = new Font("SimHei", Font.PLAIN, 14);
            // 如果需要使用自定义字体文件,可使用以下代码
            chineseFont = Font.createFont(Font.TRUETYPE_FONT,
                            AnnotationNativeApplication.class.getResourceAsStream("/fonts/simhei.ttf"))
                    .deriveFont(14f);
        } catch (Exception e) {
            // 字体加载失败时使用默认字体
            chineseFont = new Font(Font.SANS_SERIF, Font.PLAIN, 14);
            System.err.println("警告:中文字体加载失败,使用默认字体,可能导致中文显示异常");
        }
    }

    public String bbox(InputStream file, List<Detection> detections) throws IOException {
        // 1. 读取图像文件
        // 使用ImageIO读取流并转换为BufferedImage
        BufferedImage bufferedImage = ImageIO.read(file);
        // 2. 获取图像尺寸
        int h = bufferedImage.getHeight();
        int w = bufferedImage.getWidth();
        // 创建绘图对象
        Graphics2D g2d = bufferedImage.createGraphics();
        // 设置抗锯齿,使文字更清晰
        g2d.setRenderingHint(RenderingHints.KEY_TEXT_ANTIALIASING, RenderingHints.VALUE_TEXT_ANTIALIAS_ON);

        // 3. 绘制边界框和置信度
        for (Detection detection : detections) {
            float[] bbox = detection.getBbox();
            float confidence = detection.getConfidence();

            // 转换归一化坐标到绝对坐标
            int x1 = (int) (bbox[0] * w);
            int y1 = (int) (bbox[1] * h);
            int x2 = (int) (bbox[2] * w);
            int y2 = (int) (bbox[3] * h);

            // 准备置信度标签
            String label = detection.getLabel() + String.format(" %.2f", confidence);
            // 绘制红色矩形框 (注意: BufferedImage使用RGB格式)
            g2d.setColor(Color.RED);
            g2d.setStroke(new BasicStroke(3));
            g2d.drawRect(x1, y1, x2 - x1, y2 - y1);

            // 设置字体
            g2d.setFont(chineseFont);

            // 计算标签位置,确保不超出图像顶部
            int labelY = y1 - 10;
            if (labelY < 15) { // 字体高度大约15px
                labelY = 15;
            }
            // 绘制标签
            g2d.drawString(label, x1, labelY);
        }
        // 释放资源
        g2d.dispose();
        // 将Mat编码为JPEG
        ByteArrayOutputStream outputStream = new ByteArrayOutputStream();
        ImageIO.write(bufferedImage, "jpg", outputStream);
        // 转换为Base64字符串
        return Base64.getEncoder().encodeToString(outputStream.toByteArray());
    }
3.2 docker打包上线
bash
docker build -t dockerdance/annotation_native:1.0.0 .
bash
# https://whichjdk.com/
# https://adoptium.net/zh-CN/temurin/releases?version=8&os=any&arch=any  Temurin 8.0.462+8
# https://adoptium.net/zh-CN/temurin/releases?version=17&os=any&arch=any Temurin 17.0.16+8
# https://releases.ubuntu.com/ noble Ubuntu 24.04.2 LTS
# https://hub.docker.com/layers/library/eclipse-temurin/8u462-b08-jdk-noble/images/sha256-8a5c518422bbf3017338bd7ee3da6ae8a7f7643f266f2367d41a737f6fa4c51a
# https://hub.docker.com/layers/library/eclipse-temurin/17.0.16_8-jdk-noble/images/sha256-bdc4fab96f2ebc23fb7014023e22d522f1e765253876cc60ec896156a10cf01c
FROM eclipse-temurin:17.0.16_8-jdk-noble
LABEL authors="duhongming"

WORKDIR /app
COPY target/*.jar app.jar
ENTRYPOINT ["java", "-jar","app.jar"]
bash
docker run -d -p 8080:8080 dockerdance/annotation_native:1.0.03.3 测试结果
bash
curl -O "https://i-blog.csdnimg.cn/direct/ceda80935d124108ad3394641ebe5aa4.jpeg"
curl --location --request POST 'http://localhost:8080/draw-bboxes' \
--header 'User-Agent: Mozilla/5.0 (Windows NT 10.0; Win64; x64) AppleWebKit/537.36 (KHTML, like Gecko) Chrome/124.0.0.0 Safari/537.36' \
--header 'Content-Type: multipart/form-data' \
--form 'file=@"ceda80935d124108ad3394641ebe5aa4.jpeg"' \
--form 'detections="[ { \"label\": \"卫衣\", \"bbox\": [0.18, 0.25, 0.60, 0.90], \"confidence\": 0.95, \"description\": \"左侧人物穿着黑色卫衣,上半身从肩膀到腰部清晰可见。锚框紧密包围其上半身区域,置信度高因为图像清晰且无遮挡。\" }, { \"label\": \"卫衣\", \"bbox\": [0.52, 0.20, 0.87, 0.74], \"confidence\": 0.95, \"description\": \"右侧人物同样穿着黑色卫衣,上半身从肩膀到腰部也清晰可见。锚框紧密包围其上半身区域,置信度高因为图像清晰且无遮挡。处理多人场景时,按照从左到右的顺序进行标注。\" } ]"'将生成的base64转为图片:https://base64.guru/converter/decode/image
| origin | result |
|---|---|
|
 |
三、python版
看了很多网上的资料,以及询问了很多AI的意见,我发现都不能满足我的要求。解决方法都是:
一、转换为Pillow
二、使用FreeType
三、使用Pygame
上面的三种方法都能解决中文乱码的问题,我也成功显示了中文结果。但是我的项目涉及视频处理,对于实时性要求比较高,以上的三种方法对我而言都不理想,因为都大幅增加了处理的时间,比如当我使用Pillow绘制文本时,总时长为60秒的视频,只做处理不绘制任何文本的情况下用时18-20秒,但绘制文本后居然用了30-33秒。也就是说绘制文本居然增加了50%的用时,这对于实时性要求高的场景明显不合理。上面的三种解决方法都会大幅增加用时,具体的用时为Pillow>Pygame>FreeType。经过我实验下来,我发现OpenCV读取视频并保存视频不做任何处理的情况下用时5-6秒,使用cv2.putText()绘制文本用时只增加2-4秒。所以我决定找到使用cv2.putText()绘制中文文本的方法。
1. opencv-python不支持中文(我想大多数人都遇到过)
requirements.txt
opencv-python2. opencv-python-rolling支持中文(我想大多数人都没想到过)
requirements.txt
opencv-python-rolling
numpy<2
3. demo代码
import base64

import cv2


def draw_bboxes(filename, detections):
    # 1. 读取图像文件(从字节数据)
    # 将字节数据转换为numpy数组
    # nparr = np.frombuffer(file_bytes, np.uint8)
    # 解码为OpenCV图像(BGR格式)
    img = cv2.imread(filename, cv2.IMREAD_COLOR)

    if img is None:
        raise ValueError("无法读取图像")

    # 2. 获取图像尺寸
    h, w = img.shape[:2]  # 高度和宽度(rows, cols)

    # 3. 绘制边界框和置信度
    for detection in detections:
        bbox = detection["bbox"]
        confidence = detection["confidence"]

        # 转换归一化坐标到绝对坐标
        x1 = int(bbox[0] * w)
        y1 = int(bbox[1] * h)
        x2 = int(bbox[2] * w)
        y2 = int(bbox[3] * h)

        # 绘制红色矩形框(OpenCV中颜色通道为BGR,红色为(0,0,255))
        cv2.rectangle(
            img,
            (x1, y1),  # 左上角点
            (x2, y2),  # 右下角点
            (0, 0, 255),  # BGR颜色(红色)
            3  # 线宽
        )

        # 添加置信度标签
        label = f"{detection['label']} {confidence:.2f}"
        cv2.putText(
            img,
            label,
            (x1, y1 - 10),  # 文本位置
            cv2.FONT_HERSHEY_SIMPLEX,  # 字体
            0.7,  # 字体大小
            (0, 0, 255),  # 文本颜色(红色)
            2  # 文本线宽
        )
    cv2.imshow("image", img)
    # 4. 将图像转换为Base64
    # 编码为JPG格式
    ret, buffer = cv2.imencode('.jpg', img)
    if not ret:
        raise RuntimeError("无法编码图像为JPG格式")

    # 5. 编码为Base64字符串
    byte_array = buffer.tobytes()
    return base64.b64encode(byte_array).decode('utf-8')


base64_str = draw_bboxes('test.jpg', [{"label": "卫衣", "bbox": [0.18, 0.25, 0.60, 0.90], "confidence": 0.95,
                                   "description": "左侧人物穿着黑色卫衣,上半身从肩膀到腰部清晰可见。锚框紧密包围其上半身区域,置信度高因为图像清晰且无遮挡。"},
                                  {"label": "卫衣", "bbox": [0.52, 0.20, 0.87, 0.74], "confidence": 0.95,
                                   "description": "右侧人物同样穿着黑色卫衣,上半身从肩膀到腰部也清晰可见。锚框紧密包围其上半身区域,置信度高因为图像清晰且无遮挡。处理多人场景时,按照从左到右的顺序进行标注。"}])
print(base64_str)| origin | result |
|---|---|
|
 |
参考
https://www.baeldung.com/java-opencv
https://blog.csdn.net/Luobinhai/article/details/145533477
https://zhuanlan.zhihu.com/p/615815756