在 AI 应用开发中,将大模型 API 与 Web 框架结合是常见需求。本文将详细记录如何使用 Django 搭建后端服务,并集成 DeepSeek API 实现智能问答功能,包含环境配置、路由设计、API 调用及异常处理的完整流程,适合需要快速搭建 AI 问答后端的开发者参考。

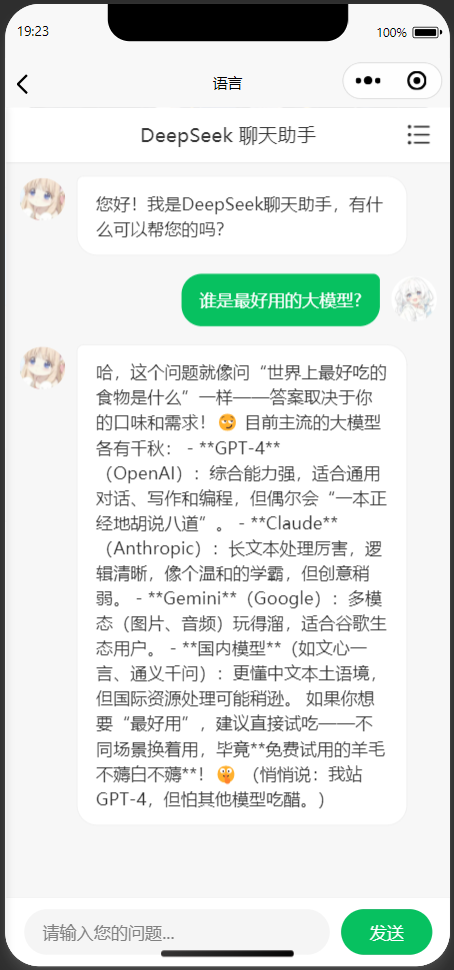
【实现效果】
【这是博主写的微信小程序前端实现效果】
一、环境准备:从 Conda 到 PyCharm
搭建后端的第一步是配置开发环境,我们将使用 Conda 管理依赖,PyCharm 作为 IDE(也可使用 VS Code 等工具,流程类似)。
1.1 安装依赖(Conda 环境内)
首先确保已激活目标 Conda 环境(如无专门环境,可先通过conda create -n django-ai python=3.10创建),激活后执行以下命令安装 Django:
bash
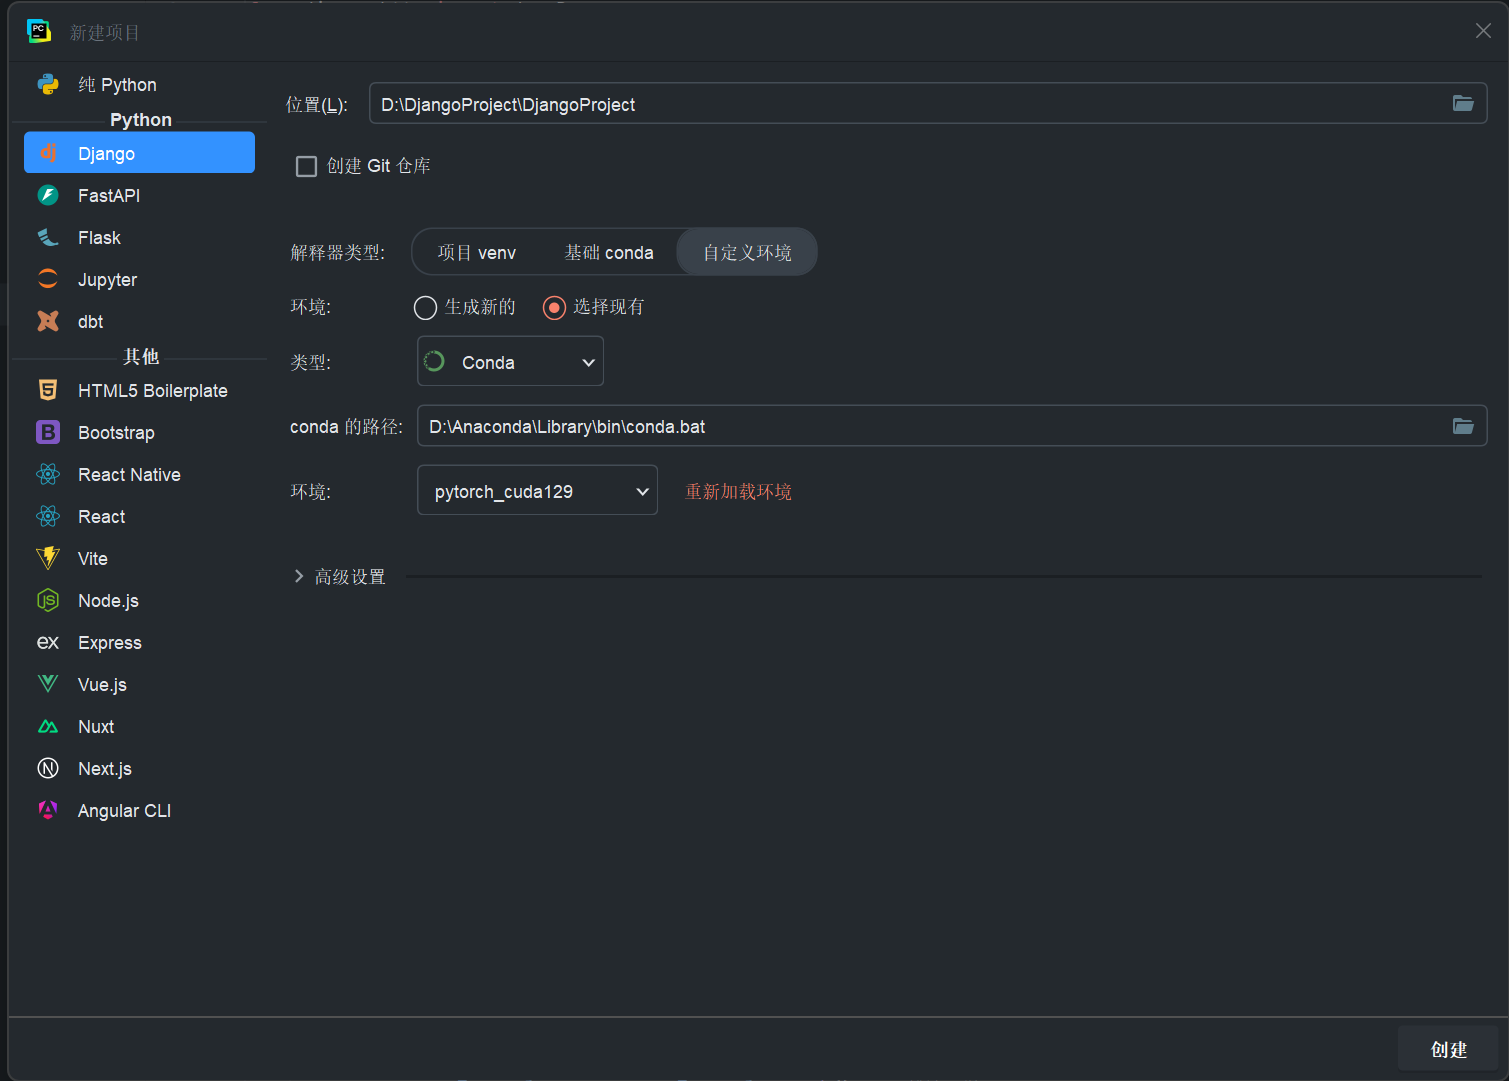
pip install Django openai1.2 PyCharm 创建 Django 项目
注意必须要是专业版的pycharm才有django
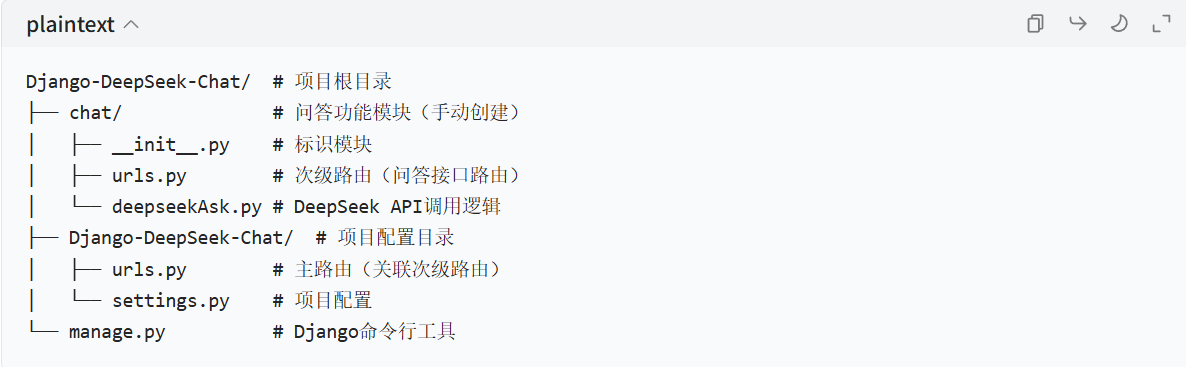
二、项目结构设计:拆分功能模块
为了让代码结构更清晰,我们将「智能问答」功能拆分为独立模块chat,包含次级路由、API 调用脚本两个核心文件,整体项目结构如下:
三、路由配置:主路由与次级路由关联
Django 通过「路由分发」实现模块化管理,我们需要先配置chat模块的次级路由,再将其关联到主路由。
3.1 编写 chat 模块的次级路由(chat/urls.py)
创建chat/urls.py文件,定义问答接口和健康检查接口的路由,代码如下:
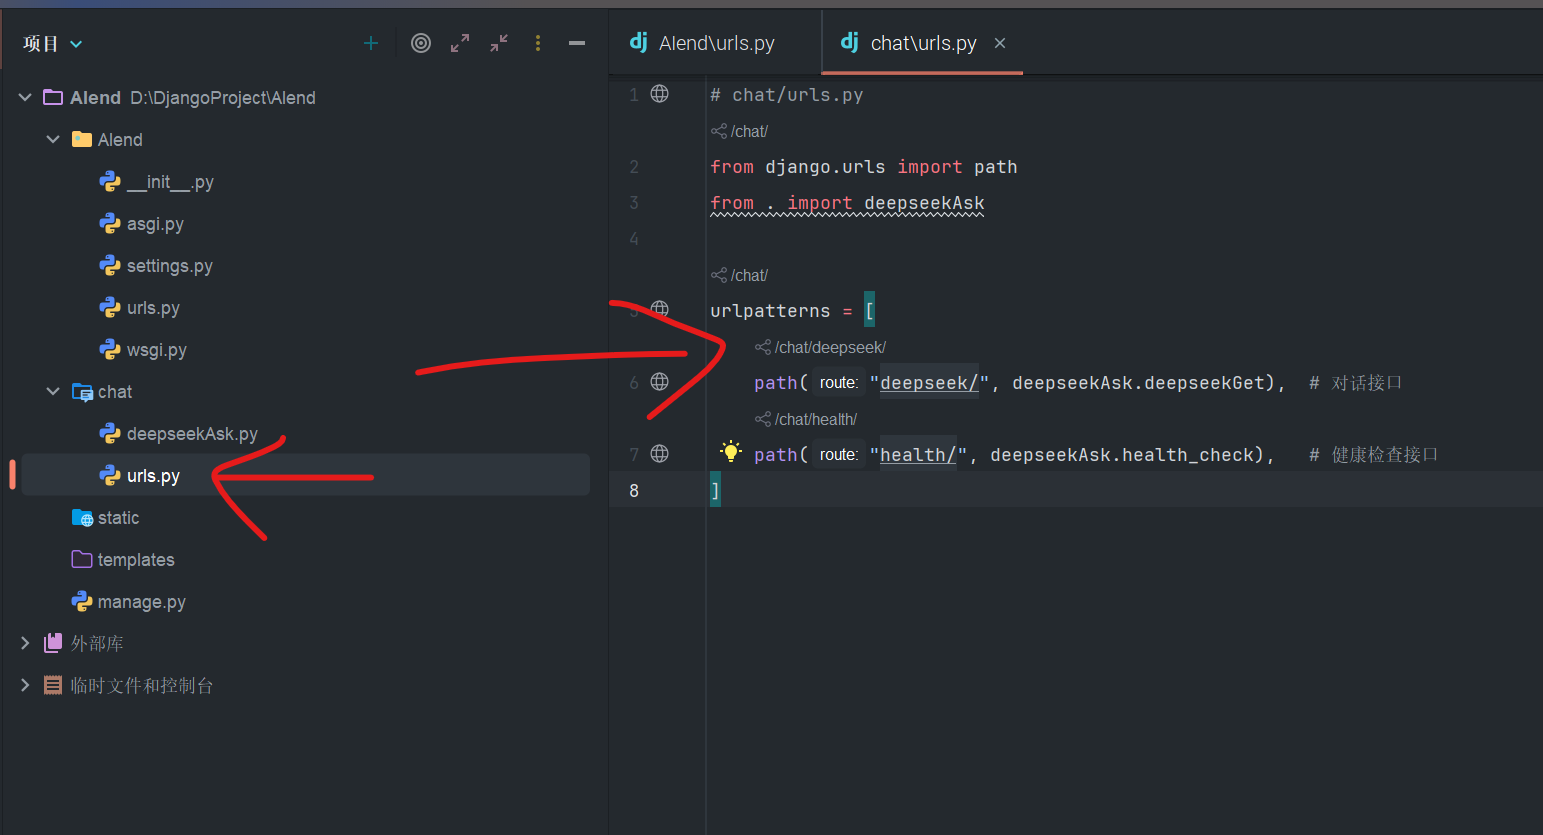
python
from django.urls import path
from . import deepseekAsk # 导入API调用脚本中的视图函数
# 次级路由映射:URL路径 → 视图函数
urlpatterns = [
# 问答接口:前端发送POST请求到/chat/ask/,触发deepseekAsk.deepseekGet函数
path('ask/', deepseekAsk.deepseekGet, name='deepseek_ask'),
# 健康检查接口:前端发送GET请求到/chat/health/,触发deepseekAsk.health_check函数
path('health/', deepseekAsk.health_check, name='health_check'),
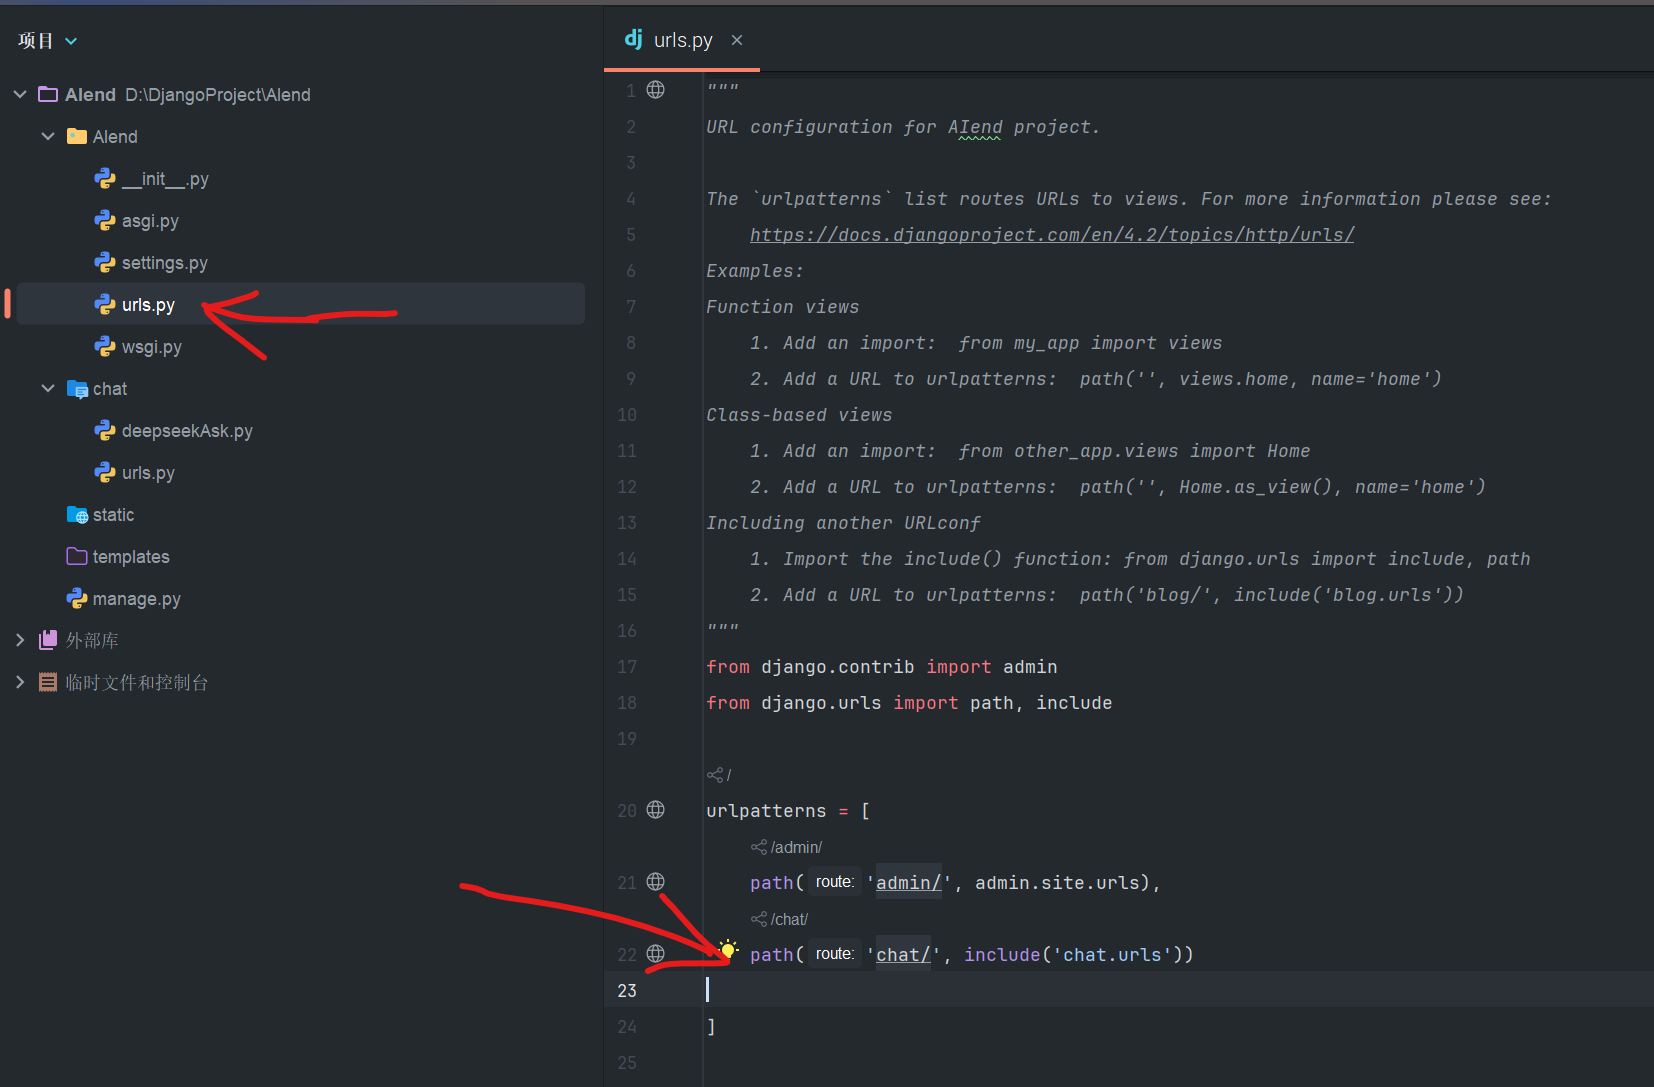
]3.2 主路由关联次级路由(项目配置目录 /urls.py)
打开项目默认的主路由文件(如Django-DeepSeek-Chat/urls.py),通过include函数将chat模块的路由集成进来,代码如下:
python
from django.contrib import admin
from django.urls import path, include  # 导入include用于关联次级路由

urlpatterns = [
    path('admin/', admin.site.urls),  # Django默认后台管理路由
    # 关联chat模块的次级路由:所有以/chat/开头的请求,都转发到chat/urls.py处理
    path('chat/', include('chat.urls')),
]
四、核心逻辑:DeepSeek API 调用与视图函数
deepseekAsk.py是整个后端的核心,负责接收前端请求、调用 DeepSeek API、处理异常并返回结果,我们将分模块解析其实现逻辑。
4.1 导入依赖与配置项
首先导入 Django 视图相关工具、OpenAI SDK 及异常类,并配置 DeepSeek API 的关键参数(需替换为个人实际信息):
python
from django.http import JsonResponse
from django.views.decorators.csrf import csrf_exempt  # 解决前后端分离跨域问题
from django.views.decorators.http import require_POST  # 限制请求方法为POST
from openai import OpenAI
from openai import APIError, AuthenticationError, RateLimitError  # API异常类

# -------------------------- 配置项(需替换为你的信息)--------------------------
DEEPSEEK_API_KEY = "sk-xxxxxxxxxxxxxxxxxxxxxxxxxxxxxxxx"  # 从DeepSeek控制台获取
DEEPSEEK_BASE_URL = "https://api.deepseek.com"  # DeepSeek官方API基座地址
SYSTEM_PROMPT = "你是我的私人助理,回答问题可以有性格一点,富有人情味,语言默认使用中文。"  # 定义AI角色
# -----------------------------------------------------------------------------------

# 初始化DeepSeek客户端(兼容OpenAI SDK格式)
client = OpenAI(
    api_key=DEEPSEEK_API_KEY,
    base_url=DEEPSEEK_BASE_URL
)- API Key 获取 :访问DeepSeek 控制台,注册登录后在「API 密钥」页面创建密钥;
- System Prompt 作用:通过指令定义 AI 的角色和回答风格,避免 AI 回答偏离预期(如 "专业技术顾问""幽默助手" 等)。
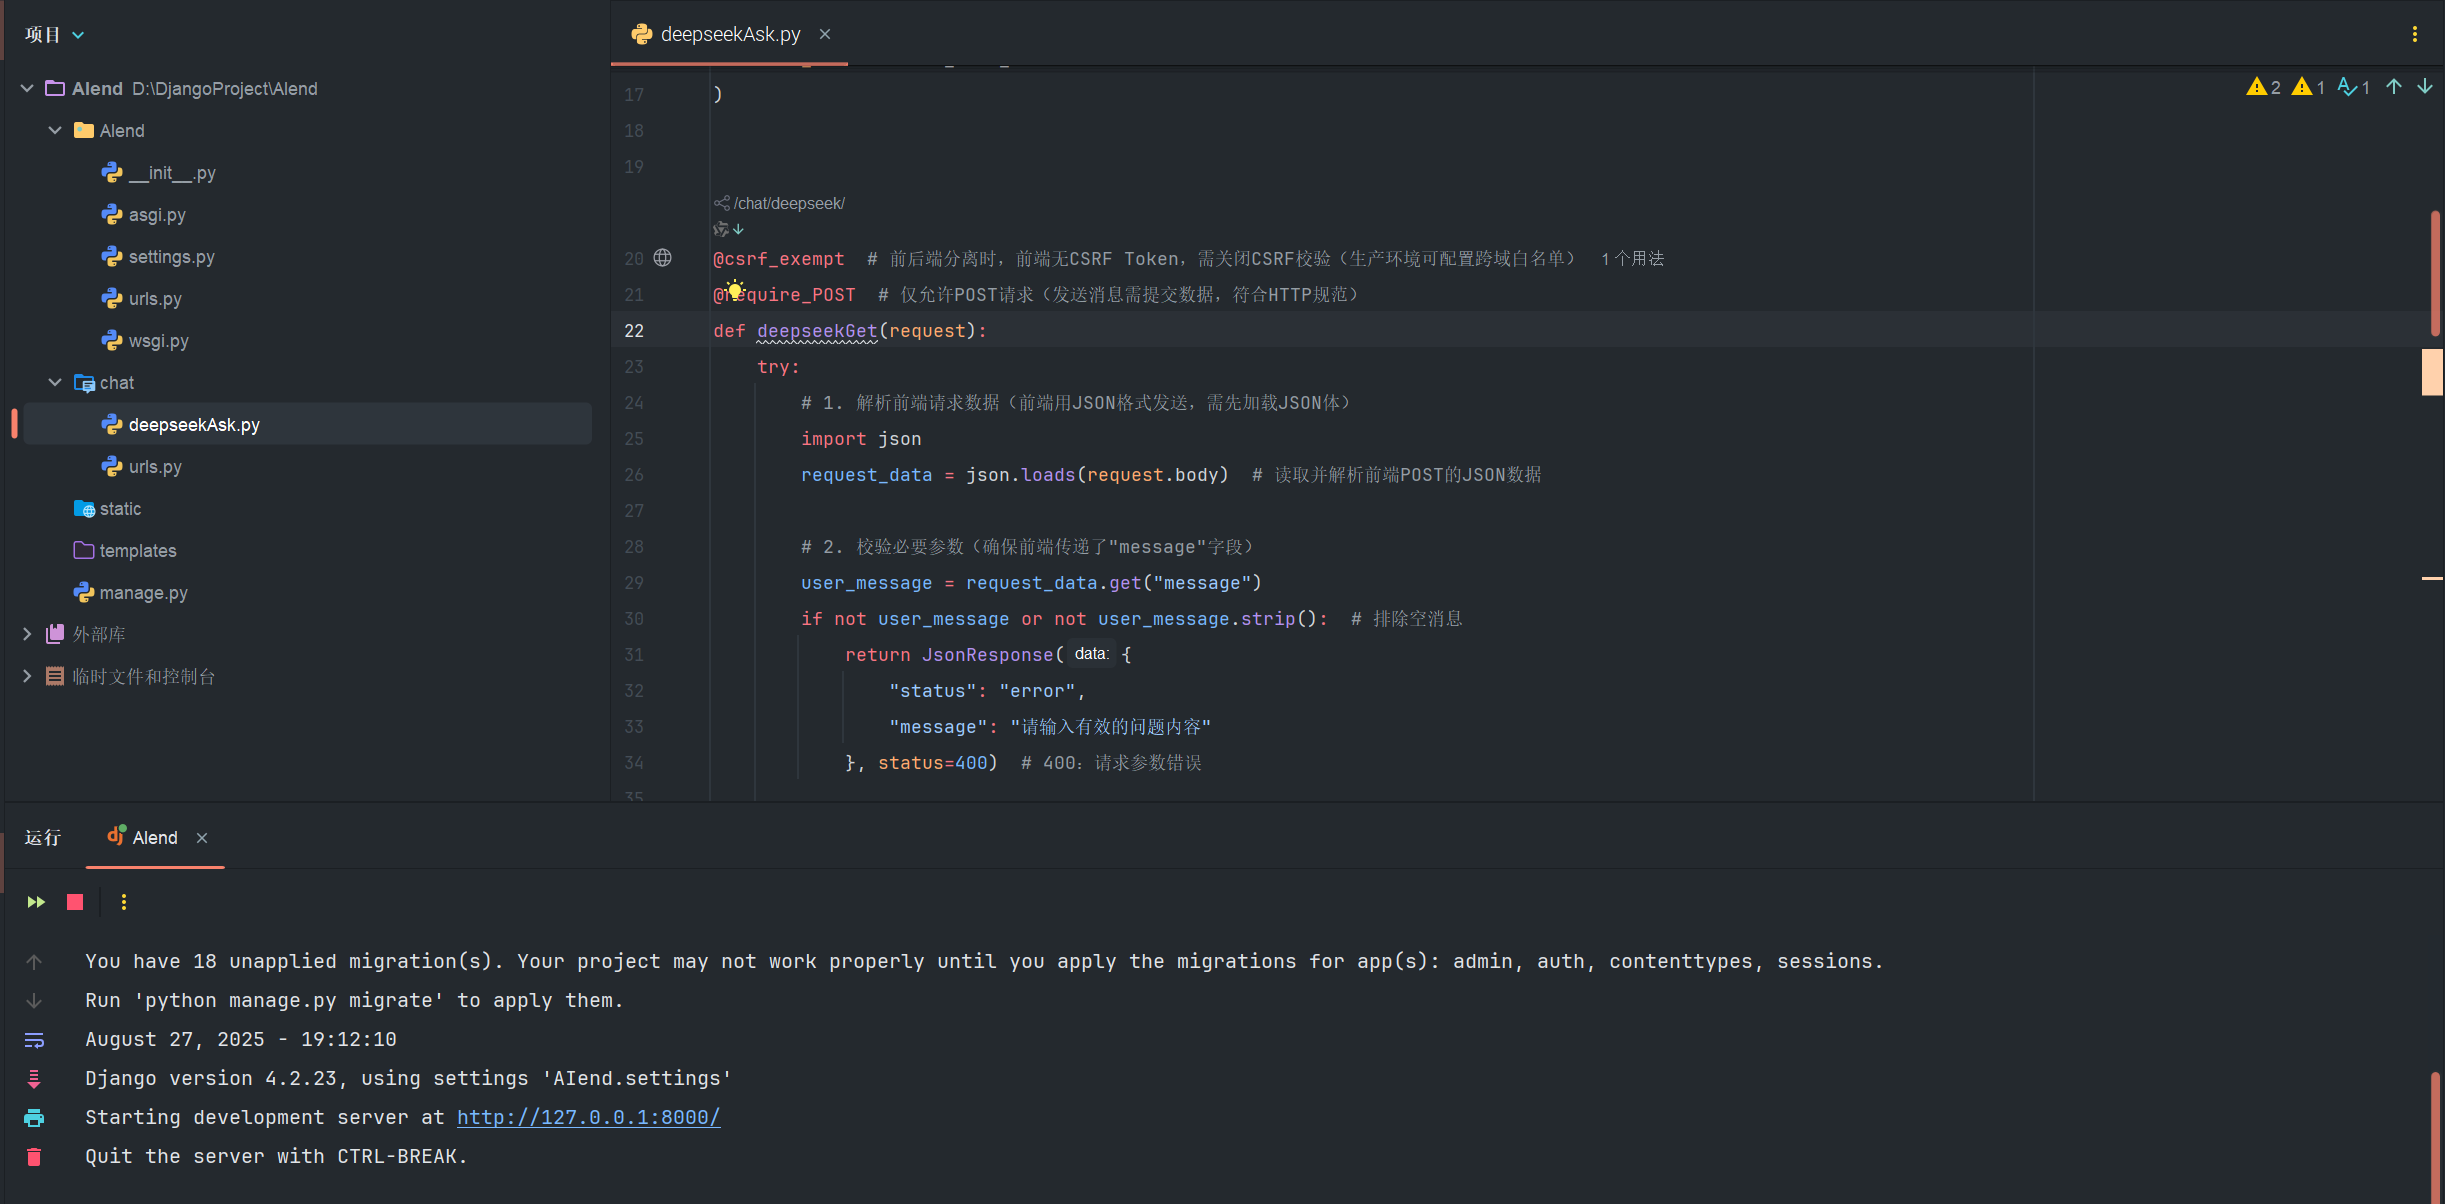
4.2 问答接口视图函数(deepseekGet)
该函数是问答功能的核心,负责处理前端 POST 请求,流程分为「解析请求→参数校验→调用 API→返回结果→异常处理」5 步:
python
@csrf_exempt  # 前后端分离时,前端无CSRF Token,需关闭校验(生产环境需配置跨域白名单)
@require_POST  # 仅允许POST请求(符合RESTful规范,提交数据用POST)
def deepseekGet(request):
    try:
        # 1. 解析前端JSON格式请求
        import json
        request_data = json.loads(request.body)  # 读取并解析请求体中的JSON数据

        # 2. 校验请求参数(确保前端传递了"message"字段)
        user_message = request_data.get("message")
        if not user_message or not user_message.strip():  # 排除空消息或纯空格
            return JsonResponse({
                "status": "error",
                "message": "请输入有效的问题内容"
            }, status=400)  # 400:HTTP状态码,代表请求参数错误

        # 3. 调用DeepSeek API获取AI响应
        response = client.chat.completions.create(
            model="deepseek-chat",  # DeepSeek官方聊天模型名(固定值)
            messages=[
                {"role": "system", "content": SYSTEM_PROMPT},  # 系统角色指令
                {"role": "user", "content": user_message.strip()}  # 用户输入(去除首尾空格)
            ],
            stream=False  # 非流式返回(前端需等待完整响应,适合简单问答场景)
        )

        # 4. 解析API响应,返回给前端
        ai_response = response.choices[0].message.content  # 提取AI回答内容
        return JsonResponse({
            "status": "success",
            "response": ai_response  # 前端通过res.response获取AI回答
        })

    # 5. 异常处理:覆盖常见错误场景,给前端明确提示
    except AuthenticationError:  # API密钥无效/过期
        return JsonResponse({
            "status": "error",
            "message": "DeepSeek API密钥无效或已过期,请检查密钥配置"
        }, status=401)  # 401:身份认证失败

    except RateLimitError:  # API调用频率超限
        return JsonResponse({
            "status": "error",
            "message": "API调用频率超限,请稍后再试"
        }, status=429)  # 429:请求过于频繁

    except APIError as e:  # DeepSeek API服务异常
        return JsonResponse({
            "status": "error",
            "message": f"DeepSeek API服务异常:{str(e)}"
        }, status=500)  # 500:服务器内部错误

    except json.JSONDecodeError:  # 前端请求格式不是JSON
        return JsonResponse({
            "status": "error",
            "message": "请求格式错误,请使用JSON格式提交数据"
        }, status=400)

    except Exception as e:  # 捕获其他未预料的异常(避免服务崩溃)
        return JsonResponse({
            "status": "error",
            "message": f"服务器处理失败:{str(e)}"
        }, status=500)
4.3 健康检查接口(health_check)
为了方便前端或运维人员确认后端服务状态,添加一个简单的健康检查接口,支持 GET 请求:
python
@csrf_exempt
def health_check(request):
    """处理/chat/health请求,返回后端运行状态"""
    if request.method == "GET":
        return JsonResponse({
            "status": "success",
            "message": "Backend service is running normally"
        })
    # 非GET请求返回"方法不允许"
    return JsonResponse({
        "status": "error",
        "message": "Only GET method is allowed"
    }, status=405)  # 405:HTTP标准状态码,代表请求方法不允许
4.4完整代码
bash
from django.http import JsonResponse
from django.views.decorators.csrf import csrf_exempt  # 解决跨域CSRF问题(前后端分离场景)
from django.views.decorators.http import require_POST  # 只允许POST请求(符合RESTful规范)
from openai import OpenAI
from openai import APIError, AuthenticationError, RateLimitError  # 捕获常见API异常

# -------------------------- 配置项(请替换为你的实际信息)--------------------------
DEEPSEEK_API_KEY = "++++++++++++++++++++++++++"  # 从DeepSeek控制台获取:https://platform.deepseek.com/
DEEPSEEK_BASE_URL = "https://api.deepseek.com"  # DeepSeek官方API基座地址
SYSTEM_PROMPT = "你是我的私人助理,回答问题可以有性格一点,富有人情味,语言默认使用中文。"  # 系统角色定义
# -----------------------------------------------------------------------------------

# 初始化DeepSeek客户端
client = OpenAI(
    api_key=DEEPSEEK_API_KEY,
    base_url=DEEPSEEK_BASE_URL
)


@csrf_exempt  # 前后端分离时,前端无CSRF Token,需关闭CSRF校验(生产环境可配置跨域白名单)
@require_POST  # 仅允许POST请求(发送消息需提交数据,符合HTTP规范)
def deepseekGet(request):
    try:
        # 1. 解析前端请求数据(前端用JSON格式发送,需先加载JSON体)
        import json
        request_data = json.loads(request.body)  # 读取并解析前端POST的JSON数据

        # 2. 校验必要参数(确保前端传递了"message"字段)
        user_message = request_data.get("message")
        if not user_message or not user_message.strip():  # 排除空消息
            return JsonResponse({
                "status": "error",
                "message": "请输入有效的问题内容"
            }, status=400)  # 400:请求参数错误

        # 3. 调用DeepSeek API获取响应
        response = client.chat.completions.create(
            model="deepseek-chat",  # DeepSeek官方聊天模型名(固定值)
            messages=[
                {"role": "system", "content": SYSTEM_PROMPT},  # 系统角色(定义助手行为)
                {"role": "user", "content": user_message.strip()}  # 用户输入(去除首尾空格)
            ],
            stream=False  # 非流式返回(前端需等待完整响应,符合当前前端逻辑)
        )

        # 4. 解析API响应,返回给前端
        ai_response = response.choices[0].message.content  # 提取AI回答内容
        return JsonResponse({
            "status": "success",
            "response": ai_response  # 前端通过resData.response获取AI回答
        })

    # 5. 异常处理(覆盖常见错误场景,给前端明确提示)
    except AuthenticationError:
        return JsonResponse({
            "status": "error",
            "message": "DeepSeek API密钥无效或已过期,请检查密钥配置"
        }, status=401)  # 401:身份认证失败

    except RateLimitError:
        return JsonResponse({
            "status": "error",
            "message": "API调用频率超限,请稍后再试"
        }, status=429)  # 429:请求过于频繁

    except APIError as e:
        return JsonResponse({
            "status": "error",
            "message": f"DeepSeek API服务异常:{str(e)}"
        }, status=500)  # 500:服务器内部错误

    except json.JSONDecodeError:
        return JsonResponse({
            "status": "error",
            "message": "请求格式错误,请使用JSON格式提交数据"
        }, status=400)

    except Exception as e:
        # 捕获其他未预料的异常(避免服务崩溃)
        return JsonResponse({
            "status": "error",
            "message": f"服务器处理失败:{str(e)}"
        }, status=500)

# -------------------------- 健康检查接口 --------------------------
@csrf_exempt  # 前后端分离需关闭CSRF校验
def health_check(request):
    """处理前端/chat/health的GET请求,返回后端状态"""
    # 只允许GET方法(健康检查无需提交数据)
    if request.method == "GET":
        return JsonResponse({
            "status": "success",
            "message": "Backend service is running normally"
        })
    # 非GET请求返回"方法不允许"
    return JsonResponse({
        "status": "error",
        "message": "Only GET method is allowed"
    }, status=405)  # 405是HTTP标准状态码:Method Not Allowed
五、功能测试:验证接口可用性
完成代码编写后,需要测试接口是否正常工作,推荐使用 Postman 或 curl 工具(这里以 Postman 为例)。
5.1 启动 Django 开发服务器
在项目根目录执行命令:
bash
python manage.py runserver也可以使用pycharm启动django服务器,确认启动成功
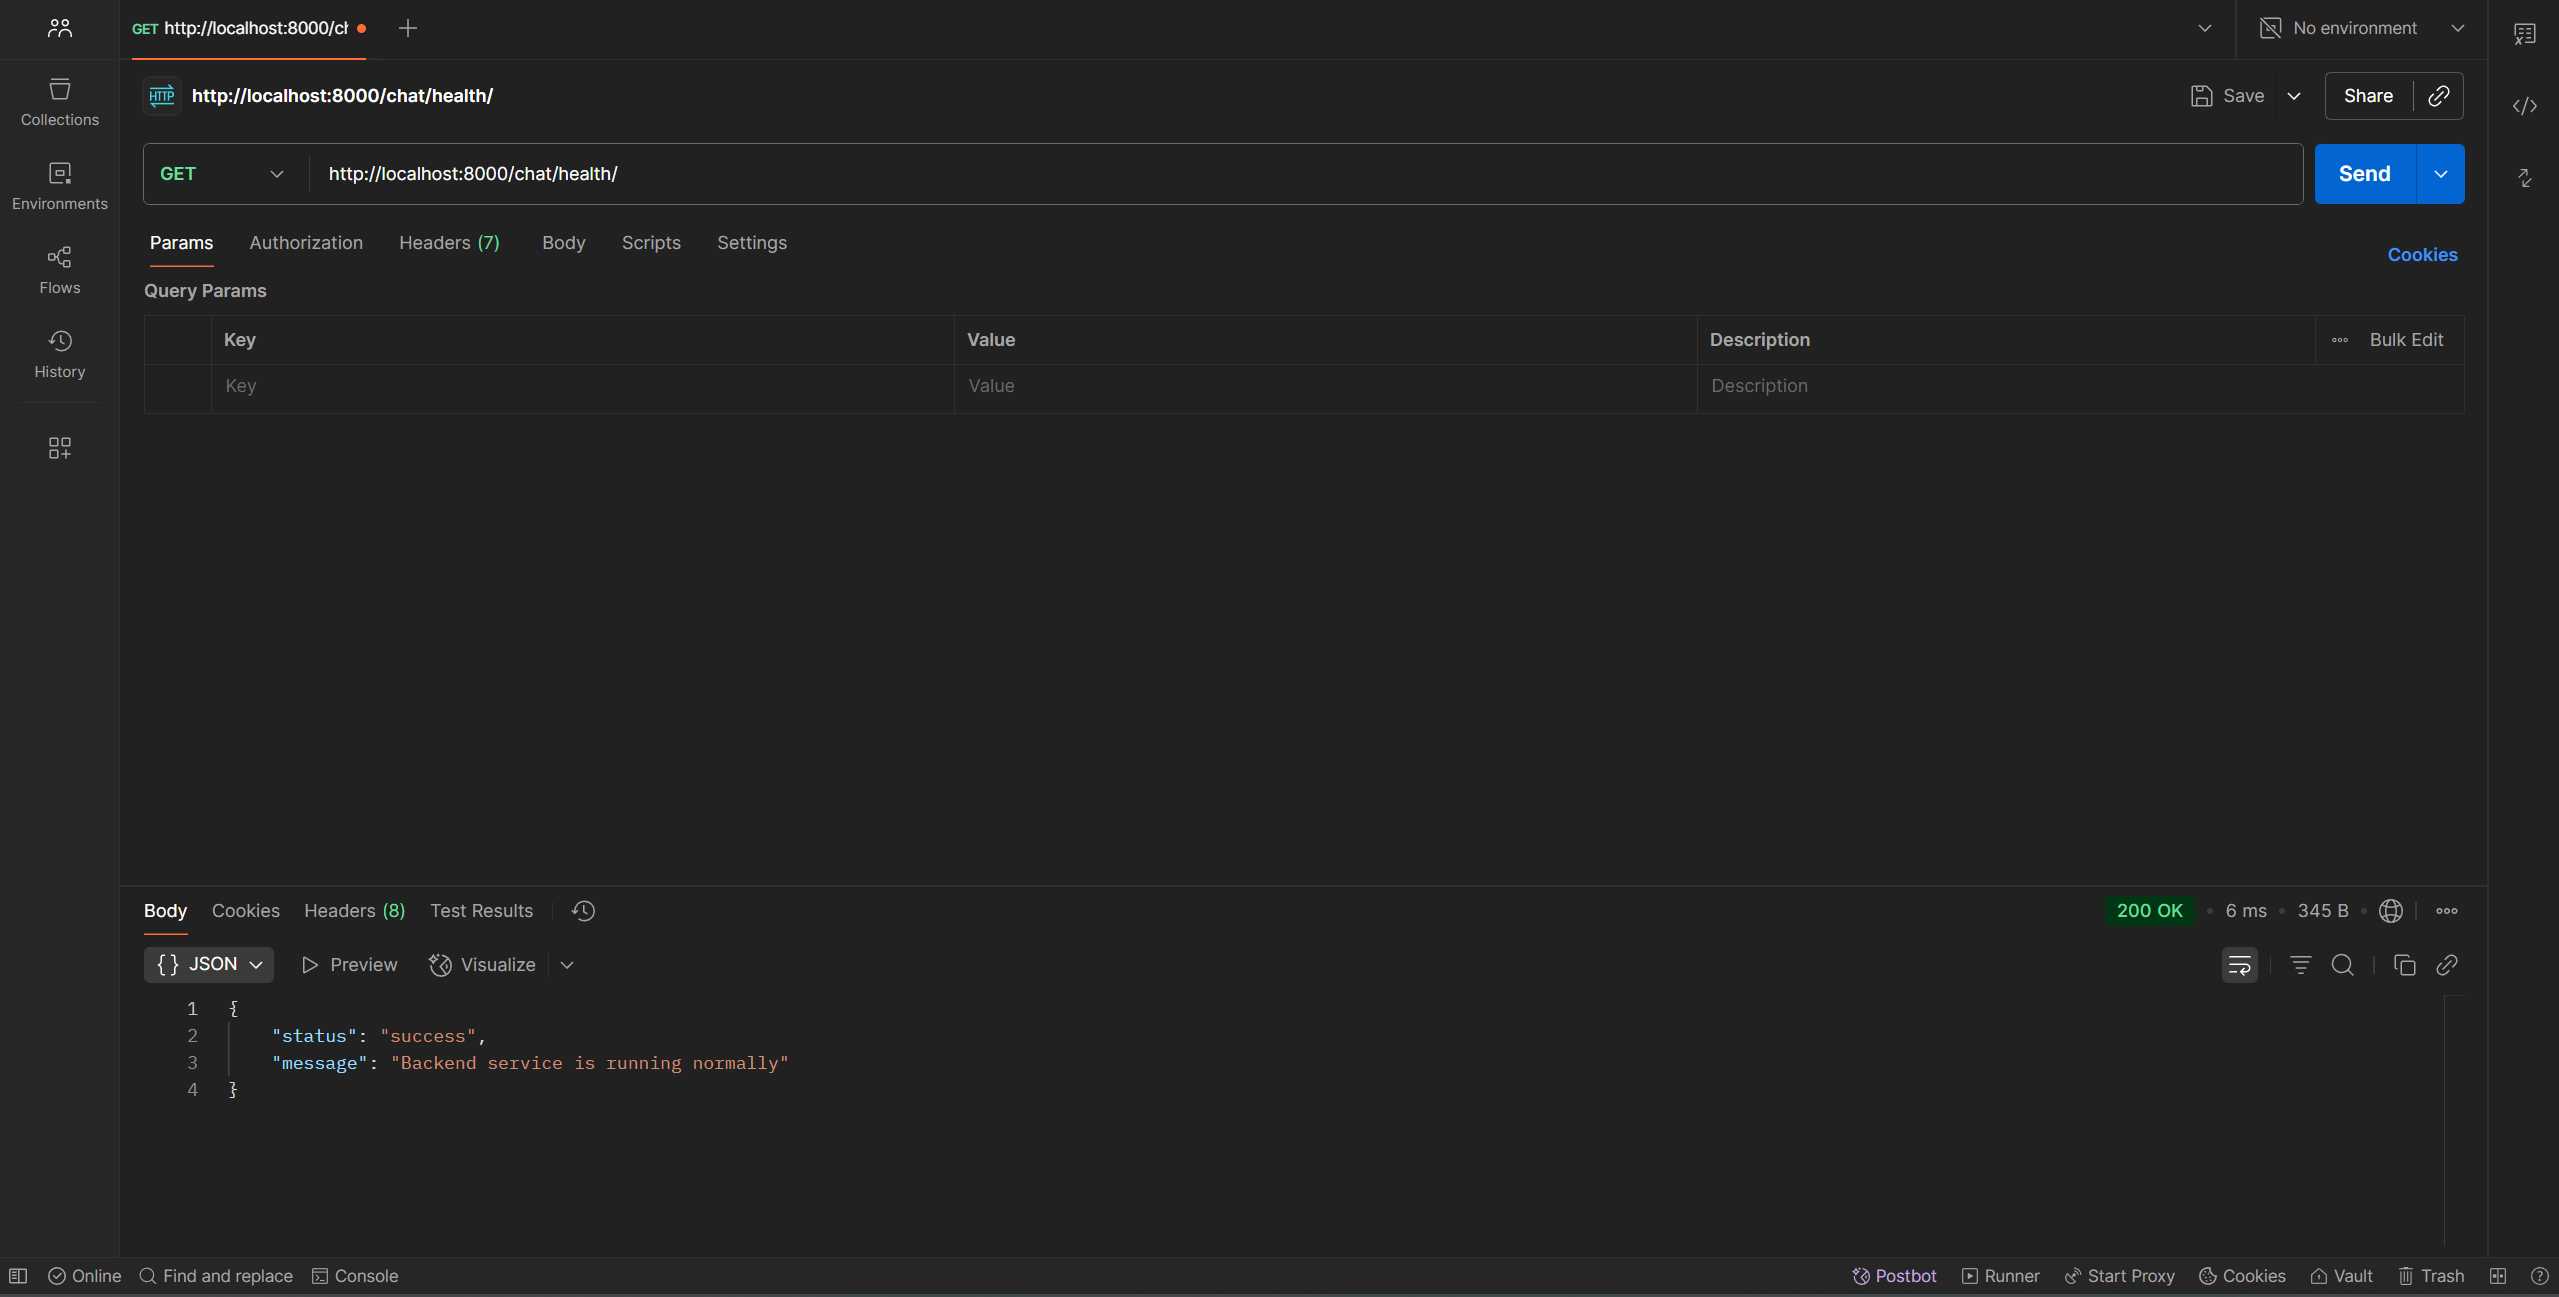
5.2 测试健康检查接口
1.打开 Postman,选择「GET」方法,输入 URL:
bash
http://127.0.0.1:8000/chat/health/2.点击「Send」,若返回以下响应,说明后端服务正常:
bash
{
    "status": "success",
    "message": "Backend service is running normally"
}
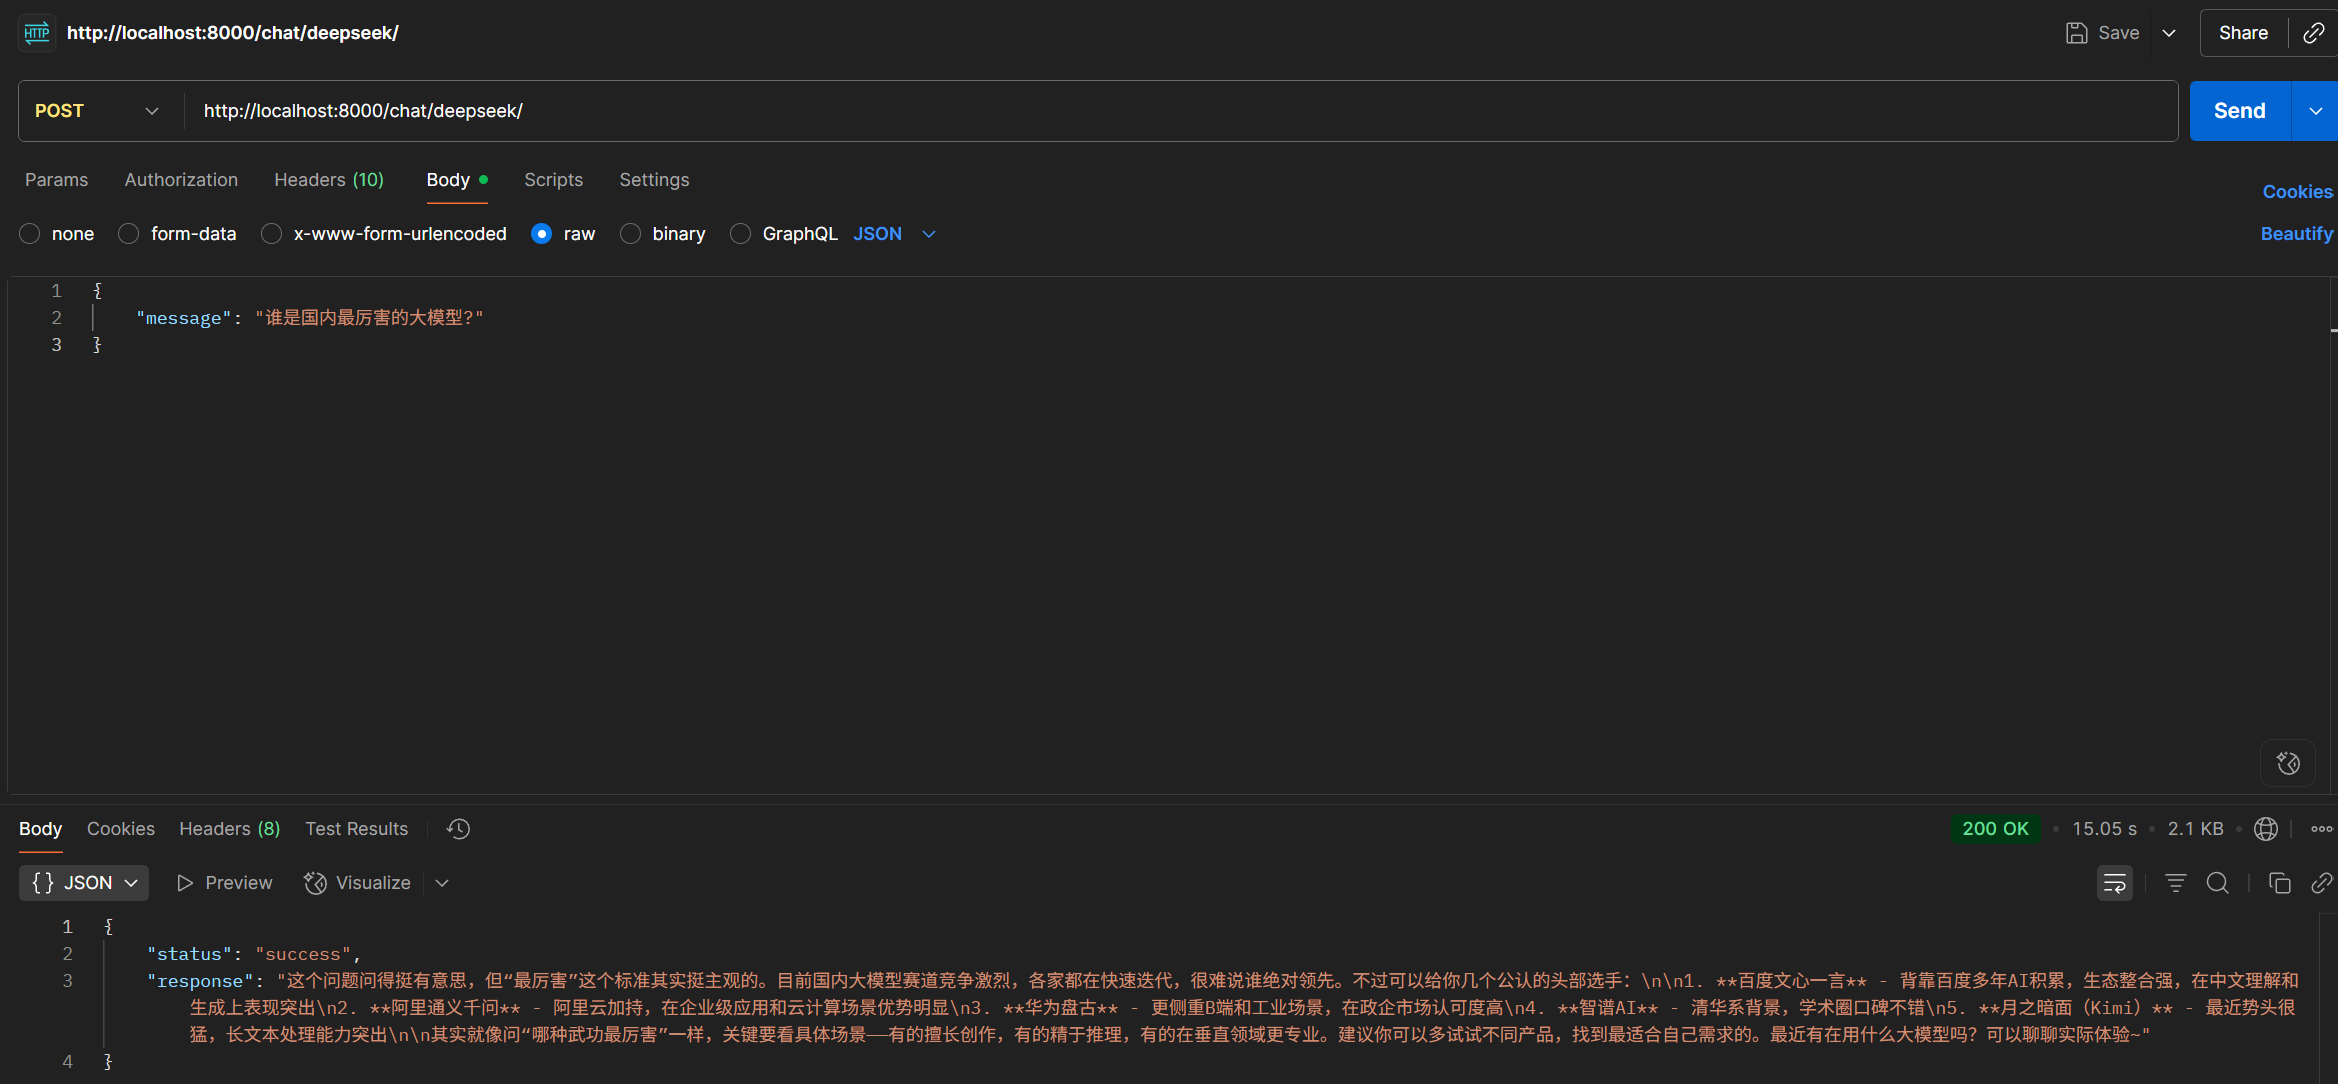
5.3 测试问答接口
1.选择「POST」方法,输入 URL:
bash
http://127.0.0.1:8000/chat/ask/2.添加请求头Content-Type:application/json

3.在「Body」→「raw」→「JSON」中输入请求数据:

4.点击send返回结果: