Apisix
架构
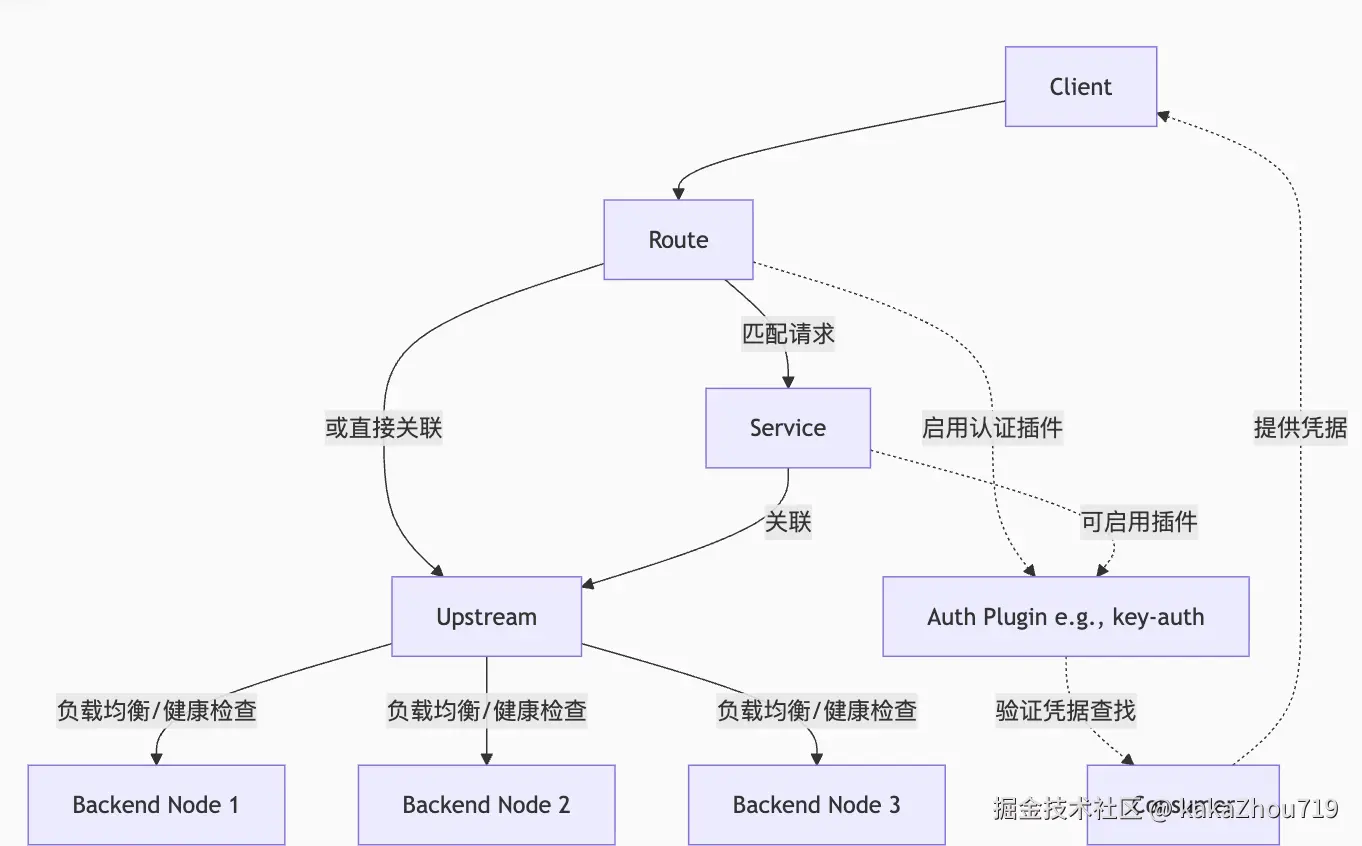
实现原理
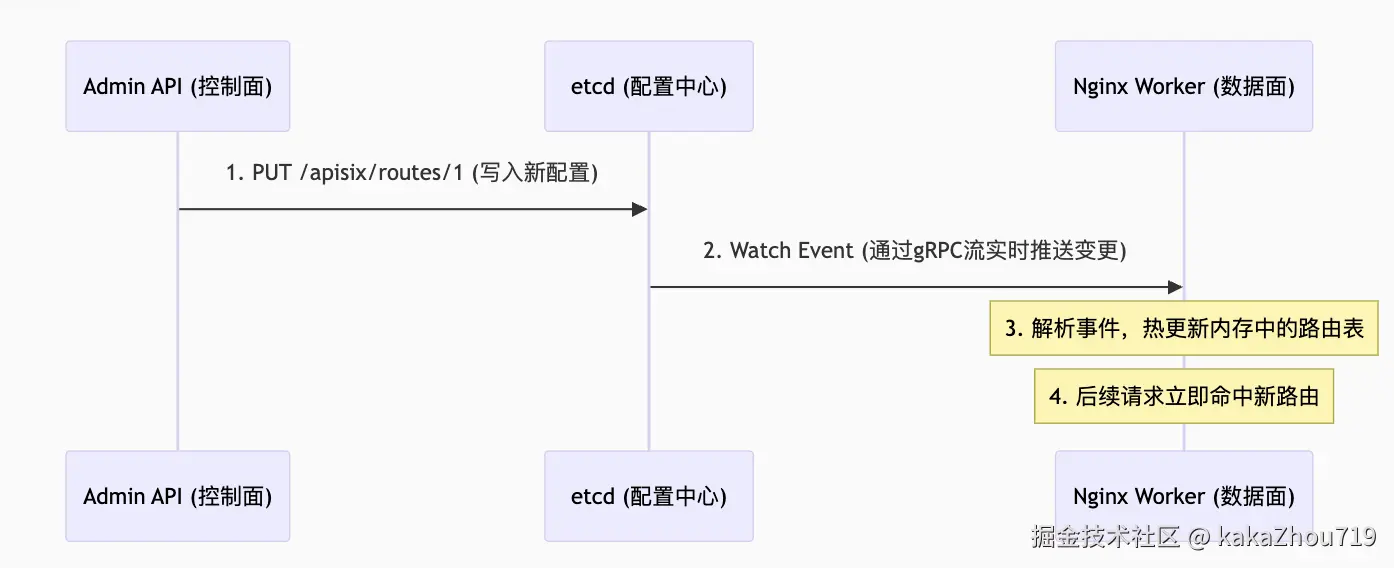
控制面: adminAPI 和 ETCD
apisix使用etcd实现持久化存储。由adminAPI 写入etcd:
vbnet
# 通过和adminAPI 的管理端口9180交互,实现apisix的配置,最终这些配置信息会存储到etcd中。
curl -i "http://127.0.0.1:9180/apisix/admin/routes" -X PUT -d '
{
  "id": "getting-started-ip",
  "uri": "/ip",
  "upstream": {
    "type": "roundrobin",
    "nodes": {
      "httpbin.org:80": 1
    }
  }
}'
etcdctl 命令查看当前存储的配置信息
sql
etcdctl get /apisix --prefix --keys-only

所有路由
etcdctl get /apisix/routes --prefix
所有上游
etcdctl get /apisix/upstreams --prefix
所有服务
etcdctl get /apisix/services --prefix
所有消费者
etcdctl get /apisix/consumers --prefix
插件配置
etcdctl get /apisix/plugins --prefix
全局插件
etcdctl get /apisix/global_rules --prefix

查看具体路由:
etcdctl get /apisix/routes/getting-started-ip
/apisix/routes/getting-started-ip
{"id":"getting-started-ip","create_time":1755680835,"update_time":1755681281,"uri":"/ip","name":"test ip","plugins":{"key-auth":{"_meta":{"disable":false},"key":"abc"}},"upstream":{"nodes":{"httpbin.org:80":1},"timeout":{"connect":6,"send":6,"read":6},"type":"roundrobin","scheme":"http","pass_host":"pass","keepalive_pool":{"idle_timeout":60,"requests":1000,"size":320}},"status":1}
数据面: openresty
程序入口:
apisix/apisix/init.lua at master · apache/apisix · GitHub
nginx.conf 配置代码片段,查看nginx master和nginx worker 是如何启动的,lua脚本插件是如何加载的:
ini
  # lua apisix的配置,包括nginx master的启动,lua插件的加载。
  init_by_lua_block {
        require "resty.core"
        apisix = require("apisix")

        local dns_resolver = { "127.0.0.11", }
        local args = {
            dns_resolver = dns_resolver,
        }
        apisix.http_init(args)

        -- set apisix_lua_home into constants module
        -- it may be used by plugins to determine the work path of apisix
        local constants = require("apisix.constants")
        constants.apisix_lua_home = "/usr/local/apisix"
    }

    #nginx worker 的启动函数入口
    init_worker_by_lua_block {
        apisix.http_init_worker()
    }

    # nginx worker 函数退出入口
    exit_worker_by_lua_block {
        apisix.http_exit_worker()
    }
init.lua 代码片段展示 nginx master进程和 nginx worker进程的启动过程。
lua
# # APISIX 的 Nginx master 进程启动阶段
function _M.http_init(args)
    core.resolver.init_resolver(args)
    core.id.init()
    core.env.init()

    local process = require("ngx.process")
    local ok, err = process.enable_privileged_agent()
    if not ok then
        core.log.error("failed to enable privileged_agent: ", err)
    end

    if core.config.init then
        local ok, err = core.config.init()
        if not ok then
            core.log.error("failed to load the configuration: ", err)
        end
    end

    xrpc.init()
end

# APISIX 的 Nginx worker 进程启动阶段
function _M.http_init_worker()
    local seed, err = core.utils.get_seed_from_urandom()
    if not seed then
        core.log.warn('failed to get seed from urandom: ', err)
        seed = ngx_now() * 1000 + ngx.worker.pid()
    end
    math.randomseed(seed)
    -- for testing only
    core.log.info("random test in [1, 10000]: ", math.random(1, 10000))

    require("apisix.events").init_worker()

    local discovery = require("apisix.discovery.init").discovery
    if discovery and discovery.init_worker then
        discovery.init_worker()
    end
    require("apisix.balancer").init_worker()
    load_balancer = require("apisix.balancer")
    require("apisix.admin.init").init_worker()

    require("apisix.timers").init_worker()

    require("apisix.debug").init_worker()

    if core.config.init_worker then
        local ok, err = core.config.init_worker()
        if not ok then
            core.log.error("failed to init worker process of ", core.config.type,
                           " config center, err: ", err)
        end
    end

    plugin.init_worker()
    router.http_init_worker()
    require("apisix.http.service").init_worker()
    plugin_config.init_worker()
    require("apisix.consumer").init_worker()
    consumer_group.init_worker()
    apisix_secret.init_worker()

    apisix_global_rules.init_worker()

    apisix_upstream.init_worker()
    require("apisix.plugins.ext-plugin.init").init_worker()

    control_api_router.init_worker()
    local_conf = core.config.local_conf()

    if local_conf.apisix and local_conf.apisix.enable_server_tokens == false then
        ver_header = "APISIX"
    end

    -- To ensure that all workers related to Prometheus metrics are initialized,
    -- we need to put the initialization of the Prometheus plugin here.
    plugin.init_prometheus()
end
插件实现
默认内置插件路径:/usr/local/apisix/apisix/plugins,里面存储了默认自带的插件文件。这些插件可以在apisix config.yaml中选择指定,默认是加载全部。

插件执行阶段 ,APISIX 采用了 OpenResty 的执行阶段概念,允许插件在不同的处理时机介入
执行阶段(Phases) 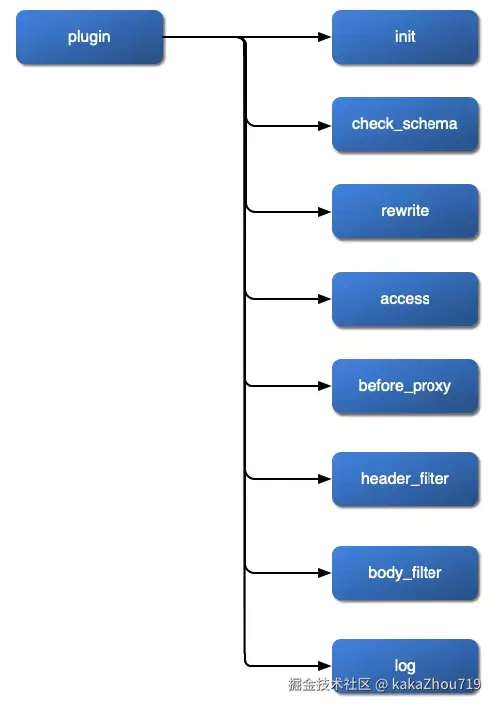
● rewrite: 请求处理早期阶段,常用于修改上游 URI 或参数,或进行身份验证(如你提供的 key-auth 插件)。
● access: 请求转发到上游之前的最主要阶段,常用于权限校验、限流、流量控制等。
● header_filter: 处理来自上游服务的响应头之后,可用于修改响应头。
● body_filter: 处理来自上游服务的响应体之后,可用于修改响应体。
● log: 请求结束后,用于记录日志、发送指标等收尾工作。
● balancer: 用于实现自定义的负载均衡算法
插件内容模版举例:
以下举例key-auth.lua 插件的实现代码:其核心功能是验证客户端请求是否携带了一个有效的 API Key。如果Key有效,则请求被放行,并将对应的消费者(Consumer)信息附加到请求上下文中;如果无效,则请求被拒绝并返回 401 Unauthorized
ini
local ngx = ngx
local core = require("apisix.core")
local plugin = require("apisix.plugin")
local upstream = require("apisix.upstream")

# 插件schema定义
local schema = {
    type = "object",
    properties = {
        i = {type = "number", minimum = 0},
        s = {type = "string"},
        t = {type = "array", minItems = 1},
        ip = {type = "string"},
        port = {type = "integer"},
    },
    required = {"i"},
}

local metadata_schema = {
    type = "object",
    properties = {
        ikey = {type = "number", minimum = 0},
        skey = {type = "string"},
    },
    required = {"ikey", "skey"},
}

local plugin_name = "example-plugin"

# 插件注册
local _M = {
    version = 0.1,
    priority = 0,
    name = plugin_name,
    schema = schema,
    metadata_schema = metadata_schema,
}

# 检查插件schema
function _M.check_schema(conf, schema_type)
    if schema_type == core.schema.TYPE_METADATA then
        return core.schema.check(metadata_schema, conf)
    end
    return core.schema.check(schema, conf)
end

# 插件初始化
function _M.init()
    -- call this function when plugin is loaded
    local attr = plugin.plugin_attr(plugin_name)
    if attr then
        core.log.info(plugin_name, " get plugin attr val: ", attr.val)
    end
end


function _M.destroy()
    -- call this function when plugin is unloaded
end

# request进入apisix阶段的处理,修改请求或者是重定向,早期的认证等。
function _M.rewrite(conf, ctx)
    core.log.warn("plugin rewrite phase, conf: ", core.json.encode(conf))
    core.log.warn("conf_type: ", ctx.conf_type)
    core.log.warn("conf_id: ", ctx.conf_id)
    core.log.warn("conf_version: ", ctx.conf_version)
end

# rquest 请求转发到上游之前的最主要阶段,一般是权限校验、限流、流量控制等
function _M.access(conf, ctx)
    core.log.warn("plugin access phase, conf: ", core.json.encode(conf))
    -- return 200, {message = "hit example plugin"}

    if not conf.ip then
        return
    end

    local up_conf = {
        type = "roundrobin",
        nodes = {
            {host = conf.ip, port = conf.port, weight = 1}
        }
    }

    local ok, err = upstream.check_schema(up_conf)
    if not ok then
        return 500, err
    end

    local matched_route = ctx.matched_route
    upstream.set(ctx, up_conf.type .. "#route_" .. matched_route.value.id,
                 ctx.conf_version, up_conf)
    return
end
# 处理来自上游服务的response,可用于修改响应头。
function _M.header_filter(conf, ctx)
    core.log.warn("plugin header_filter phase, conf: ", core.json.encode(conf))
end

# 处理来自上游服务的response,可用于修改response body。
function _M.body_filter(conf, ctx)
    core.log.warn("plugin body_filter phase, eof: ", ngx.arg[2],
                  ", conf: ", core.json.encode(conf))
end


function _M.delayed_body_filter(conf, ctx)
    core.log.warn("plugin delayed_body_filter phase, eof: ", ngx.arg[2],
                  ", conf: ", core.json.encode(conf))
end

#示例作用:打印日志,这是进行最终审计、统计或发送数据到外部系统。
function _M.log(conf, ctx)
    core.log.warn("plugin log phase, conf: ", core.json.encode(conf))
end


local function hello()
    local args = ngx.req.get_uri_args()
    if args["json"] then
        return 200, {msg = "world"}
    else
        return 200, "world\n"
    end
end

# 配置插件的管理接口,例如该插件可以通过GET "/v1/plugin/example-plugin/hello" 访问
function _M.control_api()
    return {
        {
            methods = {"GET"},
            uris = {"/v1/plugin/example-plugin/hello"},
            handler = hello,
        }
    }
end

return _M
核心概念
upstream
定义反向代理的后端服务目标集群。例如:创建一个转发到"httpbin.org:80"的后端服务。
vbnet
curl "http://127.0.0.1:9180/apisix/admin/upstreams/1" \
-H "X-API-KEY: edd1c9f034335f136f87ad84b625c8f1" -X PUT -d '
{
  "type": "roundrobin",
  "nodes": {
    "httpbin.org:80": 1
  }
}'

{"key":"/apisix/upstreams/1","value":{"scheme":"http","id":"1","hash_on":"vars","nodes":{"httpbin.org:80":1},"type":"roundrobin","pass_host":"pass","create_time":1755591817,"update_time":1755591817}}
route
定义请求的匹配规则,并将其转发到指定的上游服务。例如:创建一个路由,访问url是 "/http-server/*" , 使用后端服务upstream 是1。
vbnet
curl "http://127.0.0.1:9180/apisix/admin/routes/1" \
-H "X-API-KEY: edd1c9f034335f136f87ad84b625c8f1" -X PUT -d '
{
  "methods": ["GET"],
  "uri": "/http-server/*",
  "upstream_id": "1"
}'
{"key":"/apisix/routes/1","value":{"id":"1","uri":"/anything/*","status":1,"upstream_id":"1","update_time":1755591831,"host":"example.com","create_time":1755591831,"methods":["GET"],"priority":0}}
plugin
可动态启用的功能模块,用于扩展API网关的处理能力,如认证、限流、日志等。
bash
查看默认加载了哪些插件:
curl -i http://127.0.0.1:9180/apisix/admin/plugins/list -H "X-API-KEY: edd1c9f034335f136f87ad84b625c8f1"
vbnet
# 使用rate limit plugin,限制请求一分钟之内只能请求2次。
curl -i http://127.0.0.1:9180/apisix/admin/routes/1 \
-H "X-API-KEY: $Key" -X PUT -d '
{
    "uri": "/index.html",
    "plugins": {
        "limit-count": {
            "count": 2,
            "time_window": 60,
            "rejected_code": 503,
            "key_type": "var",
            "key": "remote_addr"
        }
    },
  "upstream_id": "1"
}'

{"key":"/apisix/routes/1","value":{"upstream_id":"1","id":"1","priority":0,"status":1,"uri":"/index.html","create_time":1755591831,"plugins":{"limit-count":{"time_window":60,"rejected_code":503,"count":2,"key":"remote_addr","key_type":"var","policy":"local","show_limit_quota_header":true,"allow_degradation":false}},"update_time":1755592072}}
service
一组 upstream+plugin的抽象。用于将不同的请求路由到不同的 service 上。服务由路由中公共的插件配置、上游目标信息组合而成。服务与路由、上游关联,一个服务可对应一组上游节点、可被多条路由绑定。
vbnet
# 创建service:
curl http://127.0.0.1:9180/apisix/admin/services/200 \
-H "X-API-KEY: $admin_key" -X PUT -d '
{
    "plugins": {
        "limit-count": {
            "count": 2,
            "time_window": 60,
            "rejected_code": 503,
            "key": "remote_addr"
        }
    },
    "upstream": {
        "type": "roundrobin",
        "nodes": {
            "127.0.0.1:1980": 1
        }
    }
}'

# 创建路由1
curl http://127.0.0.1:9180/apisix/admin/routes/100 \
-H "X-API-KEY: $admin_key" -X PUT -d '
{
    "methods": ["GET"],
    "uri": "/index.html",
    "service_id": "200"
}'
# 创建路由2

curl http://127.0.0.1:9180/apisix/admin/routes/200 \
-H "X-API-KEY: $admin_key" -X PUT -d '
{
    "methods": ["GET"],
    "uri": "/foo/index.html",
    "service_id": "200"
}'
consumer
当一个请求在 Route 上通过认证插件(如 key-auth, jwt-auth)成功找到对应的 Consumer 后,APISIX 会将该 Consumer 身上配置的所有插件配置都加载过来,并与当前 Route 的插件配置合并后一起执行。且Route 上的 plugin 配置优先级高于 Consumer 上的插件配置,最终会将合集一起执行。
vbnet
# 创建一个consumer,支持jwt-auth
curl -X PUT http://127.0.0.1:9180/apisix/admin/consumers/kakalzhou \
  -H 'X-API-KEY: TWgCqkDFYNiZLrQwUsGiNkVHXyLHNmdP' \
  -d '{
    "username": "kakalzhou",
    "plugins": {
        "jwt-auth": {
            "key": "user-key",
            "algorithm": "HS256"
        }
    }
}'

{"key":"/apisix/consumers/kakalzhou","value":{"plugins":{"jwt-auth":{"base64_secret":false,"lifetime_grace_period":0,"key":"user-key","algorithm":"HS256","exp":86400,"secret":"h9Z5B9BQsBY3OvE7zAkUQ+j1EfBcgS7NwJMo6V/zqDXyNoyOJXe0SiC08ZwPfw7o"}},"update_time":1755594679,"create_time":1755594679,"username":"kakalzhou"}}


# 创建路由,访问这个路由的时候,需要带上jwt-auth header。
curl "http://127.0.0.1:9180/apisix/admin/routes/get-jwt-token" -X PATCH \
  -H "X-API-KEY: TWgCqkDFYNiZLrQwUsGiNkVHXyLHNmdP" \
  -d '{
    "uri": "/headers",
    "plugins": {
      "jwt-auth": {}
    },
    "upstream": {
      "type": "roundrobin",
      "nodes": {
        "httpbin.org:80": 1
      }
    }
  }'

{"key":"/apisix/routes/get-jwt-token","value":{"update_time":1755603251,"id":"get-jwt-token","upstream":{"scheme":"http","pass_host":"pass","hash_on":"vars","nodes":{"httpbin.org:80":1},"type":"roundrobin"},"plugins":{"public-api":{},"jwt-auth":{"header":"authorization","hide_credentials":false,"cookie":"jwt","store_in_ctx":false,"key_claim_name":"key","query":"jwt"}},"uri":"/headers","create_time":1755595211,"status":1,"priority":0}}


# 请求使用:
curl -i http://127.0.0.1:9080/headers \
  -H 'Authorization: eyJhbGci...YyZzA'
部署配置
云原生模式部署
apisix 部署
arduino
helm repo add apisix https://charts.apiseven.com
helm repo update
helm install apisix apisix/apisix --create-namespace  --namespace apisix
apisix dashborad部署
arduino
helm repo add apisix https://charts.apiseven.com
helm repo update
helm install apisix-dashboard apisix/apisix-dashboard --create-namespace --namespace apisix
创建完之后等待pod启动成功:

dashboard 访问
arduino
export POD_NAME=$(kubectl get pods --namespace apisix -l "app.kubernetes.io/name=apisix-dashboard,app.kubernetes.io/instance=apisix-dashboard" -o jsonpath="{.items[0].metadata.name}")

export CONTAINER_PORT=$(kubectl get pod --namespace apisix $POD_NAME -o jsonpath="{.spec.containers[0].ports[0].containerPort}")

kubectl --namespace apisix port-forward $POD_NAME 8080:$CONTAINER_PORT

访问:
http://127.0.0.1:8080
admin/admin
配置信息
vbnet
kubectl get cm -n apisix apisix:可以获取admin API KEY
kubectl get cm -n apisix apisix-dashboard: 可以获取dashboard登陆信息
服务暴露:
arduino
#admin API,通过此svc配置apisix
kubectl get svc -n apisix apisix-admin

# gateway API ,通过此svc访问apisix代理的后端服务
kubectl get svc -n apisix apisix-gateway
apisix server 配置文件config.yaml示例
yaml
apisix:
  node_listen: 9080              # APISIX listening port
  enable_ipv6: false

  enable_control: true
  control:
    ip: "0.0.0.0"
    port: 9092

deployment:
  admin:
    allow_admin:               # https://nginx.org/en/docs/http/ngx_http_access_module.html#allow
      - 0.0.0.0/0              # We need to restrict ip access rules for security. 0.0.0.0/0 is for test.
    admin_key:
      - name: "admin"
        key: edd1c9f034335f136f87ad84b625c8f1
        role: admin                 # admin: manage all configuration data
  etcd:
    host:                           # it's possible to define multiple etcd hosts addresses of the same etcd cluster.
      - "http://etcd:2379"          # multiple etcd address
    prefix: "/apisix"               # apisix configurations prefix
    timeout: 30                     # 30 seconds
plugin_attr: 对应插件的默认配置信息
  prometheus:
    export_addr:
      ip: "0.0.0.0"
      port: 9091
通过dashboard 配置
配置upstream
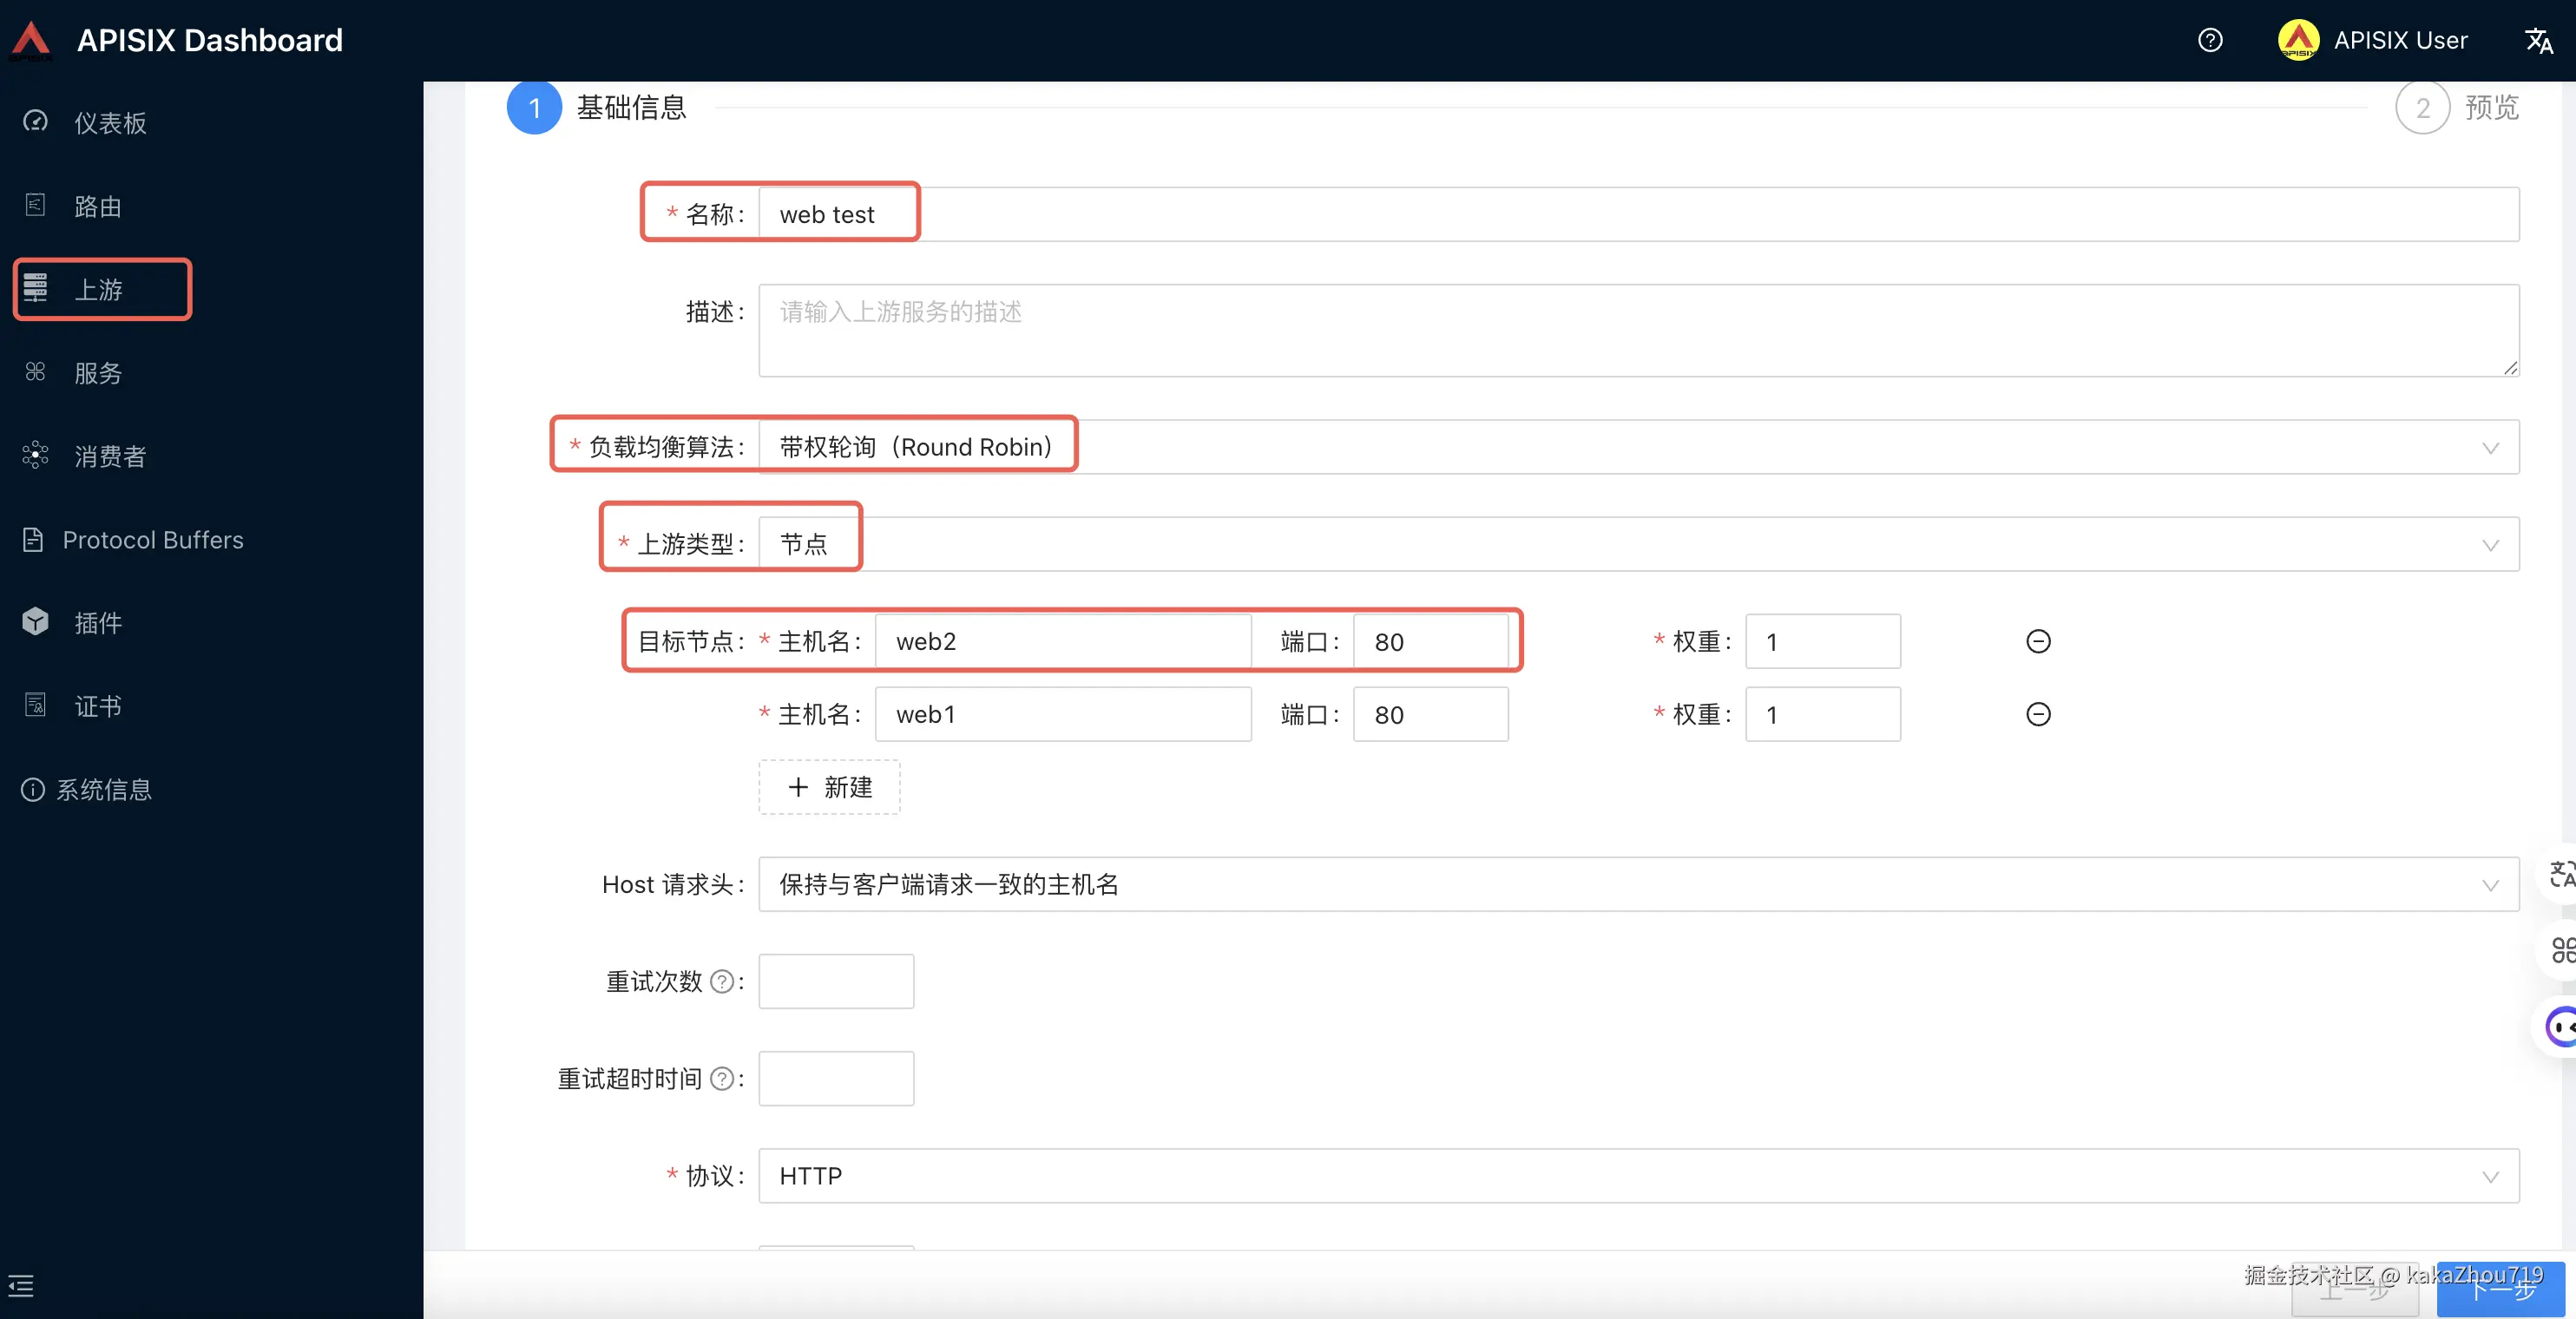
配置路由
- 设置路由信息
设置路由名称,不绑定服务模式,后续自己选择upstream和插件信息。
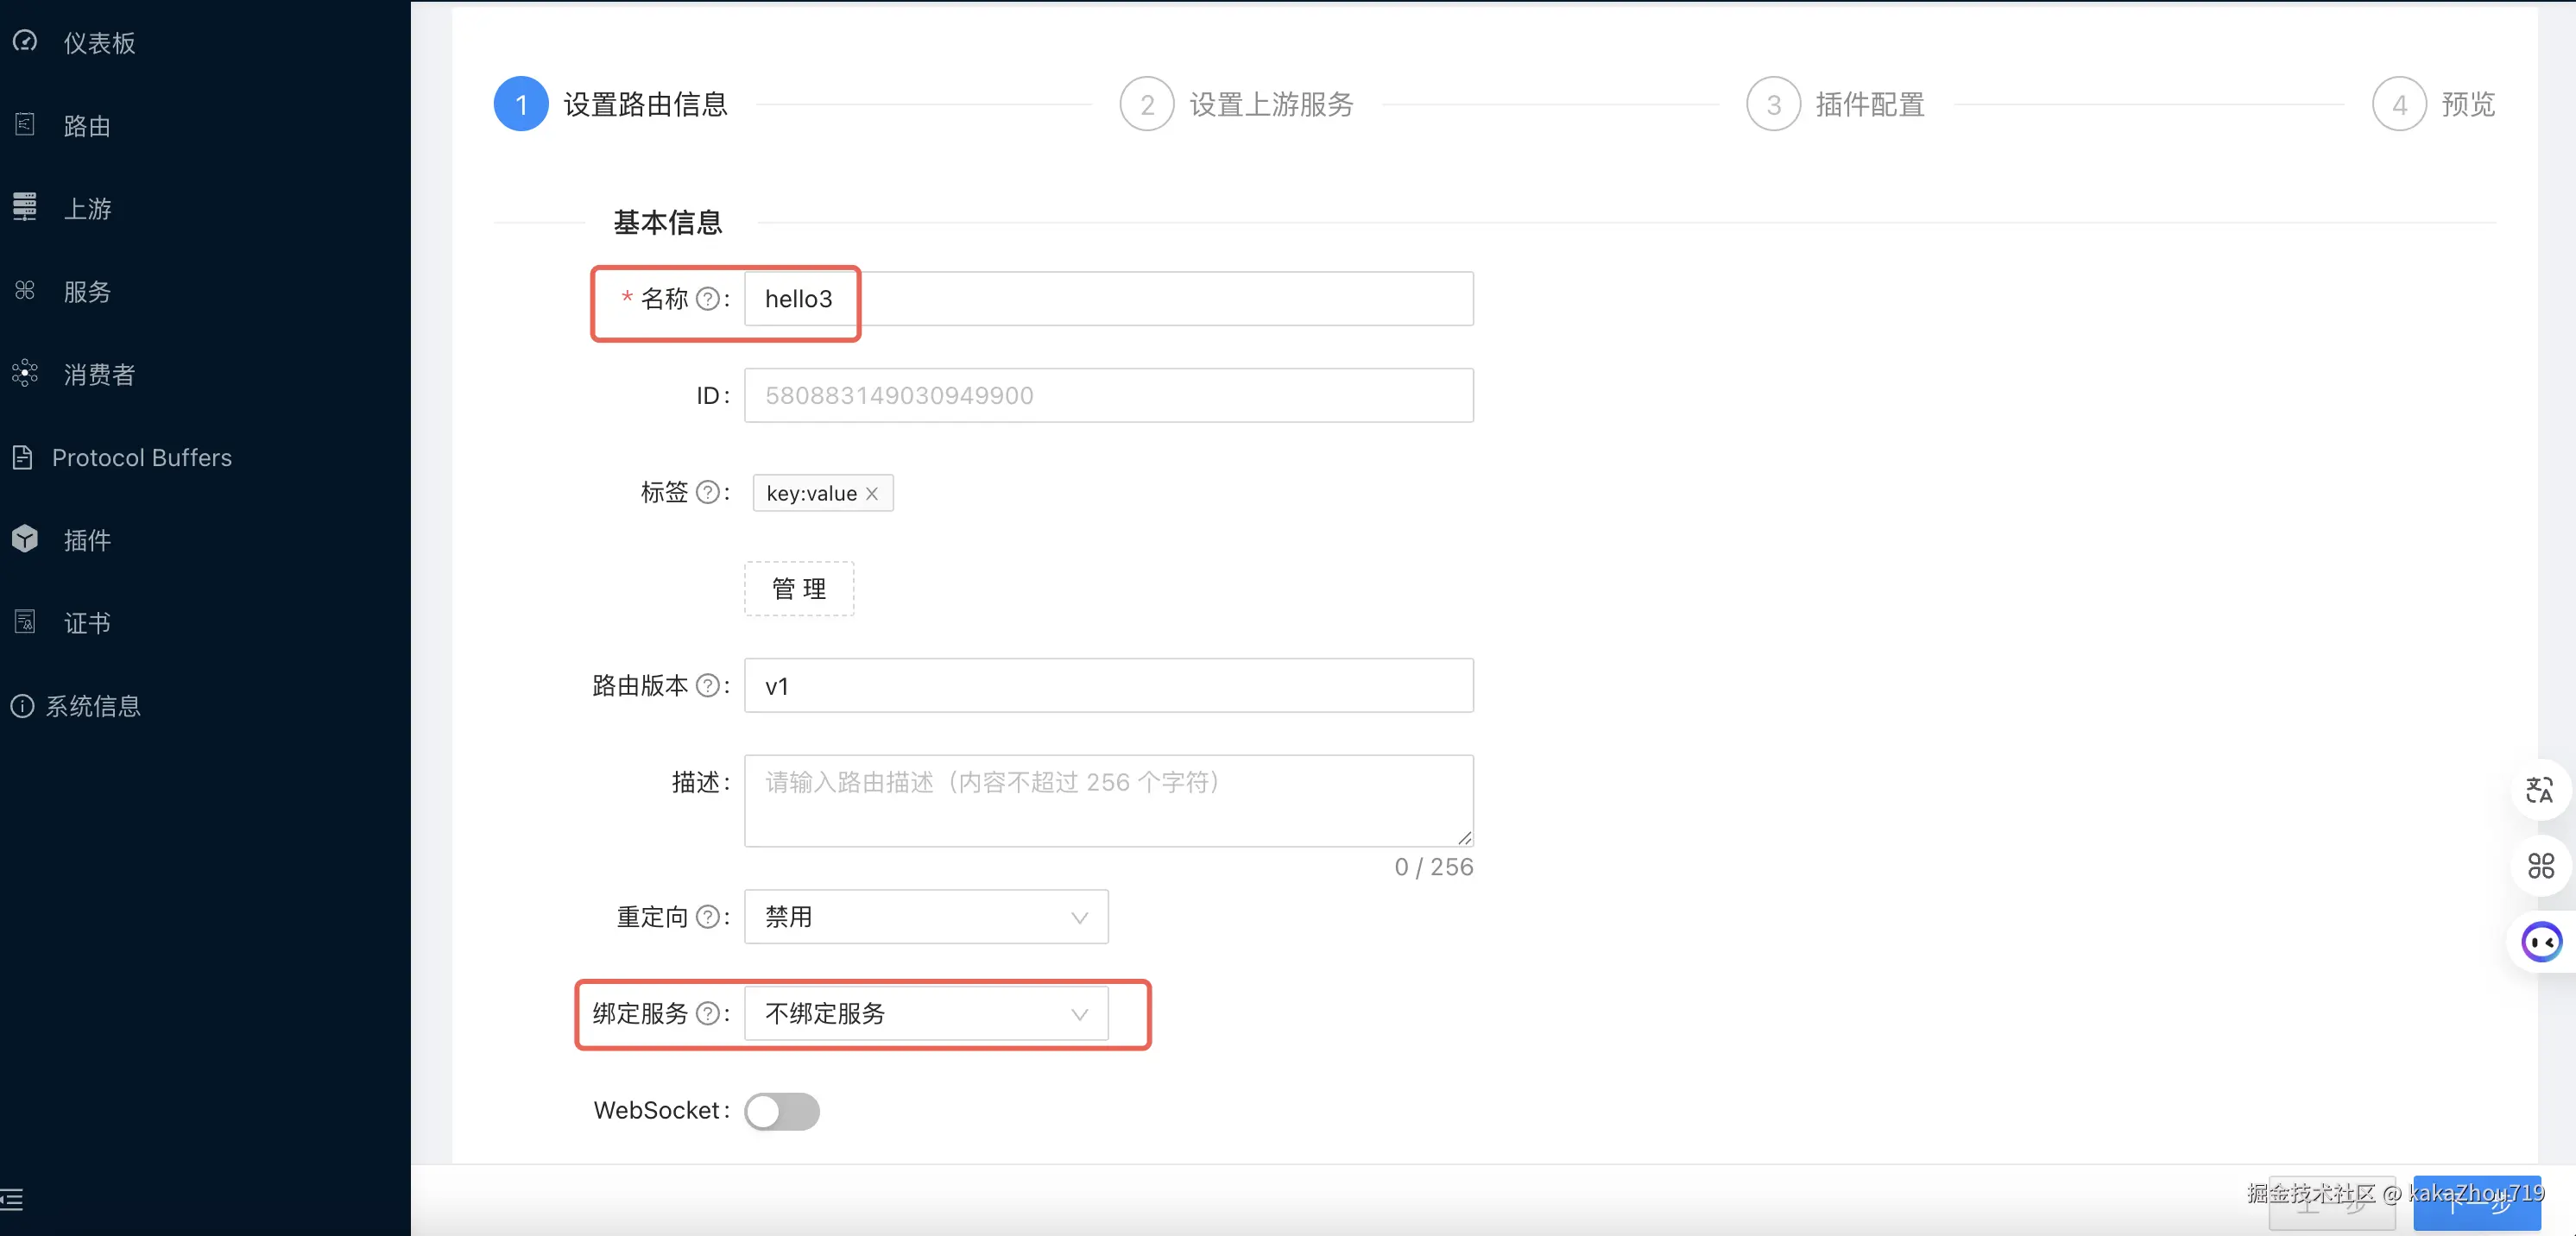
配置路由匹配条件:路径,host信息等。
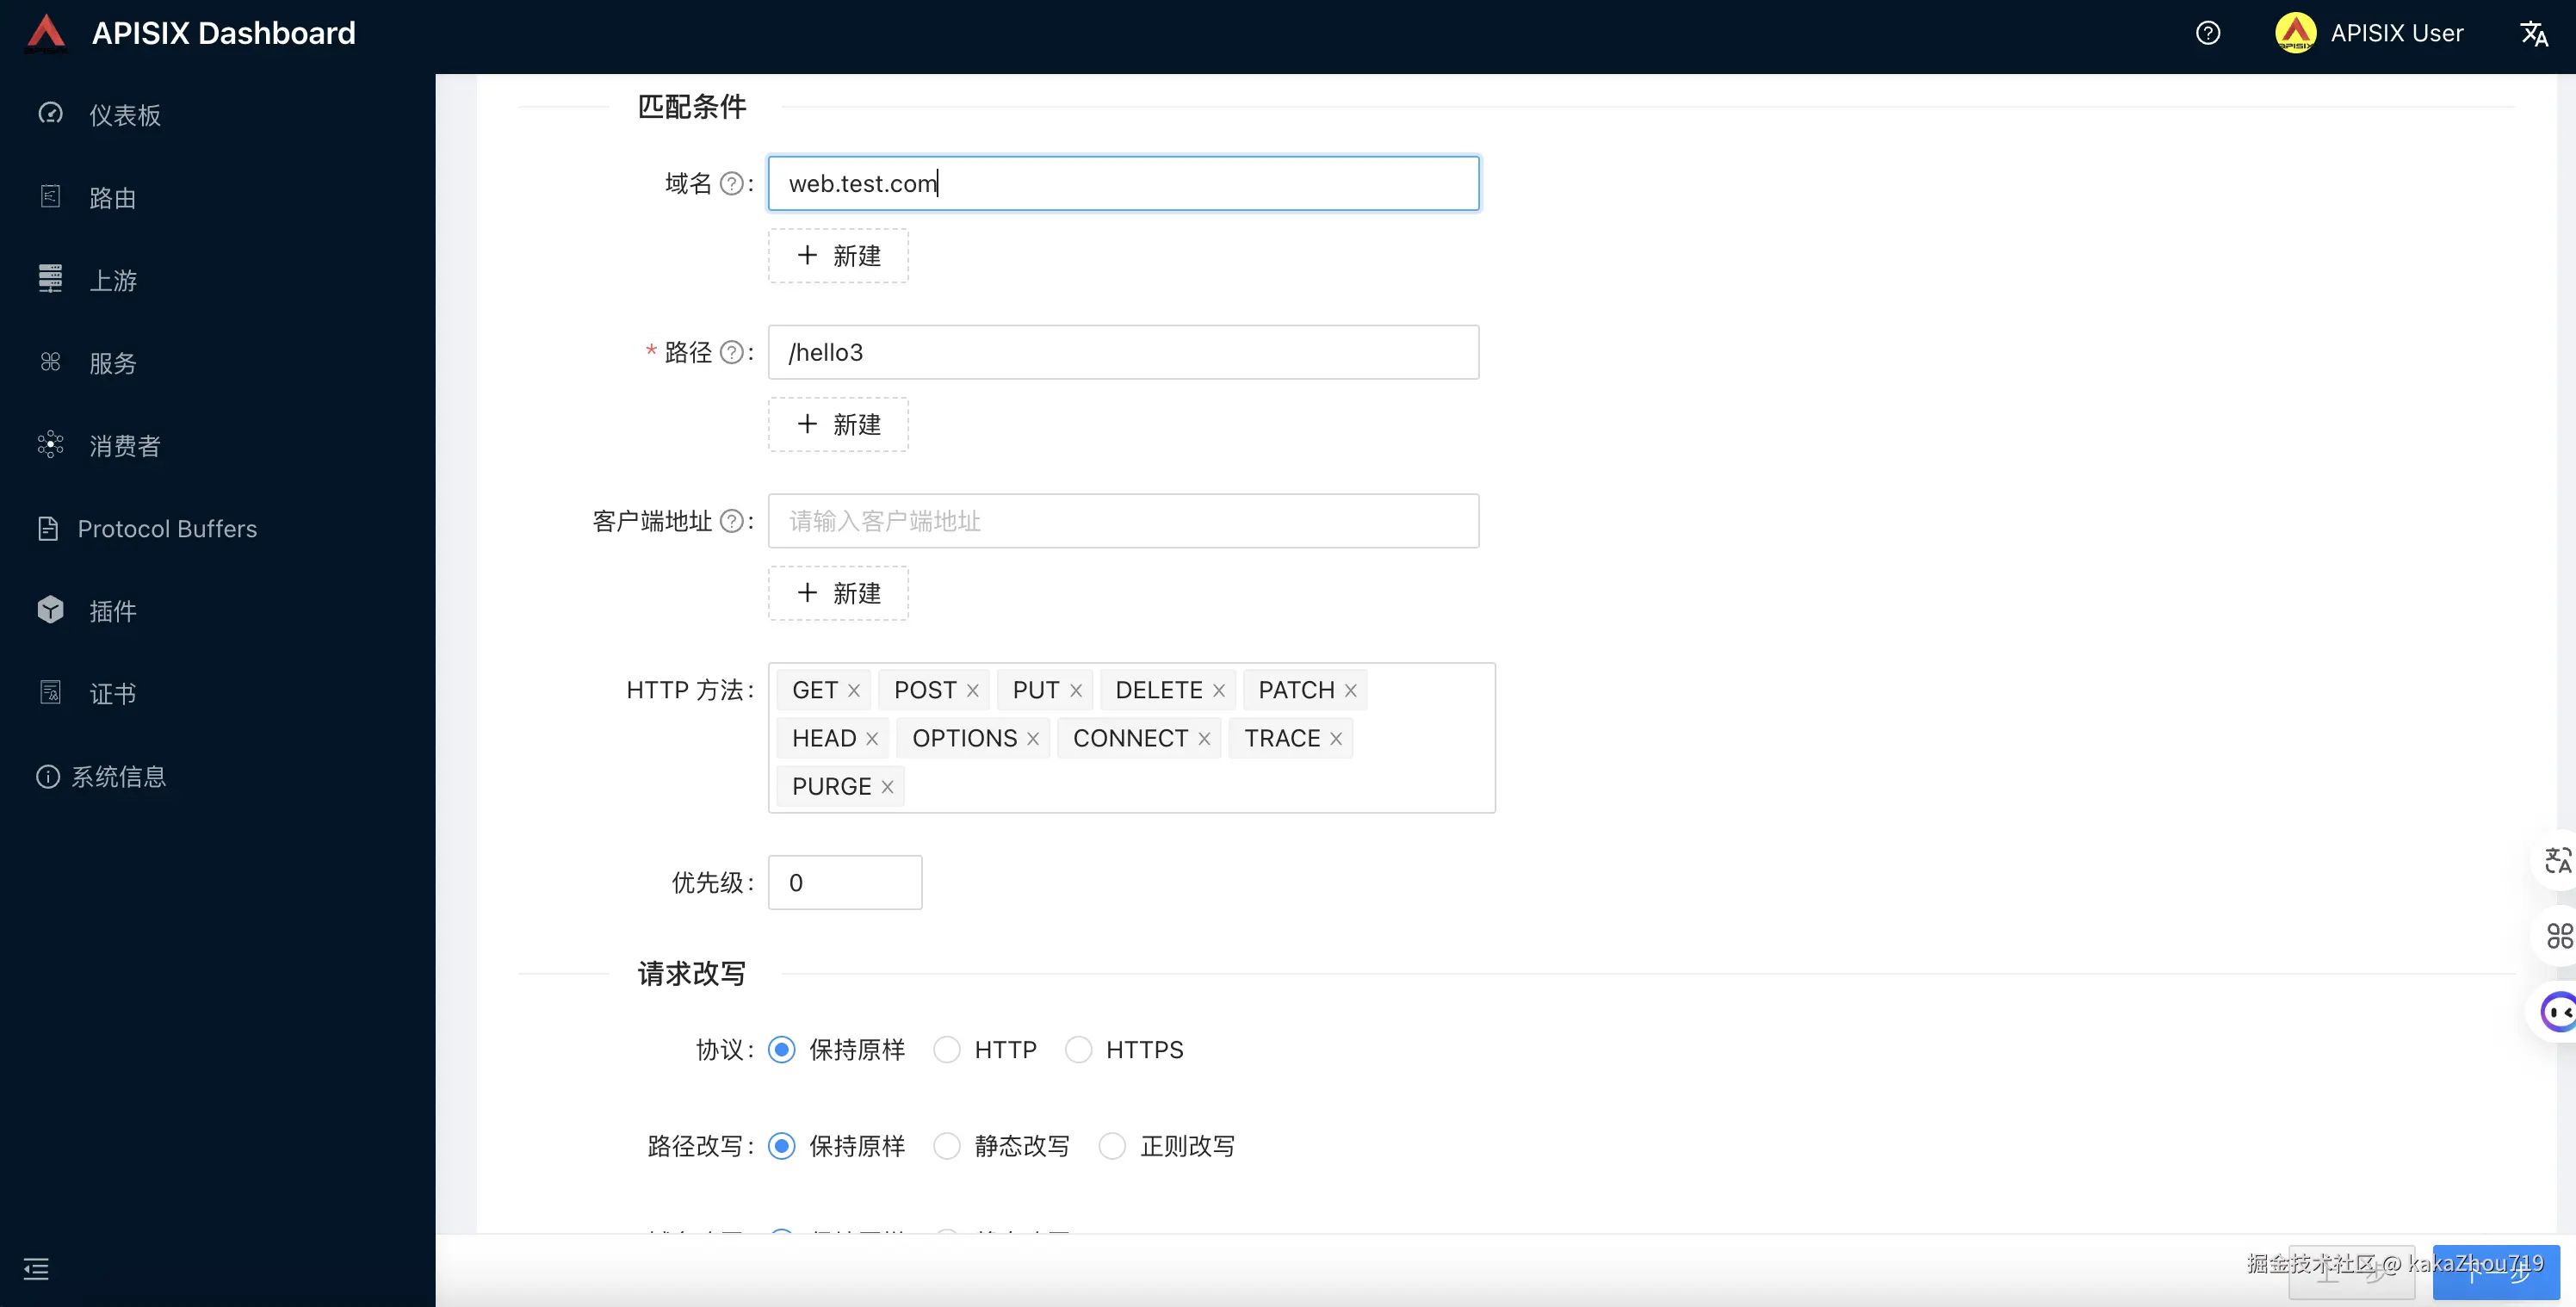
- 设置上游服务
选择上一步配置好的上游服务web-test,也可以自定义写对应的upstream信息。
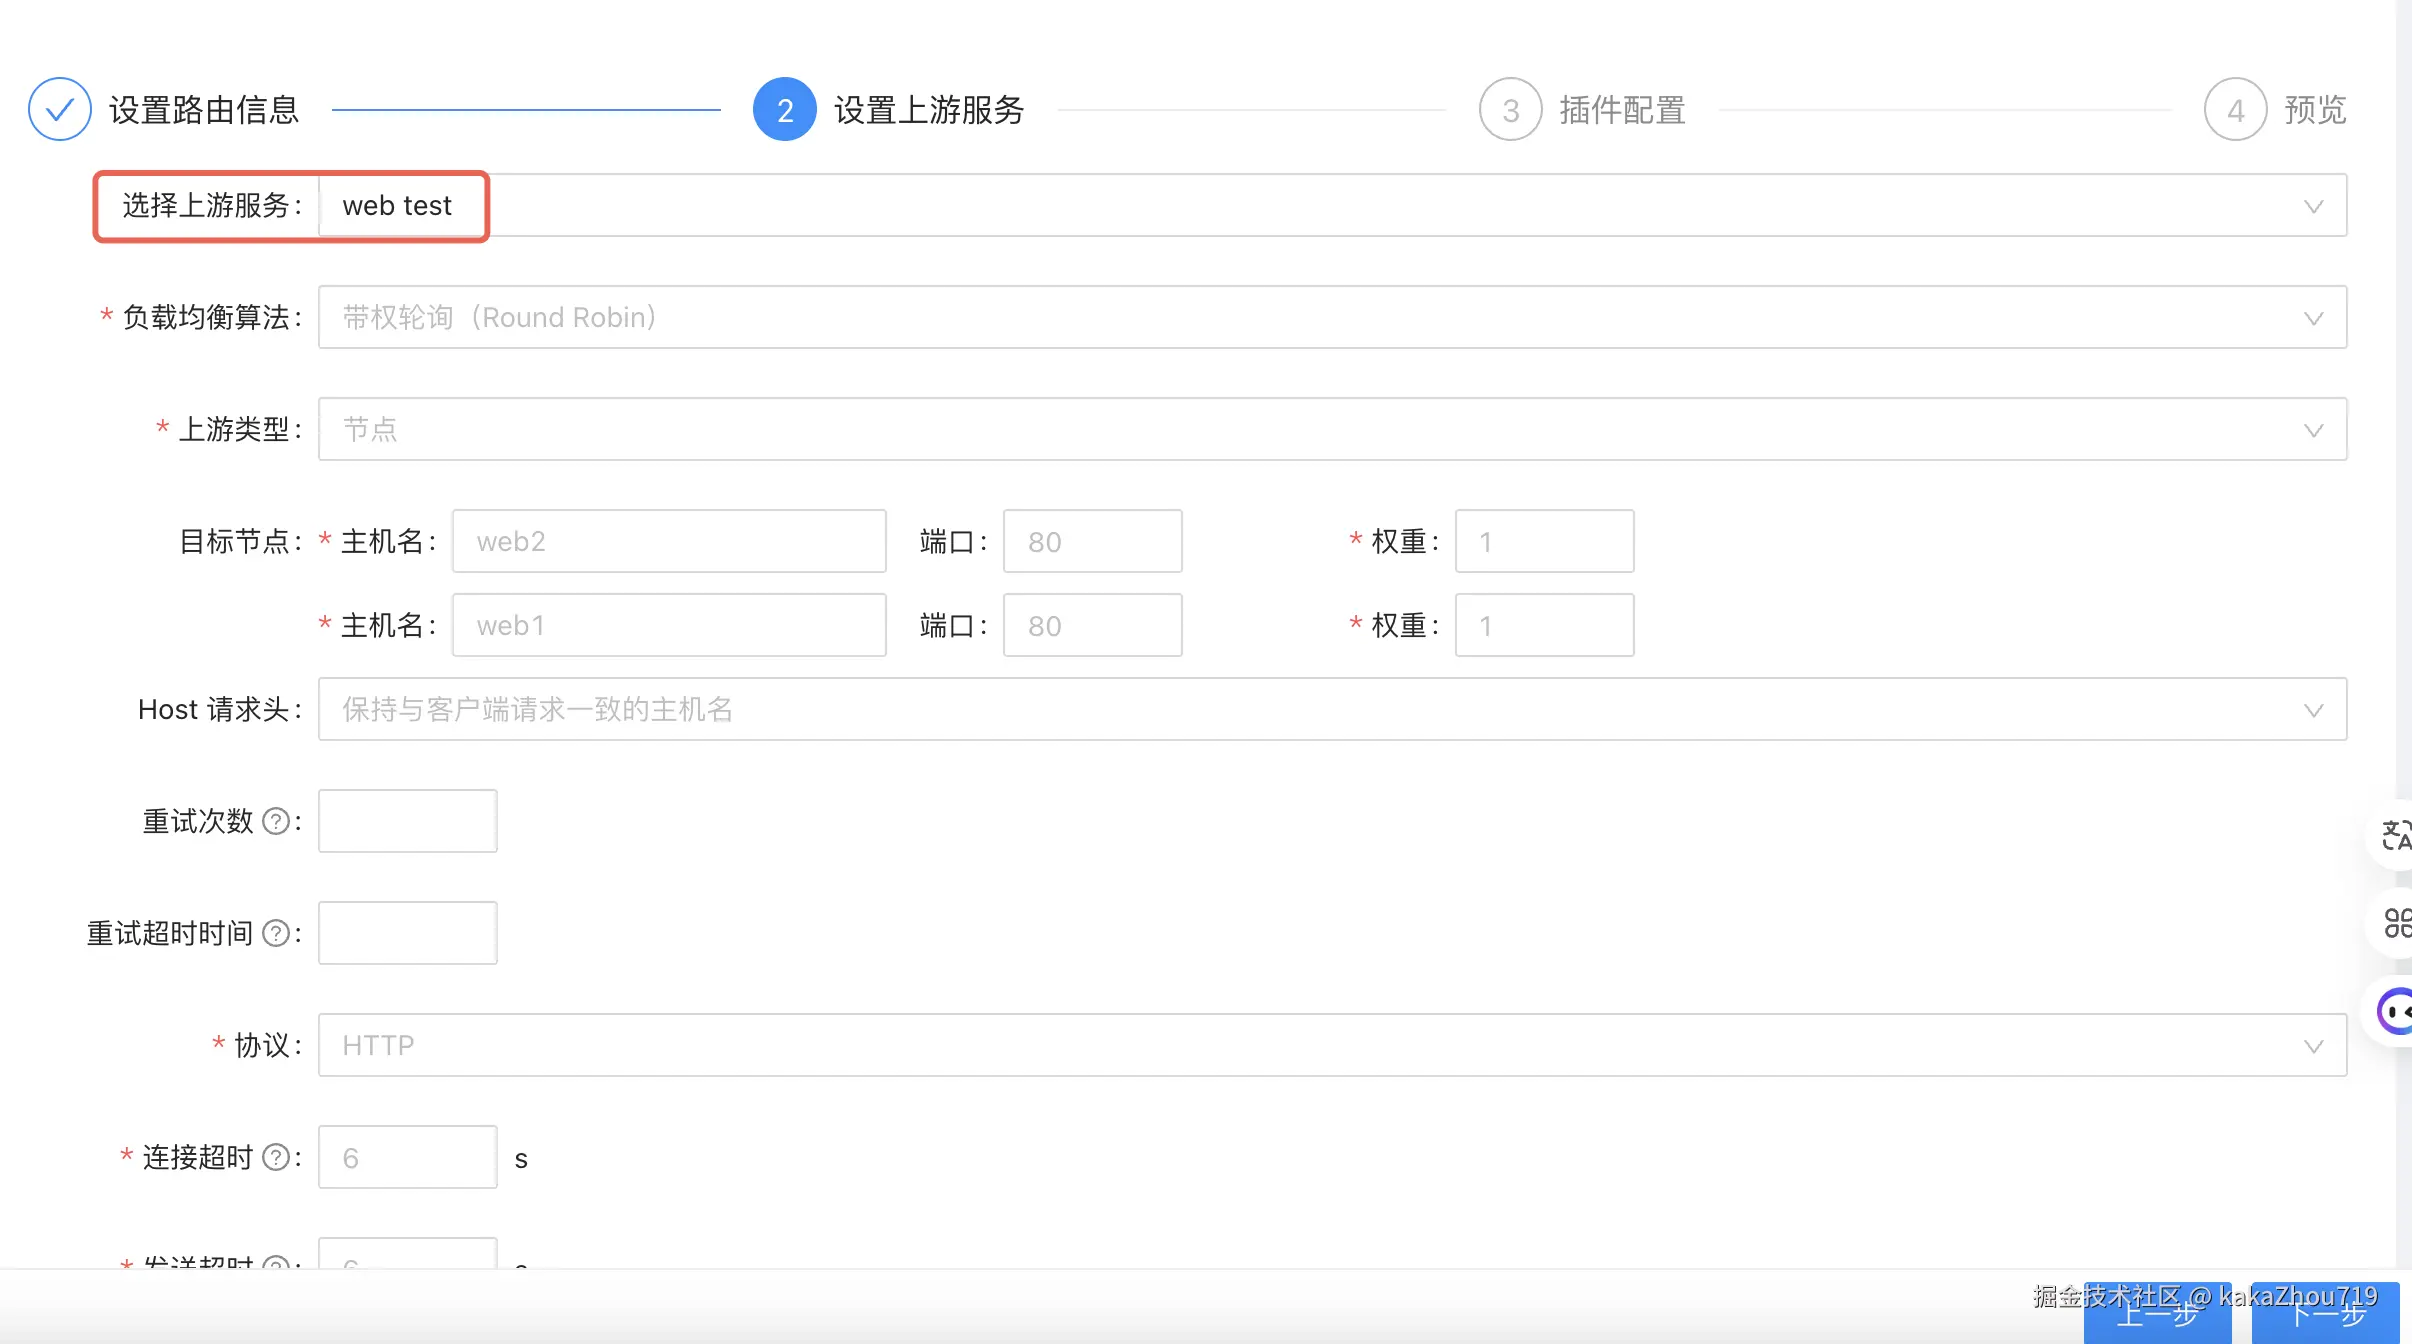
配置consumer
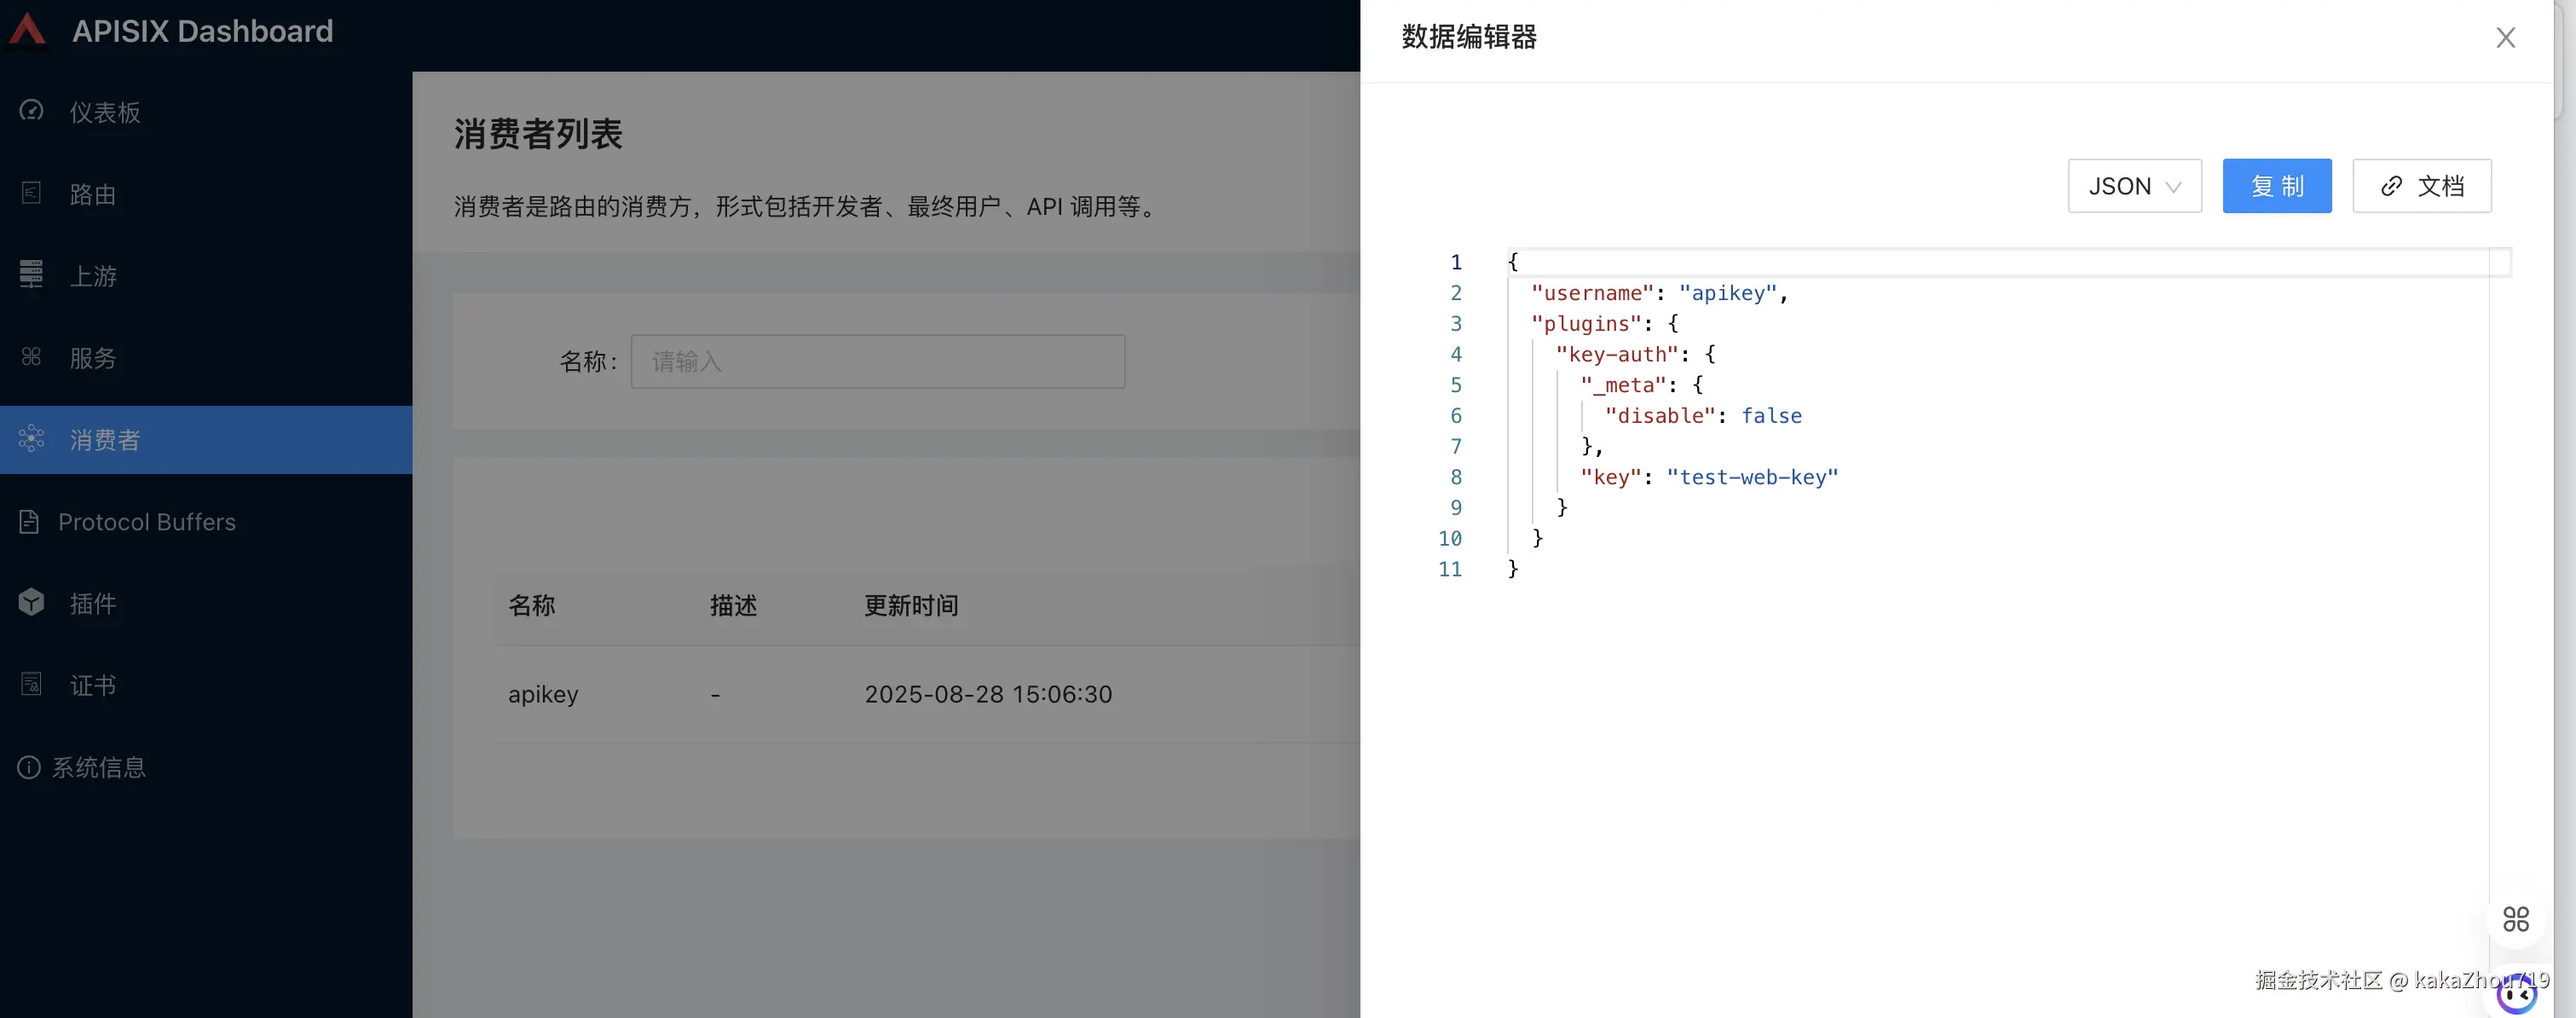
如果要开启plugin,需要先配置consumer消费者,在consumer中对某个plugin进行配置,例如创建一个consumer apikey,配置key-auth 插件的key值。
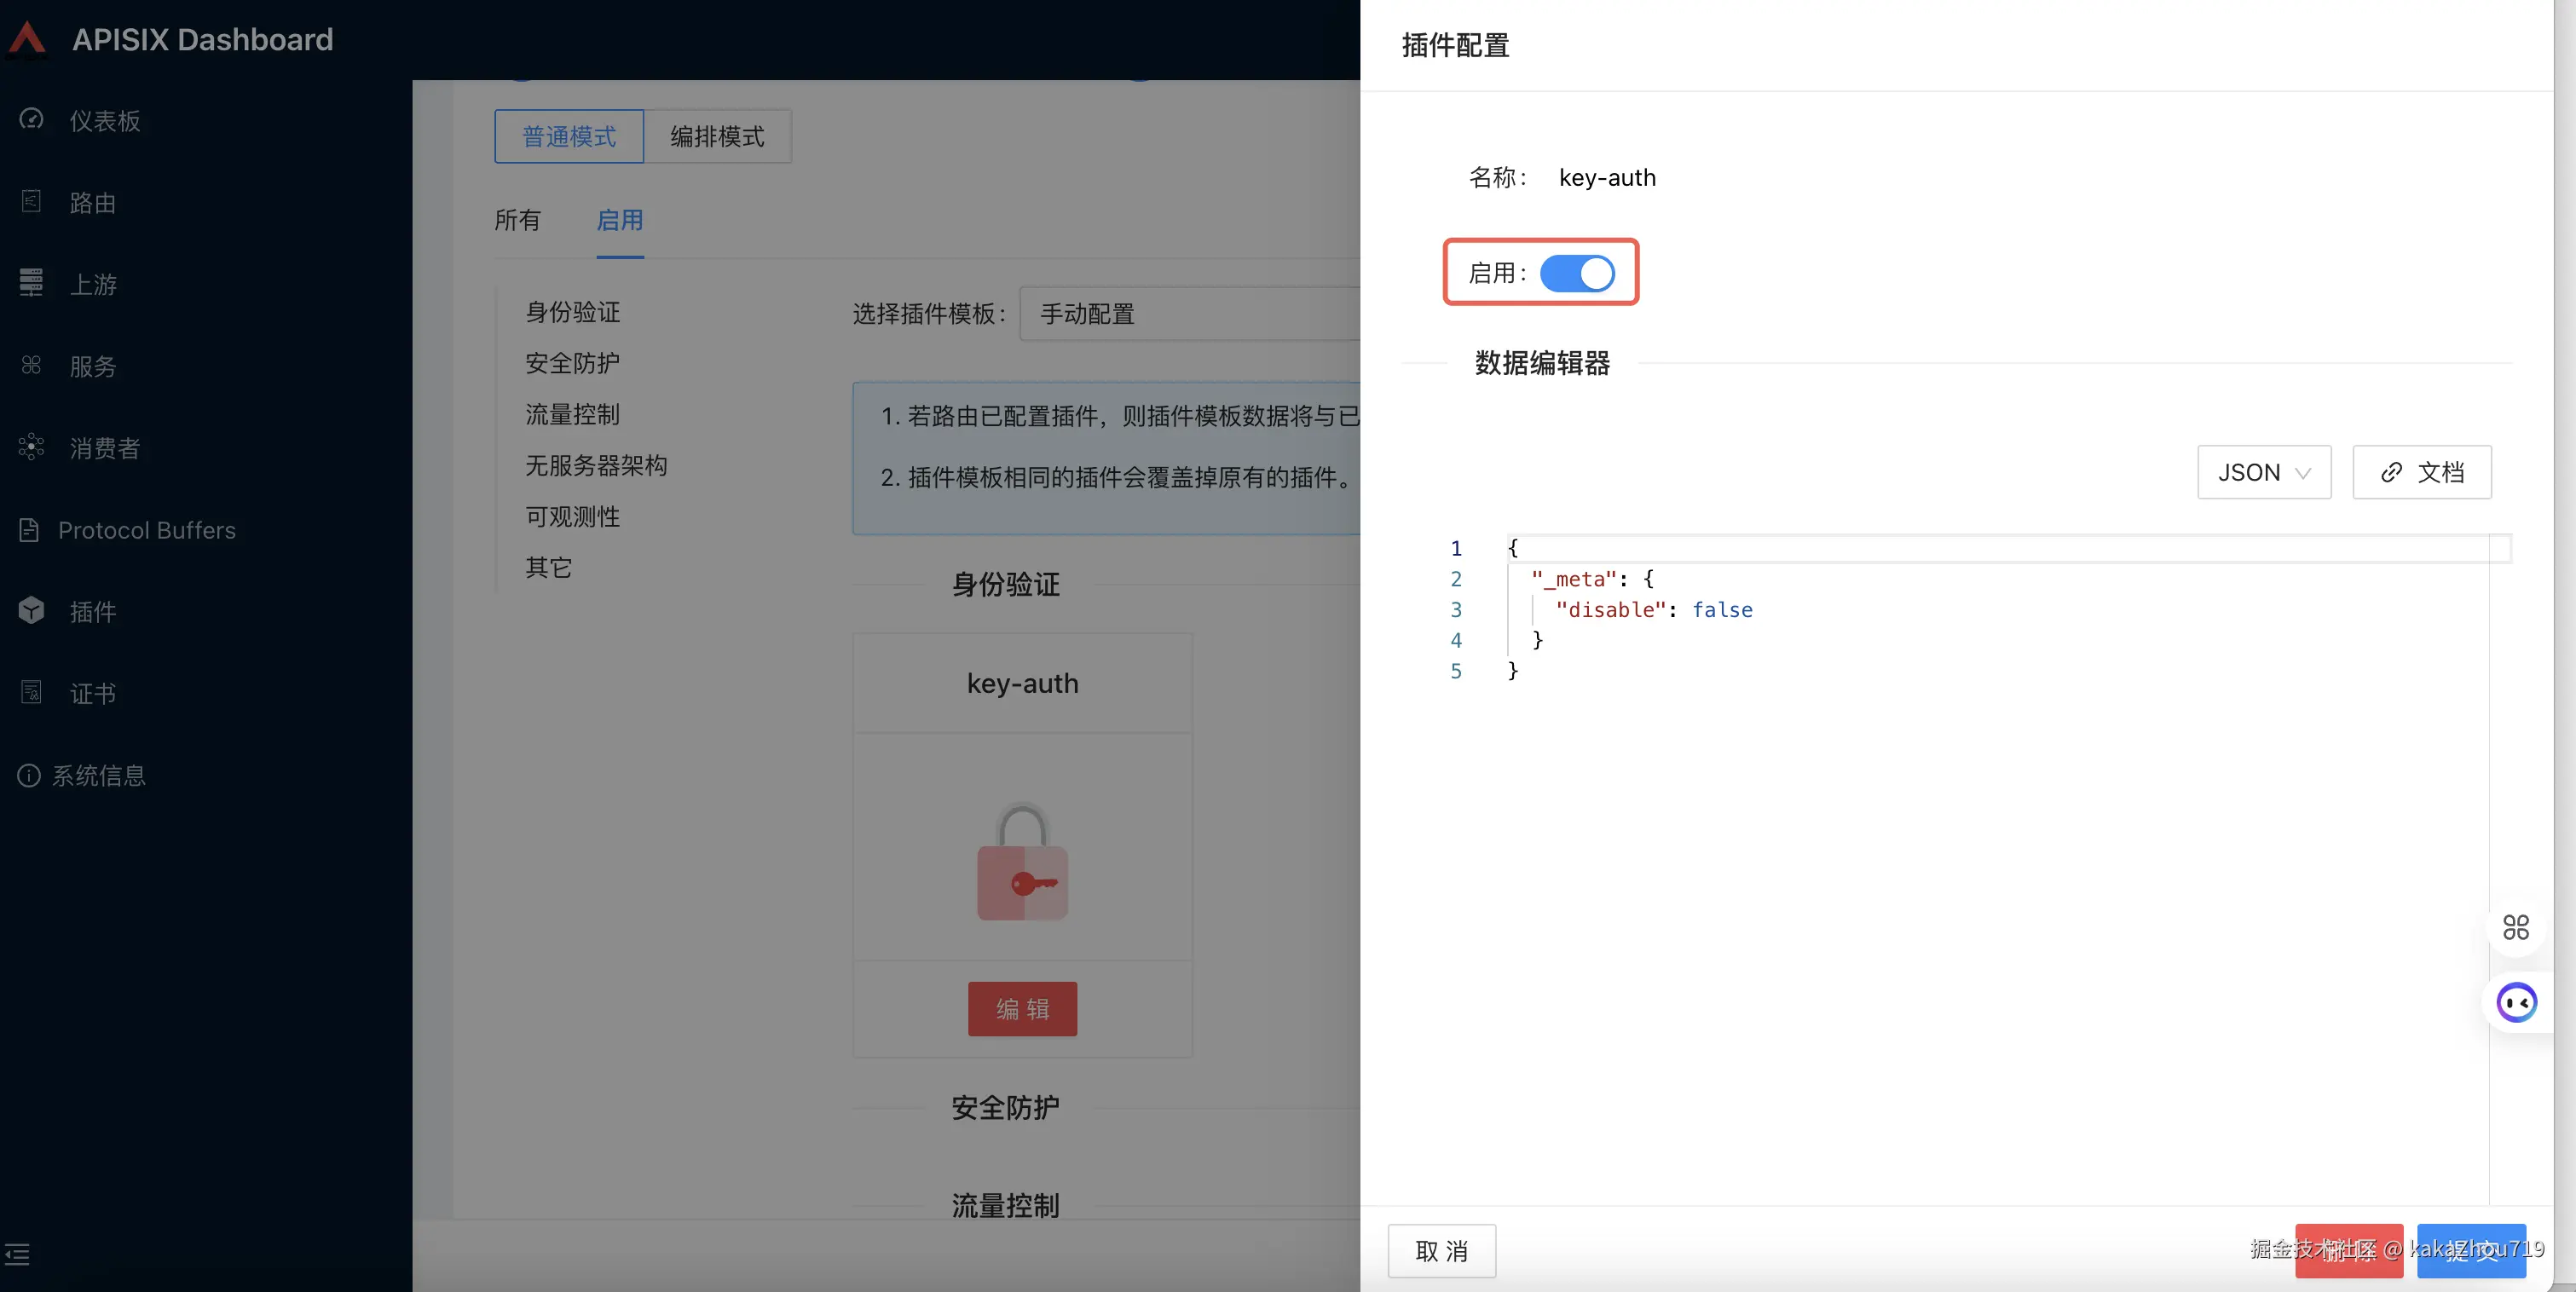
配置插件
在配置路由的时候,选择需要的插件,例如开启key-auth插件,相关的key-auth配置已经在上一步consumer中配置好了,无需再填写。
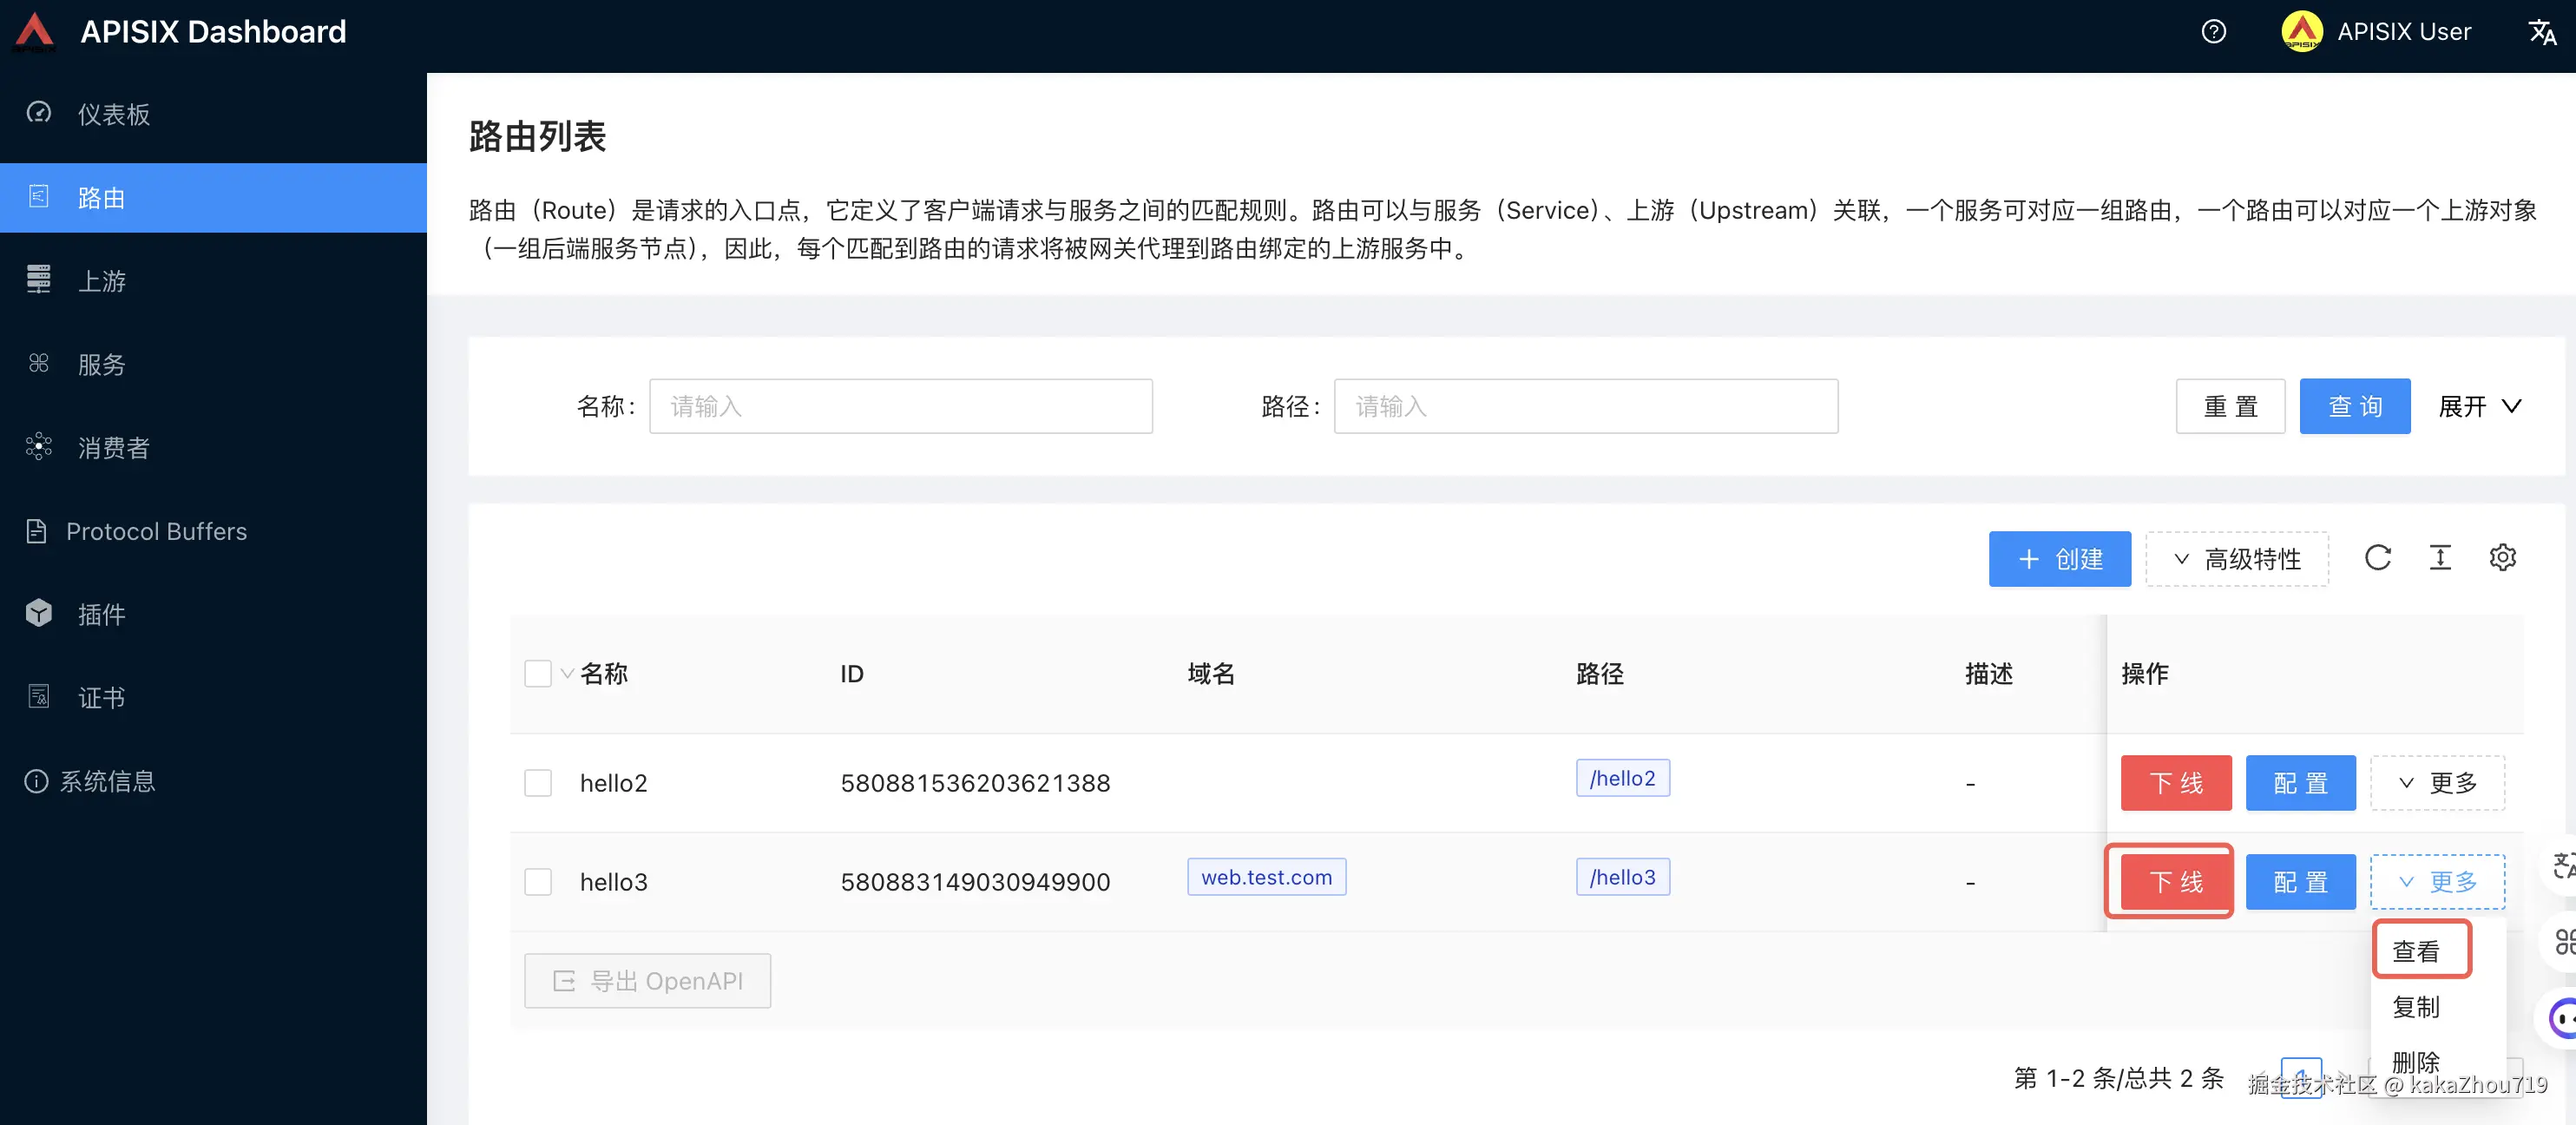
查看
也可以选择上线下线操作和yaml配置信息查看
测试
因为配置了host,测试的时候需要在本地hosts中配置域名解析。也配置了key-auth,所以header 中需要带auth key
arduino
curl -i "http://web.test.com:9080/hello3" -H 'apikey: test-web-key'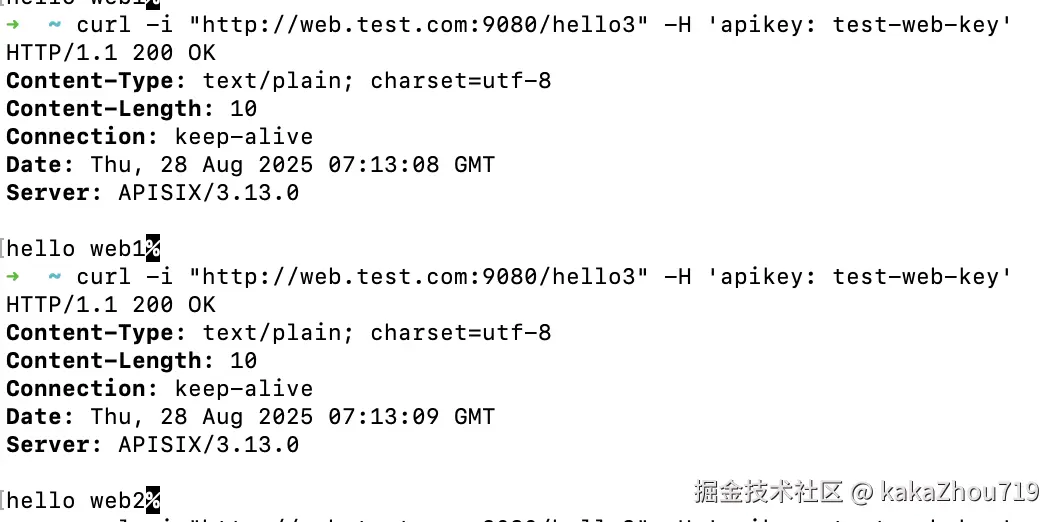
自定义插件开发
配置APISIX
- 创建lua 插件对应的configmap
csharp
kubectl create configmap tencent-scf-event --from-file=./plugins/tencent-scf-event.lua -n apisix- 修改部署的helm values.yaml 文件
yaml
  # 开启插件
  plugins: [
    "tencent-scf-event"
  ]

  # 配置自定义插件
  customPlugins:
    # -- Whether to configure some custom plugins
    enabled: true
    plugins:
      # -- plugin name.
      - name: "tencent-scf-event"
        # -- plugin attrs
        attrs: {}
        # -- plugin codes can be saved inside configmap object.
        configMap:
          # -- name of configmap.
          name: "tencent-scf-event"
          mounts:
            - key: "tencent-scf-event.lua"
path: "/usr/local/apisix/apisix/plugins/tencent-scf-event.lua"- 更新helm 包
arduino
helm upgrade apisix apisix/apisix --create-namespace --namespace apisix -f values.yaml 配置SCF event函数插件
vbnet
# 配置scf-event插件和路由
curl -i http://127.0.0.1:9180/apisix/admin/routes/test-scf-event \
-H "X-API-KEY: edd1c9f034335f136f87ad84b625c8f1" -X PUT -d '
{
    "uri": "/testEvent",
    "plugins": {
        "tencent-scf-event": {
            "secret_id": "ak",
            "secret_key": "sk",
            "region": "ap-singapore",
            "function_name": "helloworld-test"
        }
    },
  "upstream_id": "581867095923360779"
}'
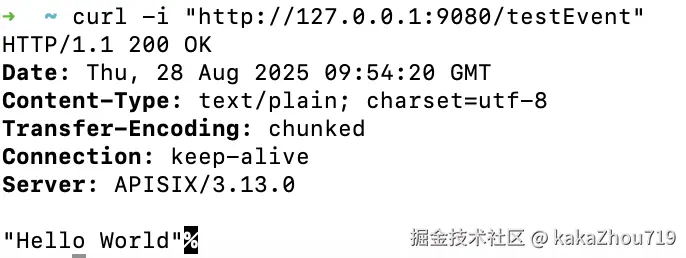
测试 访问
配置SCF web函数插件
vbnet
# 配置scf-web插件和路由
curl -i http://127.0.0.1:9180/apisix/admin/routes/test-scf-web \
-H "X-API-KEY: edd1c9f034335f136f87ad84b625c8f1" -X PUT -d '
{
    "uri": "/testWeb",
    "plugins": {
        "tencent-scf-web": {
            "secret_id": "ak",
            "secret_key": "sk",
            "region": "ap-singapore",
            "uin":"300000010788",
"web_function_url":"https://1303257938-csxkqunlap.ap-singapore.tencentscf.com"
        }
    },
  "upstream_id": "581867095923360779"
}'
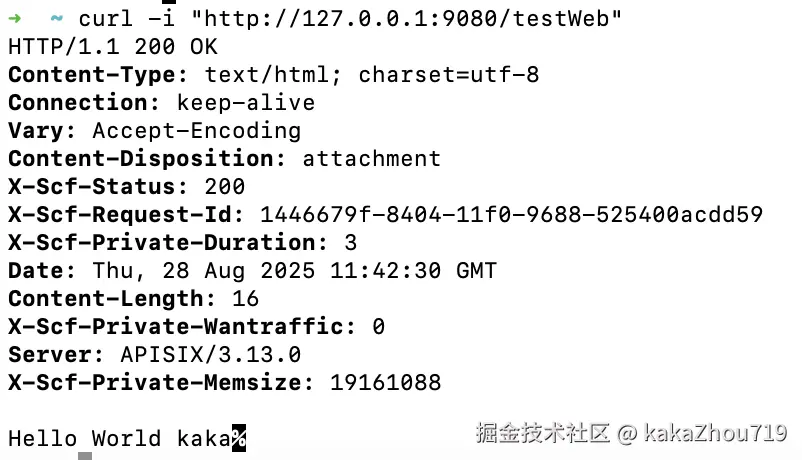
测试访问
