保姆级教程,逻辑删除及字段自动填充设置,特别要说明的是本次用的是MySQL数据库,如果使用Oracle数据库是,数据库配置需要改变,数据库表一定要大写,否则无法生成代码。
1.数据库表
sql
CREATE TABLE `student` (
  `id` int(64) NOT NULL AUTO_INCREMENT COMMENT '编号',
  `name` varchar(32) DEFAULT NULL COMMENT '姓名',
  `age` int(3) DEFAULT NULL COMMENT '年龄',
  `is_delete` int(1) NOT NULL DEFAULT '0' COMMENT '是否删除',
  `create_time` datetime DEFAULT NULL COMMENT '入库时间',
  `update_time` datetime DEFAULT NULL COMMENT '修改时间',
  PRIMARY KEY (`id`) USING BTREE
) ENGINE=InnoDB AUTO_INCREMENT=8 DEFAULT CHARSET=utf8 ROW_FORMAT=DYNAMIC;
2.依赖
代码生成工具使用 mybatis-plus-generator,generator默认使用的模板为 velocity-engine-core,也可以使用freemarker(需要额外设置)。接口文档使用 knife4j-spring-boot-starter。
xml
				<!--代码生成插件-->
        <dependency>
            <groupId>com.baomidou</groupId>
            <artifactId>mybatis-plus-generator</artifactId>
            <version>3.3.1.tmp</version>
        </dependency>

				<!--代码生成模板-->
        <dependency>
            <groupId>org.apache.velocity</groupId>
            <artifactId>velocity-engine-core</artifactId>
            <version>2.2</version>
        </dependency>
				<!--可选代码生成模板-->
        <dependency>
            <groupId>org.freemarker</groupId>
            <artifactId>freemarker</artifactId>
            <version>2.3.29</version>
        </dependency>

				<!--接口文档-->
        <dependency>
            <groupId>com.github.xiaoymin</groupId>
            <artifactId>knife4j-spring-boot-starter</artifactId>
            <version>3.0.2</version>
        </dependency>

				<!--strategy.setEntityLombokModel(true);如果设置为true是需要lombok的-->
        <dependency>
            <groupId>org.projectlombok</groupId>
            <artifactId>lombok</artifactId>
            <optional>true</optional>
        </dependency>
yml配置
yaml
mybatis-plus:
  mapper-locations: classpath*:/com/example/demo/**/mapper/xml/*.xml
  global-config:
    db-config:
      logic-not-delete-value: 0
      logic-delete-value: 1
3.代码生成类
如果要使用freemarker模板,需要额外配置 .setTemplateEngine(new FreemarkerTemplateEngine()); 启用 .setSwagger2(true);
java
class CodeGenerator {

    /**
     * 项目根路径
     */
    private static final String PROJECT_PATH = "E:\yuanzheng-codebase\m-framework\codegenerator";

    /**
     * 注释@auth 名称
     */
    private static final String AUTH = "auth";

    /**
     * 父包全限定类名
     */
    private static final String PARENT = "com.example.demo";

    /**
     * 模块名称
     */
    private static final String MODEL_NAME = "student";

    /**
     * 忽略的表前缀
     */
    private static final String[] IGNORE_TABLE_PFX = new String[]{"table_", "t_"};

    /**
     * 要生成的表名
     */
    private static final String TABLE_NAMES = "student";

    /**
     * 数据源配置
     */
    private static final DataSourceConfig DSC = new DataSourceConfig();

    static {
        DSC.setDbType(DbType.MYSQL);
        DSC.setUrl("jdbc:mysql://localhost:3306/test?useUnicode=true&characterEncoding=utf8&zeroDateTimeBehavior=convertToNull&transformedBitIsBoolean=true");
        DSC.setDriverName("com.mysql.cj.jdbc.Driver");
        DSC.setUsername("root");
        DSC.setPassword("root");
    }

    @Test
    void test() {
        main(null);
    }

    static void main(String[] args) {

        // 代码生成器
        AutoGenerator mpg = new AutoGenerator();

        /*
         * 全局配置
         */
        GlobalConfig gc = new GlobalConfig();
        // 输出路径
        gc.setOutputDir(PROJECT_PATH + "/src/main/java");
        // 设置作者
        gc.setAuthor(AUTH);
        // 生成代码后,是否打开文件夹
        gc.setOpen(false);
        // 是否覆盖原来代码
        gc.setFileOverride(false);
        // 去掉service的I前缀,一般只需要设置service就行
//        gc.setServiceName("%sService");
//        gc.setMapperName("%sMapper");
//        gc.setXmlName("%sMapper");
//        gc.setServiceImplName("%sServiceImpl");
//        gc.setControllerName("%sController");
        // 日期格式
        gc.setDateType(DateType.ONLY_DATE);
        // 实体属性 Swagger2 注解,实体类上会增加注释
        gc.setSwagger2(true);
        mpg.setGlobalConfig(gc);

        /*
         * 数据源配置
         */
        mpg.setDataSource(DSC);

        /*
         * 配置模板(generator默认的是velocity,使用freemarker的话要打开此项设置)
         */
        // mpg.setTemplateEngine(new FreemarkerTemplateEngine());


        /*
         * 包配置
         */
        PackageConfig pc = new PackageConfig();
        pc.setParent(PARENT);
        pc.setModuleName(MODEL_NAME);
        pc.setEntity("entity");
        pc.setMapper("mapper");
        pc.setService("service");
        pc.setController("controller");
        mpg.setPackageInfo(pc);

        /*
         * 策略配置
         */
        StrategyConfig strategy = new StrategyConfig();
        strategy.setInclude(TABLE_NAMES);
        strategy.setTablePrefix(IGNORE_TABLE_PFX);
        // 包的命名规则,使用驼峰规则
        strategy.setNaming(NamingStrategy.underline_to_camel);
        // 列的名称,使用驼峰规则
        strategy.setColumnNaming(NamingStrategy.underline_to_camel);
        // 是否使用lombok(要确认项目是否有lombok)
        strategy.setEntityLombokModel(true);
        // 是否使用
        strategy.setRestControllerStyle(true);
        // 逻辑删除(要结合数据表字段使用)
        strategy.setLogicDeleteFieldName("is_delete");

        // 自动填充字段
        TableFill fillInsert = new TableFill("create_time", FieldFill.INSERT);
        TableFill fillUpdate = new TableFill("update_time", FieldFill.UPDATE);
        List fillLists = new ArrayList();
        fillLists.add(fillInsert);
        fillLists.add(fillUpdate);
        strategy.setTableFillList(fillLists);
        //乐观锁
        //strategy.setVersionFieldName("version");
        mpg.setStrategy(strategy);

        // 执行
        mpg.execute();

    }
}
4.生成后的结构
Student 可以看到代码生成设置的逻辑删除字段、INSERT和UPDATE填充字段的注释。
java
@Data
@EqualsAndHashCode(callSuper = false)
@Accessors(chain = true)
@ApiModel(value="Student对象", description="")
public class Student implements Serializable {

    private static final long serialVersionUID=1L;

    @ApiModelProperty(value = "编号")
    @TableId(value = "id", type = IdType.AUTO)
    private Integer id;

    @ApiModelProperty(value = "姓名")
    private String name;

    @ApiModelProperty(value = "年龄")
    private Integer age;

    @ApiModelProperty(value = "是否删除")
    @TableLogic
    private Integer isDelete;

    @ApiModelProperty(value = "入库时间")
    @TableField(fill = FieldFill.INSERT)
    private Date createTime;

    @ApiModelProperty(value = "修改时间")
    @TableField(fill = FieldFill.UPDATE)
    private Date updateTime;
}
DateObjectHandler 处理一下填充字段。
java
@Component
public class DateObjectHandler implements MetaObjectHandler {
    @Override
    public void insertFill(MetaObject metaObject) {
        this.setFieldValByName("createTime", new Date(), metaObject);
    }

    @Override
    public void updateFill(MetaObject metaObject) {
        this.setFieldValByName("updateTime", new Date(), metaObject);
    }
}
Controller 简单测试一下。
java
@RestController
@RequestMapping("/student")
@Api(value = "学生", tags = {"增删改查"})
public class StudentController {
@Autowired
private IStudentService studentService;
@GetMapping("/get")
@ApiOperation(value = "获取学生列表")
public List<Student> getStudents() {
LambdaQueryWrapper<Student> query = Wrappers.lambdaQuery(Student.class);
return studentService.list(query);
}
@PostMapping("/add")
@ApiOperation(value = "新增学生信息")
public boolean addStudent(@ApiParam Student student) {
return studentService.save(student);
}
@PostMapping("/update")
@ApiOperation(value = "修改学生信息")
public boolean updateStudent(@ApiParam Student student) {
return studentService.updateById(student);
}
@GetMapping("/del")
@ApiOperation(value = "删除学生信息")
public boolean deleteStudent(@ApiParam(name = "id",value = "唯一ID") Integer id) {
return studentService.removeById(id);
}
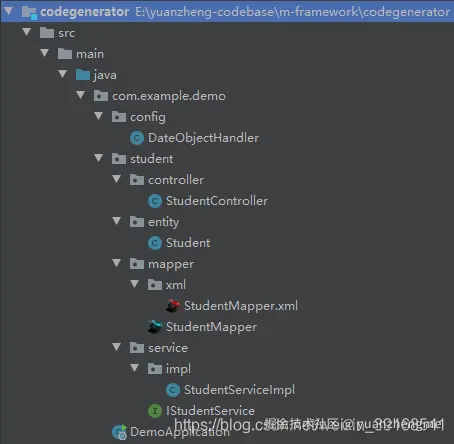
}5.使用 http://ip:port/doc.html
新增一条数据后,creatTime字段自动填充了;
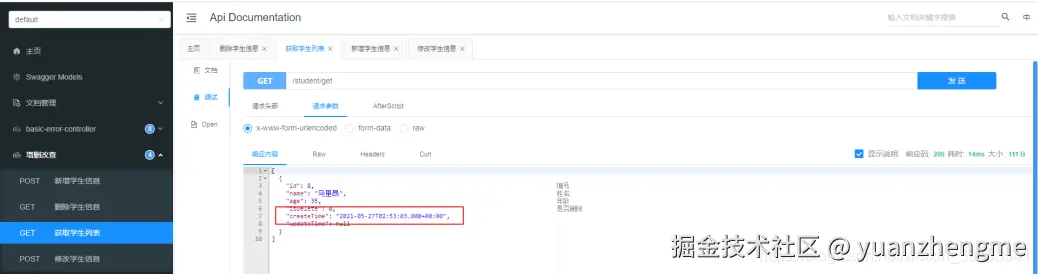 修改后,updateTime字段也自动填充了;
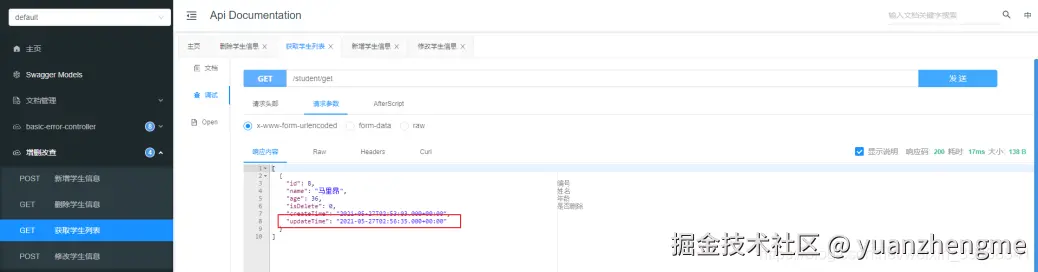 删除后,查询列表已经没有数据了;
 查询数据库,可以看到数据是逻辑删除了。

6.小小的总结
本文介绍了使用MyBatis-Plus代码生成工具和Knife4j接口文档的配置方法。针对MySQL数据库设计,重点说明逻辑删除字段(is_delete)和自动填充字段(create_time/update_time)的设置,并指出Oracle数据库需注意表名大写问题。提供了完整的依赖配置(包括mybatis-plus-generator、velocity/freemarker模板引擎、knife4j等)和YML配置示例。详细解释了代码生成类的核心配置项,包括全局设置、数据源连接、包路径定义、策略配置等,支持Lombok和Swagger注解生成。特别提醒Freemarker模板需要额外设置,Oracle用户需调整数据库配置。