| 大家好,我是工藤学编程 🦉 | 一个正在努力学习的小博主,期待你的关注 |
|---|---|
| 实战代码系列最新文章😉 | C++实现图书管理系统(Qt C++ GUI界面版) |
| SpringBoot实战系列🐷 | 【SpringBoot实战系列】SpringBoot3.X 整合 MinIO 存储原生方案 |
| 分库分表 | 分库分表之实战-sharding-JDBC分库分表执行流程原理剖析 |
| 消息队列 | 深入浅出 RabbitMQ-RabbitMQ消息确认机制(ACK) |
本文章目录
- [基于Vue 3 + JSON Server 实现轻量图书管理系统](#基于Vue 3 + JSON Server 实现轻量图书管理系统)
-
- 一、技术栈与环境准备
-
- [1. 技术栈选型](#1. 技术栈选型)
- [2. 环境搭建步骤](#2. 环境搭建步骤)
-
- 步骤1:创建Vue项目
- [步骤2:安装JSON Server](#步骤2:安装JSON Server)
- [二、JSON Server 模拟后端接口](#二、JSON Server 模拟后端接口)
-
- [1. 创建接口数据文件](#1. 创建接口数据文件)
- [2. 启动JSON Server](#2. 启动JSON Server)
- 三、Vue前端核心功能实现
-
- [1. 项目目录结构](#1. 项目目录结构)
- [2. 核心配置实现](#2. 核心配置实现)
- [3. 核心页面功能实现](#3. 核心页面功能实现)
- 四、项目运行与功能演示
-
- [1. 启动项目](#1. 启动项目)
-
- [步骤1:启动JSON Server(后端接口)](#步骤1:启动JSON Server(后端接口))
- 步骤2:启动Vue项目(前端)
- [2. 功能演示流程](#2. 功能演示流程)
基于Vue 3 + JSON Server 实现轻量图书管理系统
AI提示词如下:
我要实现一个图书管理系统,请你用vue相关代码,以及生成json文件作为接口返回内容,功能包括注册、登录,分类,查询即可
在前端学习中,"图书管理系统"是覆盖"用户认证+数据CRUD"的经典案例。本文将用Vue 3(Composition API)+ JSON Server搭建系统,实现注册、登录、图书分类、模糊查询四大核心功能,无需后端开发,10分钟即可跑通完整流程。
一、技术栈与环境准备
1. 技术栈选型
- 前端核心:Vue 3(Vite构建,Composition API)
- 路由管理:Vue Router 4(控制页面权限)
- 网络请求:Axios(处理接口调用)
- 模拟后端:JSON Server(基于JSON文件提供RESTful接口)
- 样式辅助:Tailwind CSS(快速实现简洁界面,可选)
2. 环境搭建步骤
步骤1:创建Vue项目
打开终端,执行以下命令创建Vite+Vue 3项目:
bash
# 创建项目(项目名:book-management-system)
npm create vite@latest book-management-system -- --template vue

# 进入项目目录
cd book-management-system

# 安装依赖
npm install

# 安装额外依赖(路由、axios)
npm install vue-router@4 axios
步骤2:安装JSON Server
JSON Server可将JSON文件转为可访问的API接口,全局安装:
bash
npm install -g json-server二、JSON Server 模拟后端接口
1. 创建接口数据文件
在项目根目录新建db.json文件(模拟数据库),包含用户表(users) 和图书表(books) ,初始数据如下:
json
{
  list: [
        {
            category:"literature",
            bookImg:"http://t14.baidu.com/it/u=2285971984,1142952378&fm=224&app=112&f=JPEG?w=500&h=500",
            id:1,
            author:"Charlotte Brontë",
            price:"36",
            bookName:"Jane Eyre"
        },
         {
            category:"literature",
            bookImg:"https://pic.rmb.bdstatic.com/acf7204f9c18b91bd8e3ce3d09961118.jpeg",
            id:2,
            author:"Victor Hugo",
            price:"33",
            bookName:"The Hunchback of Notre-Dame"
        },
        {
            category:"education",
            bookImg:"https://gimg2.baidu.com/image_search/src=http%3A%2F%2Fimg.alicdn.com%2Fbao%2Fuploaded%2Fi1%2F1899623276%2FTB1IRy9hnlYBeNjSszcXXbwhFXa_%21%210-item_pic.jpg&refer=http%3A%2F%2Fimg.alicdn.com&app=2002&size=f9999,10000&q=a80&n=0&g=0n&fmt=auto?sec=1731158616&t=f5b9cf04e7f605e74c0b0cb0c2e8896e",
            id:3,
            author:"Plato",
            price:"78",
            bookName:"The Republic"
        },
        {
            category:"life",
            bookImg:"https://gimg2.baidu.com/image_search/src=http%3A%2F%2Fcbu01.alicdn.com%2Fimg%2Fibank%2FO1CN01lwQysa2L7SnTLGSPy_%21%214038439645-0-cib.jpg&refer=http%3A%2F%2Fcbu01.alicdn.com&app=2002&size=f9999,10000&q=a80&n=0&g=0n&fmt=auto?sec=1731159003&t=fb0a6f17e841bf5b7b4ebfa143f14d17",
            id:4,
            author:"Viktor E. Frankl",
            price:"75",
            bookName:"Man's Search for Meaning"
        }
    ]
2. 启动JSON Server
在终端执行命令,启动接口服务(端口3000,避免与Vue项目冲突):
bash
json-server --watch db.json --port 3000启动成功后,可通过以下地址访问接口:
- 查看所有用户:http://localhost:3000/users
- 查看所有图书:http://localhost:3000/books
- 新增用户(注册):POST http://localhost:3000/users
- 图书查询:GET http://localhost:3000/books?q=关键词(模糊查询)
三、Vue前端核心功能实现
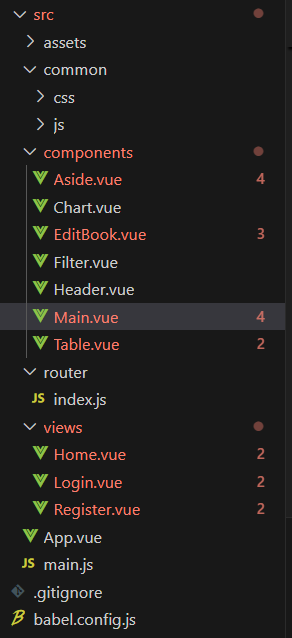
1. 项目目录结构
先梳理前端文件:
2. 核心配置实现
(1)Axios封装(处理请求拦截、基础路径)
新建src/utils/request.js,统一管理接口请求:
javascript
import axios from 'axios'

// 创建Axios实例
const request = axios.create({
  baseURL: 'http://localhost:3000', // JSON Server地址
  timeout: 5000
})

// 请求拦截器(可选:添加token)
request.interceptors.request.use(
  config => {
    // 从localStorage获取token(登录后存储)
    const token = localStorage.getItem('token')
    if (token) {
      config.headers.Authorization = `Bearer ${token}`
    }
    return config
  },
  error => Promise.reject(error)
)

// 响应拦截器(统一处理错误)
request.interceptors.response.use(
  response => response.data,
  error => {
    alert('接口请求失败:' + error.message)
    return Promise.reject(error)
  }
)

export default request
(2)路由配置(含登录权限控制)
新建src/router/index.js,区分"公开页面"和"需登录页面":
javascript
import { createRouter, createWebHistory } from 'vue-router'
import Login from '../views/Login.vue'
import Register from '../views/Register.vue'
import BookList from '../views/BookList.vue'

// 路由规则
const routes = [
  { path: '/', redirect: '/login' }, // 根路径重定向到登录页
  { path: '/login', component: Login, meta: { isPublic: true } }, // 公开页面
  { path: '/register', component: Register, meta: { isPublic: true } }, // 公开页面
  { path: '/book-list', component: BookList } // 需登录页面
]

const router = createRouter({
  history: createWebHistory(),
  routes
})

// 路由守卫(未登录拦截)
router.beforeEach((to, from, next) => {
  // 非公开页面且无token,跳转到登录页
  if (!to.meta.isPublic && !localStorage.getItem('token')) {
    next('/login')
  } else {
    next()
  }
})

export default router
(3)入口文件配置(挂载路由)
修改src/main.js,引入路由和Axios:
javascript
import { createApp } from 'vue'
import App from './App.vue'
import router from './router'
import request from './utils/request'

const app = createApp(App)

// 全局挂载Axios(方便组件内通过this.$request调用)
app.config.globalProperties.$request = request

app.use(router).mount('#app')
3. 核心页面功能实现
(1)注册页面(Register.vue)
实现"用户名+密码"注册,调用JSON Server的POST接口新增用户:
vue
<template>
  <div class="register">
    <div class="backgroundImage"></div>
    <div class="register_container">
      <h1>Book Management System</h1>
      <!-- Registration form, binding user information and validation rules -->
      <el-form class="register_form" :model="userInfo" :rules="rules" @keyup.enter="registerIn" ref="ref_form">
        <el-form-item prop="userName">
          <el-input placeholder="Please enter your username" v-model.trim="userInfo.userName">
            <template #prepend>
              <el-icon>
                <avatar />
              </el-icon>
            </template>
          </el-input>
        </el-form-item>
        <el-form-item prop="password">

          <el-input placeholder="Please enter your password" show-password v-model.trim="userInfo.password">
            <template #prepend>
              <el-icon>
                <key/>
              </el-icon>
            </template>
          </el-input>
        </el-form-item>
        <!-- Registration button, triggers the registration process when clicked -->
        <el-button type="primary" class="register_submit" @click="registerIn">Register</el-button>
        <!-- Login link, redirects to the login page when clicked -->
        <div class="login_register" @click="toLogin">Already have an account? Go to login</div>
      </el-form>
    </div>
  </div>
</template>

<script setup>
import router from "@/router";
import { ElMessage } from "element-plus";
import { reactive, ref } from "vue";
// Reference to the form
const ref_form = ref(null);
// Reactive user information object
const userInfo = reactive({
  userName: '',
  password: ''
});
// Form validation rules
const rules = {
  userName: [{ required: true, trigger: 'blur', message: 'Username cannot be empty' }],
  password: [{ required: true, trigger: 'blur', message: 'Password cannot be empty' }],
};
// Registration method, validates the form and calls getRegisterInfo method
const registerIn = () => {
  ref_form.value.validate((val) => {
    if (val) {
      getRegisterInfo();
    }
  });
};
// Get registration information method, simulates successful registration and redirects to the login page
const getRegisterInfo = () => {
  ElMessage({
    message: 'Registration successful',
    type: 'success'
  });
  router.push('/login');
};
// Method to redirect to the login page
const toLogin = () => {
  router.push('/login');
};
</script>
<style lang="less" scoped>
@-webkit-keyframes fedenum {
  0% {
    opacity: 0;
  }
  100% {
    opacity: 1;
  }
}
.register {
  display: flex;
  justify-content: center;
  align-items: center;
  height: 100vh;
  position: relative;
}

.backgroundImage {
  height: 100%;
  width: 100%;
  background-image: url("../assets/bj.jpg");
  background-repeat: no-repeat;
  background-size: cover;
  background-position: center;
  position: absolute;
  top: 0;
  left: 0;
  z-index: 0;
}

.register_container {
  animation: fadenum 1s ease;
  position: relative;
  z-index: 1;
  width: 400px;
  min-height: 273px;
  text-align: center;
  background-color: #fff;
  border-radius: 10px;
  padding: 20px;
}
el-icon {
  height: 30px !important;
}

h1 {
  font-size: 24px;
  transition: all 1s;
  font-weight: bold;
  margin-bottom: 36px;
}
.el-card {
  border-radius: 20px;
}
.register_form {
  .register_submit {
    width: 100%;
    height: 50px;
    border-radius: 20px;
    margin-bottom: 10px;
  }
  .login_register {
    width: 11rem;
    font-size: 0.875rem;
    margin: 0 auto;
  }
  :deep(.el-input-group__prepend) {
    padding: 0 10px;
  }
}
</style>
(2)登录页面(Login.vue)
验证用户名密码,登录成功后存储token(模拟JWT)并跳转图书列表:
vue
<template>
<div class="login">
<div class="backgroundImage"></div>
<div class="login_container">
<h1>Book Management System</h1>
<!-- Login form, binding user information and validation rules -->
<el-form class="login_form" :model="userInfo" :rules="rules" @keyup.enter="loginIn" ref="ref_form">
<el-form-item prop="userName">
<el-input placeholder="Please enter your username" v-model.trim="userInfo.userName">
<template #prepend>
<el-icon>
<avatar />
</el-icon>
</template>
</el-input>
</el-form-item>
<el-form-item prop="password">
<el-input placeholder="Please enter your password" show-password v-model.trim="userInfo.password">
<template #prepend>
<el-icon>
<key/>
</el-icon>
</template>
</el-input>
</el-form-item>
<!-- Login button, triggers login operation when clicked -->
<el-button type="primary" class="login_submit" @click="loginIn">Login</el-button>
<!-- Register link, redirects to register page when clicked -->
<div class="login_register" @click="toRegister">Register</div>
</el-form>
</div>
</div>
</template>
<script setup>
import { userStore } from "@/common/js/store";
import router from "@/router";
import { ElMessage } from "element-plus";
import { reactive, ref } from "vue";
// Reference to the form
const ref_form = ref(null)
// Reactive user information object
const userInfo = reactive({
userName: '',
password: ''
})
// Form validation rules
const rules = {
userName: [{ required: true, trigger: 'blur', message: 'Username cannot be empty' }],
password: [{ required: true, trigger: 'blur', message: 'Password cannot be empty' }],
}
// Login method, validates the form and calls getUserInfo method
const loginIn = () => {
ref_form.value.validate((val) => {
if (val) {
getUserInfo()
}
})
}
// Get user information method, simulates successful login and redirects to the home page
const getUserInfo = () => {
userStore.userName = userInfo.userName;
localStorage.setItem('token', '100') // Simulate setting a token
ElMessage({
message: 'Login successful',
type: 'success'
})
router.push('/home') // After successful login, redirect to the home page
}
// Method to redirect to the register page
const toRegister = () => {
router.push('/register')
}
</script>
<style lang="less" scoped>
@-webkit-keyframes fedenum {
0% {
opacity: 0;
}
100% {
opacity: 1;
}
}
.login {
display: flex;
justify-content: center;
align-items: center;
height: 100vh;
position: relative;
}
.backgroundImage {
height: 100%;
width: 100%;
background-image: url("../assets/bj.jpg");
background-repeat: no-repeat;
background-size: cover;
background-position: center;
position: absolute;
top: 0;
left: 0;
z-index: 0;
}
.login_container {
animation: fadenum 1s ease;
position: relative;
z-index: 1;
width: 400px;
min-height: 273px;
text-align: center;
background-color: #fff;
border-radius: 10px;
padding: 20px;
}
el-icon {
height: 30px !important;
}
h1 {
font-size: 24px;
transition: all 1s;
font-weight: bold;
margin-bottom: 36px;
}
.el-card {
border-radius: 20px;
}
.login_form {
.login_submit {
width: 100%;
height: 50px;
border-radius: 20px;
margin-bottom: 10px;
}
.login_register {
width: 6.25rem;
font-size: 0.875rem;
margin: 0 auto;
}
:deep(.el-input-group__prepend) {
padding: 0 10px;
}
}
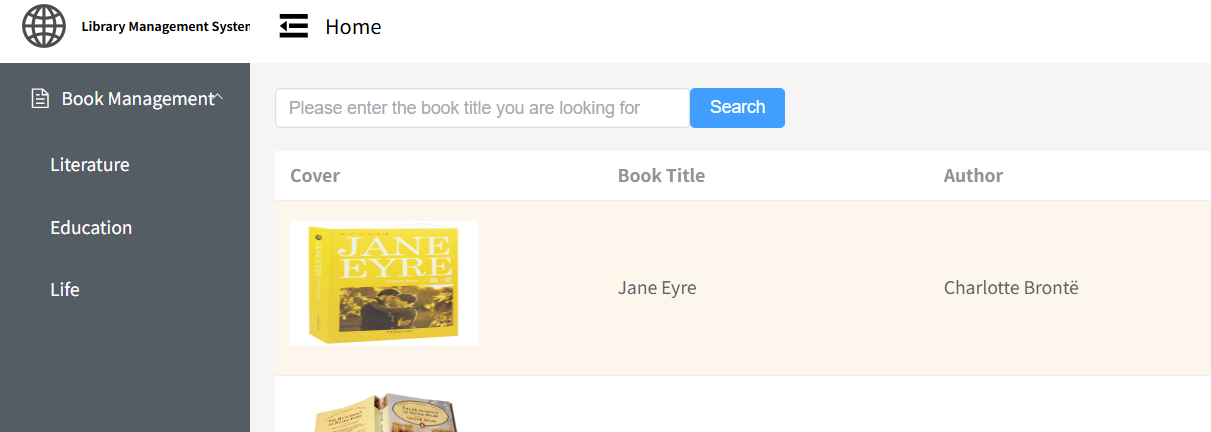
</style>(3)图书列表页(Home.vue)
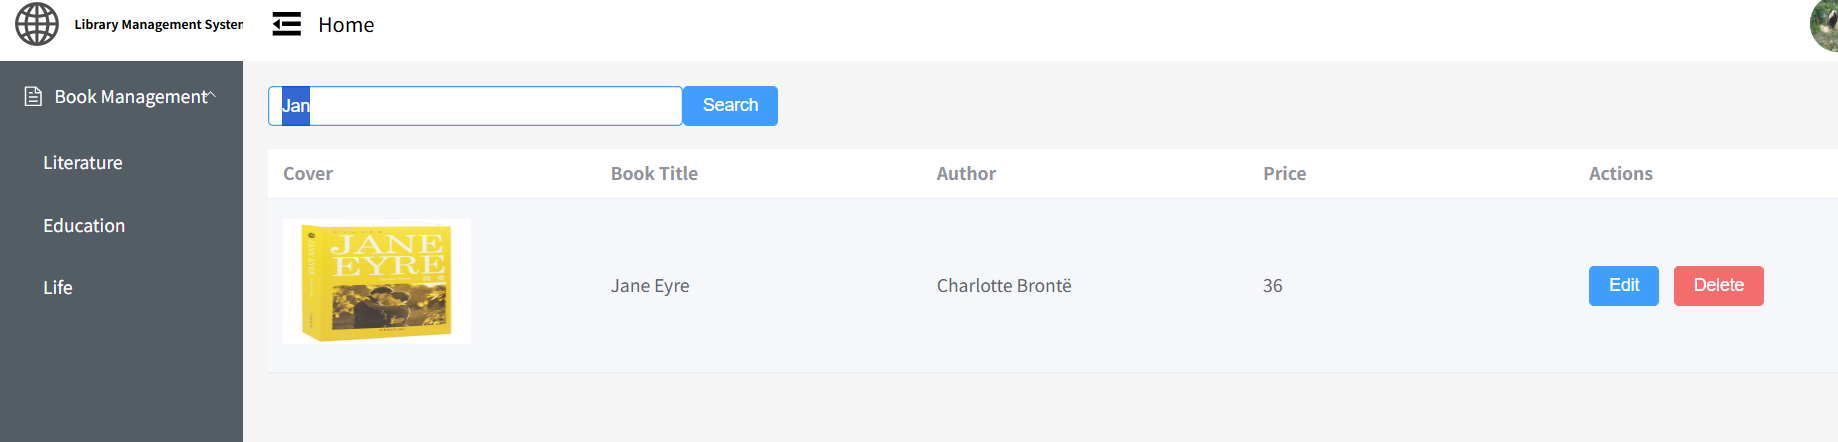
实现图书分类筛选 和模糊查询,核心功能:
- 加载所有图书
- 按"前端开发/后端开发/计算机基础"分类筛选
- 按书名/作者模糊查询
vue
<template>
  <div class="home">
    <!-- Use Element UI's el-container component to create a container for layout -->
    <el-container>
      <!-- Use el-aside component to create a sidebar -->
      <el-aside width="200px">
        <!-- Include the Aside component to display the sidebar content -->
        <!-- :handleCollapse and :isCollapse are used to control the collapse state of the sidebar -->
        <!-- @updateCategory listens for the updateCategory event emitted by the child component to update the current category -->
        <Aside :handleCollapse='handleCollapse' :isCollapse='isCollapse' @updateCategory="handleCategoryChange"/>
      </el-aside>
      <el-container>
        <!-- Use el-header component to create the header area -->
        <el-header>
          <!-- Include the Header component to display the header content -->
          <!-- :handleCollapse and :isCollapse are used to control the collapse state of the header -->
          <Header :handleCollapse='handleCollapse' :isCollapse='isCollapse'/>
        </el-header>
        <el-main>
          <!-- Use el-main component to create the main content area -->
          <!-- Include the Main component to display the main content -->
          <!-- :category is used to pass the current category to the Main component -->
          <Main :category="currentCategory"/>
        </el-main>
      </el-container>
    </el-container>
  </div>
</template>

<script setup>
import Header from '@/components/Header.vue'
import Aside from '@/components/Aside.vue'
import Main from '@/components/Main.vue'
import { userStore } from "@/common/js/store";
import { ref } from 'vue'

// Define a reactive variable to control the collapse state of the sidebar and header
const isCollapse = ref(false)
// Define a reactive variable to store the currently selected category
const currentCategory = ref('')
// Define a method to toggle the collapse state of the sidebar and header
const handleCollapse = () => {
  isCollapse.value = !isCollapse.value
}
// Define a method to handle category changes
// When the Aside component emits an updateCategory event, this method updates the value of currentCategory
const handleCategoryChange = (category) => {
  currentCategory.value = category
}
</script>
<style lang="less" scoped>
.el-aside{
  width: auto;
  background-color: #544c64;
  overflow: hidden;
}
.el-container{
  height: 100vh;
}
.el-main{
  display: flex;
}
.el-header{
  background-color: #fff;
}
</style>
(4)导航栏组件(Navbar.vue)
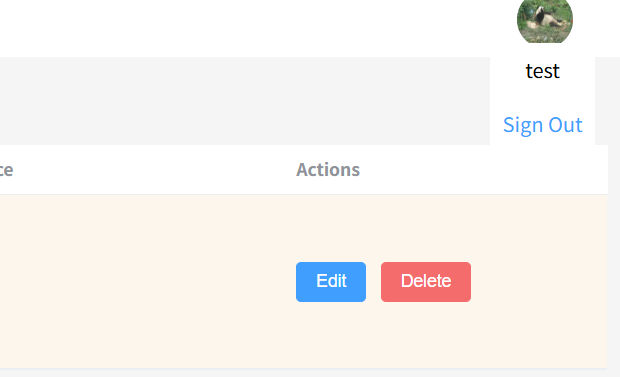
实现"用户名显示"和"退出登录"功能:
vue
<template>
  <!-- Create a vertical navigation menu with custom active text color, background color, and text color -->
   <!-- Whether to collapse, bound to the isCollapse variable -->
  <el-menu
    class="el-menu-vertical-demo"
    active-text-color="#15df84"
    background-color="#545c64"
    text-color="#fff"
    :collapse="isCollapse"
  >
    <!-- Define a library icon area containing an icon and text -->
    <div class="library-icon">
      <img src="../assets/library-icon.png"> <!-- Library icon -->
      <p>Library Management System</p>
    </div>
    <!-- Define a submenu for book management -->
    <el-sub-menu index="1">
      <template #title>
        <el-icon><document /></el-icon>
        <span>Book Management</span>
      </template>
      <!-- Define three menu items that trigger the updateCategory method and pass category parameters when clicked -->
      <el-menu-item index="1-1" @click="updateCategory('literature')">Literature</el-menu-item>
      <el-menu-item index="1-2" @click="updateCategory('education')">Education</el-menu-item>
      <el-menu-item index="1-3" @click="updateCategory('life')">Life</el-menu-item>
    </el-sub-menu>
  </el-menu>
</template>
<script setup>
// Receive the isCollapse property from the parent component
const { isCollapse } = defineProps(['isCollapse'])
// Define an event emitter to send events to the parent component
const emit = defineEmits(['updateCategory'])

// Method to update category, triggers the updateCategory event and passes category parameters
const updateCategory = (category) => {
  emit('updateCategory', category)
}
</script>
<style lang = 'less' scoped>
.el-radio-button_inner{
    padding: 0;
}
.el-menu--collapse{
    border: none;
}
.el-menu:not(.el-menu--collapse){
    width: 200px;
    min-height: 800px;
    border: none;
}
.library-icon{
    display: flex;
    align-items: center;
    font-weight: 600;
    height: 60px;
    background-color: #fff;
    white-space: nowrap;
    padding-left: 15px;
}
img{
    width: 45px;
    height: 40px;
    margin-right: 10px;
}
p{
  font-size: 10px;
  font-weight: bold;
}
</style>
四、项目运行与功能演示
1. 启动项目
步骤1:启动JSON Server(后端接口)
bash
json-server --watch db.json --port 3000步骤2:启动Vue项目(前端)
打开新终端,进入项目目录:
bash
npm run devVue项目默认启动在http://localhost:5173。
2. 功能演示流程
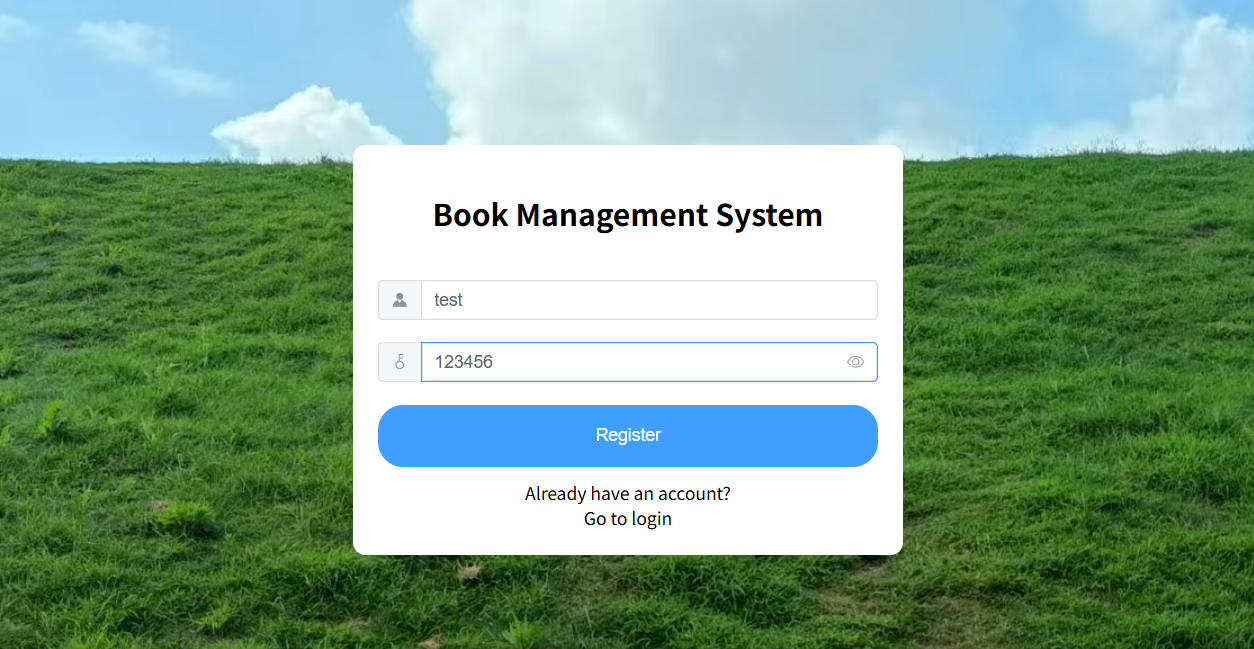
-
注册 :访问
http://localhost:5173/register,输入用户名(如test123)和密码(如123456),注册成功后跳登录页。
-
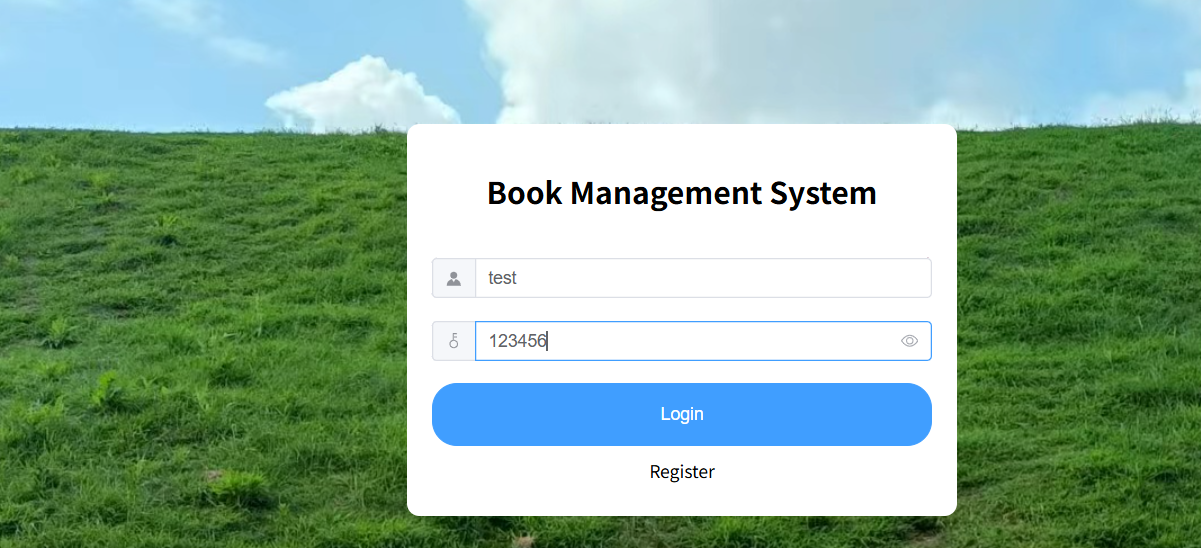
登录 :输入刚注册的账号密码,登录成功后跳图书列表页。
-
图书分类 :点击"前端开发""后端开发"等按钮,可筛选对应分类的图书。
-
模糊查询 :在搜索框输入关键词(如Jan),实时筛选图书。
-
退出登录:点击导航栏"退出登录",清除缓存并返回登录页。
觉得有用请点赞收藏!
如果有相关问题,欢迎评论区留言讨论~