昨天我们简单体验了 Chat2Graph 这个项目的安装和使用,通过一个例子演示了 Chat2Graph 的完整流程,了解了 Chat2Graph 作为一个图原生的智能体系统,通过将图计算技术与 AI 技术融合,不仅降低了用图门槛,同时也为智能体系统提供了更强的推理能力和更好的可解释性。
Chat2Graph 这个项目里引入了不少新的理念和思想,我们将结合源码深入它的核心原理,让我们先从它的多智能体协作机制开始。
用户对话的基本流程
当用户在聊天窗口发起对话时,调用 chat 接口,其实现位于 app/server/api/session_api.py 文件中:
python
@sessions_bp.route("/<string:session_id>/chat", methods=["POST"])
def chat(session_id: str):

  # 构造 chat_message 并调用 SessionManager
  response_data, message = manager.chat(chat_message)
  return make_response(data=response_data, message=message)
它将请求传递到 SessionManager 进行处理:
python
class SessionManager:
  def chat(self, chat_message: ChatMessage) -> Tuple[Dict[str, Any], str]:

    # 创建 SessionWrapper
    session_wrapper = self._agentic_service.session(session_id=chat_message.get_session_id())

    # 通过 SessionWrapper 将消息提交到多智能体系统
    job_wrapper = session_wrapper.submit(message=chat_message)

    # 保存会话
    # 更新会话名称
该方法通过 AgenticService 创建 SessionWrapper,并通过 SessionWrapper 将消息提交到多智能体系统。Chat2Graph 的代码采用分层架构,项目结构如下:
bash
app/
├── core/           # 核心智能体框架
│   ├── agent/      # 智能体实现 (Leader, Expert)
│   ├── reasoner/   # 推理引擎
│   ├── sdk/        # 开发者SDK
│   ├── service/    # 核心服务
│   └── toolkit/    # 工具系统
├── plugin/         # 插件生态 (Neo4j, LiteLLM等)
├── server/         # Flask Web 服务
└── web/            # React 前端界面
对前端请求的处理都是先到达 server 层,再由 server 层调用 core 层,而对 core 层的调用一般都通过 SDK 实现。SDK 中包含一个核心的 AgenticService 和一堆对核心服务的包装类(XXXWrapper):
bash
app/core/sdk
├── agentic_service.py
├── chat2graph.yml
└── wrapper
    ├── agent_wrapper.py
    ├── env_wrapper.py
    ├── graph_db_wrapper.py
    ├── job_wrapper.py
    ├── knowledge_wrapper.py
    ├── operator_wrapper.py
    ├── reasoner_wrapper.py
    ├── session_wrapper.py
    ├── toolkit_wrapper.py
    └── workflow_wrapper.py
因此这里的 SessionWrapper 就是对 SessionService 的包装,它的 submit() 函数实现如下:
python
class SessionWrapper:
  def submit(self, message: ChatMessage) -> JobWrapper:

    # 获取当前用户消息
    # 获取历史会话消息

    # 创建并保存任务
    job = Job(
      goal=text_message.get_payload(),
      context=historical_context,
      session_id=self._session.id,
      assigned_expert_name=text_message.get_assigned_expert_name(),
    )
    job_service.save_job(job=job)
    job_wrapper = JobWrapper(job)

    # 将任务信息更新至会话

    # 异步运行任务
    run_in_thread(job_wrapper.execute)

    return job_wrapper
这里的核心逻辑是创建了一个任务,也就是 Job 对象,包含目标、上下文、会话 ID 等信息,然后通过 JobWrapper 异步运行它:
python
class JobWrapper:
  def execute(self):
    # 调用 Leader 智能体
    agent_service: AgentService = AgentService.instance
    agent_service.leader.execute_original_job(original_job=self._job)
任务的运行由智能体模块 AgentService 负责,它包含 Leader 和 Expert 两类智能体,通过调用 Leader 智能体,多智能体系统由此开始启动。
智能体模块
智能体模块是 Chat2Graph 的核心,它负责接收任务、执行具体操作并返回结果。系统中存在两类特殊的智能体:
- Leader 智能体:作为总指挥,它接收用户的请求,理解用户意图,并将复杂任务分解为多个子任务,并根据每个子任务的特点分配给相应的 Expert 执行;
- Expert 智能体:专注于特定领域的任务处理,每个专家都具有明确的专业能力边界和执行职责,Chat2Graph 内置了建模、导数、查询、分析和问答 5 个专家;
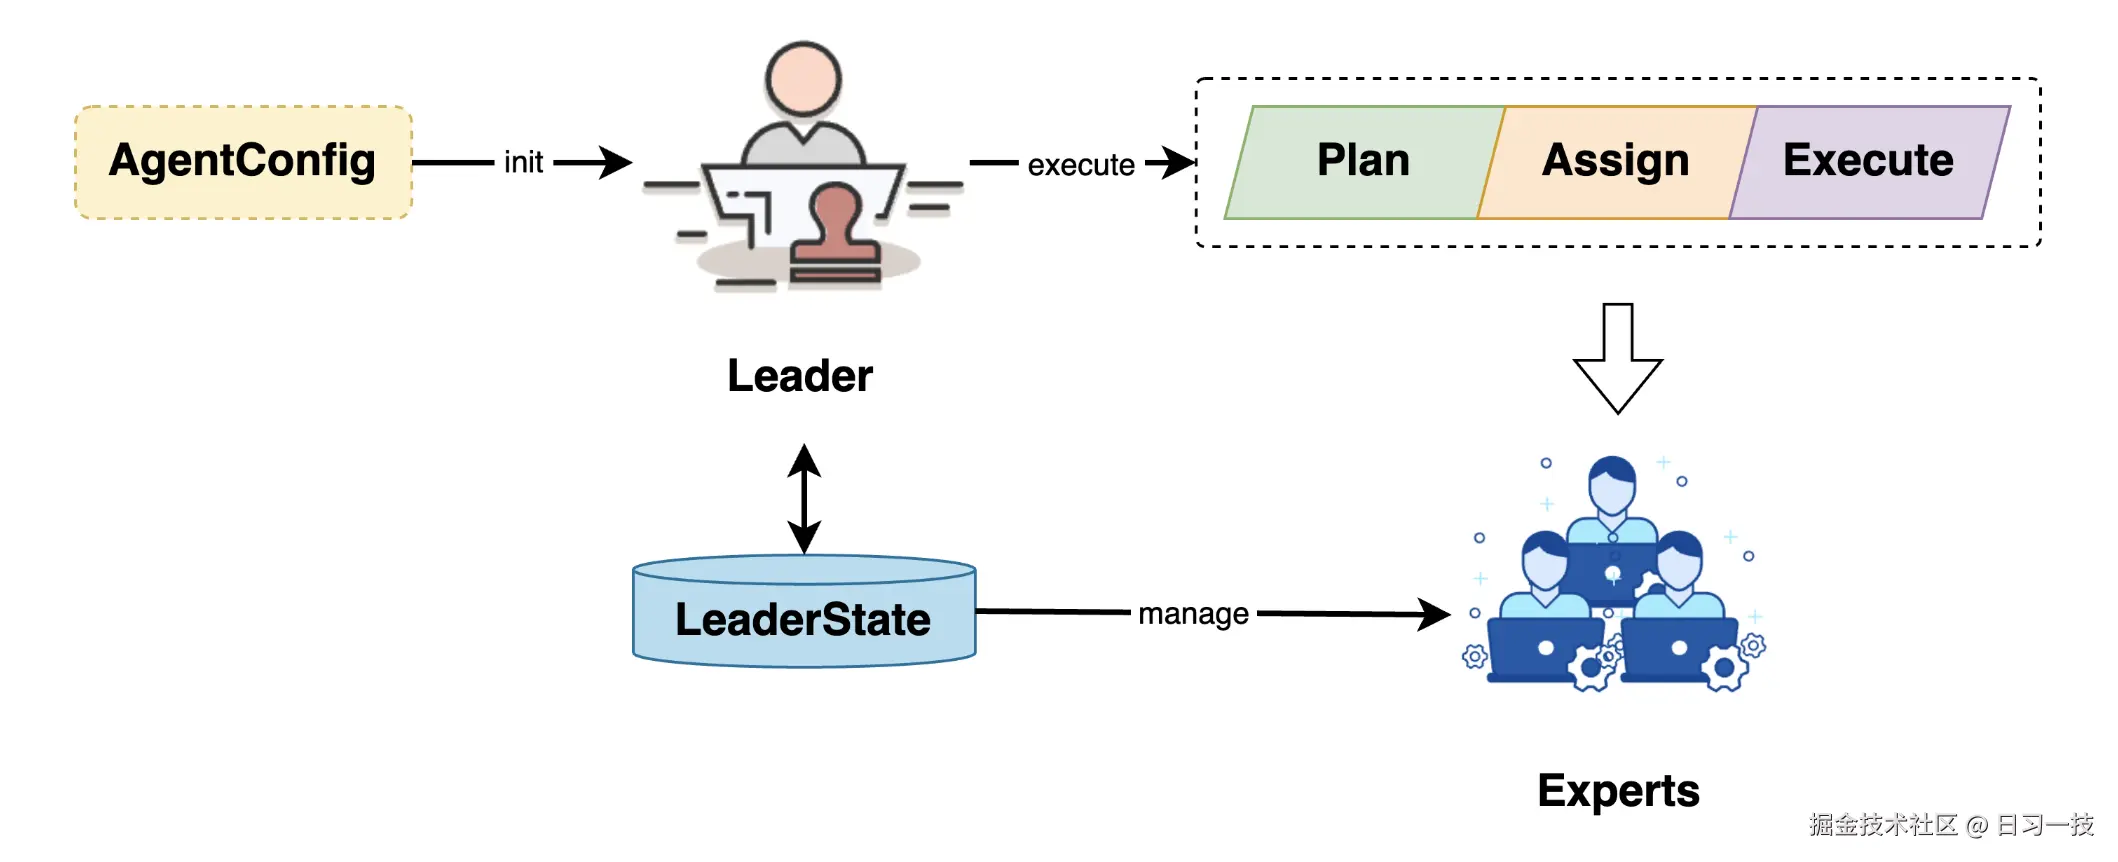
其中 Leader 负责任务的规划、分配和执行,还包括 Expert 生命周期的管理,它通过 AgentConfig 初始化:
python
class AgenticService(metaclass=Singleton):
  @staticmethod
  def load(yaml_path: Union[str, Path] = "app/core/sdk/chat2graph.yml") -> "AgenticService":

    # 加载 YAML 配置
    agentic_service_config = AgenticConfig.from_yaml(yaml_path, encoding)
    mas = AgenticService(agentic_service_config.app.name)

    # 推理机
    mas.reasoner(reasoner_type=agentic_service_config.reasoner.type)
    # 工具集
    mas.toolkit(*AgenticService._build_toolkit(agentic_service_config))

    # 构建 Leader 智能体
    mas.leader("Leader").workflow(
      AgenticService._build_leader_workflow(
        agentic_service_config=agentic_service_config,
      ),
      platform_type=workflow_platform_type,
    ).build()

    # 构建 Export 智能体
    for expert_config in agentic_service_config.experts:
      mas.expert(
        name=expert_config.profile.name,
        description=expert_config.profile.desc,
      ).workflow(
        *AgenticService._build_expert_workflow(
          expert_config=expert_config,
          agentic_service_config=agentic_service_config,
        ),
        platform_type=workflow_platform_type,
      ).build()

    return mas
这段代码在程序启动时就会被调用,通过 chat2graph.yml 配置文件构建出 1 个 Leader 智能体和 5 个 Expert 智能体。这个 YAML 文件比较复杂,包含了很多 Chat2Graph 中的概念,基本结构如下:
yaml
app:
  name: "Chat2Graph"
  desc: "A Graph Native Agentic System."
  version: "0.0.1"

# 插件系统
plugin:
  workflow_platform: "DBGPT"

# 推理机
reasoner:
  type: "DUAL"

# 工具
tools:
  - &document_reader_tool
    name: "DocumentReader"
    module_path: "app.plugin.neo4j.resource.graph_modeling"
  # ...

# 行动
actions:
  - &content_understanding_action
    name: "content_understanding"
    desc: "Understand the main content and structure of the document through reading and annotating (requires calling one or more tools)."
    tools:
      - *document_reader_tool
  # ...

# 工具集
toolkit:
  - [
      *content_understanding_action,
      *deep_recognition_action
    ]
  # ...

# 算子
operators:
  - &analysis_operator
    instruction: |
      You are a professional document analysis expert, specializing in extracting key information from documents to lay a solid foundation for building knowledge graphs...
    output_schema: |
      ...
    actions:
      - *content_understanding_action
      - *deep_recognition_action

# 5 个 Export 智能体
experts:
  - profile:
      name: "Design Expert"
      desc: |
        He is a knowledge graph modeling (schema) expert...
    reasoner:
      actor_name: "Design Expert"
      thinker_name: "Design Expert"
    workflow:
      - [*analysis_operator, *concept_modeling_operator]

  - profile:
      name: "Extraction Expert"
      desc: |
        He is a Raw Data Extraction and Data Import Graph Data Expert...
    reasoner:
      actor_name: "Extraction Expert"
      thinker_name: "Extraction Expert"
    workflow:
      - [*data_importation_operator]

  - profile:
      name: "Query Expert"
      desc: |
        He is a Graph Data Query Expert...
    reasoner:
      actor_name: "Query Expert"
      thinker_name: "Query Expert"
    workflow:
      - [*query_design_operator]

  - profile:
      name: "Analysis Expert"
      desc: |
        He is a Graph Data Analysis and Algorithm Application Expert...
    reasoner:
      actor_name: "Analysis Expert"
      thinker_name: "Analysis Expert"
    workflow:
      - [*algorithms_execute_operator]

  - profile:
      name: "Q&A Expert"
      desc: |
        He is a General Q&A and Information Retrieval Expert with prioritized multi-source research capabilities...
    reasoner:
      actor_name: "Q&A Expert"
      thinker_name: "Q&A Expert"
    workflow:
      - [*retrieval_operator, *summary_operator]

# 1 个 Leader 智能体
leader:
  actions:
    - *query_system_status_action
    - *job_decomposition_action
这里的插件、推理机、工具、动作、算子我们暂时不用管,重点关注 1 个 Leader 智能体和 5 个 Expert 智能体的配置。可以看出每个智能体都由三个核心组件构成:
- 角色(Profile):定义了智能体的身份和能力范围;
- 推理机(Reasoner):提供了基于大语言模型的推理能力;
- 工作流(Workflow):则编排了任务执行的具体流程;
Leader 智能体使用了内置的 Profile、Reasoner 和 Workflow,不需要在 YAML 文件中配置。
当用户输入自然语言指令时,Leader 智能体首先会理解任务意图,并将复杂任务分解为多个子任务,然后分配给相应的 Expert 智能体进行执行。
一主动多被动混合架构
像 Chat2Graph 这样的 1 个 Leader + 多个 Experts 智能体协作机制又被称为 一主动多被动(One-Active-Many-Passive) 架构,这种思想其实来自于去年的一篇论文:
论文指出,传统的多智能体系统面临三大核心挑战:
- 协调复杂性:多个主动智能体同时决策容易产生冲突和混乱
- 同步开销:需要复杂的同步机制(如 Raft 共识算法)来协调多个主动智能体
- 扩展困难:添加新的智能体需要重新设计整个协调机制
因此,论文提出 LLM-Agent-UMF(基于 LLM 的智能体统一建模框架) ,从功能和软件架构双视角明确智能体组件划分,引入 Core-Agent(核心智能体) 概念,并构建模块化、可扩展的体系。LLM-Agent-UMF 框架定义了 Core-Agent 的五大核心模块:
- 规划模块(Planning Module):将复杂任务分解为可执行的子任务,并生成最优执行计划;
- 记忆模块(Memory Module):存储和检索智能体运行过程中的关键信息,解决 LLM 上下文窗口有限问题;
- 角色模块(Profile Module):定义 LLM 的角色与行为模式,确保其输出符合任务场景需求;
- 行动模块(Action Module):将规划模块的高层指令转化为具体操作,调用工具或与环境交互;
- 安全模块(Security Module):基于 CIA 三元组(机密性、完整性、可用性),防范 LLM 应用的安全风险;
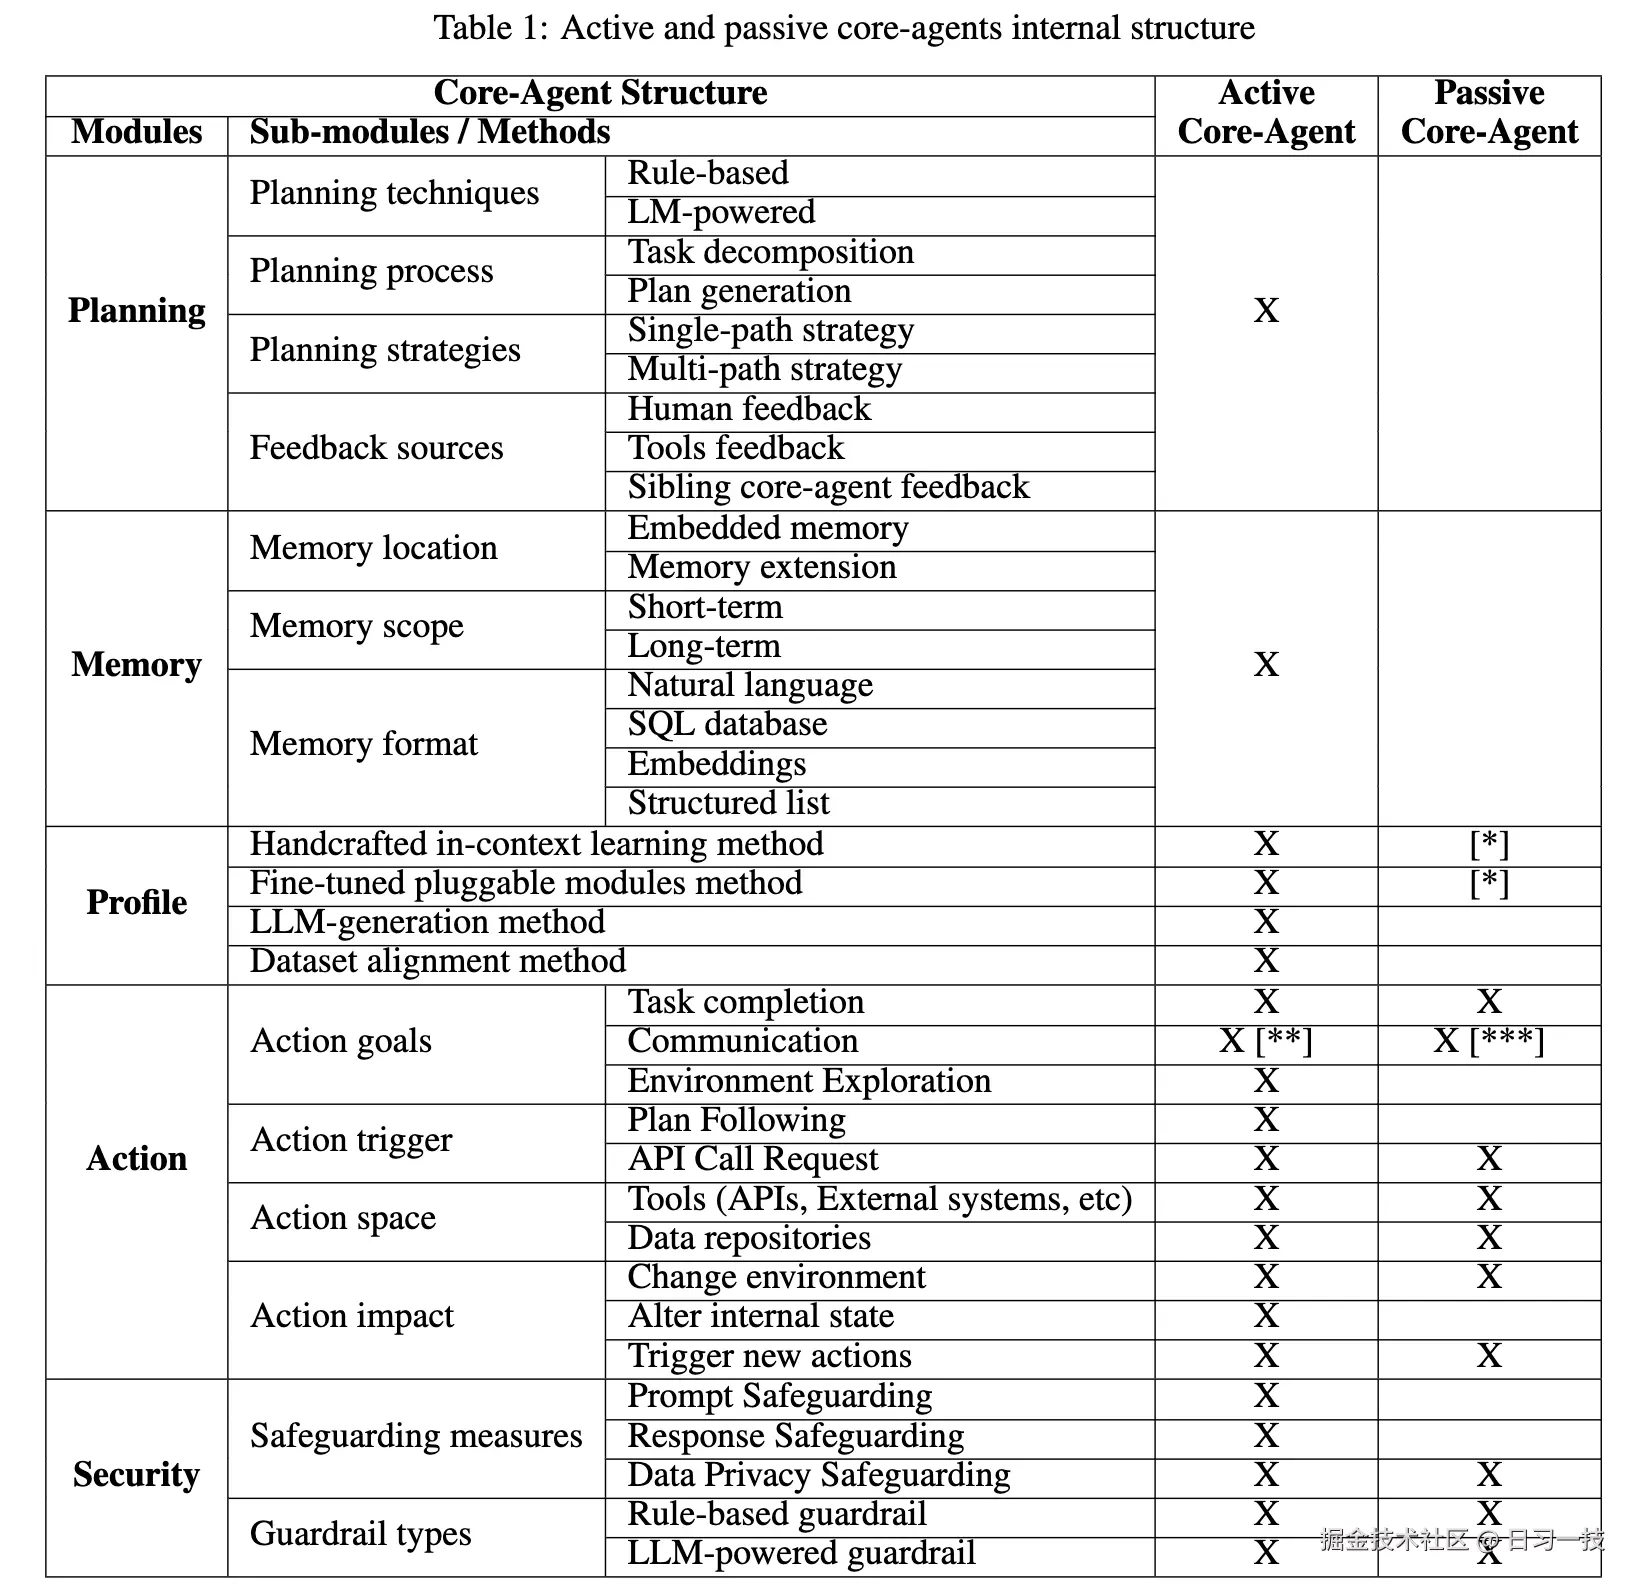
并根据智能体是否主导任务决策,将 Core-Agent 分为两类:
- 主动核心智能体(Active Core-Agent):具备完整的五大模块(规划、记忆、角色、行动、安全),主导任务决策与协调;有状态实体,可存储历史交互信息;典型能力包括自主分解复杂任务、动态调整角色或主动发起双向通信,适用于复杂任务处理;
- 被动核心智能体(Passive Core-Agent):仅保留行动模块与安全模块,无规划/记忆/角色模块;无状态实体,完全遵循外部指令;典型能力包括执行简单操作,如 API 调用、工具调用等,仅能被动响应通信;
这两类 Core-Agent 对比如下:
基于主动/被动的分类,论文提出两类多智能体架构:统一架构(Uniform Architecture) 和 混合架构(Hybrid Architecture) ,统一架构又分为 多被动核心架构 (1个LLM + 多个被动核心智能体)和 多主动核心架构(多个主动核心智能体协作)。多被动架构使用简单,易于扩展,但是缺乏高层决策能力,无法处理复杂任务;而多主动架构虽然具备强大的决策能力,但是需要设计复杂的同步机制(比如 Raft 选主),避免多个智能体决策冲突。
基于理论分析和实验验证,LLM-Agent-UMF 研究发现 一主动多被动的混合架构为最优架构,兼顾了决策能力与扩展性:
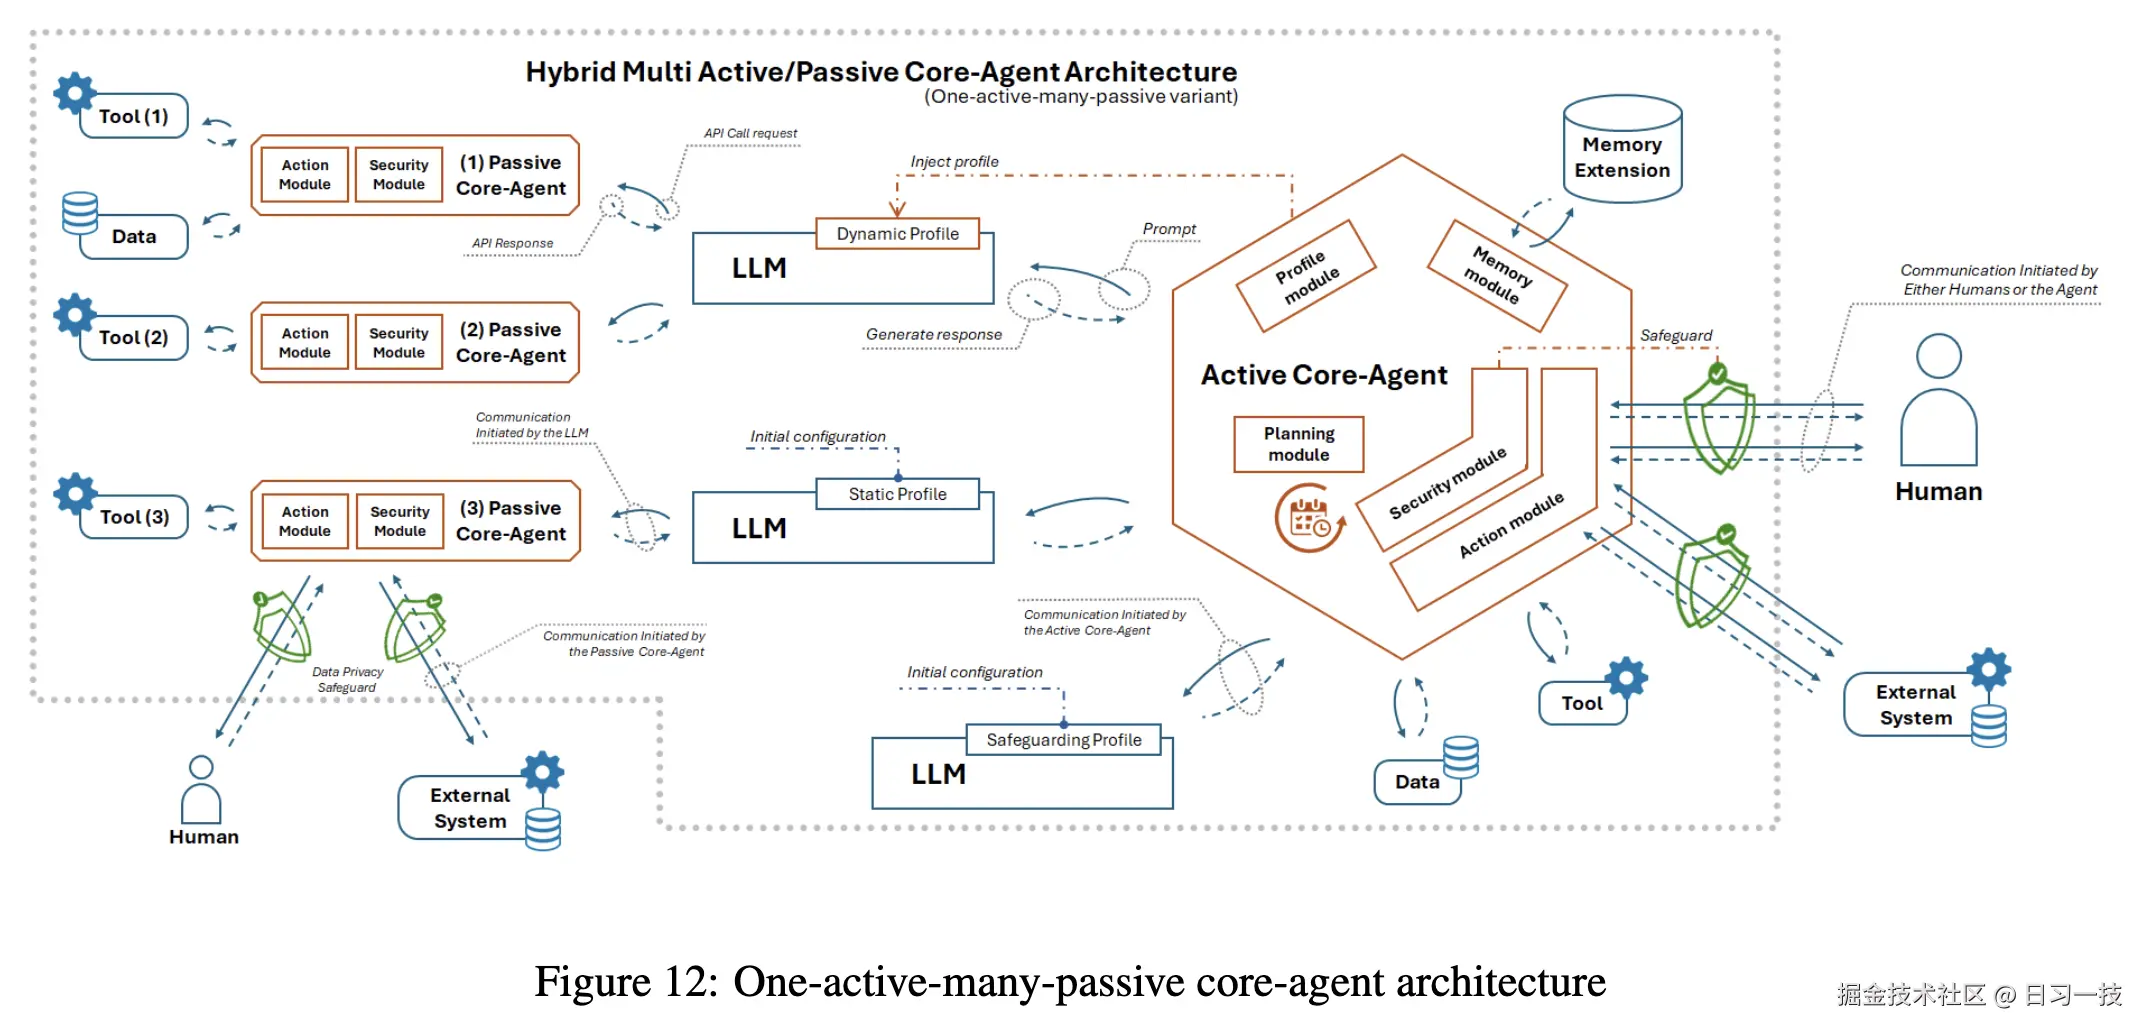
正是该理论为 Chat2Graph 的架构设计提供了科学依据。
小结
今天,我们通过对 Chat2Graph 源码和 LLM-Agent-UMF 论文的分析,学习了一主动多被动的多智能体混合架构:Leader 作为主动核心智能体,具备完整的规划、记忆、角色管理能力,统一协调整个系统;Expert 作为被动核心智能体,专注于特定领域的任务执行,简化了系统复杂度。
这种架构设计的核心优势在于:
- 统一决策:单一的 Leader 智能体避免了多个主动智能体之间的决策冲突,简化了协调机制;
- 专业分工:每个 Expert 智能体专注于特定领域(建模、导数、查询、分析、问答),提高了任务执行效率;
- 扩展性强:新增 Expert 智能体无需修改现有架构,只需在配置文件中定义新的专家即可;
- 降低复杂度:被动智能体无需维护状态和规划能力,降低了系统整体复杂度;
通过这种架构,Chat2Graph 不仅实现了高效的任务分解和执行,还为图原生智能体系统提供了一个可扩展的技术框架。在下一篇文章中,我们将深入分析 Chat2Graph 中智能体的具体实现,了解它的任务分解和执行逻辑,以及 工作流 和 推理机 等高级机制。
欢迎关注
如果这篇文章对您有所帮助,欢迎关注我的同名公众号:日习一技,每天学一点新技术。
我会每天花一个小时,记录下我学习的点点滴滴。内容包括但不限于:
- 某个产品的使用小窍门
- 开源项目的实践和心得
- 技术点的简单解读
目标是让大家用5分钟读完就能有所收获,不需要太费劲,但却可以轻松获取一些干货。不管你是技术新手还是老鸟,欢迎给我提建议,如果有想学习的技术,也欢迎交流!