文章目录
- 项目准备
- [1 缓存分类](#1 缓存分类)
-
- [1.1 MyBatis一级缓存](#1.1 MyBatis一级缓存)
- [1.2 MyBatis二级缓存](#1.2 MyBatis二级缓存)
-
- [1.2.1 开启二级缓存](#1.2.1 开启二级缓存)
- [1.2.2 Mybatis开启使用二级缓存](#1.2.2 Mybatis开启使用二级缓存)
- [2 SpringBoot使用缓存](#2 SpringBoot使用缓存)
-
- [2.1 SpringBoot开启MyBatis缓存+ehcache](#2.1 SpringBoot开启MyBatis缓存+ehcache)
-
- [2.1.1 引入依赖](#2.1.1 引入依赖)
- [2.1.2 添加缓存的配置文件 ehcache.xml](#2.1.2 添加缓存的配置文件 ehcache.xml)
- [2.1.3 读取ehcache.xml文件](#2.1.3 读取ehcache.xml文件)
- [2.1.4 设置项目启动时使用缓存](#2.1.4 设置项目启动时使用缓存)
- [2.1.5 序列化你的pojo层](#2.1.5 序列化你的pojo层)
- [2.2 缓存的使用](#2.2 缓存的使用)
-
- [2.2.1 基本使用](#2.2.1 基本使用)
- [2.2.2 @Cacheable注解使用](#2.2.2 @Cacheable注解使用)
- [2.2.2 @CachePut](#2.2.2 @CachePut)
- [2.2.3 @CacheEvict](#2.2.3 @CacheEvict)
- [3 SpringBoot+Redis使用](#3 SpringBoot+Redis使用)
-
- [3.1 Redis 缓存配置](#3.1 Redis 缓存配置)
-
- [3.1.1 引入依赖](#3.1.1 引入依赖)
- [3.1.2 yml添加配置](#3.1.2 yml添加配置)
- [3.1.3 序列化](#3.1.3 序列化)
- [3.2 Cacheable 注解](#3.2 Cacheable 注解)
- [3.3 多参数 Cacheable 注解](#3.3 多参数 Cacheable 注解)
- [3.4 缓存的清除 @CacheEvict](#3.4 缓存的清除 @CacheEvict)
- [3.5 yml配置](#3.5 yml配置)
- [3.6 缓存管理](#3.6 缓存管理)
-
- [3.6.1 编写MyRedisCacheManager配置类](#3.6.1 编写MyRedisCacheManager配置类)
- [3.6.2 编写CacheConfig](#3.6.2 编写CacheConfig)
- [3.6.3 演示](#3.6.3 演示)
项目准备
新建项目并选择模块安装
创建一个空的 Spring Boot 工程
文件-->新建项目
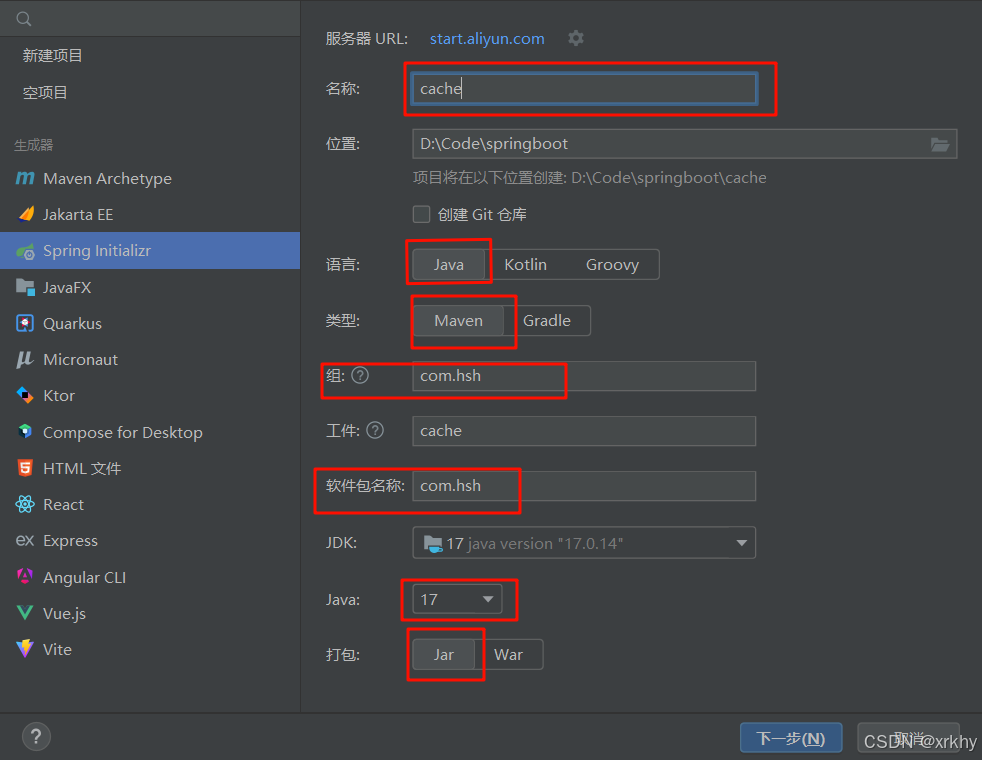
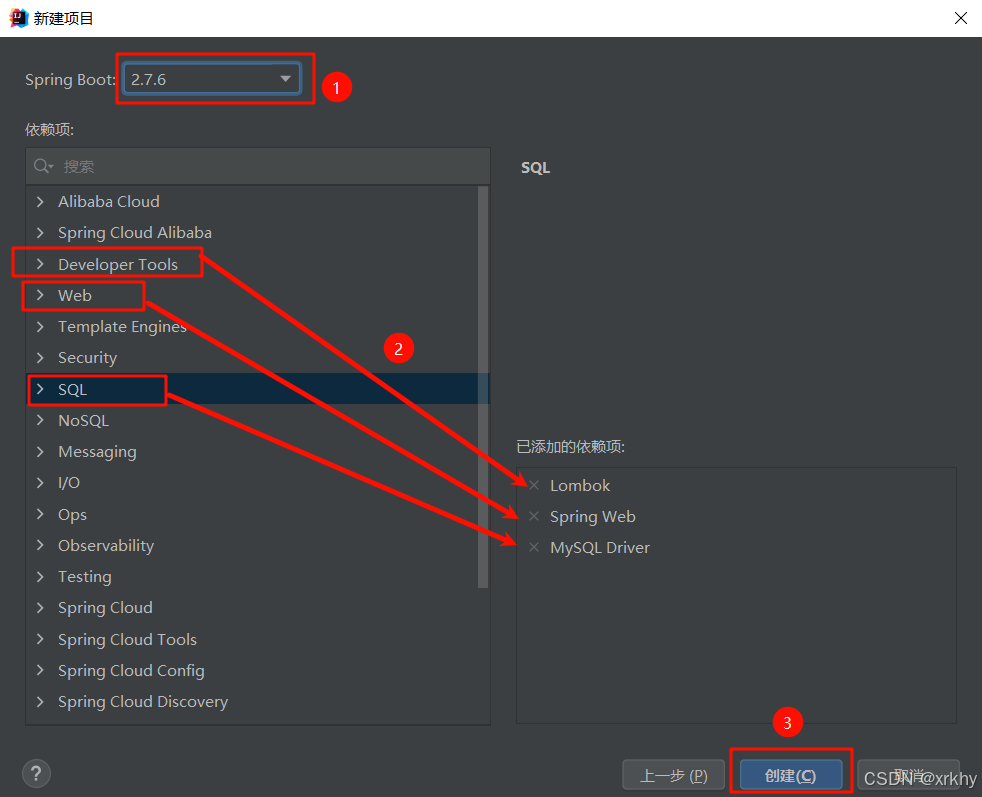
选择模块
SpringBoot版本选择2.7.6- 在
DeveloperTools中选择Lombok - 在
Web中选择SpringWeb - 在
SQL中选择MySQLDriver
添加依赖
xml
<!-- mybatis-plus依赖 -->
<dependency>
	<groupId>com.baomidou</groupId>
	<artifactId>mybatis-plus-boot-starter</artifactId>
	<version>3.5.1</version>
	<!--sql性能分析插件使用版本-->
	<!-- <version>3.1.2</version> -->
</dependency>
添加application.yml
我们删除application.properties
在resources文件下新建application.yml.
在 application.yml 中配置文件中添加mysql 数据库相关配置:
yml
server:
  port: 8080
spring:
  datasource:
    driver-class-name: com.mysql.cj.jdbc.Driver
    url: jdbc:mysql://127.0.0.1:3306/smbms?useUnicode=true&characterEncoding=utf-8&useSSL=false&allowPublicKeyRetrieval=true
    username: root
    password: root
# mybatis-plus 相关配置
mybatis-plus:
  type-aliases-package: com.hsh.pojo #类型别名所在的包
  #控制台打印sql语句
  configuration:
    log-impl: org.apache.ibatis.logging.stdout.StdOutImpl
    map-underscore-to-camel-case: false #关闭驼峰映射
注意你要写你的
数据库端口号,账号,密码,你要简化的包名这些一定要看一下。
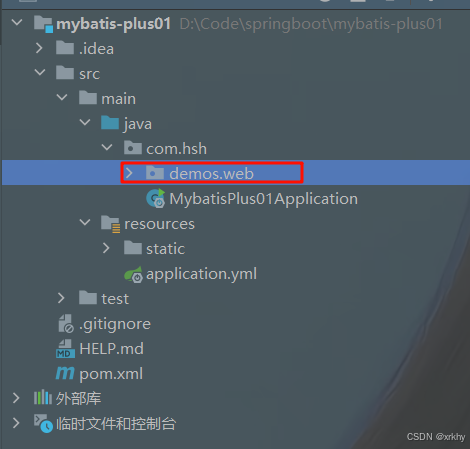
删除demos.web包
编写pojo层
user
com/hsh/pojo/user
java
package com.hsh.pojo;

import lombok.AllArgsConstructor;
import lombok.Data;
import lombok.NoArgsConstructor;

import java.time.LocalDateTime;

@Data
@NoArgsConstructor
@AllArgsConstructor
@TableName("smbms_user")
public class User {
    private Long id;// 主键ID
    private String userCode;// 用户编码
    private String userName;// 用户名称
    private String userPassword;// 用户密码
    private Integer gender;// 性别(1:女、 2:男)
    private LocalDateTime birthday;//  出生日期
    private String phone;//  手机
    private String address;//  地址
    private Long userRole;// 用户角色(取自角色表-角色id)
    private Long createdBy;// 创建者(userId)
    private LocalDateTime creationDate;// 创建时间
    private Long modifyBy; // 更新者(userId)
    private LocalDateTime modifyDate; // 更新时间
}
dto/ResultJson
java
package com.hsh.pojo.tdo;
import java.io.Serializable;

@Data
public class ResultJSON<T> implements Serializable {
    private Integer code;
    private String msg;
    private T data;
    public ResultJSON(Integer code, String msg, T data) {
        this.code = code;
        this.msg = msg;
        this.data = data;

    }

    /**
     * 操作成功或者失败
     * @param c 受影响行数
     * @return 当前传入的受影响行数>0则返回成功,否则返回失败
     */
    public static  ResultJSON successORerror(int c){
        return c>0?new ResultJSON(200,"操作成功",c)
                :new ResultJSON(400,"操作失败",c);
    }

    public static ResultJSON success(){
        return new ResultJSON(200,"操作成功",null);
    }
    public static ResultJSON success(String msg){
        return new ResultJSON(200,msg,null);
    }
    public static <T> ResultJSON success(T data){
        return new ResultJSON(200,"操作成功",data);
    }
    public static ResultJSON success(Integer code,String msg){
        return new ResultJSON(code,msg,null);
    }
    public static <T> ResultJSON success(String msg,T data){
        return new ResultJSON(200,msg,data);
    }
    public static <T> ResultJSON success(Integer code,String msg,T data){
        return new ResultJSON(code,msg,data);
    }

    public static ResultJSON error(){
        return new ResultJSON(500,"操作失败",null);
    }
    public static ResultJSON error(String msg){
        return new ResultJSON(500,msg,null);
    }
    public static ResultJSON error(Integer code,String msg){
        return new ResultJSON(code,msg,null);
    }

}
编写mapper层
UserMapper
java
package com.hsh.mapper;

public interface UserMapper extends BaseMapper<User> {

}
编写service层
UserService
java
// 接口
package com.hsh.service;
public interface UserService {
    ResultJSON<User> getUserById(Long id);
}
// 实现类
package com.hsh.service.impl;

import com.baomidou.mybatisplus.extension.service.impl.ServiceImpl;
import com.hsh.mapper.UserMapper;
import com.hsh.pojo.User;
import com.hsh.pojo.dto.ResultJSON;
import com.hsh.service.UserService;
import org.springframework.beans.factory.annotation.Autowired;
import org.springframework.stereotype.Service;

@Service
public class UserServiceImpl extends ServiceImpl<UserMapper, User> implements UserService {
    @Autowired
    private UserMapper userMapper;
    @Override
    public ResultJSON<User> getUserById(Long id) {
        User user = userMapper.selectById(id);
        return ResultJSON.success(user);
    }
}
编写controller层
java
package com.hsh.controller;

@RestController
@RequestMapping("/user")
public class UserController {
    @Autowired
    private UserService userService;
    @RequestMapping("/getUserById")
    public ResultJSON getUserById(Long id){
        return ResultJSON.success(userService.getUserById(id));
    }
}
编写配置类
MybatisPlusConfig
java
package com.hsh.config;

@Configuration
@MapperScan("com.hsh.mapper")
public class MybatisPlusConfig {

}
编写测试类
java
package com.hsh;

import com.hsh.mapper.UserMapper;
import org.junit.jupiter.api.Test;
import org.springframework.beans.factory.annotation.Autowired;
import org.springframework.boot.test.context.SpringBootTest;

@SpringBootTest
class MybatisPlus01ApplicationTests {
    @Autowired
    private UserMapper userMapper;

    @Test
    void contextLoads() {
        System.out.println(userMapper.selectById(1));
    }
}
1 缓存分类
1.1 MyBatis一级缓存
Mybatis对缓存提供支持,但是在没有配置的默认情况下,它只开启一级缓存,一级缓存只是相对于同一个SqlSession而言。所以在参数和SQL完全一样的情况下,我们使用同一个SqlSession对象调用一个Mapper方法,往往只执行一次SQL,因为使用SelSession第一次查询后,MyBatis会将其放在缓存中,以后再查询的时候,如果没有声明需要刷新,并且缓存没有超时的情况下,SqlSession都会取出当前缓存的数据,而不会再次发送SQL到数据库。
1.2 MyBatis二级缓存
MyBatis的二级缓存是Application级别的缓存,它可以提高对数据库查询的效率,以提高应用的性能。
1.2.1 开启二级缓存
SqlSessionFactory层面上的二级缓存默认是不开启的,二级缓存的开启需要进行配置,实现二级缓存的时候,
springboot+ehcache的MyBatis要求返回的POJO必须是可序列化的。 也就是要求实现Serializable接口,配置方法很简单,只需要在映射XML文件配置就可以开启缓存了。
1.2.2 Mybatis开启使用二级缓存
修改配置文件mybatis-config.xml加入
xml
<setting name="cacheEnabled"value="true"/>在mapper.xml中开启二缓存,mapper.xml下的sql执行完成会存储到它的缓存区
xml
<!--回收策略为先进先出,每隔60秒刷新一次,最多缓存512个引用对象,只读-->
<cache eviction="FIFO" flushInterval="60000" size="512" readOnly="true"/>
参数说明:
eviction:
LRU 最近最少使用的:移除最长时间不被使用的对象
FIFO 先进先出:按对象进入缓存的顺序来移除它们
SOFT 软引用:移除基于垃圾回收器状态和软引用规则的对象
WEAK 弱引用:更积极地移除基于垃圾收集器状态和弱引用规则的对象
flushInterval :刷新间隔)可以被设置为任意的正整数,而且它们代表一个合理的毫秒形式的时间段。默
认情况是不设置,也就是没有刷新间隔,缓存仅仅调用语句时刷新(mia毫秒单位)
size :引用数目)可以被设置为任意正整数,要记住你缓存的对象数目和你运行环境的可用内存资源数目。
默认值是1024
readOnly :(只读)属性可以被设置为true或false。只读的缓存会给所有调用者返回缓存对象的相同实
例。因此这些对象不能被修改。这提供了很重要的性能优势。可读写的缓存会返回缓存对象的拷贝(通过序列
化)。这会慢一些,但是安全,因此默认是false
select,insert,update标签中的缓存属性
bash
useCache=false,禁用二级缓存
flushCache=true 刷新缓存 ,一般用于insert,update(目前版本可以自动刷新)
2 SpringBoot使用缓存
2.1 SpringBoot开启MyBatis缓存+ehcache
2.1.1 引入依赖
引入缓存的依赖包,在配置 pom.xml 文件中添加
xml
<!--添加缓存-->
<dependency>
	<groupId>org.springframework.boot</groupId>
	<artifactId>spring-boot-starter-cache</artifactId>
</dependency>
<dependency>
	<groupId>net.sf.ehcache</groupId>
	<artifactId>ehcache</artifactId>
</dependency>
2.1.2 添加缓存的配置文件 ehcache.xml
标签解释
diskStore标签:指定一个文件目录,当EhCache把数据写到硬盘上时,将把数据写到这个文件目录下- user.home 属性: 用户主目录
- user.dir属性 : 用户当前工作目录
- java.io.tmpdir属性 : 这是 Java 虚拟机的默认临时文件路径。默认临时文件路径。例如,在 Windows 系统中可能是 C:\Users用户名\AppData\Local\Temp`
defaultCache标签:默认缓存策略,当ehcache找不到定义的缓存时,则默认缓存策略。- 属性同下面的cache。只不过他没有name属性
cache:自定义的缓存策略。(可以有多个cache标签)- name: 缓存名称
- eternal: true表示对象永不过期,此时会忽略 timeToIdleSeconds和timeToLiveSeconds属性,默认为false
- timeToIdleSeconds: 设定允许对象处于空闲状态的最长时间,以秒为单位。当对象自从最近一次被访问后,如果处于空闲状态的时间超过了。timeToIdleSeconds属性值,这个对象就会过期,EHCache将把它从缓存中清空。只有当eternal属性为false,该属性才有效。如果该属性值为0,则表示对象可以无限期地处于空闲状态
- timeToLiveSeconds: 设定对象允许存在于缓存中的最长时间,以秒为单位。当对
象自从被存放到缓存中后,如果处于缓存中的时间超过了 timeToLiveSeconds属性值,这个对象就会过期,EHCache将把它从缓存中清除。只有当eternal属性为false,该属性才有效。如果该属性值为0,则表示对象可以无限期地存在于缓存中。timeToLiveSeconds必须大于timeToIdleSeconds属性,才有意义。 - maxElementsInMemory: 内存中最大缓存对象数;maxElementsInMemory界限
后,会把溢出的对象写到硬盘缓存中。注意:如果缓存的对象要写入到硬盘中的话,则该对象必须实现了Serializable接口才行 - memoryStoreEvictionPolicy: 当达到maxElementsInMemory限制时,Ehcache将会根
据指定的策略去清理内存。可选策略有:LRU(最近最少使用,默认策略)、FIFO(先进先出)、LFU(最少访问次数) - maxElementsOnDisk: 硬盘中最大缓存对象数,若是0表示无穷大
- overflowToDisk: 是否保存到磁盘,当系统宕机时
- diskPersistent: 是否缓存虚拟机重启期数据,是否持久化磁盘缓存,当这个属性的值为true时,系统在初始化时会在磁盘中查找文件名为cache名称,后缀名为index的文件,这个文件中存放了已经持久化在磁盘中的cache的index,找到后会把cache加载到内存,要想把cache真正持久化到磁盘,写程序时注意执行net.sf.ehcache.Cache.put(Element element)后要调用flush()方法。
- diskSpoolBufferSizeMB: 这个参数设置DiskStore(磁盘缓存)的缓存区大小。默认是30MB。每个Cache都应该有自己的一个缓冲区。
- diskExpiryThreadIntervalSeconds: 磁盘失效线程运行时间间隔,默认为120秒。
- clearOnFlush: 内存数量最大时是否清除。
在resources下新建ehcache.xml
xml
<?xml version="1.0" encoding="UTF-8"?>
<ehcache xmlns:xsi="http://www.w3.org/2001/XMLSchema-instance"
xsi:noNamespaceSchemaLocation="http://ehcache.org/ehcache.xsd"
updateCheck="false">
<!--
diskStore标签:指定一个文件目录,当EhCache把数据写到硬盘上时,
将把数据写到这个文件目录下
user.home : 用户主目录
user.dir : 用户当前工作目录
java.io.tmpdir : 这是 Java 虚拟机的默认临时文件路径。默认临时文件路径
例如,在 Windows 系统中可能是 C:\Users\[用户名]\AppData\Local\Temp\`
-->
<diskStore path="java.io.tmpdir/Tmp_EhCache"/>
<!--
1.name: 缓存名称
2.eternal: true表示对象永不过期,此时会忽略 timeToIdleSeconds和timeToLiveSeconds属性,默认为false
3.timeToIdleSeconds: 设定允许对象处于空闲状态的最长时间,以秒为单位。当对象自从最近一次被访问后,如果处于空闲状态的时间超过了。timeToIdleSeconds属性值,这个对象就会过期,EHCache将把它从缓存中清空。只有当eternal属性为false,该属性才有效。如果该属性值为0,则表示对象可以无限期地处于空闲状态
4.timeToLiveSeconds: 设定对象允许存在于缓存中的最长时间,以秒为单位。当对
象自从被存放到缓存中后,如果处于缓存中的时间超过了 timeToLiveSeconds属性值,这个对象就会过期,EHCache将把它从缓存中清除。只有当eternal属性为false,该属性才有效。如果该属性值为0,则表
示对象可以无限期地存在于缓存中。timeToLiveSeconds必须大于timeToIdleSeconds属性,才有意义
5.maxElementsInMemory: 内存中最大缓存对象数;maxElementsInMemory界限
后,会把溢出的对象写到硬盘缓存中。注意:如果缓存的对象要写入到硬盘中的话,则该对象必须实现了
Serializable接口才行
6.memoryStoreEvictionPolicy: 当达到maxElementsInMemory限制时,Ehcache将会根
据指定的策略去清理内存。可选策略有:LRU(最近最少使用,默认策略)、FIFO(先进先出)、LFU(最少访问次数)
7.maxElementsOnDisk: 硬盘中最大缓存对象数,若是0表示无穷大
8.overflowToDisk: 是否保存到磁盘,当系统宕机时
9.diskPersistent: 是否缓存虚拟机重启期数据,是否持久化磁盘缓存,当这个
属性的值为true时,系统在初始化时会在磁盘中查找文件名为cache名称,后缀名为index的文件,这个文件
中存放了已经持久化在磁盘中的cache的index,找到后会把cache加载到内存,要想把cache真正持久化到
磁盘,写程序时注意执行net.sf.ehcache.Cache.put(Element element)后要调用flush()方法
10.diskSpoolBufferSizeMB: 这个参数设置DiskStore(磁盘缓存)的缓存区大小。默
认是30MB。每个Cache都应该有自己的一个缓冲区
11.diskExpiryThreadIntervalSeconds: 磁盘失效线程运行时间间隔,默认为120秒
12.clearOnFlush: 内存数量最大时是否清除
-->
<!--defaultCache:默认缓存策略,当ehcache找不到定义的缓存时,则默认缓存策略-->
<defaultCache eternal="false" maxElementsInMemory="1000"
overflowToDisk="true" diskPersistent="true" timeToIdleSeconds="0"
timeToLiveSeconds="600" memoryStoreEvictionPolicy="LRU"/>
<cache
name="myCache"
eternal="false"
maxElementsInMemory="200"
overflowToDisk="false"
diskPersistent="true"
timeToIdleSeconds="0"
timeToLiveSeconds="300"
memoryStoreEvictionPolicy="LRU"/>
</ehcache>2.1.3 读取ehcache.xml文件
在application.properties配置中读取ehcache.xml文件
properties
#读取缓存配置文件
spring.cache.ehcache.config=classpath:ehcache.xml

#最后记得开启打印sql语句,方便测试,下面二选一
logging.level.com.hz.dao=debug
mybatis-plus.configuration.log-impl=org.apache.ibatis.logging.stdout.StdOutImpl
2.1.4 设置项目启动时使用缓存
java
@SpringBootApplication
@EnableCaching //开启缓存
public class Springboot1Application {
	public static void main(String[] args) {
		SpringApplication.run(Springboot1Application.class, args);
	}
}
2.1.5 序列化你的pojo层
pojo/dto/ResultJSON
java
package com.hsh.pojo.dto;

@Data
public class ResultJSON<T> implements Serializable {
    // ....
}
pojo/user
java
package com.hsh.pojo;

@Data
@TableName("smbms_user")
public class User implements Serializable {
    //....
}
2.2 缓存的使用
2.2.1 基本使用
在service层加上@Cacheable("myCache")这个myCache是指定上面的cache标签的name。如果不写使用<defaultCache/>
java
package com.hsh.service.impl;

@Service
public class UserServiceImpl extends ServiceImpl<UserMapper, User> implements UserService {

    @Autowired
    private UserMapper userMapper;
    @Override
    @Cacheable(value = "myCache", key = "#id")
    public ResultJSON<User> getUserById(Long id) {
        User user = userMapper.selectById(id);
        return ResultJSON.success(user);
    }
}访问http://localhost:8080/user/getUserById?id=1多次刷新
idea控制台日志只输出一次说明缓存使用成功。
2.2.2 @Cacheable注解使用
@Cacheable
可以标记在一个方法上,也可以标记在一个类上。当标记在一个方法上时表示该方法是支持缓存的,当标记在一个类上时则表示该类所有的方法都是支持缓存的。对于一个支持缓存的方法,Spring会在其被调用后将其返回值缓存起来,以保证下次利用同样的参数来执行该方法时可以直接从缓存中获取结果,而不需要再次执行该方法。该注解一般用在service层上
@Cacheable可以指定三个属性,value、key和condition
key= "#id"的作用
key = "#id"是一个 SpEL(Spring Expression Language)表达式,它指定了缓存项的唯一标识符(缓存键)。具体作用是:- #id:表示使用该方法入参中的 id的值作为缓存键。
- 例如,当你调用 getUserById(123L)时,Spring 会以 123为键,将查询到的 User对象存储在名为 "myCache"的缓存区域中。
- 下次再调用 getUserById(123L),Spring 会先检查 "myCache"缓存区域中是否存在键为 123的数据。如果存在,则直接返回该缓存数据,不再执行 userMapper.selectById(id)和数据库查询。
condition(缓存条件):方法执行前判断,满足条件才缓存
java
@Cacheable("myCache1")//Cache是发生在ehcache.xml中myCache1上的
public User find(Integer id) {
....
}
@Cacheable({"cache1", "cache2"})//Cache是发生在ehcache.xml中cache1和cache2上的
public User find(Integer id) {
.....
}
//自定义策略是指我们可以通过Spring的EL表达式来指定我们的key
//#id指参数id作为key
@Cacheable(value="myCache1", key="#id")
public User find(Integer id) {
...
}
//#p0标识第一个参数作为key
@Cacheable(value="myCache1", key="#p0")
public User find(Integer id) {
.....
}
//#user.user_id表示对象user属性user_id作为key
@Cacheable(value="myCache1", key="#user.user_id")
public User find(User user) {
.....
}
@Cacheable(value="myCache1", key="#p0.user_id")
public User find(User user) {
.....
}
Spring还为我们提供了一个root对象可以用来生成key
| 示例 | 描述 |
|---|---|
| #root.methodName | 当前方法名 |
| #root.method.name | 当前方法 |
| #root.target | 当前被调用的对象 |
| #root.targetClass | 当前被调用的对象的class |
| #root.args0 | 当前方法参数组成的数组 |
| #root.caches0.name | 当前被调用的方法使用的Cache |
java
//表示只有当user的id为偶数时才会进行缓存
@Cacheable(value={"users"}, key="#user.id", condition="#user.id%2==0")
public User find(User user) {
...
}
2.2.2 @CachePut
使用@CachePut时我们可以指定的属性跟@Cacheable是一样的
@Cacheable不同的是使用@CachePut标注的方法在执行前不会去检查缓存中是否存在之前执行过的结果,而是每次都会执行该方法,并将执行结果以键值对的形式存入指定的缓存中
2.2.3 @CacheEvict
@CacheEvict 清除缓存
可以指定的属性有value、key、condition、allEntries、beforeInvocation
java
@CacheEvict(value="myCache",key="#p0.user_id")
public int updUser(SfUser user) throws Exception {
	return sfUserMapper.updUser(user);
}
// allEntries是boolean类型,表示是否需要清除缓存中的所有元素。默认为false,表示不需要。当指定了。
// allEntries为true时,Spring Cache将忽略指定的key。
// 有的时候我们需要Cache一下清除所有的元素,这比一个一个清除元素更有效率。
@CacheEvict(value="users", allEntries=true)
public void delete(Integer id) {
	System.out.println("delete user by id: " + id);
}
3 SpringBoot+Redis使用
当我们的应用程序需要频繁地读取和写入数据时,为了提高应用程序的性能,我们通常会使用缓存技术。Spring Boot 提供了一种简单而强大的缓存框架,它可以轻松地将数据缓存到 Redis 中。
在 Spring Boot 中可以在方法上简单的加上注解实现缓存。
3.1 Redis 缓存配置
3.1.1 引入依赖
首先,您需要在您的项目中添加 Redis 的依赖。您可以将以下依赖添加到您的项目的 pom.xml 文件中:
xml
<dependency>
	<groupId>org.springframework.boot</groupId>
	<artifactId>spring-boot-starter-data-redis</artifactId>
</dependency>
3.1.2 yml添加配置
一旦 Redis 的依赖被添加,您需要配置 Redis 的相关信息。以下是一个示例 Redis 配置:
yml
spring:
  redis:
    host: 127.0.0.1
    port: 6379
    password:
    database: 0
在上述配置文件中,host 和 port 属性指定了 Redis 服务器的主机名和端口号,password 属性用于指定 Redis 服务器的密码(如果有的话),而 database 属性则指定了 Redis 服务器使用的数据库编号。
3.1.3 序列化
Redis 的默认序列化器是 JdkSerializationRedisSerializer,但是在实际使用中,由于其序列化后的大小通常比较大,因此我们通常使用 StringRedisSerializer 或者 Jackson2JsonRedisSerializer 将缓存值序列化为字符串或者 JSON 格式。以下是一个自定义序列化器的示例:
java
package com.hsh.config;

@Configuration
public class RedisConfig {
    /**
     * redisTemplate 默认使用JDK的序列化机制, 存储二进制字节码, 所以自定义序列化类
     * @param redisConnectionFactory redis连接工厂类
     * @return RedisTemplate
     */
    @Bean
    public RedisTemplate<Object, Object> redisTemplate(RedisConnectionFactory redisConnectionFactory) {
        RedisTemplate<Object, Object> redisTemplate = new RedisTemplate<>();
        redisTemplate.setConnectionFactory(redisConnectionFactory);
        // 使用Jackson2JsonRedisSerialize 替换默认序列化
        Jackson2JsonRedisSerializer jackson2JsonRedisSerializer = new Jackson2JsonRedisSerializer(Object.class);

        ObjectMapper objectMapper = new ObjectMapper();
        objectMapper.setVisibility(PropertyAccessor.ALL,JsonAutoDetect.Visibility.ANY);
        objectMapper.enableDefaultTyping(ObjectMapper.DefaultTyping.NON_FINAL);
        jackson2JsonRedisSerializer.setObjectMapper(objectMapper);
        // 设置value的序列化规则和 key的序列化规则
        redisTemplate.setKeySerializer(new StringRedisSerializer());
        redisTemplate.setValueSerializer(jackson2JsonRedisSerializer);
        redisTemplate.afterPropertiesSet();
        return redisTemplate;
    }
}
在此示例中,我们通过自定义 Bean 配置了 RedisTemplate,使用 StringRedisSerializer 序列化 Redis键,并使用 Jackson2JsonRedisSerializer 序列化 Redis 值为 JSON 格式。
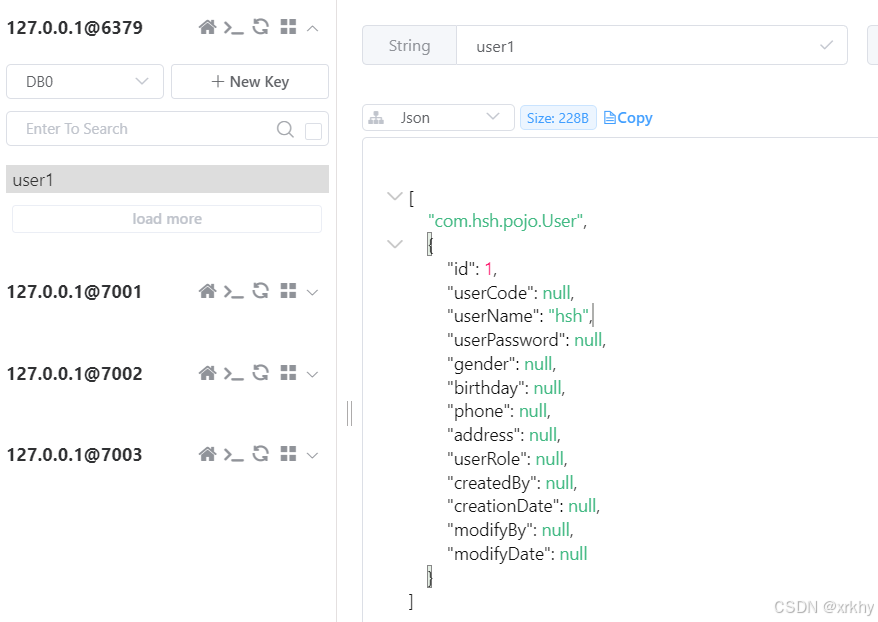
可以再测试类中验证使用一下
java
package com.hsh;

@SpringBootTest
class CacheApplicationTests {
    @Autowired
    private RedisTemplate<Object, Object> redisTemplate;

    @Test
    void contextLoads() {
        User user = new User();
        user.setId(1L);
        user.setUserName("hsh");
        redisTemplate.opsForValue().set("user1", user);
        System.out.println(redisTemplate.opsForValue().get("user1"));
    }
}
打开redis可视化工具查看。
3.2 Cacheable 注解
我们知道上面ehcache已经使用@Cacheable注解了,此时这个Redis也使用了这个注解。idea
可能会报错,如果报错解决办法:将上面引入的
spring-boot-starter-cache和ehcache的依赖注释掉就行。
使用 Cacheable 注解来标记需要进行缓存的方法。以下是一个具有 Cacheable 注解的示例方法:同样还是在service实现类的方法上编写。
java
package com.hsh.service.impl;

@Service
public class UserServiceImpl extends ServiceImpl<UserMapper, User> implements UserService {
    @Autowired
    private UserMapper userMapper;
    @Override
    @Cacheable(value = "users")
    public ResultJSON<User> getUserById(Long id) {
        User user = userMapper.selectById(id);
        return ResultJSON.success(user);
    }
}访问http://localhost:8080/user/getUserById?id=1。
打开Redis的可视化窗口查看。
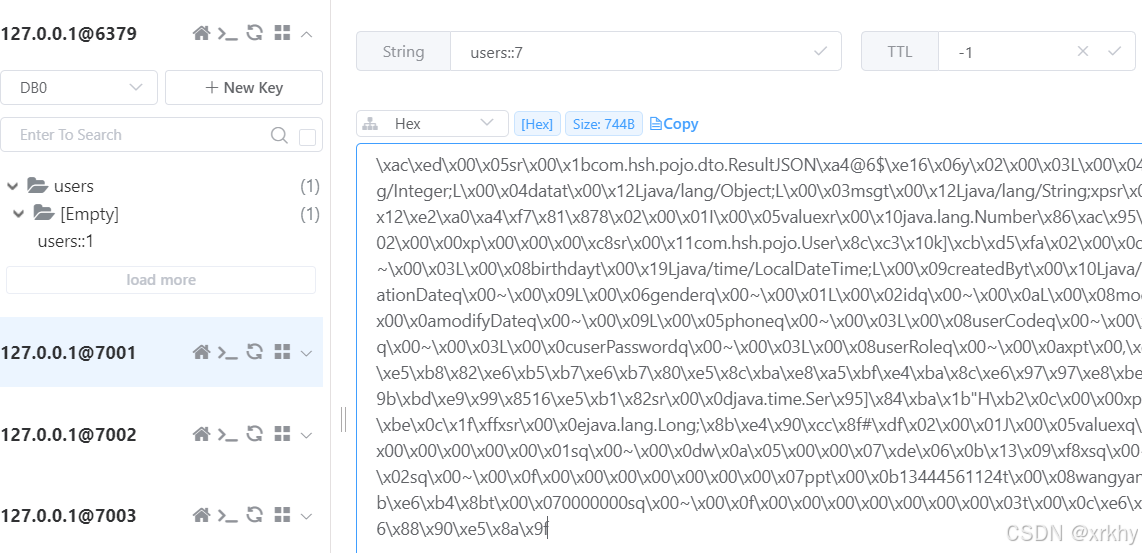
在这个例子中,@Cacheable 注解用于标记 getUserById 方法,而 value 属性则用于指定缓存的存储区域的名称。由于我们正在使用 Redis 作为缓存,因此 Redis 中的 key 将由 Cacheable 注解中的 key 属性指定。在此示例中,key 属性设置为 "#id",这意味着我们将使用方法参数 id 作为 Redis 缓存的键。
3.3 多参数 Cacheable 注解
在某些情况下,我们需要以多个参数作为 key 来缓存数据。此时,我们可以对 key 属性使用表达式language(SpEL)来设置多个参数:
java
@Servicepublic class UserService {
@Cacheable(value = "users", key = "#id + '_' + #name")
	public User getUserByIdAndName(Long id, String name) {
		// 查询用户并返回
	}
}
在上述示例中,我们使用了表达式语言(SpEL)将 id 和 name 两个参数组合成了一个 Redis 缓存键。
3.4 缓存的清除 @CacheEvict
有时候,您需要清除 Redis 缓存中的某些数据,以便在下一次访问时重建缓存。在 Spring Boot 中,可以使用 @CacheEvict 注解来清除 Redis 缓存中的数据。以下是一个使用 @CacheEvict 注解的示例:
java
@Servicepublic class UserService {
	@Cacheable(value = "users", key = "#id")
	public User getUserById(Long id) {
		// 查询用户并返回
	}
	@CacheEvict(value = "users", key = "#id")
	public void deleteUserById(Long id) {
		// 删除用户并返回
	}
	@CacheEvict(value = "users", allEntries = true)
	public void deleteAllUsers() {
		// 删除所有用户并返回
	}
}
在此示例中,我们添加了删除单个用户和删除所有用户的两个方法,使用 @CacheEvict 注解来删除Redis 缓存中的相应数据。请注意,我们设置了 allEntries 属性为 true,以删除所有缓存中的数据。
3.5 yml配置
yml
spring:
  cache:
    type: redis
    redis:
    cache-names: userCache,providerCache #缓存名称列表
      cache-null-values: false #查询结果为 null 不进行缓存
      time-to-live: 90000ms #缓存毫秒 设置过期时间
      use-key-prefix: true #配置key的前缀 如果指定了前缀,就用指定的,如果没有,就默认使用缓存的名字作为前缀
下面90秒后消失。
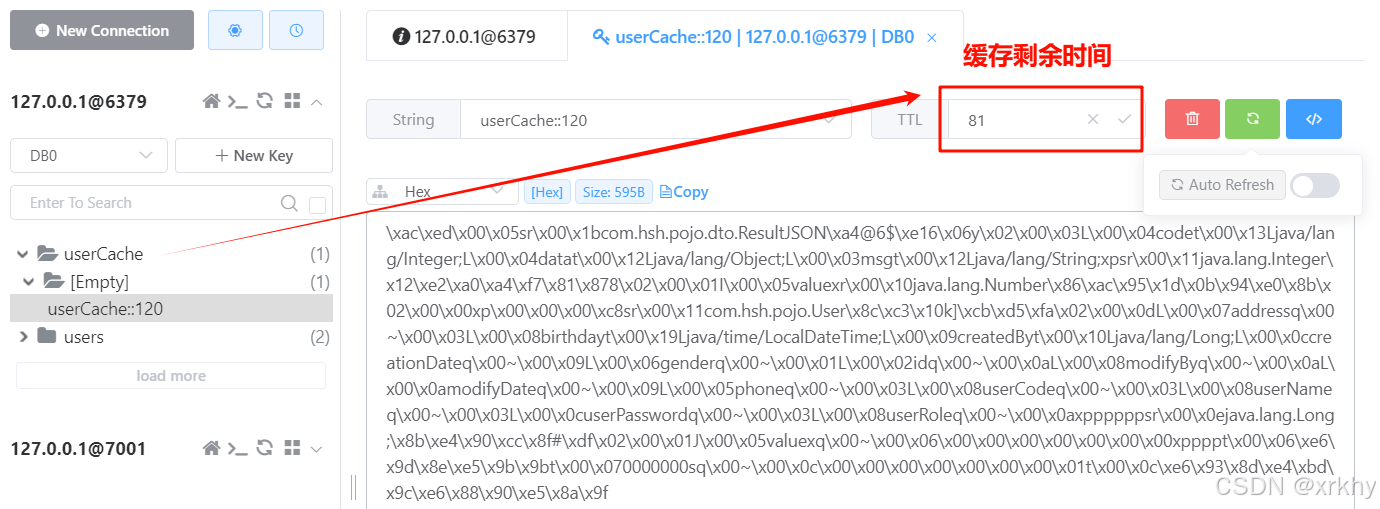
3.6 缓存管理
上面的3.5yml配置的方式有问题,我们所有的@Cacheable(cacheNames = "userCache", key = "#id")都是90秒。我们希望在写@Cacheable是自定义缓存时间。即最终我们期望的使用方式如下。
java
@Cacheable(cacheNames = "demoCache#3600", key = "#id")通过 # 分隔,后面部分表示此 Cache 的TTL(单位:秒)
下面来写代码演示
演示之前记得把yml中的配置删除。
3.6.1 编写MyRedisCacheManager配置类
编写MyRedisCacheManager 类,给下面的CacheConfig类中的cacheManager方法使用。MyRedisCacheManager这个类只是把字符串中的时间给拆了出来。
java
package com.hsh.config;

public class MyRedisCacheManager extends RedisCacheManager {
    public MyRedisCacheManager(RedisCacheWriter cacheWriter,
                               RedisCacheConfiguration defaultCacheConfiguration) {
        super(cacheWriter, defaultCacheConfiguration);
    }
    @Override
    protected RedisCache createRedisCache(String name, RedisCacheConfiguration
            cacheConfig) {
        String[] array = StringUtils.delimitedListToStringArray(name, "#");
        name = array[0];
        if (array.length > 1) { // 解析TTL
            long ttl = Long.parseLong(array[1]);
            cacheConfig = cacheConfig.entryTtl(Duration.ofSeconds(ttl)); // 注意单位我此处用的是秒,而非毫秒
        }
        return super.createRedisCache(name, cacheConfig);
    }
}
3.6.2 编写CacheConfig
java
package com.hsh.config;
// @EnableCaching已经在启动类配置过这里不用配置了。
//@EnableCaching // 使用了CacheManager,别忘了开启它 否则无效
@Configuration
public class CacheConfig extends CachingConfigurerSupport {
    @Bean
    public CacheManager cacheManager() {
    	// entryTtl(Duration.ofDays(1))是今天有效
        RedisCacheConfiguration defaultCacheConfig =
                RedisCacheConfiguration.defaultCacheConfig()
                        .entryTtl(Duration.ofDays(1))
                        .computePrefixWith(cacheName -> "caching:" + cacheName);
        MyRedisCacheManager redisCacheManager = new MyRedisCacheManager(RedisCacheWriter.nonLockingRedisCacheWriter(redisConnectionFactory()), defaultCacheConfig);
        return redisCacheManager;
    }

    @Bean
    public RedisConnectionFactory redisConnectionFactory() {
        RedisStandaloneConfiguration configuration = new
                RedisStandaloneConfiguration();
        configuration.setHostName("127.0.0.1");
        configuration.setPort(6379);
        configuration.setDatabase(0);
        configuration.setPassword("123456");
        LettuceConnectionFactory factory = new
                LettuceConnectionFactory(configuration);
        return factory;
    }

    // 下面这个序列化可以不写,因为我们已经在RedisConfig这个类中配置过了序列化
    //@Bean
    //public RedisTemplate<String, String> redisTemplate() {
    //    RedisTemplate<String, String> redisTemplate = new StringRedisTemplate();
    //    redisTemplate.setConnectionFactory(redisConnectionFactory());
    //    return redisTemplate;
    //}
}
3.6.3 演示
java
package com.hsh.service.impl;

@Service
public class UserServiceImpl extends ServiceImpl<UserMapper, User> implements UserService {

    @Autowired
    private UserMapper userMapper;
    // 注意这里必须使用@Cacheable的属性cacheNames 且我们设置的单位是秒。
    @Override
    @Cacheable(cacheNames = "userCache#30", key = "#id")
    public ResultJSON<User> getUserById(Long id) {
        User user = userMapper.selectById(id);
        return ResultJSON.success(user);
    }
}