什么是微服务
用控制器来完成集群的工作负载,那么应用如何暴漏出去?需要通过微服务暴漏出去后才能被访问
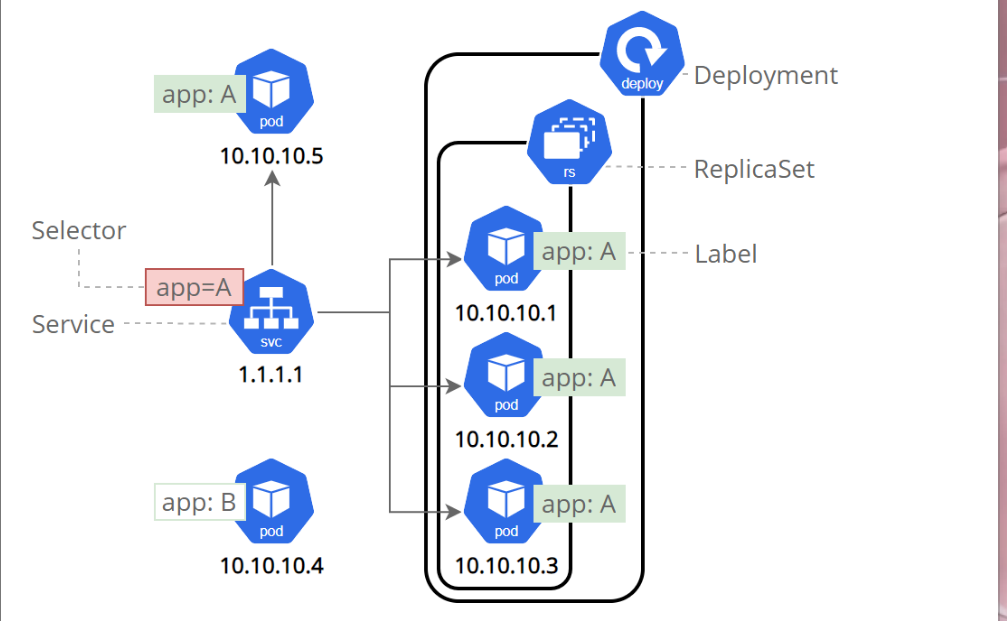
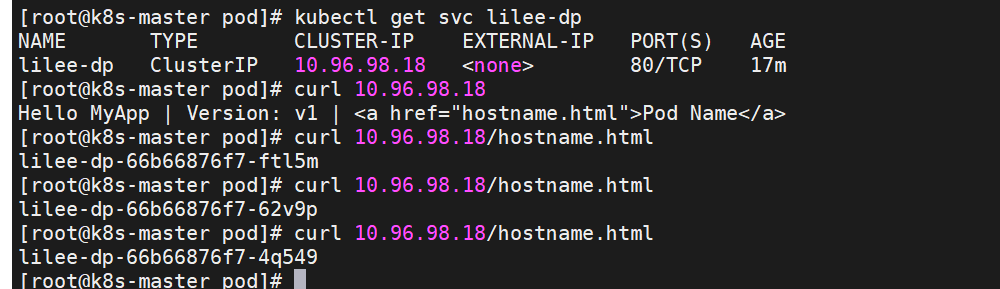
- Service是一组提供相同服务的Pod对外开放的接口。
- 借助Service,应用可以实现服务发现和负载均衡。
- sericev默认只支持4层负载均衡能力,没有7层功能。(可以通过Ingress实现)

微服务的类型
| 微服务类型 | 作用描述 |
|---|---|
| ClusterIP | 默认值,k8s系统给service自动分配的虚拟IP,只能在集群内部访问 |
| NodePort | 将Service通过指定的Node上的端口暴露给外部,访问任意一个NodeIP:nodePort都将路由到ClusterIP |
| LoadBalancer | 在NodePort的基础上,借助cloud provider创建一个外部的负载均衡器,并将请求转发到 NodeIP:NodePort,此模式只能在云服务器上使用 |
| ExternalName | 将服务通过 DNS CNAME 记录方式转发到指定的域名(通过 spec.externlName 设定 |

三 ipvs模式
-
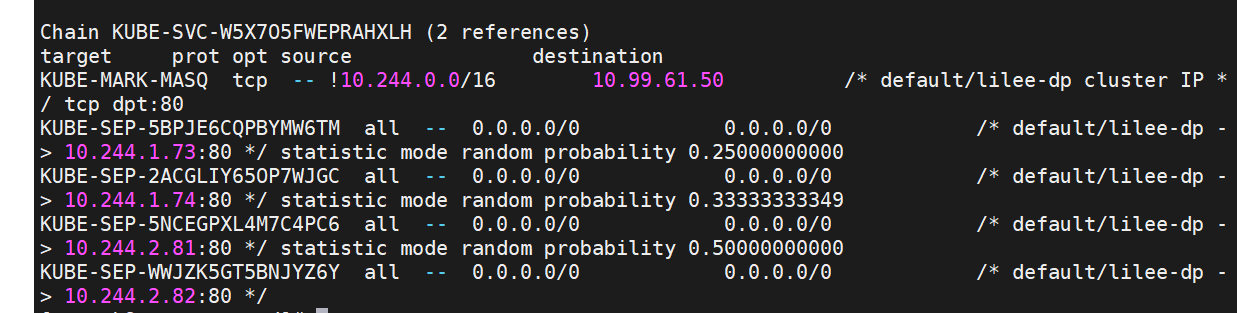
Service 是由 kube-proxy 组件,加上 iptables 来共同实现的
-
kube-proxy 通过 iptables 处理 Service 的过程,需要在宿主机上设置相当多的 iptables 规则,如果宿主机有大量的Pod,不断刷新iptables规则,会消耗大量的CPU资源
-
IPVS模式的service,可以使K8s集群支持更多量级的Pod
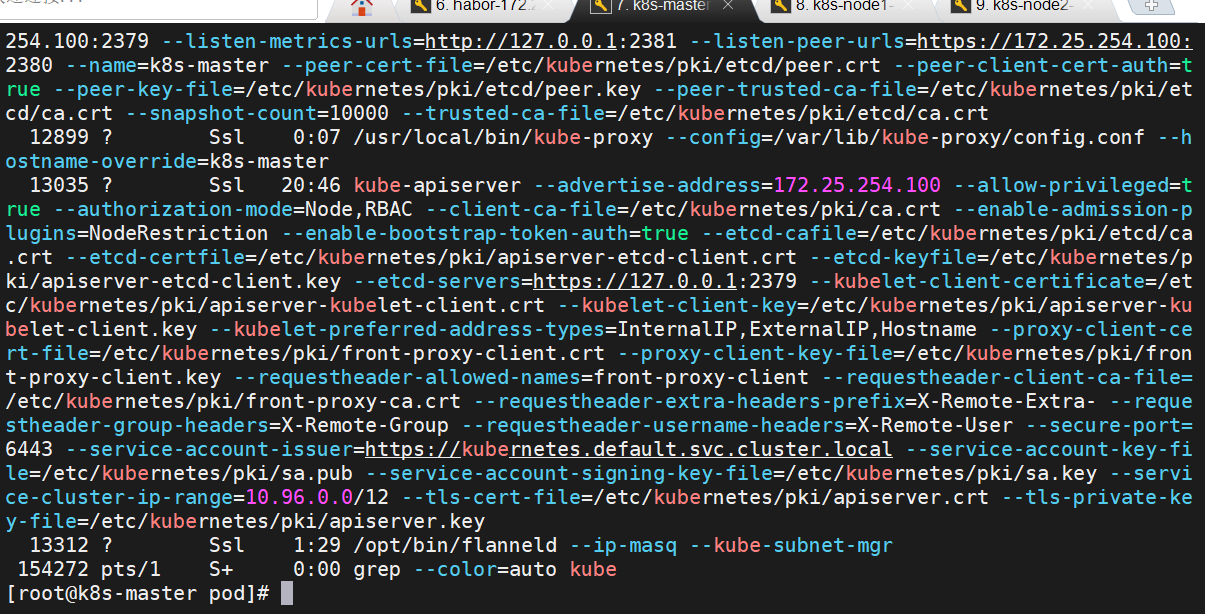
ps -ef | grep kube
3.1 ipvs模式配置方式
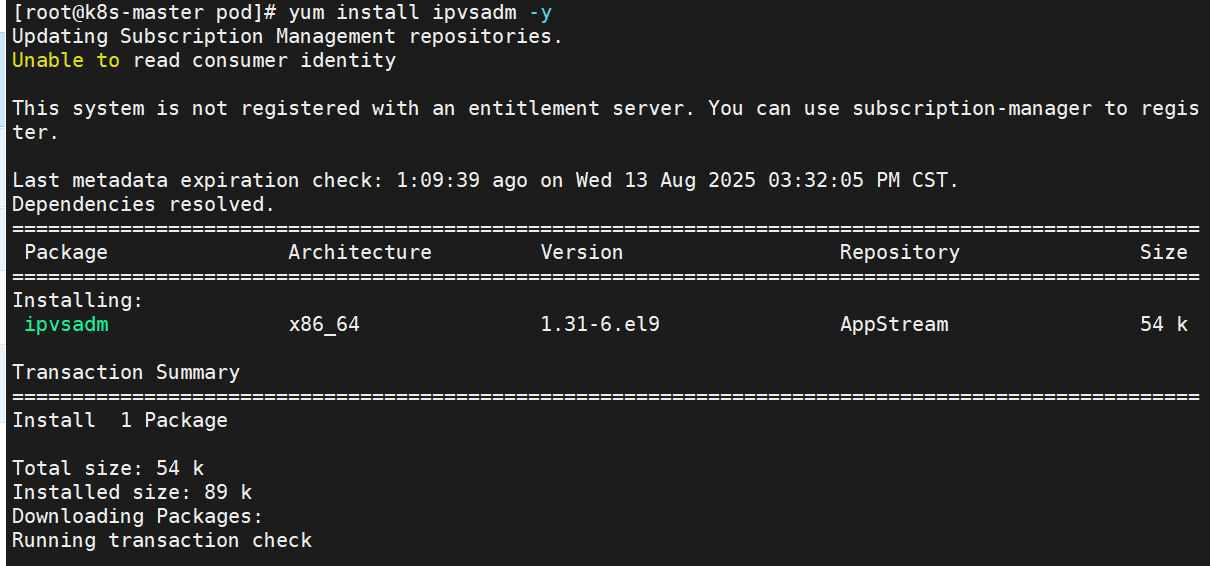
1 在所有节点中安装ipvsadm
root@k8s-所有节点 podyum install ipvsadm --y
root@k8s-master pod# ps ax | grep kube
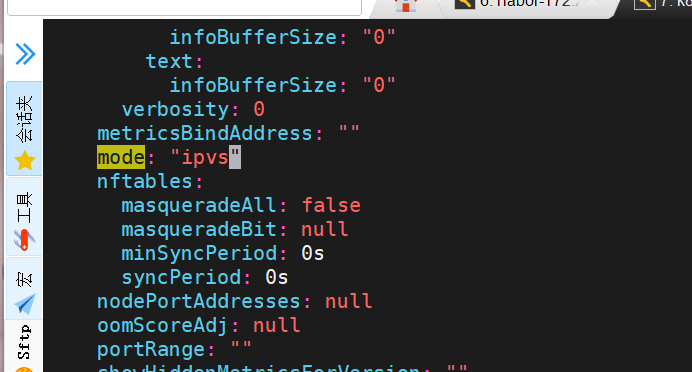
2 修改master节点的代理配置
root@k8s-master \~# kubectl -n kube-system edit cm kube-proxy
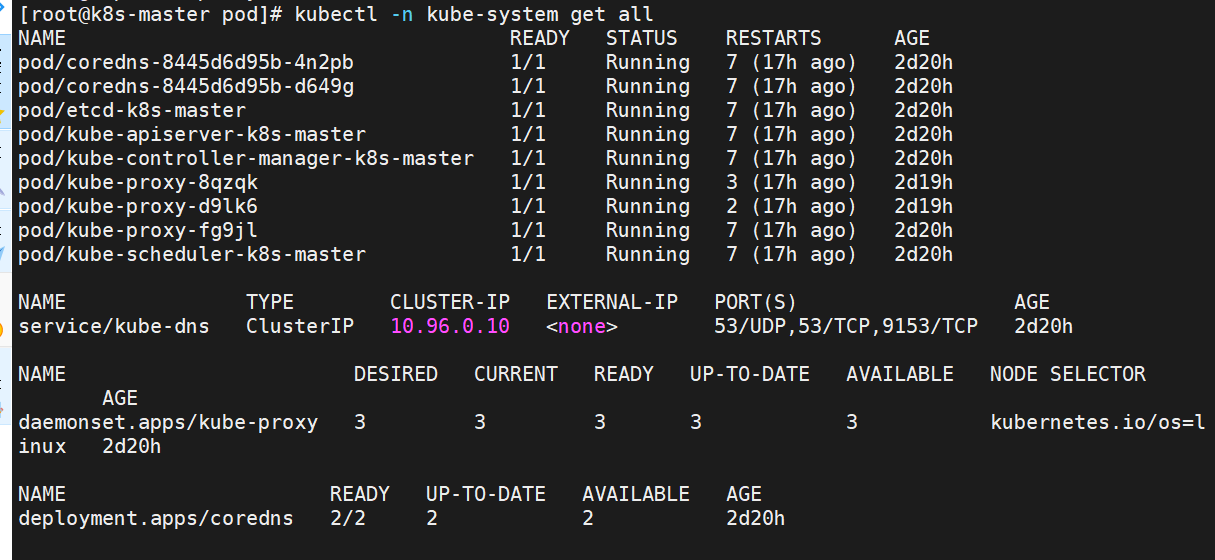
3 重启pod,在pod运行时配置文件中采用默认配置,当改变配置文件后已经运行的pod状态不会变化,所以要重启pod
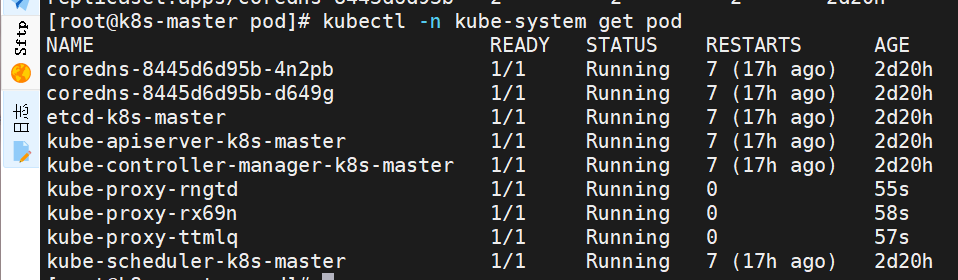
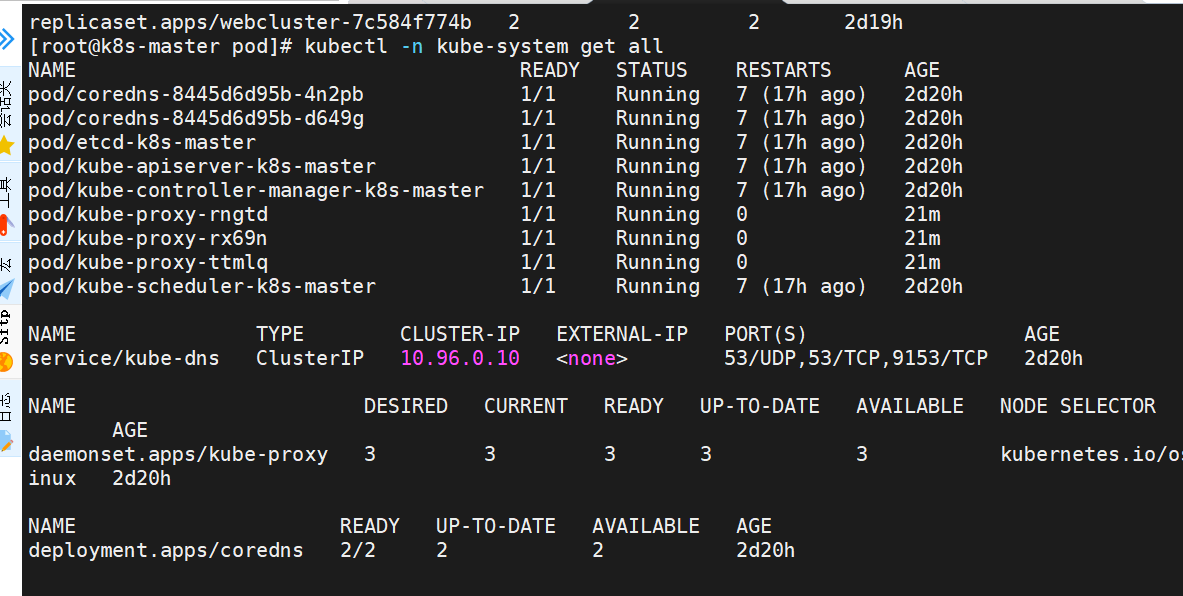
root@k8s-master pod# kubectl -n kube-system get all
root@k8s-master pod# kubectl -n kube-system get pod | awk '/proxy/{system("kubectl -n kube-system delete pods "$1)}'

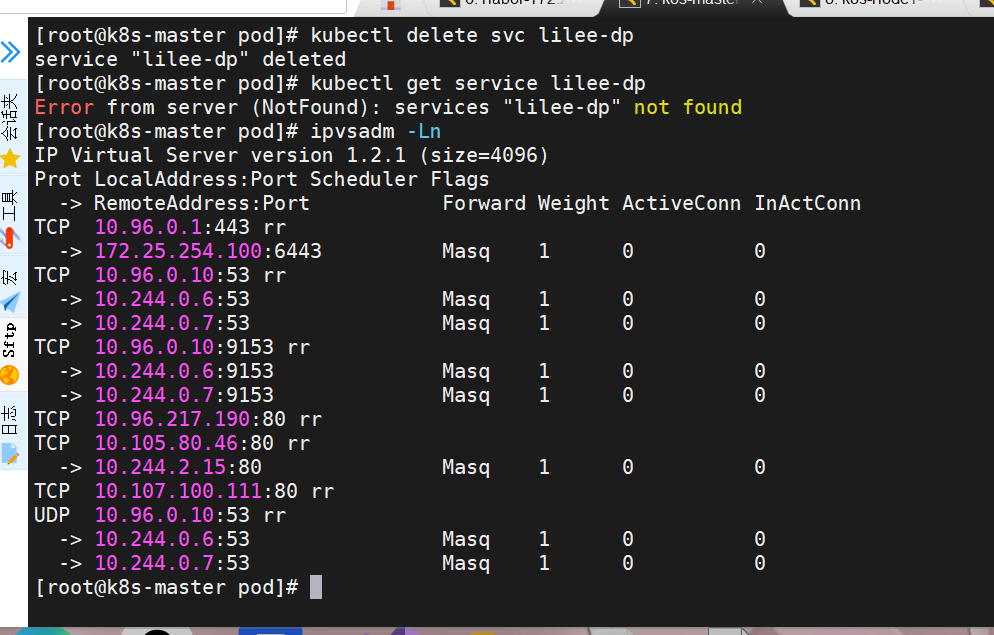
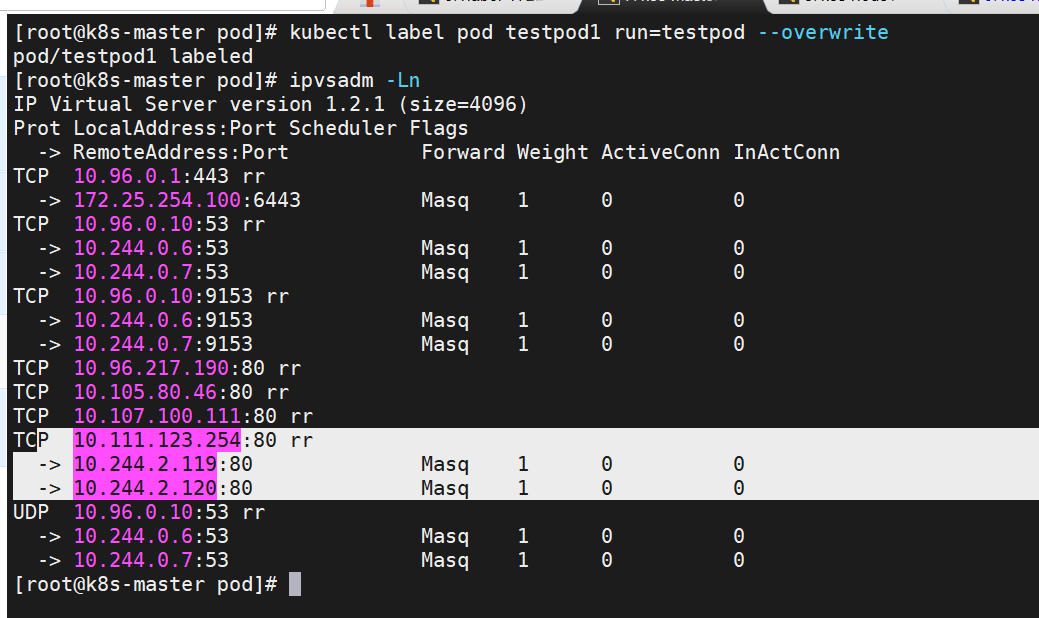
 root@k8s-master pod# ipvsadm -Ln

!NOTE
切换ipvs模式后,kube-proxy会在宿主机上添加一个虚拟网卡:kube-ipvs0,并分配所有service IP
[root@k8s-master ~]# ip a | tail
 inet6 fe80::c4fb:e9ff:feee:7d32/64 scope link
    valid_lft forever preferred_lft forever
8: kube-ipvs0: <BROADCAST,NOARP> mtu 1500 qdisc noop state DOWN group default
 link/ether fe:9f:c8:5d:a6:c8 brd ff:ff:ff:ff:ff:ff
 inet 10.96.0.10/32 scope global kube-ipvs0
    valid_lft forever preferred_lft forever
 inet 10.96.0.1/32 scope global kube-ipvs0
    valid_lft forever preferred_lft forever
 inet 10.97.59.25/32 scope global kube-ipvs0
    valid_lft forever preferred_lft forever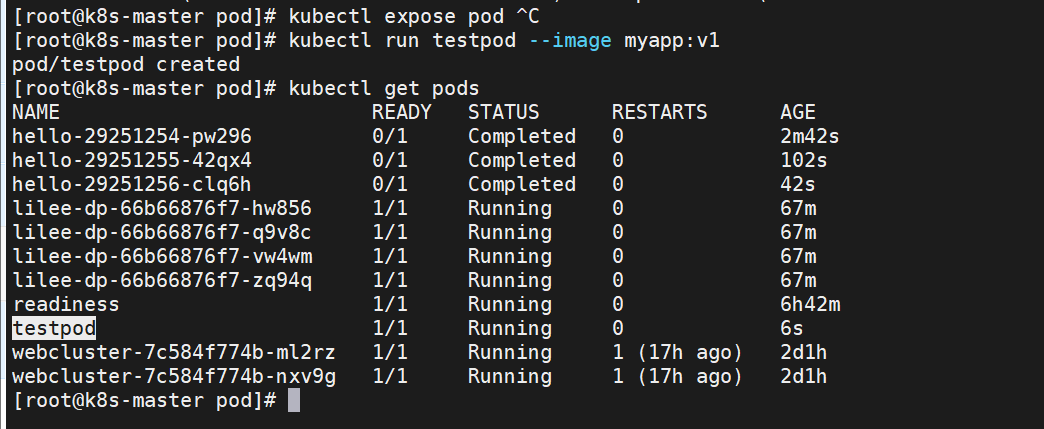

微服务类型详解
clusterip
特点:
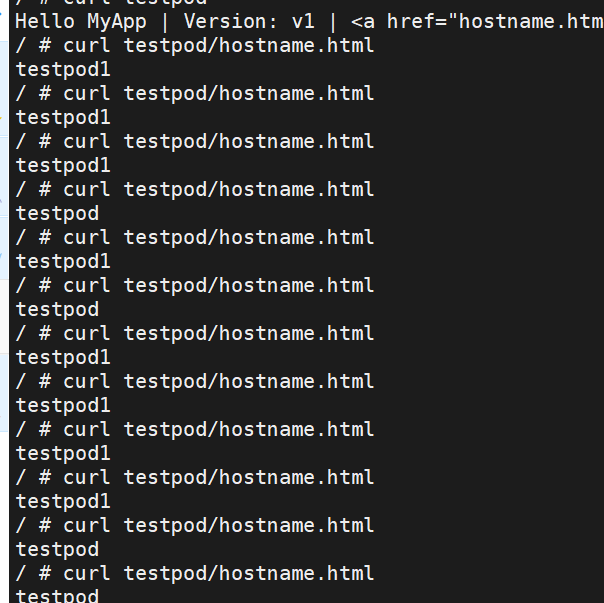
clusterip模式只能在集群内访问,并对集群内的pod提供健康检测和自动发现功能
示例:
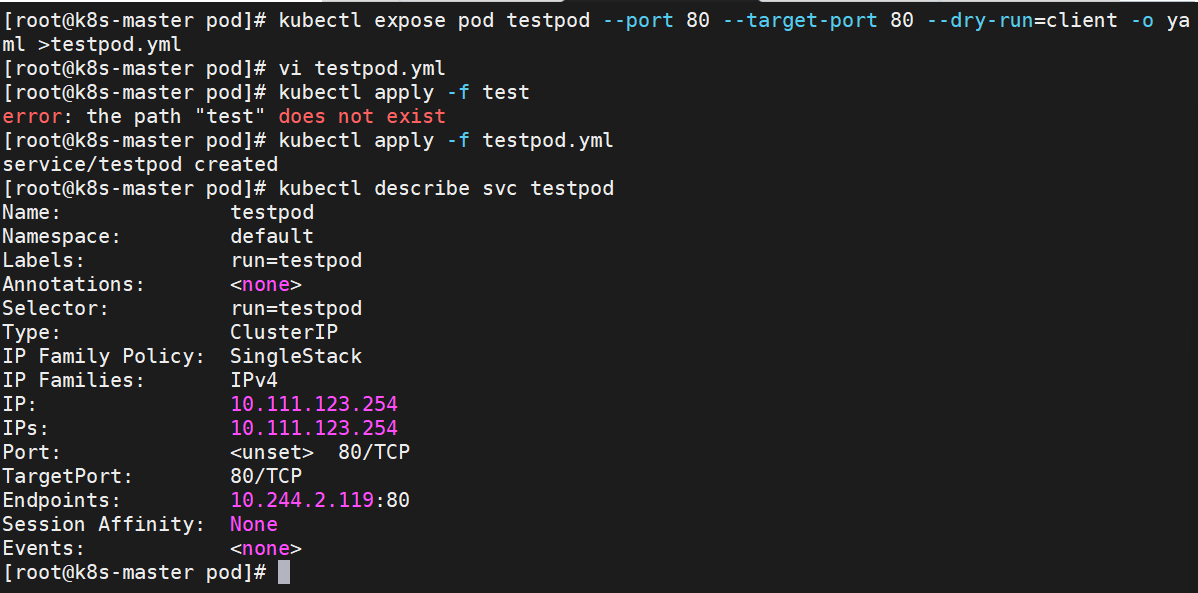
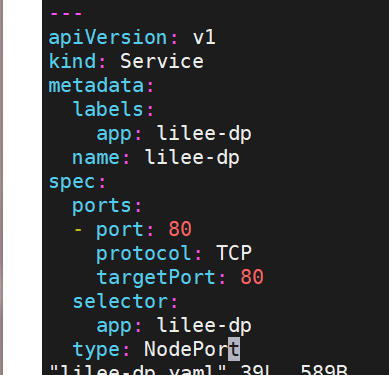
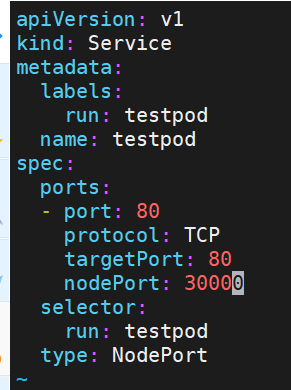
apiVersion: v1
kind: Service
metadata:
  labels:
    run: testpod
  name: testpod
spec:
  ports:
  - port: 80
    protocol: TCP
    targetPort: 80
  selector:
    run: testpod
  type: ClusterIP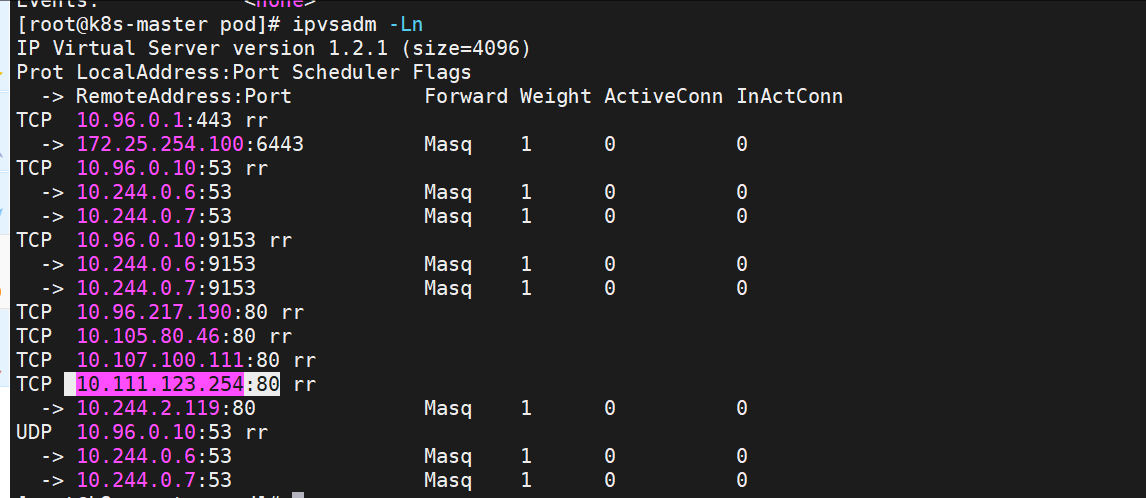
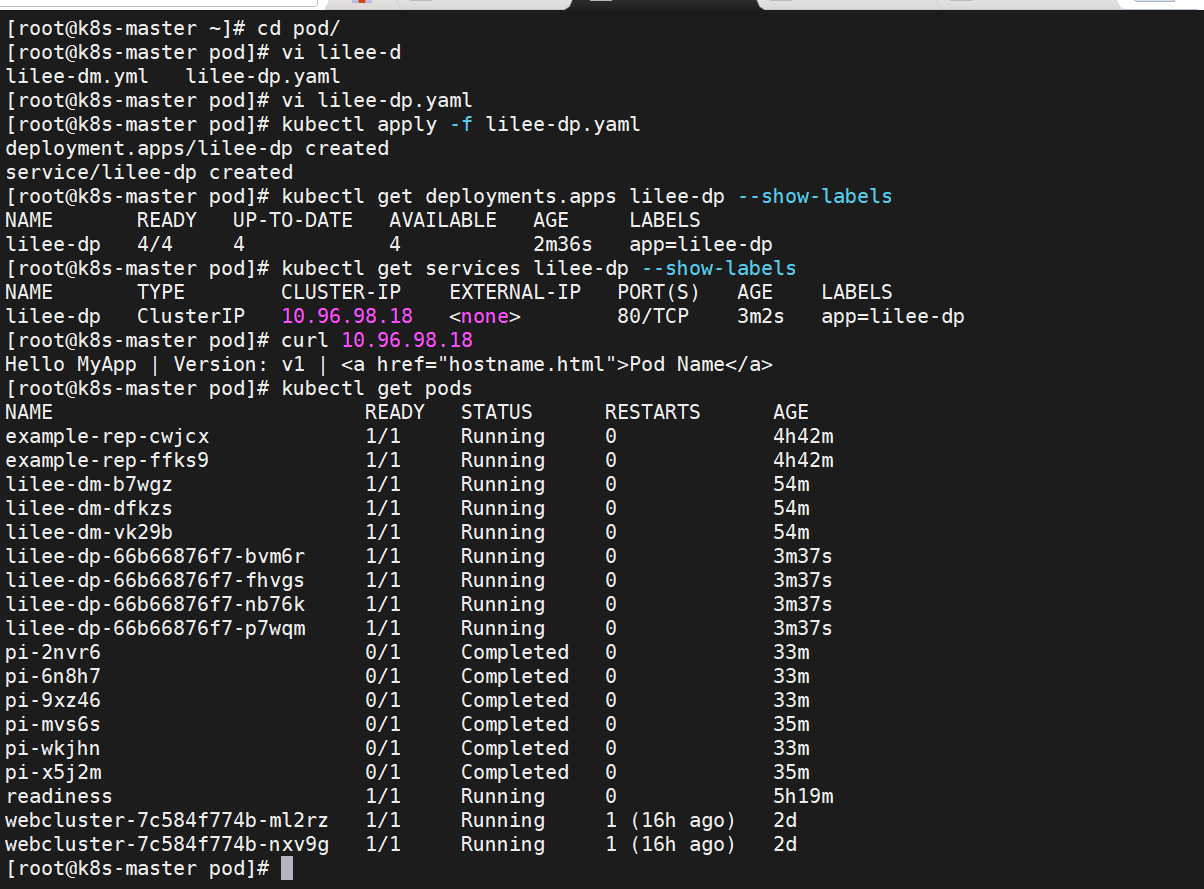
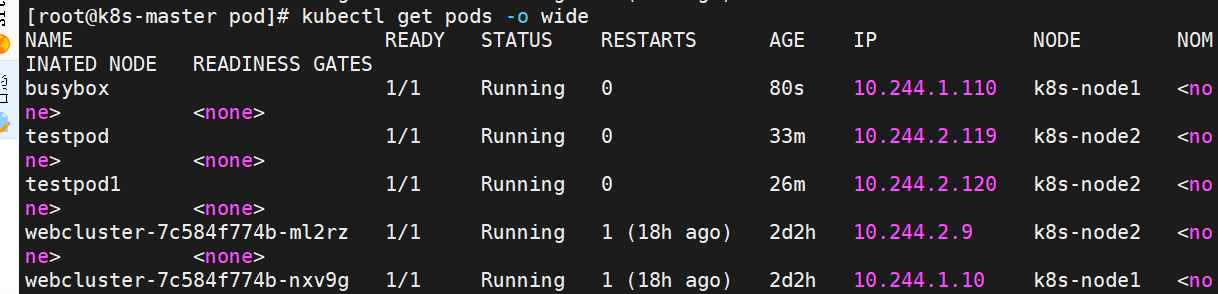
root@k8s-master pod# kubectl run testpod1 --image myapp:v1
pod/testpod1 created
root@k8s-master pod# kubectl get pods --show-labels
root@k8s-master pod# kubectl label pod testpod1 run=testpod --overwrite
自动发现
root@k8s-master pod# kubectl -n kube-system get all
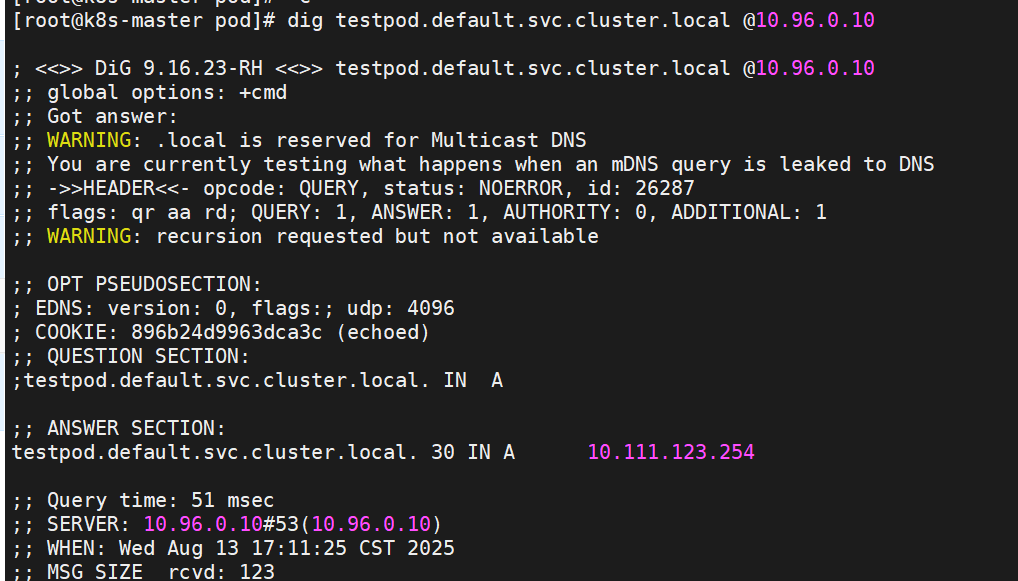
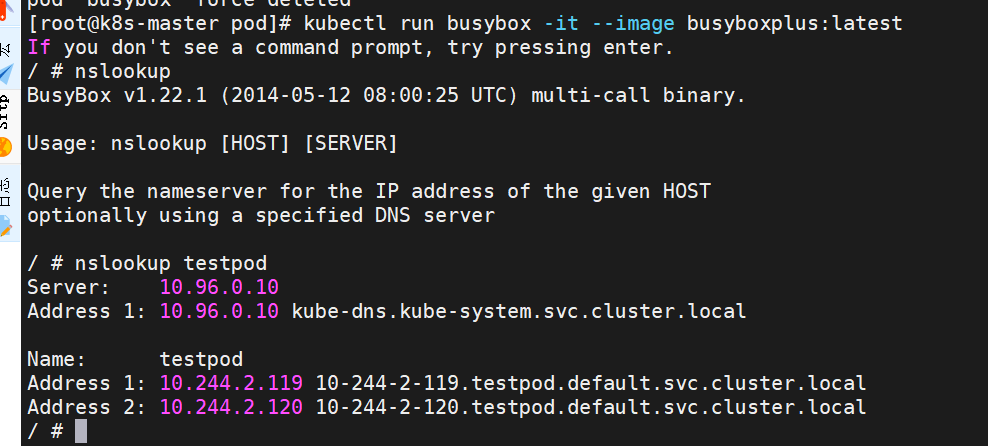
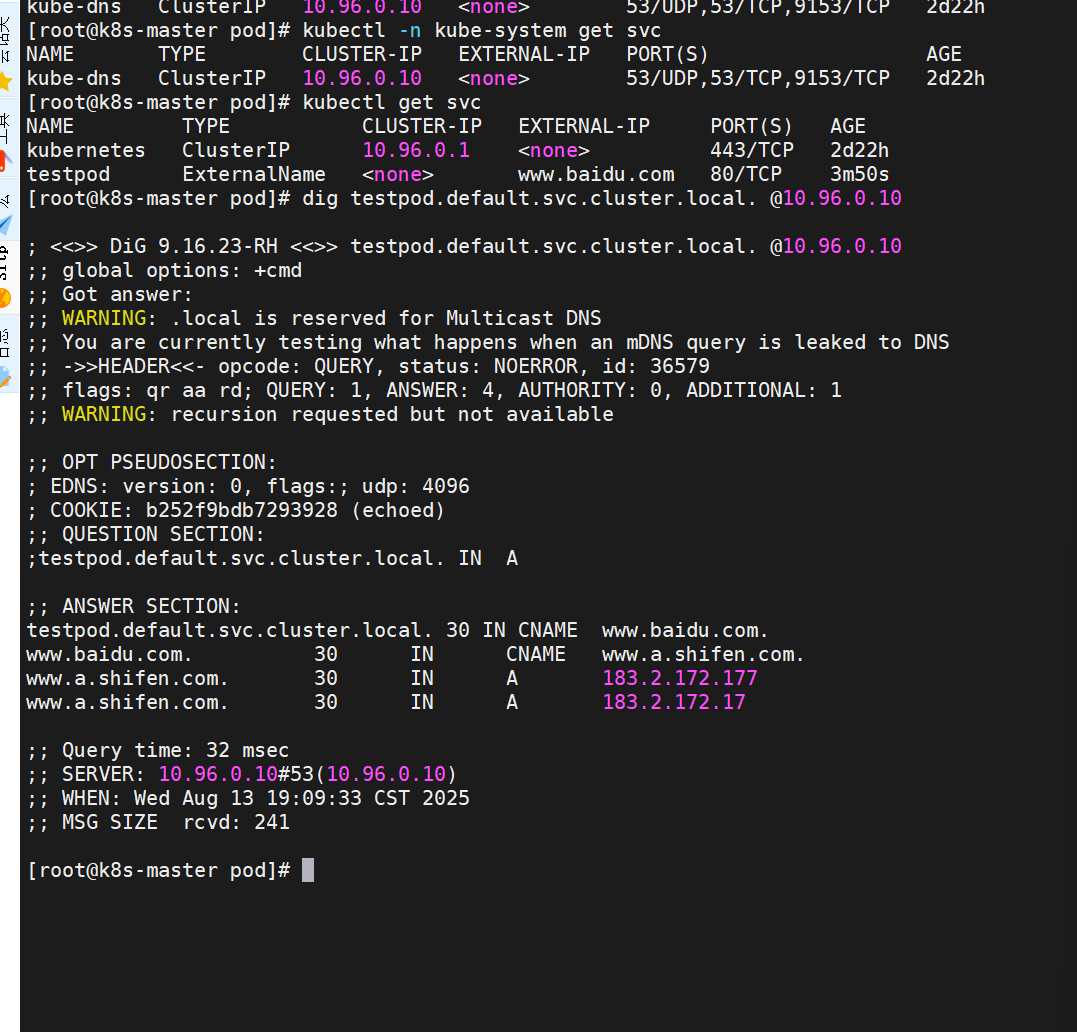
root@k8s-master pod# dig testpod.default.svc.cluster.local @10.96.0.10
root@k8s-master pod# kubectl run busybox -it --image busyboxplus:latest

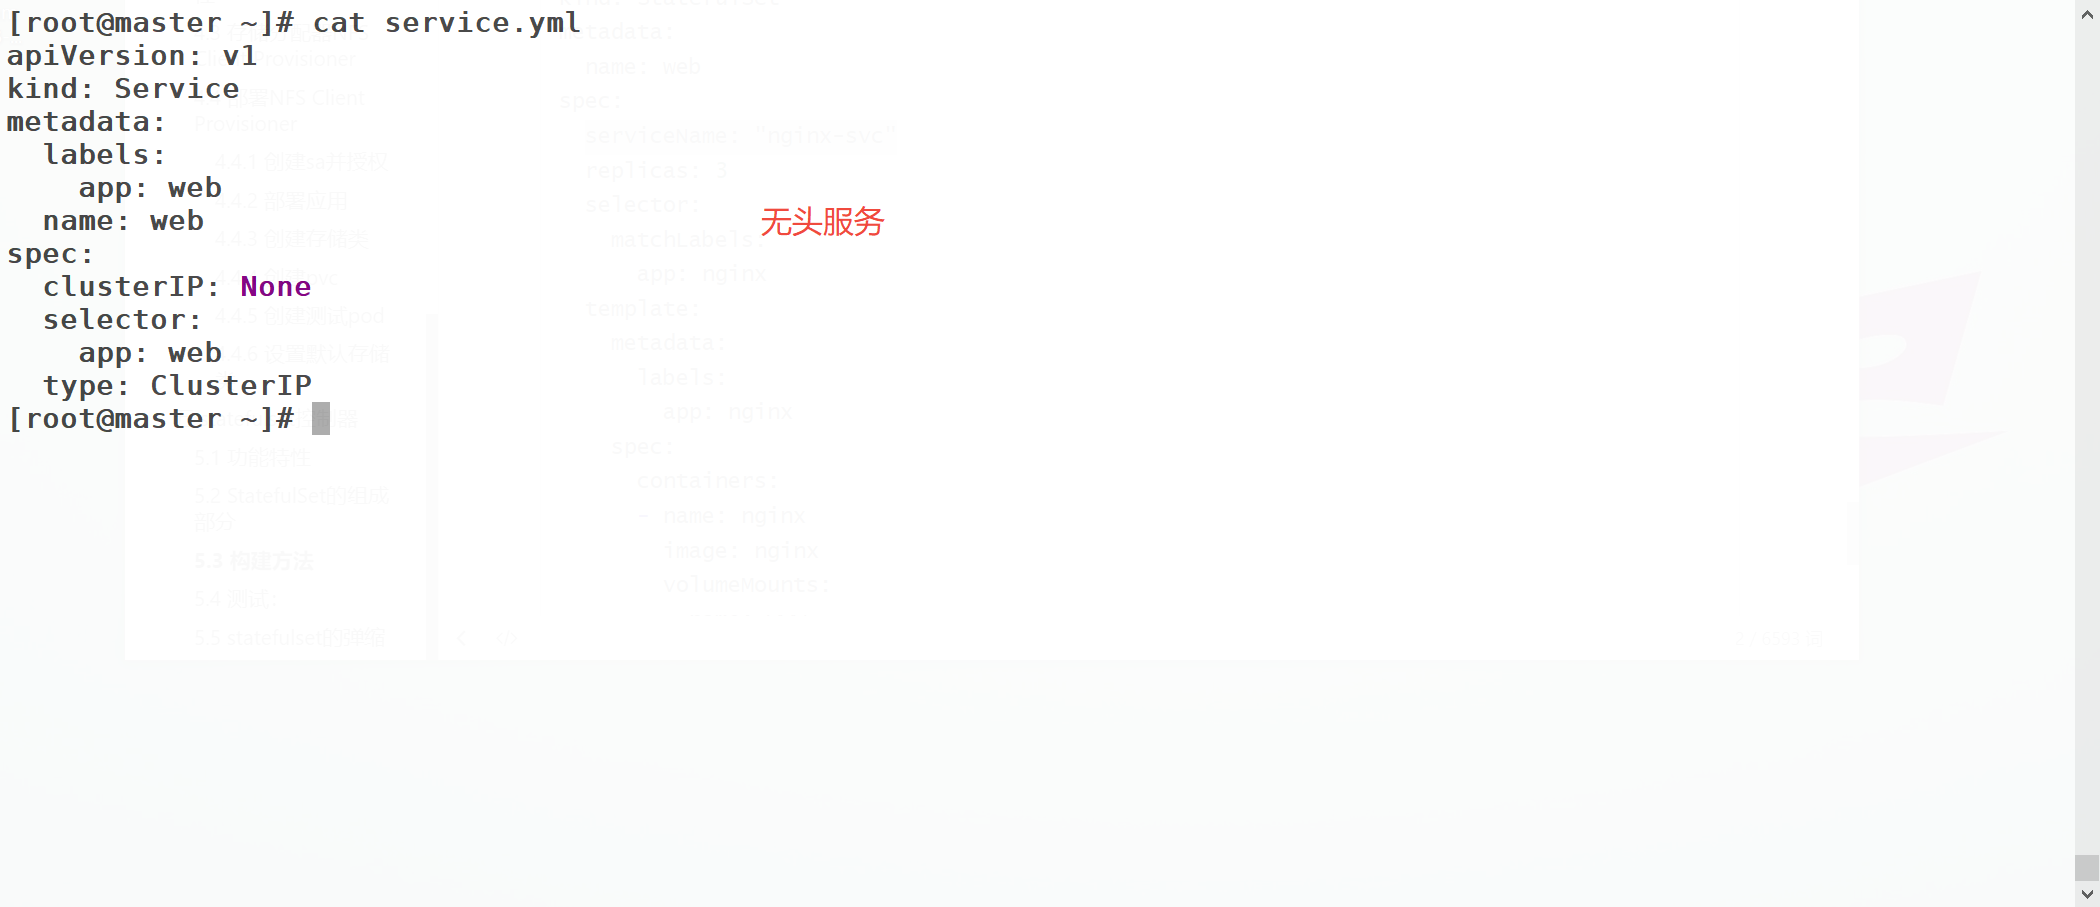
ClusterIP中的特殊模式headless
headless(无头服务)
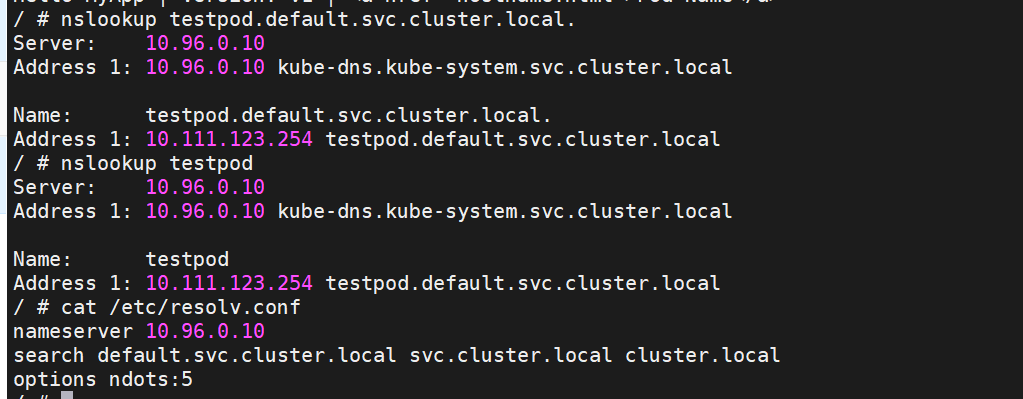
对于无头 Services 并不会分配 Cluster IP,kube-proxy不会处理它们, 而且平台也不会为它们进行负载均衡和路由,集群访问通过dns解析直接指向到业务pod上的IP,所有的调度有dns单独完成
root@k8s-master pod# kubectl delete pod busybox
容器内测试

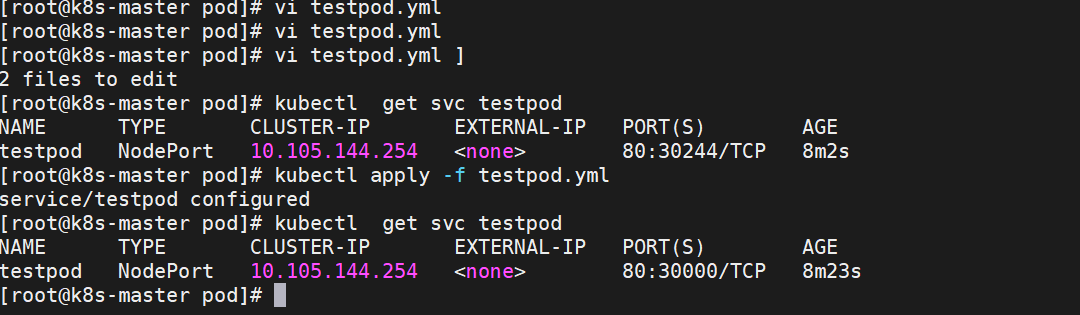
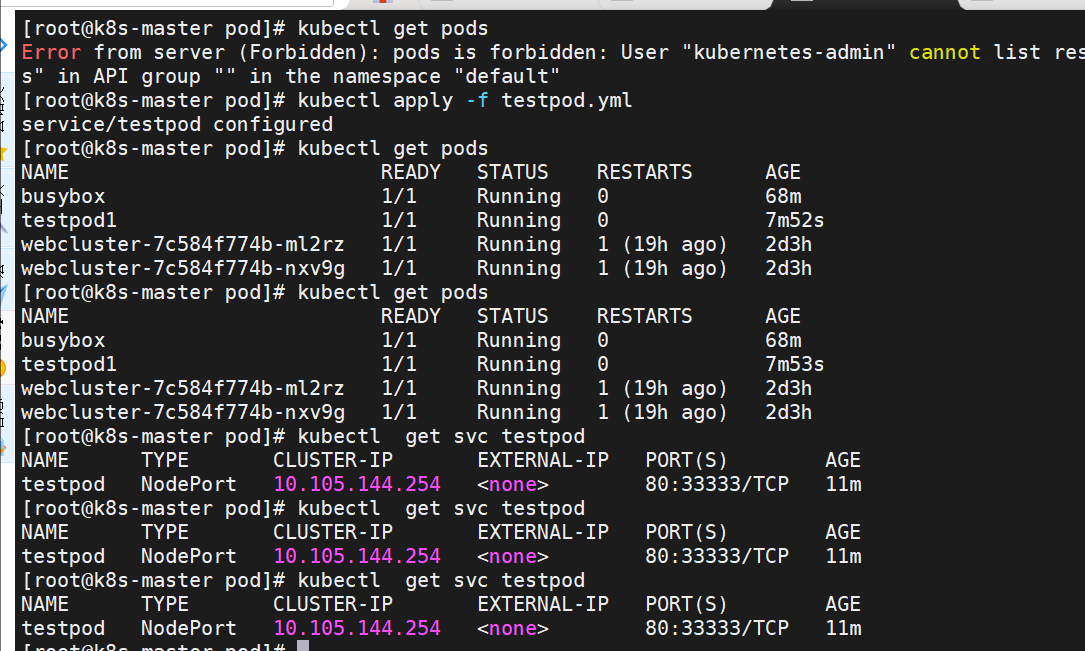
nodeport
通过ipvs暴漏端口从而使外部主机通过master节点的对外ip:<port>来访问pod业务
其访问过程为:

示例:


!NOTE
nodeport默认端口
nodeport默认端口是30000-32767,超出会报错

如果需要使用这个范围以外的端口就需要特殊设定
root@k8s-master \~# vim /etc/kubernetes/manifests/kube-apiserver.yaml
- --service-node-port-range=30000-40000
!NOTE
添加"--service-node-port-range=" 参数,端口范围可以自定义
修改后api-server会自动重启,等apiserver正常启动后才能操作集群
集群重启自动完成在修改完参数后全程不需要人为干预
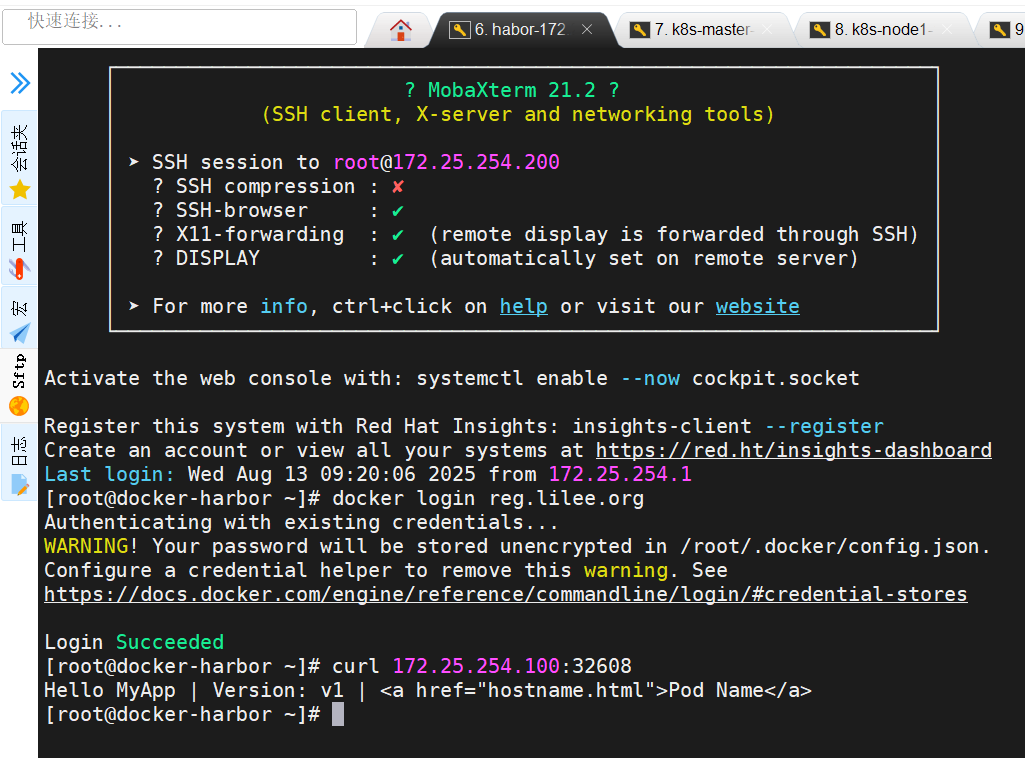
loadbalancer
云平台会为我们分配vip并实现访问,如果是裸金属主机那么需要metallb来实现ip的分配

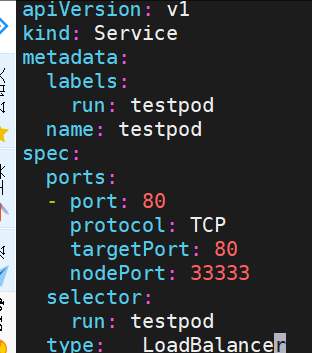
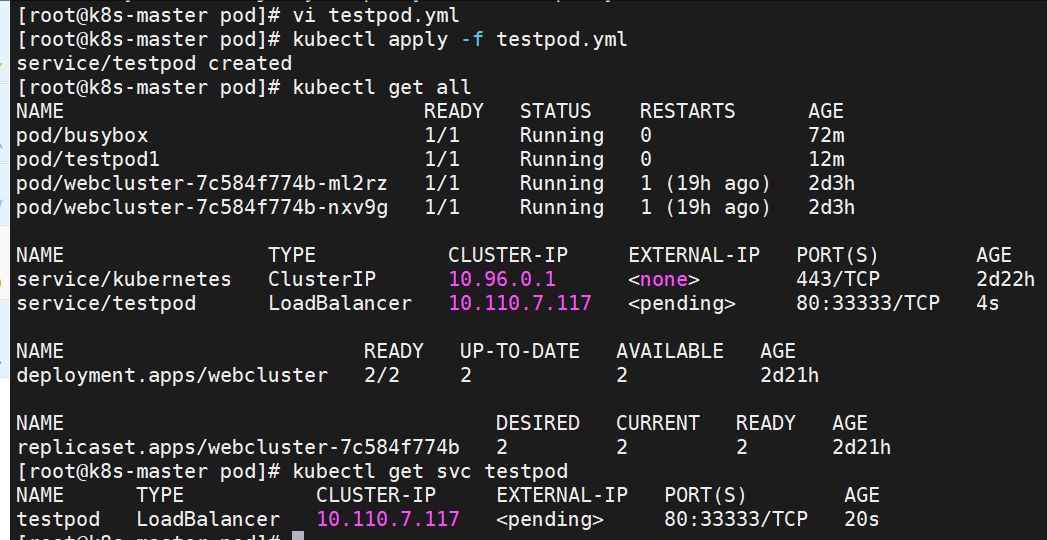
LoadBalancer模式适用云平台,裸金属环境需要安装metallb提供支持
- LoadBalancer :核心是分发网络请求(如 HTTP、TCP 流量)到多台服务器,实现负载均衡、高可用,提升服务响应能力。
- DHCP :核心是分配网络配置(如 IP 地址、子网掩码、网关)给客户端设备,简化网络参数的手动配置流程。
metalLB
官网:Installation :: MetalLB, bare metal load-balancer for Kubernetes
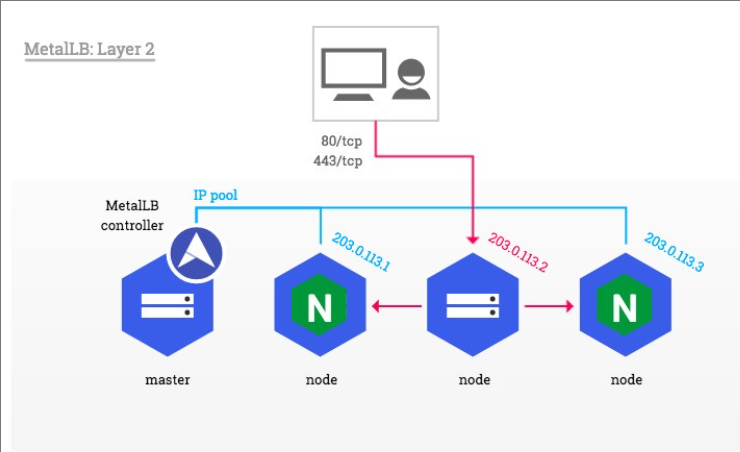
metalLB功能
为LoadBalancer分配vip
1.设置ipvs模式
root@k8s-master \~# kubectl edit cm -n kube-system kube-proxy
apiVersion: kubeproxy.config.k8s.io/v1alpha1
kind: KubeProxyConfiguration
mode: "ipvs"
ipvs:
strictARP: true
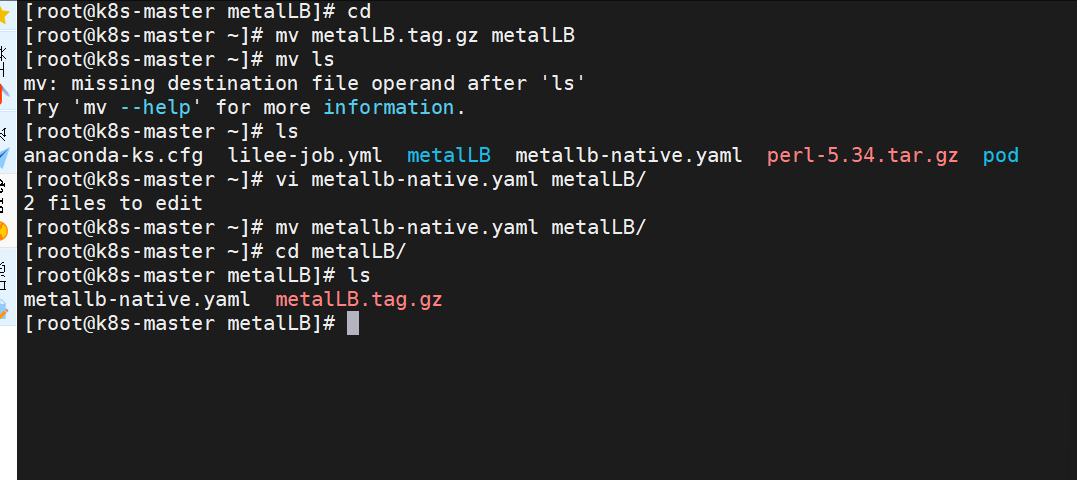
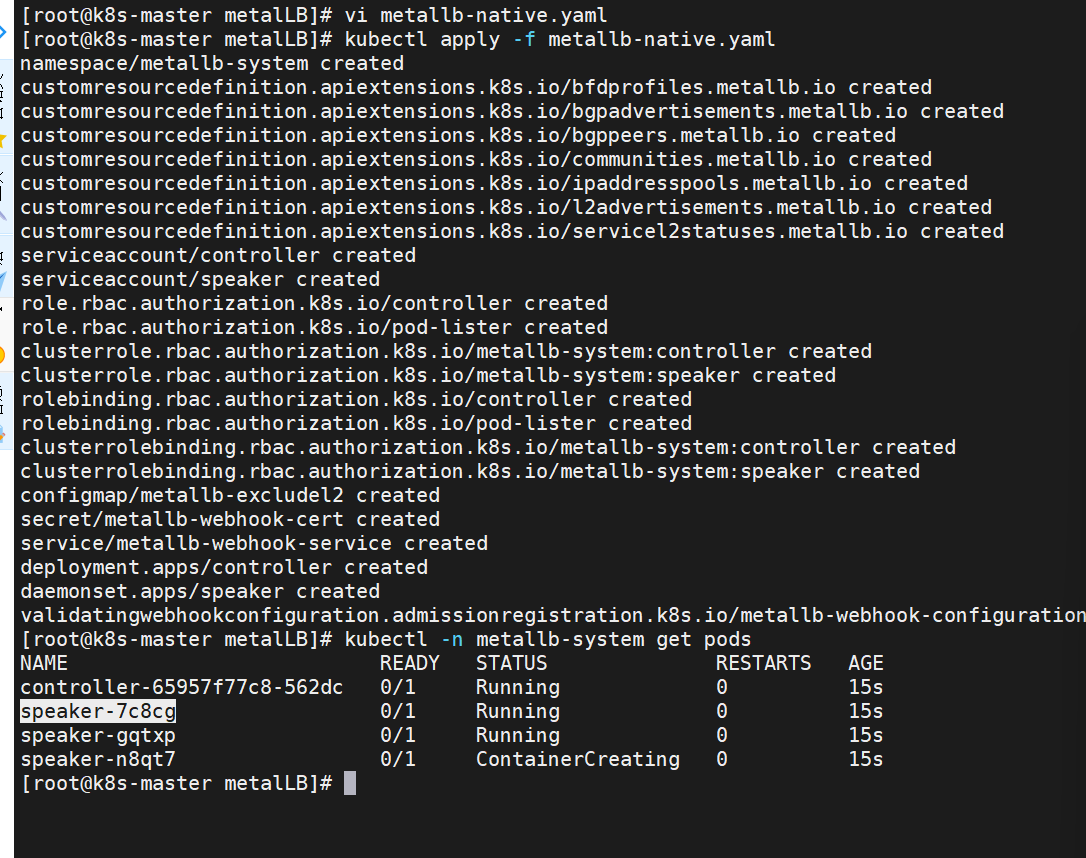
2.下载部署文件
3.修改文件中镜像地址,与harbor仓库路径保持一致
root@k8s-master \~# vim metallb-native.yaml
...
image: metallb/controller:v0.14.8
image: metallb/speaker:v0.14.8
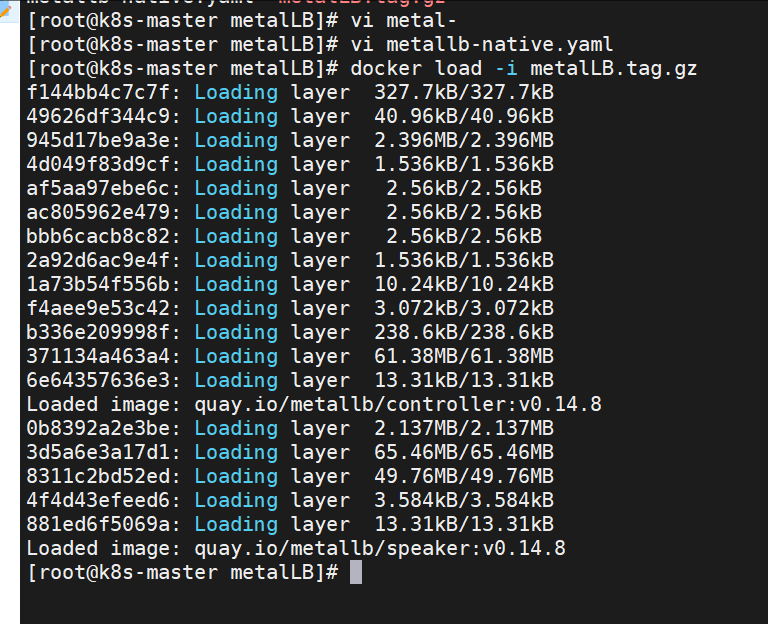
4.上传镜像到harbor
root@k8s-master metalLB# docker tag quay.io/metallb/controller:v0.14.8 reg.lilee.org/metallb/controller:v0.14.8
root@k8s-master metalLB# docker push reg.lilee.org/metallb/controller:v0.14.8
root@k8s-master metalLB# docker tag quay.io/metallb/speaker:v0.14.8 reg.lilee.org/metallb/speaker:v0.14.8
root@k8s-master metalLB# docker push reg.lilee.org/metallb/speaker:v0.14.8
部署服务
配置分配地址段
root@k8s-master \~# vim configmap.yml
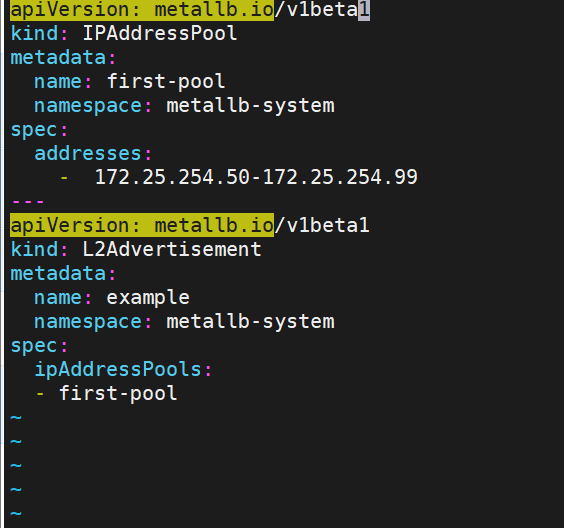

#通过分配地址从集群外访问服务
root@reg \~# curl 172.25.254.50

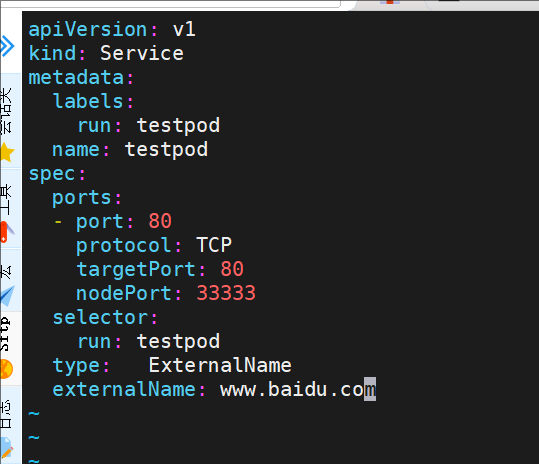
externalname
-
开启services后,不会被分配IP,而是用dns解析CNAME固定域名来解决ip变化问题
-
一般应用于外部业务和pod沟通或外部业务迁移到pod内时
-
在应用向集群迁移过程中,externalname在过度阶段就可以起作用了。
-
集群外的资源迁移到集群时,在迁移的过程中ip可能会变化,但是域名+dns解析能完美解决此问题
示例:

root@k8s-master pod# kubectl run -it test --image busyboxplus
If you don't see a command prompt, try pressing enter.
/ # ping testpod
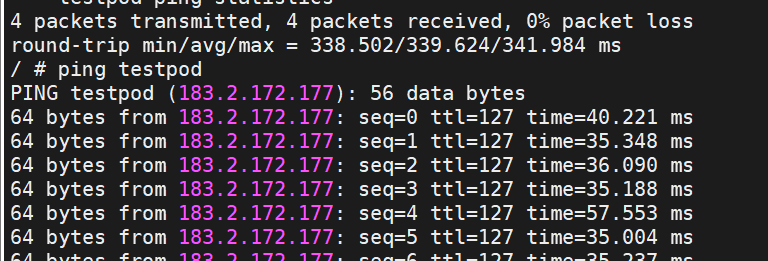
status
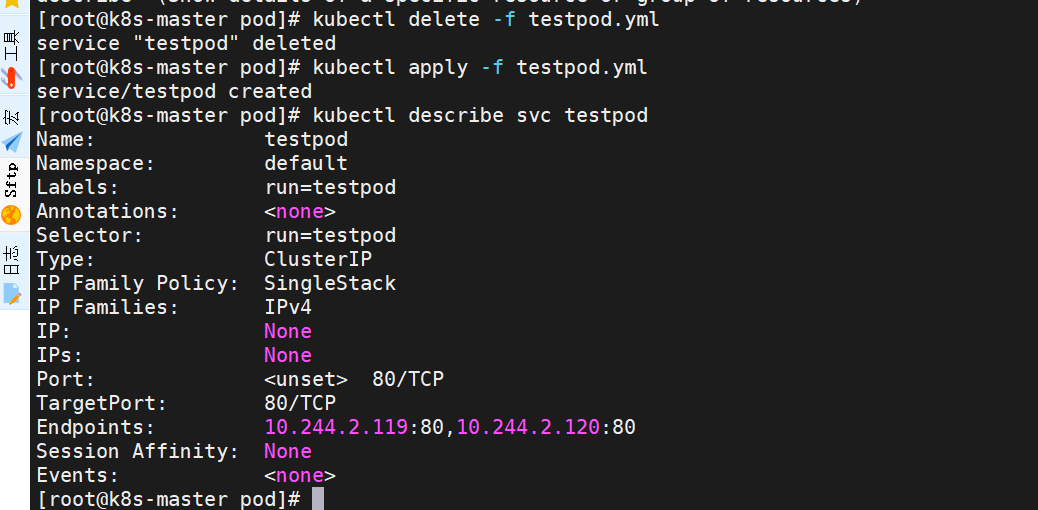
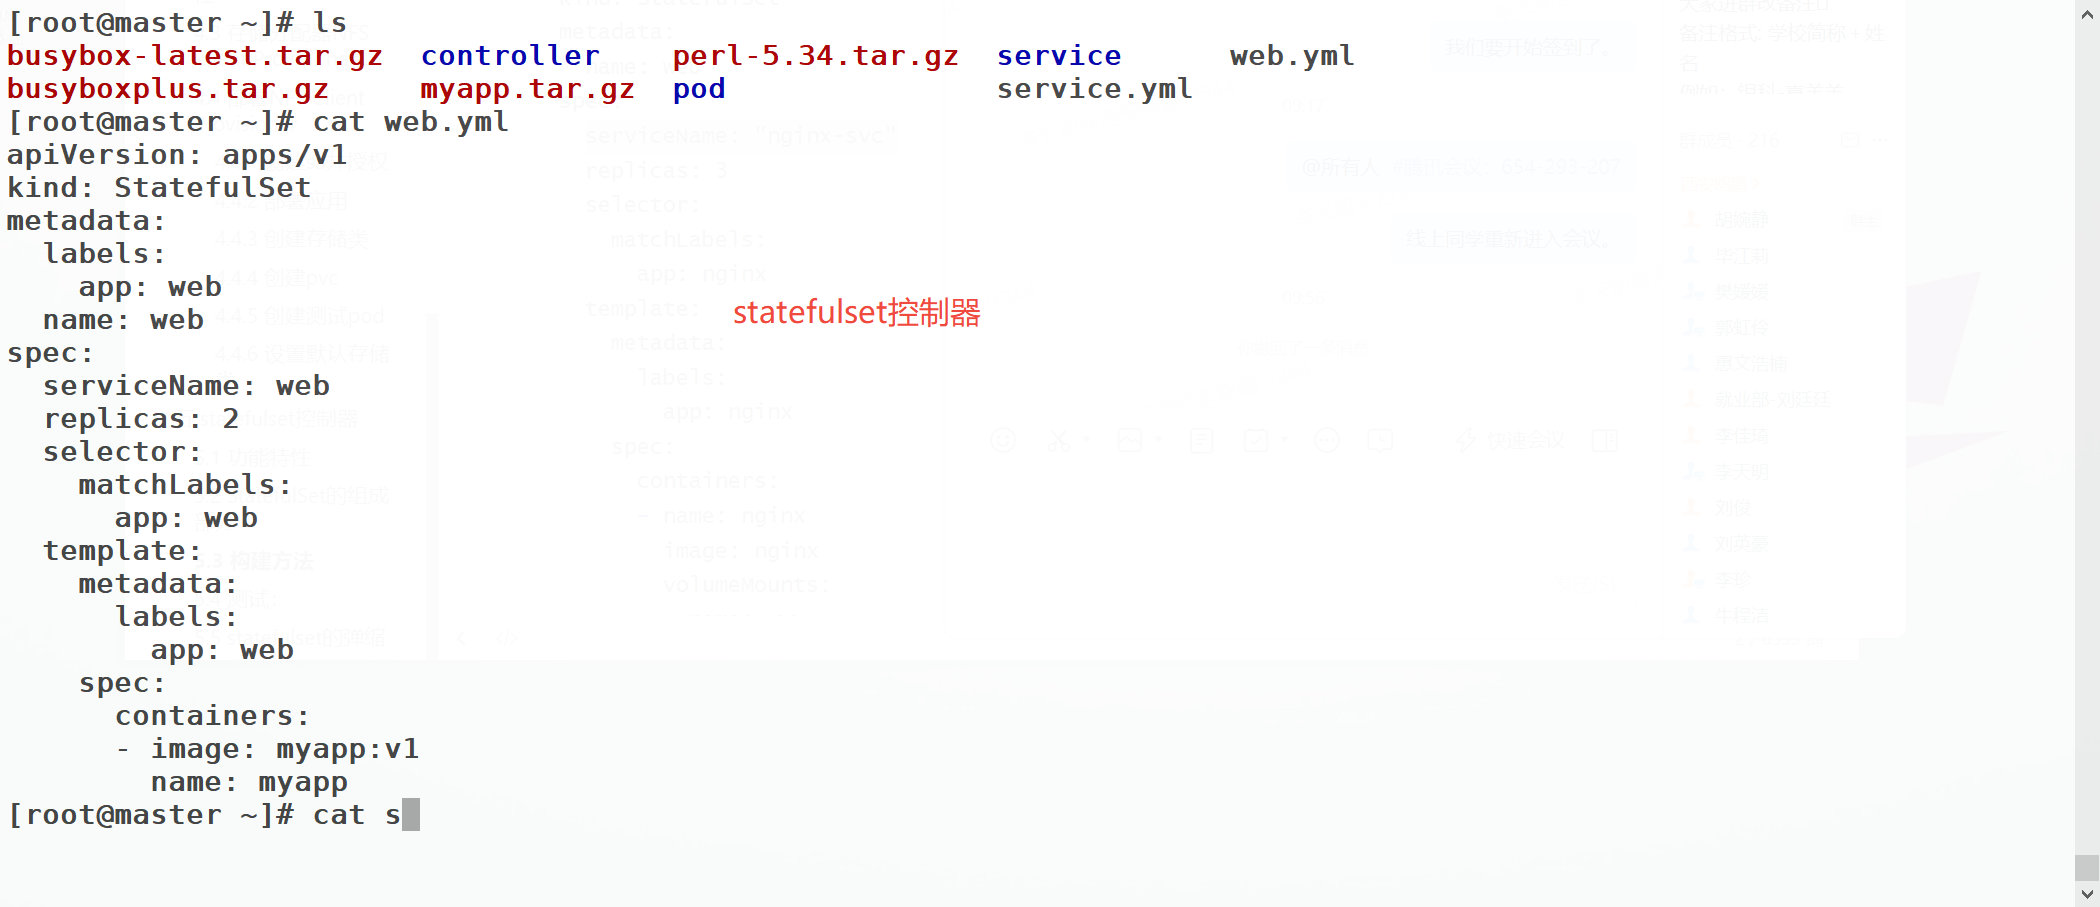
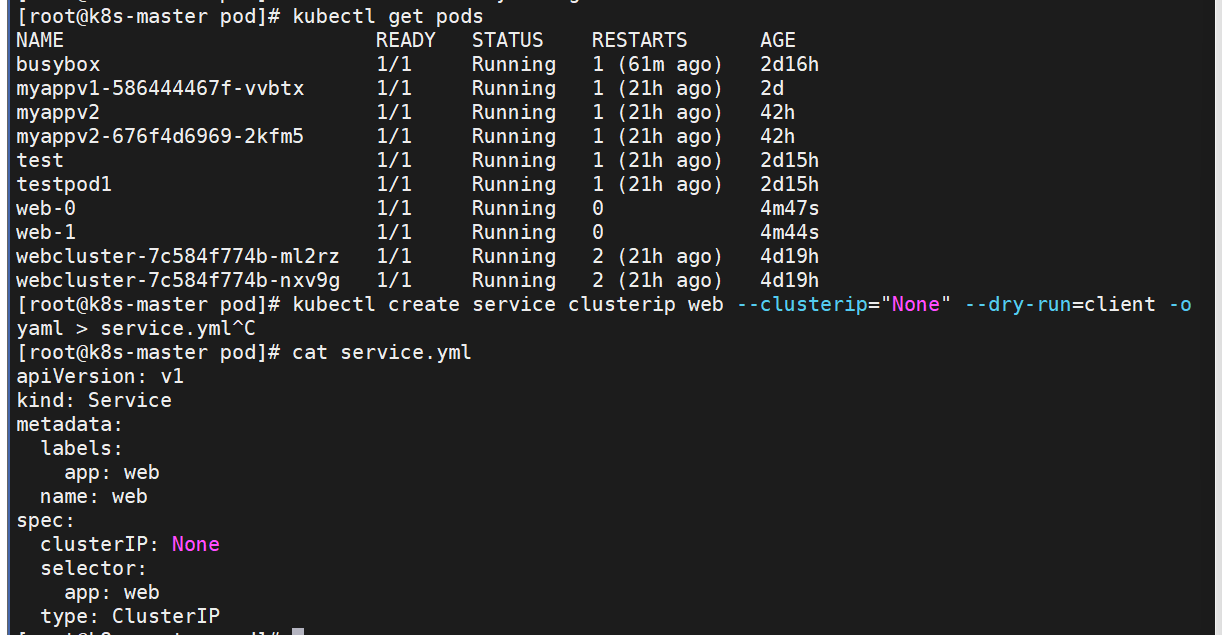
root@k8s-master pod# kubectl create service clusterip web --clusterip="None" --dry-run=client -o yaml > service.yml
root@k8s-master pod# kubectl apply -f service.yml

root@k8s-master pod# kubectl apply -f web.yaml
复制一个标签
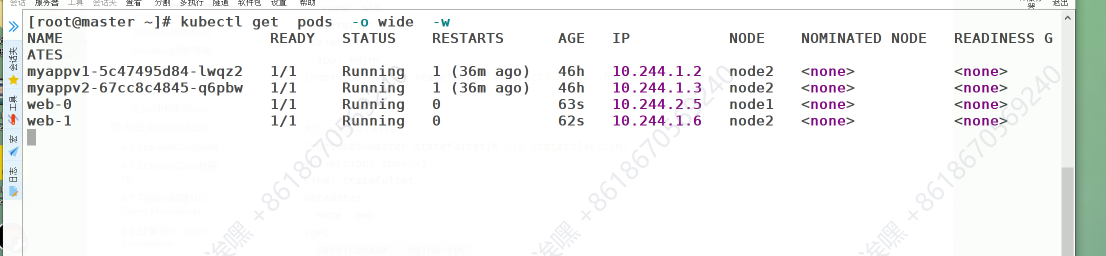

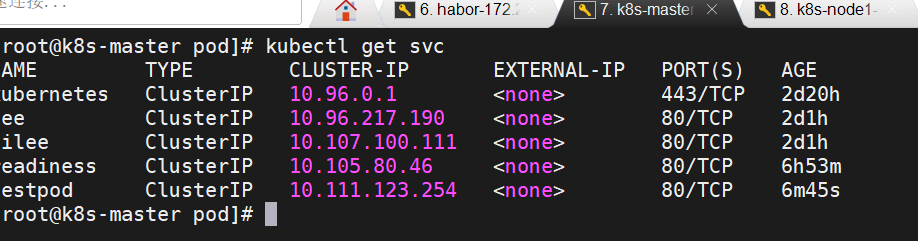
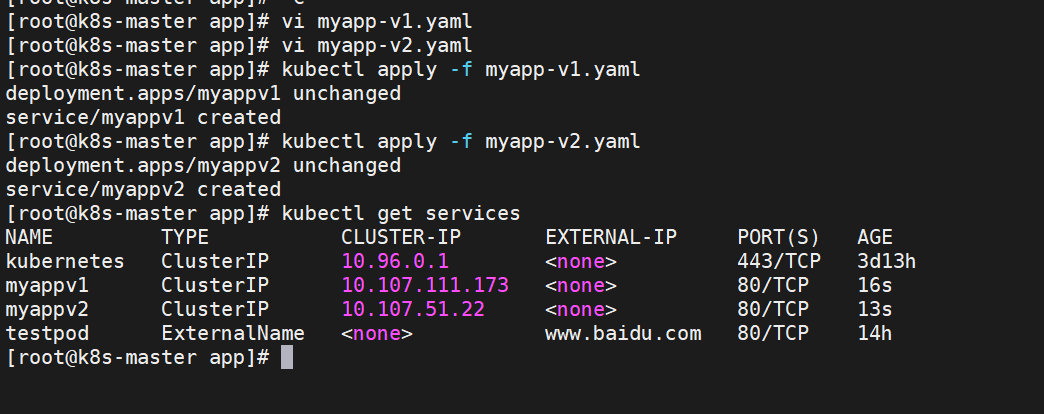
root@k8s-master pod# kubectl -n kube-system get svc

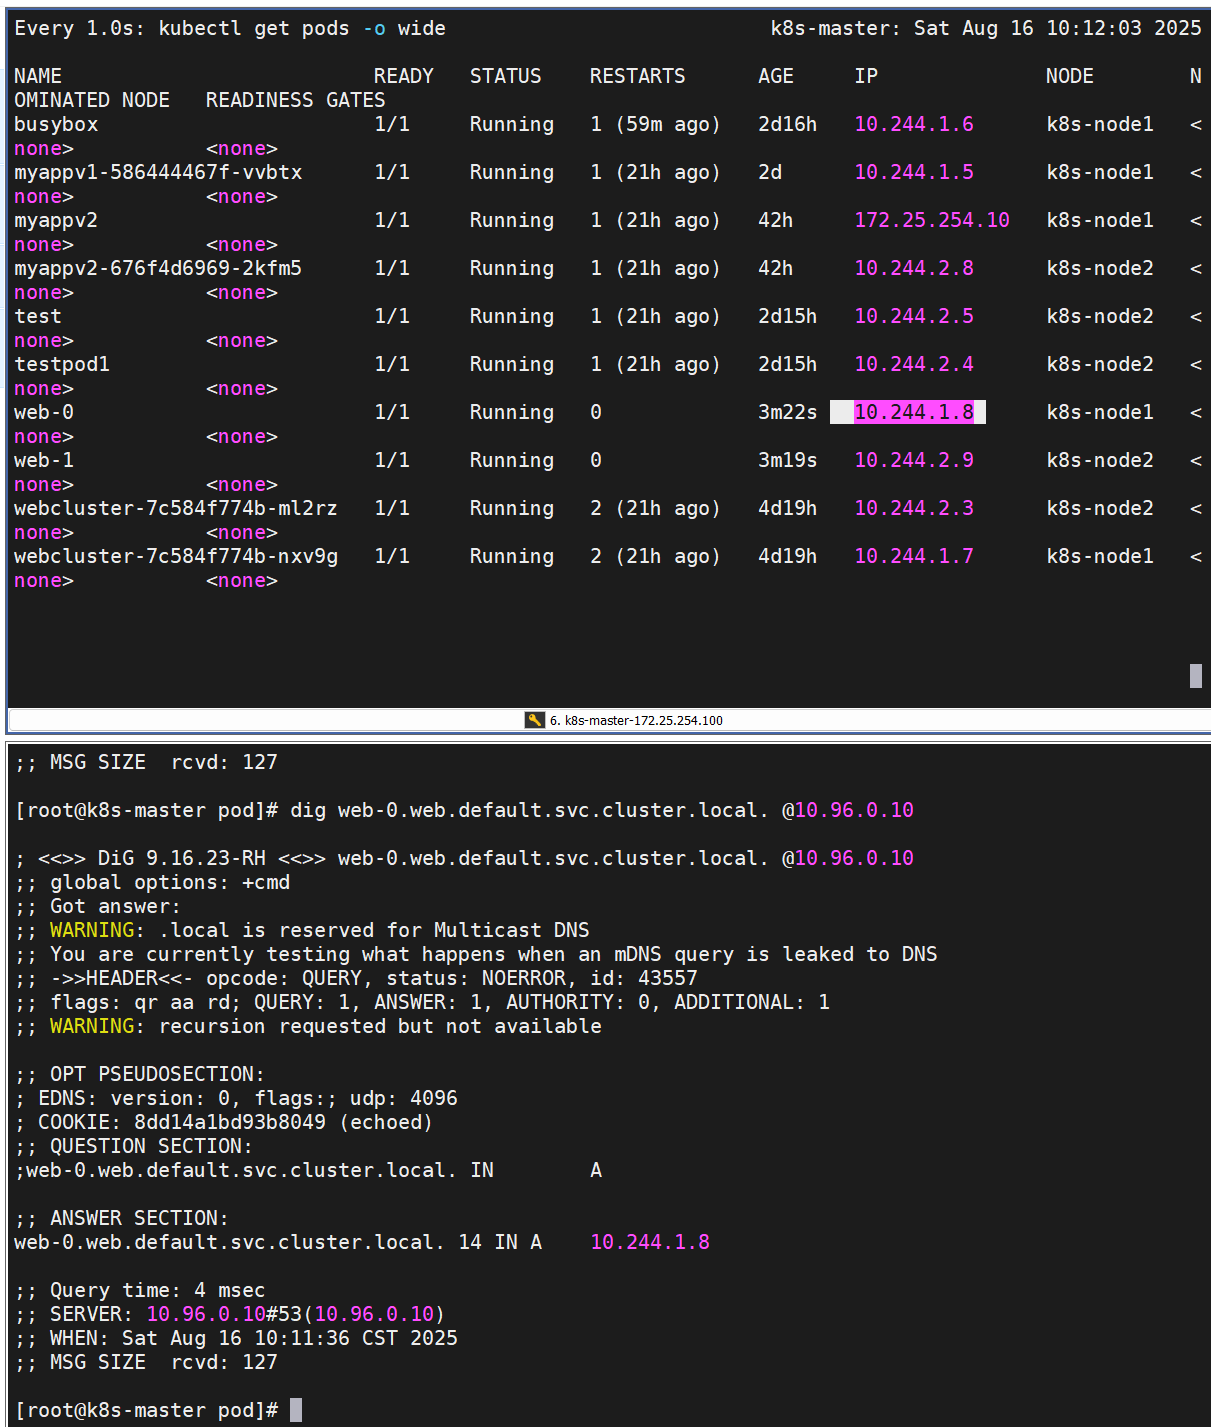
root@k8s-master pod# dig web-0.web.default.svc.cluster.local. @10.96.0.10
root@k8s-master \~# watch -n 1 kubectl get pods -o wide
Ingress-nginx
官网:
Installation Guide - Ingress-Nginx Controller
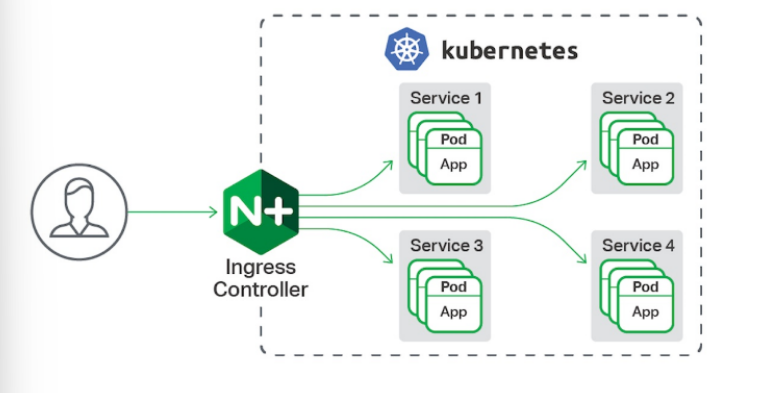 - 一种全局的、为了代理不同后端 Service 而设置的负载均衡服务,支持7层
-
Ingress由两部分组成:Ingress controller和Ingress服务
-
Ingress Controller 会根据你定义的 Ingress 对象,提供对应的代理能力。
-
业界常用的各种反向代理项目,比如 Nginx、HAProxy、Envoy、Traefik 等,都已经为Kubernetes 专门维护了对应的 Ingress Controller。
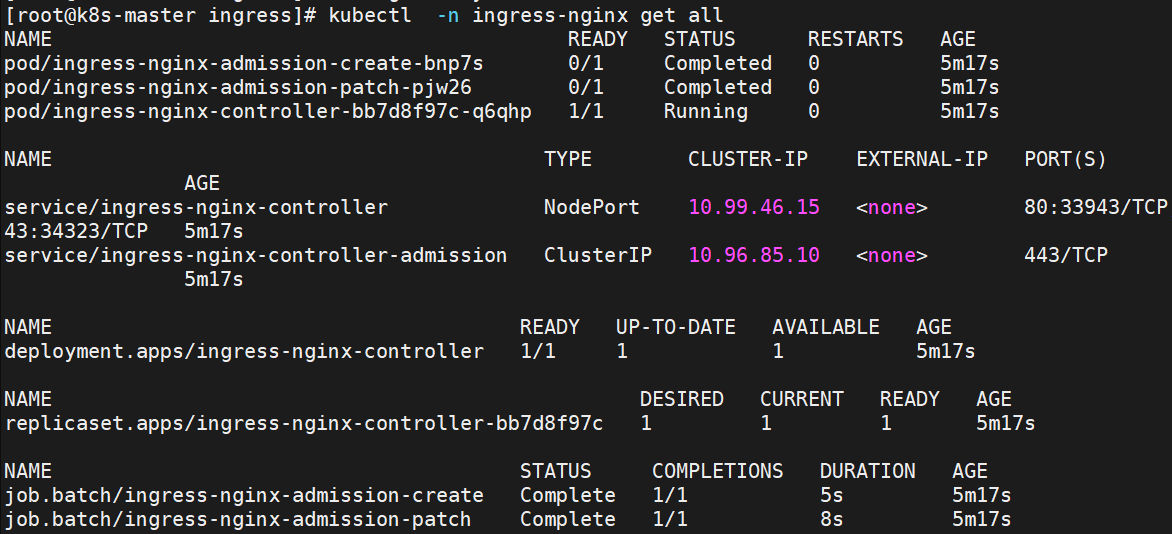
部署ingress
下载部署文件
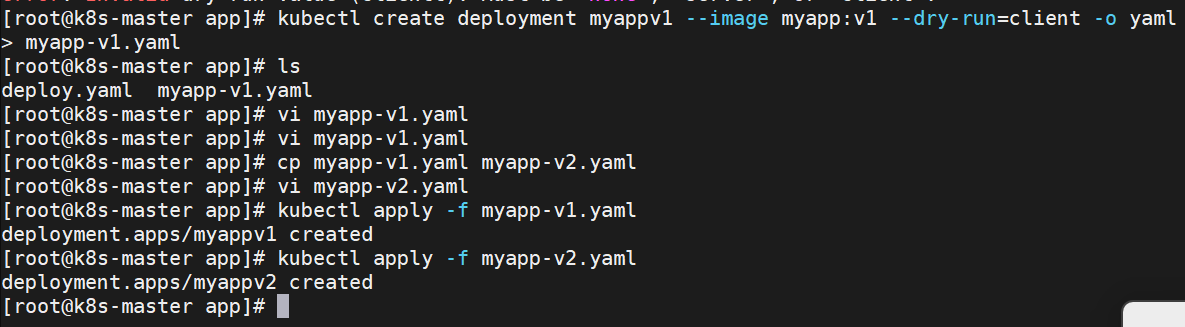
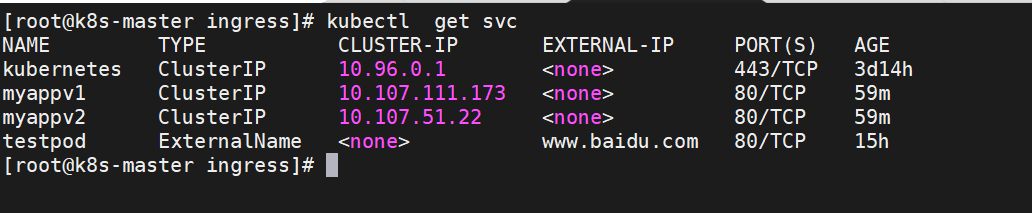
root@k8s-master app# kubectl expose deployment myappv1 --port 80 --target-port 80 --dry-run=client -o yaml >> myapp-v1.yaml
root@k8s-master app# kubectl expose deployment myappv2 --port 80 --target-port 80 --dry-run=client -o yaml >> myapp-v2.yaml


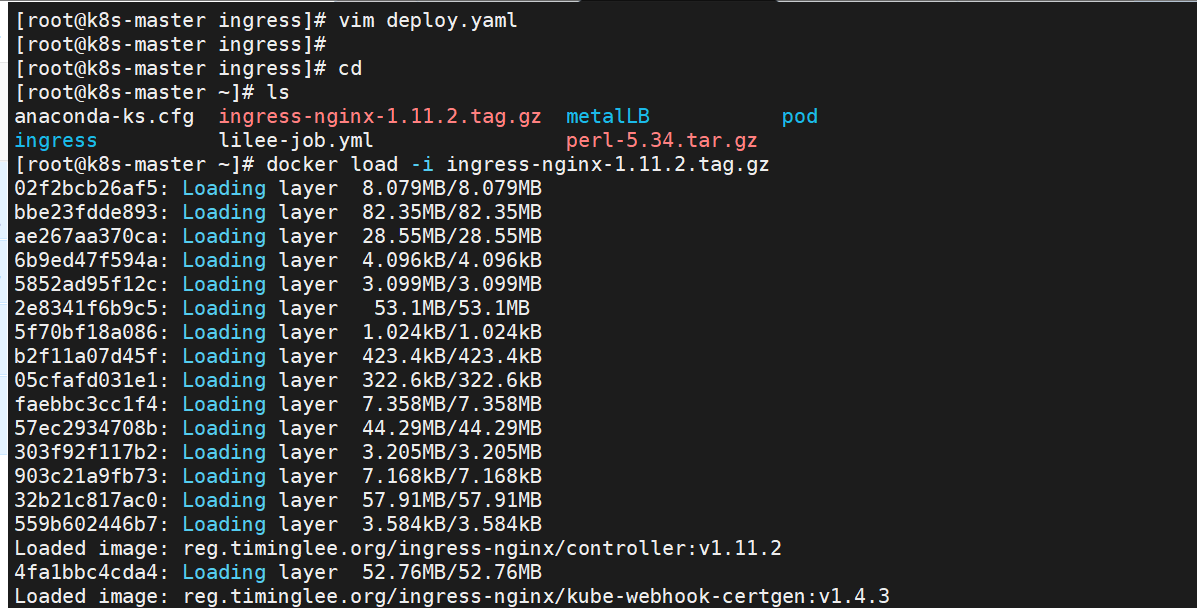
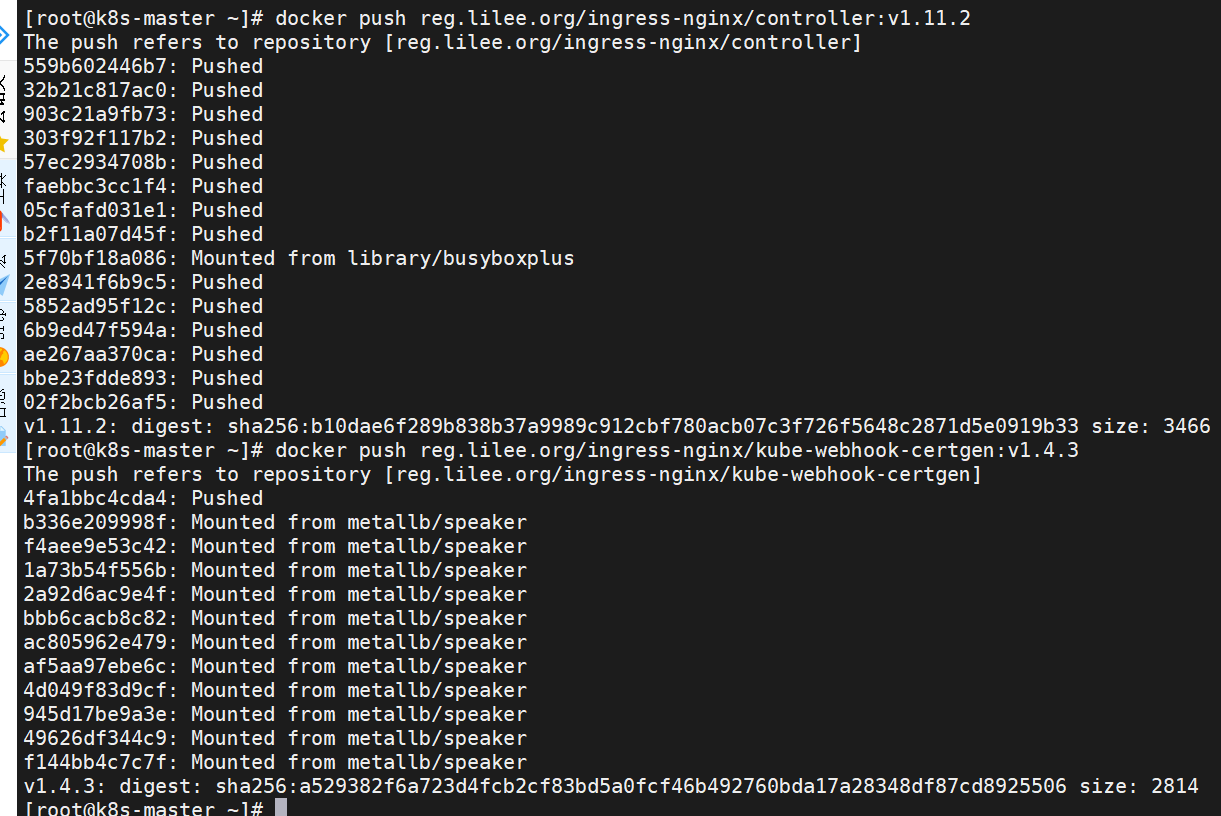
root@k8s-master \~# docker tag reg.timinglee.org/ingress-nginx/controller:v1.11.2 reg.lilee.org/ingress-nginx/controller:v1.11.2
root@k8s-master \~# docker tag reg.timinglee.org/ingress-nginx/kube-webhook-certgen:v1.4.3 reg.lilee.org/ingress-nginx/kube-webhook-certgen:v1.4.3
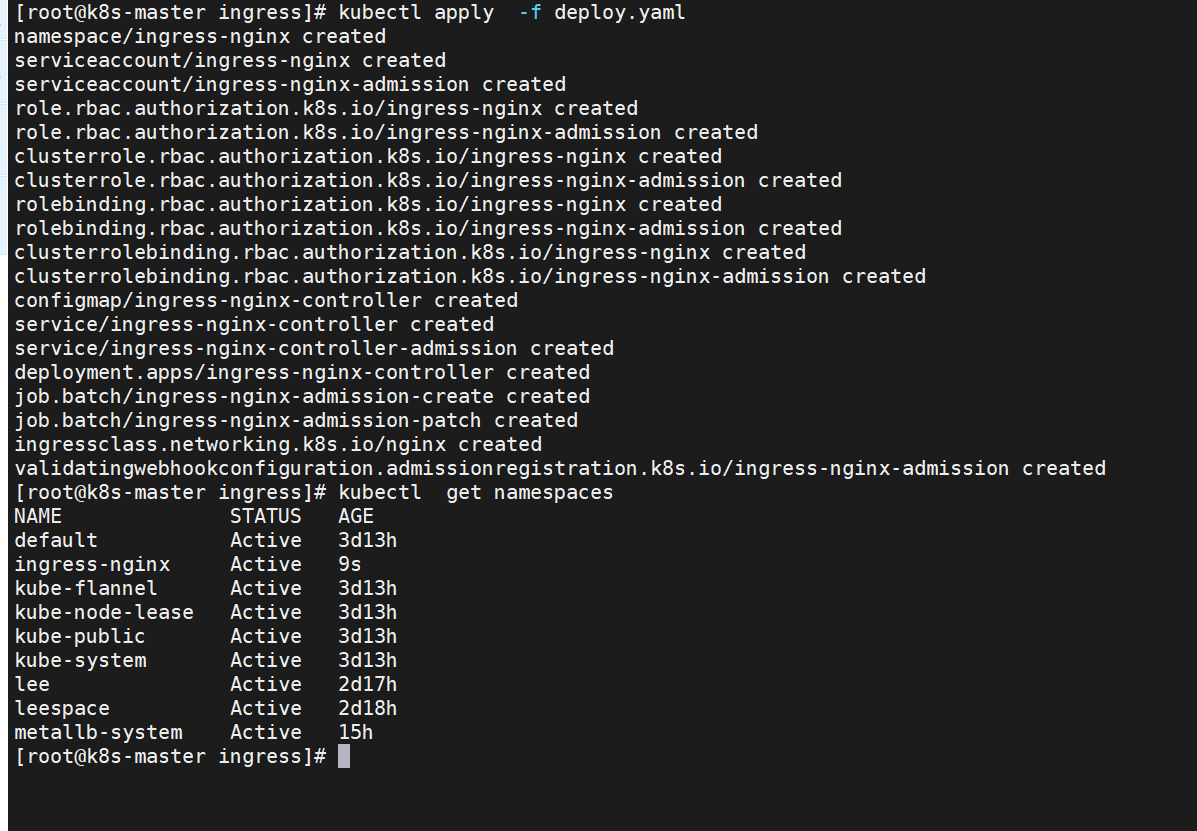
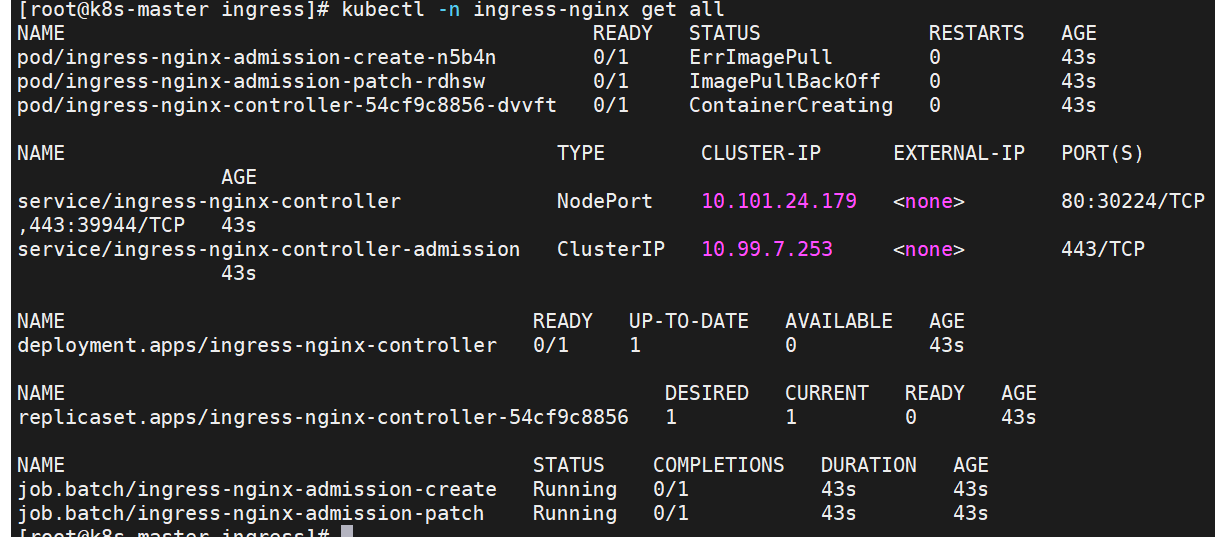


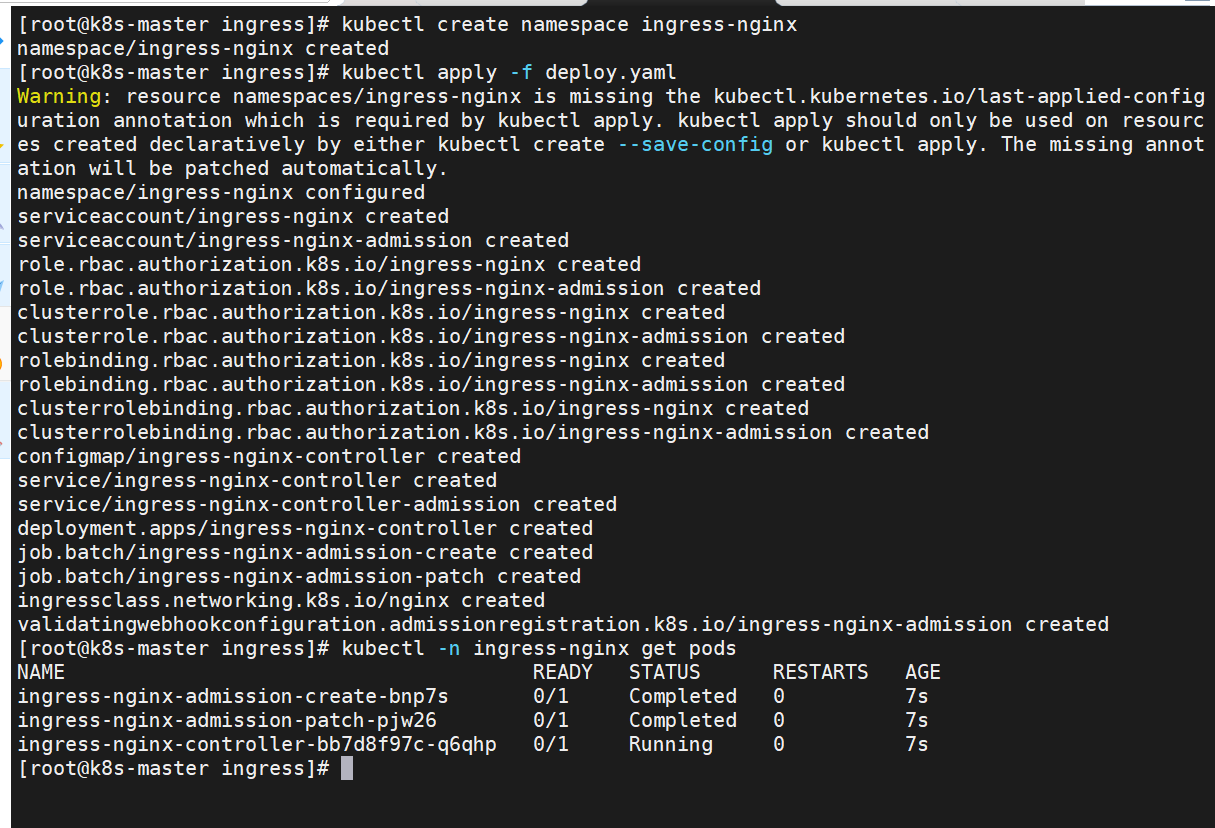
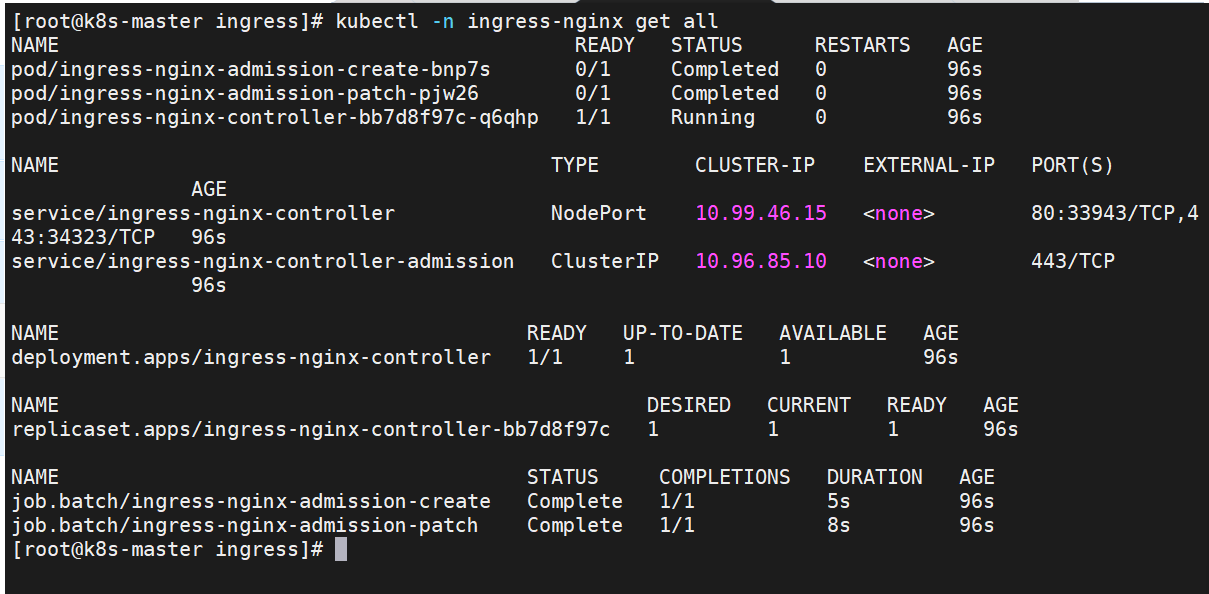
root@k8s-master ingress# kubectl apply -f deploy.yaml
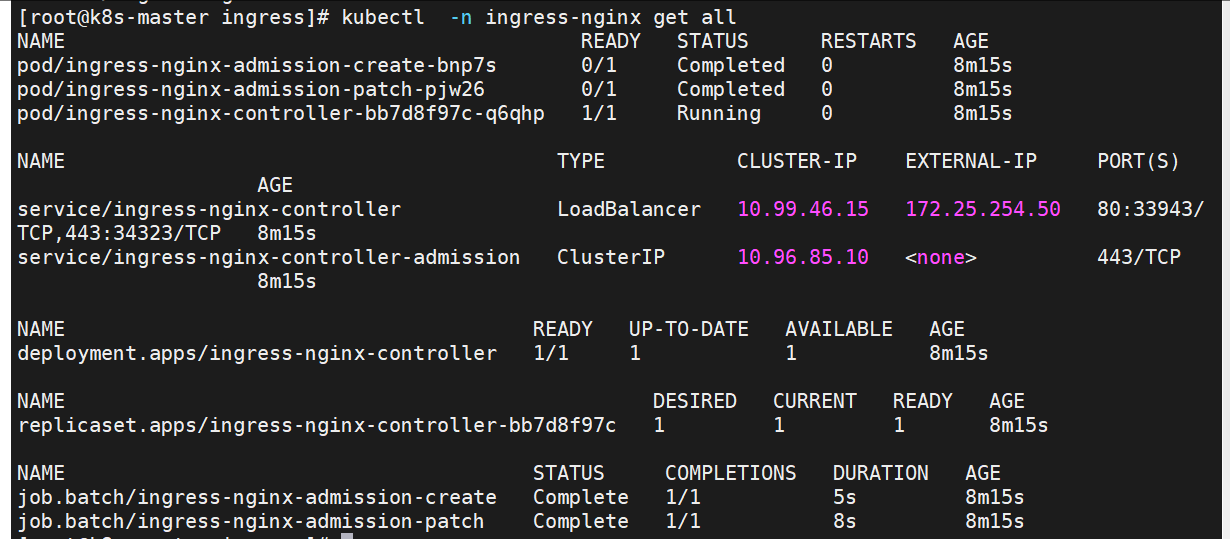
root@k8s-master ingress# kubectl -n ingress-nginx edit svc ingress-nginx-controller

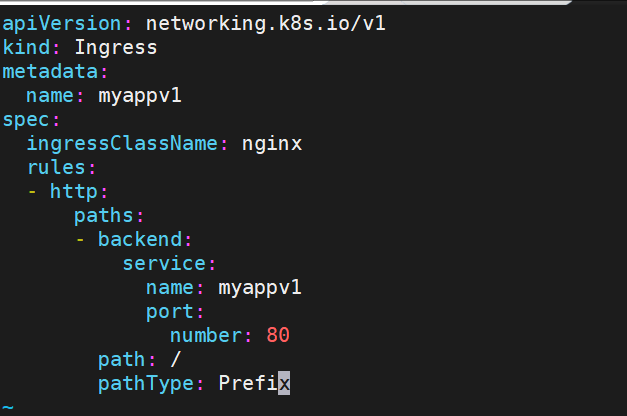
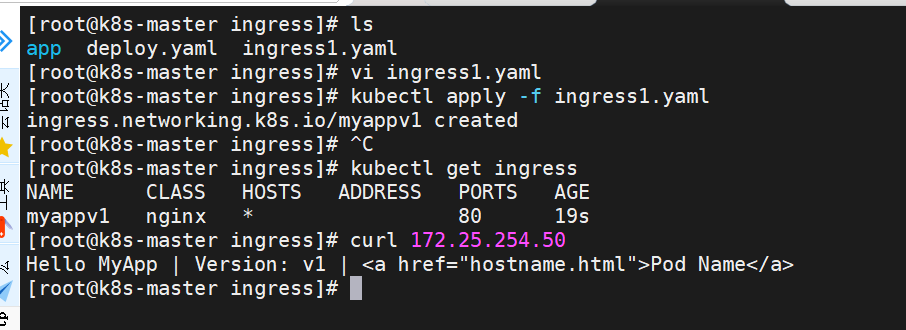
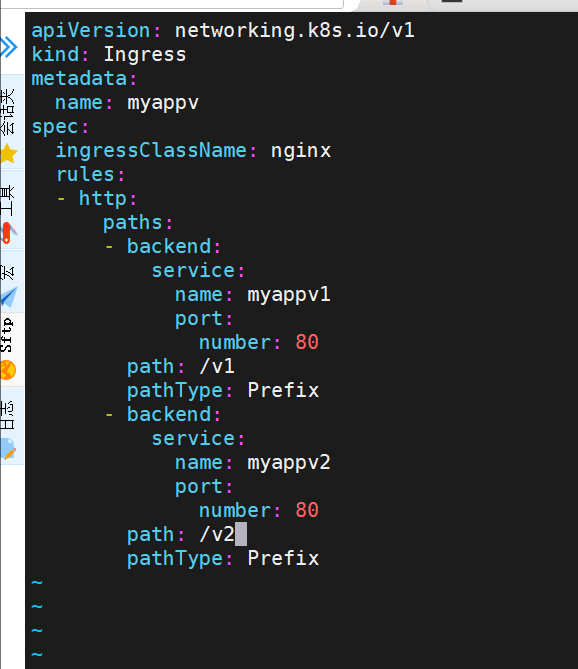
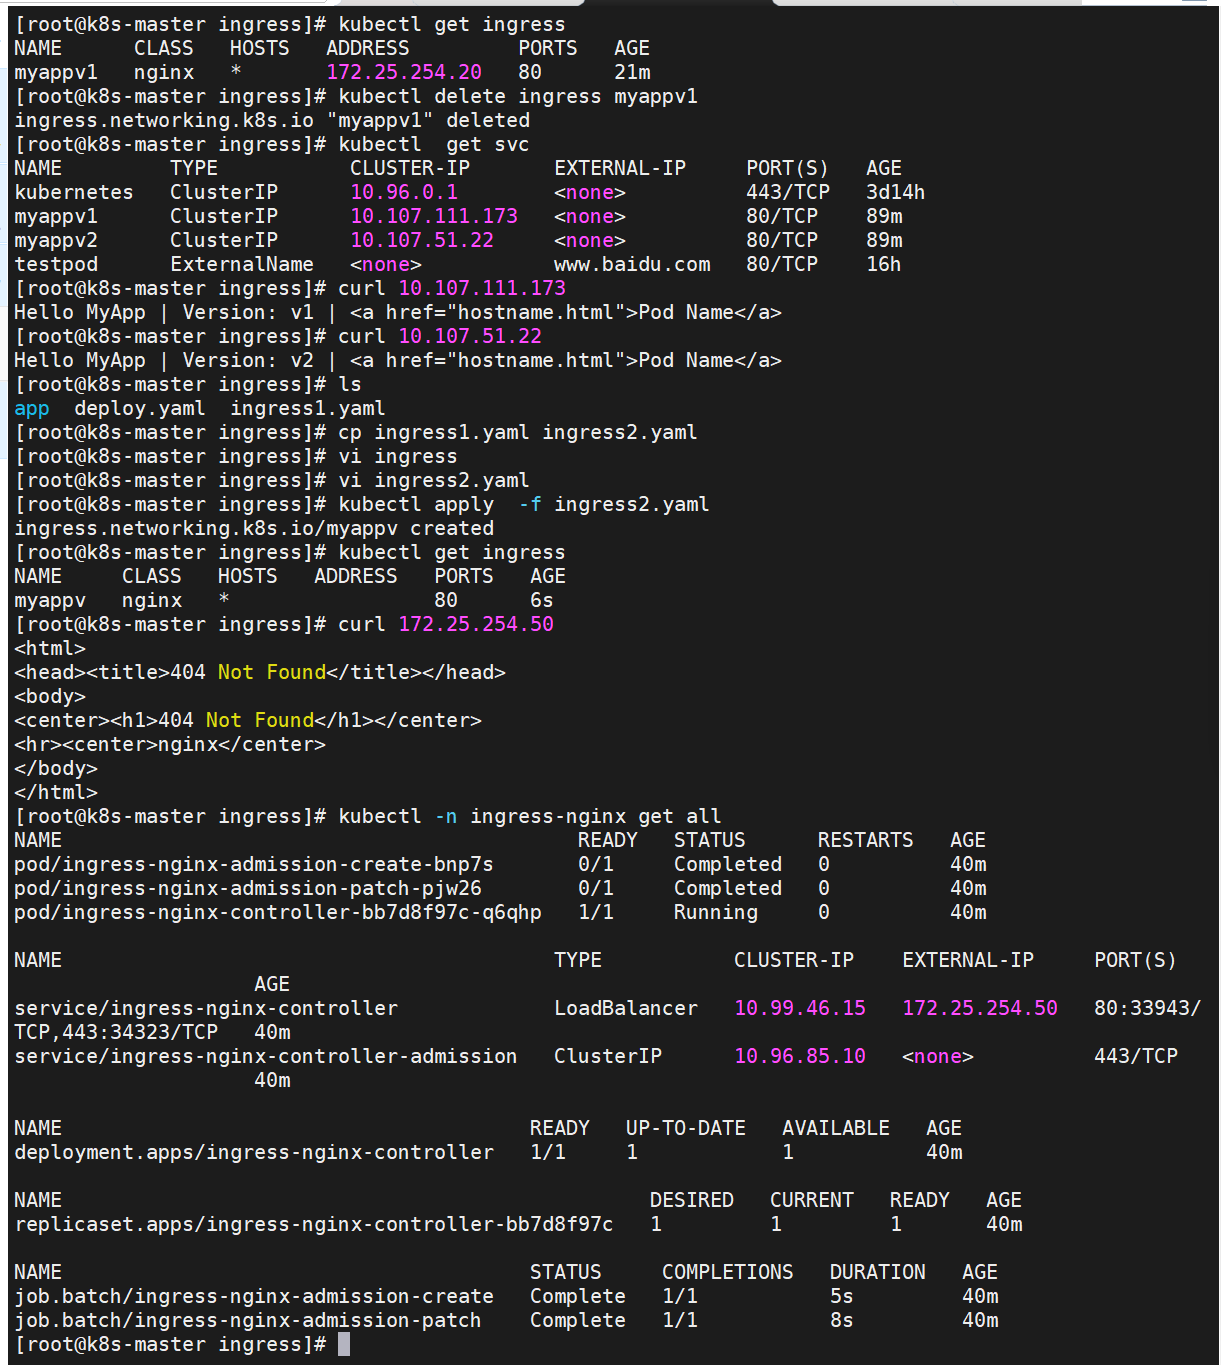
root@k8s-master ingress# vi ingress1.yaml
root@k8s-master ingress# kubectl apply -f ingress1.yaml
!NOTE
在ingress-nginx-controller中看到的对外IP就是ingress最终对外开放的ip
k8s中ingress的基于访问路径的发布
在 vi/vim 编辑器中,使用 y7y 复制 7 行内容后,粘贴操作非常简单:
只需确保当前处于普通模式 (按 Esc 可退出插入模式进入普通模式),然后按以下键粘贴:
- 按
p(小写):将复制的内容粘贴到光标所在行的下方 - 按
P(大写):将复制的内容粘贴到光标所在行的上方
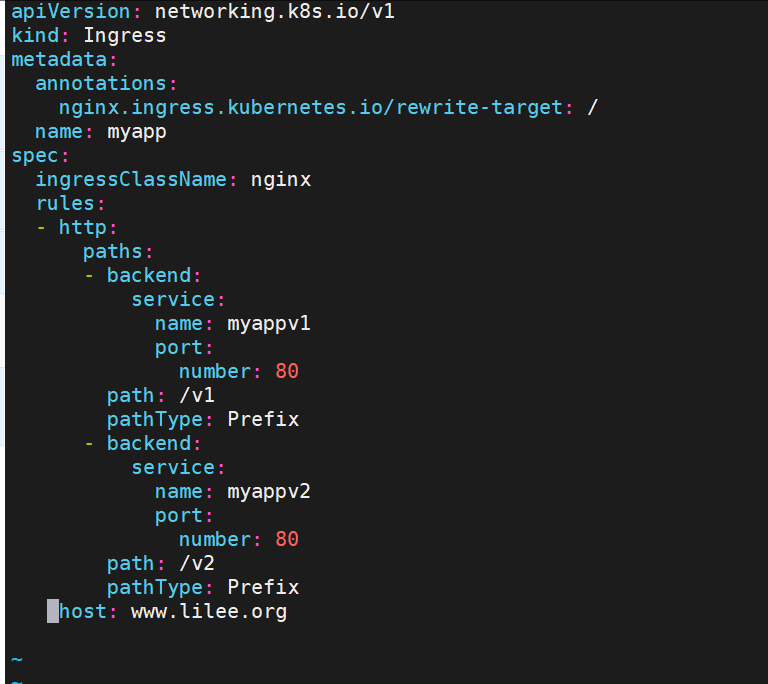
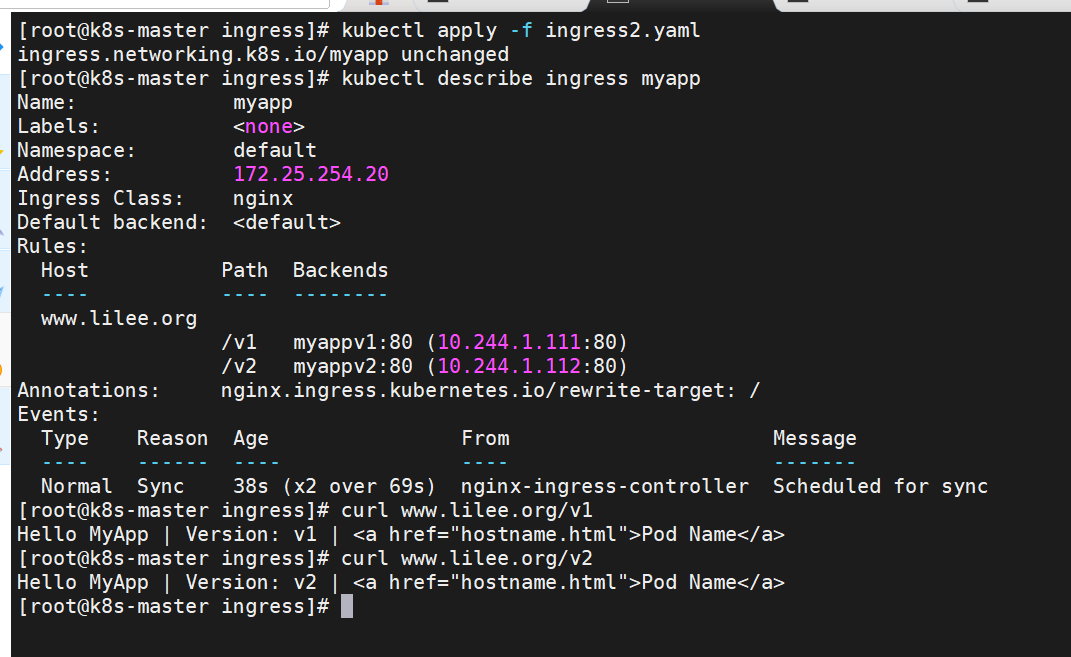
基于域名的访问
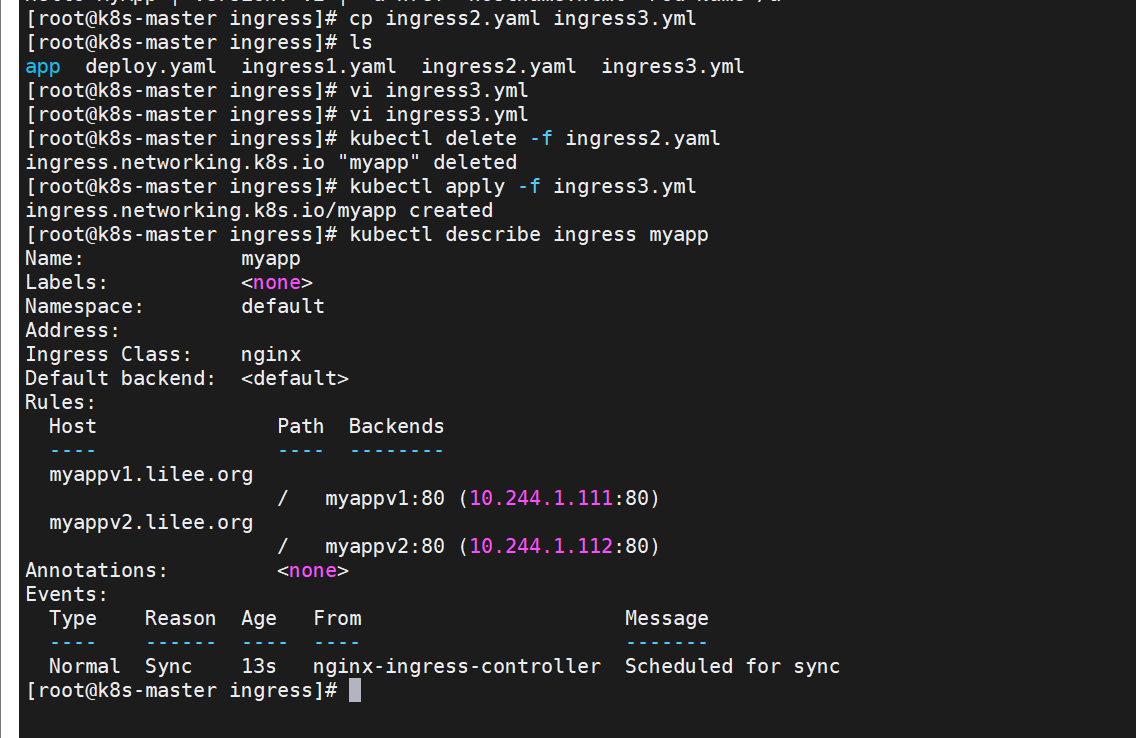
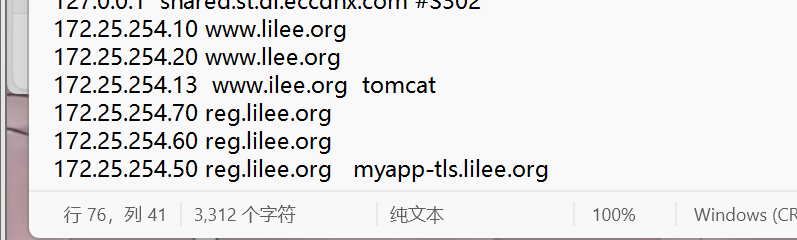
root@k8s-master ingress# vi /etc/hosts
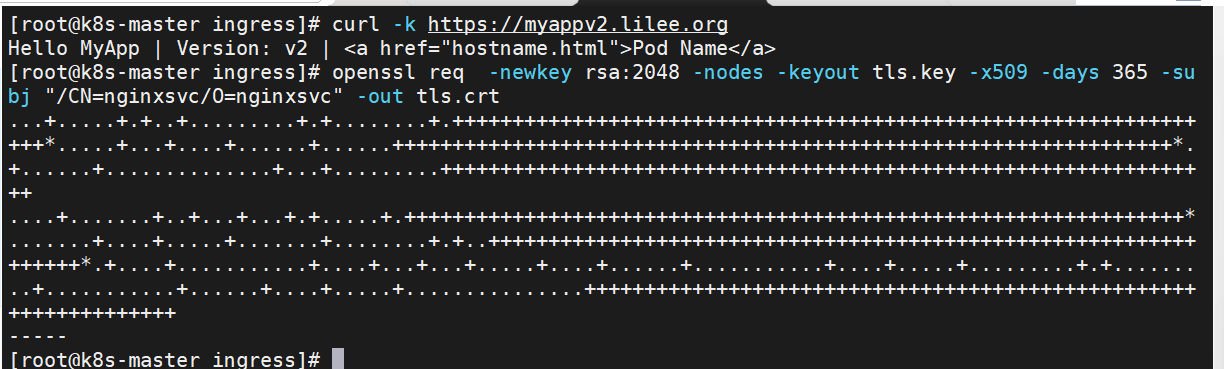
172.25.254.50 www.lilee.org myappv1.lilee.org myappv2.lilee.org

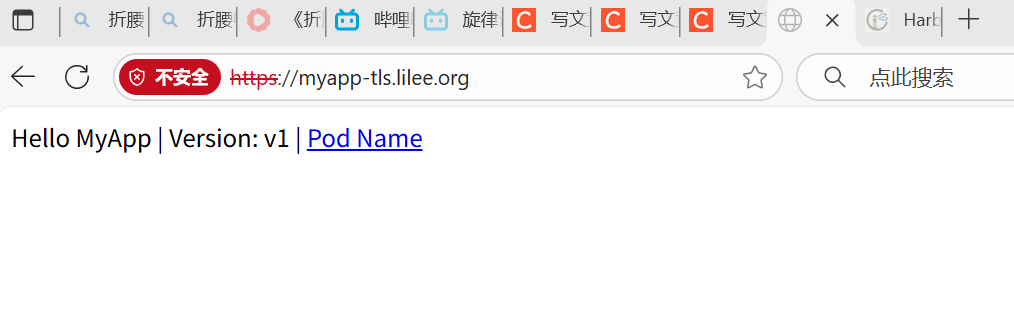
建立tls加密

#建立证书
root@k8s-master app# openssl req -newkey rsa:2048 -nodes -keyout tls.key -x509 -days 365 -subj "/CN=nginxsvc/O=nginxsvc" -out tls.crt
root@k8s-master ingress# kubectl create secret tls web0tls-secret --key tls.key --cert tls.crt
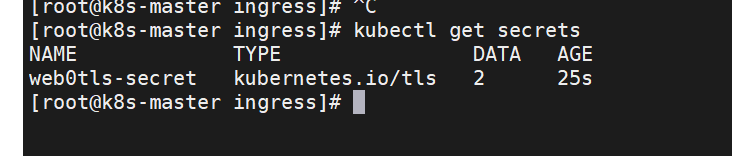
!NOTE
secret通常在kubernetes中存放敏感数据,他并不是一种加密方式,在后面课程中会有专门讲解
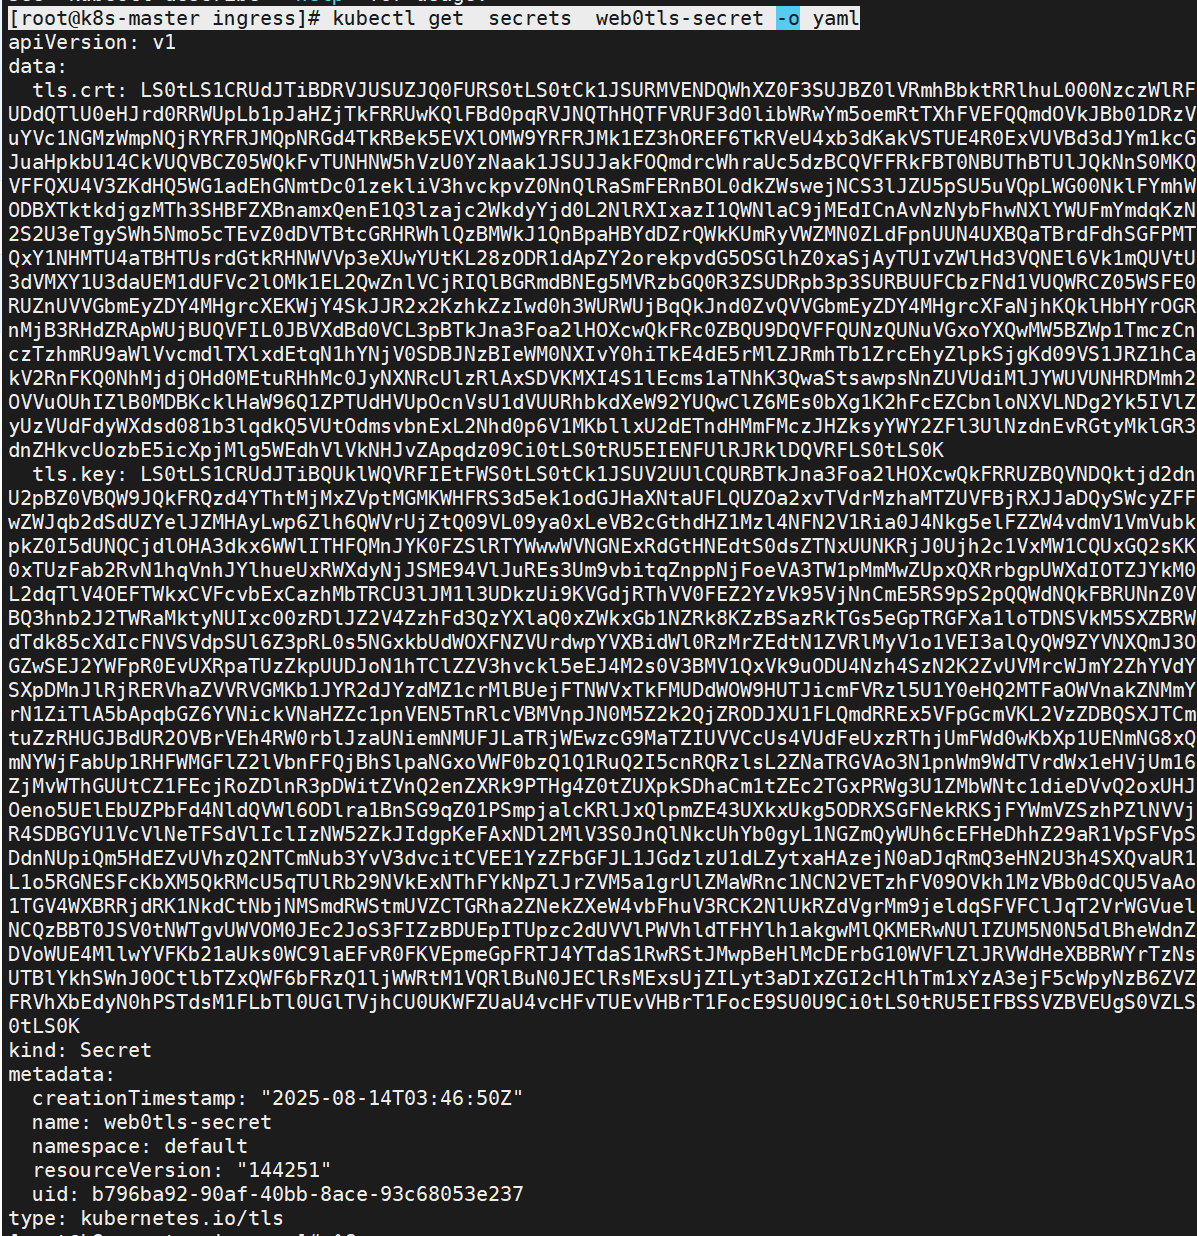
root@k8s-master ingress# kubectl get secrets web0tls-secret -o yaml
root@k8s-master ingress# vi /etc/hosts
172.25.254.50 www.lilee.org myappv1.lilee.org myappv2.lilee.org myapp-tls.lilee.org

C:\Windows\System32\drivers\etc\hosts

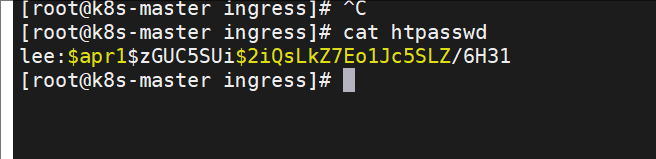
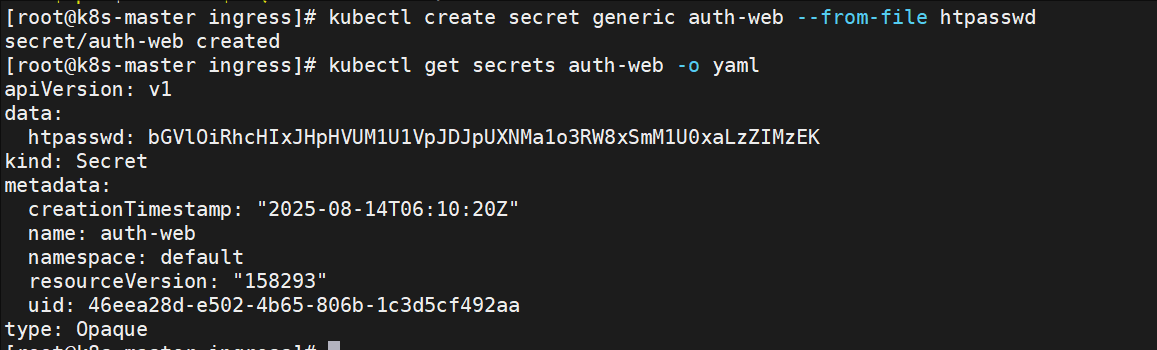
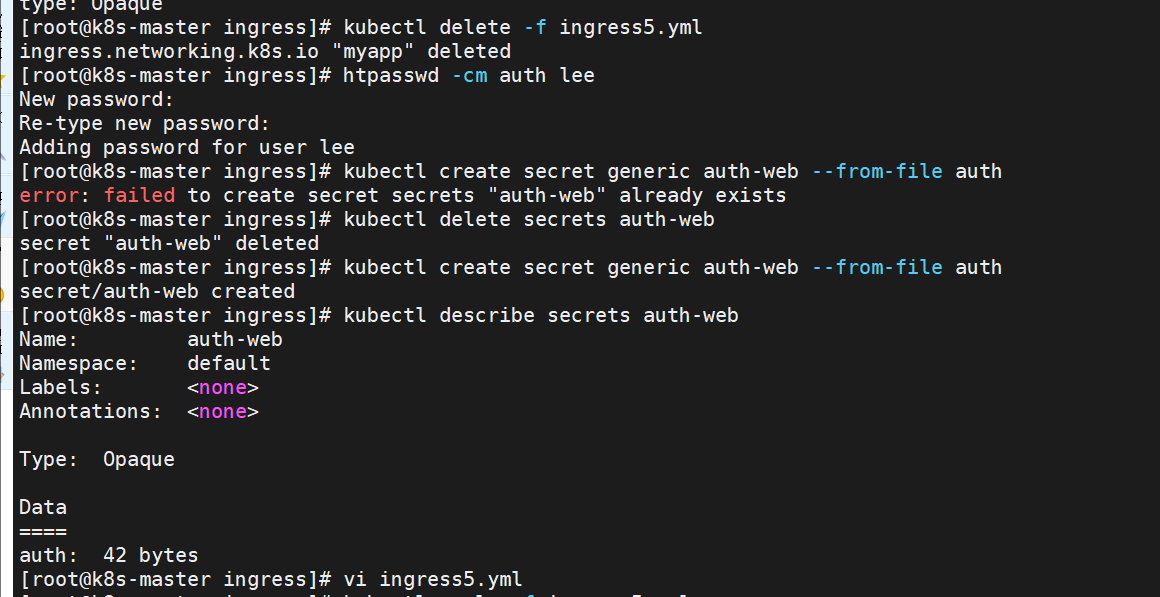
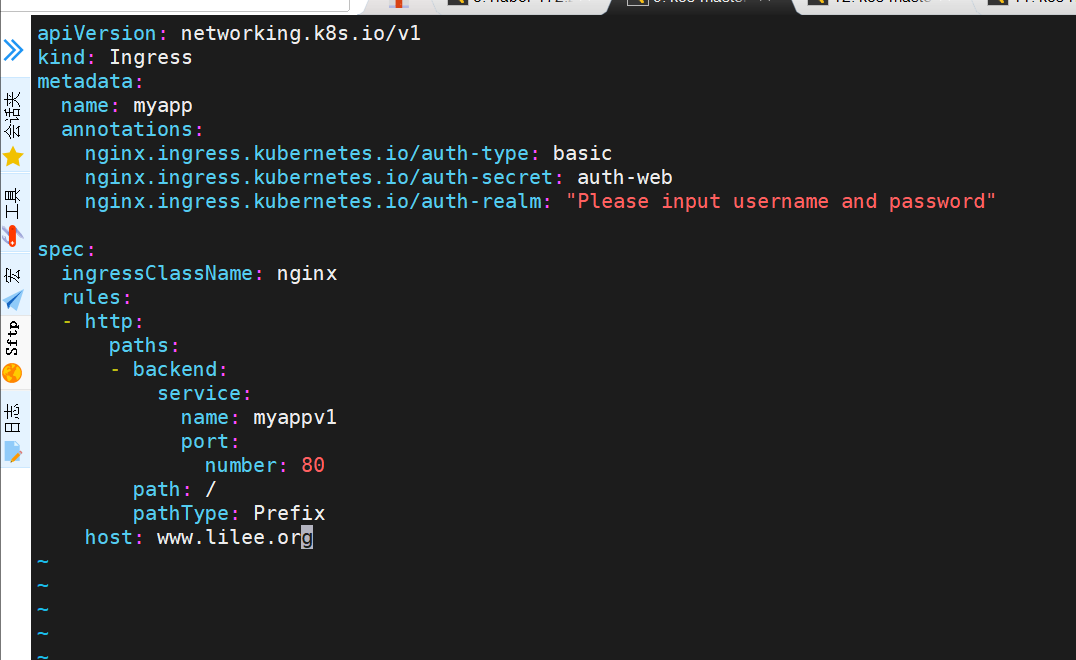
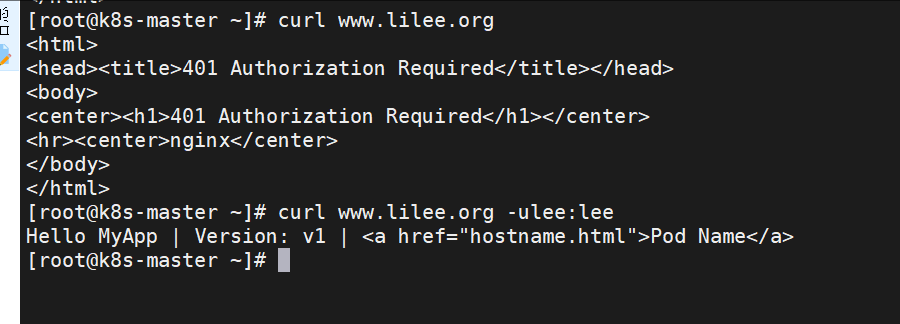
建立auth认证
root@k8s-master app# dnf install httpd-tools -y
root@k8s-master ingress# htpasswd -cm htpasswd lee

vim ~/.vimrc
回收:
root@k8s-master ingress# kubectl delete -f ingress5.yml
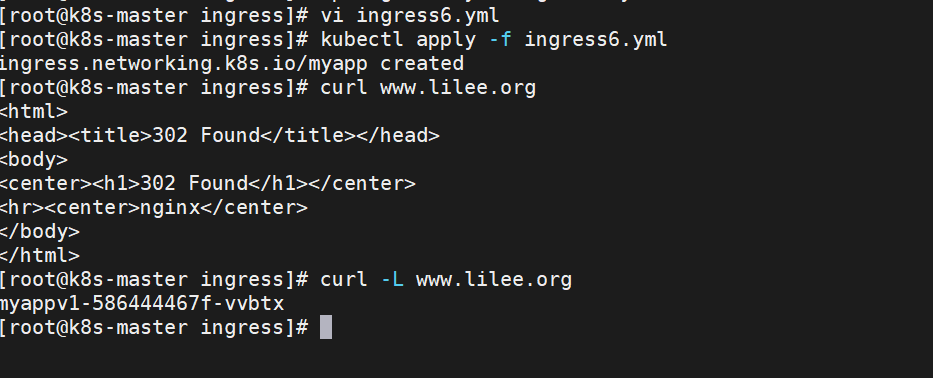
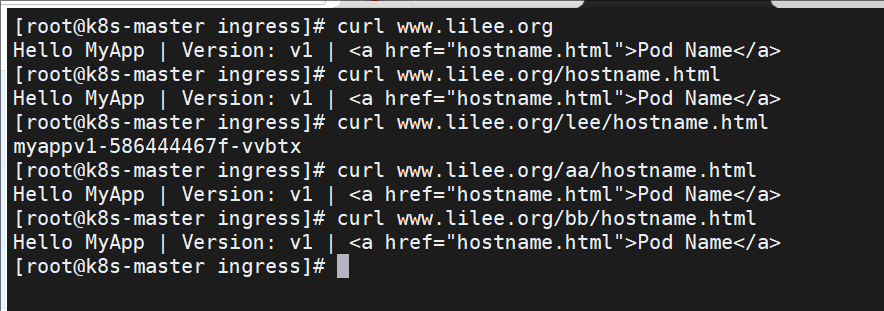
rewrite重定向
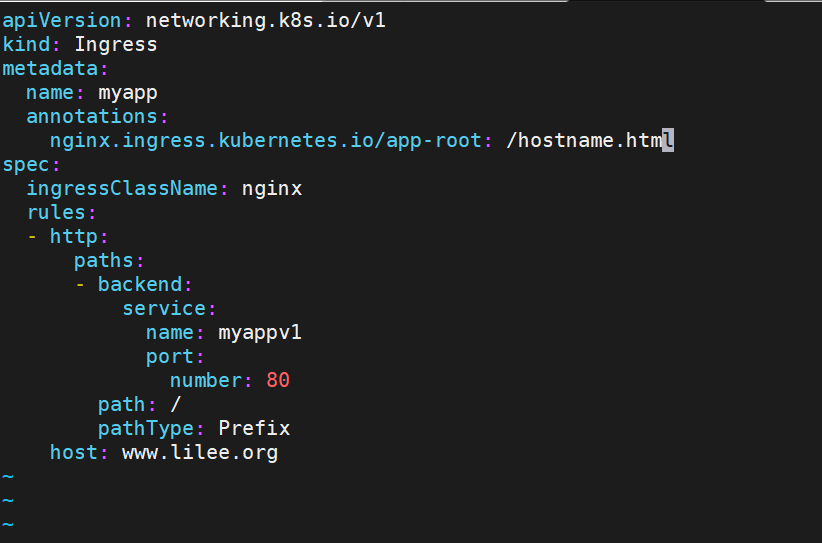
root@k8s-master ingress# kubectl delete -f ingress6.yml

root@k8s-master ingress# vim ingress6.yml
root@k8s-master ingress# kubectl delete -f ingress6.yml
root@k8s-master ingress# kubectl apply -f ingress6.yml
root@k8s-master ingress# kubectl delete -f ingress6.yml
Canary金丝雀发布
什么是金丝雀发布
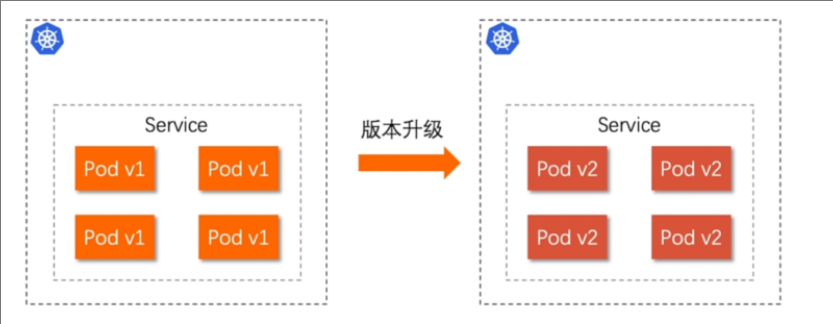
金丝雀发布(Canary Release)也称为灰度发布,是一种软件发布策略。
主要目的是在将新版本的软件全面推广到生产环境之前,先在一小部分用户或服务器上进行测试和验证,以降低因新版本引入重大问题而对整个系统造成的影响。
是一种Pod的发布方式。金丝雀发布采取先添加、再删除的方式,保证Pod的总量不低于期望值。并且在更新部分Pod后,暂停更新,当确认新Pod版本运行正常后再进行其他版本的Pod的更新。
Canary发布方式

其中header和weight中的最多
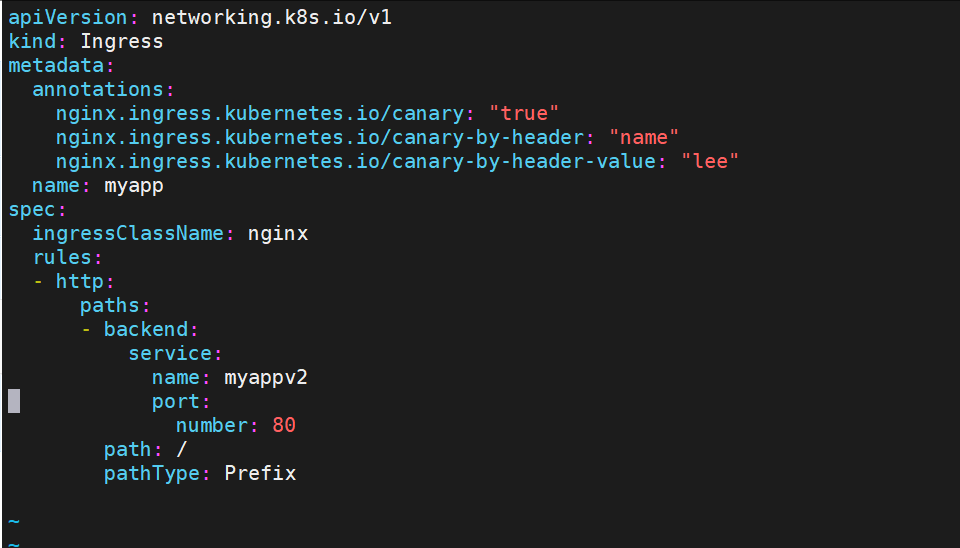
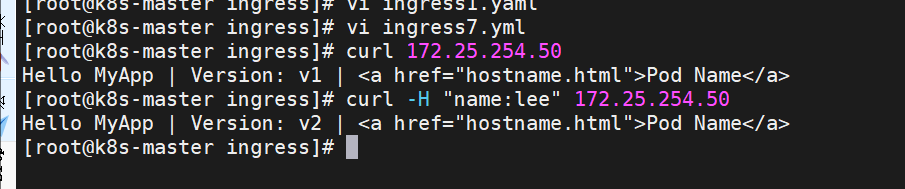
基于header(http包头)灰度
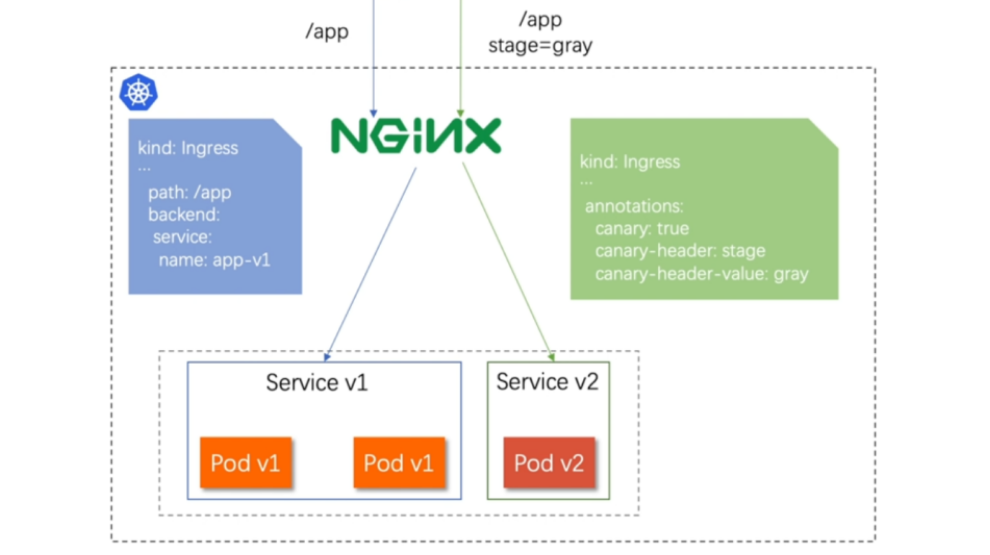
-
通过Annotaion扩展
-
创建灰度ingress,配置灰度头部key以及value
-
灰度流量验证完毕后,切换正式ingress到新版本
-
之前我们在做升级时可以通过控制器做滚动更新,默认25%利用header可以使升级更为平滑,通过key 和vule 测试新的业务体系是否有问题。
示例:
root@k8s-master ingress# vi ingress1.yaml
root@k8s-master ingress# vi ingress7.yml

root@k8s-master ingress# kubectl delete -f ingress7.yml
错误解决
如果出现Rules:
Host Path Backends
*
/ myappv2:80 (<none>)
这种情况
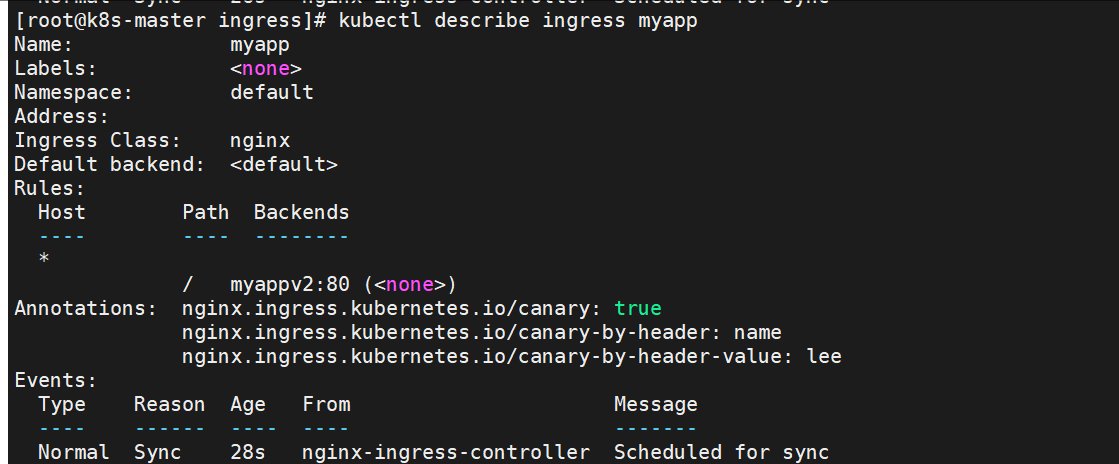
当前集群中确实没有 myappv2 的 Pod ,这就是 myappv2 服务没有后端(<none>)的根本原因。需要先创建 myappv2 的 Deployment(或 ReplicaSet)来生成对应的 Pod。
解决步骤:创建 myappv2 的 Deployment 和 Service
1. 创建 myappv2 的 Deployment 配置文件
新建一个 myappv2-deploy.yaml 文件,定义 myappv2 的 Pod 模板(确保标签与后续 Service 匹配):
apiVersion: apps/v1
kind: Deployment
metadata:
  name: myappv2  # Deployment 名称
spec:
  replicas: 1  # 副本数
  selector:
    matchLabels:
      app: myappv2  # 标签选择器(与 Pod 标签一致)
  template:
    metadata:
      labels:
        app: myappv2  # Pod 标签(需与 Service 选择器匹配)
    spec:
      containers:
      - name: myappv2
        image: myapp:v2  # 替换为 myappv2 的镜像(例如与 v1 不同版本)
        ports:
        - containerPort: 80  # 容器暴露的端口(与 Service 端口对应)
        # 可选:添加健康检查(确保 Pod 被标记为就绪)
        readinessProbe:
          httpGet:
            path: /
            port: 80
          initialDelaySeconds: 5
periodSeconds: 10- 注意:
image需替换为实际的myappv2镜像(如果没有专用镜像,可临时用与myappv1相同的镜像,但后续需区分版本)。 - 标签
app: myappv2是关键,后续 Service 会通过这个标签关联 Pod。
2. 创建 myappv2 的 Service 配置文件
新建 myappv2-svc.yaml,定义 Service 并通过标签选择器关联 myappv2 的 Pod:
apiVersion: v1
kind: Service
metadata:
  name: myappv2  # Service 名称(需与 Ingress 中定义的一致)
spec:
  selector:
    app: myappv2  # 匹配 Pod 的标签(与 Deployment 中一致)
  ports:
  - port: 80  # Service 暴露的端口(与 Ingress 中定义的一致)
    targetPort: 80  # 映射到 Pod 的端口(与容器暴露的端口一致)
  type: ClusterIP  # 默认为 ClusterIP,适合内部访问
3. 应用配置,创建资源
# 创建 Deployment(生成 myappv2 的 Pod)
kubectl apply -f myappv2-deploy.yaml

# 创建 Service(关联 myappv2 的 Pod)
kubectl apply -f myappv2-svc.yaml
4. 验证 myappv2 的 Pod 和 Service 是否正常
# 检查 myappv2 的 Pod 是否运行(状态应为 Running,READY 1/1)
kubectl get pods -l app=myappv2
# 检查 myappv2 服务的 Endpoints(应显示 Pod 的 IP:端口,说明已关联)
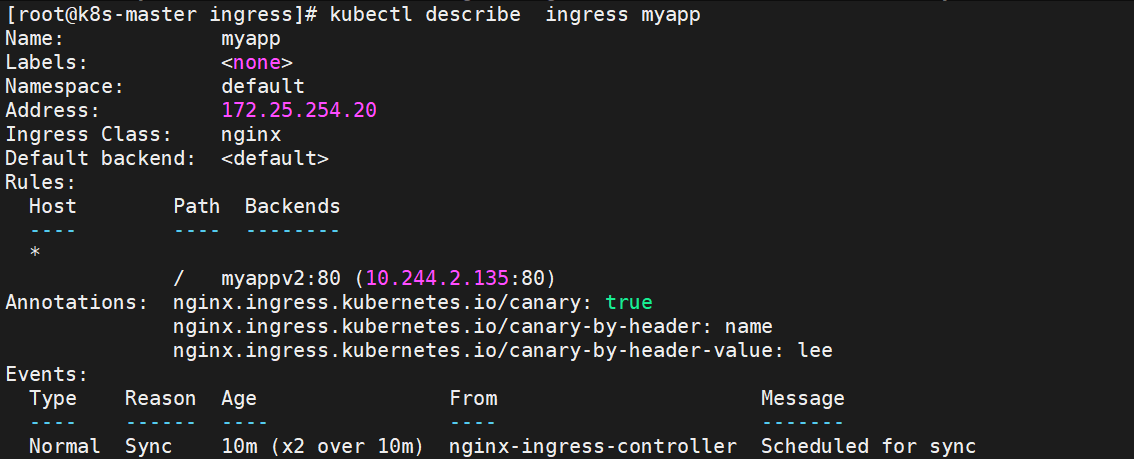
kubectl describe svc myappv2 | grep "Endpoints"
删除旧 Ingress kubectl delete ingress myappv2
重新应用新 Ingress kubectl apply -f ingress1.yaml

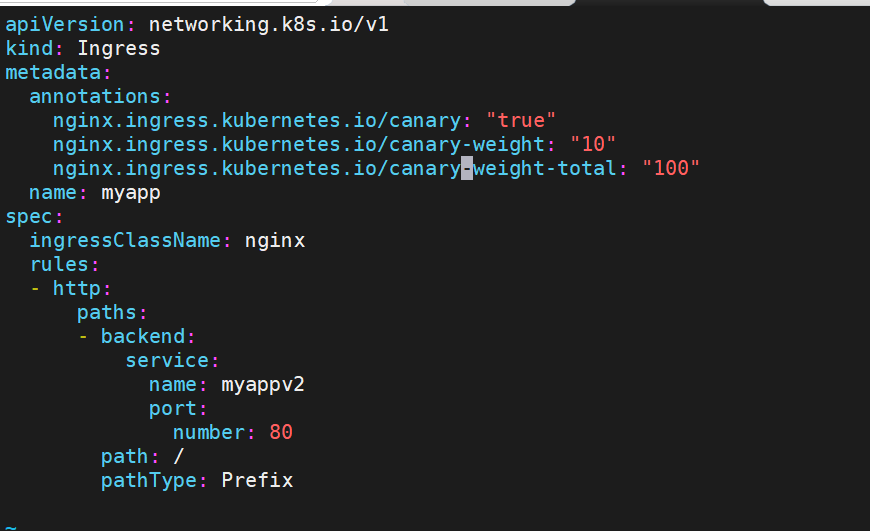
基于权重的灰度发布
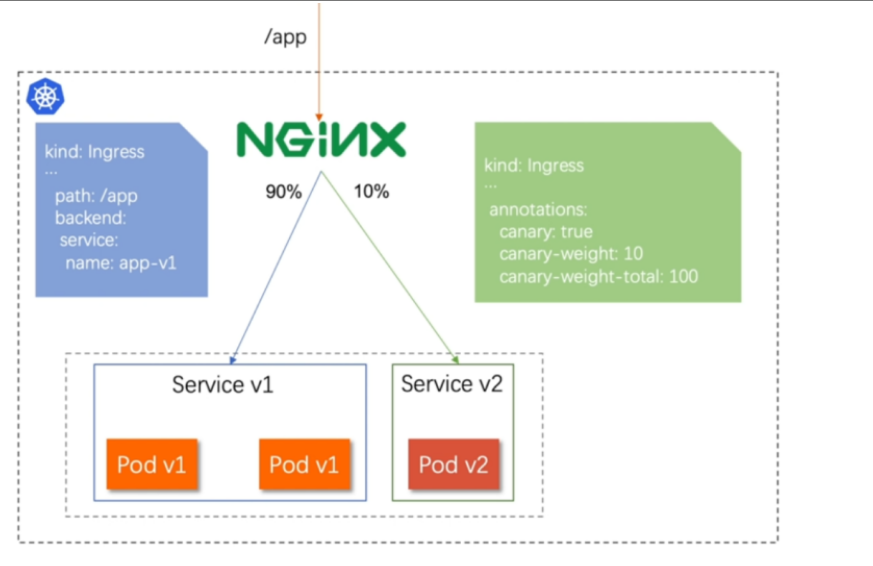
-
通过Annotaion拓展
-
创建灰度ingress,配置灰度权重以及总权重
-
灰度流量验证完毕后,切换正式ingress到新版本
示例
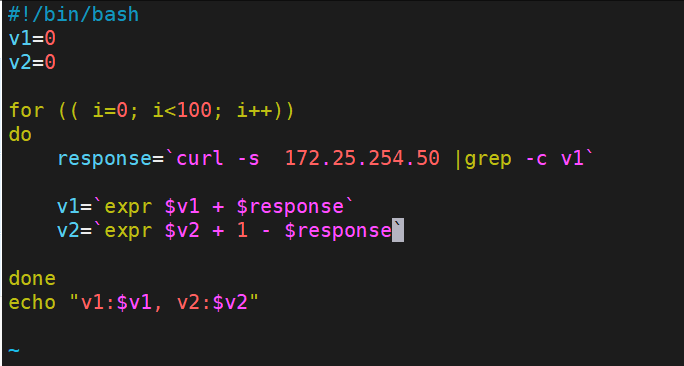
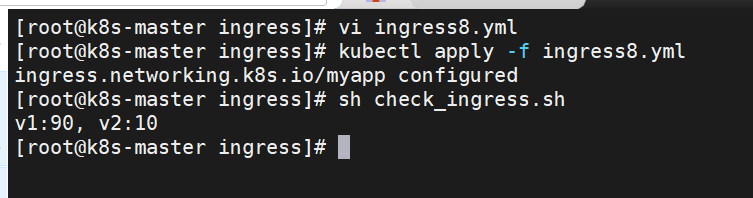
root@k8s-master ingress# vi ingress8.yml
#更改完毕权重后继续测试可观察变化
root@k8s-master ingress# vi check_ingress.sh