
CI/CD 实战:GitHub Actions 自动化部署 Spring Boot 项目
🌟 Hello,我是摘星! 🌈 在彩虹般绚烂的技术栈中,我是那个永不停歇的色彩收集者。 🦋 每一个优化都是我培育的花朵,每一个特性都是我放飞的蝴蝶。 🔬 每一次代码审查都是我的显微镜观察,每一次重构都是我的化学实验。 🎵 在编程的交响乐中,我既是指挥家也是演奏者。让我们一起,在技术的音乐厅里,奏响属于程序员的华美乐章。
摘要
作为一名在 DevOps 领域摸爬滚打多年的技术人,我深知自动化部署对于现代软件开发的重要性。在这个快节奏的互联网时代,手动部署不仅效率低下,还容易出错,更是团队协作的瓶颈。今天,我将与大家分享如何使用 GitHub Actions 构建一套完整的 CI/CD 流水线,实现 Spring Boot 项目的自动化部署。
在我的实际项目经验中,传统的部署方式往往需要开发人员手动执行一系列繁琐的步骤:代码拉取、编译打包、测试验证、服务器部署、环境配置等。这个过程不仅耗时,还极易因为人为操作失误导致生产环境故障。而 GitHub Actions 的出现,让我们能够将这些重复性工作完全自动化,从代码提交到生产部署,整个流程一气呵成。
本文将从零开始,详细介绍如何设计和实现一个企业级的 CI/CD 流水线。我们将涵盖工作流配置、多环境部署策略、安全性考虑、性能优化等关键环节。通过实际案例和最佳实践,帮助大家构建稳定、高效、可维护的自动化部署体系。无论你是 DevOps 新手还是有经验的工程师,都能从中获得实用的技术洞察和操作指导。
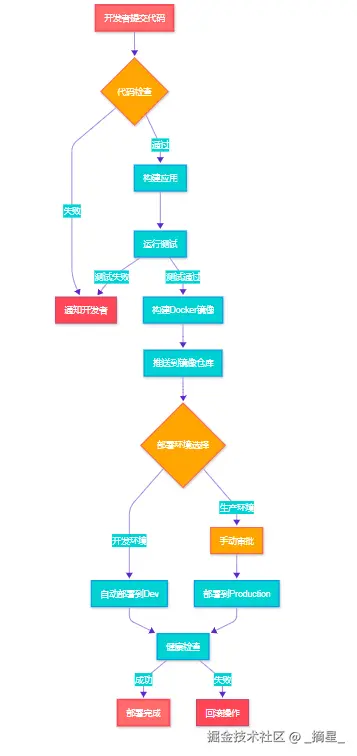
图1:CI/CD 流水线整体流程图 - 展示从代码提交到部署完成的完整自动化流程
1. GitHub Actions 基础概念与架构
1.1 核心组件解析
GitHub Actions 是 GitHub 提供的持续集成和持续部署平台,它允许我们在代码仓库中定义工作流,自动化软件开发生命周期中的各个环节。
工作流(Workflow) 是自动化流程的顶层概念,定义在 .github/workflows 目录下的 YAML 文件中。每个工作流包含一个或多个作业(Job),作业之间可以并行执行或按依赖关系顺序执行。
作业(Job) 是工作流中的执行单元,运行在指定的运行器(Runner)上。每个作业包含多个步骤(Step),这些步骤按顺序执行,共享同一个文件系统和环境变量。
步骤(Step) 是作业中的最小执行单元,可以是运行命令、执行脚本或使用预定义的动作(Action)。
yaml
# .github/workflows/ci-cd.yml
name: Spring Boot CI/CD Pipeline

on:
  push:
    branches: [ main, develop ]
  pull_request:
    branches: [ main ]

env:
  JAVA_VERSION: '17'
  MAVEN_OPTS: '-Xmx1024m'
  DOCKER_REGISTRY: 'ghcr.io'

jobs:
  test:
    runs-on: ubuntu-latest
    steps:
      - name: Checkout code
        uses: actions/checkout@v4

      - name: Set up JDK
        uses: actions/setup-java@v4
        with:
          java-version: ${{ env.JAVA_VERSION }}
          distribution: 'temurin'

      - name: Cache Maven dependencies
        uses: actions/cache@v3
        with:
          path: ~/.m2
          key: ${{ runner.os }}-m2-${{ hashFiles('**/pom.xml') }}
restore-keys: ${{ runner.os }}-m2这个基础配置展示了工作流的核心结构。on 字段定义了触发条件,env 设置全局环境变量,jobs 包含具体的执行逻辑。缓存配置能显著提升构建速度,避免重复下载依赖。
1.2 运行器与执行环境
GitHub 提供了多种运行器选择,包括 GitHub 托管的运行器和自托管运行器。对于大多数项目,GitHub 托管的 `ubuntu-latest` 运行器已经足够使用。
2. Spring Boot 项目 CI/CD 配置实战
2.1 完整工作流配置
基于我在生产环境中的实践经验,下面是一个完整的 Spring Boot CI/CD 工作流配置:
yaml
name: Spring Boot Production Pipeline

on:
  push:
    branches: [ main ]
    tags: [ 'v*' ]
  pull_request:
    branches: [ main ]

env:
  JAVA_VERSION: '17'
  MAVEN_OPTS: '-Xmx2048m -XX:MaxPermSize=512m'
  DOCKER_REGISTRY: 'ghcr.io'
  IMAGE_NAME: 'mycompany/spring-boot-app'

jobs:
  # 代码质量检查和测试
  quality-gate:
    runs-on: ubuntu-latest
    outputs:
      version: ${{ steps.version.outputs.version }}
    steps:
      - name: Checkout repository
        uses: actions/checkout@v4
        with:
          fetch-depth: 0  # 获取完整历史用于 SonarQube 分析

      - name: Set up JDK ${{ env.JAVA_VERSION }}
        uses: actions/setup-java@v4
        with:
          java-version: ${{ env.JAVA_VERSION }}
          distribution: 'temurin'

      - name: Cache Maven dependencies
        uses: actions/cache@v3
        with:
          path: ~/.m2
          key: ${{ runner.os }}-m2-${{ hashFiles('**/pom.xml') }}
          restore-keys: |
            ${{ runner.os }}-m2-

      - name: Extract version
        id: version
        run: |
          if [[ $GITHUB_REF == refs/tags/* ]]; then
            VERSION=${GITHUB_REF#refs/tags/v}
          else
            VERSION=$(mvn help:evaluate -Dexpression=project.version -q -DforceStdout)-${GITHUB_SHA::8}
          fi
          echo "version=$VERSION" >> $GITHUB_OUTPUT
          echo "Version: $VERSION"

      - name: Run tests with coverage
        run: |
          mvn clean verify \
            -Dmaven.test.failure.ignore=false \
            -Dspring.profiles.active=test \
            jacoco:report

      - name: SonarQube analysis
        env:
          GITHUB_TOKEN: ${{ secrets.GITHUB_TOKEN }}
          SONAR_TOKEN: ${{ secrets.SONAR_TOKEN }}
        run: |
          mvn sonar:sonar \
            -Dsonar.projectKey=spring-boot-app \
            -Dsonar.organization=mycompany \
            -Dsonar.host.url=https://sonarcloud.io \
            -Dsonar.coverage.jacoco.xmlReportPaths=target/site/jacoco/jacoco.xml

      - name: Upload test results
        uses: actions/upload-artifact@v3
        if: always()
        with:
          name: test-results
          path: |
            target/surefire-reports/
            target/site/jacoco/
这个质量检查阶段包含了版本提取、测试执行、代码覆盖率分析和 SonarQube 静态代码分析。版本号的动态生成策略能够区分正式发布和开发构建。
2.2 Docker 镜像构建与推送
```yaml # Docker 镜像构建 build-image: needs: quality-gate runs-on: ubuntu-latest if: github.event_name == 'push' outputs: image-digest: ${{ steps.build.outputs.digest }} steps: - name: Checkout repository uses: actions/checkout@v4
yaml
  - name: Set up JDK ${{ env.JAVA_VERSION }}
    uses: actions/setup-java@v4
    with:
      java-version: ${{ env.JAVA_VERSION }}
      distribution: 'temurin'

  - name: Cache Maven dependencies
    uses: actions/cache@v3
    with:
      path: ~/.m2
      key: ${{ runner.os }}-m2-${{ hashFiles('**/pom.xml') }}

  - name: Build application
    run: |
      mvn clean package -DskipTests \
        -Dspring.profiles.active=prod \
        -Dmaven.compiler.debug=false \
        -Dmaven.compiler.debuglevel=none

  - name: Set up Docker Buildx
    uses: docker/setup-buildx-action@v3

  - name: Log in to Container Registry
    uses: docker/login-action@v3
    with:
      registry: ${{ env.DOCKER_REGISTRY }}
      username: ${{ github.actor }}
      password: ${{ secrets.GITHUB_TOKEN }}

  - name: Extract metadata
    id: meta
    uses: docker/metadata-action@v5
    with:
      images: ${{ env.DOCKER_REGISTRY }}/${{ env.IMAGE_NAME }}
      tags: |
        type=ref,event=branch
        type=ref,event=pr
        type=semver,pattern={{version}}
        type=semver,pattern={{major}}.{{minor}}
        type=sha,prefix={{branch}}-

  - name: Build and push Docker image
    id: build
    uses: docker/build-push-action@v5
    with:
      context: .
      file: ./Dockerfile
      push: true
      tags: ${{ steps.meta.outputs.tags }}
      labels: ${{ steps.meta.outputs.labels }}
      cache-from: type=gha
      cache-to: type=gha,mode=max
      platforms: linux/amd64,linux/arm64
bash
Docker 构建阶段使用了多平台构建和缓存优化,能够显著提升构建效率。标签策略支持多种版本管理需求。

<h3 id="ceRQS">2.3 优化的 Dockerfile</h3>
```dockerfile
# 多阶段构建 Dockerfile
FROM eclipse-temurin:17-jdk-alpine AS builder

# 设置工作目录
WORKDIR /app

# 复制 Maven 配置文件
COPY pom.xml .
COPY .mvn .mvn
COPY mvnw .

# 下载依赖(利用 Docker 层缓存)
RUN ./mvnw dependency:go-offline -B

# 复制源代码
COPY src ./src

# 构建应用
RUN ./mvnw clean package -DskipTests -B && \
    java -Djarmode=layertools -jar target/*.jar extract

# 运行时镜像
FROM eclipse-temurin:17-jre-alpine

# 创建非 root 用户
RUN addgroup -g 1001 -S spring && \
    adduser -u 1001 -S spring -G spring

# 安装必要的工具
RUN apk add --no-cache curl tzdata && \
    cp /usr/share/zoneinfo/Asia/Shanghai /etc/localtime && \
    echo "Asia/Shanghai" > /etc/timezone

WORKDIR /app

# 复制应用层(按依赖关系分层,优化缓存)
COPY --from=builder --chown=spring:spring app/dependencies/ ./
COPY --from=builder --chown=spring:spring app/spring-boot-loader/ ./
COPY --from=builder --chown=spring:spring app/snapshot-dependencies/ ./
COPY --from=builder --chown=spring:spring app/application/ ./

# 切换到非 root 用户
USER spring:spring

# 健康检查
HEALTHCHECK --interval=30s --timeout=10s --start-period=60s --retries=3 \
    CMD curl -f http://localhost:8080/actuator/health || exit 1

# 暴露端口
EXPOSE 8080

# JVM 优化参数
ENV JAVA_OPTS="-XX:+UseContainerSupport -XX:MaxRAMPercentage=75.0 -XX:+UseG1GC -XX:+UseStringDeduplication"

# 启动应用
ENTRYPOINT ["sh", "-c", "java $JAVA_OPTS org.springframework.boot.loader.JarLauncher"]
这个 Dockerfile 采用了多阶段构建和分层优化策略,能够显著减小镜像大小并提升构建效率。
3. 多环境部署策略
3.1 环境配置管理
在实际项目中,我们通常需要支持开发、测试、预生产和生产等多个环境。每个环境都有不同的配置需求和部署策略。
yaml
  # 开发环境自动部署
  deploy-dev:
    needs: [quality-gate, build-image]
    runs-on: ubuntu-latest
    if: github.ref == 'refs/heads/develop'
    environment:
      name: development
      url: https://dev.myapp.com
    steps:
      - name: Deploy to Development
        uses: azure/k8s-deploy@v1
        with:
          manifests: |
            k8s/dev/deployment.yaml
            k8s/dev/service.yaml
            k8s/dev/ingress.yaml
          images: |
            ${{ env.DOCKER_REGISTRY }}/${{ env.IMAGE_NAME }}:${{ needs.quality-gate.outputs.version }}
          kubectl-version: 'latest'

  # 生产环境手动部署
  deploy-prod:
    needs: [quality-gate, build-image]
    runs-on: ubuntu-latest
    if: startsWith(github.ref, 'refs/tags/v')
    environment:
      name: production
      url: https://myapp.com
    steps:
      - name: Checkout repository
        uses: actions/checkout@v4

      - name: Configure kubectl
        run: |
          echo "${{ secrets.KUBE_CONFIG }}" | base64 -d > kubeconfig
          export KUBECONFIG=kubeconfig

      - name: Deploy to Production
        run: |
          # 更新镜像标签
          sed -i "s|IMAGE_TAG|${{ needs.quality-gate.outputs.version }}|g" k8s/prod/deployment.yaml

          # 应用配置
          kubectl apply -f k8s/prod/

          # 等待部署完成
          kubectl rollout status deployment/spring-boot-app -n production --timeout=300s

      - name: Run smoke tests
        run: |
          # 等待服务就绪
          sleep 30

          # 执行冒烟测试
          curl -f https://myapp.com/actuator/health || exit 1
          curl -f https://myapp.com/api/v1/status || exit 1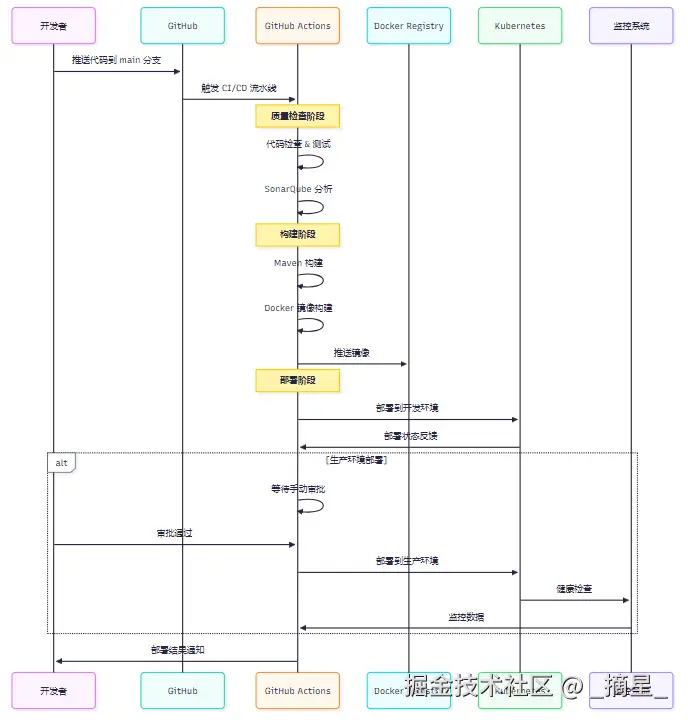
图3:多环境部署时序图 - 展示从代码提交到多环境部署的完整交互流程
3.2 Kubernetes 部署配置
```yaml # k8s/prod/deployment.yaml apiVersion: apps/v1 kind: Deployment metadata: name: spring-boot-app namespace: production labels: app: spring-boot-app version: IMAGE_TAG spec: replicas: 3 strategy: type: RollingUpdate rollingUpdate: maxSurge: 1 maxUnavailable: 0 selector: matchLabels: app: spring-boot-app template: metadata: labels: app: spring-boot-app version: IMAGE_TAG annotations: prometheus.io/scrape: "true" prometheus.io/port: "8080" prometheus.io/path: "/actuator/prometheus" spec: serviceAccountName: spring-boot-app securityContext: runAsNonRoot: true runAsUser: 1001 fsGroup: 1001 containers: - name: app image: ghcr.io/mycompany/spring-boot-app:IMAGE_TAG ports: - containerPort: 8080 name: http env: - name: SPRING_PROFILES_ACTIVE value: "prod" - name: JAVA_OPTS value: "-XX:+UseContainerSupport -XX:MaxRAMPercentage=75.0" resources: requests: memory: "512Mi" cpu: "250m" limits: memory: "1Gi" cpu: "500m" livenessProbe: httpGet: path: /actuator/health/liveness port: 8080 initialDelaySeconds: 60 periodSeconds: 30 timeoutSeconds: 10 failureThreshold: 3 readinessProbe: httpGet: path: /actuator/health/readiness port: 8080 initialDelaySeconds: 30 periodSeconds: 10 timeoutSeconds: 5 failureThreshold: 3 volumeMounts: - name: config mountPath: /app/config readOnly: true - name: logs mountPath: /app/logs volumes: - name: config configMap: name: spring-boot-app-config - name: logs emptyDir: {} ```
这个 Kubernetes 部署配置包含了生产环境的最佳实践:滚动更新策略、资源限制、健康检查、安全配置等。
4. 安全性与最佳实践
4.1 密钥管理策略
在 CI/CD 流水线中,安全性是至关重要的考虑因素。GitHub Actions 提供了多层次的密钥管理机制:
| 密钥类型 | 作用域 | 使用场景 | 安全级别 |
|---|---|---|---|
| Repository Secrets | 单个仓库 | 数据库密码、API密钥 | 高 |
| Organization Secrets | 组织级别 | 共享服务凭证 | 高 |
| Environment Secrets | 特定环境 | 环境专用配置 | 最高 |
| Dependabot Secrets | 依赖更新 | 私有仓库访问 | 中 |
yaml
  security-scan:
    runs-on: ubuntu-latest
    steps:
      - name: Checkout code
        uses: actions/checkout@v4

      - name: Run Trivy vulnerability scanner
        uses: aquasecurity/trivy-action@master
        with:
          image-ref: ${{ env.DOCKER_REGISTRY }}/${{ env.IMAGE_NAME }}:${{ needs.quality-gate.outputs.version }}
          format: 'sarif'
          output: 'trivy-results.sarif'

      - name: Upload Trivy scan results
        uses: github/codeql-action/upload-sarif@v2
        with:
          sarif_file: 'trivy-results.sarif'

      - name: OWASP Dependency Check
        uses: dependency-check/Dependency-Check_Action@main
        with:
          project: 'spring-boot-app'
          path: '.'
          format: 'ALL'

      - name: Upload dependency check results
        uses: actions/upload-artifact@v3
        with:
          name: dependency-check-report
          path: reports/
4.2 访问控制与审批流程
```yaml # 生产环境保护规则配置 production: protection_rules: required_reviewers: 2 restrict_pushes: true required_status_checks: - "quality-gate" - "security-scan" - "build-image" deployment_branch_policy: protected_branches: true custom_branch_policies: false ``` 安全原则:在生产环境部署中,永远不要跳过安全检查和代码审查。每一次部署都应该经过严格的质量门禁和人工审批,这是保障系统稳定性的最后一道防线。
5. 性能优化与监控
5.1 构建性能优化
基于我的实践经验,以下是一些关键的性能优化策略:
yaml
  optimized-build:
    runs-on: ubuntu-latest
    steps:
      - name: Checkout with shallow clone
        uses: actions/checkout@v4
        with:
          fetch-depth: 1  # 浅克隆,减少网络传输

      - name: Setup Java with cache
        uses: actions/setup-java@v4
        with:
          java-version: ${{ env.JAVA_VERSION }}
          distribution: 'temurin'
          cache: 'maven'  # 自动缓存 Maven 依赖

      - name: Parallel Maven build
        run: |
          mvn clean package \
            -T 2C \  # 使用 2 倍 CPU 核心数的线程
            -DskipTests \
            -Dmaven.javadoc.skip=true \
            -Dmaven.source.skip=true \
            --batch-mode \
            --no-transfer-progress

      - name: Docker build with cache
        uses: docker/build-push-action@v5
        with:
          context: .
          cache-from: type=gha
          cache-to: type=gha,mode=max
          build-args: |
            BUILDKIT_INLINE_CACHE=1
5.2 部署监控与告警
```yaml post-deployment-monitoring: needs: deploy-prod runs-on: ubuntu-latest steps: - name: Wait for deployment stabilization run: sleep 120
bash
  - name: Health check with retry
    run: |
      for i in {1..10}; do
        if curl -f https://myapp.com/actuator/health; then
          echo "Health check passed"
          break
        fi
        echo "Attempt $i failed, retrying in 30s..."
        sleep 30
      done

  - name: Performance baseline test
    run: |
      # 使用 Apache Bench 进行基准测试
      ab -n 1000 -c 10 https://myapp.com/api/v1/status

  - name: Send deployment notification
    uses: 8398a7/action-slack@v3
    with:
      status: ${{ job.status }}
      channel: '#deployments'
      webhook_url: ${{ secrets.SLACK_WEBHOOK }}
    if: always()
less
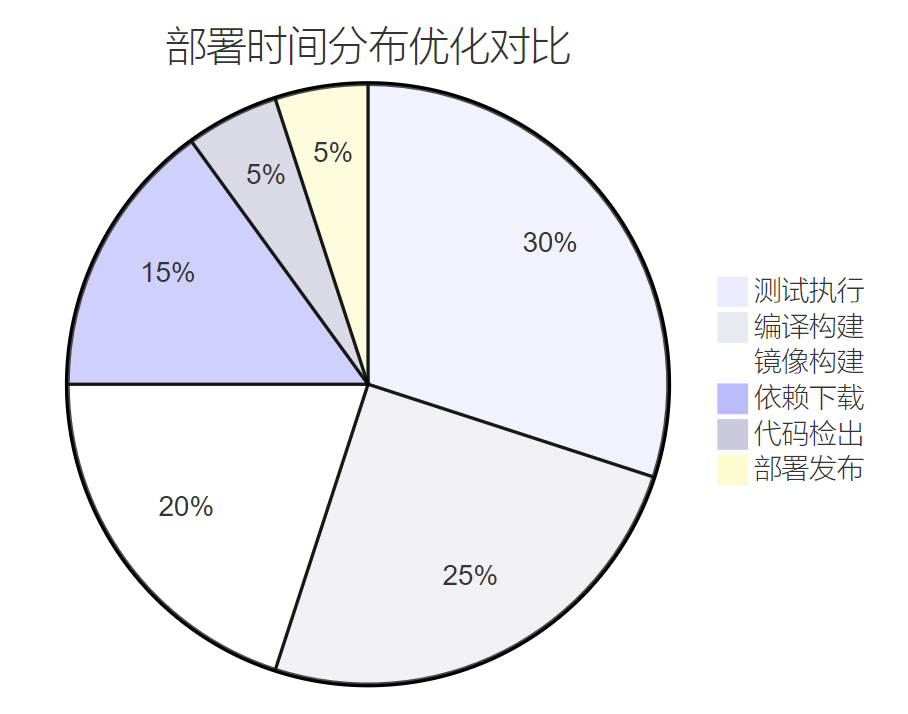
_图4:部署时间分布饼图 - 展示各阶段耗时占比,指导优化重点_
<h2 id="ihiLK">6. 故障处理与回滚策略</h2>
<h3 id="LiOEz">6.1 自动回滚机制</h3>
```yaml
rollback-on-failure:
needs: deploy-prod
runs-on: ubuntu-latest
if: failure()
steps:
- name: Get previous successful deployment
id: previous
run: |
PREVIOUS_TAG=$(kubectl get deployment spring-boot-app -n production -o jsonpath='{.metadata.annotations.deployment\.kubernetes\.io/revision}')
echo "previous-tag=$PREVIOUS_TAG" >> $GITHUB_OUTPUT
- name: Rollback deployment
run: |
kubectl rollout undo deployment/spring-boot-app -n production
kubectl rollout status deployment/spring-boot-app -n production --timeout=300s
- name: Verify rollback
run: |
sleep 60
curl -f https://myapp.com/actuator/health || exit 1
- name: Notify rollback
uses: 8398a7/action-slack@v3
with:
status: 'failure'
channel: '#alerts'
webhook_url: ${{ secrets.SLACK_WEBHOOK }}
text: |
🚨 Production deployment failed and rolled back
Repository: ${{ github.repository }}
Commit: ${{ github.sha }}
Previous version restored successfully6.2 蓝绿部署策略
```yaml blue-green-deployment: runs-on: ubuntu-latest steps: - name: Deploy to Green Environment run: | # 部署到绿色环境 kubectl apply -f k8s/green/ kubectl rollout status deployment/spring-boot-app-green -n production
bash
  - name: Run Integration Tests
    run: |
      # 对绿色环境执行集成测试
      ./scripts/integration-tests.sh https://green.myapp.com

  - name: Switch Traffic to Green
    run: |
      # 切换流量到绿色环境
      kubectl patch service spring-boot-app -n production -p '{"spec":{"selector":{"version":"green"}}}'

  - name: Monitor Green Environment
    run: |
      # 监控绿色环境 5 分钟
      for i in {1..10}; do
        curl -f https://myapp.com/actuator/health || exit 1
        sleep 30
      done

  - name: Cleanup Blue Environment
    run: |
      # 清理蓝色环境
      kubectl delete deployment spring-boot-app-blue -n production
bash
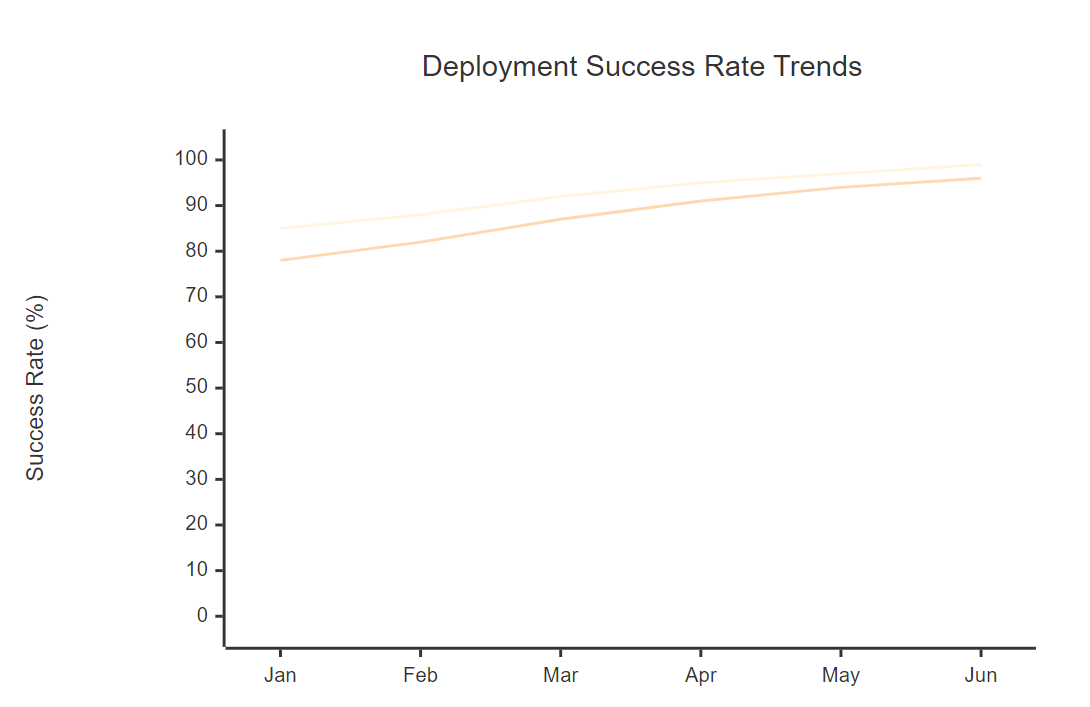
_图5:部署成功率趋势图 - 展示 CI/CD 优化前后的部署成功率对比_
<h2 id="oHEVJ">7. 高级特性与扩展</h2>
<h3 id="Gw9HF">7.1 矩阵构建策略</h3>
对于需要支持多个 Java 版本或操作系统的项目,可以使用矩阵构建:
```yaml
matrix-build:
runs-on: ${{ matrix.os }}
strategy:
matrix:
os: [ubuntu-latest, windows-latest, macos-latest]
java-version: ['11', '17', '21']
exclude:
- os: windows-latest
java-version: '11'
steps:
- name: Checkout code
uses: actions/checkout@v4
- name: Set up JDK ${{ matrix.java-version }}
uses: actions/setup-java@v4
with:
java-version: ${{ matrix.java-version }}
distribution: 'temurin'
- name: Run tests
run: mvn test -Djava.version=${{ matrix.java-version }}7.2 条件执行与路径过滤
```yaml on: push: branches: main, develop paths: - 'src/**' - 'pom.xml' - '.github/workflows/**' pull_request: branches: main paths-ignore: - 'docs/**' - '*.md' - '.gitignore'
jobs: conditional-deploy: if: | github.event_name == 'push' && github.ref == 'refs/heads/main' && !contains(github.event.head_commit.message, 'skip ci')
bash
<h3 id="pDY1M">7.3 自定义 Actions 开发</h3>
```yaml
# .github/actions/deploy-spring-boot/action.yml
name: 'Deploy Spring Boot Application'
description: 'Custom action for deploying Spring Boot apps'
inputs:
  environment:
    description: 'Target environment'
    required: true
  image-tag:
    description: 'Docker image tag'
    required: true
  kubeconfig:
    description: 'Kubernetes config'
    required: true
outputs:
  deployment-url:
    description: 'Deployed application URL'
    value: ${{ steps.deploy.outputs.url }}
runs:
  using: 'composite'
  steps:
    - name: Setup kubectl
      uses: azure/setup-kubectl@v3
      with:
        version: 'latest'

    - name: Deploy application
      id: deploy
      shell: bash
      run: |
        echo "${{ inputs.kubeconfig }}" | base64 -d > kubeconfig
        export KUBECONFIG=kubeconfig

        # 替换镜像标签
        sed -i "s|IMAGE_TAG|${{ inputs.image-tag }}|g" k8s/${{ inputs.environment }}/deployment.yaml

        # 执行部署
        kubectl apply -f k8s/${{ inputs.environment }}/
        kubectl rollout status deployment/spring-boot-app -n ${{ inputs.environment }}

        # 获取服务 URL
        URL=$(kubectl get ingress spring-boot-app -n ${{ inputs.environment }} -o jsonpath='{.spec.rules[0].host}')
        echo "url=https://$URL" >> $GITHUB_OUTPUT
8. 性能监控与指标分析
8.1 关键指标定义
在 CI/CD 流水线中,我们需要关注以下关键指标:
| 指标类型 | 具体指标 | 目标值 | 监控方式 |
|---|---|---|---|
| 构建性能 | 构建时间 | < 10分钟 | GitHub Actions 时间统计 |
| 部署频率 | 每日部署次数 | > 5次 | Git 提交频率分析 |
| 失败率 | 构建失败率 | < 5% | 失败构建统计 |
| 恢复时间 | 平均恢复时间 | < 30分钟 | 故障处理时间跟踪 |
| 代码质量 | 测试覆盖率 | > 80% | SonarQube 报告 |
8.2 监控仪表板配置
```yaml metrics-collection: runs-on: ubuntu-latest steps: - name: Collect build metrics run: | # 收集构建指标 BUILD_TIME=${{ github.event.workflow_run.conclusion == 'success' && github.event.workflow_run.updated_at - github.event.workflow_run.created_at || 0 }}
arduino
      # 发送到监控系统
      curl -X POST https://metrics.mycompany.com/api/v1/metrics \
        -H "Content-Type: application/json" \
        -d '{
          "metric": "cicd.build.duration",
          "value": "'$BUILD_TIME'",
          "tags": {
            "repository": "'${{ github.repository }}'",
            "branch": "'${{ github.ref_name }}'",
            "status": "'${{ job.status }}'"
          }
        }'

  - name: Update deployment dashboard
    uses: actions/github-script@v6
    with:
      script: |
        const { data: deployments } = await github.rest.repos.listDeployments({
          owner: context.repo.owner,
          repo: context.repo.repo,
          per_page: 10
        });

        // 更新部署统计
        console.log(`Recent deployments: ${deployments.length}`);
bash
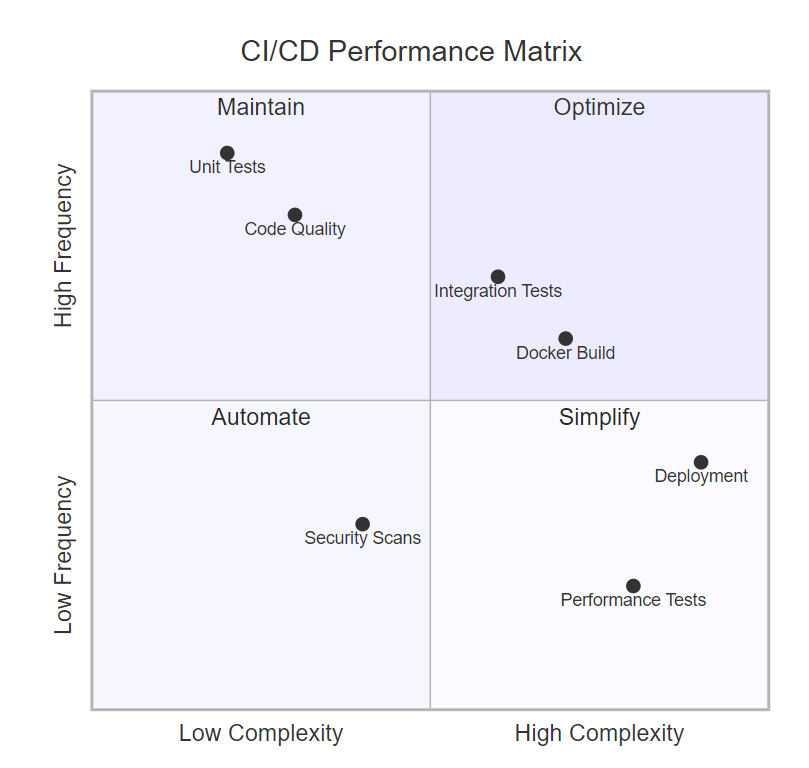
_图6:CI/CD 性能象限图 - 展示不同流程的复杂度与频率分布,指导优化策略_
<h2 id="P28SW">9. 团队协作与工作流优化</h2>
<h3 id="RiSRK">9.1 分支策略与工作流</h3>
```yaml
# 基于 GitFlow 的工作流配置
name: GitFlow CI/CD
on:
push:
branches: [ main, develop, 'release/*', 'hotfix/*' ]
pull_request:
branches: [ main, develop ]
jobs:
determine-strategy:
runs-on: ubuntu-latest
outputs:
deploy-env: ${{ steps.strategy.outputs.environment }}
skip-tests: ${{ steps.strategy.outputs.skip-tests }}
steps:
- name: Determine deployment strategy
id: strategy
run: |
if [[ "${{ github.ref }}" == "refs/heads/main" ]]; then
echo "environment=production" >> $GITHUB_OUTPUT
echo "skip-tests=false" >> $GITHUB_OUTPUT
elif [[ "${{ github.ref }}" == "refs/heads/develop" ]]; then
echo "environment=development" >> $GITHUB_OUTPUT
echo "skip-tests=false" >> $GITHUB_OUTPUT
elif [[ "${{ github.ref }}" == refs/heads/release/* ]]; then
echo "environment=staging" >> $GITHUB_OUTPUT
echo "skip-tests=false" >> $GITHUB_OUTPUT
elif [[ "${{ github.ref }}" == refs/heads/hotfix/* ]]; then
echo "environment=hotfix" >> $GITHUB_OUTPUT
echo "skip-tests=true" >> $GITHUB_OUTPUT
else
echo "environment=none" >> $GITHUB_OUTPUT
echo "skip-tests=false" >> $GITHUB_OUTPUT
fi9.2 代码审查集成
```yaml code-review-automation: runs-on: ubuntu-latest if: github.event_name == 'pull_request' steps: - name: Checkout PR uses: actions/checkout@v4 with: fetch-depth: 0
typescript
  - name: Run automated code review
    uses: github/super-linter@v4
    env:
      DEFAULT_BRANCH: main
      GITHUB_TOKEN: ${{ secrets.GITHUB_TOKEN }}
      VALIDATE_JAVA: true
      VALIDATE_DOCKERFILE: true
      VALIDATE_YAML: true

  - name: Comment PR with review results
    uses: actions/github-script@v6
    with:
      script: |
        const fs = require('fs');
        const path = './super-linter.log';

        if (fs.existsSync(path)) {
          const logContent = fs.readFileSync(path, 'utf8');
          const issues = logContent.split('\n').filter(line => line.includes('ERROR'));

          if (issues.length > 0) {
            await github.rest.issues.createComment({
              issue_number: context.issue.number,
              owner: context.repo.owner,
              repo: context.repo.repo,
              body: `## 🔍 Code Review Results\n\nFound ${issues.length} issues:\n\n${issues.slice(0, 10).map(issue => `- ${issue}`).join('\n')}`
            });
          }
        }
bash
<h2 id="AIgJa">10. 故障排查与调试技巧</h2>
<h3 id="SwS4e">10.1 常见问题诊断</h3>
在实际使用中,我遇到过各种各样的问题,以下是一些常见的故障排查方法:

```yaml
  debug-workflow:
    runs-on: ubuntu-latest
    steps:
      - name: Debug environment
        run: |
          echo "=== System Information ==="
          uname -a
          df -h
          free -m

          echo "=== Environment Variables ==="
          env | sort

          echo "=== GitHub Context ==="
          echo "Event: ${{ github.event_name }}"
          echo "Ref: ${{ github.ref }}"
          echo "SHA: ${{ github.sha }}"
          echo "Actor: ${{ github.actor }}"

      - name: Debug with tmate (remote access)
        uses: mxschmitt/action-tmate@v3
        if: ${{ failure() && github.event.inputs.debug == 'true' }}
        with:
          limit-access-to-actor: true
10.2 日志收集与分析
```yaml - name: Collect logs on failure if: failure() run: | # 收集系统日志 sudo journalctl --no-pager > system.log
yaml
      # 收集 Docker 日志
      docker logs $(docker ps -aq) > docker.log 2>&1 || true

      # 收集应用日志
      kubectl logs -l app=spring-boot-app -n production --tail=1000 > app.log || true

  - name: Upload failure artifacts
    uses: actions/upload-artifact@v3
    if: failure()
    with:
      name: failure-logs-${{ github.run_id }}
      path: |
        *.log
        target/surefire-reports/
        target/failsafe-reports/
      retention-days: 30
less
<h2 id="RsG3k">总结</h2>
通过这次深入的 CI/CD 实战分享,我希望能够帮助大家建立起完整的自动化部署体系。从我多年的实践经验来看,一个成功的 CI/CD 流水线不仅仅是技术的堆砌,更是团队协作文化和工程效率的体现。

在实施过程中,我们需要循序渐进,从简单的自动化构建开始,逐步完善测试、安全检查、多环境部署等环节。每一个环节都要考虑到实际的业务需求和团队能力,不能盲目追求技术的先进性而忽略了实用性和可维护性。

特别值得强调的是,CI/CD 不是一次性的项目,而是需要持续优化和改进的过程。随着项目的发展和团队的成长,我们的流水线也需要不断演进。监控指标、性能优化、安全加固这些工作都需要持续投入。

在安全性方面,我们必须始终保持警惕。密钥管理、访问控制、漏洞扫描这些环节一个都不能少。生产环境的部署更是需要严格的审批流程和回滚机制,这是对用户负责,也是对团队负责。

最后,我想说的是,技术是为业务服务的。再完美的 CI/CD 流水线,如果不能提升团队效率、保障产品质量、降低运维成本,那就失去了它存在的意义。我们要始终以解决实际问题为导向,用技术的力量让开发和运维工作变得更加高效和可靠。

希望这篇文章能够为大家在 DevOps 道路上提供一些有价值的参考。技术的世界日新月异,但工程实践的核心原则是相通的:自动化、标准化、可观测性。让我们一起在这条路上不断探索,用代码改变世界,用自动化释放创造力。

我是摘星!如果这篇文章在你的技术成长路上留下了印记
👁️	【关注】与我一起探索技术的无限可能,见证每一次突破
👍	【点赞】为优质技术内容点亮明灯,传递知识的力量
🔖	【收藏】将精华内容珍藏,随时回顾技术要点
💬	【评论】分享你的独特见解,让思维碰撞出智慧火花
🗳️	【投票】用你的选择为技术社区贡献一份力量
技术路漫漫,让我们携手前行,在代码的世界里摘取属于程序员的那片星辰大海!

---

<h2 id="JCH5B">参考链接</h2>
1. [GitHub Actions 官方文档](https://docs.github.com/en/actions)
2. [Spring Boot 官方部署指南](https://spring.io/guides/gs/spring-boot-docker/)
3. [Kubernetes 部署最佳实践](https://kubernetes.io/docs/concepts/workloads/controllers/deployment/)
4. [Docker 多阶段构建优化](https://docs.docker.com/develop/dev-best-practices/)
5. [SonarQube 代码质量分析](https://docs.sonarqube.org/latest/)

<h2 id="LC5ss">关键词标签</h2>
`#CI/CD` `#GitHub Actions` `#Spring Boot` `#Docker` `#Kubernetes` `#DevOps` `#自动化部署` `#容器化` `#微服务` `#持续集成`