前言
大家好,我是大华!
今天给大家分享一个超酷的LED数字时钟效果。这个时钟不仅显示当前时间,还有倒计时功能,而且完全由Vue和CSS实现!
为了方便理解,把代码分成了基础款 和升级款两种,都有完整的源码。
先看看效果:
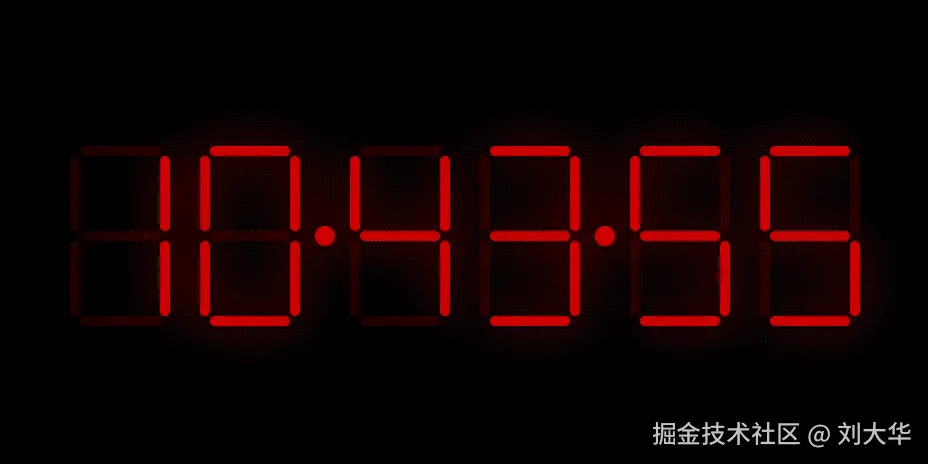
基础款:
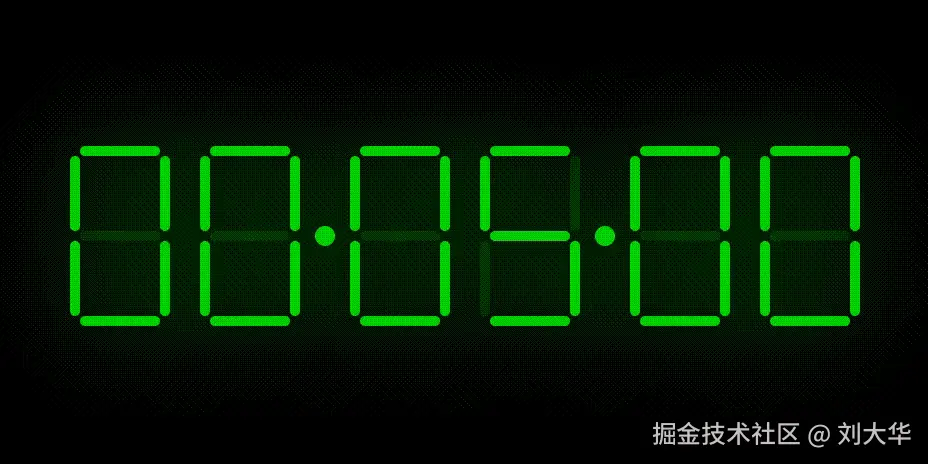
升级款(支持倒计时、颜色参数的配置):
这就是我们今天要做的:七段数码管LED时钟。
接下来我们一步步展示讲解实现思路和实现,完整源码在后面。
理解七段数码管
千万不要被它的名字吓到了。
"七段" = 7个发光的小条,它们编号是1到7,位置如下:
   ┌───1───┐
   │       │
   6       2
   │       │
   └───7───┘
   │       │
   5       3
   │       │
   └───4───┘
比如要显示数字 1,只需要点亮第2和第3段。
要显示 8,7段全部点亮!
所以,核心思路是:
给每个数字,定义好它该亮哪几段。
然后根据当前时间,动态点亮对应的段。
版本一:基础版
逻辑比较简单,先贴完整代码:
html
<template>
  <div class="clock">
    <!-- 小时 -->
    <div class="digit hours">
      <div
        v-for="i in 7"
        :key="'h1-' + i"
        class="segment"
        :class="{ on: getActiveSegments(parseInt(time.hours[0])).includes(i) }"
      ></div>
    </div>
    <div class="digit hours">
      <div
        v-for="i in 7"
        :key="'h2-' + i"
        class="segment"
        :class="{ on: getActiveSegments(parseInt(time.hours[1])).includes(i) }"
      ></div>
    </div>

    <div class="separator"></div>

    <!-- 分钟 -->
    <div class="digit minutes">
      <div
        v-for="i in 7"
        :key="'m1-' + i"
        class="segment"
        :class="{ on: getActiveSegments(parseInt(time.minutes[0])).includes(i) }"
      ></div>
    </div>
    <div class="digit minutes">
      <div
        v-for="i in 7"
        :key="'m2-' + i"
        class="segment"
        :class="{ on: getActiveSegments(parseInt(time.minutes[1])).includes(i) }"
      ></div>
    </div>

    <div class="separator"></div>

    <!-- 秒钟 -->
    <div class="digit seconds">
      <div
        v-for="i in 7"
        :key="'s1-' + i"
        class="segment"
        :class="{ on: getActiveSegments(parseInt(time.seconds[0])).includes(i) }"
      ></div>
    </div>
    <div class="digit seconds">
      <div
        v-for="i in 7"
        :key="'s2-' + i"
        class="segment"
        :class="{ on: getActiveSegments(parseInt(time.seconds[1])).includes(i) }"
      ></div>
    </div>
  </div>
</template>

<script setup>
import { ref, onMounted, onUnmounted } from 'vue';

// 七段数码管数字对应的段亮起编号 (1-7)
const digitSegments = [
  [1, 2, 3, 4, 5, 6],     // 0
  [2, 3],                  // 1
  [1, 2, 7, 5, 4],         // 2
  [1, 2, 7, 3, 4],         // 3
  [6, 7, 2, 3],            // 4
  [1, 6, 7, 3, 4],         // 5
  [1, 3, 4, 5, 6, 7],      // 6
  [1, 2, 3],               // 7
  [1, 2, 3, 4, 5, 6, 7],   // 8
  [1, 2, 3, 4, 6, 7]       // 9
];

const time = ref({
  hours: '00',
  minutes: '00',
  seconds: '00'
});

let intervalId = null;

const updateTime = () => {
  const now = new Date();
  time.value = {
    hours: String(now.getHours()).padStart(2, '0'),
    minutes: String(now.getMinutes()).padStart(2, '0'),
    seconds: String(now.getSeconds()).padStart(2, '0')
  };
};

const getActiveSegments = (digit) => {
  return digitSegments[digit] || [];
};

// 启动定时器
onMounted(() => {
  updateTime();
  intervalId = setInterval(updateTime, 1000);
});

// 清理定时器
onUnmounted(() => {
  if (intervalId) {
    clearInterval(intervalId);
  }
});
</script>

<style scoped>
/* 样式保持不变 */
.clock {
  height: 200px;
  position: absolute;
  top: 50%;
  left: 50%;
  width: 900px;
  margin-left: -450px;
  margin-top: -100px;
  text-align: center;
}

.digit {
  width: 120px;
  height: 200px;
  margin: 0 5px;
  position: relative;
  display: inline-block;
}

.segment {
  background: #c00;
  border-radius: 5px;
  position: absolute;
  opacity: 0.15;
  transition: opacity 0.2s;
}

.segment.on,
.separator {
  opacity: 1;
  box-shadow: 0 0 50px rgba(255, 0, 0, 0.7);
  transition: opacity 0s;
}

.separator {
  width: 20px;
  height: 20px;
  background: #c00;
  border-radius: 50%;
  display: inline-block;
  position: relative;
  top: -90px;
}

.digit .segment:nth-child(1) {
  top: 10px;
  left: 20px;
  right: 20px;
  height: 10px;
}

.digit .segment:nth-child(2) {
  top: 20px;
  right: 10px;
  width: 10px;
  height: calc(50% - 25px);
}

.digit .segment:nth-child(3) {
  bottom: 20px;
  right: 10px;
  width: 10px;
  height: calc(50% - 25px);
}

.digit .segment:nth-child(4) {
  bottom: 10px;
  right: 20px;
  height: 10px;
  left: 20px;
}

.digit .segment:nth-child(5) {
  bottom: 20px;
  left: 10px;
  width: 10px;
  height: calc(50% - 25px);
}

.digit .segment:nth-child(6) {
  top: 20px;
  left: 10px;
  width: 10px;
  height: calc(50% - 25px);
}

.digit .segment:nth-child(7) {
  bottom: calc(50% - 5px);
  right: 20px;
  left: 20px;
  height: 10px;
}
</style>
下面来简单讲解一下
1. 数据结构:怎么存"亮哪几段"?
js
const digitSegments = [
  [1, 2, 3, 4, 5, 6],     // 0
  [2, 3],                  // 1
  [1, 2, 7, 5, 4],         // 2
  ...
];
很简单吧?
digitSegments[0] 就是数字0要亮的段。
digitSegments[1] 就是数字1要亮的段。
2. 怎么让"段"亮起来?
每个"段"就是一个 div。
html
<div class="segment" v-for="i in 7"></div>然后判断:当前数字对应的段列表里,有没有这个 i?
js
:class="{ on: getActiveSegments(2).includes(i) }"如果有,就加上 on 类,让它变亮!
3. 时间怎么更新?
用 setInterval,每秒更新一次。
js
onMounted(() => {
  updateTime(); // 先更新一次
  intervalId = setInterval(updateTime, 1000); // 每秒更新
});
updateTime 函数获取当前时间,格式化成 HH:mm:ss,存到 time 变量里。
4. 样式怎么实现"发光"?
靠 CSS 的 box-shadow!
css
.segment.on {
  opacity: 1;
  box-shadow: 0 0 50px rgba(255, 0, 0, 0.7);
}
一亮起来,就加个红色光晕。
瞬间就有那味儿了!
5. 数字怎么摆?
用 position: absolute 把7个段拼成一个"8"字。
比如第1段(上面的横):
css
.digit .segment:nth-child(1) {
  top: 10px;
  left: 20px;
  right: 20px;
  height: 10px;
}
其他段同理,上下左右定位。
基础版小结:代码清晰,逻辑简单。
这时如果想换个颜色?改CSS。
想变大一点?改CSS。
想用在别处?得复制粘贴+改一堆。
所以,我们来做一个升级版!
版本二:升级版(专业级组件)
这个版本,直接做成一个可配置的Vue组件!
1. 支持传参!
用 defineProps 接收外部配置:
js
const props = defineProps({
  type: { default: 'clock' }, // clock 或 countdown
  countdownTime: { default: 60 },
  segmentWidth: { default: 10 },
  digitColor: { default: '#c00' },
  glowColor: { default: 'rgba(255,0,0,0.7)' },
  fontSize: { default: 200 }
})
这意味着,你可以这样用:
vue
<LedClock
  type="countdown"
  countdownTime="300"
  digitColor="green"
  fontSize="150"
/>
直接显示一个 绿色的、倒计时5分钟 的LED钟!
2. 支持倒计时模式!
不只是显示时间。
还能倒着数!
js
if (props.type === 'countdown') {
  // 启动倒计时逻辑
  remainingSeconds.value = props.countdownTime;
  intervalId = setInterval(() => {
    remainingSeconds.value--;
    updateTimeFromCountdown(); // 转成 HH:MM:SS
  }, 1000);
}
倒计时归零,自动停止。
3. 样式全部动态!
以前CSS写死像素。
现在全用 calc(v-bind(fontSize) / 200 * xx)。
比如:
css
height: v-bind(fontSize + 'px');
margin: 0 calc(v-bind(fontSize) / 200 * 5px);
意思是:
所有尺寸,都按 fontSize 的比例来缩放!
传 fontSize=100,整个钟就变小。
传 fontSize=300,就变大!
完全响应式!
4. 颜色也能换!
css
background: v-bind(digitColor);
box-shadow: 0 0 ... v-bind(glowColor);
v-bind() 直接把JS变量注入CSS。
想红就红,想蓝就蓝。
5. 自动重置逻辑
用 watch 监听 type 和 countdownTime 变化:
js
watch(
  () => [props.type, props.countdownTime],
  () => {
    startInterval(); // 参数一变,立刻重启定时器
  }
)
比如你从"时钟"切到"倒计时",
或者改了倒计时时间,
组件自动重新初始化!
升级版完整源码
html
<template>
  <div class="clock" :style="{ height: fontSize + 'px' }">
    <!-- 小时 -->
    <div class="digit">
      <div
        v-for="i in 7"
        :key="'h1-' + i"
        class="segment"
        :class="{ on: getActiveSegments(time.hours[0]).includes(i) }"
      ></div>
    </div>
    <div class="digit">
      <div
        v-for="i in 7"
        :key="'h2-' + i"
        class="segment"
        :class="{ on: getActiveSegments(time.hours[1]).includes(i) }"
      ></div>
    </div>

    <div class="separator"></div>

    <!-- 分钟 -->
    <div class="digit">
      <div
        v-for="i in 7"
        :key="'m1-' + i"
        class="segment"
        :class="{ on: getActiveSegments(time.minutes[0]).includes(i) }"
      ></div>
    </div>
    <div class="digit">
      <div
        v-for="i in 7"
        :key="'m2-' + i"
        class="segment"
        :class="{ on: getActiveSegments(time.minutes[1]).includes(i) }"
      ></div>
    </div>

    <div class="separator"></div>

    <!-- 秒钟 -->
    <div class="digit">
      <div
        v-for="i in 7"
        :key="'s1-' + i"
        class="segment"
        :class="{ on: getActiveSegments(time.seconds[0]).includes(i) }"
      ></div>
    </div>
    <div class="digit">
      <div
        v-for="i in 7"
        :key="'s2-' + i"
        class="segment"
        :class="{ on: getActiveSegments(time.seconds[1]).includes(i) }"
      ></div>
    </div>
  </div>
</template>

<script setup>
import { ref, onMounted, onUnmounted, watch, defineEmits } from 'vue';

// ----------------------
// Props 定义
// ----------------------
const props = defineProps({
  type: {
    type: String,
    default: 'clock',
    validator: (value) => ['clock', 'countdown'].includes(value)
  },
  countdownTime: {
    type: Number,
    default: 60 // 默认倒计时 60 秒
  },
  segmentWidth: {
    type: Number,
    default: 10
  },
  digitColor: {
    type: String,
    default: '#c00'
  },
  glowColor: {
    type: String,
    default: 'rgba(255,0,0,0.7)'
  },
  fontSize: {
    type: Number,
    default: 200
  }
});

// ----------------------
// 七段数码管定义
// ----------------------
const digitSegments = [
  [1, 2, 3, 4, 5, 6],     // 0
  [2, 3],                  // 1
  [1, 2, 7, 5, 4],         // 2
  [1, 2, 7, 3, 4],         // 3
  [6, 7, 2, 3],            // 4
  [1, 6, 7, 3, 4],         // 5
  [1, 3, 4, 5, 6, 7],      // 6 (修正:确保段2不亮)
  [1, 2, 3],               // 7
  [1, 2, 3, 4, 5, 6, 7],   // 8
  [1, 2, 3, 4, 6, 7]       // 9 (修正:补全底横段4)
];

const getActiveSegments = (digit) => {
  const num = parseInt(digit);
  return isNaN(num) ? [] : digitSegments[num];
};

// ----------------------
// 时间状态
// ----------------------
const time = ref({
  hours: '00',
  minutes: '00',
  seconds: '00'
});

let intervalId = null;

// 倒计时剩余秒数
const remainingSeconds = ref(0);

// 初始化倒计时
const initCountdown = () => {
  remainingSeconds.value = props.countdownTime;
  updateTimeFromCountdown();
};

// 根据剩余秒数更新显示
const updateTimeFromCountdown = () => {
  const h = Math.floor(remainingSeconds.value / 3600);
  const m = Math.floor((remainingSeconds.value % 3600) / 60);
  const s = remainingSeconds.value % 60;

  time.value = {
    hours: String(h).padStart(2, '0'),
    minutes: String(m).padStart(2, '0'),
    seconds: String(s).padStart(2, '0')
  };
};

// 实时时钟更新
const updateClock = () => {
  const now = new Date();
  time.value = {
    hours: String(now.getHours()).padStart(2, '0'),
    minutes: String(now.getMinutes()).padStart(2, '0'),
    seconds: String(now.getSeconds()).padStart(2, '0')
  };
};

// ----------------------
// 定时器逻辑
// ----------------------
const startInterval = () => {
  if (intervalId) clearInterval(intervalId);

  if (props.type === 'countdown') {
    initCountdown();
    intervalId = setInterval(() => {
      if (remainingSeconds.value <= 0) {
        clearInterval(intervalId);
        emit('finish'); // 倒计时结束触发事件
        return;
      }
      remainingSeconds.value--;
      updateTimeFromCountdown();
    }, 1000);
  } else {
    updateClock();
    intervalId = setInterval(updateClock, 1000);
  }
};

// ----------------------
// 生命周期 & 监听
// ----------------------
onMounted(() => {
  startInterval();
});

onUnmounted(() => {
  if (intervalId) clearInterval(intervalId);
});

// 当 type 或 countdownTime 改变时重新启动
watch(
  () => [props.type, props.countdownTime],
  () => {
    startInterval();
  }
);

// 定义事件
const emit = defineEmits(['finish']);
</script>

<style scoped>
.clock {
  position: absolute;
  top: 50%;
  left: 50%;
  width: 900px;
  margin-left: -450px;
  margin-top: calc(v-bind(fontSize) / -2 + 'px');
  text-align: center;
}

.digit {
  width: calc(v-bind(fontSize) / 200 * 120px);
  height: v-bind(fontSize + 'px');
  margin: 0 calc(v-bind(fontSize) / 200 * 5px);
  position: relative;
  display: inline-block;
}

.segment {
  background: v-bind(digitColor);
  border-radius: calc(v-bind(fontSize) / 200 * 5px);
  position: absolute;
  opacity: 0.15;
  transition: opacity 0.2s;
}

.segment.on,
.separator {
  opacity: 1;
  box-shadow: 0 0 calc(v-bind(fontSize) * 0.5px) v-bind(glowColor);
  transition: opacity 0s;
}

.separator {
  width: calc(v-bind(fontSize) / 200 * 20px);
  height: calc(v-bind(fontSize) / 200 * 20px);
  background: v-bind(digitColor);
  border-radius: 50%;
  display: inline-block;
  position: relative;
  top: calc(v-bind(fontSize) / 200 * -90px);
}

/* 动态调整段的尺寸 */
.digit .segment:nth-child(1) {
  top: calc(v-bind(fontSize) / 200 * 10px);
  left: calc(v-bind(fontSize) / 200 * 20px);
  right: calc(v-bind(fontSize) / 200 * 20px);
  height: calc(v-bind(fontSize) / 200 * 10px);
}

.digit .segment:nth-child(2),
.digit .segment:nth-child(3) {
  top: calc(v-bind(fontSize) / 200 * 20px);
  right: calc(v-bind(fontSize) / 200 * 10px);
  width: calc(v-bind(fontSize) / 200 * 10px);
  height: calc(v-bind(fontSize) / 400 * 150px);
}

.digit .segment:nth-child(3) {
  top: auto;
  bottom: calc(v-bind(fontSize) / 200 * 20px);
}

.digit .segment:nth-child(4) {
  bottom: calc(v-bind(fontSize) / 200 * 10px);
  left: calc(v-bind(fontSize) / 200 * 20px);
  right: calc(v-bind(fontSize) / 200 * 20px);
  height: calc(v-bind(fontSize) / 200 * 10px);
}

.digit .segment:nth-child(5),
.digit .segment:nth-child(6) {
  bottom: calc(v-bind(fontSize) / 200 * 20px);
  left: calc(v-bind(fontSize) / 200 * 10px);
  width: calc(v-bind(fontSize) / 200 * 10px);
  height: calc(v-bind(fontSize) / 400 * 150px);
}

.digit .segment:nth-child(6) {
  bottom: auto;
  top: calc(v-bind(fontSize) / 200 * 20px);
}

.digit .segment:nth-child(7) {
  bottom: calc(v-bind(fontSize) / 200 * 95px);
  left: calc(v-bind(fontSize) / 200 * 20px);
  right: calc(v-bind(fontSize) / 200 * 20px);
  height: calc(v-bind(fontSize) / 200 * 10px);
}
</style>
两个版本对比
| 功能 | 基础版 | 升级版 |
|---|---|---|
| 显示时间 | ✅ | ✅ |
| 倒计时 | ❌ | ✅ |
| 自定义大小 | ❌ | ✅ |
| 自定义颜色 | ❌ | ✅ |
| 可复用 | ❌ | ✅ |
| 代码复杂度 | ⭐ | ⭐⭐⭐ |
关键技术点总结
1. 七段编码表
本质是"数字→段编号"的映射。
可以背下来,也可以画图推导。
2. 动态类名 + includes
:class="{ on: array.includes(i) }"
是判断"是否包含"的极简写法。
3. v-bind() in CSS
Vue 3 的黑科技!
让CSS也能用JS变量。
实现真正的动态样式。
4. watch + setInterval
参数变了,定时器也要重置。
避免内存泄漏和逻辑错乱。
5. padStart(2, '0')
9 → '09'
15 → '15'
保证两位数显示,必备技巧!
你能用它做什么?
- 做一个炫酷的网页时钟
- 当作倒计时器(发布会、考试)
- 做数字动画(得分、排行榜)
- 甚至做成一个"黑客风"仪表盘
只要改改颜色、加点音效,
瞬间科技感拉满!
如果你觉得这篇文章对你有帮助,欢迎点赞、收藏、转发。
公众号:程序员刘大华,专注分享前后端开发的实战笔记。关注我,少走弯路,一起进步!
📌往期精彩
《工作 5 年没碰过分布式锁,是我太菜还是公司太稳?网友:太真实了!》
《90%的人不知道!Spring官方早已不推荐@Autowired?这3种注入方式你用对了吗?》