1. 申请优云智算服务器
优云智算官网:https://www.compshare.cn/
1.1 申请
选择 部署GPU示例 -->> 平台镜像
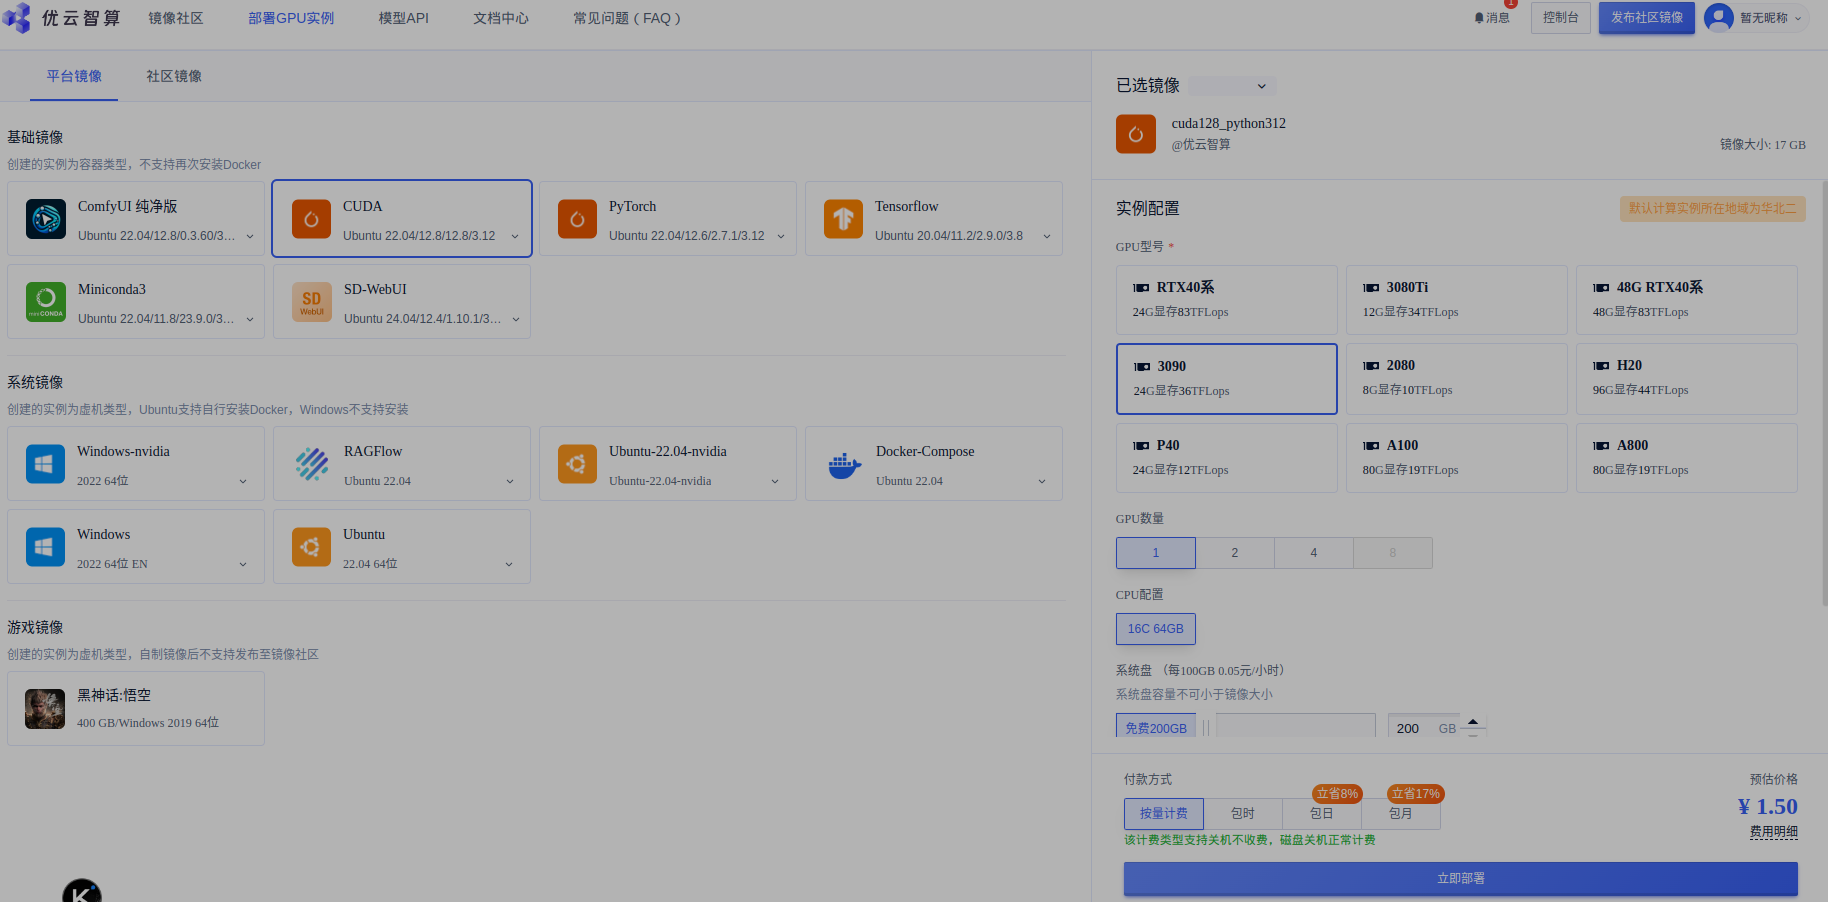
点击确定后:

等系统初始化完成,显示 运行中时
1.2 登录
打开本地shell
输入登录指令和密码
bash
$ ssh -p 23 root@117.50.81.213
root@117.50.81.213's password:
Welcome to Ubuntu 22.04.3 LTS (GNU/Linux 5.15.0-113-generic x86_64)

 * Documentation:  https://help.ubuntu.com
 * Management:     https://landscape.canonical.com
 * Support:        https://ubuntu.com/advantage

This system has been minimized by removing packages and content that are
not required on a system that users do not log into.

To restore this content, you can run the 'unminimize' command.
Last login: Fri Sep 26 08:08:04 2025 from 113.108.106.159
1.3 查看显卡、cuda
bash
# nvcc -V
nvcc: NVIDIA (R) Cuda compiler driver
Copyright (c) 2005-2023 NVIDIA Corporation
Built on Tue_Feb__7_19:32:13_PST_2023
Cuda compilation tools, release 12.1, V12.1.66
Build cuda_12.1.r12.1/compiler.32415258_0
# nvidia-smi
Fri Sep 26 08:27:08 2025
+-----------------------------------------------------------------------------------------+
| NVIDIA-SMI 570.153.02             Driver Version: 570.153.02     CUDA Version: 12.8     |
|-----------------------------------------+------------------------+----------------------+
| GPU  Name                 Persistence-M | Bus-Id          Disp.A | Volatile Uncorr. ECC |
| Fan  Temp   Perf          Pwr:Usage/Cap |           Memory-Usage | GPU-Util  Compute M. |
|                                         |                        |               MIG M. |
|=========================================+========================+======================|
|   0  NVIDIA GeForce RTX 3090        Off |   00000000:00:03.0 Off |                  N/A |
| 30%   31C    P8             11W /  350W |    7007MiB /  24576MiB |      0%      Default |
|                                         |                        |                  N/A |
+-----------------------------------------+------------------------+----------------------+

+-----------------------------------------------------------------------------------------+
| Processes:                                                                              |
|  GPU   GI   CI              PID   Type   Process name                        GPU Memory |
|        ID   ID                                                               Usage      |
|=========================================================================================|
|    0   N/A  N/A           14729      C   ...comfyui_home/.venv/bin/python       6998MiB |
+-----------------------------------------------------------------------------------------+
2. 安装ComfyUI
2.1 安装
首先安装uv
bash
curl -LsSf https://astral.sh/uv/install.sh | sh为 ComfyUI 创建一个 home 目录,并且使用 uv 初始化一个 Python 虚拟环境
bash
cd ~/work
mkdir comfyui_home
cd comfyui_home
mkdir logs
uv init --python 3.12
vi pyproject.toml
编辑 uv 的配置文件 pyproject.toml,在 pyproject.toml 的开头加入清华大学的 Python 库镜像服务器:
bash
[[tool.uv.index]]
url = "https://pypi.tuna.tsinghua.edu.cn/simple"
default = true
安装 ComfyUI 的命令行工具,并且使用 ComfyUI 命令行工具安装 ComfyUI。ComfyUI 的安装目录是 /root/comfyui_home/ComfyUI
bash
uv add comfy-cli pip
uv run comfy --workspace=/root/comfyui_home/ComfyUI install
安装时 ComfyUI 时要选择 Nvidia 显卡
2.2 启动
如果 ComfyUI 安装成功,可以使用以下命令启动 ComfyUI
bash
uv run comfy launch -- --listen 0.0.0.0 --port 8119使用 0.0.0.0 就是接受网络中的所有客户端机器连接
2.3 查看
查看服务器运行状态:
bash
# ps aux | grep comfy
root       14706  0.0  0.0 1435008 39568 pts/1   Sl+  08:08   0:00 uv run comfy launch -- --listen 0.0.0.0 --port 8119
root       14725  0.0  0.0  61464 56260 pts/1    S+   08:08   0:00 /root/comfyui_home/.venv/bin/python /root/comfyui_home/.venv/bin/comfy launch -- --listen 0.0.0.0 --port 8119
root       14729  3.2 14.9 72164148 9844528 pts/1 Sl+ 08:08   0:56 /root/comfyui_home/.venv/bin/python main.py --listen 0.0.0.0 --port 8119
root       14865  0.0  0.0   4024  1992 pts/2    S+   08:37   0:00 grep --color=auto comfy
查看端口状态:
bash
 lsof -i :8119
COMMAND   PID USER   FD   TYPE DEVICE SIZE/OFF NODE NAME
python  14729 root   54u  IPv4 265437      0t0  TCP *:8119 (LISTEN)
python  14729 root   55u  IPv4 265438      0t0  TCP 10.60.72.45:8119->113.108.106.159:52834 (ESTABLISHED)
3. Python调用ComfyUI服务器
3.1 先放开端口
点击 控制台 -->> 更多操作 -->> 配置防火墙
选择镜像
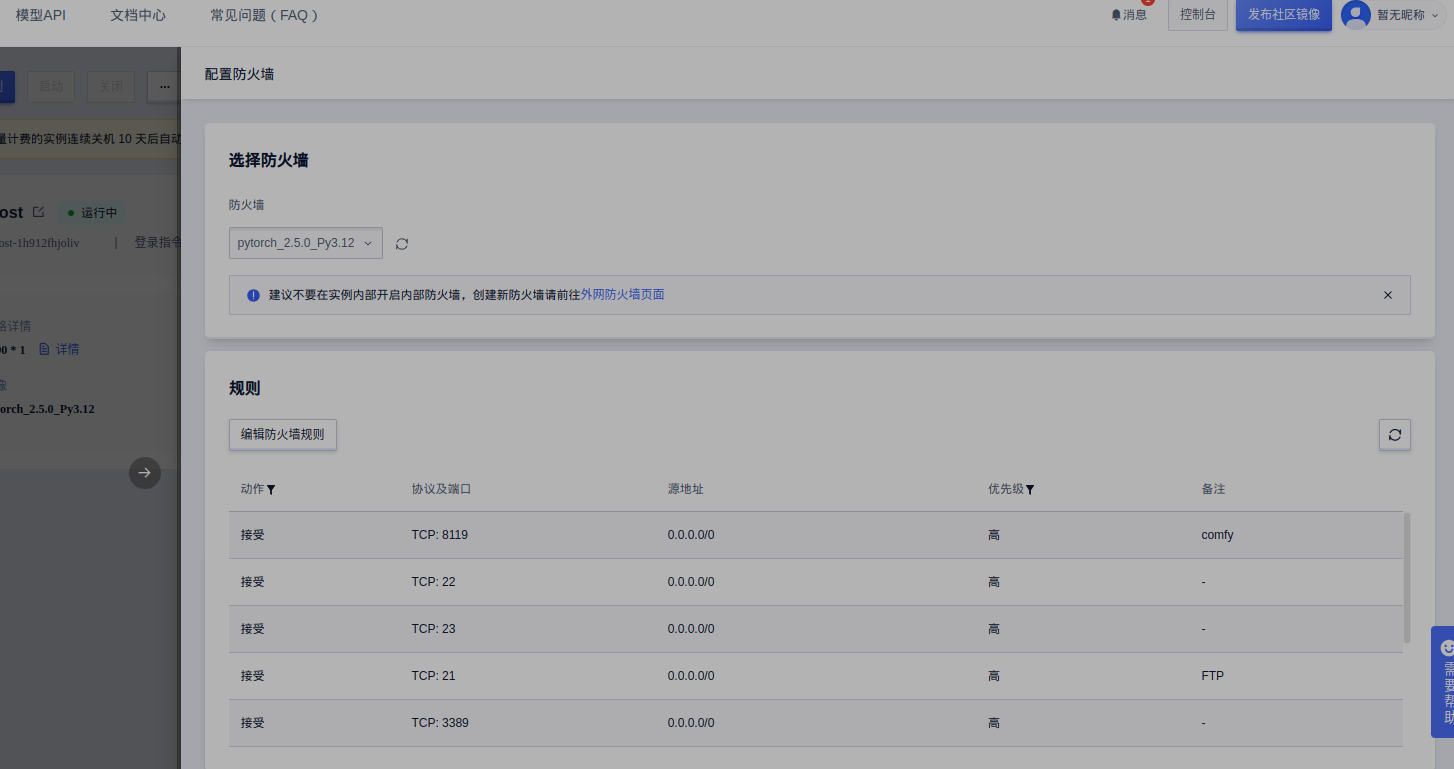
点击 编辑防火墙规则 -->> 添加规则
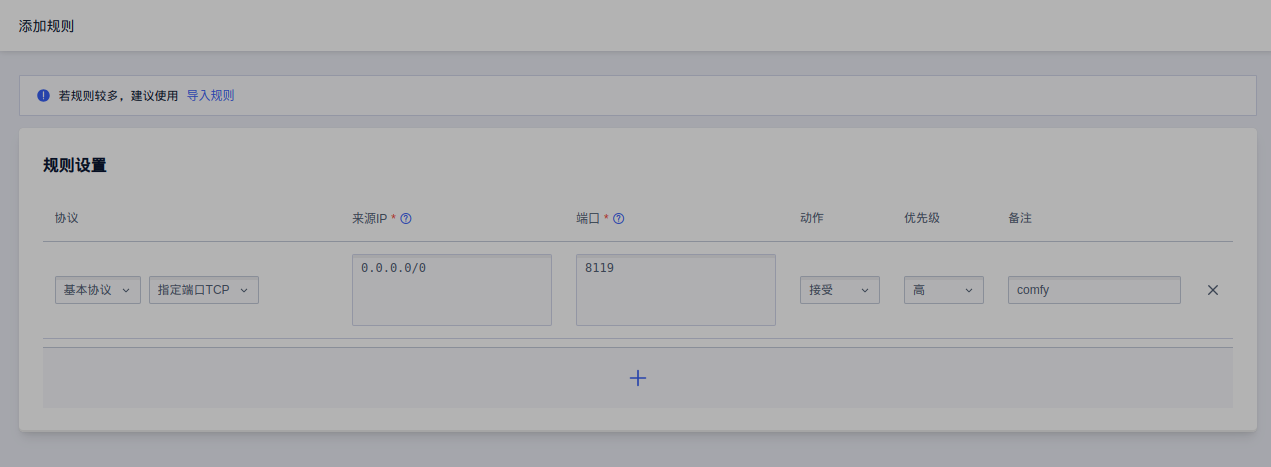
再点击 下一步 -->> 确定
3.2 本地显示
bash
# curl ipinfo.io
{
"ip": "117.50.81.213",
"city": "Beijing",
"region": "Beijing",
"country": "CN",
"loc": "39.9075,116.3972",
"org": "AS23724 IDC, China Telecommunications Corporation",
"postal": "100000",
"timezone": "Asia/Shanghai",
"readme": "https://ipinfo.io/missingauth"
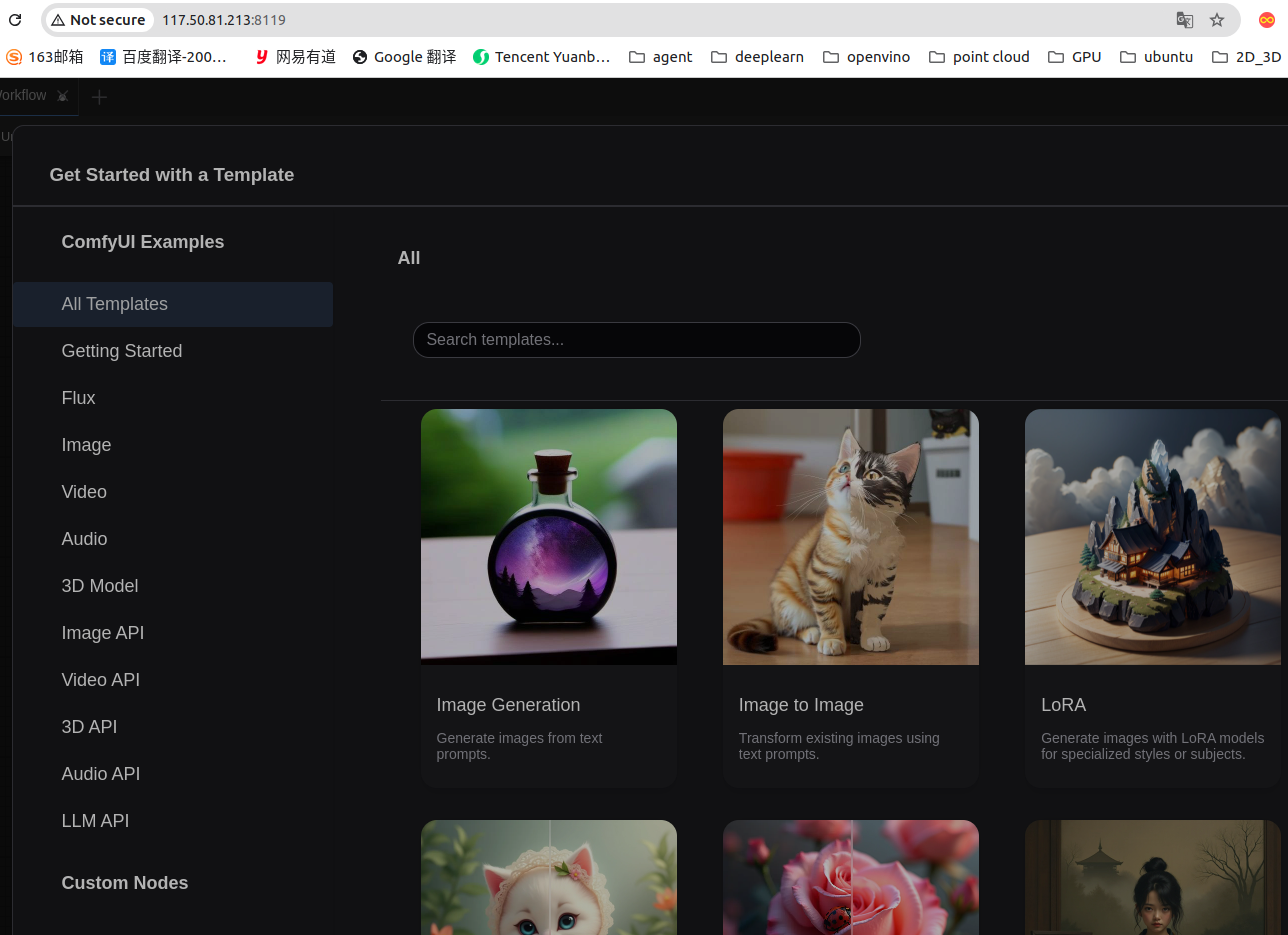
}本地浏览器输入 http://117.50.81.213:8119/ 显示:
3.3 python代码
bash
import urllib.request
import urllib.parse
import json
import time
import os
import base64
from PIL import Image
import io
import requests

class ComfyUIClient:
    def __init__(self, server_address="127.0.0.1", port=8188):
        self.server_address = server_address
        self.port = port
        self.base_url = f"http://{server_address}:{port}"

    def _make_request(self, endpoint, data=None, method="GET"):
        """发送HTTP请求到ComfyUI服务器"""
        url = f"{self.base_url}{endpoint}"

        if data and method == "POST":
            data = json.dumps(data).encode('utf-8')
            req = urllib.request.Request(url, data=data, headers={'Content-Type': 'application/json'})
            req.method = "POST"
        else:
            req = urllib.request.Request(url)

        try:
            with urllib.request.urlopen(req) as response:
                return json.loads(response.read().decode('utf-8'))
        except urllib.error.HTTPError as e:
            print(f"HTTP错误: {e.code} - {e.reason}")
            if e.code == 400:
                # 读取错误详情
                error_detail = e.read().decode('utf-8')
                print(f"错误详情: {error_detail}")
            return None
        except Exception as e:
            print(f"请求错误: {e}")
            return None

    def get_available_nodes(self):
        """获取服务器上可用的节点列表"""
        return self._make_request("/object_info")

    def validate_workflow(self, workflow):
        """验证工作流中的节点是否都存在"""
        available_nodes = self.get_available_nodes()
        if available_nodes:
            available_node_types = set(available_nodes.keys())

            # 检查工作流中的所有节点类型
            for node_id, node_data in workflow.items():
                node_type = node_data.get("class_type")
                if node_type and node_type not in available_node_types:
                    print(f"警告: 节点类型 '{node_type}' 在服务器上不存在")
                    return False
            return True
        return False

    def submit_prompt(self, workflow):
        """提交工作流到ComfyUI服务器执行"""
        return self._make_request("/prompt", data={"prompt": workflow}, method="POST")

    def wait_for_completion(self, prompt_id, check_interval=1, timeout=300):
        """等待工作流执行完成"""
        start_time = time.time()
        while time.time() - start_time < timeout:
            history = self.get_history(prompt_id)
            if history and prompt_id in history:
                status = history[prompt_id]
                if status.get('status', {}).get('completed', False):
                    return True
                elif status.get('status', {}).get('failed', False):
                    print("工作流执行失败")
                    return False

            time.sleep(check_interval)

        print("等待超时")
        return False

    def get_history(self, prompt_id):
        """获取指定提示ID的历史记录"""
        return self._make_request(f"/history/{prompt_id}")

    def view_image(self, filename, subfolder="", type="output"):
        """查看生成的图像"""
        params = {"filename": filename}
        if subfolder:
            params["subfolder"] = subfolder
        if type:
            params["type"] = type

        url = f"{self.base_url}/view?{urllib.parse.urlencode(params)}"

        try:
            response = requests.get(url)
            if response.status_code == 200:
                return response.content
            else:
                print(f"获取图像失败: HTTP {response.status_code}")
                return None
        except Exception as e:
            print(f"获取图像错误: {e}")
            return None

    def download_image(self, image_data, filename, output_dir="output_images"):
        """下载图像到本地"""
        if not os.path.exists(output_dir):
            os.makedirs(output_dir)

        filepath = os.path.join(output_dir, filename)
        with open(filepath, "wb") as f:
            f.write(image_data)

        print(f"图像已保存到: {filepath}")
        return filepath

    def display_image(self, image_data):
        """显示图像(需要PIL库)"""
        try:
            image = Image.open(io.BytesIO(image_data))
            image.show()
            return image
        except Exception as e:
            print(f"显示图像错误: {e}")
            return None

    def get_image_info_from_history(self, history, prompt_id):
        """从历史记录中提取图像信息"""
        if not history or prompt_id not in history:
            return []

        outputs = history[prompt_id].get('outputs', {})
        image_infos = []

        for node_id, output in outputs.items():
            if 'images' in output:
                for image_info in output['images']:
                    image_infos.append(image_info)

        return image_infos

    def generate_simple_workflow(self, prompt_text, model_name="sdxl-动漫二次元_2.0.safetensors"):
        """生成一个简单的工作流,只使用核心节点"""
        # 修复节点连接问题
        workflow = {
            "checkpoint_loader": {
                "class_type": "CheckpointLoaderSimple",
                "inputs": {
                    "ckpt_name": model_name
                }
            },
            "positive_prompt": {
                "class_type": "CLIPTextEncode",
                "inputs": {
                    "text": prompt_text,
                    "clip": ["checkpoint_loader", 1]  # 使用索引1获取CLIP模型
                }
            },
            "negative_prompt": {
                "class_type": "CLIPTextEncode",
                "inputs": {
                    "text": "blurry, low quality",
                    "clip": ["checkpoint_loader", 1]  # 使用索引1获取CLIP模型
                }
            },
            "latent_image": {
                "class_type": "EmptyLatentImage",
                "inputs": {
                    "width": 1024,
                    "height": 1024,
                    "batch_size": 1
                }
            },
            "ksampler": {
                "class_type": "KSampler",
                "inputs": {
                    "seed": 42,
                    "steps": 20,
                    "cfg": 7,
                    "sampler_name": "euler",
                    "scheduler": "normal",
                    "denoise": 1,
                    "model": ["checkpoint_loader", 0],  # 使用索引0获取模型
                    "positive": ["positive_prompt", 0],
                    "negative": ["negative_prompt", 0],
                    "latent_image": ["latent_image", 0]
                }
            },
            "vae_decode": {
                "class_type": "VAEDecode",
                "inputs": {
                    "samples": ["ksampler", 0],
                    "vae": ["checkpoint_loader", 2]  # 使用索引2获取VAE
                }
            },
            "save_image": {
                "class_type": "SaveImage",
                "inputs": {
                    "images": ["vae_decode", 0],
                    "filename_prefix": "comfyui_output"
                }
            }
        }

        return workflow

# 使用示例
if __name__ == "__main__":
    # 创建客户端实例 http://117.50.81.213:8119/
    client = ComfyUIClient("117.50.81.213", 8119)

    # 获取服务器上的可用节点
    available_nodes = client.get_available_nodes()
    if available_nodes:
        print("服务器上的节点数量:", len(available_nodes))
        # 打印前10个节点类型
        for i, node_type in enumerate(list(available_nodes.keys())[:10]):
            print(f"{i+1}. {node_type}")
    else:
        print("无法获取节点列表")

    # 生成一个简单的工作流
    # workflow = client.generate_simple_workflow("A princess standing in front of a church, holding a long magic wand in her left hand and a Bible in her right, was about to use magic, masterpiece, best quality")
    workflow = client.generate_simple_workflow("A princess standing in front of a church, holding a crystal ball in her left hand and a Bible in her right, was about to use magic, masterpiece, best quality")

    # 验证工作流
    if client.validate_workflow(workflow):
        print("工作流验证通过")

        # 提交工作流
        result = client.submit_prompt(workflow)

        if result and 'prompt_id' in result:
            prompt_id = result['prompt_id']
            print(f"工作流已提交,ID: {prompt_id}")

            # 等待执行完成
            if client.wait_for_completion(prompt_id):
                # 获取执行结果
                history = client.get_history(prompt_id)
                if history and prompt_id in history:
                    # 获取所有生成的图像信息
                    image_infos = client.get_image_info_from_history(history, prompt_id)

                    if image_infos:
                        print(f"找到 {len(image_infos)} 张生成的图像")

                        # 下载和显示所有图像
                        for i, image_info in enumerate(image_infos):
                            filename = image_info['filename']
                            subfolder = image_info.get('subfolder', '')
                            type = image_info.get('type', 'output')

                            print(f"正在获取图像 {i+1}: {filename} (子文件夹: {subfolder})")

                            # 获取图像数据
                            image_data = client.view_image(filename, subfolder, type)

                            if image_data:
                                # 保存图像到本地
                                local_path = client.download_image(
                                    image_data,
                                    f"output_{prompt_id}_{i+1}.png"
                                )

                                # 显示图像(需要PIL库)
                                try:
                                    client.display_image(image_data)
                                except Exception as e:
                                    print(f"无法显示图像: {e}")
                                    print("请确保已安装PIL库: pip install pillow")
                            else:
                                print(f"无法获取图像 {filename}")
                    else:
                        print("未找到生成的图像")
                else:
                    print("无法获取历史记录")
        else:
            print("提交工作流失败")
    else:
        print("工作流验证失败,包含不存在的节点")
输出图片