文章目录
- [一、Redis 与 Spring Boot 集成概述](#一、Redis 与 Spring Boot 集成概述)
-
- [1.1 Redis 简介](#1.1 Redis 简介)
- [1.2 Spring Boot 集成 Redis 的优势](#1.2 Spring Boot 集成 Redis 的优势)
- [1.3 应用场景](#1.3 应用场景)
- 二、环境准备与搭建
-
- [2.1 环境要求](#2.1 环境要求)
- [2.2 Redis 安装与配置](#2.2 Redis 安装与配置)
-
- [2.2.1 Windows 系统安装 Redis](#2.2.1 Windows 系统安装 Redis)
- [2.2.2 Linux 系统安装 Redis](#2.2.2 Linux 系统安装 Redis)
- [2.2.3 Redis 基本配置](#2.2.3 Redis 基本配置)
- [2.3 创建 Spring Boot 项目](#2.3 创建 Spring Boot 项目)
-
- [2.3.1 使用 Spring Initializr 创建项目](#2.3.1 使用 Spring Initializr 创建项目)
- [2.3.2 手动配置 pom.xml](#2.3.2 手动配置 pom.xml)
- [三、Redis 核心配置](#三、Redis 核心配置)
-
- [3.1 基本配置](#3.1 基本配置)
- [3.2 集群配置](#3.2 集群配置)
- [3.3 哨兵模式配置](#3.3 哨兵模式配置)
- [3.4 自定义 RedisTemplate 配置](#3.4 自定义 RedisTemplate 配置)
- [3.5 序列化器详解](#3.5 序列化器详解)
- [四、Redis 数据结构操作](#四、Redis 数据结构操作)
-
- [4.1 StringRedisTemplate 操作](#4.1 StringRedisTemplate 操作)
- [4.2 RedisTemplate 操作对象](#4.2 RedisTemplate 操作对象)
- [4.3 操作 Hash 类型](#4.3 操作 Hash 类型)
- [4.4 操作 List 类型](#4.4 操作 List 类型)
- [4.5 操作 Set 类型](#4.5 操作 Set 类型)
- [4.6 操作 ZSet 类型](#4.6 操作 ZSet 类型)
- [五、Spring 缓存抽象集成](#五、Spring 缓存抽象集成)
-
- [5.1 开启缓存支持](#5.1 开启缓存支持)
- [5.2 配置缓存管理器](#5.2 配置缓存管理器)
- [5.3 缓存注解详解](#5.3 缓存注解详解)
- [5.4 缓存注解使用示例](#5.4 缓存注解使用示例)
- [5.5 SpEL 表达式在缓存中的应用](#5.5 SpEL 表达式在缓存中的应用)
- [六、Redis 高级特性](#六、Redis 高级特性)
-
- [6.1 分布式锁](#6.1 分布式锁)
- [6.2 发布 / 订阅](#6.2 发布 / 订阅)
-
- [6.2.1 消息发布者](#6.2.1 消息发布者)
- [6.2.2 消息订阅者](#6.2.2 消息订阅者)
- [6.2.3 配置消息监听容器](#6.2.3 配置消息监听容器)
- [6.3 管道操作](#6.3 管道操作)
- [6.4 事务](#6.4 事务)
- 七、实战案例
-
- [7.1 缓存用户信息](#7.1 缓存用户信息)
-
- [7.1.1 控制器](#7.1.1 控制器)
- [7.1.2 测试](#7.1.2 测试)
- [7.2 实现分布式计数器](#7.2 实现分布式计数器)
- 八、问题排查与最佳实践
-
- [8.1 常见问题及解决方案](#8.1 常见问题及解决方案)
- [8.2 最佳实践](#8.2 最佳实践)
- 九、总结
一、Redis 与 Spring Boot 集成概述
1.1 Redis 简介
Redis(Remote Dictionary Server)是一个开源的、高性能的键值对存储数据库,它以其出色的性能、丰富的数据结构和灵活的使用方式,在现代软件开发中占据了重要地位。
Redis 具有以下核心特性:
- 基于内存存储,读写速度极快,单机每秒可处理数十万次操作
- 支持多种数据结构,包括字符串(String)、哈希(Hash)、列表(List)、集合(Set)、有序集合(ZSet)等
- 支持数据持久化,可将内存中的数据定期写入磁盘,避免数据丢失
- 支持主从复制、哨兵模式和集群模式,保证高可用性和扩展性
- 提供丰富的功能,如事务、Lua 脚本、发布 / 订阅、过期策略等
1.2 Spring Boot 集成 Redis 的优势
Spring Boot 作为当前流行的 Java 开发框架,简化了 Java 应用的开发配置过程。将 Spring Boot 与 Redis 集成,具有以下优势:
- 自动配置:Spring Boot 提供了 Redis 自动配置模块,减少手动配置工作
- 模板化操作:通过 RedisTemplate 等模板类,简化 Redis 操作
- 缓存支持:无缝集成 Spring 缓存抽象,轻松实现数据缓存
- 连接池管理:内置连接池支持,优化 Redis 连接性能
- 与 Spring 生态完美融合:可与 Spring MVC、Spring Data 等组件无缝协作
1.3 应用场景
Spring Boot 集成 Redis 后,可应用于多种场景:
- 数据缓存:减轻数据库压力,提高数据访问速度
- 会话存储:分布式系统中共享会话信息
- 计数器:实现访问量、下载量等计数功能
- 分布式锁:解决分布式系统中的并发问题
- 消息队列:基于发布 / 订阅功能实现简单的消息通信
- 排行榜:利用 ZSet 数据结构实现实时排行榜
二、环境准备与搭建
2.1 环境要求
- JDK:1.8 及以上版本
- Spring Boot:2.x 或 3.x 版本(本文以 2.7.10 为例)
- Redis:5.x 及以上版本
- Maven:3.6 及以上版本(或 Gradle 7.0 及以上)
2.2 Redis 安装与配置
2.2.1 Windows 系统安装 Redis
- 访问 Redis 官方网站(https://redis.io/download)下载 Windows 版本的 Redis(可2. 通过 GitHub 上的微软维护版本获取 解压下载的压缩包到指定目录,如 D:\redis
- 打开命令提示符,进入 Redis 目录,执行以下命令启动 Redis 服务器:
java
redis-server.exe redis.windows.conf- 另开一个命令提示符窗口,执行以下命令启动 Redis 客户端:
java
redis-cli.exe -h 127.0.0.1 -p 63792.2.2 Linux 系统安装 Redis
- 通过包管理器安装(以 Ubuntu 为例):
java
sudo apt update
sudo apt install redis-server- 启动 Redis 服务:
java
sudo systemctl start redis-server- 验证 Redis 是否启动成功:
java
redis-cli ping若返回 "PONG",则表示 Redis 启动成功。
2.2.3 Redis 基本配置
Redis 的主要配置文件为 redis.conf,常用配置项如下:
- port 6379:默认端口号
- bind 127.0.0.1:绑定的 IP 地址,默认只允许本地访问
- requirepass yourpassword:设置访问密码
- daemonize yes:以守护进程方式运行(Linux 系统)
- maxmemory:设置 Redis 最大使用内存
- maxmemory-policy:内存达到上限时的淘汰策略
修改配置后,需重启 Redis 服务使配置生效。
2.3 创建 Spring Boot 项目
2.3.1 使用 Spring Initializr 创建项目
- 访问 https://start.spring.io/
- 填写项目信息:
Group:com.example
Artifact:springboot-redis-demo
Name:springboot-redis-demo
Description:Demo project for Spring Boot and Redis
Package name:com.example.redisdemo
Type:Maven
Java:8
Spring Boot:2.7.10
- 选择依赖:
Spring Web
Spring Data Redis
Lombok(可选,用于简化代码)
- 点击 "Generate" 按钮下载项目压缩包,解压后导入 IDE(如 IntelliJ IDEA 或 Eclipse)
2.3.2 手动配置 pom.xml
若手动创建项目,需在 pom.xml 中添加以下依赖:
java
<?xml version="1.0" encoding="UTF-8"?>
<project xmlns="http://maven.apache.org/POM/4.0.0" xmlns:xsi="http://www.w3.org/2001/XMLSchema-instance"
         xsi:schemaLocation="http://maven.apache.org/POM/4.0.0 https://maven.apache.org/xsd/maven-4.0.0.xsd">
    <modelVersion>4.0.0</modelVersion>
    <parent>
        <groupId>org.springframework.boot</groupId>
        <artifactId>spring-boot-starter-parent</artifactId>
        <version>2.7.10</version>
        <relativePath/> <!-- lookup parent from repository -->
    </parent>
    <groupId>com.example</groupId>
    <artifactId>springboot-redis-demo</artifactId>
    <version>0.0.1-SNAPSHOT</version>
    <name>springboot-redis-demo</name>
    <description>Demo project for Spring Boot and Redis</description>

    <properties>
        <java.version>1.8</java.version>
    </properties>

    <dependencies>
        <!-- Spring Web 依赖 -->
        <dependency>
            <groupId>org.springframework.boot</groupId>
            <artifactId>spring-boot-starter-web</artifactId>
        </dependency>

        <!-- Spring Data Redis 依赖 -->
        <dependency>
            <groupId>org.springframework.boot</groupId>
            <artifactId>spring-boot-starter-data-redis</artifactId>
        </dependency>

        <!-- 连接池依赖 -->
        <dependency>
            <groupId>org.apache.commons</groupId>
            <artifactId>commons-pool2</artifactId>
        </dependency>

        <!-- Lombok 依赖(可选) -->
        <dependency>
            <groupId>org.projectlombok</groupId>
            <artifactId>lombok</artifactId>
            <optional>true</optional>
        </dependency>

        <!-- 测试依赖 -->
        <dependency>
            <groupId>org.springframework.boot</groupId>
            <artifactId>spring-boot-starter-test</artifactId>
            <scope>test</scope>
        </dependency>
    </dependencies>

    <build>
        <plugins>
            <plugin>
                <groupId>org.springframework.boot</groupId>
                <artifactId>spring-boot-maven-plugin</artifactId>
                <configuration>
                    <excludes>
                        <exclude>
                            <groupId>org.projectlombok</groupId>
                            <artifactId>lombok</artifactId>
                        </exclude>
                    </excludes>
                </configuration>
            </plugin>
        </plugins>
    </build>
</project>
三、Redis 核心配置
3.1 基本配置
Spring Boot 提供了自动配置功能,我们只需在配置文件中添加 Redis 相关配置即可。常用的配置文件格式有两种:application.properties 和 application.yml,这里以 application.yml 为例。
在 src/main/resources 目录下创建 application.yml 文件,添加以下配置:
java
spring:
  redis:
    # Redis 服务器地址
    host: 127.0.0.1
    # Redis 服务器端口
    port: 6379
    # Redis 服务器密码(若未设置密码,可省略)
    password:
    # 数据库索引(0-15,默认为 0)
    database: 0
    # 连接超时时间(毫秒)
    timeout: 3000ms
    # Lettuce 连接池配置
    lettuce:
      pool:
        # 最大连接数
        max-active: 8
        # 最大空闲连接
        max-idle: 8
        # 最小空闲连接
        min-idle: 2
        # 最大等待时间(-1 表示无限制)
        max-wait: -1ms
3.2 集群配置
如果使用 Redis 集群,配置方式如下:
java
spring:
  redis:
    password:
    timeout: 3000ms
    cluster:
      # 集群节点列表
      nodes:
        - 192.168.1.101:6379
        - 192.168.1.102:6379
        - 192.168.1.103:6379
        - 192.168.1.104:6379
        - 192.168.1.105:6379
        - 192.168.1.106:6379
      # 最大重定向次数
      max-redirects: 3
    lettuce:
      pool:
        max-active: 16
        max-idle: 8
        min-idle: 4
        max-wait: 1000ms
3.3 哨兵模式配置
若 Redis 采用哨兵模式,配置如下:
java
spring:
  redis:
    password:
    timeout: 3000ms
    sentinel:
      # 主节点名称
      master: mymaster
      # 哨兵节点列表
      nodes:
        - 192.168.1.201:26379
        - 192.168.1.202:26379
        - 192.168.1.203:26379
    lettuce:
      pool:
        max-active: 16
        max-idle: 8
        min-idle: 4
        max-wait: 1000ms
3.4 自定义 RedisTemplate 配置
Spring Boot 自动配置的 RedisTemplate 使用 JdkSerializationRedisSerializer 进行序列化,这种方式会导致存储的数据带有序列化前缀,可读性差且占用空间。因此,通常需要自定义 RedisTemplate,使用 JSON 序列化方式。
创建 Redis 配置类:
java
package com.example.redisdemo.config;

import org.springframework.context.annotation.Bean;
import org.springframework.context.annotation.Configuration;
import org.springframework.data.redis.connection.RedisConnectionFactory;
import org.springframework.data.redis.core.RedisTemplate;
import org.springframework.data.redis.serializer.GenericJackson2JsonRedisSerializer;
import org.springframework.data.redis.serializer.StringRedisSerializer;

@Configuration
public class RedisConfig {

    /**
     * 自定义 RedisTemplate,使用 JSON 序列化
     */
    @Bean
    public RedisTemplate<String, Object> redisTemplate(RedisConnectionFactory factory) {
        // 创建 RedisTemplate 实例
        RedisTemplate<String, Object> template = new RedisTemplate<>();

        // 设置连接工厂
        template.setConnectionFactory(factory);

        // 创建字符串序列化器
        StringRedisSerializer stringSerializer = new StringRedisSerializer();

        // 创建 JSON 序列化器
        GenericJackson2JsonRedisSerializer jsonSerializer = new GenericJackson2JsonRedisSerializer();

        // 设置 key 的序列化器
        template.setKeySerializer(stringSerializer);
        // 设置 hash key 的序列化器
        template.setHashKeySerializer(stringSerializer);
        // 设置 value 的序列化器
        template.setValueSerializer(jsonSerializer);
        // 设置 hash value 的序列化器
        template.setHashValueSerializer(jsonSerializer);

        // 初始化模板
        template.afterPropertiesSet();

        return template;
    }
}
上述配置中,我们使用 StringRedisSerializer 序列化 key,使用 GenericJackson2JsonRedisSerializer 序列化 value。GenericJackson2JsonRedisSerializer 基于 Jackson 库,能够将对象序列化为 JSON 格式,并且在反序列化时能够自动识别对象类型。
3.5 序列化器详解
Redis 序列化器用于将 Java 对象转换为可存储在 Redis 中的字节序列,以及将字节序列转换回 Java 对象。Spring Data Redis 提供了多种序列化器:
- StringRedisSerializer:将对象序列化为字符串,主要用于序列化 key
- JdkSerializationRedisSerializer:使用 JDK 自带的序列化机制,默认的序列化器
- GenericJackson2JsonRedisSerializer:使用 Jackson 库将对象序列化为 JSON 格式
- Jackson2JsonRedisSerializer:与 GenericJackson2JsonRedisSerializer 类似,但需要指定目标类
- OxmSerializer:使用 Spring O/X 映射功能进行序列化,支持 XML 格式
各种序列化器的优缺点:
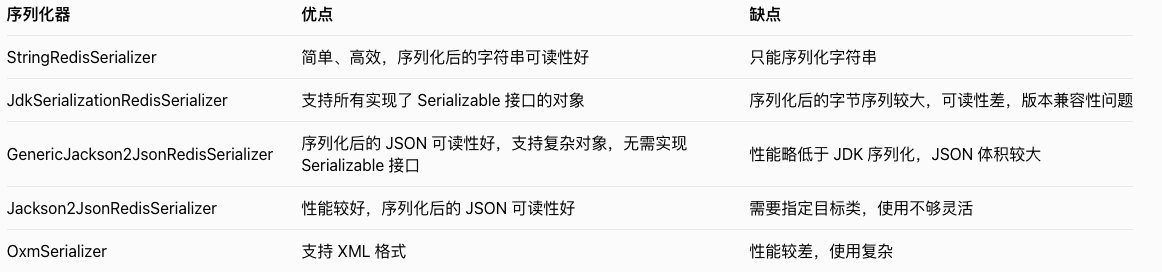
在实际开发中,推荐使用 StringRedisSerializer 作为 key 的序列化器,使用 GenericJackson2JsonRedisSerializer 或 Jackson2JsonRedisSerializer 作为 value 的序列化器。
四、Redis 数据结构操作
Spring Data Redis 提供了 RedisTemplate 和 StringRedisTemplate 两个模板类用于操作 Redis。StringRedisTemplate 是 RedisTemplate 的子类,专门用于处理字符串类型的数据。
4.1 StringRedisTemplate 操作
StringRedisTemplate 的 opsForValue() 方法返回 ValueOperations 对象,用于操作 String 类型的数据。
java
package com.example.redisdemo.service;

import org.springframework.data.redis.core.StringRedisTemplate;
import org.springframework.data.redis.core.ValueOperations;
import org.springframework.stereotype.Service;

import javax.annotation.Resource;
import java.util.concurrent.TimeUnit;

@Service
public class StringRedisService {

    @Resource
    private StringRedisTemplate stringRedisTemplate;

    /**
     * 设置字符串值
     */
    public void setString(String key, String value) {
        ValueOperations<String, String> operations = stringRedisTemplate.opsForValue();
        operations.set(key, value);
    }

    /**
     * 设置字符串值并指定过期时间
     */
    public void setStringWithExpire(String key, String value, long timeout, TimeUnit unit) {
        ValueOperations<String, String> operations = stringRedisTemplate.opsForValue();
        operations.set(key, value, timeout, unit);
    }

    /**
     * 获取字符串值
     */
    public String getString(String key) {
        ValueOperations<String, String> operations = stringRedisTemplate.opsForValue();
        return operations.get(key);
    }

    /**
     * 自增操作
     */
    public Long increment(String key, long delta) {
        ValueOperations<String, String> operations = stringRedisTemplate.opsForValue();
        return operations.increment(key, delta);
    }

    /**
     * 自减操作
     */
    public Long decrement(String key, long delta) {
        ValueOperations<String, String> operations = stringRedisTemplate.opsForValue();
        return operations.decrement(key, delta);
    }

    /**
     * 删除键
     */
    public Boolean delete(String key) {
        return stringRedisTemplate.delete(key);
    }
}
4.2 RedisTemplate 操作对象
RedisTemplate 可以操作各种类型的对象,下面以操作用户对象为例进行说明。
首先定义一个 User 实体类:
java
package com.example.redisdemo.entity;

import lombok.AllArgsConstructor;
import lombok.Data;
import lombok.NoArgsConstructor;

import java.io.Serializable;

@Data
@NoArgsConstructor
@AllArgsConstructor
public class User implements Serializable {
    private Long id;
    private String name;
    private Integer age;
    private String email;
}
然后创建一个服务类,使用 RedisTemplate 操作 User 对象:
java
package com.example.redisdemo.service;

import com.example.redisdemo.entity.User;
import org.springframework.data.redis.core.RedisTemplate;
import org.springframework.data.redis.core.ValueOperations;
import org.springframework.stereotype.Service;

import javax.annotation.Resource;
import java.util.concurrent.TimeUnit;

@Service
public class ObjectRedisService {

    @Resource
    private RedisTemplate<String, Object> redisTemplate;

    /**
     * 存储用户对象
     */
    public void saveUser(String key, User user) {
        ValueOperations<String, Object> operations = redisTemplate.opsForValue();
        operations.set(key, user);
    }

    /**
     * 存储用户对象并指定过期时间
     */
    public void saveUserWithExpire(String key, User user, long timeout, TimeUnit unit) {
        ValueOperations<String, Object> operations = redisTemplate.opsForValue();
        operations.set(key, user, timeout, unit);
    }

    /**
     * 获取用户对象
     */
    public User getUser(String key) {
        ValueOperations<String, Object> operations = redisTemplate.opsForValue();
        return (User) operations.get(key);
    }

    /**
     * 删除用户对象
     */
    public Boolean deleteUser(String key) {
        return redisTemplate.delete(key);
    }
}
4.3 操作 Hash 类型
Hash 类型适合存储对象的多个属性,RedisTemplate 的 opsForHash() 方法返回 HashOperations 对象,用于操作 Hash 类型的数据。
java
package com.example.redisdemo.service;

import org.springframework.data.redis.core.HashOperations;
import org.springframework.data.redis.core.RedisTemplate;
import org.springframework.stereotype.Service;

import javax.annotation.Resource;
import java.util.Map;
import java.util.Set;

@Service
public class HashRedisService {

    @Resource
    private RedisTemplate<String, Object> redisTemplate;

    /**
     * 向 Hash 中添加一个字段
     */
    public void put(String key, String hashKey, Object value) {
        HashOperations<String, String, Object> operations = redisTemplate.opsForHash();
        operations.put(key, hashKey, value);
    }

    /**
     * 向 Hash 中添加多个字段
     */
    public void putAll(String key, Map<String, Object> map) {
        HashOperations<String, String, Object> operations = redisTemplate.opsForHash();
        operations.putAll(key, map);
    }

    /**
     * 获取 Hash 中指定字段的值
     */
    public Object get(String key, String hashKey) {
        HashOperations<String, String, Object> operations = redisTemplate.opsForHash();
        return operations.get(key, hashKey);
    }

    /**
     * 获取 Hash 中所有字段和值
     */
    public Map<String, Object> getAll(String key) {
        HashOperations<String, String, Object> operations = redisTemplate.opsForHash();
        return operations.entries(key);
    }

    /**
     * 获取 Hash 中所有字段
     */
    public Set<String> getKeys(String key) {
        HashOperations<String, String, Object> operations = redisTemplate.opsForHash();
        return operations.keys(key);
    }

    /**
     * 获取 Hash 中所有值
     */
    public Object[] getValues(String key) {
        HashOperations<String, String, Object> operations = redisTemplate.opsForHash();
        return operations.values(key).toArray();
    }

    /**
     * 删除 Hash 中指定字段
     */
    public Long delete(String key, String... hashKeys) {
        HashOperations<String, String, Object> operations = redisTemplate.opsForHash();
        return operations.delete(key, hashKeys);
    }

    /**
     * 判断 Hash 中是否存在指定字段
     */
    public Boolean hasKey(String key, String hashKey) {
        HashOperations<String, String, Object> operations = redisTemplate.opsForHash();
        return operations.hasKey(key, hashKey);
    }
}
4.4 操作 List 类型
List 类型是一个有序的字符串列表,RedisTemplate 的 opsForList() 方法返回 ListOperations 对象,用于操作 List 类型的数据。
java
package com.example.redisdemo.service;

import org.springframework.data.redis.core.ListOperations;
import org.springframework.data.redis.core.RedisTemplate;
import org.springframework.stereotype.Service;

import javax.annotation.Resource;
import java.util.List;

@Service
public class ListRedisService {

    @Resource
    private RedisTemplate<String, Object> redisTemplate;

    /**
     * 从列表左侧插入元素
     */
    public Long leftPush(String key, Object value) {
        ListOperations<String, Object> operations = redisTemplate.opsForList();
        return operations.leftPush(key, value);
    }

    /**
     * 从列表左侧插入多个元素
     */
    public Long leftPushAll(String key, Object... values) {
        ListOperations<String, Object> operations = redisTemplate.opsForList();
        return operations.leftPushAll(key, values);
    }

    /**
     * 从列表右侧插入元素
     */
    public Long rightPush(String key, Object value) {
        ListOperations<String, Object> operations = redisTemplate.opsForList();
        return operations.rightPush(key, value);
    }

    /**
     * 从列表右侧插入多个元素
     */
    public Long rightPushAll(String key, Object... values) {
        ListOperations<String, Object> operations = redisTemplate.opsForList();
        return operations.rightPushAll(key, values);
    }

    /**
     * 获取列表指定范围内的元素
     */
    public List<Object> range(String key, long start, long end) {
        ListOperations<String, Object> operations = redisTemplate.opsForList();
        return operations.range(key, start, end);
    }

    /**
     * 获取列表长度
     */
    public Long size(String key) {
        ListOperations<String, Object> operations = redisTemplate.opsForList();
        return operations.size(key);
    }

    /**
     * 从列表左侧弹出元素
     */
    public Object leftPop(String key) {
        ListOperations<String, Object> operations = redisTemplate.opsForList();
        return operations.leftPop(key);
    }

    /**
     * 从列表右侧弹出元素
     */
    public Object rightPop(String key) {
        ListOperations<String, Object> operations = redisTemplate.opsForList();
        return operations.rightPop(key);
    }

    /**
     * 根据索引设置列表元素的值
     */
    public void set(String key, long index, Object value) {
        ListOperations<String, Object> operations = redisTemplate.opsForList();
        operations.set(key, index, value);
    }

    /**
     * 删除列表中指定次数的元素
     */
    public Long remove(String key, long count, Object value) {
        ListOperations<String, Object> operations = redisTemplate.opsForList();
        return operations.remove(key, count, value);
    }
}
4.5 操作 Set 类型
Set 类型是一个无序的字符串集合,不允许重复元素,RedisTemplate 的 opsForSet() 方法返回 SetOperations 对象,用于操作 Set 类型的数据。
java
package com.example.redisdemo.service;

import org.springframework.data.redis.core.SetOperations;
import org.springframework.data.redis.core.RedisTemplate;
import org.springframework.stereotype.Service;

import javax.annotation.Resource;
import java.util.Set;

@Service
public class SetRedisService {

    @Resource
    private RedisTemplate<String, Object> redisTemplate;

    /**
     * 向集合中添加元素
     */
    public Long add(String key, Object... values) {
        SetOperations<String, Object> operations = redisTemplate.opsForSet();
        return operations.add(key, values);
    }

    /**
     * 获取集合中的所有元素
     */
    public Set<Object> members(String key) {
        SetOperations<String, Object> operations = redisTemplate.opsForSet();
        return operations.members(key);
    }

    /**
     * 判断元素是否在集合中
     */
    public Boolean isMember(String key, Object value) {
        SetOperations<String, Object> operations = redisTemplate.opsForSet();
        return operations.isMember(key, value);
    }

    /**
     * 获取集合的大小
     */
    public Long size(String key) {
        SetOperations<String, Object> operations = redisTemplate.opsForSet();
        return operations.size(key);
    }

    /**
     * 从集合中移除元素
     */
    public Long remove(String key, Object... values) {
        SetOperations<String, Object> operations = redisTemplate.opsForSet();
        return operations.remove(key, values);
    }

    /**
     * 随机从集合中弹出一个元素
     */
    public Object pop(String key) {
        SetOperations<String, Object> operations = redisTemplate.opsForSet();
        return operations.pop(key);
    }

    /**
     * 计算两个集合的交集
     */
    public Set<Object> intersect(String key1, String key2) {
        SetOperations<String, Object> operations = redisTemplate.opsForSet();
        return operations.intersect(key1, key2);
    }

    /**
     * 计算两个集合的并集
     */
    public Set<Object> union(String key1, String key2) {
        SetOperations<String, Object> operations = redisTemplate.opsForSet();
        return operations.union(key1, key2);
    }

    /**
     * 计算两个集合的差集
     */
    public Set<Object> difference(String key1, String key2) {
        SetOperations<String, Object> operations = redisTemplate.opsForSet();
        return operations.difference(key1, key2);
    }
}
4.6 操作 ZSet 类型
ZSet 类型是一个有序的字符串集合,每个元素都关联一个分数(score),RedisTemplate 的 opsForZSet() 方法返回 ZSetOperations 对象,用于操作 ZSet 类型的数据。
java
package com.example.redisdemo.service;

import org.springframework.data.redis.core.ZSetOperations;
import org.springframework.data.redis.core.RedisTemplate;
import org.springframework.stereotype.Service;

import javax.annotation.Resource;
import java.util.Set;

@Service
public class ZSetRedisService {

    @Resource
    private RedisTemplate<String, Object> redisTemplate;

    /**
     * 向有序集合中添加元素
     */
    public Boolean add(String key, Object value, double score) {
        ZSetOperations<String, Object> operations = redisTemplate.opsForZSet();
        return operations.add(key, value, score);
    }

    /**
     * 向有序集合中添加多个元素
     */
    public Long add(String key, Set<ZSetOperations.TypedTuple<Object>> tuples) {
        ZSetOperations<String, Object> operations = redisTemplate.opsForZSet();
        return operations.add(key, tuples);
    }

    /**
     * 获取有序集合中元素的分数
     */
    public Double score(String key, Object value) {
        ZSetOperations<String, Object> operations = redisTemplate.opsForZSet();
        return operations.score(key, value);
    }

    /**
     * 增加有序集合中元素的分数
     */
    public Double incrementScore(String key, Object value, double delta) {
        ZSetOperations<String, Object> operations = redisTemplate.opsForZSet();
        return operations.incrementScore(key, value, delta);
    }

    /**
     * 获取有序集合的大小
     */
    public Long size(String key) {
        ZSetOperations<String, Object> operations = redisTemplate.opsForZSet();
        return operations.size(key);
    }

    /**
     * 移除有序集合中的元素
     */
    public Long remove(String key, Object... values) {
        ZSetOperations<String, Object> operations = redisTemplate.opsForZSet();
        return operations.remove(key, values);
    }

    /**
     * 获取有序集合中指定排名范围的元素(按分数升序)
     */
    public Set<Object> range(String key, long start, long end) {
        ZSetOperations<String, Object> operations = redisTemplate.opsForZSet();
        return operations.range(key, start, end);
    }

    /**
     * 获取有序集合中指定分数范围的元素(按分数升序)
     */
    public Set<Object> rangeByScore(String key, double min, double max) {
        ZSetOperations<String, Object> operations = redisTemplate.opsForZSet();
        return operations.rangeByScore(key, min, max);
    }

    /**
     * 获取元素在有序集合中的排名(按分数升序)
     */
    public Long rank(String key, Object value) {
        ZSetOperations<String, Object> operations = redisTemplate.opsForZSet();
        return operations.rank(key, value);
    }

    /**
     * 获取元素在有序集合中的排名(按分数降序)
     */
    public Long reverseRank(String key, Object value) {
        ZSetOperations<String, Object> operations = redisTemplate.opsForZSet();
        return operations.reverseRank(key, value);
    }
}
五、Spring 缓存抽象集成
Spring 提供了缓存抽象,可以通过注解的方式轻松实现数据缓存功能。Spring Boot 与 Redis 集成后,可以将 Redis 作为缓存的存储介质。
5.1 开启缓存支持
要使用 Spring 缓存抽象,需要在配置类或启动类上添加 @EnableCaching 注解开启缓存支持。
java
package com.example.redisdemo;

import org.springframework.boot.SpringApplication;
import org.springframework.boot.autoconfigure.SpringBootApplication;
import org.springframework.cache.annotation.EnableCaching;

@SpringBootApplication
@EnableCaching // 开启缓存支持
public class RedisDemoApplication {

    public static void main(String[] args) {
        SpringApplication.run(RedisDemoApplication.class, args);
    }
}
5.2 配置缓存管理器
Spring Boot 会自动配置 RedisCacheManager,但我们可以根据需要自定义缓存管理器,设置缓存过期时间、序列化方式等。
java
package com.example.redisdemo.config;

import org.springframework.cache.annotation.EnableCaching;
import org.springframework.context.annotation.Bean;
import org.springframework.context.annotation.Configuration;
import org.springframework.data.redis.cache.RedisCacheConfiguration;
import org.springframework.data.redis.cache.RedisCacheManager;
import org.springframework.data.redis.connection.RedisConnectionFactory;
import org.springframework.data.redis.serializer.GenericJackson2JsonRedisSerializer;
import org.springframework.data.redis.serializer.RedisSerializationContext;
import org.springframework.data.redis.serializer.StringRedisSerializer;

import java.time.Duration;
import java.util.HashMap;
import java.util.Map;

@Configuration
@EnableCaching
public class CacheConfig {

    /**
     * 自定义 RedisCacheManager
     */
    @Bean
    public RedisCacheManager cacheManager(RedisConnectionFactory factory) {
        // 全局默认缓存配置
        RedisCacheConfiguration defaultConfig = RedisCacheConfiguration.defaultCacheConfig()
                // 设置 key 序列化器
                .serializeKeysWith(RedisSerializationContext.SerializationPair
                        .fromSerializer(new StringRedisSerializer()))
                // 设置 value 序列化器
                .serializeValuesWith(RedisSerializationContext.SerializationPair
                        .fromSerializer(new GenericJackson2JsonRedisSerializer()))
                // 默认过期时间 30 分钟
                .entryTtl(Duration.ofMinutes(30))
                // 不缓存 null 值
                .disableCachingNullValues();

        // 针对不同缓存名称设置不同的过期时间
        Map<String, RedisCacheConfiguration> configMap = new HashMap<>();
        // 用户缓存过期时间 1 小时
        configMap.put("userCache", defaultConfig.entryTtl(Duration.ofHours(1)));
        // 商品缓存过期时间 10 分钟
        configMap.put("productCache", defaultConfig.entryTtl(Duration.ofMinutes(10)));
        // 订单缓存过期时间 5 分钟
        configMap.put("orderCache", defaultConfig.entryTtl(Duration.ofMinutes(5)));

        // 创建缓存管理器
        return RedisCacheManager.builder(factory)
                .cacheDefaults(defaultConfig) // 设置默认缓存配置
                .withInitialCacheConfigurations(configMap) // 设置自定义缓存配置
                .build();
    }
}
5.3 缓存注解详解
Spring 缓存抽象提供了多个注解用于实现缓存功能:
- @Cacheable:用于查询操作,方法执行前先查询缓存,如果缓存中存在,则直接返回缓存结果,不执行方法;如果缓存中不存在,则执行方法,并将方法返回值存入缓存。
主要属性:- value/cacheNames:缓存名称,必填,用于指定缓存的存储位置
- key:缓存的 key,可以使用 SpEL 表达式,默认为方法参数组合
- condition:缓存条件,满足条件才进行缓存
- unless:排除条件,满足条件则不进行缓存
- @CachePut:用于更新操作,方法执行后将返回值存入缓存,无论缓存中是否已存在该 key。
主要属性与 @Cacheable 相同。 - @CacheEvict:用于删除操作,方法执行后删除缓存中的指定数据。
主要属性:- value/cacheNames:缓存名称,必填
- key:要删除的缓存 key
- allEntries:是否删除缓存中的所有数据,默认为 false
- beforeInvocation:是否在方法执行前删除缓存,默认为 false
- @Caching:用于组合多个缓存注解,可以同时指定 @Cacheable、@CachePut 和 @CacheEvict。
- @CacheConfig:用于类级别,统一配置该类中所有缓存注解的公共属性,如 value、keyGenerator 等。
5.4 缓存注解使用示例
下面以用户服务为例,展示缓存注解的使用:
java
package com.example.redisdemo.service;

import com.example.redisdemo.entity.User;
import org.springframework.cache.annotation.CacheEvict;
import org.springframework.cache.annotation.CachePut;
import org.springframework.cache.annotation.Cacheable;
import org.springframework.stereotype.Service;

import java.util.HashMap;
import java.util.Map;

@Service
public class UserCacheService {

    // 模拟数据库存储用户信息
    private static final Map<Long, User> userMap = new HashMap<>();

    static {
        // 初始化一些用户数据
        userMap.put(1L, new User(1L, "张三", 20, "zhangsan@example.com"));
        userMap.put(2L, new User(2L, "李四", 25, "lisi@example.com"));
        userMap.put(3L, new User(3L, "王五", 30, "wangwu@example.com"));
    }

    /**
     * 根据 ID 查询用户
     * 使用 @Cacheable 注解,缓存名称为 userCache,key 为 "user:" + id
     */
    @Cacheable(value = "userCache", key = "'user:' + #id")
    public User getUserById(Long id) {
        System.out.println("从数据库查询用户,id=" + id);
        return userMap.get(id);
    }

    /**
     * 添加用户
     * 使用 @CachePut 注解,将新添加的用户存入缓存
     */
    @CachePut(value = "userCache", key = "'user:' + #result.id")
    public User addUser(User user) {
        System.out.println("向数据库添加用户,user=" + user);
        userMap.put(user.getId(), user);
        return user;
    }

    /**
     * 更新用户
     * 使用 @CachePut 注解,更新缓存中的用户信息
     */
    @CachePut(value = "userCache", key = "'user:' + #user.id")
    public User updateUser(User user) {
        System.out.println("更新数据库中的用户,user=" + user);
        userMap.put(user.getId(), user);
        return user;
    }

    /**
     * 删除用户
     * 使用 @CacheEvict 注解,删除缓存中的用户信息
     */
    @CacheEvict(value = "userCache", key = "'user:' + #id")
    public void deleteUser(Long id) {
        System.out.println("从数据库删除用户,id=" + id);
        userMap.remove(id);
    }

    /**
     * 清空所有用户缓存
     * 使用 @CacheEvict 注解,allEntries = true 表示删除缓存中的所有数据
     */
    @CacheEvict(value = "userCache", allEntries = true)
    public void clearUserCache() {
        System.out.println("清空所有用户缓存");
    }
}
5.5 SpEL 表达式在缓存中的应用
在缓存注解中,key、condition、unless 等属性支持使用 SpEL 表达式,使缓存配置更加灵活。
常用的 SpEL 表达式:
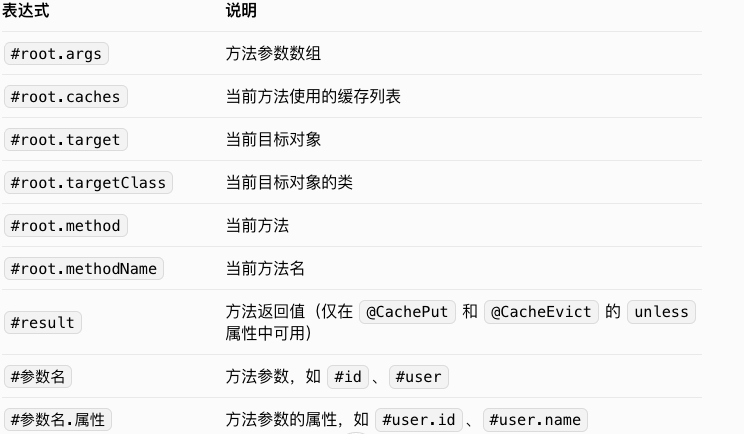
示例:
java
// 使用方法参数作为 key
@Cacheable(value = "userCache", key = "#id")
public User getUserById(Long id) { ... }

// 使用方法参数的属性作为 key
@Cacheable(value = "userCache", key = "#user.id")
public User getUserByUser(User user) { ... }

// 组合多个参数作为 key
@Cacheable(value = "userCache", key = "#name + ':' + #age")
public List<User> getUsersByNameAndAge(String name, Integer age) { ... }

// 根据条件进行缓存
@Cacheable(value = "userCache", key = "#id", condition = "#id > 10")
public User getUserById(Long id) { ... }

// 根据返回值决定是否缓存
@Cacheable(value = "userCache", key = "#id", unless = "#result == null")
public User getUserById(Long id) { ... }
六、Redis 高级特性
6.1 分布式锁
在分布式系统中,多个进程可能同时操作共享资源,为了保证数据一致性,需要使用分布式锁。Redis 可以通过 setIfAbsent 方法(即 SET NX 命令)实现分布式锁。
java
package com.example.redisdemo.service;

import org.springframework.data.redis.core.RedisTemplate;
import org.springframework.stereotype.Service;

import javax.annotation.Resource;
import java.util.concurrent.TimeUnit;

@Service
public class RedisDistributedLockService {

    @Resource
    private RedisTemplate<String, Object> redisTemplate;

    // 锁的前缀
    private static final String LOCK_PREFIX = "lock:";

    /**
     * 获取分布式锁
     *
     * @param lockKey 锁的 key
     * @param value 锁的 value,用于标识锁的持有者
     * @param expireTime 锁的过期时间
     * @param unit 时间单位
     * @return 是否获取到锁
     */
    public boolean tryLock(String lockKey, String value, long expireTime, TimeUnit unit) {
        String key = LOCK_PREFIX + lockKey;
        // 使用 setIfAbsent 方法实现分布式锁,该方法是原子操作
        return Boolean.TRUE.equals(redisTemplate.opsForValue().setIfAbsent(key, value, expireTime, unit));
    }

    /**
     * 释放分布式锁
     *
     * @param lockKey 锁的 key
     * @param value 锁的 value,用于验证是否为锁的持有者
     */
    public void unlock(String lockKey, String value) {
        String key = LOCK_PREFIX + lockKey;
        try {
            // 获取锁的 value
            Object currentValue = redisTemplate.opsForValue().get(key);
            // 验证是否为锁的持有者
            if (currentValue != null && currentValue.equals(value)) {
                // 释放锁
                redisTemplate.delete(key);
            }
        } catch (Exception e) {
            // 处理异常
            e.printStackTrace();
        }
    }
}
上述实现存在一个问题:如果持有锁的进程在释放锁之前崩溃,可能导致锁无法释放。为了解决这个问题,可以给锁设置过期时间,确保锁最终会被释放。
更完善的分布式锁实现可以使用 Redisson 框架,它提供了更可靠的分布式锁实现,支持自动续期、公平锁等功能。
6.2 发布 / 订阅
Redis 提供了发布 / 订阅功能,可以实现简单的消息通信。Spring Data Redis 对 Redis 的发布 / 订阅功能进行了封装,使用起来更加方便。
6.2.1 消息发布者
java
package com.example.redisdemo.service;

import org.springframework.data.redis.core.RedisTemplate;
import org.springframework.stereotype.Service;

import javax.annotation.Resource;

@Service
public class RedisMessagePublisher {

    @Resource
    private RedisTemplate<String, Object> redisTemplate;

    /**
     * 发布消息
     *
     * @param channel 频道
     * @param message 消息内容
     */
    public void publish(String channel, Object message) {
        redisTemplate.convertAndSend(channel, message);
    }
}
6.2.2 消息订阅者
java
package com.example.redisdemo.service;

import org.springframework.data.redis.connection.Message;
import org.springframework.data.redis.connection.MessageListener;
import org.springframework.stereotype.Service;

@Service
public class RedisMessageSubscriber implements MessageListener {

    /**
     * 接收消息
     *
     * @param message 消息
     * @param pattern 模式
     */
    @Override
    public void onMessage(Message message, byte[] pattern) {
        // 获取消息内容
        String content = new String(message.getBody());
        // 获取频道
        String channel = new String(message.getChannel());
        // 处理消息
        System.out.println("收到来自频道 " + channel + " 的消息:" + content);
    }
}
6.2.3 配置消息监听容器
java
package com.example.redisdemo.config;

import com.example.redisdemo.service.RedisMessageSubscriber;
import org.springframework.context.annotation.Bean;
import org.springframework.context.annotation.Configuration;
import org.springframework.data.redis.connection.RedisConnectionFactory;
import org.springframework.data.redis.listener.PatternTopic;
import org.springframework.data.redis.listener.RedisMessageListenerContainer;
import org.springframework.data.redis.listener.adapter.MessageListenerAdapter;

@Configuration
public class RedisMessageConfig {

    /**
     * 配置消息监听适配器
     */
    @Bean
    public MessageListenerAdapter messageListenerAdapter(RedisMessageSubscriber subscriber) {
        return new MessageListenerAdapter(subscriber);
    }

    /**
     * 配置消息监听容器
     */
    @Bean
    public RedisMessageListenerContainer redisMessageListenerContainer(
            RedisConnectionFactory factory, MessageListenerAdapter adapter) {
        RedisMessageListenerContainer container = new RedisMessageListenerContainer();
        container.setConnectionFactory(factory);
        // 订阅 "news" 频道
        container.addMessageListener(adapter, new PatternTopic("news"));
        // 可以订阅多个频道
        container.addMessageListener(adapter, new PatternTopic("notice"));
        return container;
    }
}
6.3 管道操作
Redis 管道(Pipeline)允许客户端一次性发送多个命令,减少网络往返次数,提高批量操作的效率。
java
package com.example.redisdemo.service;

import org.springframework.data.redis.core.RedisCallback;
import org.springframework.data.redis.core.RedisTemplate;
import org.springframework.stereotype.Service;

import javax.annotation.Resource;
import java.util.List;

@Service
public class RedisPipelineService {

    @Resource
    private RedisTemplate<String, Object> redisTemplate;

    /**
     * 批量设置键值对
     *
     * @param keys 键列表
     * @param values 值列表
     * @return 操作结果
     */
    public List<Object> batchSet(List<String> keys, List<Object> values) {
        if (keys.size() != values.size()) {
            throw new IllegalArgumentException("keys 和 values 的大小必须相等");
        }

        // 使用管道进行批量操作
        return redisTemplate.executePipelined((RedisCallback<Object>) connection -> {
            for (int i = 0; i < keys.size(); i++) {
                String key = keys.get(i);
                Object value = values.get(i);
                // 序列化 key 和 value
                byte[] keyBytes = redisTemplate.getKeySerializer().serialize(key);
                byte[] valueBytes = redisTemplate.getValueSerializer().serialize(value);
                // 设置键值对
                connection.set(keyBytes, valueBytes);
            }
            return null;
        });
    }

    /**
     * 批量获取值
     *
     * @param keys 键列表
     * @return 值列表
     */
    public List<Object> batchGet(List<String> keys) {
        // 使用管道进行批量操作
        return redisTemplate.executePipelined((RedisCallback<Object>) connection -> {
            for (String key : keys) {
                // 序列化 key
                byte[] keyBytes = redisTemplate.getKeySerializer().serialize(key);
                // 获取值
                connection.get(keyBytes);
            }
            return null;
        }, redisTemplate.getValueSerializer());
    }
}
6.4 事务
Redis 支持事务,可以将多个命令打包成一个事务,一次性执行,要么全部执行,要么全部不执行。
java
package com.example.redisdemo.service;

import org.springframework.data.redis.core.RedisTemplate;
import org.springframework.data.redis.core.SessionCallback;
import org.springframework.stereotype.Service;

import javax.annotation.Resource;
import java.util.List;

@Service
public class RedisTransactionService {

    @Resource
    private RedisTemplate<String, Object> redisTemplate;

    /**
     * 执行 Redis 事务
     */
    public List<Object> executeTransaction() {
        // 使用 SessionCallback 执行事务
        return redisTemplate.execute((SessionCallback<List<Object>>) session -> {
            // 开启事务
            session.multi();

            // 向事务中添加命令
            session.opsForValue().set("name", "张三");
            session.opsForValue().set("age", 20);
            session.opsForHash().put("user", "id", 1);
            session.opsForHash().put("user", "name", "张三");

            // 执行事务
            return session.exec();
        });
    }

    /**
     * 带条件的事务(使用 Watch 命令)
     */
    public List<Object> executeTransactionWithCondition(String key, Object expectedValue) {
        // 使用 SessionCallback 执行事务
        return redisTemplate.execute((SessionCallback<List<Object>>) session -> {
            // 监视 key
            session.watch(key);

            // 获取当前值
            Object currentValue = session.opsForValue().get(key);

            // 判断当前值是否与预期值一致
            if (expectedValue.equals(currentValue)) {
                // 开启事务
                session.multi();

                // 向事务中添加命令
                session.opsForValue().set(key, "new value");
                session.opsForValue().set("otherKey", "other value");

                // 执行事务
                return session.exec();
            } else {
                // 取消监视
                session.unwatch();
                return null;
            }
        });
    }
}
七、实战案例
7.1 缓存用户信息
下面实现一个用户信息管理系统,使用 Redis 缓存用户信息,提高查询效率。
7.1.1 控制器
java
package com.example.redisdemo.controller;

import com.example.redisdemo.entity.User;
import com.example.redisdemo.service.UserCacheService;
import org.springframework.web.bind.annotation.*;

@RestController
@RequestMapping("/users")
public class UserController {

    private final UserCacheService userCacheService;

    public UserController(UserCacheService userCacheService) {
        this.userCacheService = userCacheService;
    }

    /**
     * 根据 ID 查询用户
     */
    @GetMapping("/{id}")
    public User getUserById(@PathVariable Long id) {
        return userCacheService.getUserById(id);
    }

    /**
     * 添加用户
     */
    @PostMapping
    public User addUser(@RequestBody User user) {
        return userCacheService.addUser(user);
    }

    /**
     * 更新用户
     */
    @PutMapping
    public User updateUser(@RequestBody User user) {
        return userCacheService.updateUser(user);
    }

    /**
     * 删除用户
     */
    @DeleteMapping("/{id}")
    public void deleteUser(@PathVariable Long id) {
        userCacheService.deleteUser(id);
    }

    /**
     * 清空用户缓存
     */
    @DeleteMapping("/cache")
    public void clearUserCache() {
        userCacheService.clearUserCache();
    }
}
7.1.2 测试
- 启动应用后,可以使用 Postman 或 curl 等工具测试接口:
- 查询用户:GET http://localhost:8080/users/1
- 添加用户:POST http://localhost:8080/users,请求体为 JSON 格式的用户信息
- 更新用户:PUT http://localhost:8080/users,请求体为 JSON 格式的用户信息
- 删除用户:DELETE http://localhost:8080/users/1
- 清空缓存:DELETE http://localhost:8080/users/cache
7.2 实现分布式计数器
使用 Redis 的自增操作实现一个分布式计数器,可用于统计网站访问量、下载量等。
java
package com.example.redisdemo.service;

import org.springframework.data.redis.core.StringRedisTemplate;
import org.springframework.stereotype.Service;

import javax.annotation.Resource;
import java.util.concurrent.TimeUnit;

@Service
public class DistributedCounterService {

    @Resource
    private StringRedisTemplate stringRedisTemplate;

    /**
     * 增加计数器的值
     *
     * @param key 计数器 key
     * @param delta 增加的值
     * @return 增加后的值
     */
    public Long increment(String key, long delta) {
        return stringRedisTemplate.opsForValue().increment(key, delta);
    }

    /**
     * 减少计数器的值
     *
     * @param key 计数器 key
     * @param delta 减少的值
     * @return 减少后的值
     */
    public Long decrement(String key, long delta) {
        return stringRedisTemplate.opsForValue().decrement(key, delta);
    }

    /**
     * 获取计数器的值
     *
     * @param key 计数器 key
     * @return 计数器的值
     */
    public Long getCount(String key) {
        String value = stringRedisTemplate.opsForValue().get(key);
        return value == null ? 0 : Long.parseLong(value);
    }

    /**
     * 重置计数器的值
     *
     * @param key 计数器 key
     */
    public void reset(String key) {
        stringRedisTemplate.delete(key);
    }

    /**
     * 设置计数器的过期时间
     *
     * @param key 计数器 key
     * @param timeout 过期时间
     * @param unit 时间单位
     * @return 是否设置成功
     */
    public Boolean expire(String key, long timeout, TimeUnit unit) {
        return stringRedisTemplate.expire(key, timeout, unit);
    }
}
八、问题排查与最佳实践
8.1 常见问题及解决方案
- 连接超时
- 检查 Redis 服务器是否启动
- 检查 Redis 服务器地址和端口是否正确
- 检查防火墙是否允许连接 Redis 端口
- 检查网络是否通畅
- 密码错误
- 检查 Redis 配置的密码是否正确
- 检查应用配置中的密码是否与 Redis 配置一致
- 序列化异常
- 确保使用的序列化器能够正确序列化和反序列化对象
- 对于自定义对象,确保其具有无参构造函数
- 检查对象是否实现了序列化接口(如果使用 JDK 序列化)
- 缓存与数据库不一致
- 确保更新数据库后及时更新或删除缓存
- 考虑使用事务保证缓存和数据库操作的原子性
- 对于并发场景,可使用分布式锁保证数据一致性
- Redis 内存溢出
- 合理设置缓存过期时间
- 配置 Redis 的内存淘汰策略
- 定期清理无用缓存
8.2 最佳实践
- 合理设置过期时间
- 根据业务需求为缓存设置合适的过期时间,避免 Redis 内存溢出
- 对于热点数据,可以适当延长过期时间
- 对于变化频繁的数据,应缩短过期时间
- 选择合适的序列化方式
- 推荐使用 StringRedisSerializer 作为 key 的序列化器
- 对于 value 的序列化,推荐使用 JSON 序列化器,如 GenericJackson2JsonRedisSerializer
- 避免使用 JDK 序列化器,除非有特殊需求
- 使用连接池
- 配置合理的连接池参数,提高连接复用率
- 根据业务并发量调整最大连接数、最大空闲连接数等参数
- 缓存穿透防护
- 对于不存在的 key,也进行缓存(缓存 null 值)
- 使用布隆过滤器过滤不存在的 key
- 缓存击穿防护
- 对于热点 key,设置永不过期或延长过期时间
- 使用互斥锁防止缓存击穿
- 缓存雪崩防护
- 为不同的 key 设置随机的过期时间,避免大量缓存同时过期
- 使用熔断降级机制,当 Redis 不可用时,直接访问数据库
- 部署 Redis 集群,提高可用性
- 监控与告警
- 监控 Redis 的内存使用情况、连接数、命中率等指标
- 设置告警阈值,当指标超过阈值时及时告警
- 数据备份与恢复
- 配置 Redis 持久化机制(RDB 或 AOF)
- 定期备份 Redis 数据,确保数据可恢复
九、总结
本文详细介绍了 Spring Boot 集成 Redis 的全过程,包括环境搭建、核心配置、数据结构操作、缓存注解使用、高级特性及实战案例。通过本文的学习,读者可以掌握 Spring Boot 与 Redis 集成的基本方法和最佳实践。
Redis 作为一款高性能的缓存数据库,在现代软件开发中有着广泛的应用。Spring Boot 提供了简洁的配置和丰富的模板类,使得集成 Redis 变得非常简单。在实际开发中,应根据业务需求合理使用 Redis 的各种功能,充分发挥其高性能的优势,同时注意解决缓存一致性、分布式锁等问题,确保系统的稳定运行。
随着业务的发展,还可以进一步学习 Redis 集群、哨兵模式、Redisson 框架等高级内容,以应对更高的并发和更复杂的业务场景。