k8s-部署单master节点
- 前言
- 一、环境初始化
-
- 1.1配置主机名
- 1.2修改机器静态IP
- [1.3 关闭selinux和firewalld](#1.3 关闭selinux和firewalld)
- [1.4 配置主机hosts文件(可选)](#1.4 配置主机hosts文件(可选))
- [1.5 配置主机之间的免密通道(可选)](#1.5 配置主机之间的免密通道(可选))
- [1.6 关闭交换分区swap,提升性能](#1.6 关闭交换分区swap,提升性能)
- [1.7 修改机器内核参数](#1.7 修改机器内核参数)
- [1.8 添加防火墙模块到内核里](#1.8 添加防火墙模块到内核里)
- 二、安装docker服务
-
- [2.1 配置阿里云docker的repo源和国内镜像加速器](#2.1 配置阿里云docker的repo源和国内镜像加速器)
- [2.2 下载 docker](#2.2 下载 docker)
- [2.3 启动并设置开机自启](#2.3 启动并设置开机自启)
- [2.4 配置镜像加速器](#2.4 配置镜像加速器)
- [三、部署 kubernetes](#三、部署 kubernetes)
-
- [3.1 配置安装k8s组件需要的阿里云的repo源](#3.1 配置安装k8s组件需要的阿里云的repo源)
- [3.2 安装kubeadm、kubelet、kubectl](#3.2 安装kubeadm、kubelet、kubectl)
- [3.3 初始化 kubernetes](#3.3 初始化 kubernetes)
- [3.4 node节点加入集群](#3.4 node节点加入集群)
- [3.5 安装calico网络插件](#3.5 安装calico网络插件)
- [3.6 k8s配置ipvs](#3.6 k8s配置ipvs)
- [3.7 配置node节点上可以使用kubectl](#3.7 配置node节点上可以使用kubectl)
- [3.8 安装dashboard](#3.8 安装dashboard)
- 安装脚本
前言
实验环境规划:
操作系统:全新的rocky9.6
配置: 4核cpu +/8Gib 内存/100G磁盘
网卡模式:NAT
| K8S集群角色 | IP | 主机名 |
|---|---|---|
| 控制节点master | 192.168.168.145 | K8s-1 |
| 工作节点node1 | 192.168.168.146 | K8s-2 |
| 工作节点node2 | 192.168.168.147 | K8s-3 |
不做特殊说明所有机器都需要做相同的操作,只不过这里我使用k8s1实验部分脚本是否可行,k8s2来验证每一步是否可行,k8s3实验所有脚本是否可行
一、环境初始化
1.1配置主机名
root@k8s-1 \~# hostnamectl set-hostname k8s-1
root@k8s-2 \~# hostnamectl set-hostname k8s-2
root@k8s-3 \~# hostnamectl set-hostname k8s-3
1.2修改机器静态IP
root@k8s-2 \~# vim /etc/NetworkManager/system-connections/ens33.nmconnection
ipv4
address1=192.168.168.146/24
dns=114.114.114.114
gateway=192.168.168.2
method=manual
修改好配置文件之后要刷新服务之后才能生效
root@k8s-2 \~# nmcli c down ens33 && nmcli c up ens33
不成功可先执行
root@k8s-2 \~# nmcli c reload
再用新的ip重连
1.3 关闭selinux和firewalld
临时关闭selinux
setenforce 0
查看是否修改成功
getenfoce
永久修改selinux
sed -i '/^SELINUX=/ s/enforcing/disabled/' /etc/selinux/config
关闭防火墙
systemctl stop firewalld
systemctl disable firewalld
1.4 配置主机hosts文件(可选)
方便相互之间通过主机名互相访问
修改每台机器的/etc/hosts文件,增加如下三行:
192.168.168.145 k8s-1
192.168.168.146 k8s-2
192.168.168.147 k8s-3
1.5 配置主机之间的免密通道(可选)
bash
[root@k8s-2 ~]# ssh-keygen
Generating public/private rsa key pair.
Enter file in which to save the key (/root/.ssh/id_rsa):
Enter passphrase (empty for no passphrase):
Enter same passphrase again:
Your identification has been saved in /root/.ssh/id_rsa
Your public key has been saved in /root/.ssh/id_rsa.pub
The key fingerprint is:
SHA256:mr5x7gGA90WEFrfL9f7vXuK5VsRkWGCU1ywUHpNRnbY root@k8s-2
The key's randomart image is:
+---[RSA 3072]----+
|      .++    oX@*|
|   .  oo .   o==B|
|  . o.  o .   o*.|
|   . o o o .   Eo|
|      o S   .  . |
|       +   .    .|
|      + o   . ...|
|     . + .   o.o.|
|      ooo    .==+|
+----[SHA256]-----+

[root@k8s-2 ~]# ssh-copy-id -i /root/.ssh/id_rsa.pub k8s-1
/usr/bin/ssh-copy-id: INFO: Source of key(s) to be installed: "/root/.ssh/id_rsa.pub"
The authenticity of host 'k8s-1 (192.168.168.145)' can't be established.
ED25519 key fingerprint is SHA256:MG3kgRXVf//jIktPa5ysLPziy6VkB26VksYBU6ve4lo.
This key is not known by any other names
Are you sure you want to continue connecting (yes/no/[fingerprint])? yes
/usr/bin/ssh-copy-id: INFO: attempting to log in with the new key(s), to filter out any that are already installed
/usr/bin/ssh-copy-id: INFO: 1 key(s) remain to be installed -- if you are prompted now it is to install the new keys
root@k8s-1's password:

Number of key(s) added: 1

Now try logging into the machine, with:   "ssh 'k8s-1'"
and check to make sure that only the key(s) you wanted were added.
测试
root@k8s-2 \~# ssh k8s-1
Last login: Mon Sep 15 11:47:51 2025 from 192.168.168.1
root@k8s-1 \~#
1.6 关闭交换分区swap,提升性能
临时关闭
root@k8s2 \~# swapoff -a
永久关闭
root@k8s2 \~# sed -i '/swap/s/^/#/' /etc/fstab
查看swap分区是否关闭
root@k8s-1 \~# free
total used free shared buff/cache available
Mem: 7832716 1466168 5314304 12424 1318736 6366548
Swap: 0 0 0
为什么要关闭swap交换分区?
swap是交换分区,如果机器内存不够,会使用swap分区,但是swap分区的性能较低,k8s设计的时候为了能提升性能,默认是不允许使用交换分区的
Kubeadm初始化的时候会检测swap是否关闭,如果没关闭,那就初始化失败。如果不想要关闭交换分区,安装k8s的时候可以指定--ignore-preflight-errors=Swap来解决
1.7 修改机器内核参数
root@k8s2 \~# cat <<EOF | tee /etc/modules-load.d/k8s.conf
overlay
br_netfilter
EOF
root@k8s2 \~# modprobe overlay
root@k8s2 \~# modprobe br_netfilter
root@k8s2 \~# cat > /etc/sysctl.d/k8s.conf <<EOF
net.bridge.bridge-nf-call-ip6tables = 1
net.bridge.bridge-nf-call-iptables = 1
net.ipv4.ip_forward = 1
EOF
root@k8s2 \~# sysctl -p /etc/sysctl.d/k8s.conf
查看
root@k8s2 \~# lsmod | egrep "br_netfilter|overlay"
br_netfilter 36864 0
bridge 417792 1 br_netfilter
overlay 229376 14
1.8 添加防火墙模块到内核里
考虑开机能启动,也可放到/etc/rc.local
root@k8s-2 \~#cat > /etc/modules-load.d/ipvs.modules <<EOF
#!/bin/bash
modprobe -- ip_vs
modprobe -- ip_vs_rr
modprobe -- ip_vs_wrr
modprobe -- ip_vs_sh
modprobe -- nf_conntrack
EOF
为脚本文件添加执行权限
root@k8s-2 \~#chmod +x /etc/modules-load.d/ipvs.modules
执行脚本文件
root@k8s-2 \~#/bin/bash /etc/modules-load.d/ipvs.modules
验证模块是否加载成功
root@k8s-2 \~# lsmod | grep -e ip_vs -e nf_conntrack
ip_vs_sh 12288 0
ip_vs_wrr 12288 0
ip_vs_rr 12288 0
ip_vs 237568 6 ip_vs_rr,ip_vs_sh,ip_vs_wrr
nf_conntrack 229376 3 nf_nat,nft_ct,ip_vs
nf_defrag_ipv6 24576 2 nf_conntrack,ip_vs
nf_defrag_ipv4 12288 1 nf_conntrack
libcrc32c 12288 5 nf_conntrack,nf_nat,nf_tables,xfs,ip_vs
二、安装docker服务
2.1 配置阿里云docker的repo源和国内镜像加速器
root@k8s-2 \~# yum install -y
yum-utilsroot@k8s-2 \~#
yum-config-manager --add-repo https://mirrors.aliyun.com/docker-ce/linux/centos/docker-ce.repo -y
2.2 下载 docker
注意:不要下最新版的!!!!从这里开始可以做一个快照
k8s1.24版本后,默认的容器运行时软件变成了containerd,但是还是可以支持docker,需要额外安装一个软件
root@k8s-2 \~#
yum install -y docker-ce-20.10.24 docker-ce-cli-20.10.24 containerd.io-1.6.20
当你不指定具体的发行版后缀(如 .el7/.el9)时,DNF/YUM 会根据当前系统的版本(Rocky Linux 9 对应 .el9)自动匹配仓库中最合适的包版本,从而避免版本后缀不匹配的问题
2.3 启动并设置开机自启
root@k8s-2 \~# systemctl start docker
root@k8s-2 \~# systemctl enable docker
查看docker进程
root@k8s-2 \~# ps aux|grep docker
root 1014 1.2 1.3 1759656 105880 ? Ssl 09:21 1:32 /usr/bin/dockerd -H fd:// --containerd=/run/containerd/containerd.sock
root 146230 0.0 0.0 6408 2176 pts/0 S+ 11:27 0:00 grep --color=auto docker
2.4 配置镜像加速器
root@k8s2 \~# mkdir -p /etc/docker
root@k8s-2 docker# tee /etc/docker/daemon.json <<EOF
{
"registry-mirrors":"https://docker.xuanyuan.me","https://docker.1panel.live", "exec-opts": "native.cgroupdriver=systemd"
}
EOF
root@k8s2 \~# systemctl daemon-reload
root@k8s-2 docker# systemctl restart docker
三、部署 kubernetes
3.1 配置安装k8s组件需要的阿里云的repo源
root@k8s2 \~# cat > /etc/yum.repos.d/kubernetes.repo <<EOF
kubernetes
name=Kubernetes
baseurl=https://mirrors.aliyun.com/kubernetes/yum/repos/kubernetes-el7-x86_64/
enabled=1
gpgcheck=1
repo_gpgcheck=1
gpgkey=https://mirrors.aliyun.com/kubernetes/yum/doc/yum-key.gpg https://mirrors.aliyun.com/kubernetes/yum/doc/rpm-package-key.gpg
EOF
3.2 安装kubeadm、kubelet、kubectl
root@k8s2 \~# yum install -y kubeadm-1.23.17-0 kubelet-1.23.17-0 kubectl-1.23.17-0 --disableexcludes=kubernetes
root@k8s2 # kubelet --version
Kubernetes v1.23.17
root@k8s2 \~# systemctl start kubelet
root@k8s2 \~# systemctl enable kubelet
kubeadm: kubeadm是一个工具,用来初始化k8s集群的 --》安装k8s的kubelet: 安装在集群的所有节点上,用于启动Pod的 --》启动pod的,管理docker的kubectl: 通过kubectl可以部署和管理应用,查看各种资源,创建、删除和更新各种组件 --》命令行工具
还有二进制安装,要去下载所有组件的二进制程序,在多台宿主机上安装
下载地址:https://github.com/kubernetes/kubernetes/releases
3.3 初始化 kubernetes
确保一下端口未被占用:
- 6443:API Server
- 2370:etcd
- 10250:Kubelet
- 10251:kube-scheduler
- 10252:kube-controller-manager
只在master节点上做,初始化kubernetes集群
bash
[root@k8s1 ~]# kubeadm init \
    --kubernetes-version=v1.23.17 \
    --pod-network-cidr=10.224.0.0/16 \
    --service-cidr=10.96.0.0/12 \
    --apiserver-advertise-address=192.168.168.145 \
--image-repository=registry.aliyuncs.com/google_containers- 第一行指定kubernetes版本为1.23.17
- 第二行指定pod网络的CIDR范围,需要与后续安装的网络插件配置一直
- 第三行指定service的CIDR范围
- 第四行指定API Server的地址,也是其他机器节点访问API Server的地址
- 第五行指定镜像仓库地址
命令后面要用
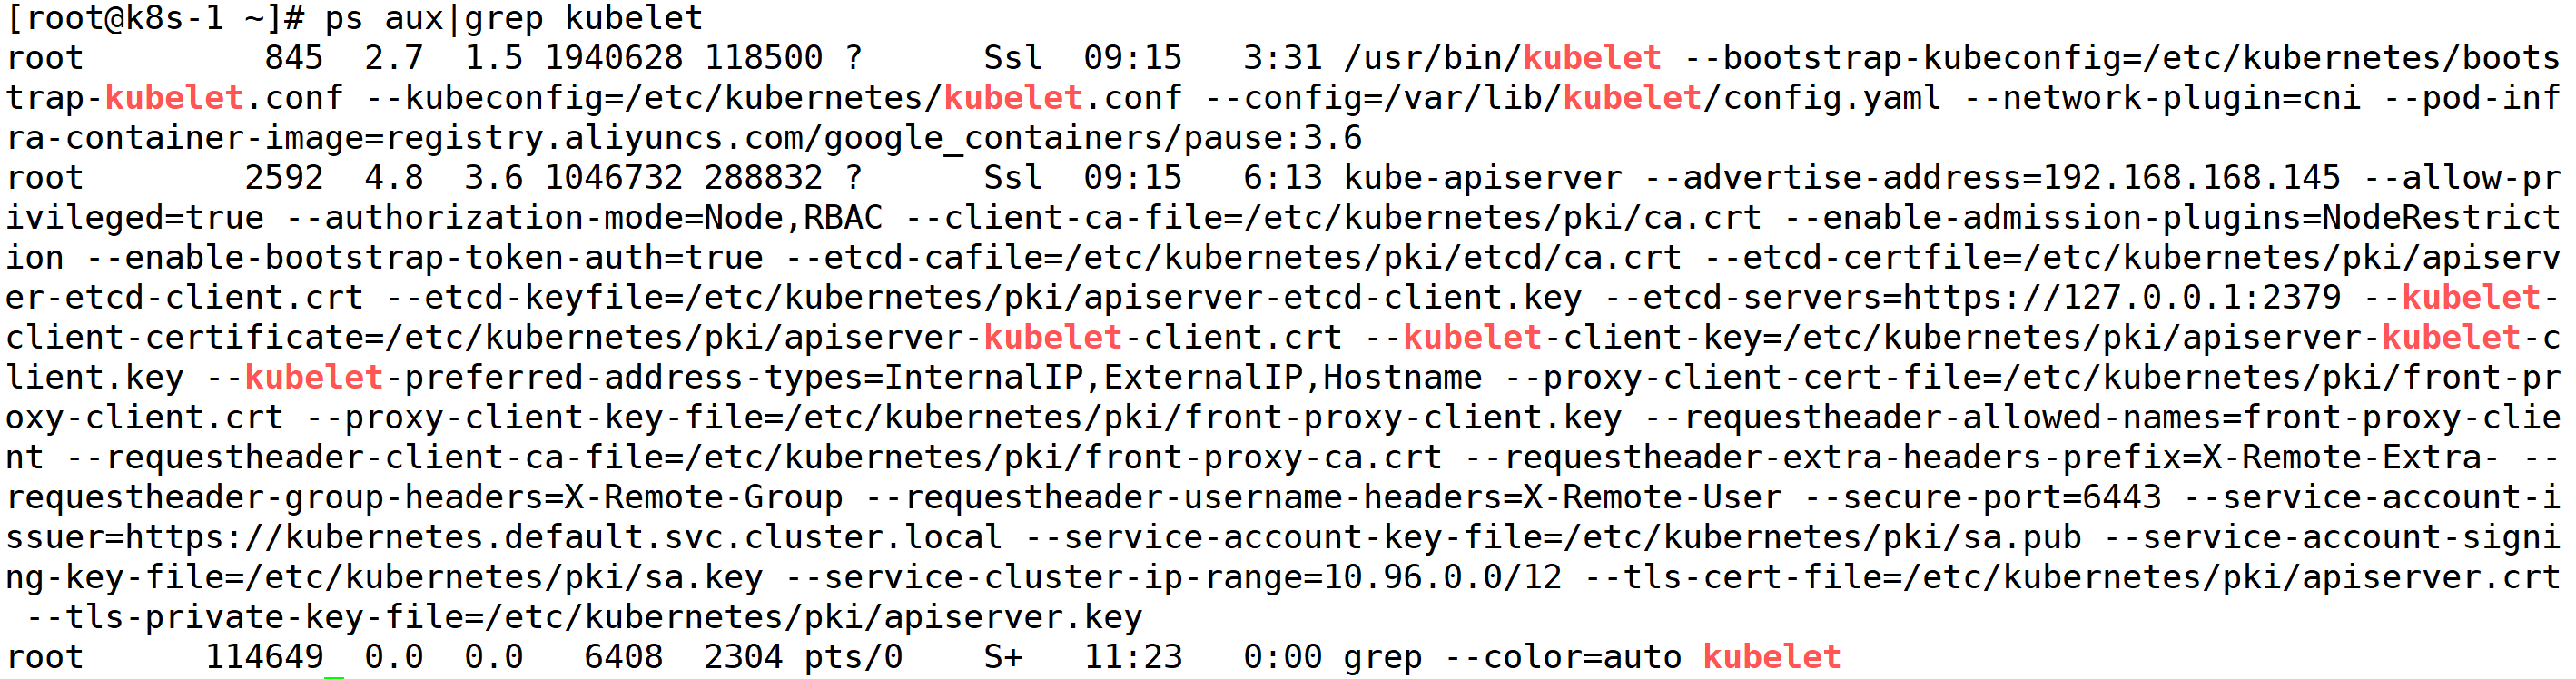
查看kubelet是否开启
设置开机自启
root@k8s-1 \~# systemctl enable kubelet
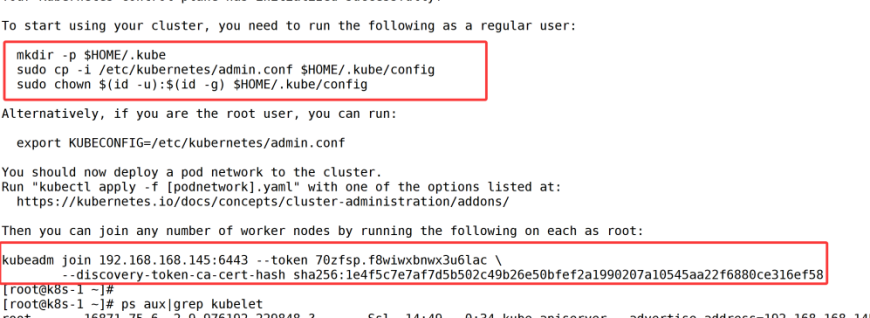
配置 kubectl 客户端
bash
[root@k8s1 ~]# mkdir -p $HOME/.kube
[root@k8s1 ~]# cp -i /etc/kubernetes/admin.conf $HOME/.kube/config
[root@k8s1 ~]# chown $(id -u):$(id -g) $HOME/.kube/config
验证 kube-apiserver 端口
bash
[root@k8s1 ~]# ss -anplut|grep 6443
tcp    LISTEN     0      128    [::]:6443               [::]:*                   users:(("kube-apiserver",pid=2234,fd=7))
3.4 node节点加入集群
bash
[root@k8s2 ~]# kubeadm join 192.168.168.145:6443 --token 70zfsp.f8wiwxbnwx3u6lac \
	--discovery-token-ca-cert-hash sha256:1e4f5c7e7af7d5b502c49b26e50bfef2a1990207a10545aa22f6880ce316ef58
如果不记得命令,可以在master节点上查找
bash
[root@k8s-1 pod]#  kubeadm token create --print-join-command
kubeadm join 192.168.168.145:6443 --token 7ert39.xjntgpzy43g0x925 --discovery-token-ca-cert-hash sha256:1e4f5c7e7af7d5b502c49b26e50bfef2a1990207a10545aa22f6880ce316ef58
检查node状态
root@k8s-1 \~# kubectl get nodes
NAME STATUS ROLES AGE VERSION
k8s-1 NotReady control-plane,master 100m v1.23.17
k8s-2 NotReady 16m v1.23.17
设置k8s-2的角色为worker 后面记得补k8s3!!!
root@k8s1 \~# kubectl label node k8s-2 node-role.kubernetes.io/worker=worker
node/k8s-2 labeled
root@k8s1 \~# kubectl get nodes
NAME STATUS ROLES AGE VERSION
k8s1 NotReady control-plane,master 100m v1.23.17
k8s2 NotReady worker 16m v1.23.17
3.5 安装calico网络插件
calico是k8s集群里网络通信的一个组件(软件),实现集群内部不同的机器之间的容器的通信(大的网络规模)。k8s集群节点可以到5000节点,1亿个容器
flannel 也是一个网络插件(适合小规模的集群,节点服务器的数量比较小,例如:10台左右)
terway 是阿里云自己研发的一个网络插件
root@k8s-1 \~# kubectl apply -f https://docs.projectcalico.org/archive/v3.25/manifests/calico.yaml
root@k8s-1 \~# kubectl get nodes
NAME STATUS ROLES AGE VERSION
k8s1 NotReady control-plane,master 106m v1.23.17
k8s2 Ready worker 21m v1.23.17
过一会都是Ready
查看docker镜像,会有一个calico镜像
root@k8s-1 \~# docker images
可能网络不好拉不下来镜像,启动不起来
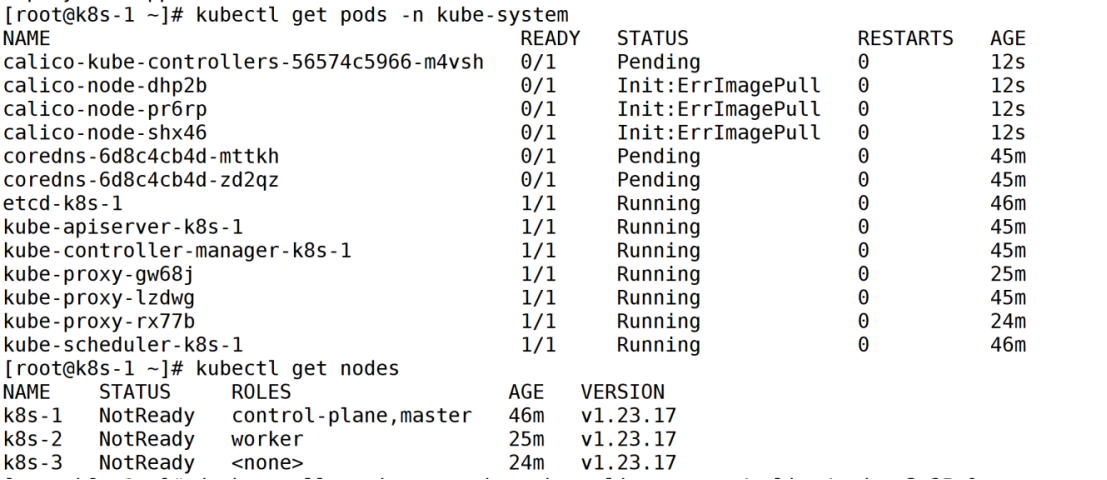
解决方案
- 导入calico的镜像 -> 每个节点都要做
root@k8s-1 \~# ls
anaconda-ks.cfg calico.cni.tar calico.node.tar coredns.tar
root@k8s-1 \~# docker load -i calico.cni.tar
root@k8s-1 \~# docker load -i calico.node.tar
root@k8s-1 \~# docker load -i coredns.tar
清理之前的 Calico 残留资源
root@k8s-1 \~# kubectl delete -f calico.yaml
重新部署 Calico
root@k8s-1 \~# kubectl apply -f calico.yaml
root@k8s-1 \~# kubectl get pods -n kube-system
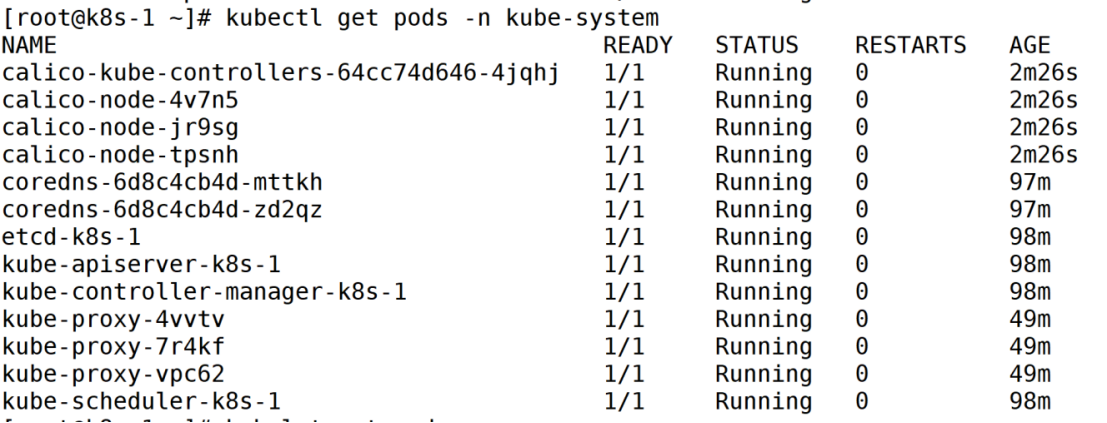

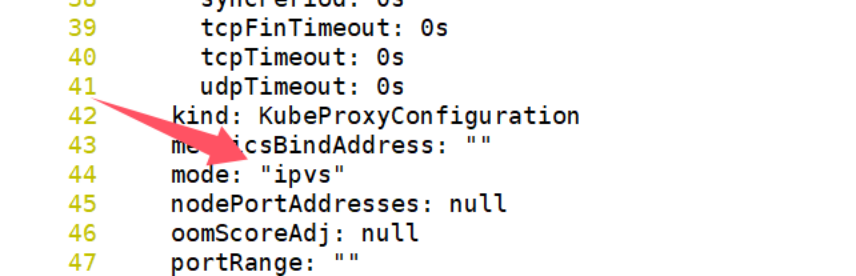
3.6 k8s配置ipvs
在44行加ipvs,然后退出
root@k8s1 \~# kubectl edit configmap kube-proxy -n kube-system
configmap/kube-proxy edited
除kube-proxy Pod 是为了让配置的 IPVS 模式生效,因为kube-proxy的运行模式无法动态切换,必须通过重启(删除 Pod 触发重建)才能应用新配置
root@k8s1 \~# kubectl delete pods -n kube-system -l k8s-app=kube-proxy
pod "kube-proxy-5t569" deleted
pod "kube-proxy-zw9jl" deleted
3.7 配置node节点上可以使用kubectl
bash
[root@k8s-2 ~]# kubectl get node
The connection to the server localhost:8080 was refused - did you specify the right host or port?

[root@k8s-2 ~]# mkdir -p $HOME/.kube
You have new mail in /var/spool/mail/root
[root@k8s-2 ~]# scp  k8s-1:/etc/kubernetes/admin.conf /root/.kube/config
[root@k8s-2 ~]#  chown $(id -u):$(id -g) $HOME/.kube/config
[root@k8s-2 ~]#  kubectl get node
NAME   STATUS   ROLES                  AGE    VERSION
k8s-1   Ready    control-plane,master   166m   v1.23.17
k8s-2   Ready    worker                 81m    v1.23.17
3.8 安装dashboard
root@k8s-1 \~# yum install wget -y
root@k8s-1 \~# wget https://raw.githubusercontent.com/kubernetes/dashboard/v2.7.0/aio/deploy/recommended.yaml
root@k8s-1 \~# kubectl apply -f recommended.yaml
查看
bash
[root@k8s-1 ~]# kubectl get pods,svc -n kubernetes-dashboard
NAME READY STATUS RESTARTS AGE
pod/dashboard-metrics-scraper-6f669b9c9b-clkmx 1/1 Running 0 4m42s
pod/kubernetes-dashboard-758765f476-zwjf6 1/1 Running 0 4m43s
NAME TYPE CLUSTER-IP EXTERNAL-IP PORT(S) AGE
service/dashboard-metrics-scraper ClusterIP 10.97.251.89 <none> 8000/TCP 4m44s
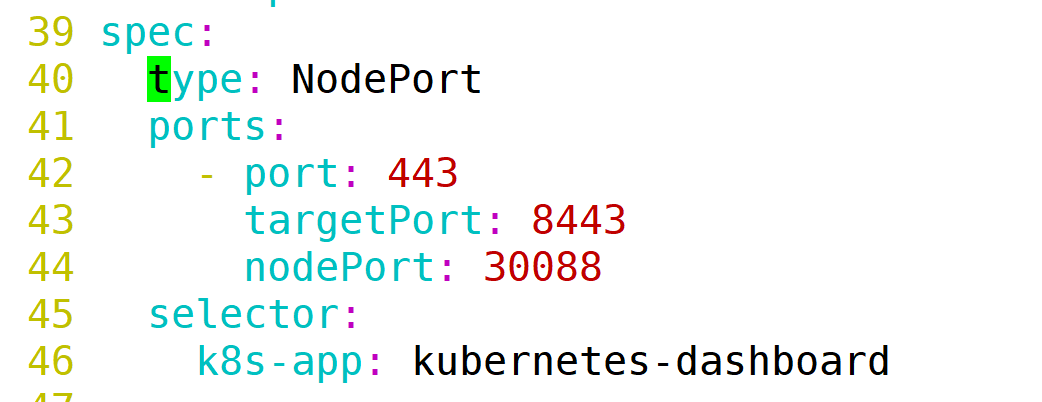
service/kubernetes-dashboard ClusterIP 10.109.54.60 <none> 443/TCP 4m48s修改Service部分,改为NodePort对外暴露端口
root@k8s-1 \~# vim recommended.yaml
解决token默认15分钟过期的问题
bash
193       containers:
194         - name: kubernetes-dashboard
195           image: kubernetesui/dashboard:v2.7.0
196           imagePullPolicy: Always
197           ports:
198             - containerPort: 8443
199               protocol: TCP
200           args:
201             - --auto-generate-certificates
202             - --namespace=kubernetes-dashboard
203             - --token-ttl=43200         #添加这条配置,超时时间调整为12小时
重新应用
root@k8s-1 \~# kubectl apply -f recommended.yaml
创建账号
bash
[root@k8s-1 ~]# vim dashboard-access-token.yaml
# Creating a Service Account
apiVersion: v1
kind: ServiceAccount
metadata:
  name: admin-user
  namespace: kubernetes-dashboard
---
# Creating a ClusterRoleBinding
apiVersion: rbac.authorization.k8s.io/v1
kind: ClusterRoleBinding
metadata:
  name: admin-user
roleRef:
  apiGroup: rbac.authorization.k8s.io
  kind: ClusterRole
  name: cluster-admin
subjects:
- kind: ServiceAccount
  name: admin-user
  namespace: kubernetes-dashboard
---
# Getting a long-lived Bearer Token for ServiceAccount
apiVersion: v1
kind: Secret
metadata:
  name: admin-user
  namespace: kubernetes-dashboard
  annotations:
    kubernetes.io/service-account.name: "admin-user"
type: kubernetes.io/service-account-token
# Clean up and next steps
# kubectl -n kubernetes-dashboard delete serviceaccount admin-user
# kubectl -n kubernetes-dashboard delete clusterrolebinding admin-user
执行
root@k8s-1 \~# kubectl apply -f dashboard-access-token.yaml
serviceaccount/admin-user created
clusterrolebinding.rbac.authorization.k8s.io/admin-user created
secret/admin-user created
获取token
root@k8s-1 \~# kubectl get secret admin-user -n kubernetes-dashboard -o jsonpath={".data.token"} | base64 -d
获取端口
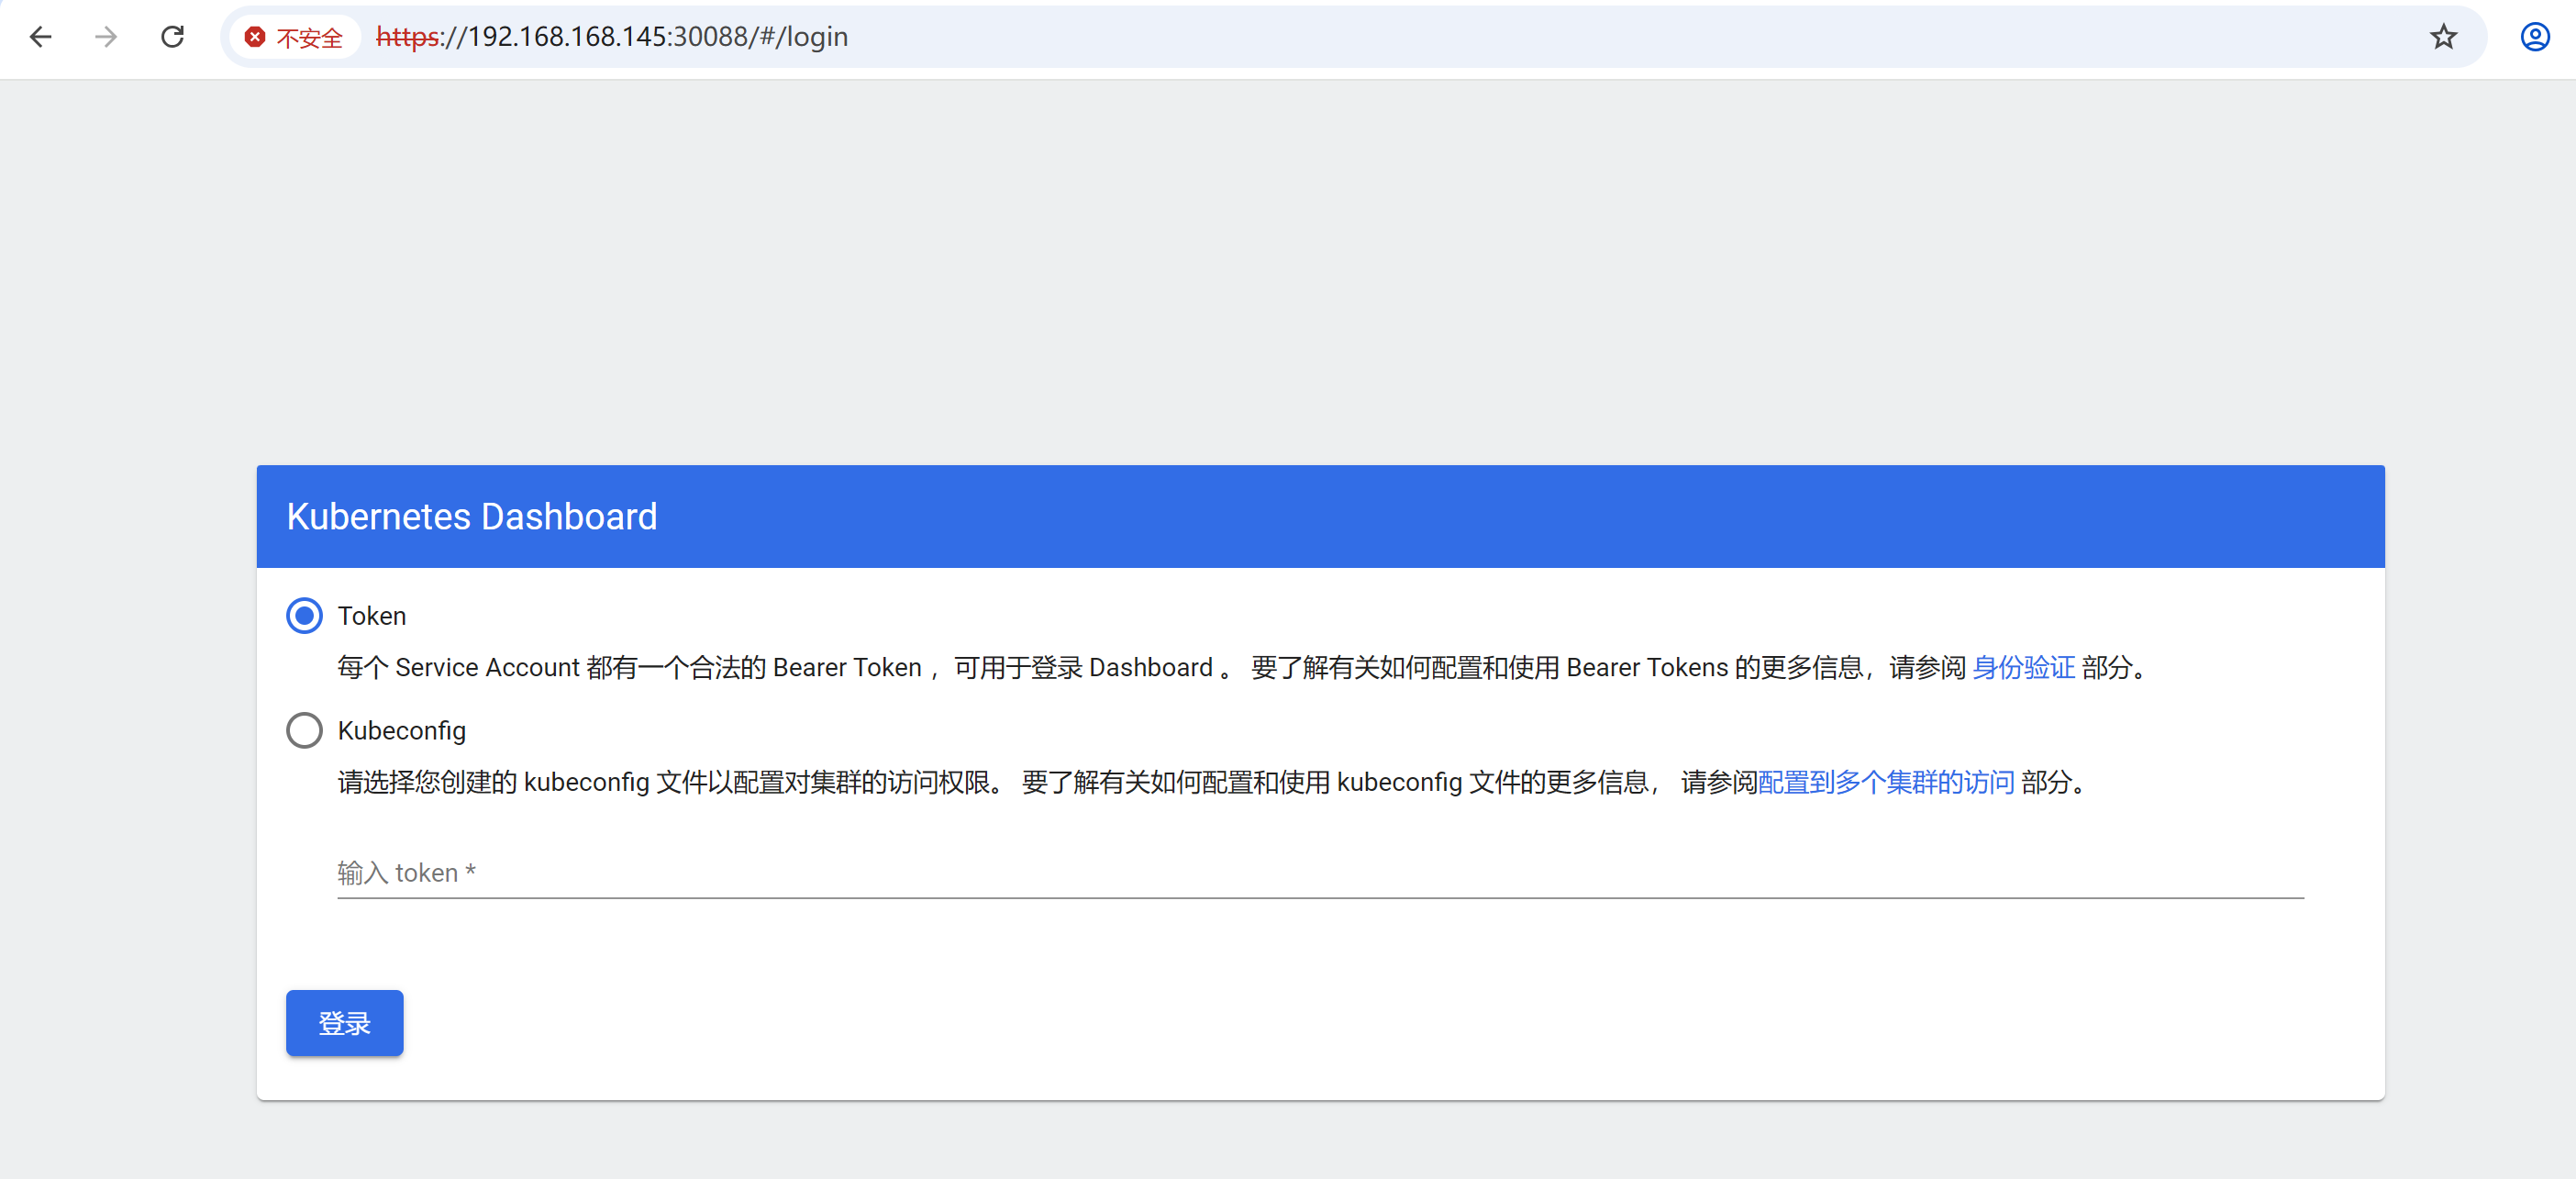
root@k8s-1 \~# kubectl get svc -n kubernetes-dashboard
NAME TYPE CLUSTER-IP EXTERNAL-IP PORT(S) AGE
dashboard-metrics-scraper ClusterIP 10.97.251.89 8000/TCP 14m
kubernetes-dashboard NodePort 10.109.54.60 443:30088/TCP 14m
浏览器访问30088端口,输入获取的token即可进入
安装脚本
脚本说明:
$1为主机名
$2为要配置的静态IP地址
其他定义的变量如ip可在脚本中修改
脚本可跑到安装部署kubernetes
脚本中修改网络配置后,并没有刷新,防止中断脚本
init_env.sh
bash
#!/bin/bash

set -e
yum install vim psmisc tree net-tools wget -y

#定义变量
gateway="192.168.168.2"
k8s1="192.168.168.145"
k8s2="192.168.168.146"
k8s3="192.168.168.147"

#修改主机名
hostnamectl set-hostname $1

#关闭selinux和firewalld
setenforce 0
sed -i '/^SELINUX=/ s/enforcing/disabled/' /etc/selinux/config
systemctl stop firewalld
systemctl disable firewalld

#配置静态ip
sed -i '/^\[ipv4\]$/a address1='"$2"'/24\ngateway='"$gateway"'\ndns=114.114.114.114' "/etc/NetworkManager/system-connections/ens33.nmconnection"
sed -i '/^\[ipv4\]$/,/^\[/{0,/method=auto/s//method=manual/;}' "/etc/NetworkManager/system-connections/ens33.nmconnection"

#建立集群通信
cat >>/etc/hosts <<EOF
$k8s1 k8s-1
$k8s2 k8s-2
$k8s3 k8s-3
EOF

#关闭交换分区swap
swapoff -a
sed -i '/swap/s/^/#/' /etc/fstab

#修改机器内核参数
cat <<EOF | tee /etc/modules-load.d/k8s.conf
overlay
br_netfilter
EOF

# 加载网桥过滤模块
modprobe overlay
modprobe br_netfilter

# 编辑/etc/sysctl.d/kubernetes.conf文件,主要是对容器虚拟网络的支持,添加如下配置:
echo "modprobe br_netfilter" >> /etc/profile
cat > /etc/sysctl.d/k8s.conf <<EOF
net.bridge.bridge-nf-call-ip6tables = 1
net.bridge.bridge-nf-call-iptables = 1
net.ipv4.ip_forward = 1
EOF
sysctl -p /etc/sysctl.d/k8s.conf

# 配置防火墙模块  modprobe加载模块到内核中
cat <<EOF > /etc/modules-load.d/ipvs.modules
#!/bin/bash
modprobe -- ip_vs
modprobe -- ip_vs_rr
modprobe -- ip_vs_wrr
modprobe -- ip_vs_sh
modprobe -- nf_conntrack
EOF

# 为脚本文件添加执行权限
chmod +x /etc/modules-load.d/ipvs.modules
# 执行脚本文件
/bin/bash /etc/modules-load.d/ipvs.modules

#配置时间同步
systemctl restart chronyd && systemctl enable chronyd

#安装docker
yum install -y yum-utils
yum-config-manager --add-repo https://mirrors.aliyun.com/docker-ce/linux/centos/docker-ce.repo -y
yum install -y docker-ce-20.10.24 docker-ce-cli-20.10.24 containerd.io-1.6.20
systemctl start docker
systemctl enable docker
mkdir -p /etc/docker
tee /etc/docker/daemon.json <<EOF
{
  "registry-mirrors":["https://docker.xuanyuan.me","https://docker.1panel.live"],                                       "exec-opts": ["native.cgroupdriver=systemd"]
}
EOF
systemctl daemon-reload
systemctl restart docker

#安装k8s组件
cat <<EOF > /etc/yum.repos.d/kubernetes.repo
[kubernetes]
name=Kubernetes
baseurl=https://mirrors.aliyun.com/kubernetes/yum/repos/kubernetes-el7-x86_64/
enabled=1
gpgcheck=1
repo_gpgcheck=1
gpgkey=https://mirrors.aliyun.com/kubernetes/yum/doc/yum-key.gpg https://mirrors.aliyun.com/kubernetes/yum/doc/rpm-package-key.gpg
EOF
# 安装kubelet、kubeadm、kubectl
yum install -y kubeadm-1.23.17-0 kubelet-1.23.17-0 kubectl-1.23.17-0 --disableexcludes=kubernetes
systemctl start kubelet
systemctl enable kubelet
root@k8s1 \~# bash init_env.sh k8s-3 192.168.168.147