目录
[1 项目说明](#1 项目说明)
[2 项目需完成的任务](#2 项目需完成的任务)
[3 部署pxe网络服务器安装系统](#3 部署pxe网络服务器安装系统)
[3.1 启动pxe主机并安装相应软件](#3.1 启动pxe主机并安装相应软件)
[3.2 制作自动安装脚本](#3.2 制作自动安装脚本)
[3.3 测试是否能够完成自动安装系统](#3.3 测试是否能够完成自动安装系统)
[4 在相应主机中安装对应软件](#4 在相应主机中安装对应软件)
[4.1 主机资源清单](#4.1 主机资源清单)
[4.2 利用ansible构建devops环境](#4.2 利用ansible构建devops环境)
[4.2.1 安装ansible](#4.2.1 安装ansible)
[4.2.2 配置ansible环境](#4.2.2 配置ansible环境)
[4.2.3 根据主机资源清单构建devops系统环境](#4.2.3 根据主机资源清单构建devops系统环境)
[4.2.4 配置资源服务器](#4.2.4 配置资源服务器)
[4.2.5 利用playbook构建devops环境(根据实际情况适当修改)](#4.2.5 利用playbook构建devops环境(根据实际情况适当修改))
[4.2.6 安装和测试效果](#4.2.6 安装和测试效果)
[5 配置自动集成自动交付环境](#5 配置自动集成自动交付环境)
[5.1 配置gitlab](#5.1 配置gitlab)
[5.1.1 gitlab初始化](#5.1.1 gitlab初始化)
[5.1.2 建立项目](#5.1.2 建立项目)
[5.1.3 建立dev与gitlab的连接](#5.1.3 建立dev与gitlab的连接)
[5.2 配置jenkins](#5.2 配置jenkins)
[5.2.1 jenkins初始化](#5.2.1 jenkins初始化)
[5.2.2 新建项目](#5.2.2 新建项目)
[5.2.3 Jenkins中gitlab触发器的部署与使用](#5.2.3 Jenkins中gitlab触发器的部署与使用)
[5.2.3.1 安装gitlab插件](#5.2.3.1 安装gitlab插件)
[5.2.4 部署Jenkins自动触发](#5.2.4 部署Jenkins自动触发)
[5.2.4.1 测试自动触发](#5.2.4.1 测试自动触发)
[5.3 docker build 持续集成](#5.3 docker build 持续集成)
[5.3.1 在Jenkins中添加registry-node](#5.3.1 在Jenkins中添加registry-node)
[5.3.2 设置Jenkins容器构建规则](#5.3.2 设置Jenkins容器构建规则)
[5.3.3 测试镜像构建](#5.3.3 测试镜像构建)
[5.3.4 测试效果](#5.3.4 测试效果)
1 项目说明
某中型企业因业务全面云化,需采用Docker容器技术统一管理所有业务系统。在业务平台开发过程中,要求实现自动化部署、自动发布以及智能错误检测与修复功能。
2 项目需完成的任务
- 部署pxe网络服务器安装系统
- 安装对应软件至对应服务器
- 配置自动集成自动交付环境
- 测试环境是否可用
3 部署pxe网络服务器安装系统
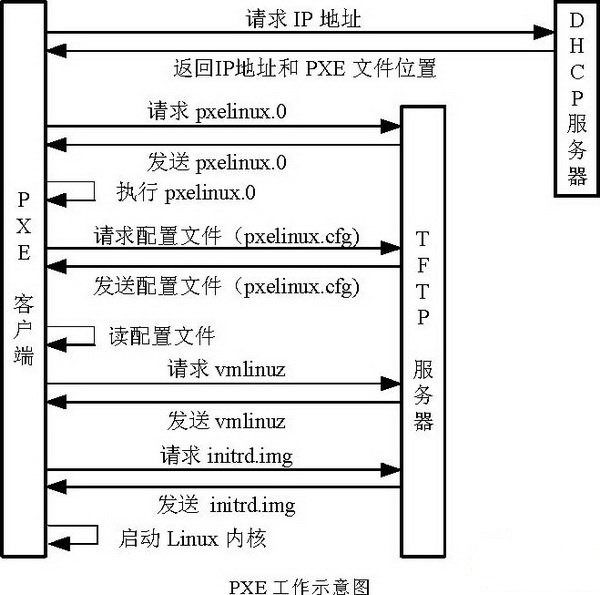
预执行环境(Preboot eXecution Environment,简称PXE)是一种通过网络接口启动计算机的机制。该技术使计算机能够不依赖本地存储设备(如硬盘)或已安装的操作系统完成启动过程。
-
安装必要服务:
- 安装 dhcp-server(用于 IP 地址分配)
- 安装 tftp-server(用于传输启动文件)
- 安装 httpd(用于提供安装源)
- 安装 syslinux-nonlinux(提供 PXE 启动所需的引导程序)
-
启动并设置服务自启:
- 启动 tftp 和 httpd 服务,并设置为开机自启
-
配置安装源:
- 创建目录
/var/www/html/rhel9作为 RHEL9 安装源 - 挂载光盘到该目录,使安装文件可通过 HTTP 访问
- 将挂载命令添加到
/etc/rc.d/rc.local,确保系统重启后自动挂载 - 给
rc.local添加执行权限使其生效
- 创建目录
-
配置 TFTP 服务:
- 将光盘中的启动文件复制到 TFTP 服务器目录
- 复制 pxelinux.0 引导程序到 TFTP 目录
- 创建 pxelinux.cfg 配置目录
- 复制并重命名启动配置文件
- 修改启动配置文件,设置安装菜单选项,指定内核、初始化镜像和安装源的 HTTP 路径
-
配置 DHCP 服务:
- 从示例文件复制 DHCP 配置
- 编辑 DHCP 配置文件,设置域名、DNS 服务器、租约时间
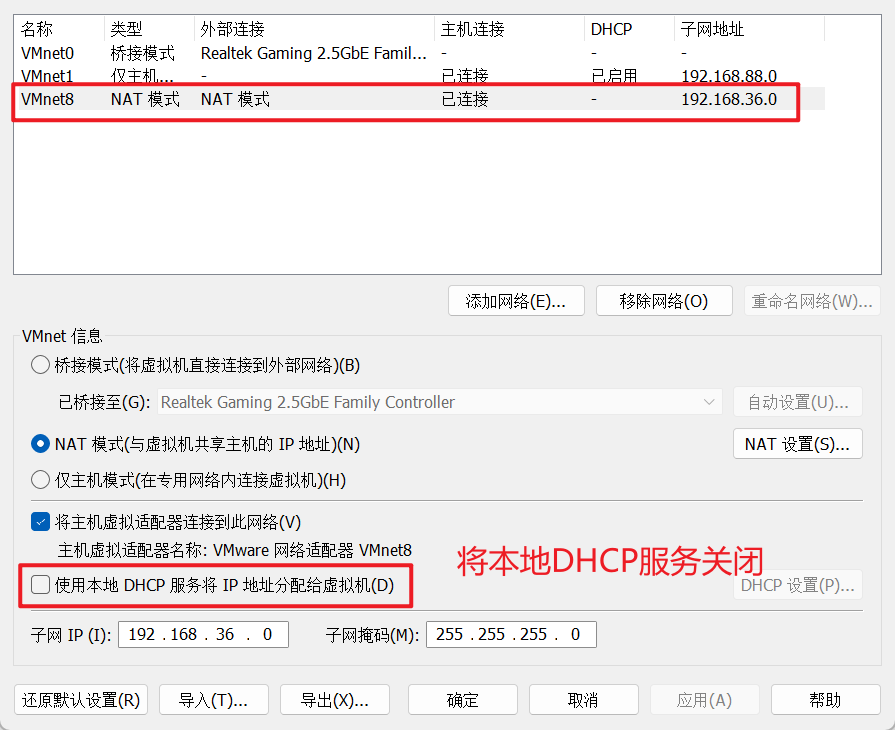
- 配置子网 192.168.36.0/24 的 IP 地址范围
- 指定网关、PXE 服务器 IP 地址和启动文件名
- 启动 dhcpd 服务并设置为开机自启
完成这些配置后,同一网络中的客户端可以通过 PXE 启动,从该服务器获取 IP 地址、引导程序和安装文件,实现网络自动安装 RHEL9.1 操作系统。
3.1 启动pxe主机并安装相应软件
1.安装对应组件
[root@pxe ~]# dnf install dhcp-server tftp-server httpd syslinux-nonlinux-6.04-0.19.el9.noarch -y2.设置各组件开机自启
[root@pxe ~]# systemctl enable --now tftp.service httpd3.创建安装源目录
[root@pxe ~]# mkdir -p /var/www/html/rhel94.将光盘挂载到安装源目录,让安装文件能够通过http访问
[root@pxe ~]# mount /dev/cdrom /var/www/html/rhel9/
mount: /var/www/html/rhel9: WARNING: source write-protected, mounted read-only.
5.将挂载命令写入/etc/rc.d/rc.local文件,确保开机自动挂载,并给定可执行权限
[root@pxe ~]# echo mount /dev/cdrom /var/www/html/rhel9/ >> /etc/rc.d/rc.local
[root@pxe ~]# chmod +x /etc/rc.d/rc.local
6.将光盘中的启动文件复制到 TFTP 服务器目录
[root@pxe ~]# cp /var/www/html/rhel9/isolinux/* /var/lib/tftpboot/7.复制 pxelinux.0 引导程序到 TFTP 目录
[root@pxe ~]# cp /usr/share/syslinux/pxelinux.0 /var/lib/tftpboot/8.创建 pxelinux.cfg 配置目录
[root@pxe ~]# mkdir /var/lib/tftpboot/pxelinux.cfg9.复制并重命名启动配置文件
[root@pxe ~]# cp /var/lib/tftpboot/isolinux.cfg /var/lib/tftpboot/pxelinux.cfg/default10.修改启动配置文件,设置安装菜单选项,指定内核、初始化镜像和安装源的 HTTP 路径
[root@pxe ~]# chmod 644 /var/lib/tftpboot/pxelinux.cfg/default
[root@pxe ~]# vim /var/lib/tftpboot/pxelinux.cfg/default
11.从示例文件复制 DHCP 配置
[root@pxe ~]# cd /etc/dhcp/
[root@pxe dhcp]# ls
dhclient.d  dhcpd6.conf  dhcpd.conf
[root@pxe dhcp]# cat dhcpd.conf
#
# DHCP Server Configuration file.
#   see /usr/share/doc/dhcp-server/dhcpd.conf.example
#   see dhcpd.conf(5) man page
#
[root@pxe dhcp]# cp /usr/share/doc/dhcp-server/dhcpd.conf.example dhcpd.conf
cp:是否覆盖'dhcpd.conf'? y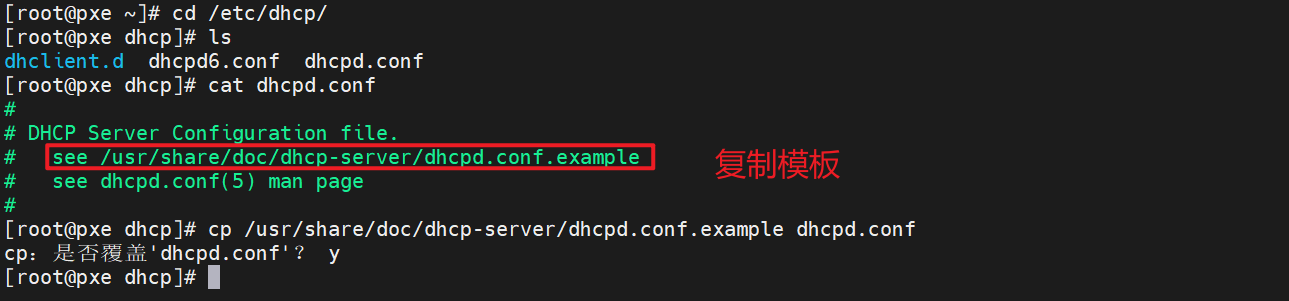
12.编辑 DHCP 配置文件,设置域名、DNS 服务器、租约时间等
[root@pxe dhcp]# vim dhcpd.conf
[root@pxe dhcp]# cat dhcpd.conf
option domain-name "cg.org";
option domain-name-servers 8.8.8.8;
default-lease-time 600;
max-lease-time 7200;
log-facility local7;
subnet 192.168.36.0 netmask 255.255.255.0 {
range 192.168.36.51 192.168.36.199;
option routers 192.168.36.2;
next-server 192.168.36.200;
filename "pxelinux.0";
}
13.启动dhcp服务,并设置开机自启
[root@pxe dhcp]# systemctl enable --now dhcpd.service3.2 制作自动安装脚本
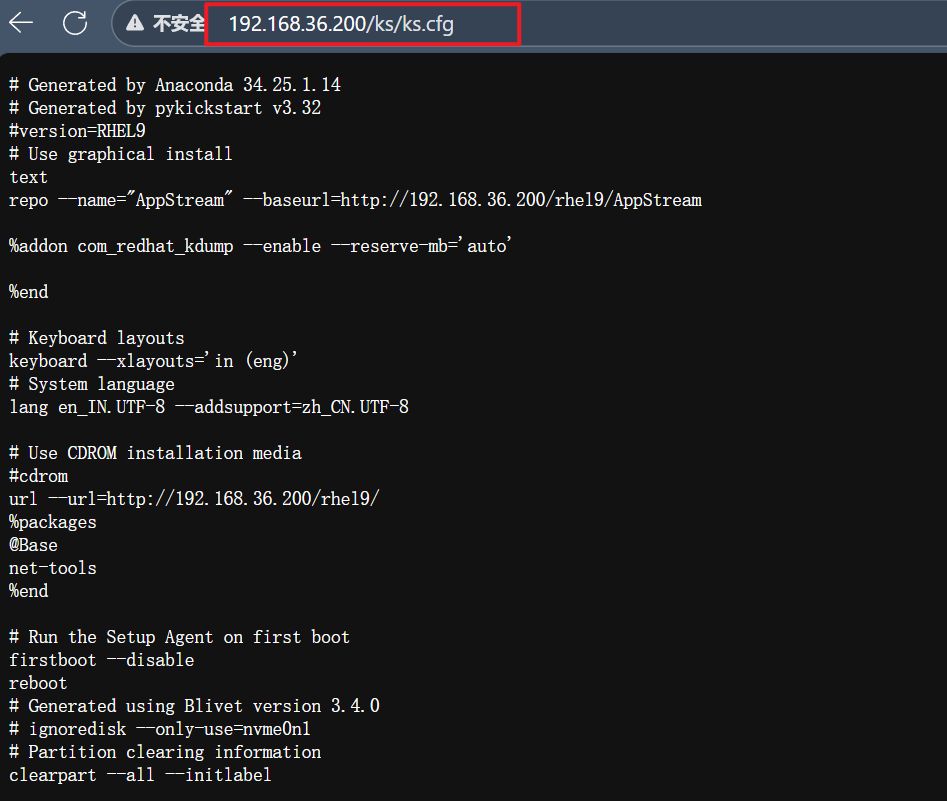
1.准备 Kickstart 脚本存储环境
在 HTTP 服务的根目录(/var/www/html)下创建ks文件夹,用于存放 Kickstart 配置文件(ks.cfg),确保客户端能通过网络(HTTP)访问该脚本。
[root@pxe ~]# mkdir /var/www/html/ks -p2.生成基础 Kickstart 模板并设置权限
anaconda-ks.cfg是系统安装时自动生成的记录(包含安装过程中的所有手动配置),将其复制为ks.cfg作为自动化安装的基础模板。
[root@pxe ~]# cp /root/anaconda-ks.cfg  /var/www/html/ks/ks.cfg
[root@pxe ~]# chmod 644 /var/www/html/ks/ks.cfg3.编辑 Kickstart 脚本(ks.cfg)
通过vim修改ks.cfg,定义自动化安装的所有参数,关键配置包括:
-
安装模式:
- 禁用图形界面(
text),使用文本模式安装。 - 指定安装源为 HTTP 路径(
url --url=http://192.168.36.200/rhel9/),关联之前配置的 PXE 服务器安装源。 - 添加 AppStream 仓库(
repo --name="AppStream"),确保软件包正常安装。
- 禁用图形界面(
-
系统基础配置:
- 语言(英文为主,支持中文)、时区(亚洲 / 上海)、键盘布局(英文)。
- 根用户密码(已加密存储),允许通过 SSH 登录。
- 禁用首次启动向导(
firstboot --disable),安装完成后自动重启(reboot)。
-
磁盘分区:
- 清空所有磁盘(
clearpart --all --initlabel)。 - 自动创建分区:
/boot(1024MB,XFS)、swap(4012MB)、根分区/(剩余全部空间,XFS)。
- 清空所有磁盘(
-
预装软件:
- 通过
%packages指定安装基础包组(@Base)和net-tools工具。
- 通过
-
后安装操作(
%post):-
配置本地 YUM 源(
rhel9.repo),指向 PXE 服务器的 AppStream 和 BaseOS 仓库,避免依赖外部网络。 -
自动安装
java-21-openjdk软件包,完成额外软件部署。[root@pxe ~]# vim /var/www/html/ks/ks.cfg
Generated by Anaconda 34.25.1.14
Generated by pykickstart v3.32
#version=RHEL9
Use graphical install
text
repo --name="AppStream" --baseurl=http://192.168.36.200/rhel9/AppStream%addon com_redhat_kdump --enable --reserve-mb='auto'
%end
Keyboard layouts
keyboard --xlayouts='in (eng)'
System language
lang en_IN.UTF-8 --addsupport=zh_CN.UTF-8
Use CDROM installation media
#cdrom
url --url=http://192.168.36.200/rhel9/
%packages
@Base
net-tools
%endRun the Setup Agent on first boot
firstboot --disable
rebootGenerated using Blivet version 3.4.0
ignoredisk --only-use=nvme0n1
Partition clearing information
clearpart --all --initlabel
part / --fstype="xfs" --grow --size=1
part /boot --fstype="xfs" --size=1024
part swap --fstype="swap" --size=4012System timezone
timezone Asia/Shanghai --utc
Root password
rootpw --iscrypted --allow-ssh 6V.dDtFj4.8xvSRHP$717Em0H2DOMrp5F6Px9rI3m2x6NuVFWneHu5ZV.m9/lbGh5XvFYhrN4VM3jelH0mI5O6UiQ5NN9/TMPOn.Ihc/
%post
cat > /etc/yum.repos.d/rhel9.repo <<EOF
[AppStream]
name = AppStream
baseurl = http://192.168.36.200/rhel9/AppStream
[BaseOS]
name = BaseOS
baseurl = http://192.168.36.200/rhel9/BaseOS
gpgcheck = 0
EOF
dnf install java-21-openjdk.x86_64 -y
%end
-
4.追加inst.ks参数
[root@PXE-server ~]# vim /var/lib/tftpboot/pxelinux.cfg/default
3.3 测试是否能够完成自动安装系统
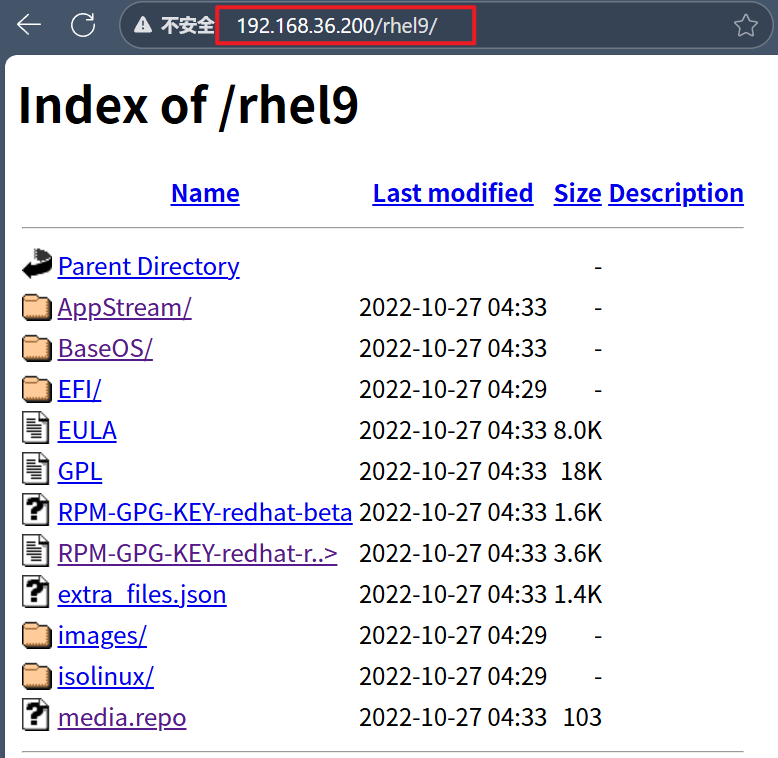
1.验证是否能够访问
2.测试是否能够达到效果
3.确认三大组件都启动
[root@pxe ~]# systemctl status tftp.service dhcpd.service httpd.service4.确认防火墙关闭,selinux关闭
[root@pxe ~]# systemctl status firewalld.service
[root@pxe ~]# getenforce
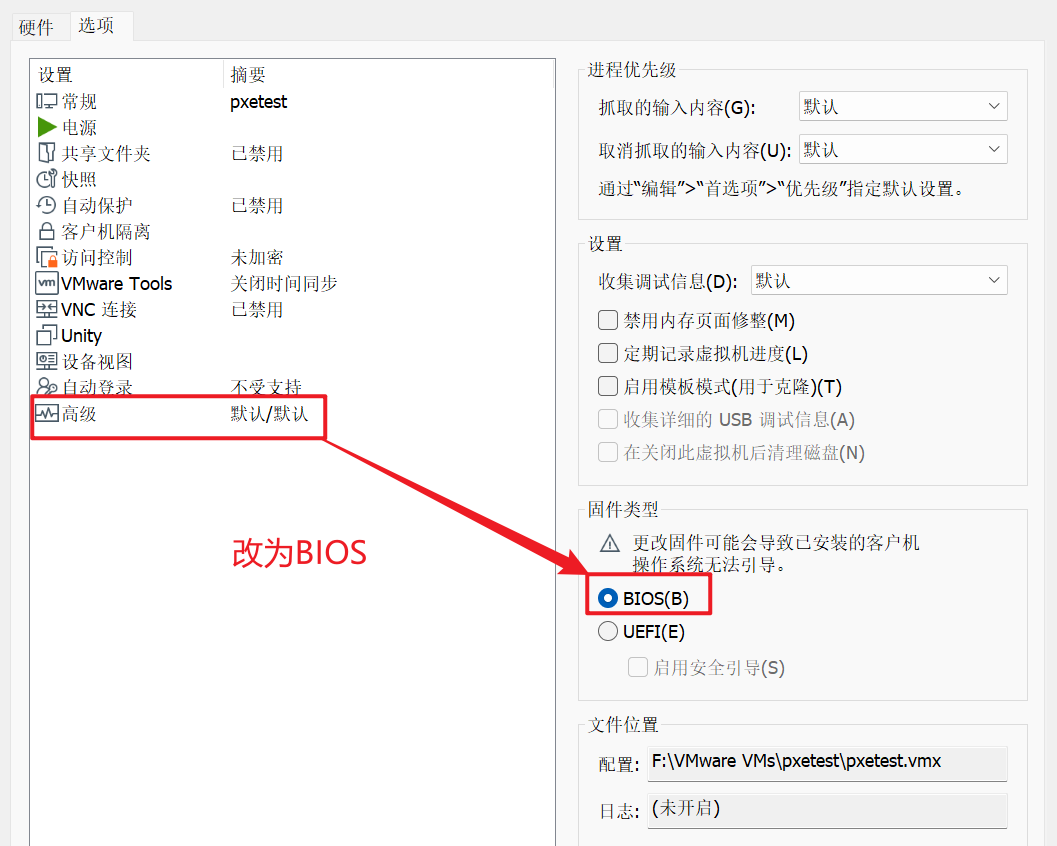
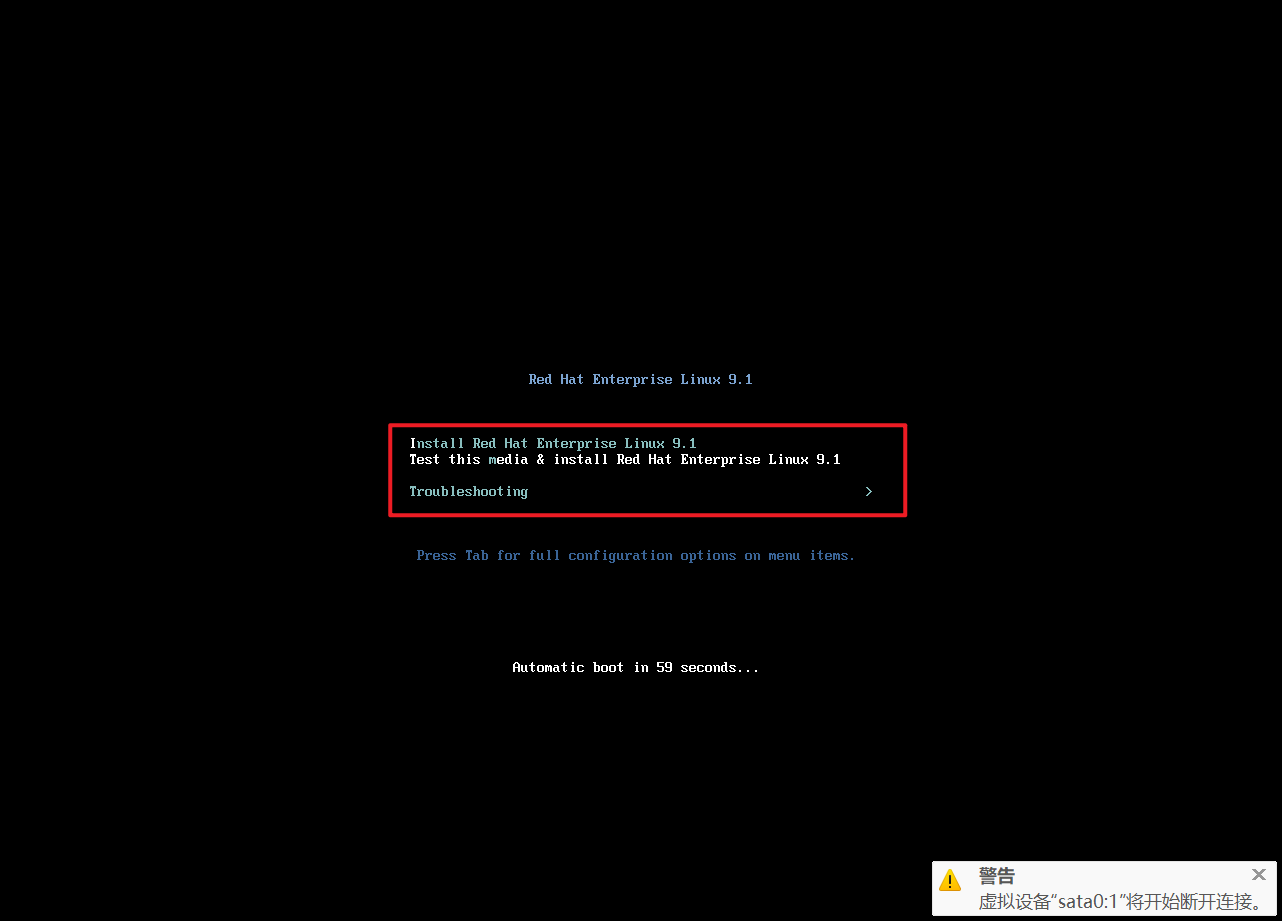
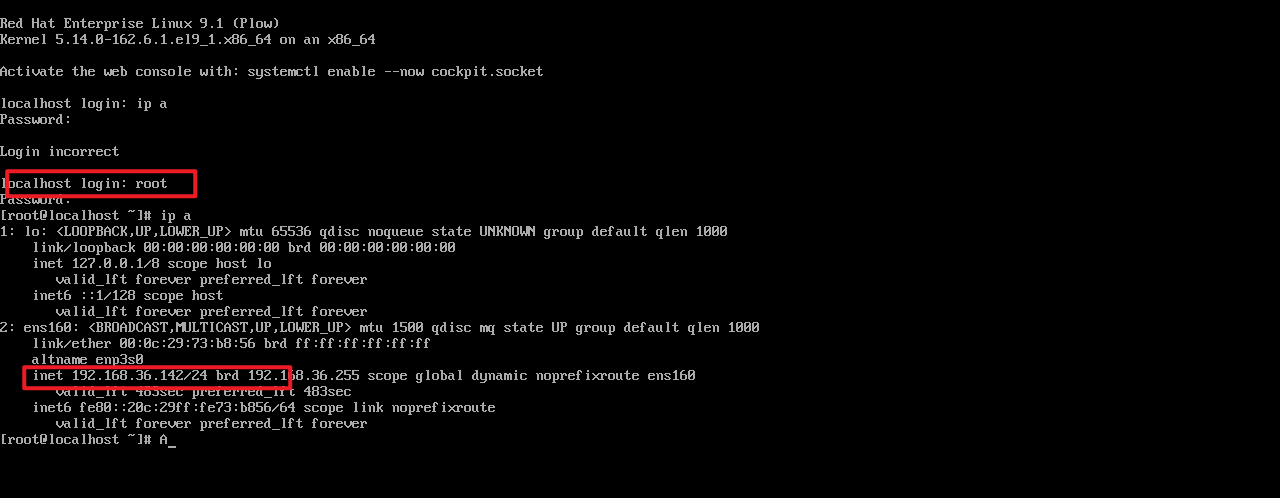
Disabled5.开启测试机观察是否达到预期效果
4 在相应主机中安装对应软件
4.1 主机资源清单
|-----------|------------------|-------------|------|-----------------------|
| 主机 | IP | 配置 | 用途 | 软件 |
| dev | 192.168.36.10/24 | cup:2、mem:4 | 代码书写 | git |
| gitlab | 192.168.36.20/24 | cpu:2、mem:4 | 代码仓库 | git、gitlab、jdk |
| jenkins | 192.168.36.30/24 | cpu:2、mem:4 | 代码管家 | git、jdk、jenkins |
| harbor | 192.168.36.40/24 | cpu:2、mem:4 | 镜像仓库 | git、jdk、docker、harbor |
| webserver | 192.168.36.50/24 | cpu:2、mem:4 | 业务主机 | git、docker、jdk |
4.2 利用ansible构建devops环境
4.2.1 安装ansible
1.配置安装源
[root@pxe ~]# vim /etc/yum.repos.d/ansible.repo
[ansible]
name = ansible
baseurl = https://mirrors.aliyun.com/epel-archive/9.1/Everything/x86_64/
gpgcheck = 0
2.安装ansible
[root@pxe ~]# yum search ansible
[root@pxe ~]# yum install ansible.noarch -y4.2.2配置ansible环境
1.配置root环境用于对ansible的初始化
[root@pxe ~]# mkdir /root/ansible
[root@pxe ~]# cd /root/ansible/
[root@pxe ansible]# vim ansible.cfg
[defaults]
inventory=./inventory
remote_user=root
host_key_checking=false
[privilege_escalation]
become=False
[root@pxe ansible]# vim inventory
[server]
192.168.36.10
192.168.36.20
192.168.36.30
192.168.36.40
192.168.36.50
2.利用root身份设置ansible
[root@pxe ansible]# ansible all -m shell -a "useradd devops" -k
SSH password: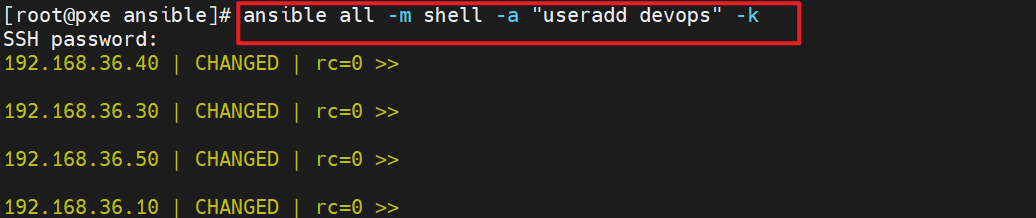
3.设置devops用户的密码
[root@pxe ansible]# ansible all -m shell -a "echo lee | passwd --stdin devops" -k
SSH password: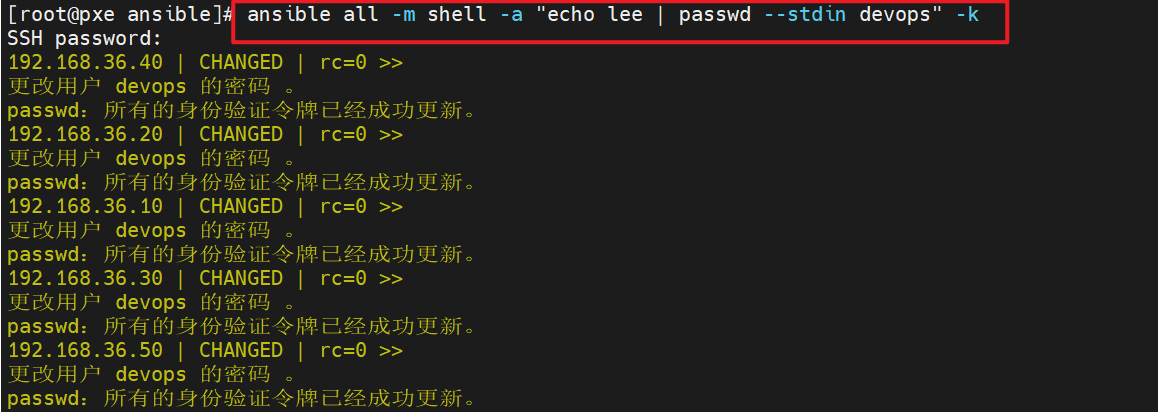
4.创建.ssh目录并设置权限
[root@pxe ansible]# ansible all -m file -a 'path=/home/devops/.ssh owner=devops group=devops mode=700 state=directory' -k
SSH password: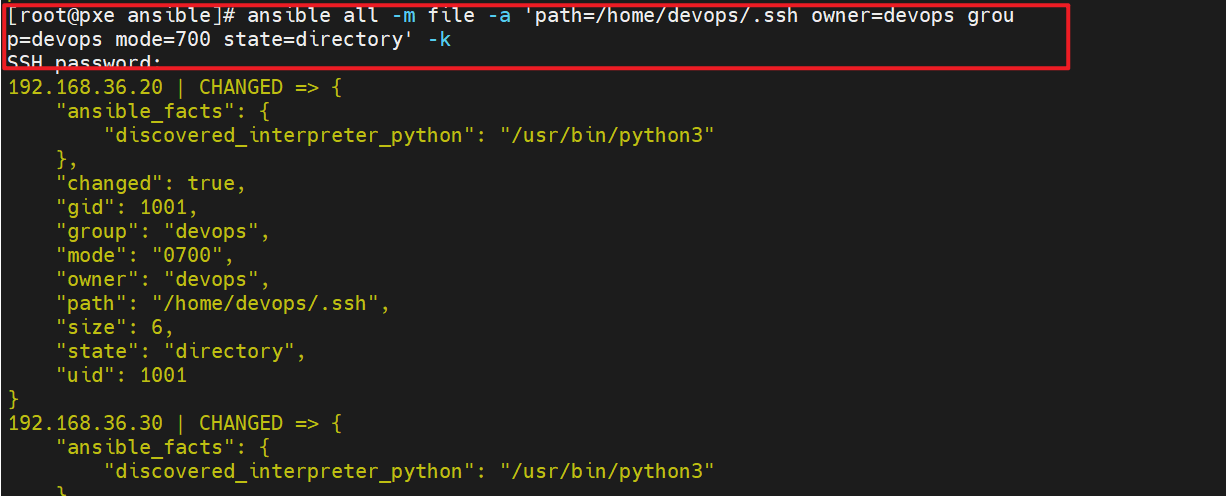
5.在控制节点配置devops用户及 SSH 密钥
[root@pxe ansible]# useradd devops
[root@pxe ansible]# echo lee | passwd --stdin devops
[root@pxe ansible]# su - devops
[devops@pxe ~]$ ssh-keygen
[devops@pxe ~]$ exit
[root@pxe ansible]# ssh-copy-id devops@localhost
6.配置 SSH 密钥认证(实现无密码登录)
[root@pxe ansible]# ansible all -m copy -a 'src=/home/devops/.ssh/authorized_keys dest=/home/devops/.ssh/authorized_keys owner=devops group=devops mode=600' -k
SSH password: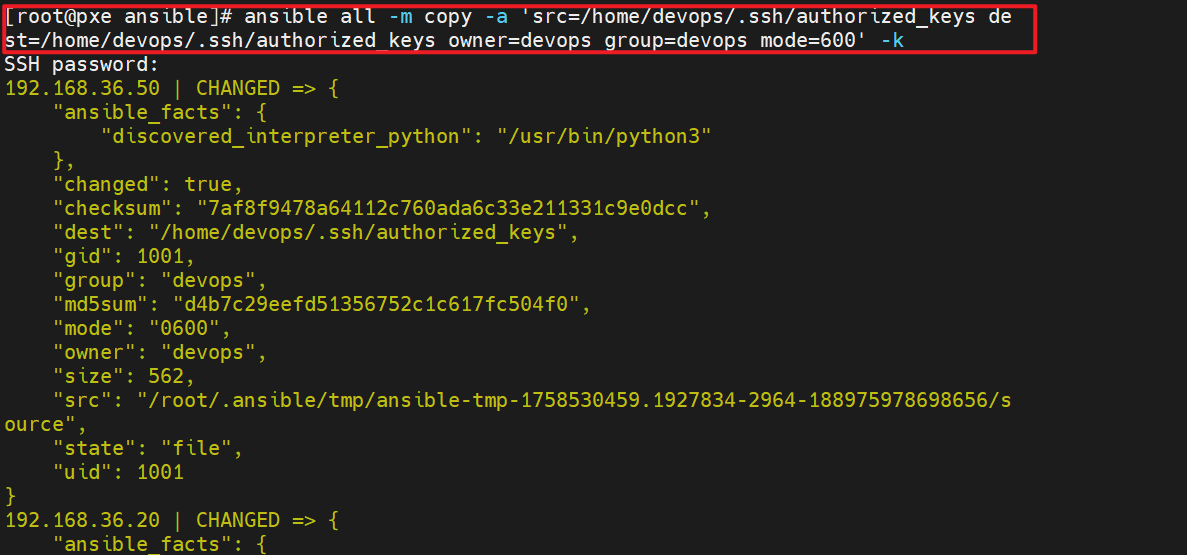
7.配置sudo权限(允许devops执行特权操作)
[root@pxe ansible]# ansible all -m shell -a 'echo "devops ALL=(root) NOPASSWD: ALL" >> /etc/sudoers' -k
SSH password: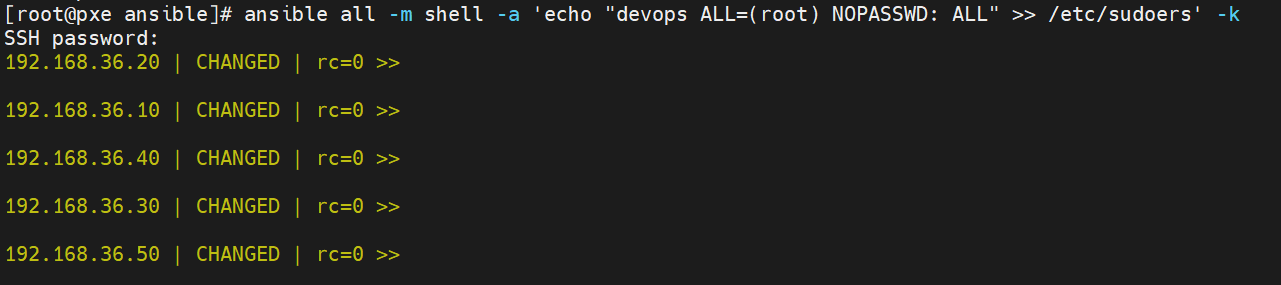
8.配置 Ansible 环境(切换到devops用户)
[root@pxe ansible]# su - devops
[devops@pxe ~]$ mkdir ansible && cd ansible
[devops@pxe ansible]$ vim ansible.cfg
[defaults]
remote_user=devops               # 默认使用devops用户连接远程主机
inventory=/home/devops/ansible/inventory  # 指定主机清单路径
host_key_checking=false          # 禁用SSH主机密钥检查(避免首次连接确认)

[privilege_escalation]
become=yes                       # 启用提权
become_ask_pass=False            # 提权时不询问密码(依赖sudoers配置)
become_method=sudo               # 使用sudo方式提权
become_user=root                 # 提权到root用户
[devops@pxe ansible]$ vim inventory
[server]
192.168.36.10
192.168.36.20
192.168.36.30
192.168.36.40
192.168.36.50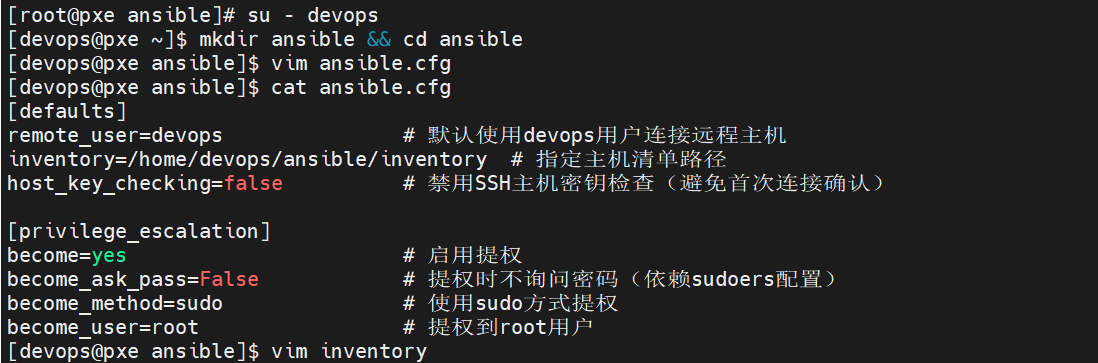
9.验证 Ansible 配置
[devops@pxe ansible]$ ansible all -m ping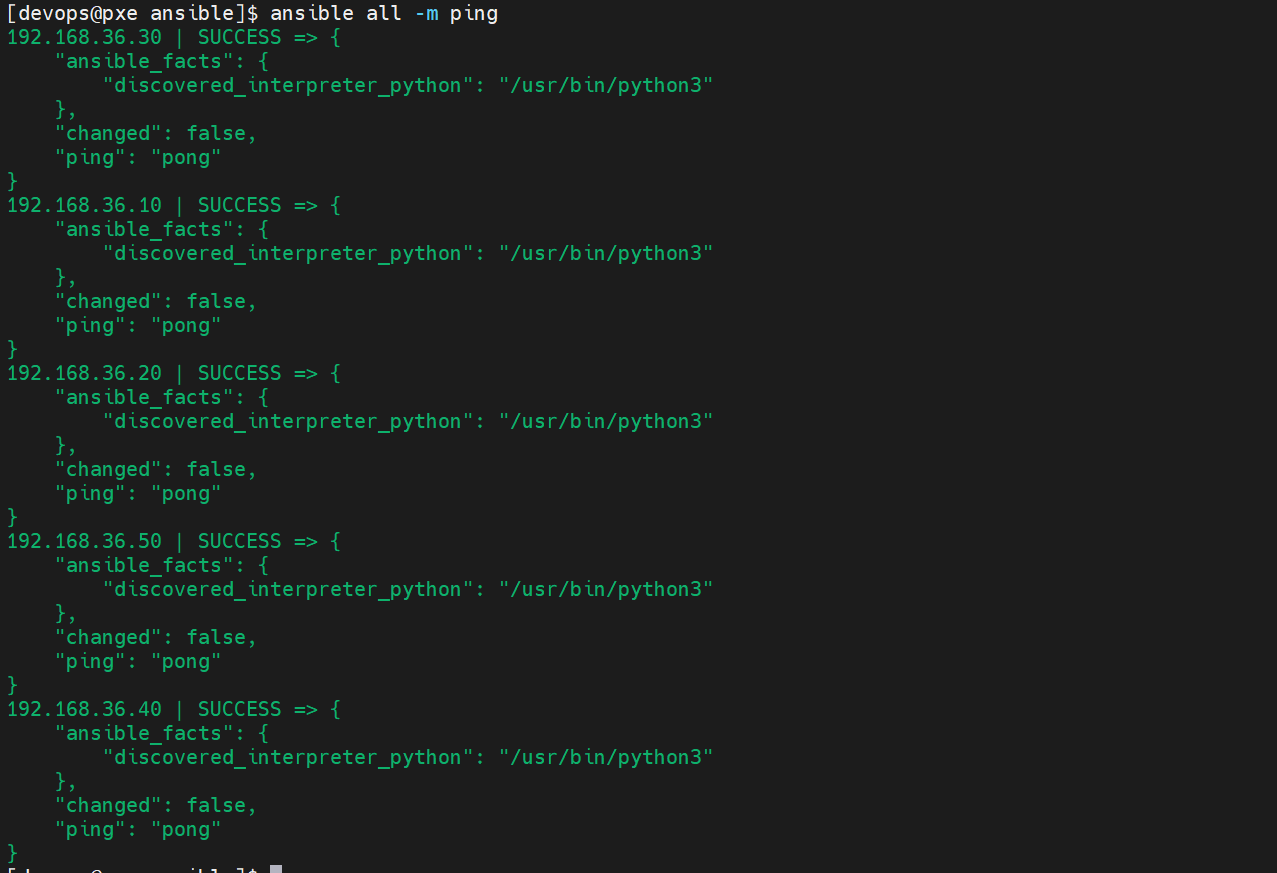
4.2.3 根据主机资源清单构建devops系统环境
[devops@pxe ansible]$ vim inventory
[devops@pxe ansible]$ cat inventory
[dev]
192.168.36.10
[gitlab]
192.168.36.20
[jenkins]
192.168.36.30
[harbor]
192.168.36.40
[webserver]
192.168.36.50
4.2.4 配置资源服务器
1.构建本地软件仓库
[root@pxe ~]# dnf install httpd -y
[root@pxe ~]# mkdir /var/www/html/rhel9/
[root@pxe ~]# echo "mount /dev/xxxx.iso /var/www/html/rhel9" >> /etc/rc.d/rc.local
[root@pxe ~]# chmod 755 /etc/rc.d/rc.local
2.构建第三方软件
[root@pxe ~]# cd /var/www/html/
[root@pxe html]# mkdir jenkins harbor gitlab docker
3.从官网下载安装软件到相应的目录中
[root@pxe html]# ls
docker  gitlab  harbor  jenkins  ks  rhel9
[root@pxe html]# tree docker gitlab harbor jenkins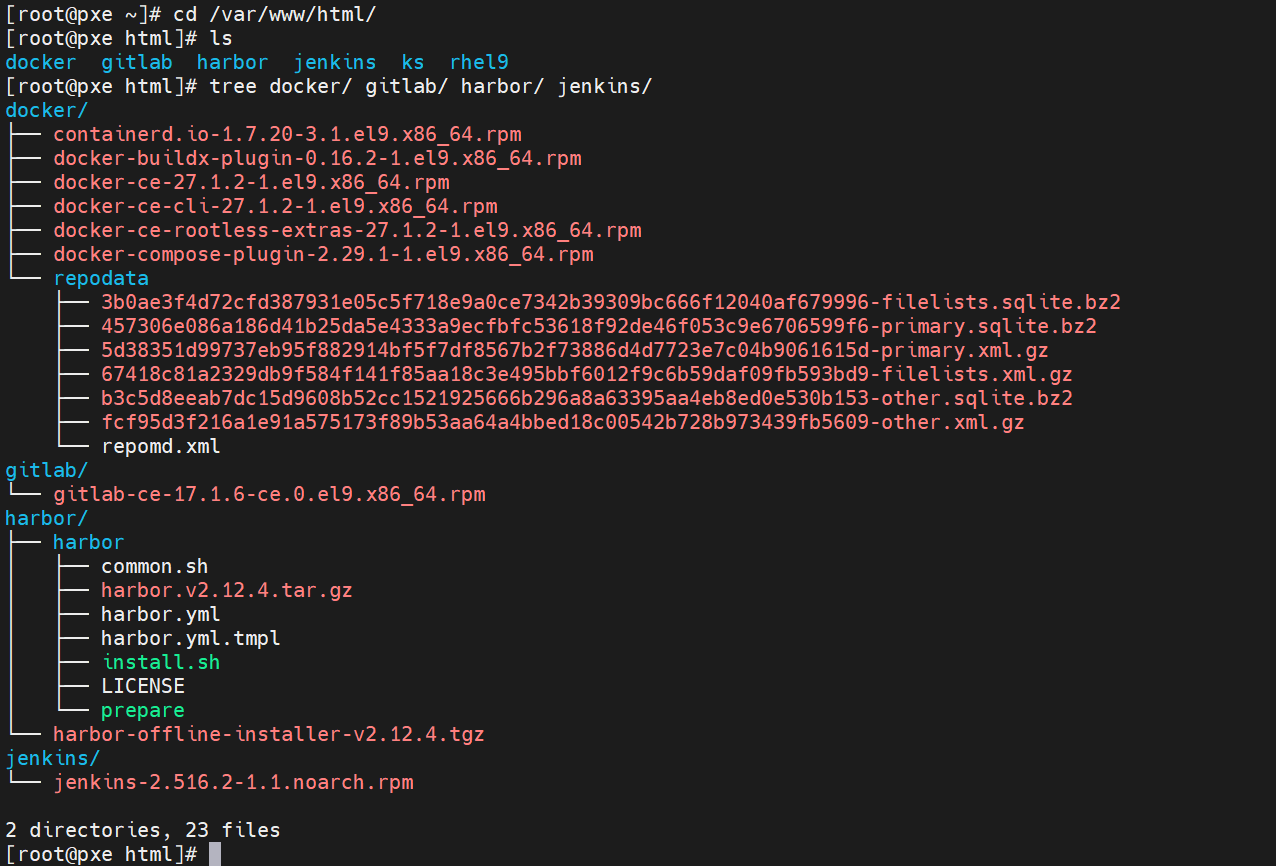
4.构建docker仓库
[root@pxe docker]# dnf install createrepo -y
[root@pxe docker]# createrepo -v /var/www/html/docker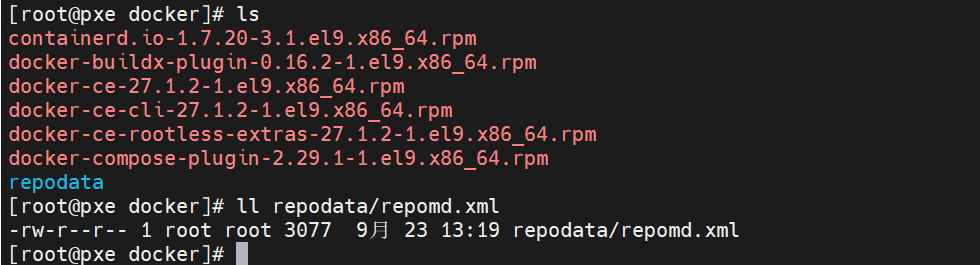
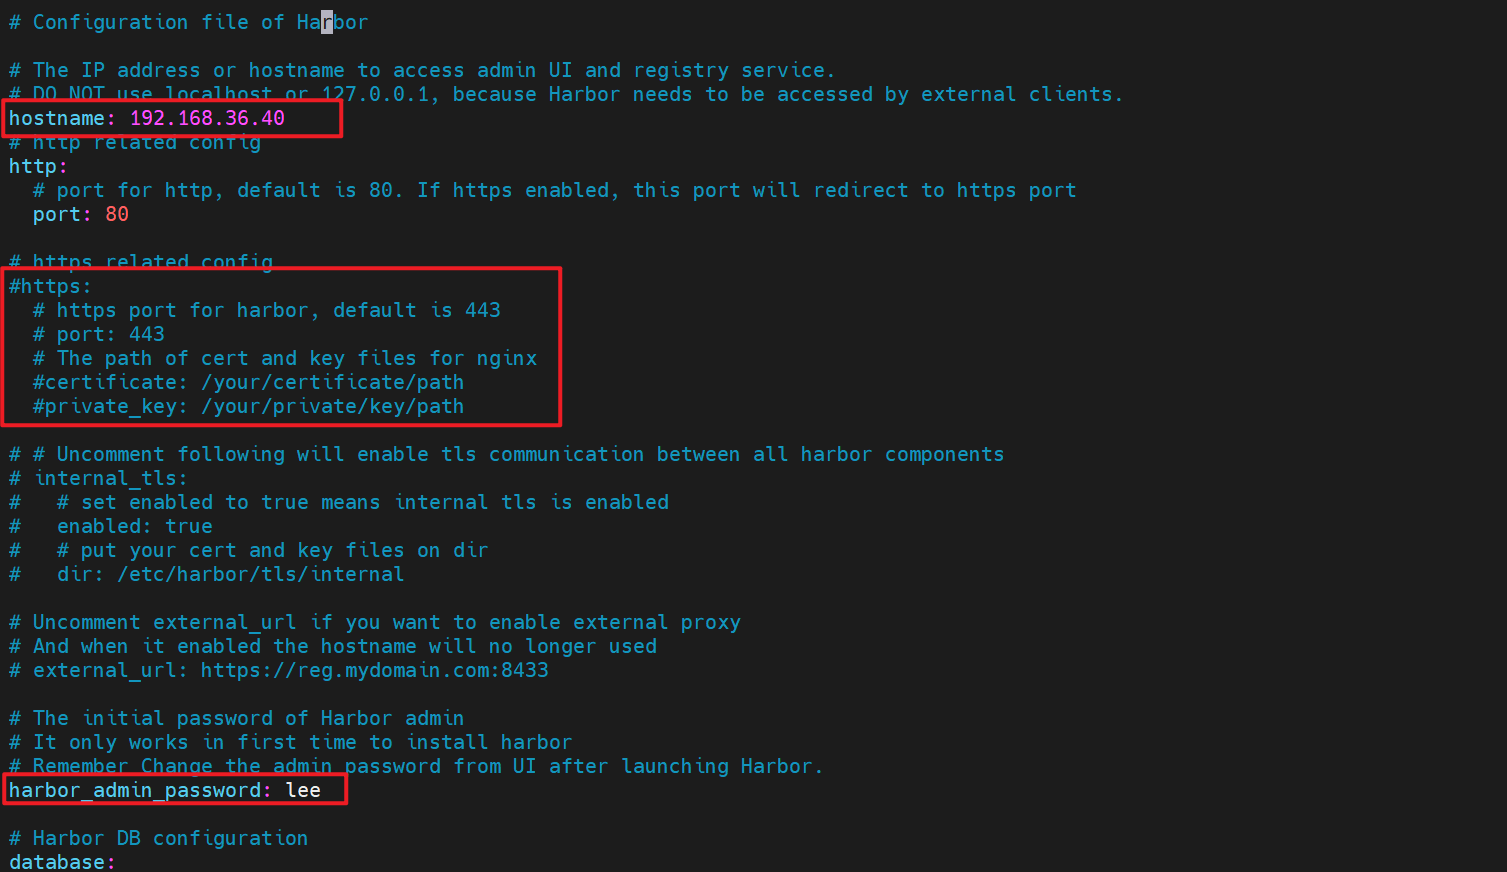
5.修改harbor.yaml文件
[root@pxe html]# ls
docker  gitlab  harbor  jenkins  ks  rhel9
[root@pxe html]# cd harbor/
[root@pxe harbor]# ls
harbor  harbor-offline-installer-v2.12.4.tgz
[root@pxe harbor]# cd harbor/
[root@pxe harbor]# ls
common.sh  harbor.v2.12.4.tar.gz  harbor.yml  harbor.yml.tmpl  install.sh  LICENSE  prepare
[root@pxe harbor]# vim harbor.yml更加详细的harbor.yaml文件配置修改请参考:k8s简介及部署方法_k8容器部署-CSDN博客![]() https://blog.csdn.net/m0_75254642/article/details/150428867?spm=1001.2014.3001.5502
https://blog.csdn.net/m0_75254642/article/details/150428867?spm=1001.2014.3001.5502
4.2.5 利用playbook构建devops环境(根据实际情况适当修改)
[root@pxe harbor]# su - devops
[devops@pxe ~]$ ls
ansible
[devops@pxe ~]$ cd ansible/
[devops@pxe ansible]$ ls
ansible.cfg  inventory  setup_devops.yaml
[devops@pxe ansible]$ vim setup_devops.yaml

- name: Install CI/CD Pipeline Software
  hosts: all
  tasks:
    - name: Install Git for dev/gitlab/jenkins/webserver Hosts
      dnf:
        name: git
        state: present
      when: >
        inventory_hostname in groups.dev or
        inventory_hostname in groups.gitlab or
        inventory_hostname in groups.jenkins or
        inventory_hostname in groups.webserver

    - name: Install Java-21-OpenJDK for gitlab/jenkins/webserver Hosts
      dnf:
        name: java-21-openjdk
        state: present
      when: >
        inventory_hostname in groups.gitlab or
        inventory_hostname in groups.jenkins or
        inventory_hostname in groups.webserver

    - name: Install GitLab RPM for gitlab Host
      dnf:
        name: 'http://192.168.36.200/gitlab/gitlab-ce-17.1.6-ce.0.el9.x86_64.rpm'
        disable_gpg_check: yes
        state: present
      when: inventory_hostname in groups.gitlab

    - name: Configure GitLab External URL
      lineinfile:
        path: /etc/gitlab/gitlab.rb
        regexp: '^external_url'
        line: "external_url 'http://192.168.36.20'"
      when: inventory_hostname in groups.gitlab

    - name: Start GitLab Service
      shell: "gitlab-ctl reconfigure && gitlab-ctl start"
      when: inventory_hostname in groups.gitlab

    - name: Install Jenkins RPM for jenkins Host
      dnf:
        name: 'http://192.168.36.200/jenkins/jenkins-2.516.2-1.1.noarch.rpm'
        disable_gpg_check: yes
        state: present
      when: inventory_hostname in groups.jenkins

    - name: Start Jenkins Service
      service:
        name: jenkins
        state: started
        enabled: yes
      when: inventory_hostname in groups.jenkins

    - name: Setup Docker Repository for harbor/webserver Hosts
      yum_repository:
        name: docker
        description: "docker-ce"
        baseurl: http://192.168.36.200/docker
        file: docker
      when: inventory_hostname in groups.harbor or inventory_hostname in groups.webserver

    - name: Install Docker-ce for harbor/webserver Hosts
      dnf:
        name: docker-ce
        state: present
        disable_gpg_check: yes
      when: inventory_hostname in groups.harbor or inventory_hostname in groups.webserver

    - name: Configure Docker Insecure Registry
      copy:
        dest: /etc/docker/daemon.json
        content: |
          {
            "insecure-registries" : ["http://192.168.36.40"]
          }
      when: inventory_hostname in groups.harbor or inventory_hostname in groups.webserver

    - name: Start Docker Service
      service:
        name: docker
        state: started
        enabled: yes
      when: inventory_hostname in groups.harbor or inventory_hostname in groups.webserver

    - name: Download and Extract Harbor for harbor Host
      unarchive:
        src: http://192.168.36.200/harbor/harbor-offline-installer-v2.5.4.tgz
        dest: /opt
        creates: /opt/harbor
        remote_src: yes
      when: inventory_hostname in groups.harbor

    - name: Copy Harbor Configuration File
      copy:
        src: /var/www/html/harbor/harbor/harbor.yml
        dest: /opt/harbor/harbor.yml
      when: inventory_hostname in groups.harbor

    - name: Start Harbor Service
      shell: "cd /opt/harbor && ./install.sh && docker compose up -d"
      when: inventory_hostname in groups.harbor
4.2.6 安装和测试效果
[devops@pxe ~]$ cd ansible/
[devops@pxe ansible]$ ls
ansible.cfg  inventory  setup_devops.yaml
[devops@pxe ansible]$ ansible-playbook -i inventory setup_devops.yaml
浏览器访问:

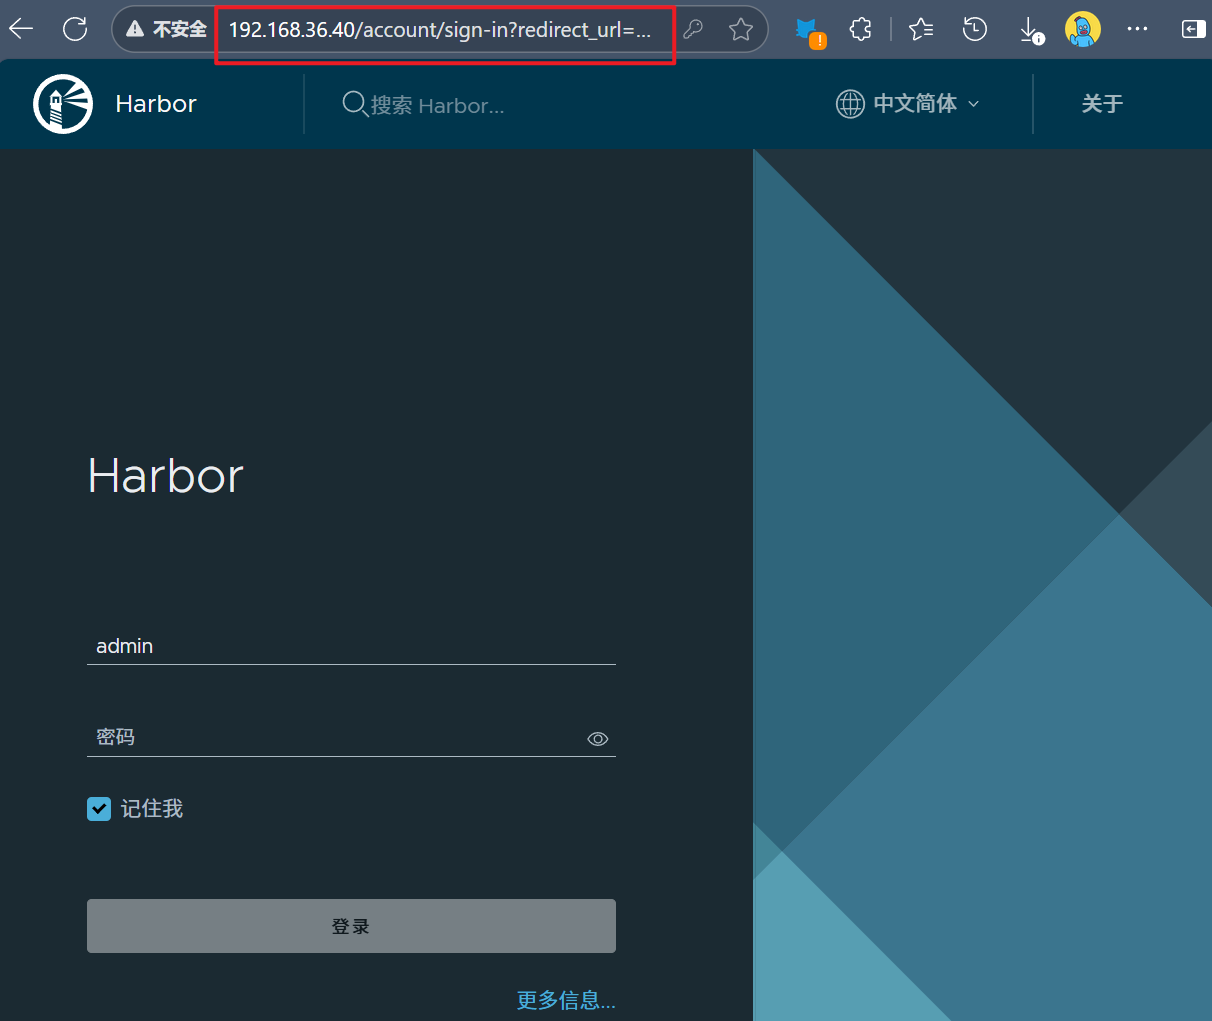
5 配置自动集成自动交付环境
更加详细的CICD配置请参考:
5.1 配置gitlab
5.1.1 gitlab初始化
1.查看gitlab默认密码
[devops@pxe ansible]$ ansible gitlab -m shell -a 'cat /etc/gitlab/initial_root_password'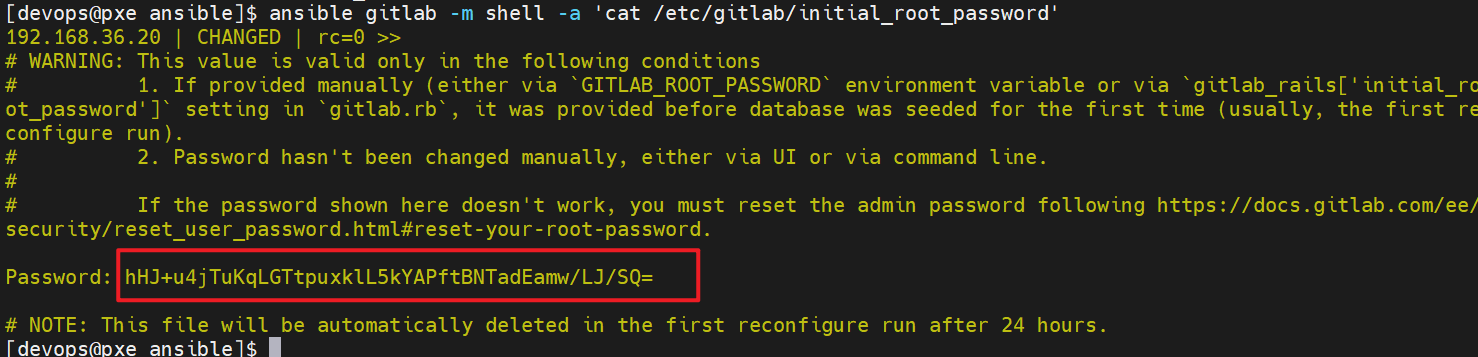
2.登录gitlab默认用户是root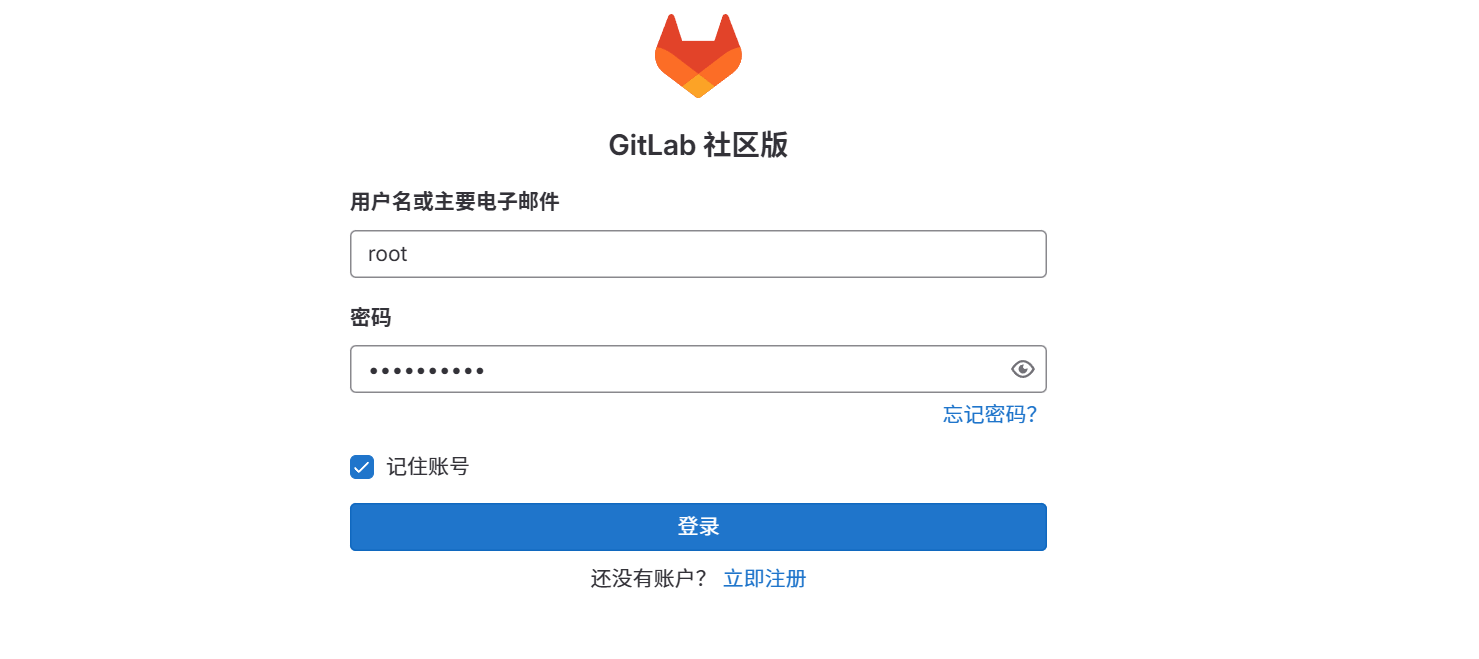
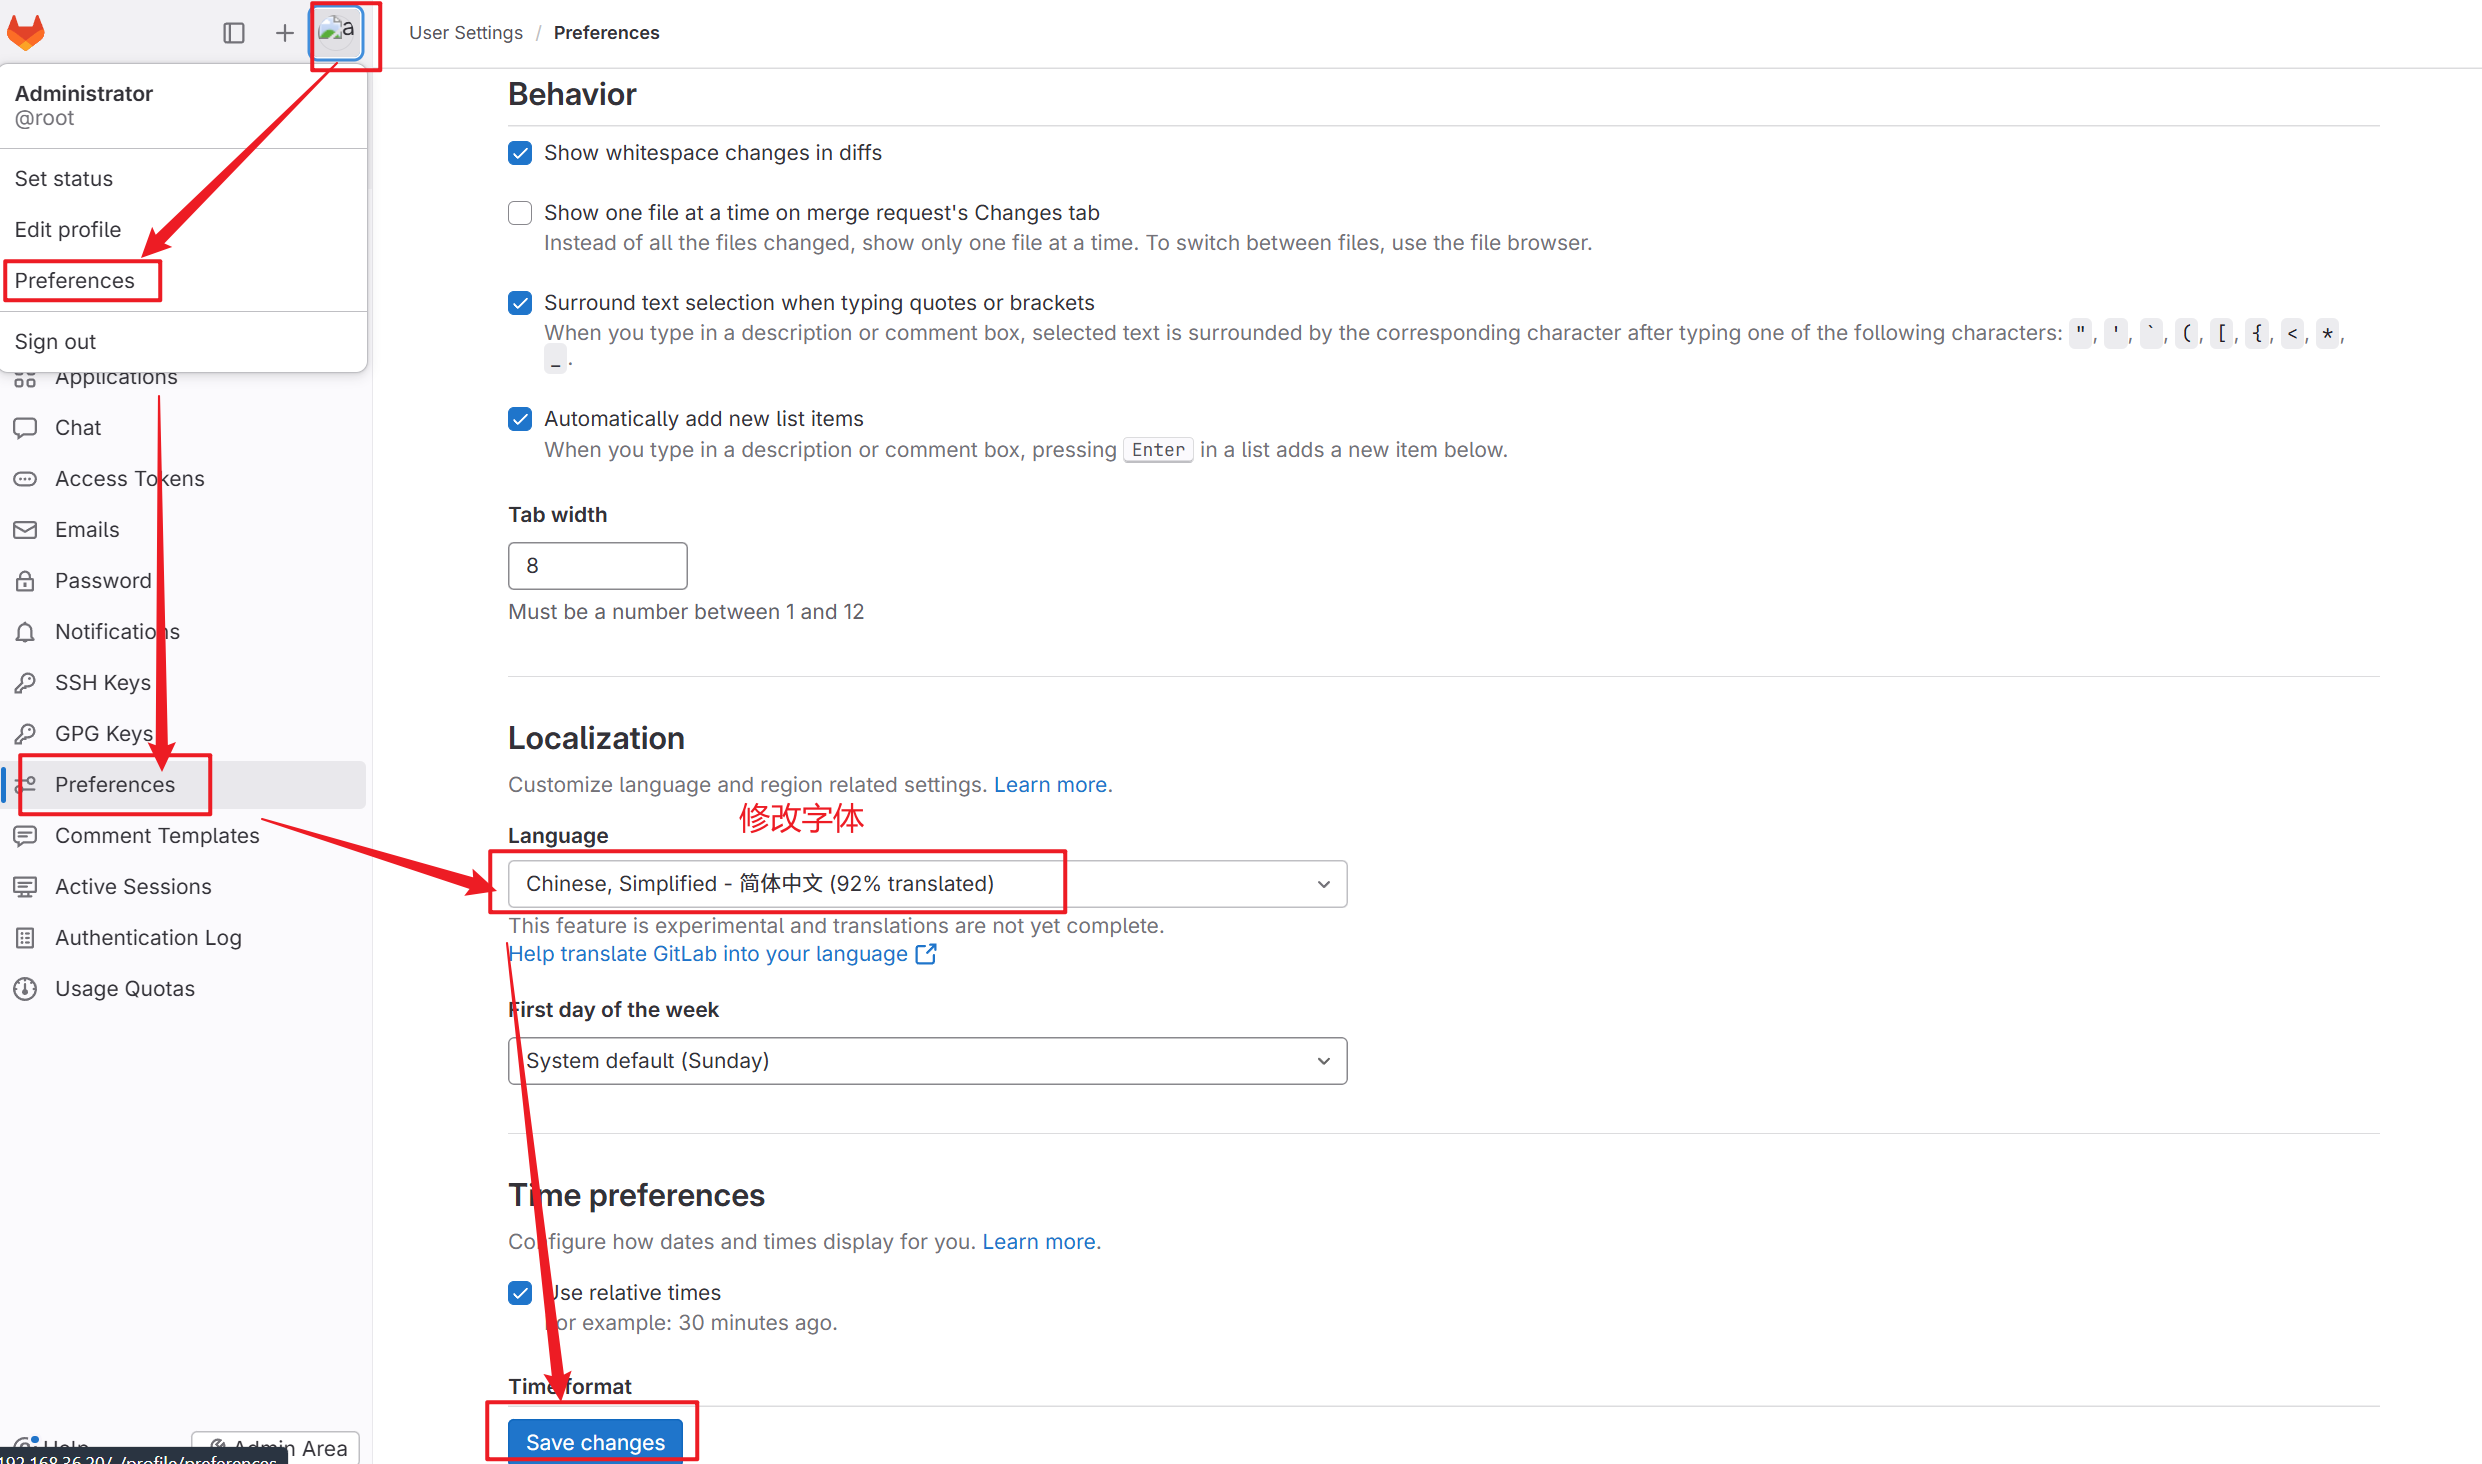
3.修改语言
4.修改密码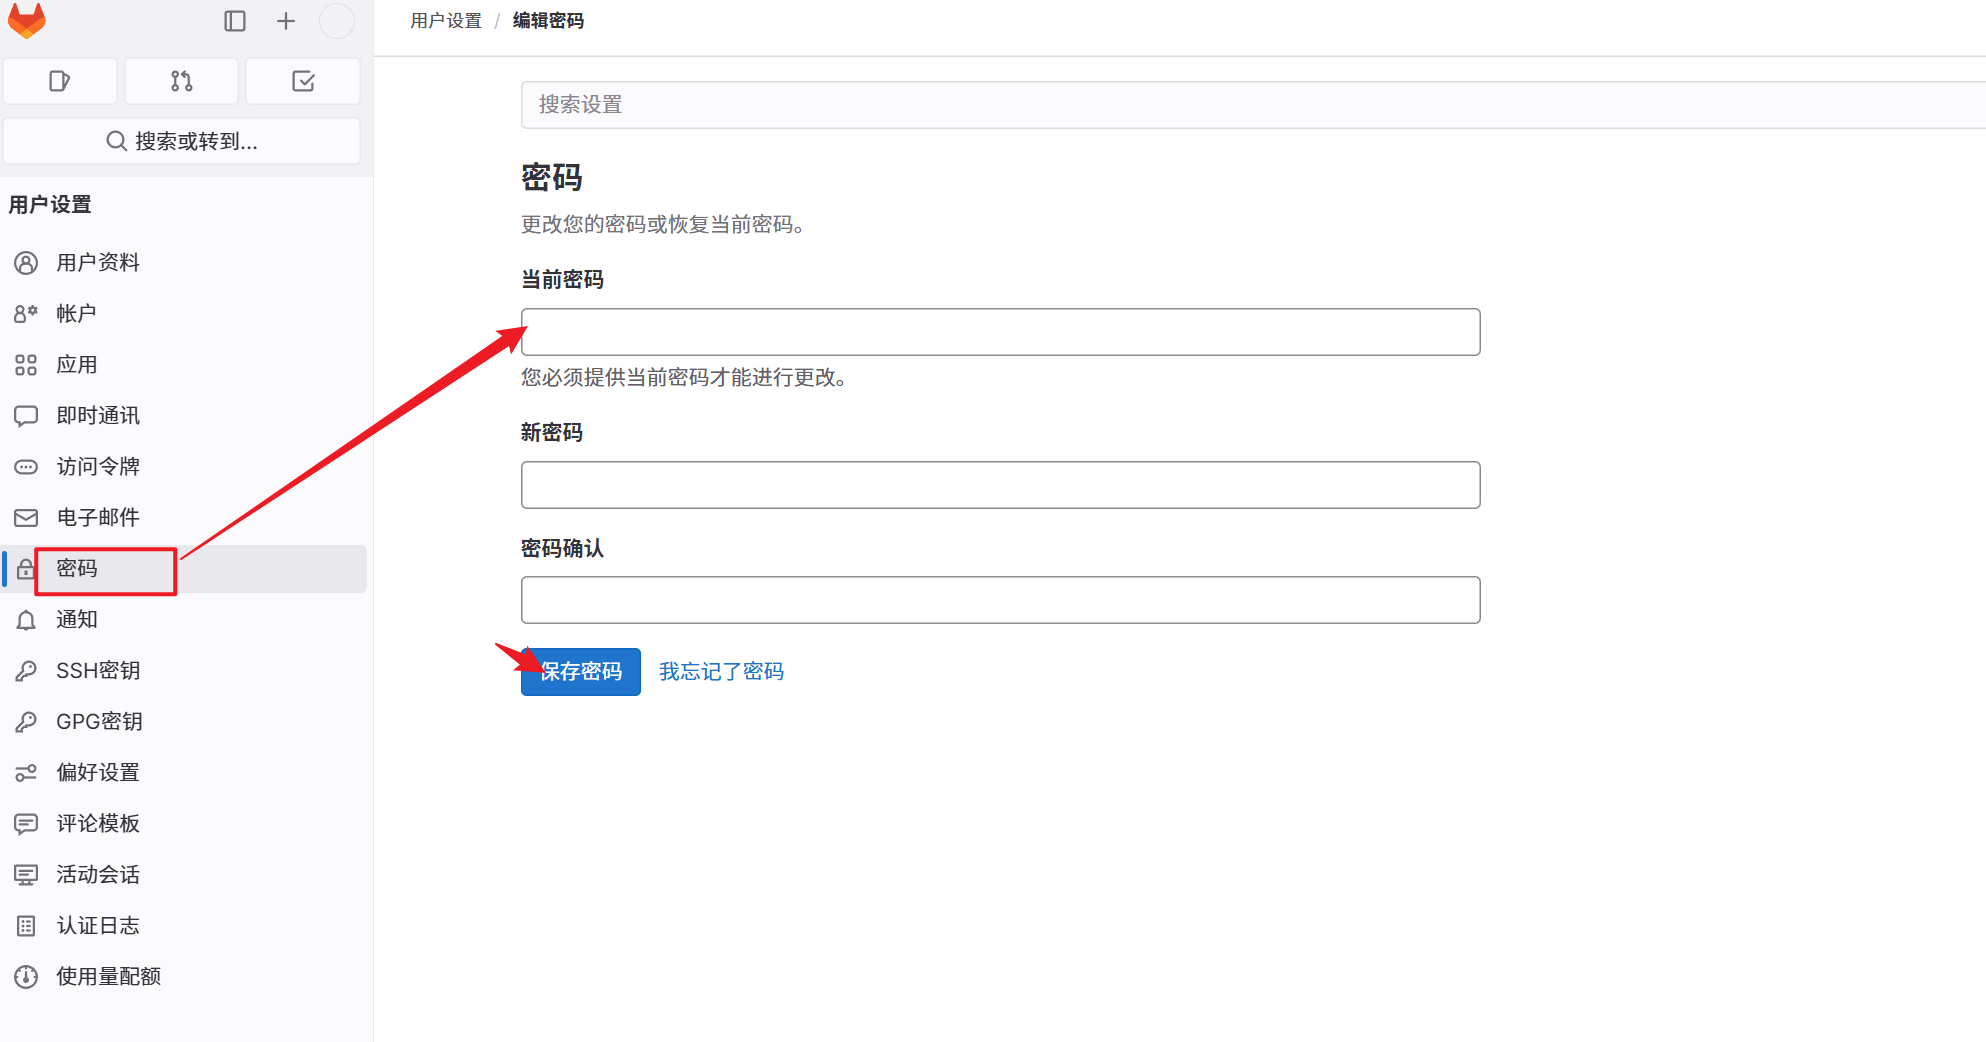
5.1.2 建立项目
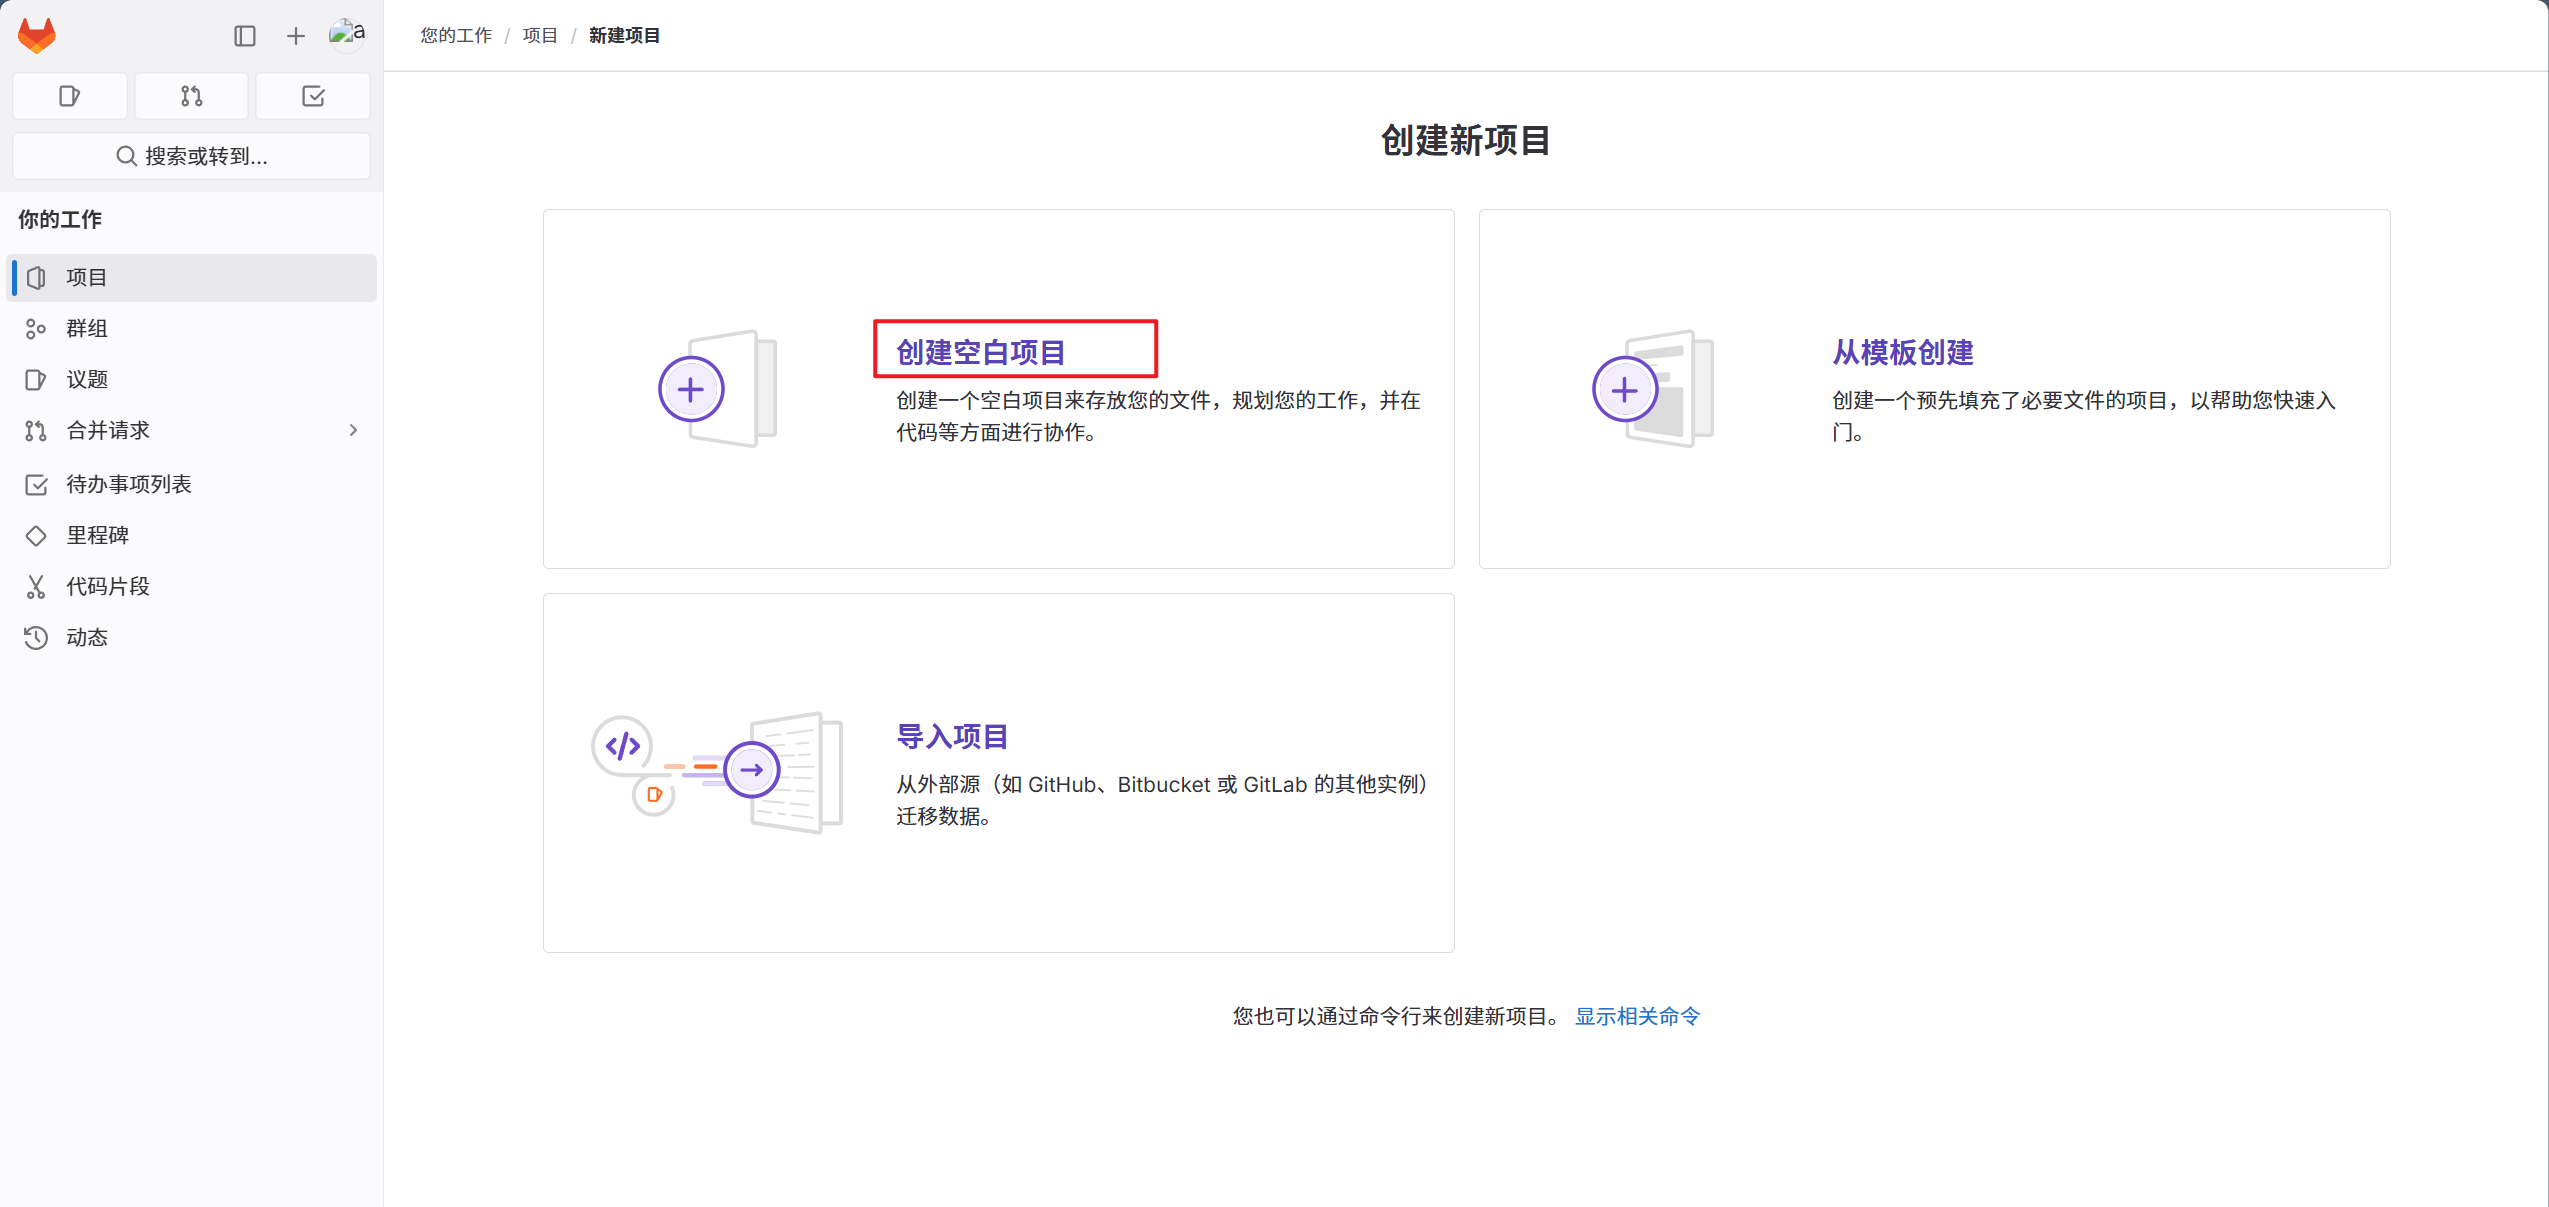
1.创建新项目
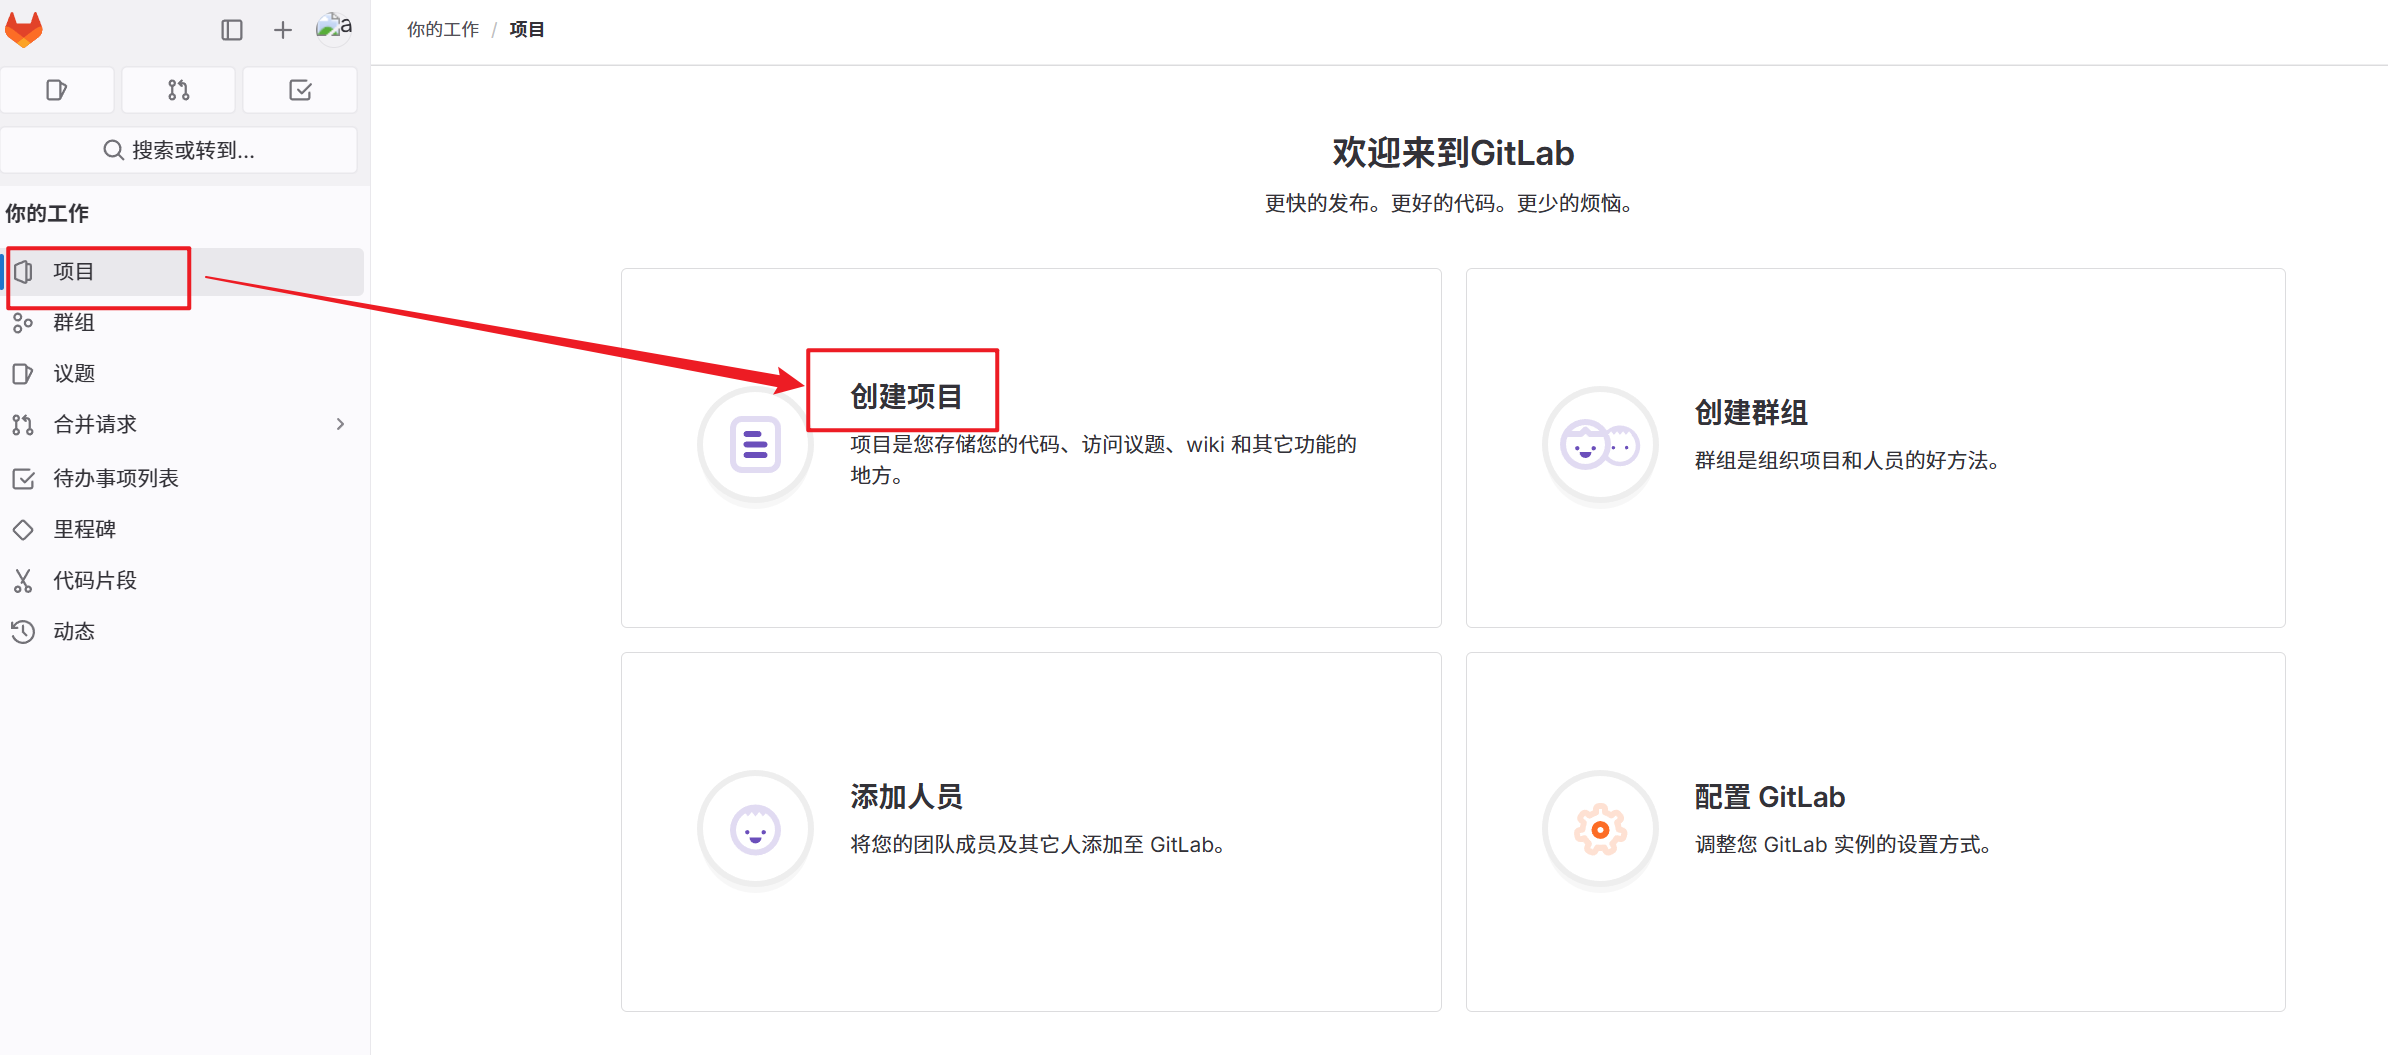
2.创建空白项目
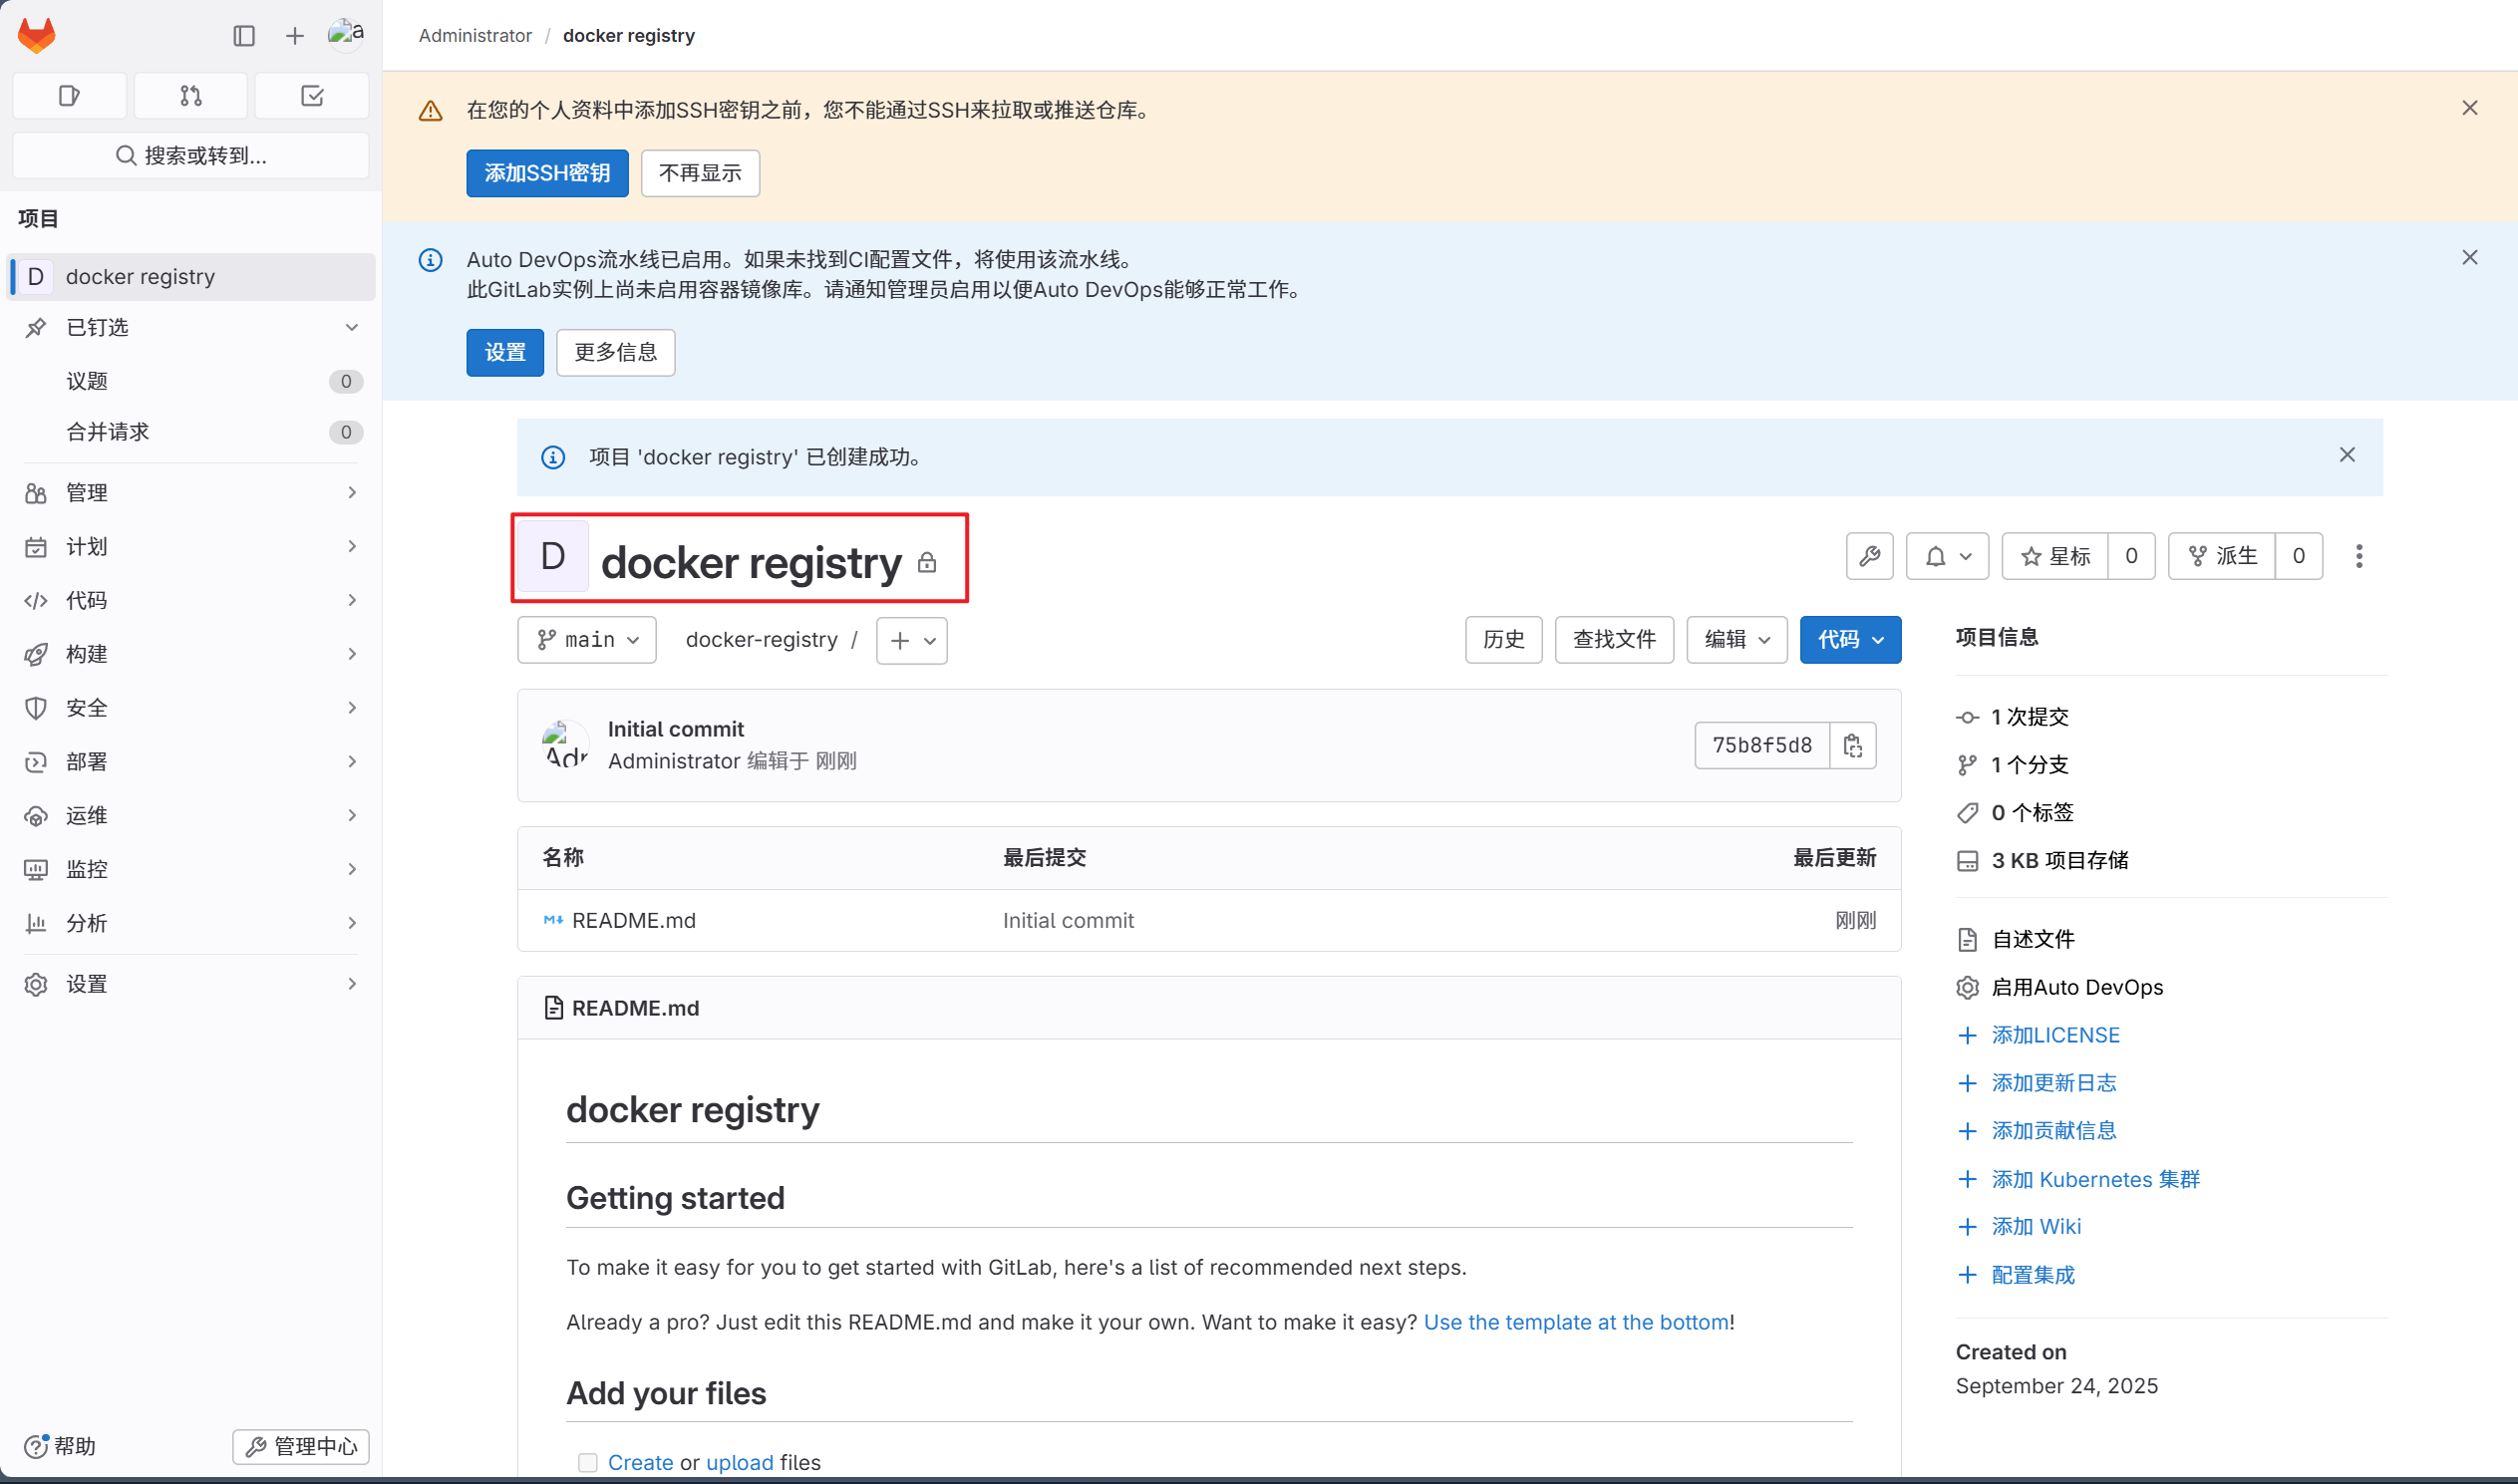
3.编写项目信息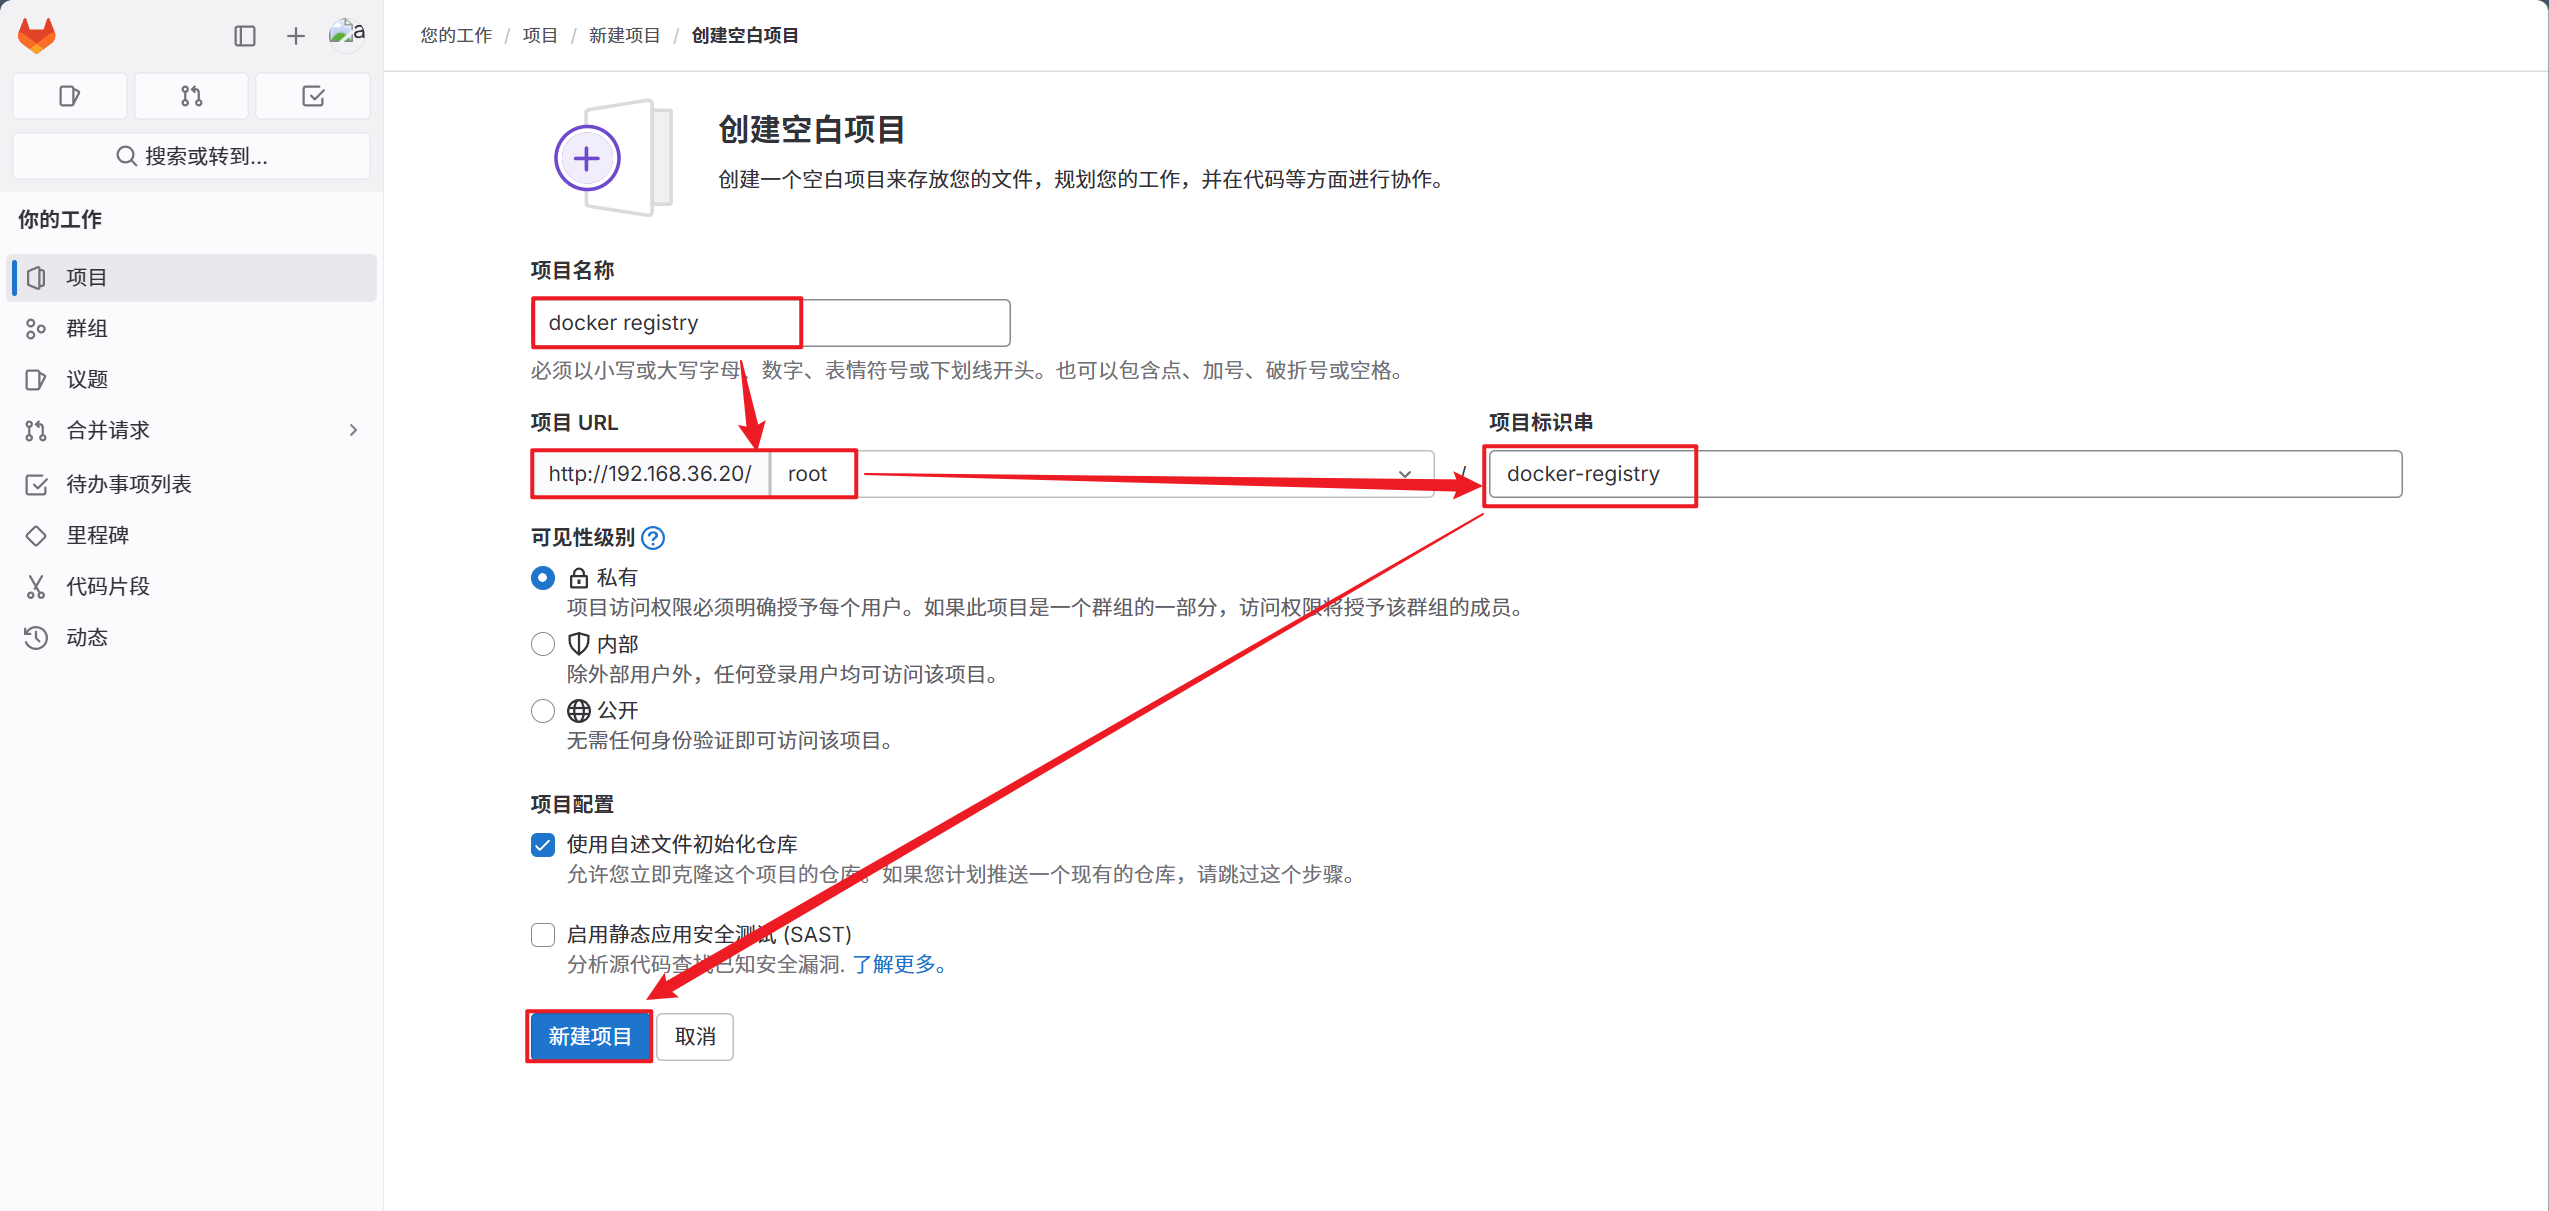
5.1.3 建立dev与gitlab的连接
1.生成rsa密钥
[root@dev ~]# ssh-keygen
[root@dev ~]# cat /root/.ssh/id_rsa.pub
2.将密钥添加到gitlab中
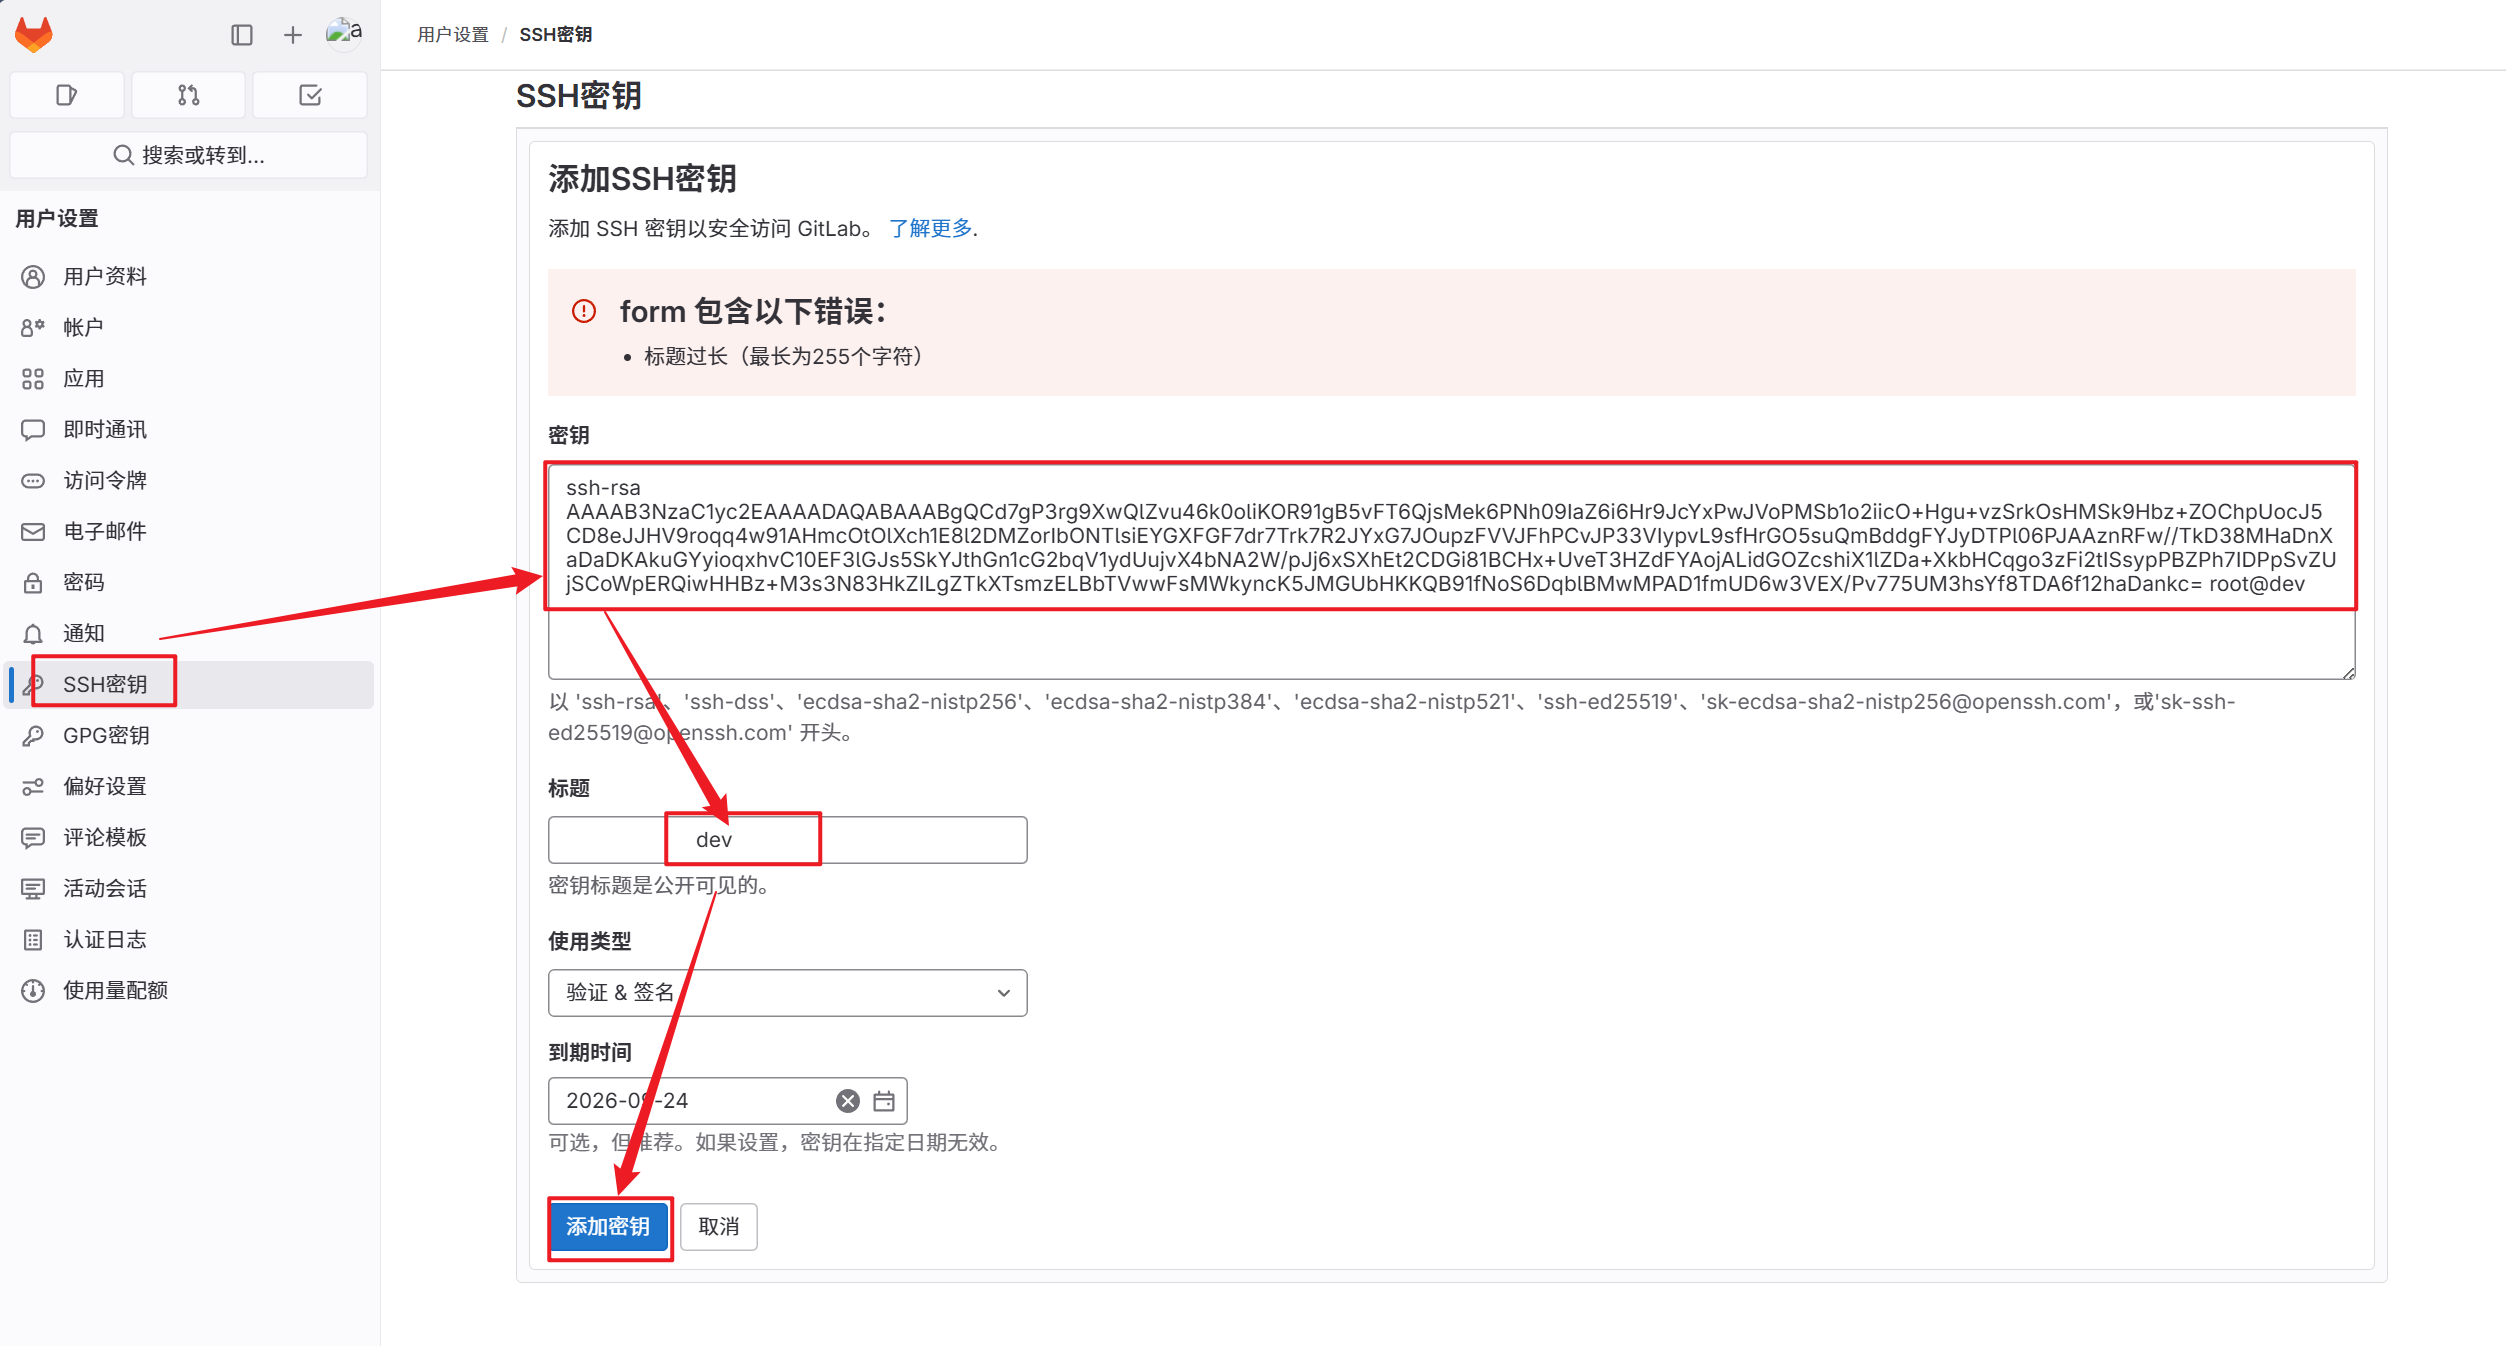
3.跳过对目标主机 SSH 密钥指纹的检查与确认步骤
[root@dev ~]# vim /etc/ssh/ssh_config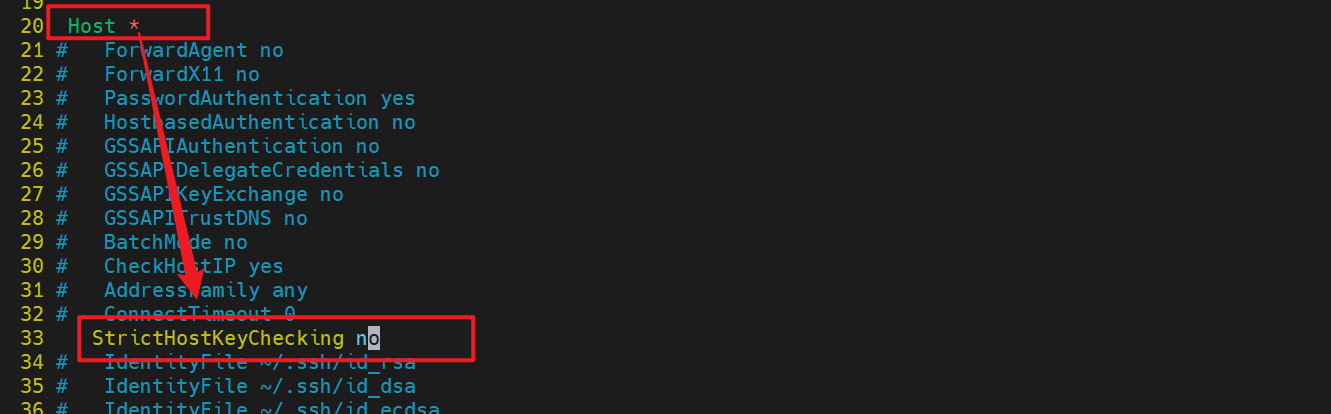
4.在dev主机拉取项目并上传项目
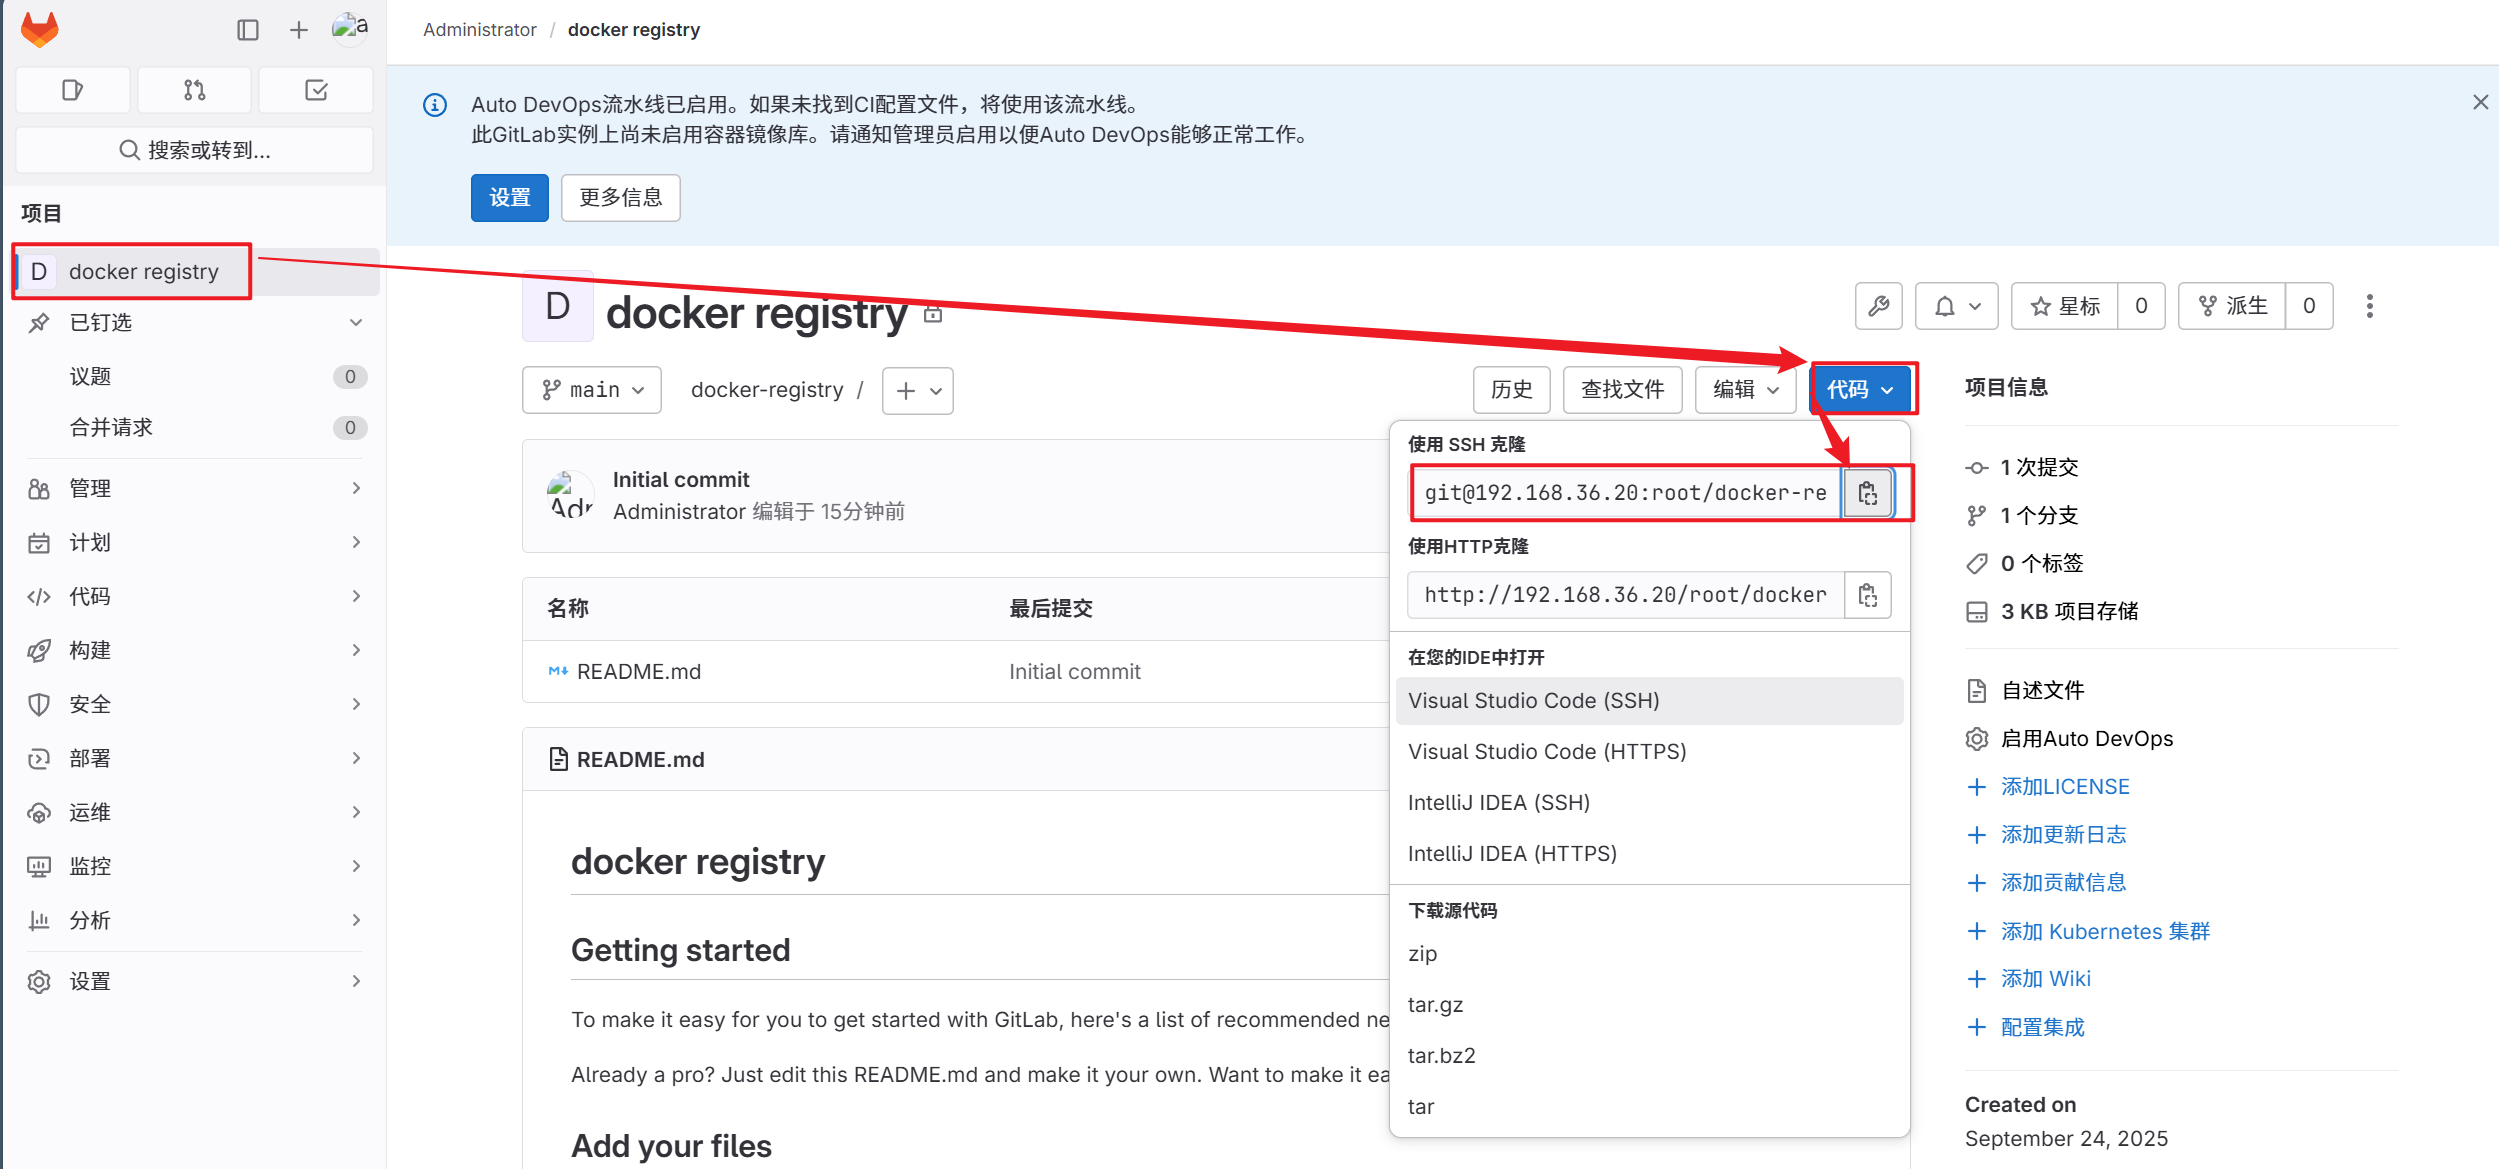
[root@dev ~]# git clone git@192.168.36.20:root/docker-registry.git
[root@dev docker-registry]# git config --global user.name "cg"
[root@dev docker-registry]# git config --global user.email "cg@163.com"
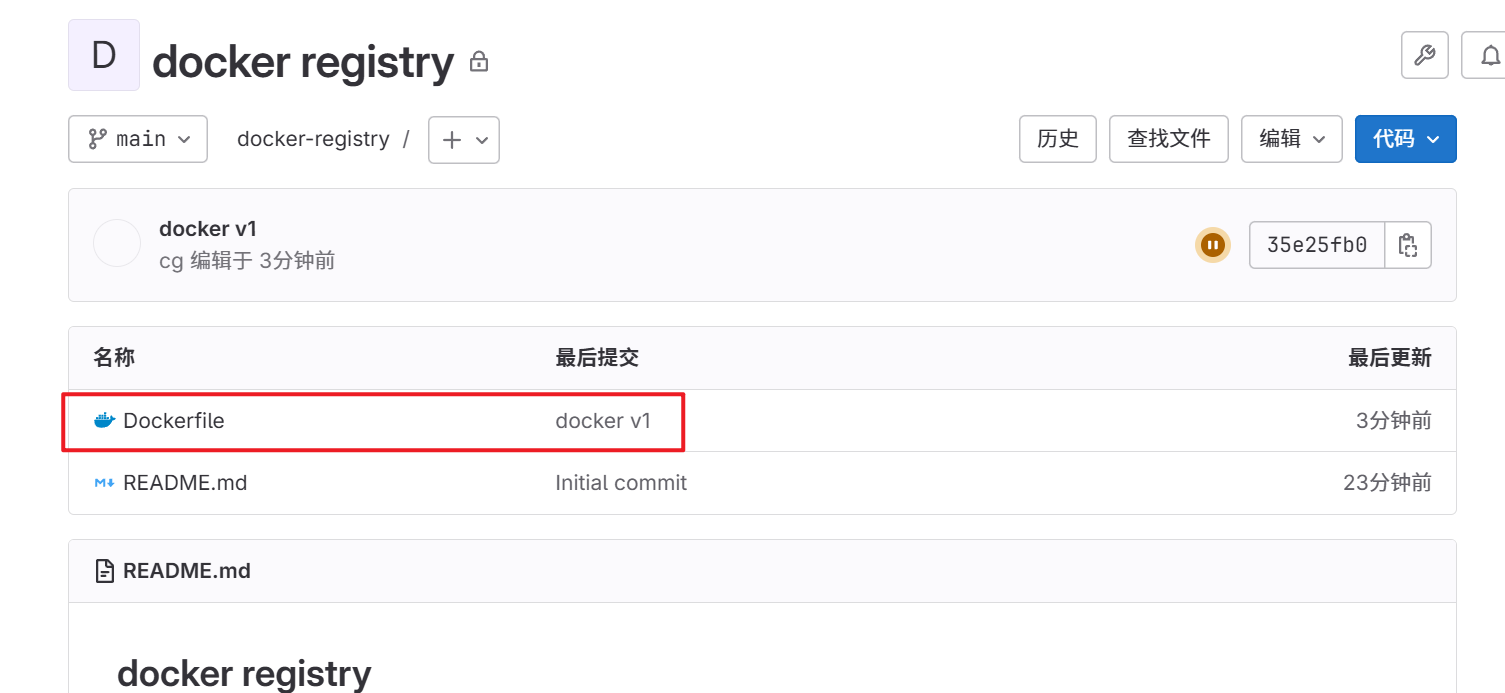
[root@dev docker-registry]# vim Dockerfile
[root@dev docker-registry]# git add Dockerfile
[root@dev docker-registry]# git commit -m "docker v1"
[root@dev docker-registry]# git push -u origin main
5.验证项目是否上传成功
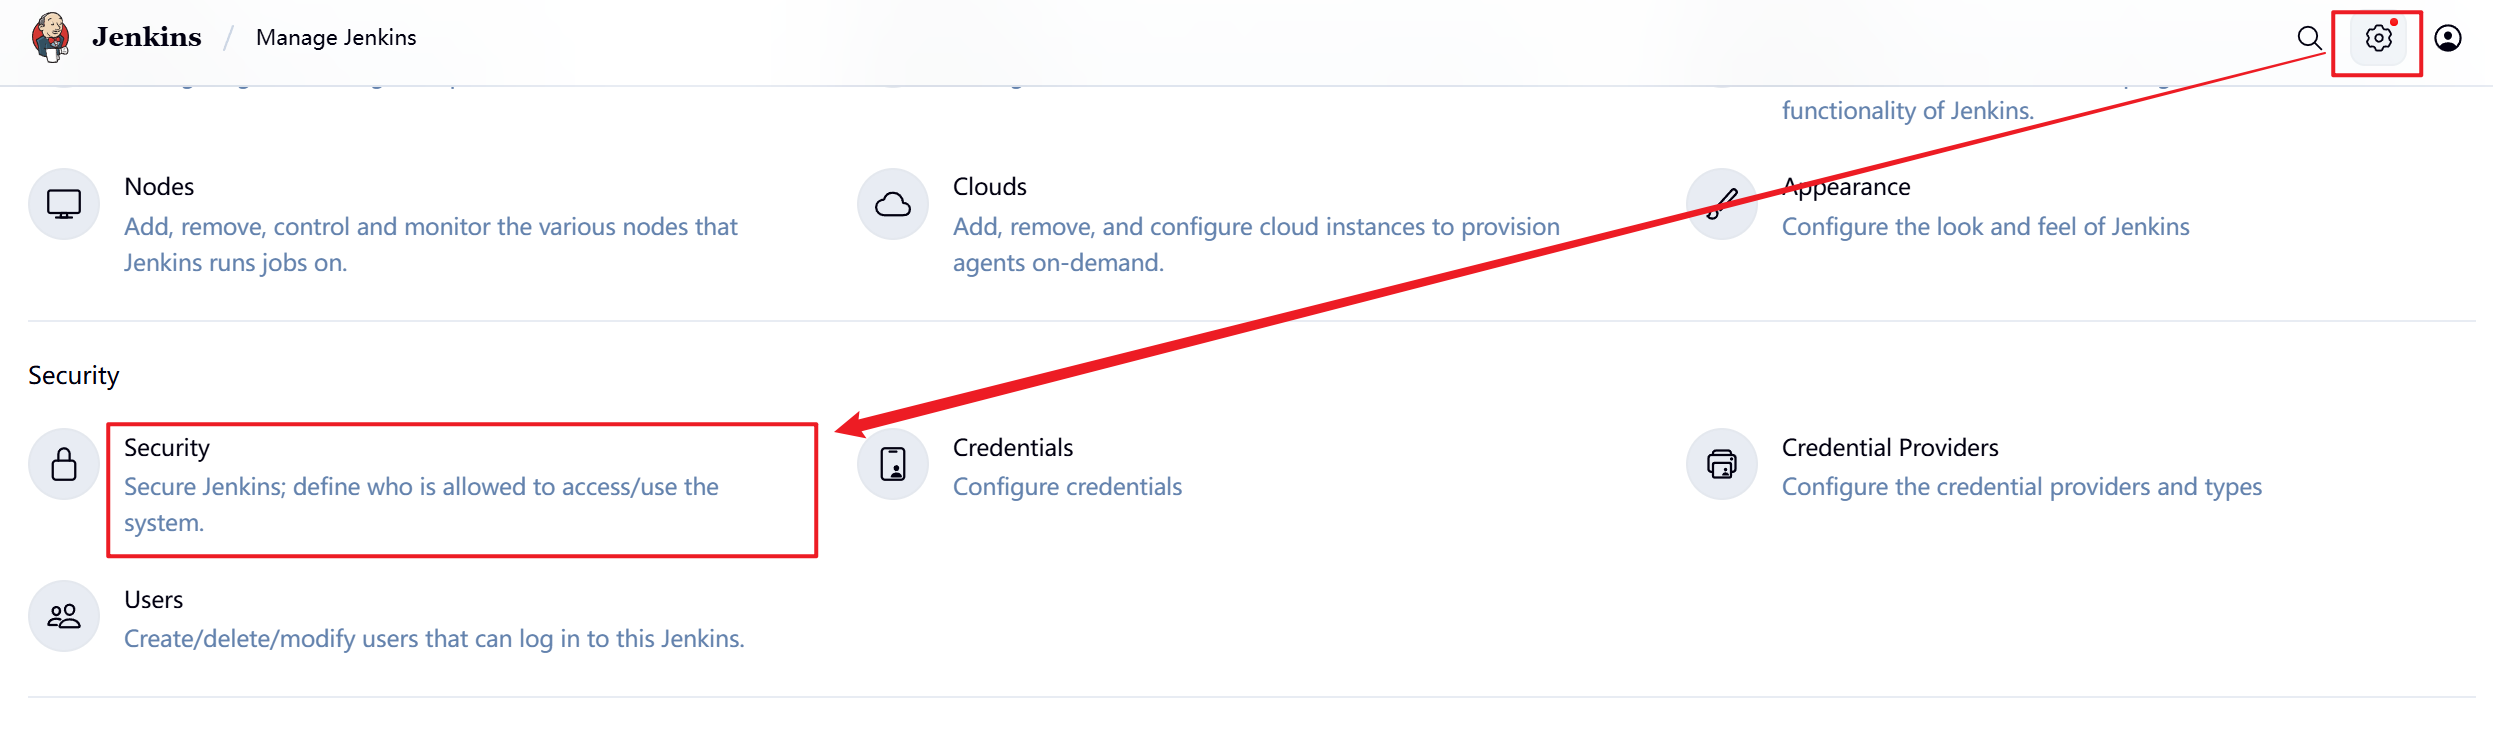
5.2 配置****jenkins
5.2.1 jenkins初始化
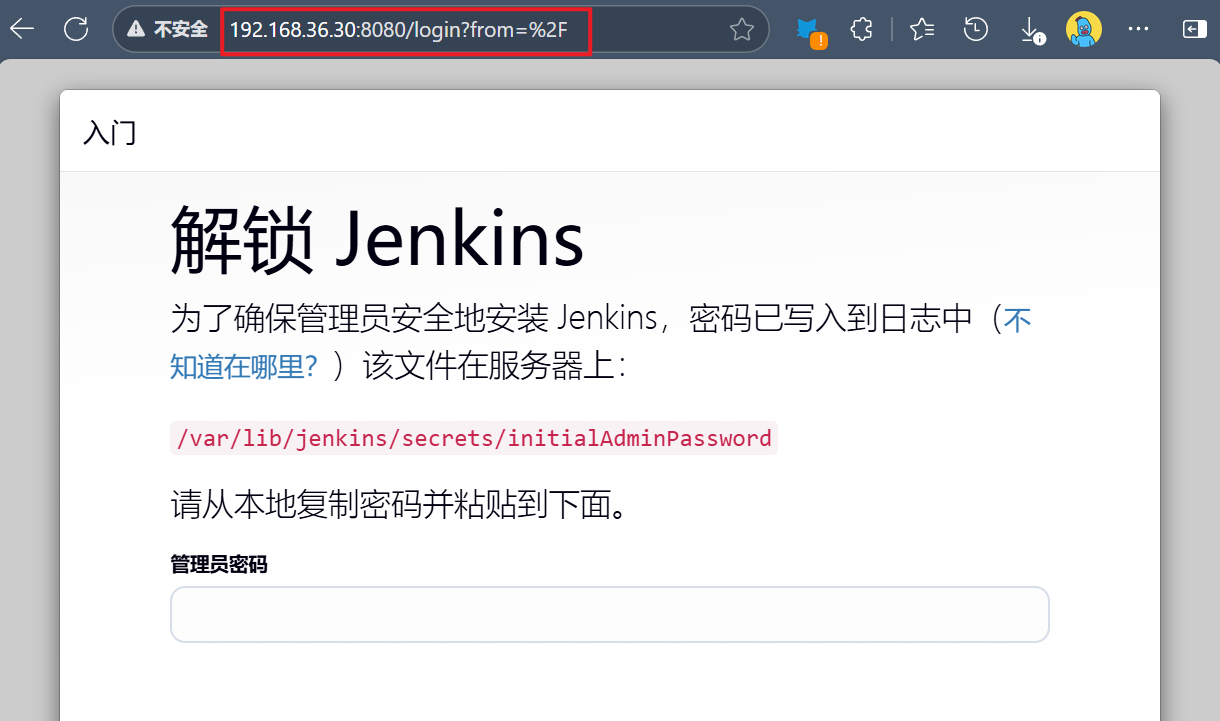
1.查看初始密码并登录Jenkins
[root@jenkins ~]# cat /var/lib/jenkins/secrets/initialAdminPassword
240d8b53af904df99c3538cf4a26b763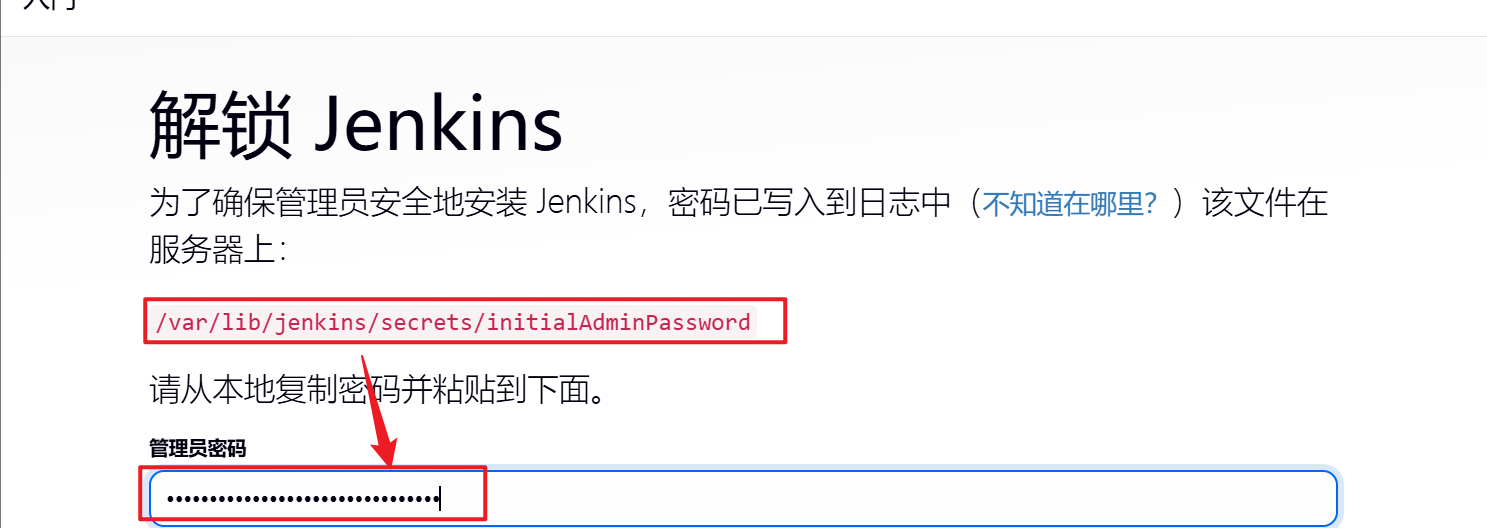
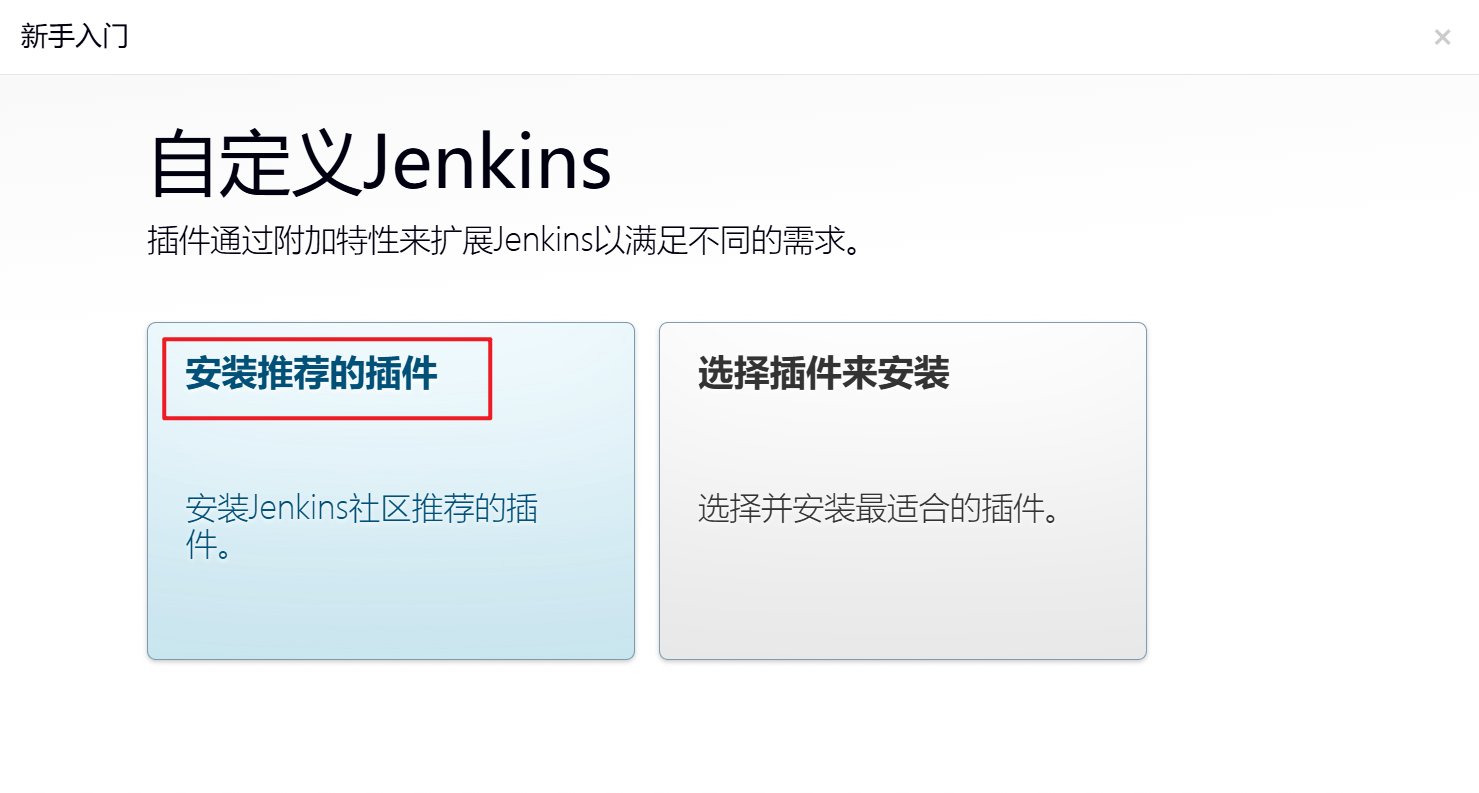
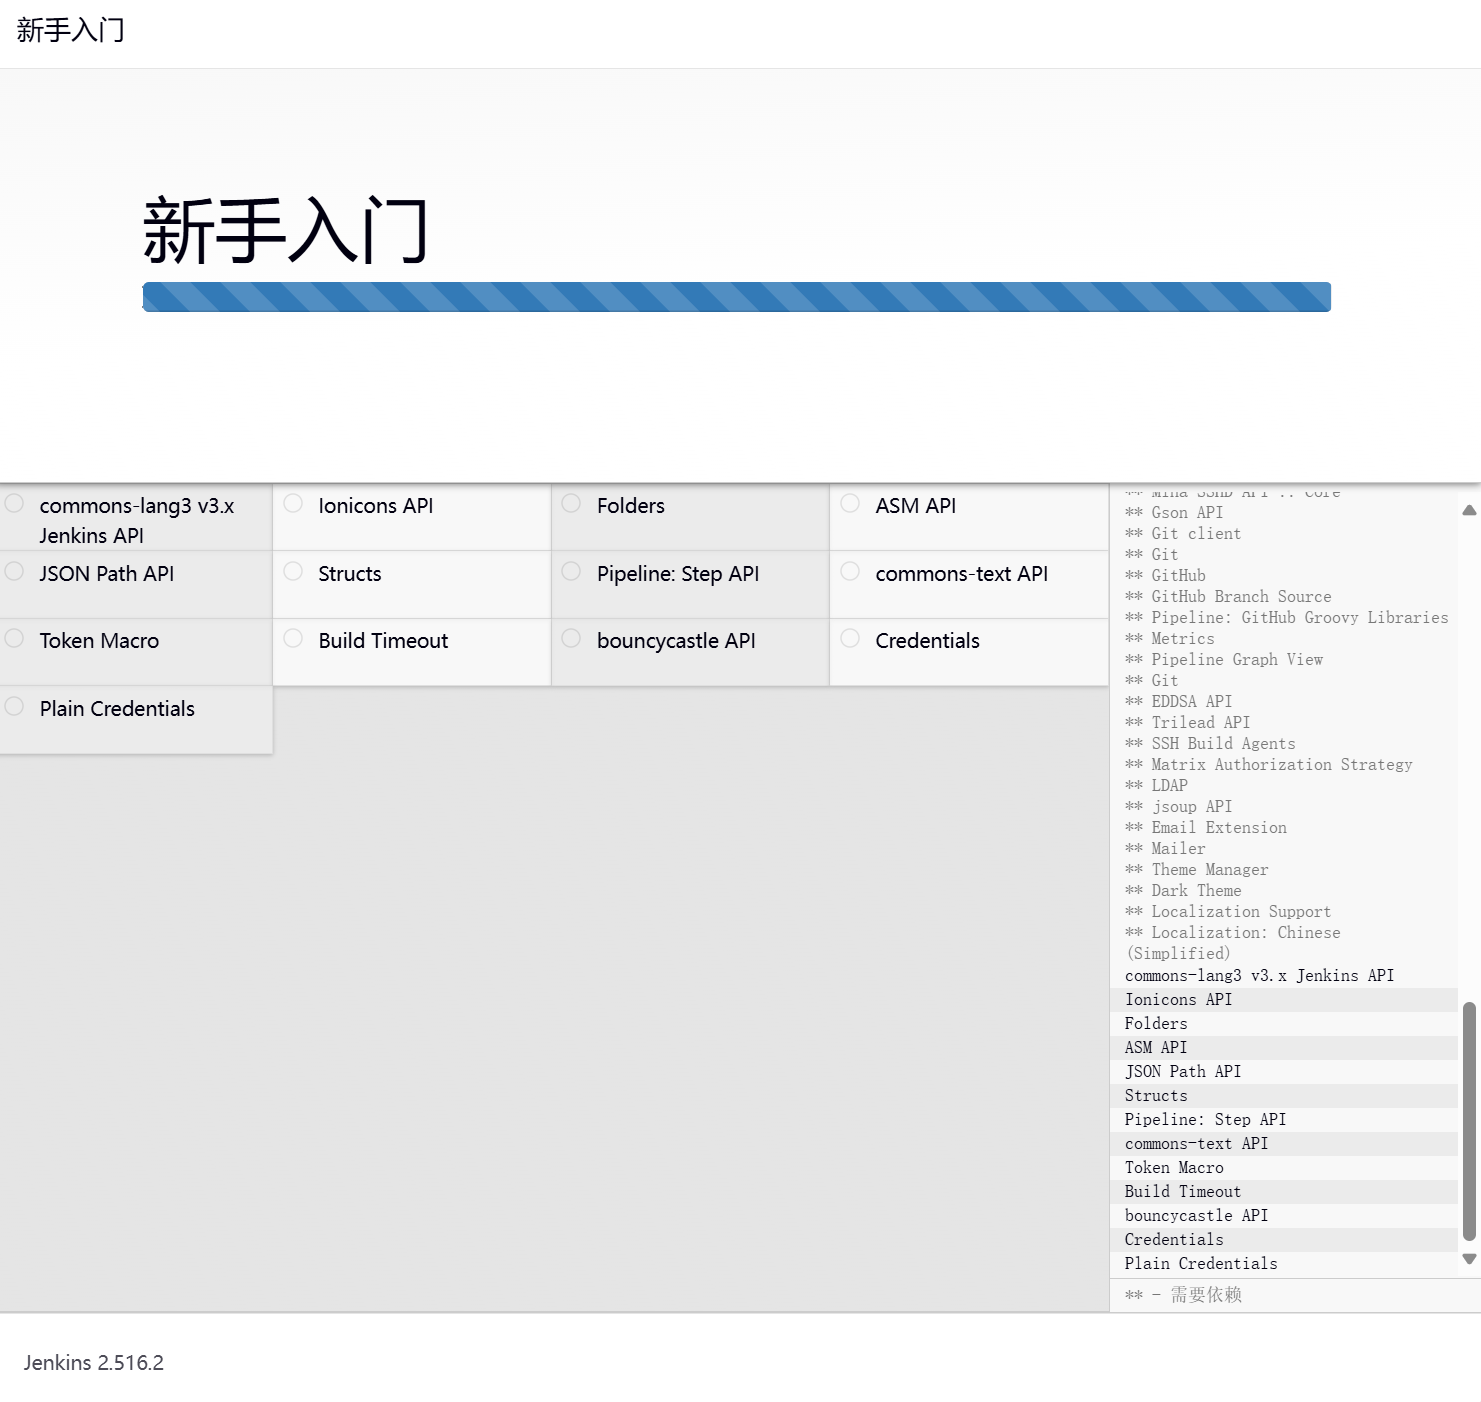
2.安装推荐的插件(建议开启科学上网)
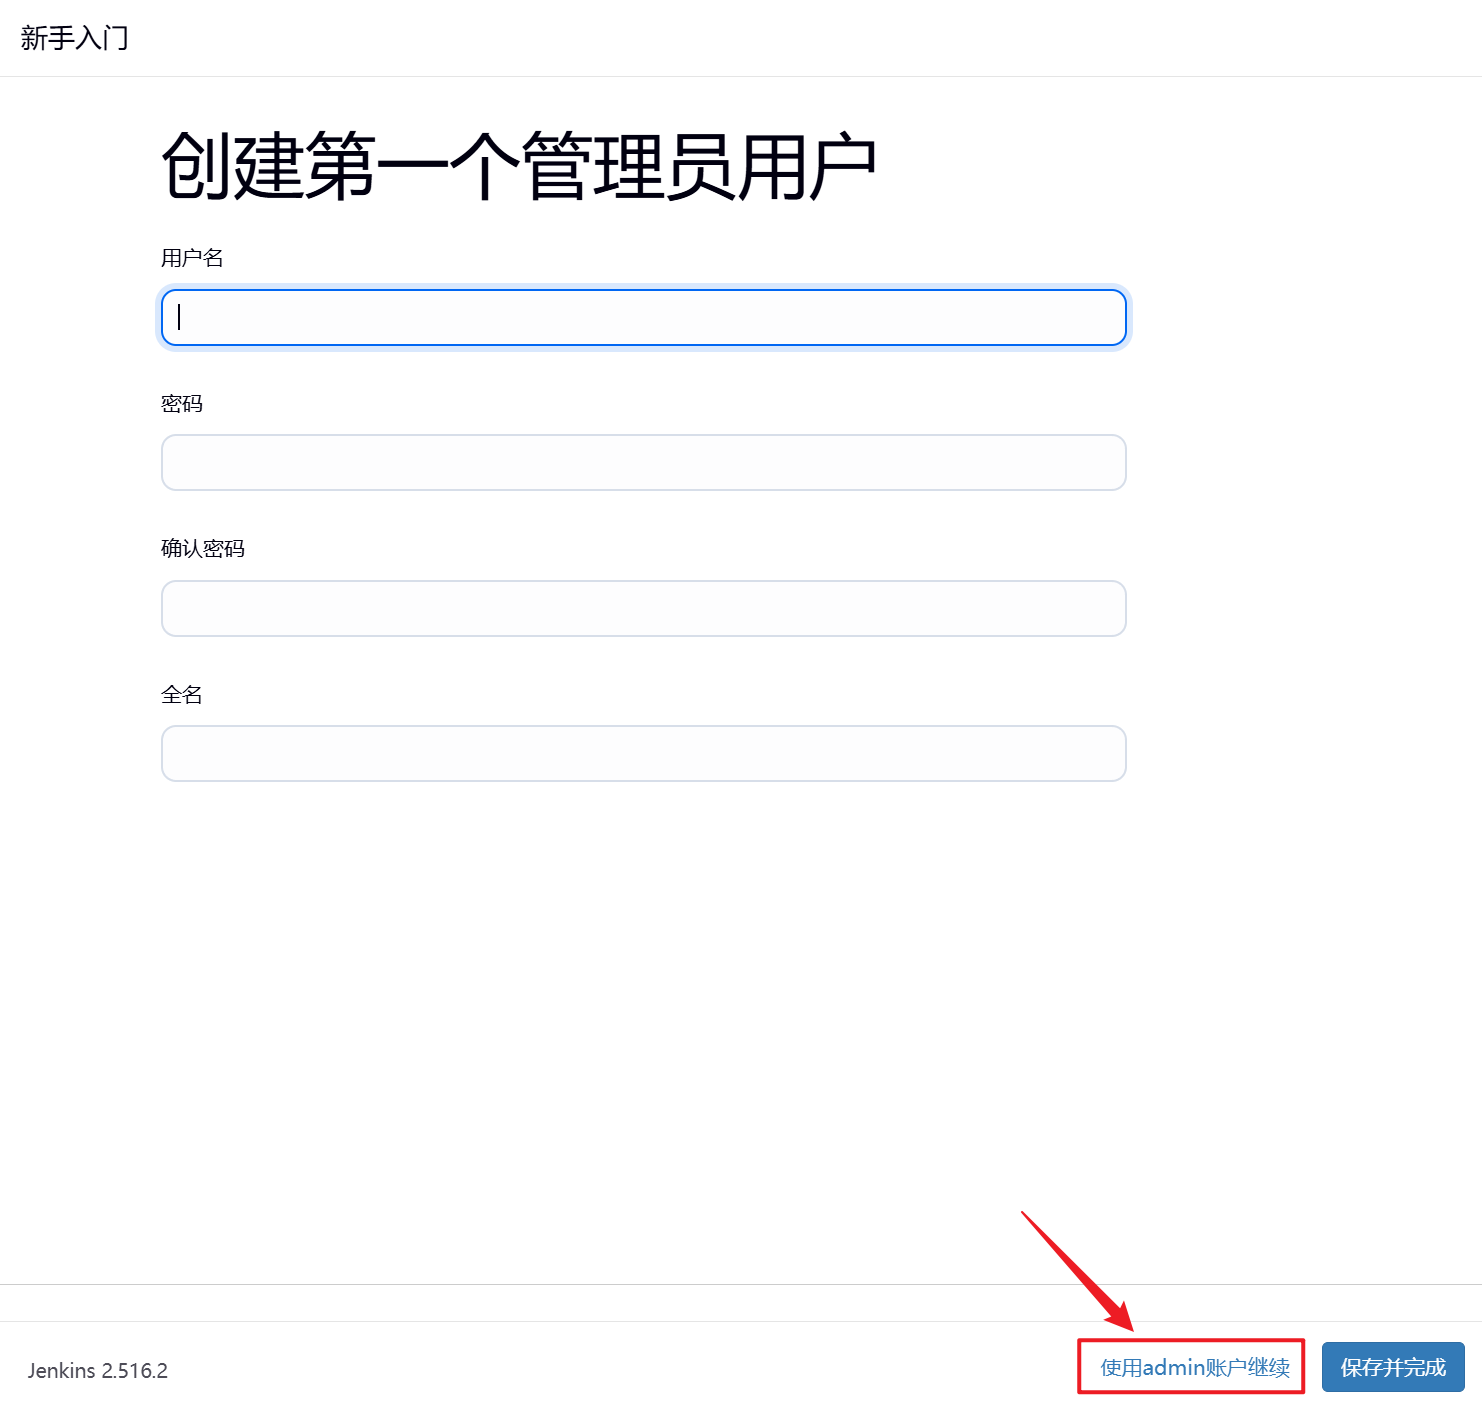
3.使用admin账户
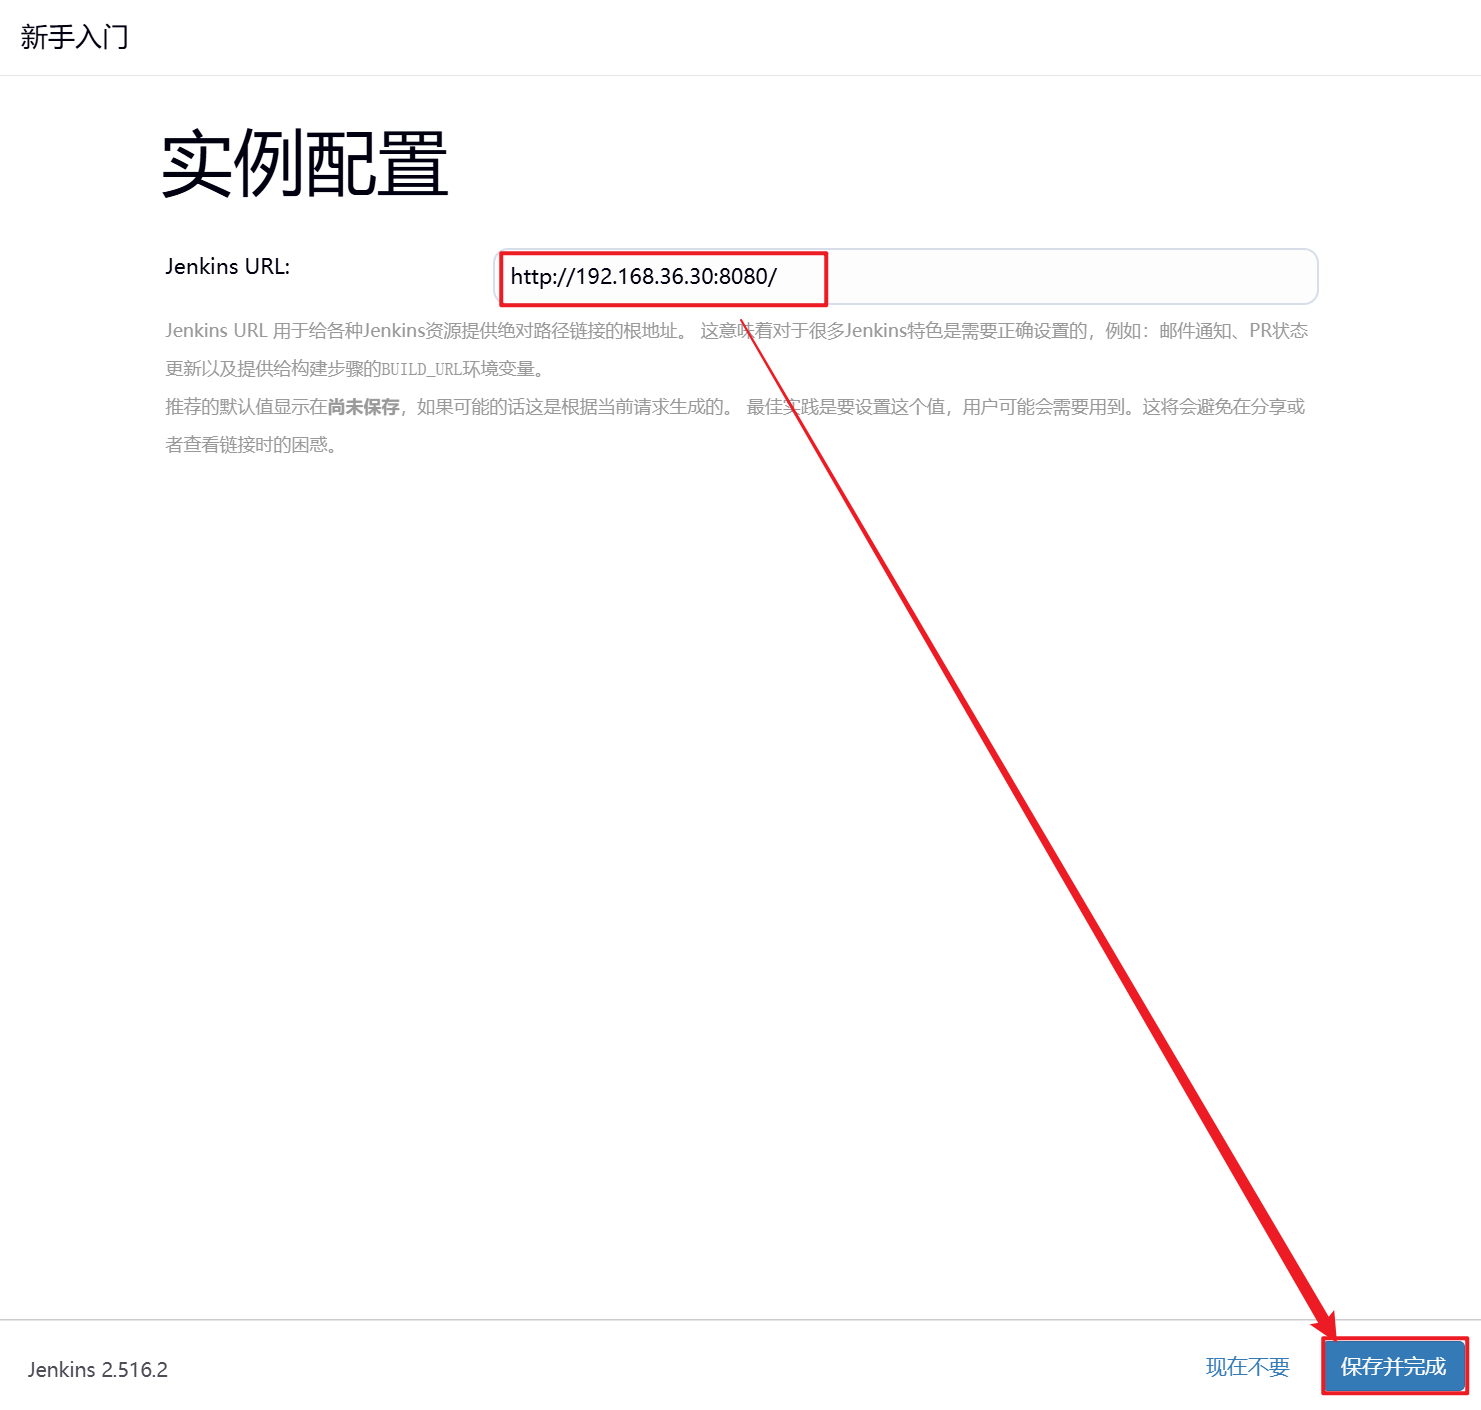
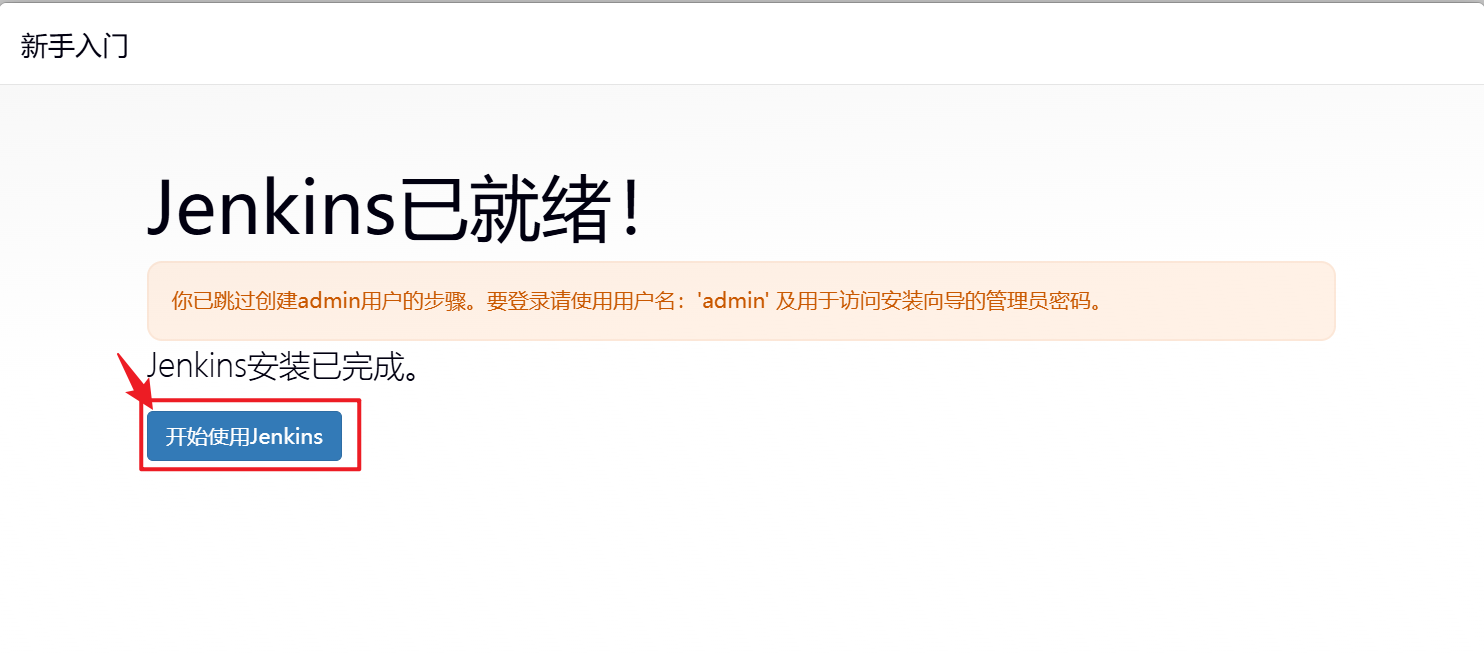
4.重启Jenkins
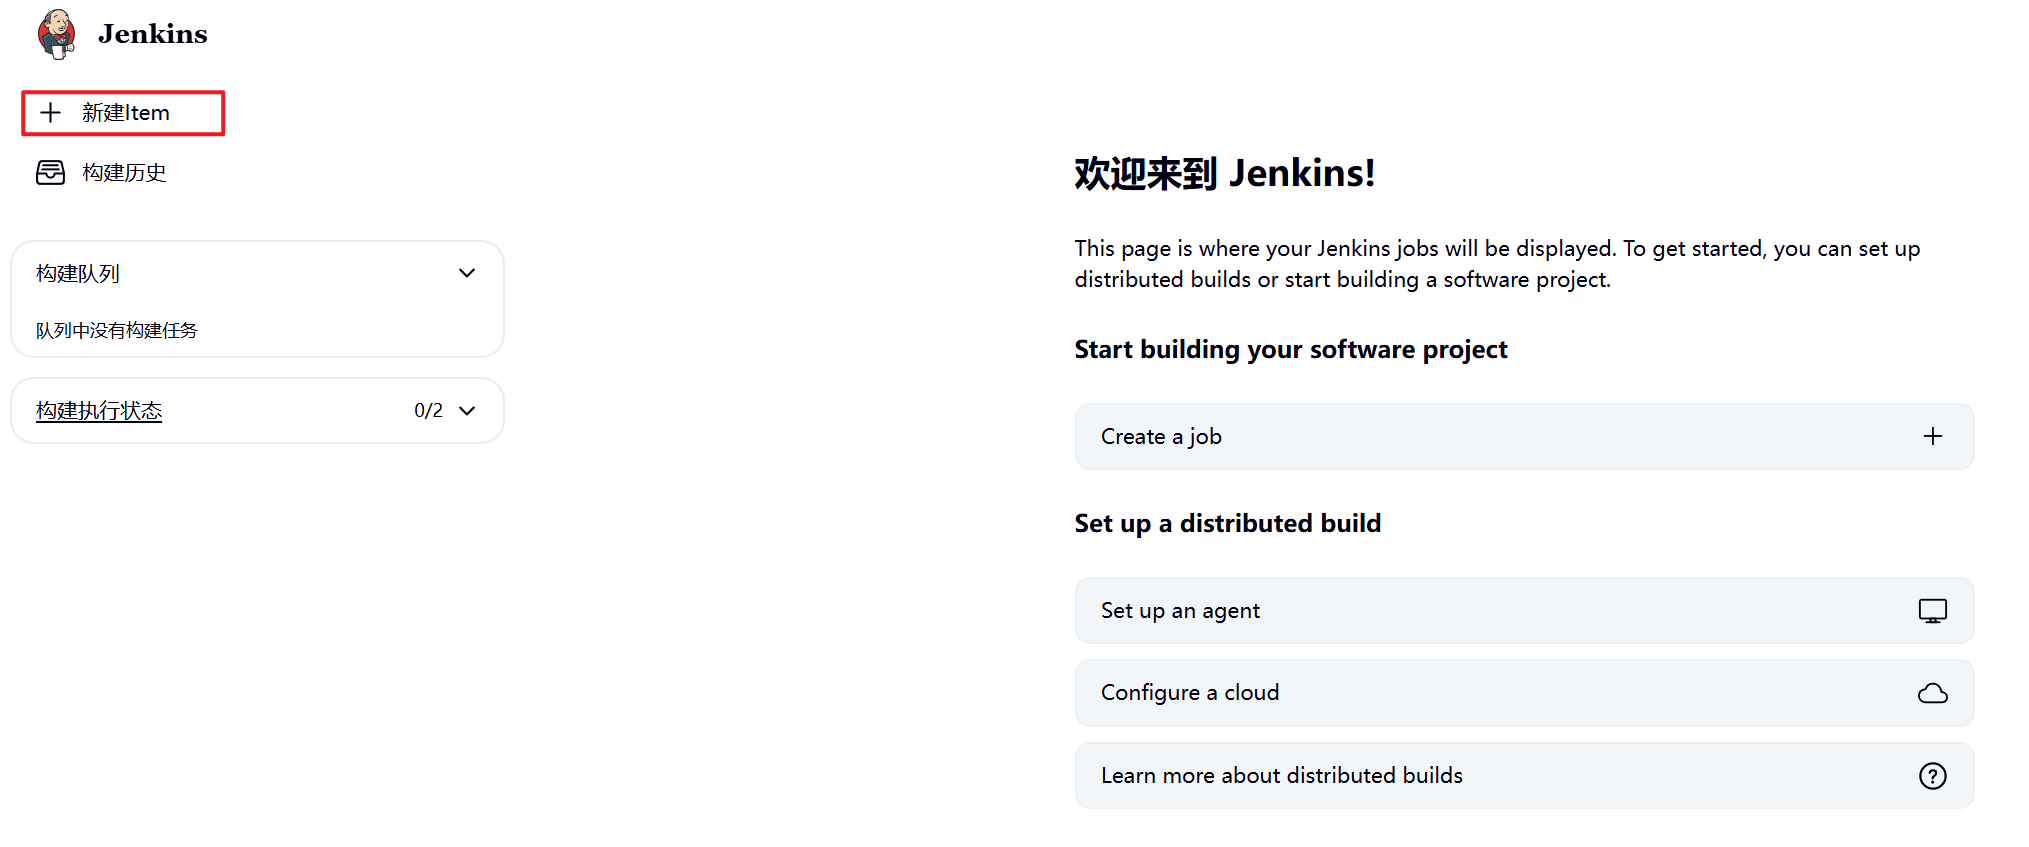
[root@jenkins ~]# systemctl restart jenkins.service5.2.2 新建项目
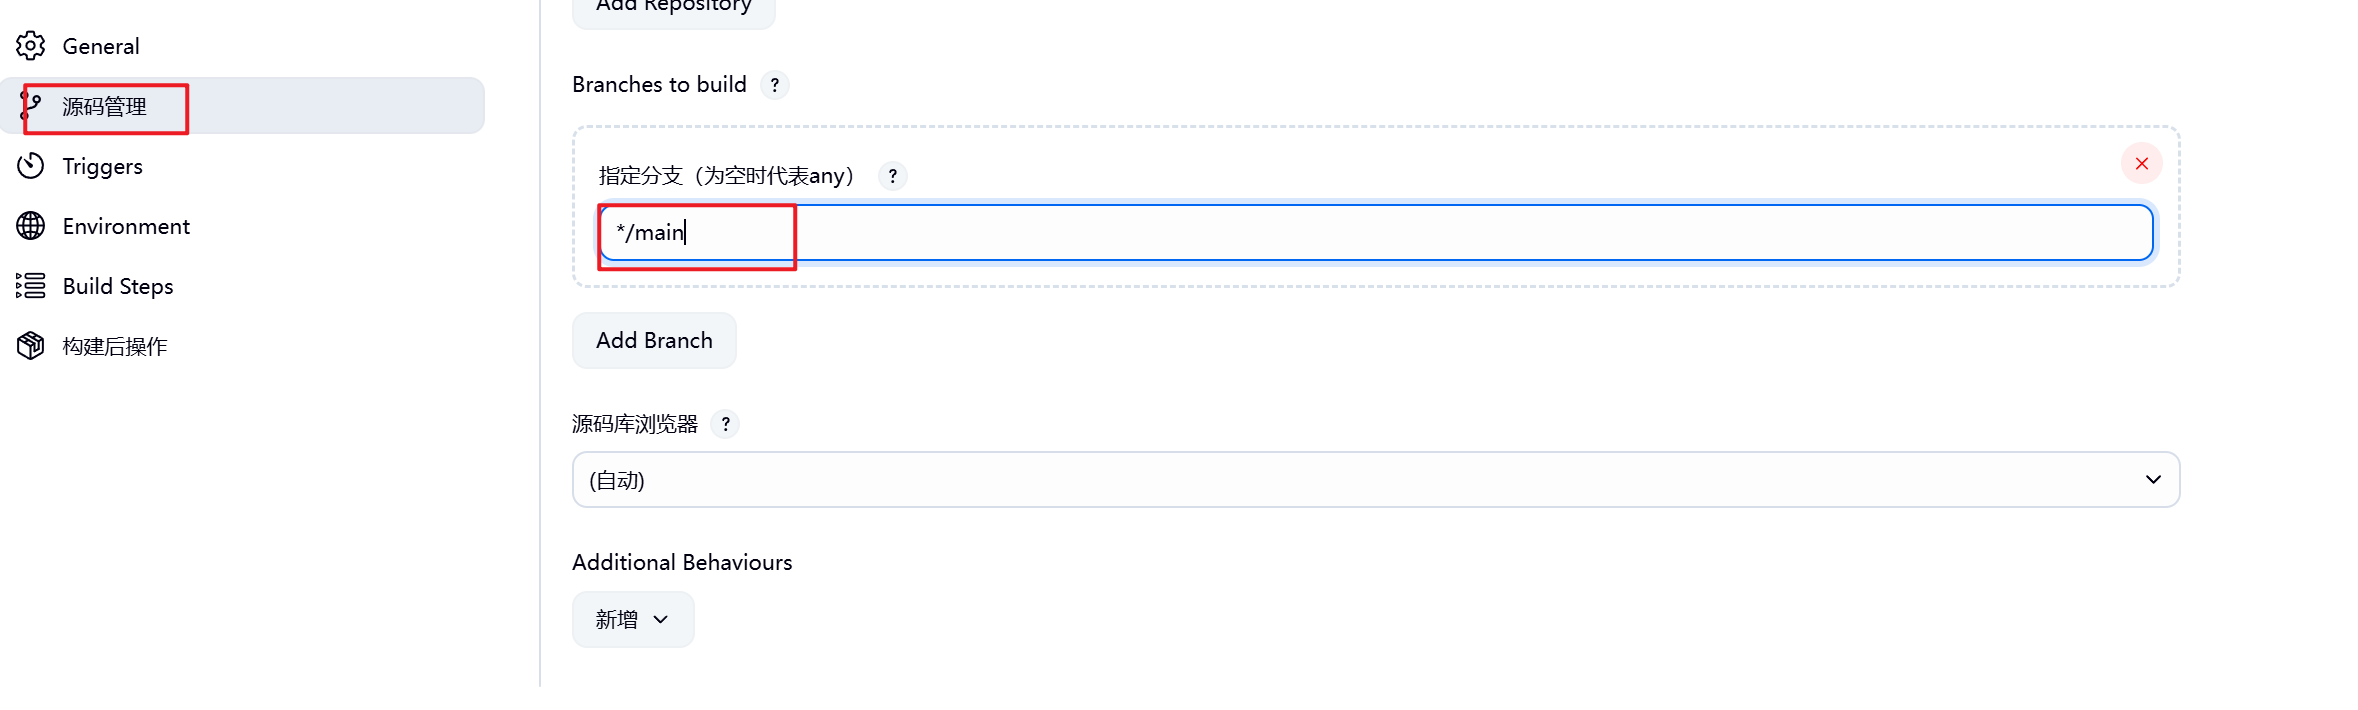
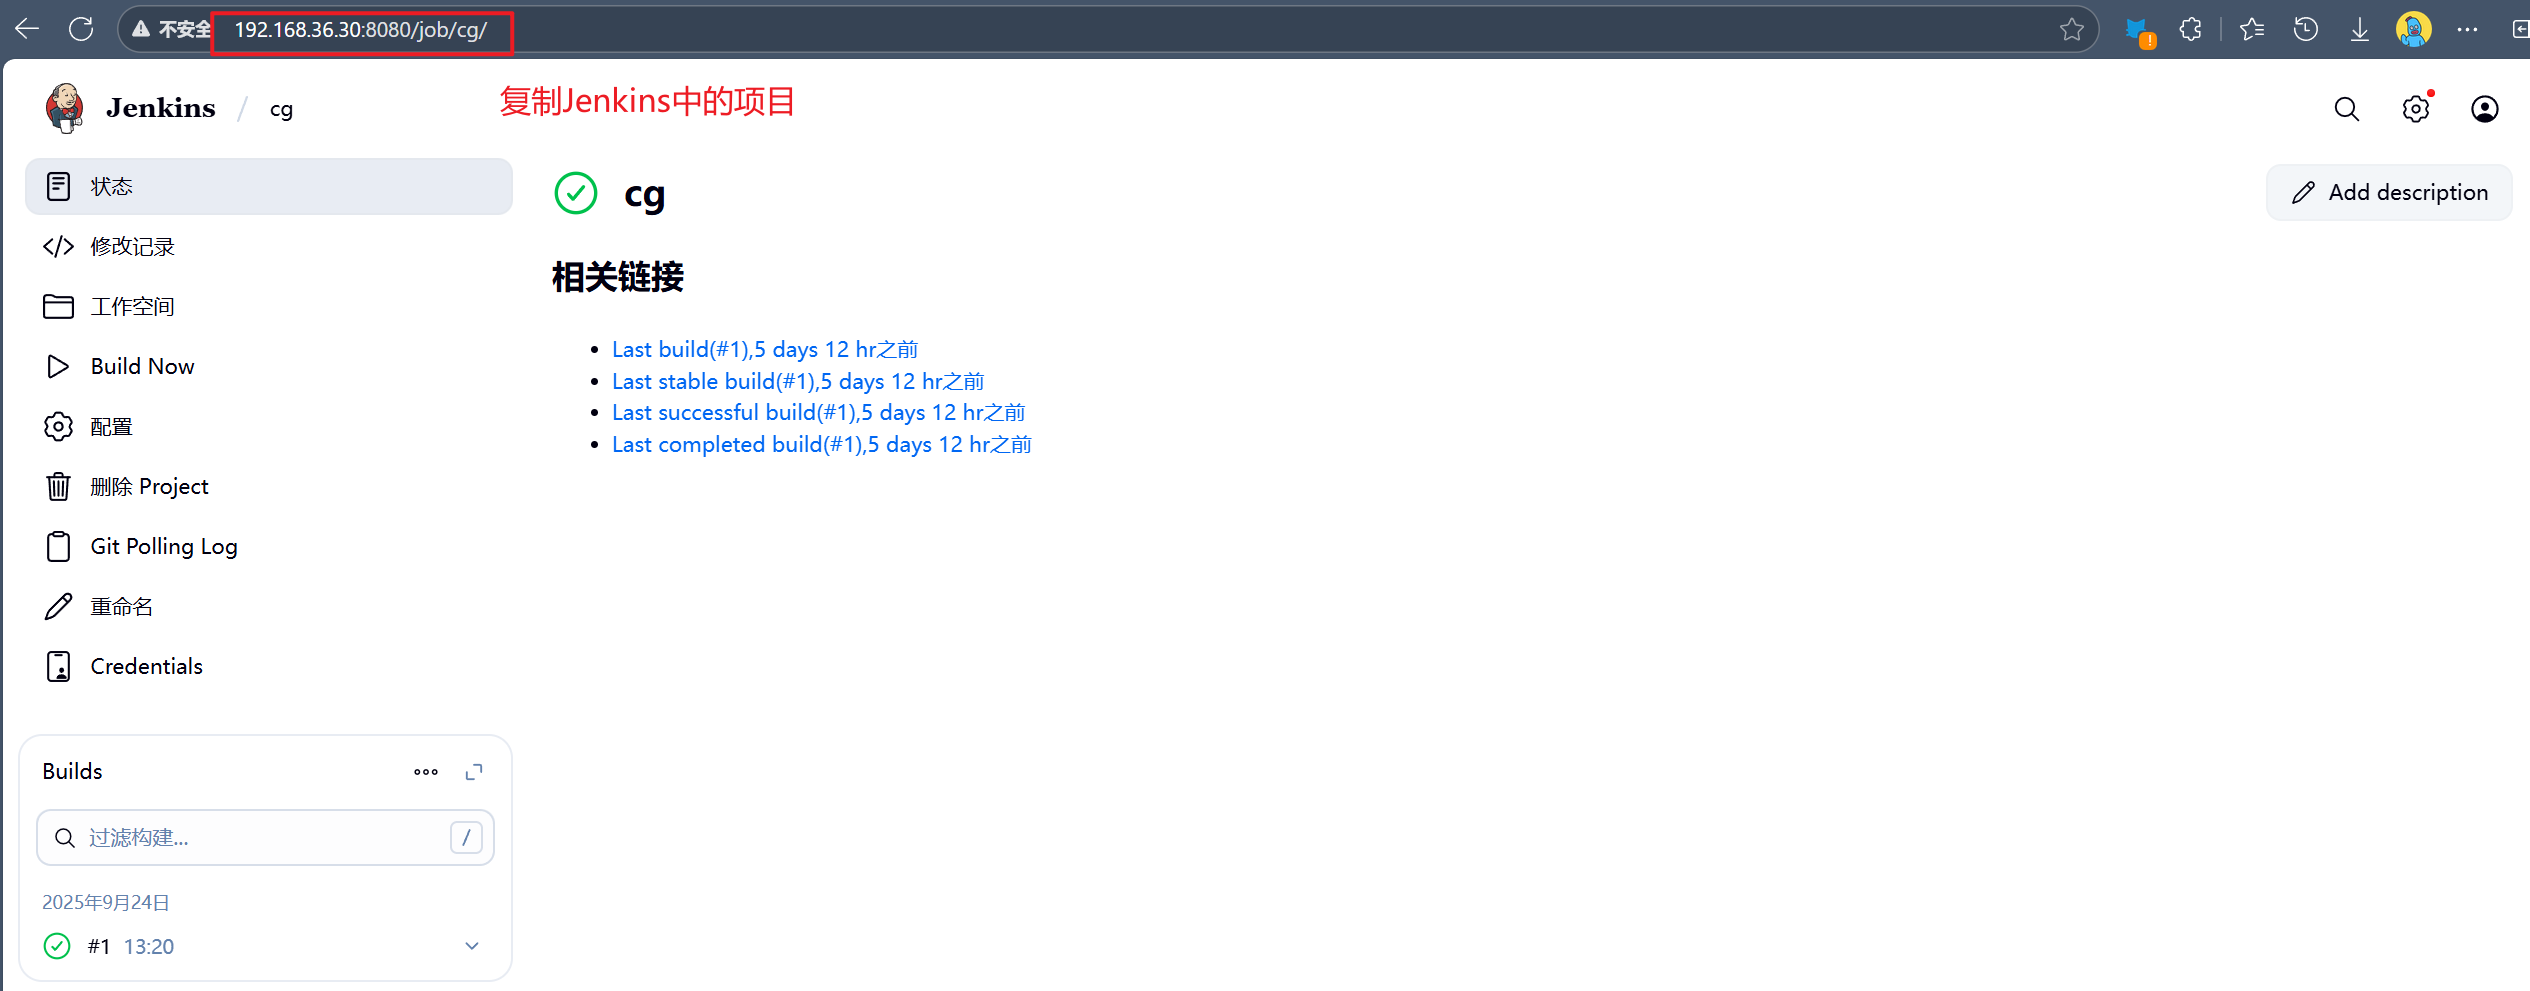
1.新建Item
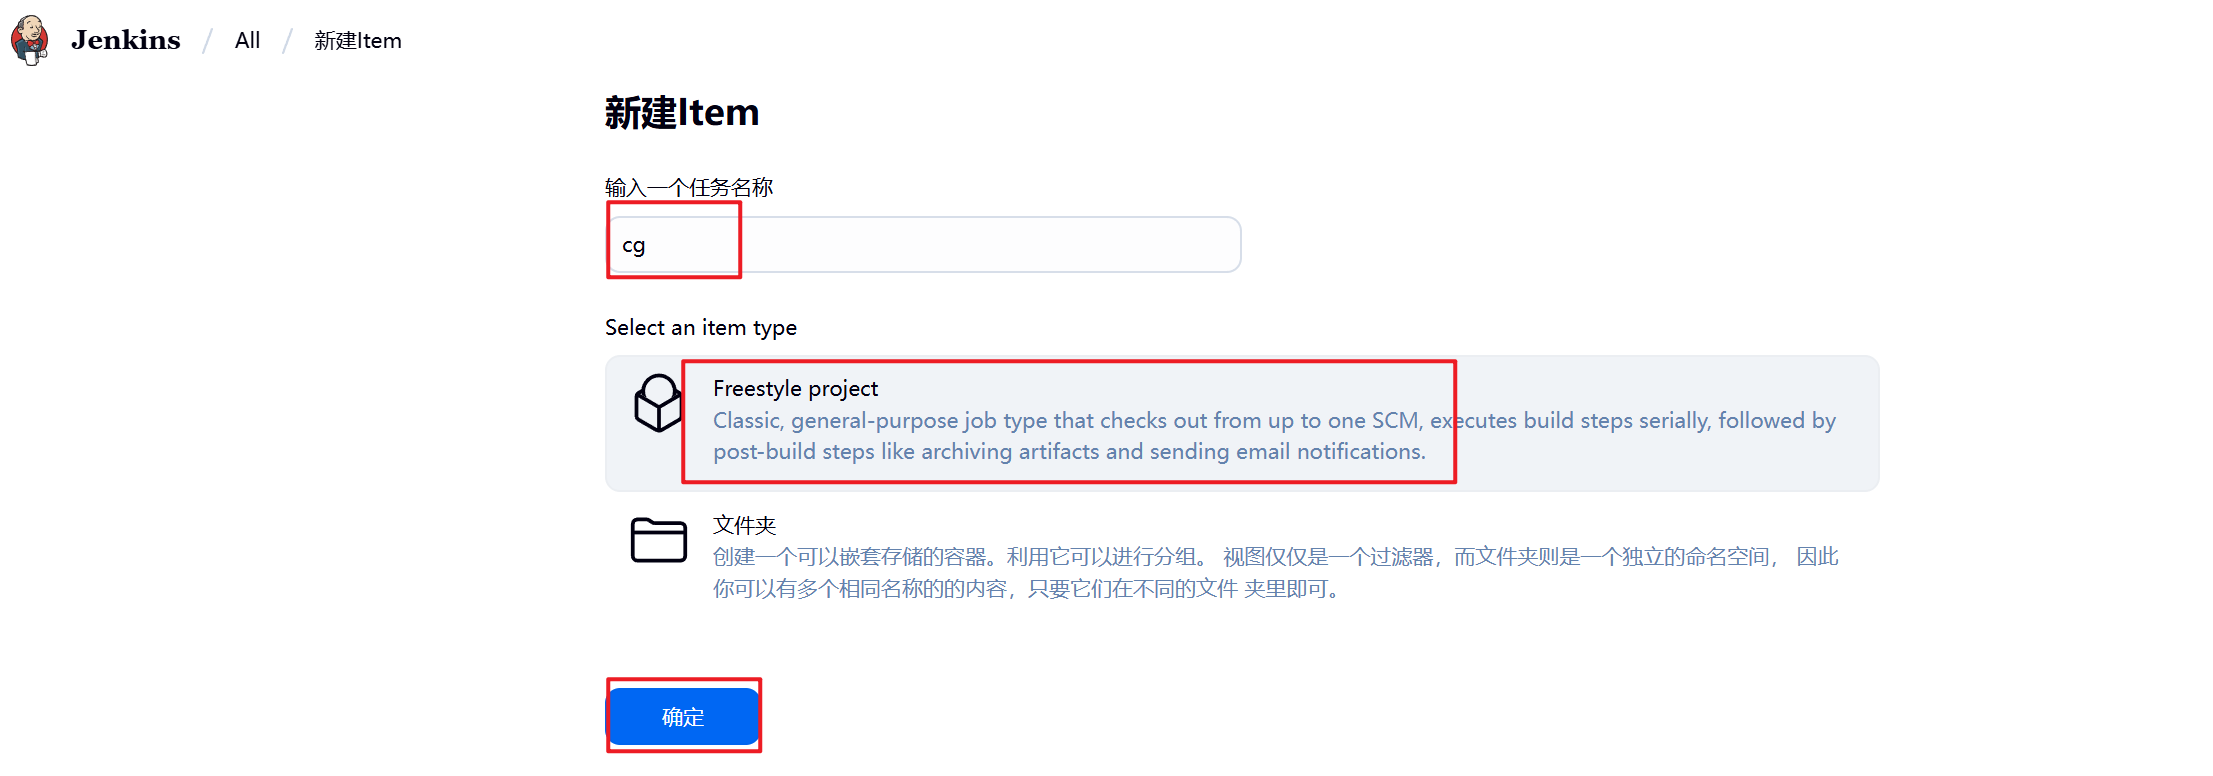
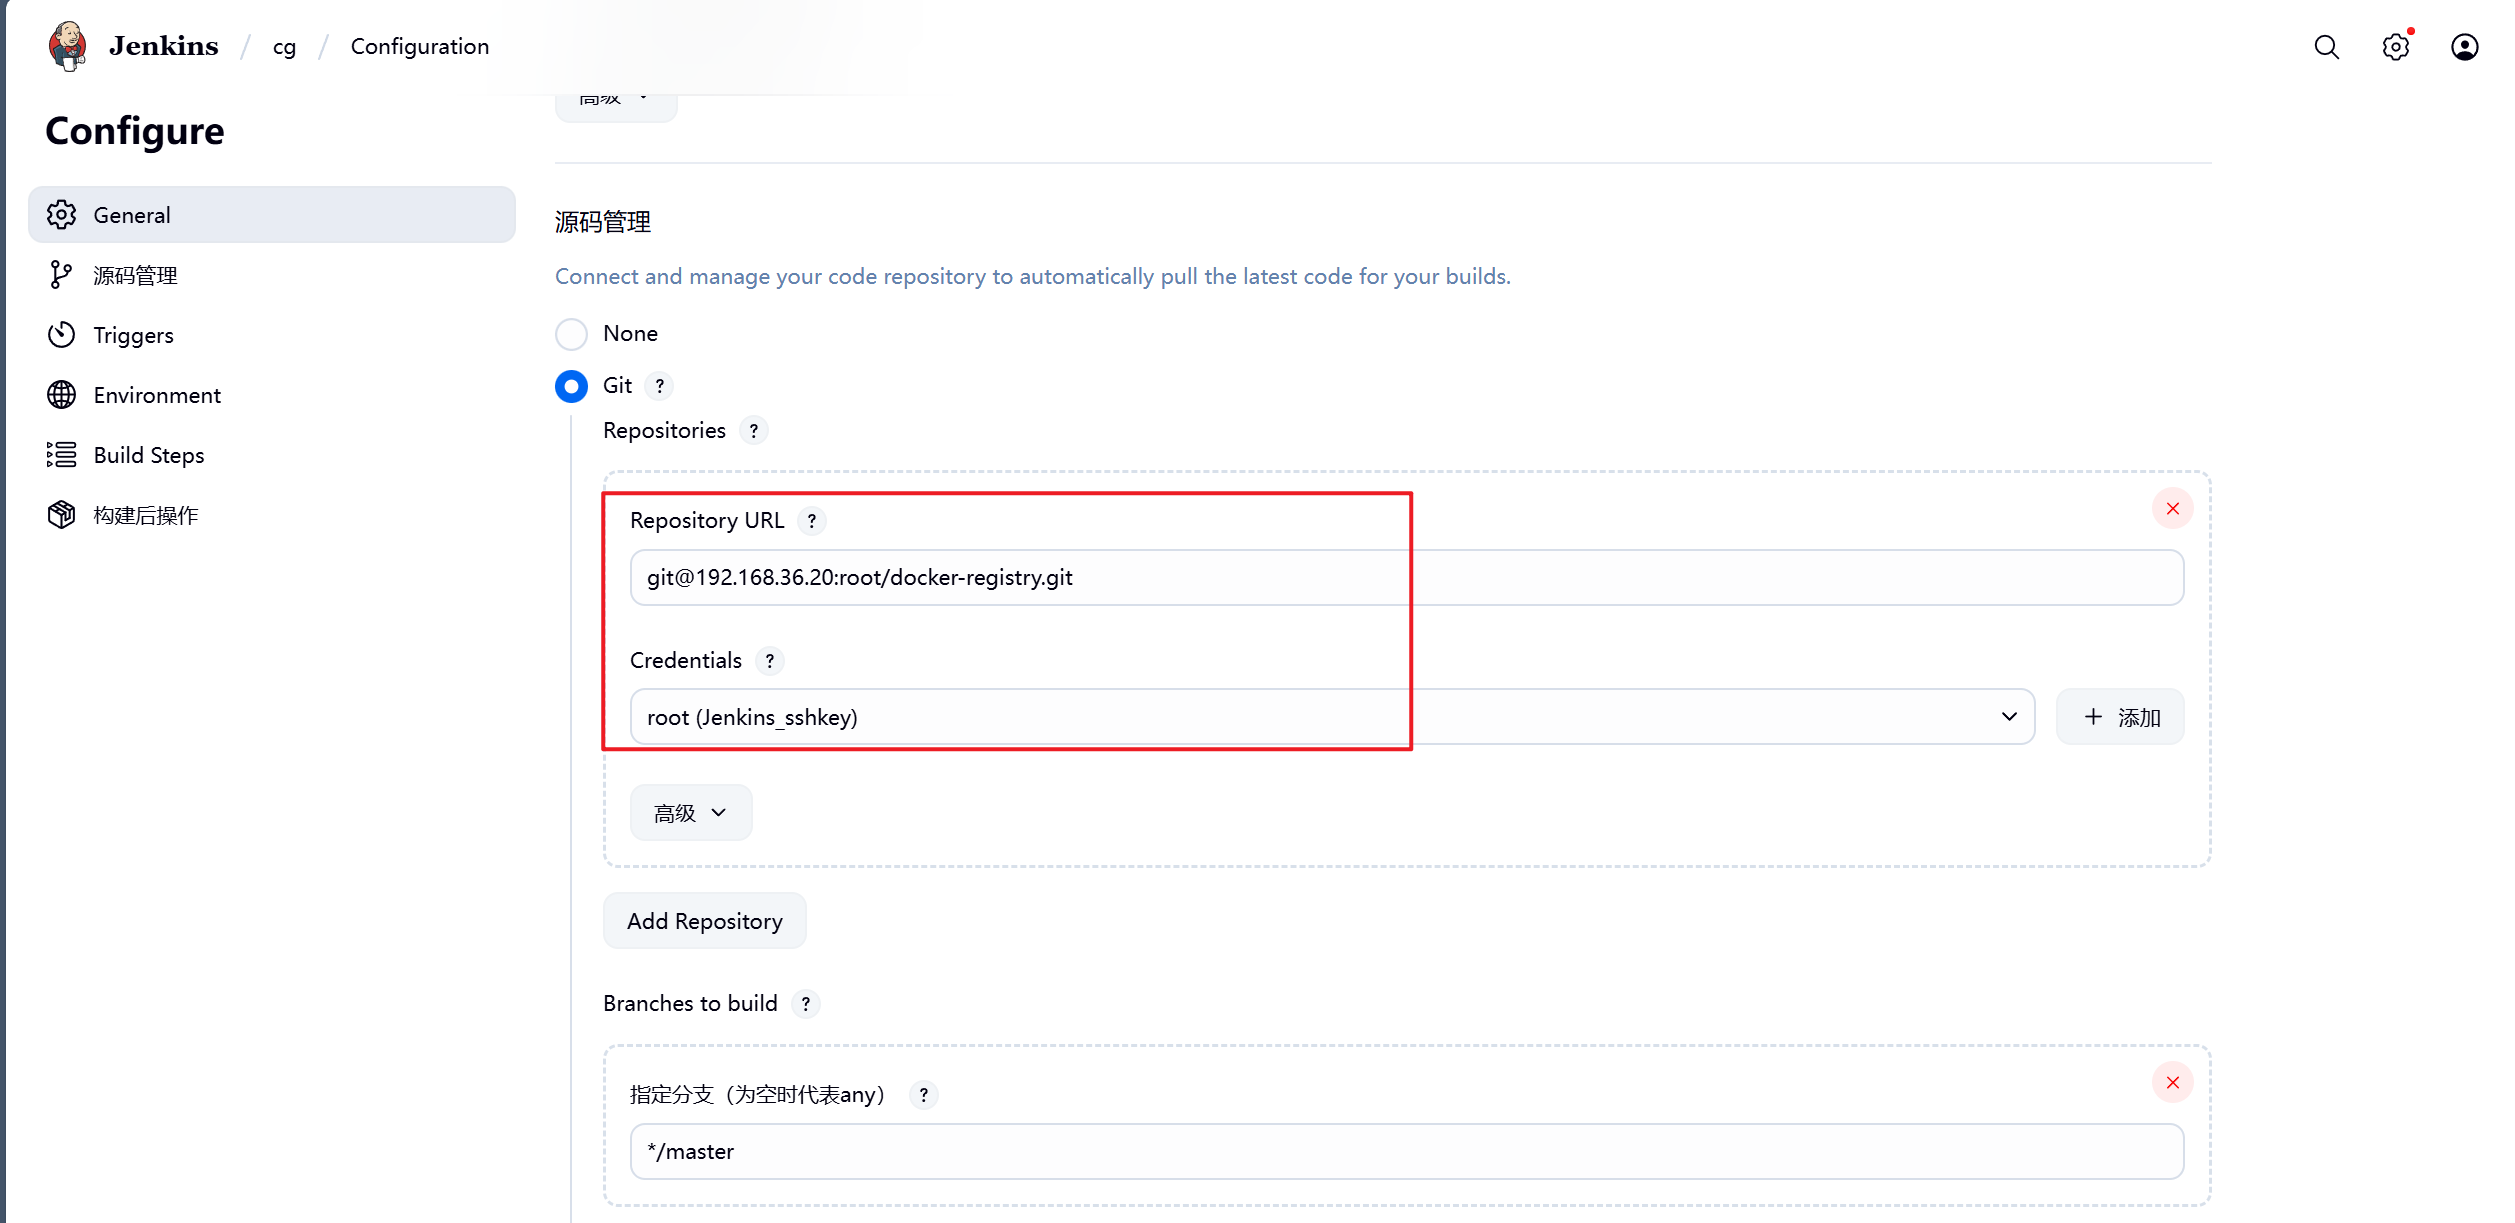
2.复制gitlab项目链接到Jenkins
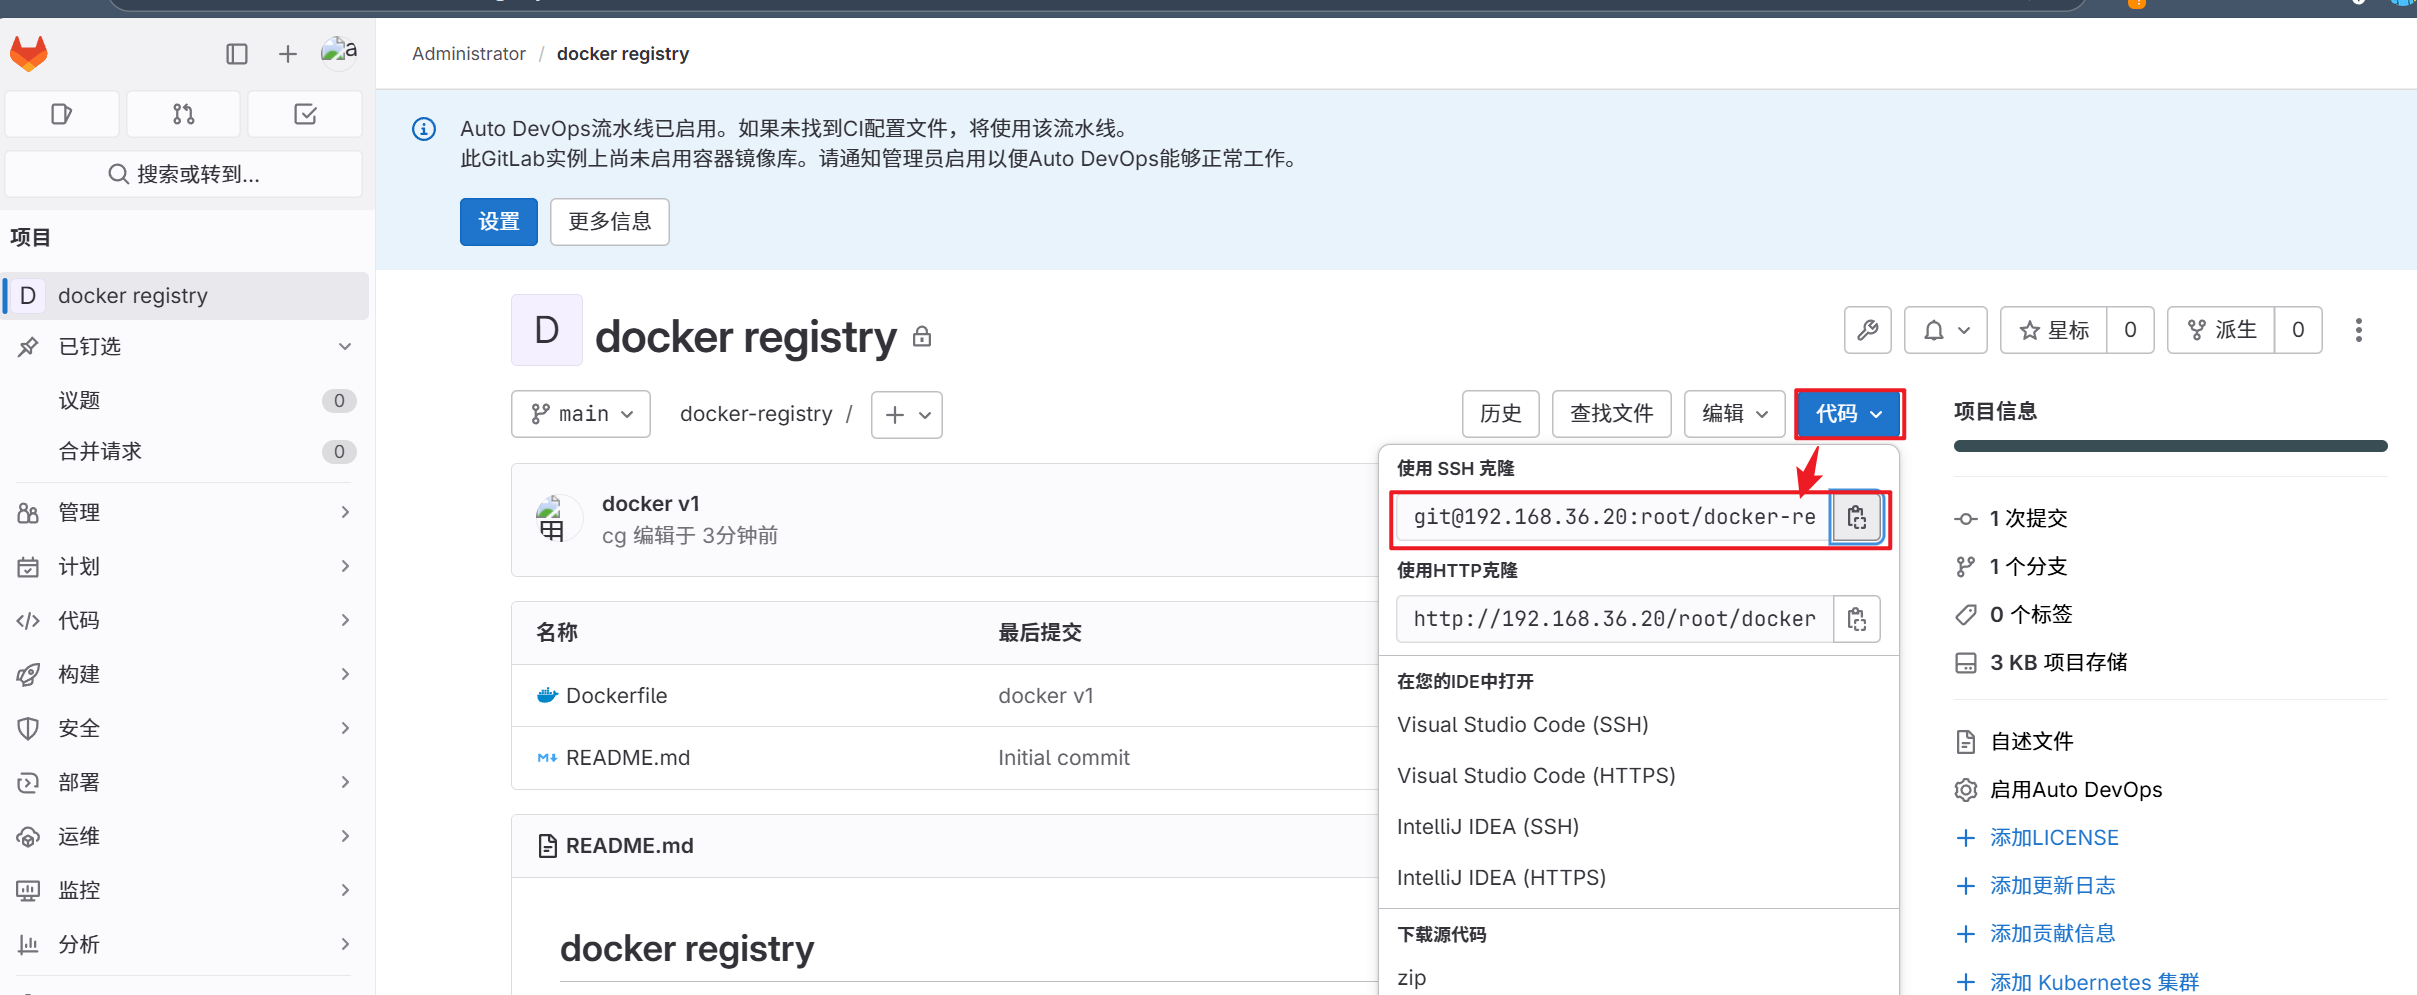
3.将gitlab项目粘贴至Jenkins(报错是因为gitlab中没有Jenkins的密钥)
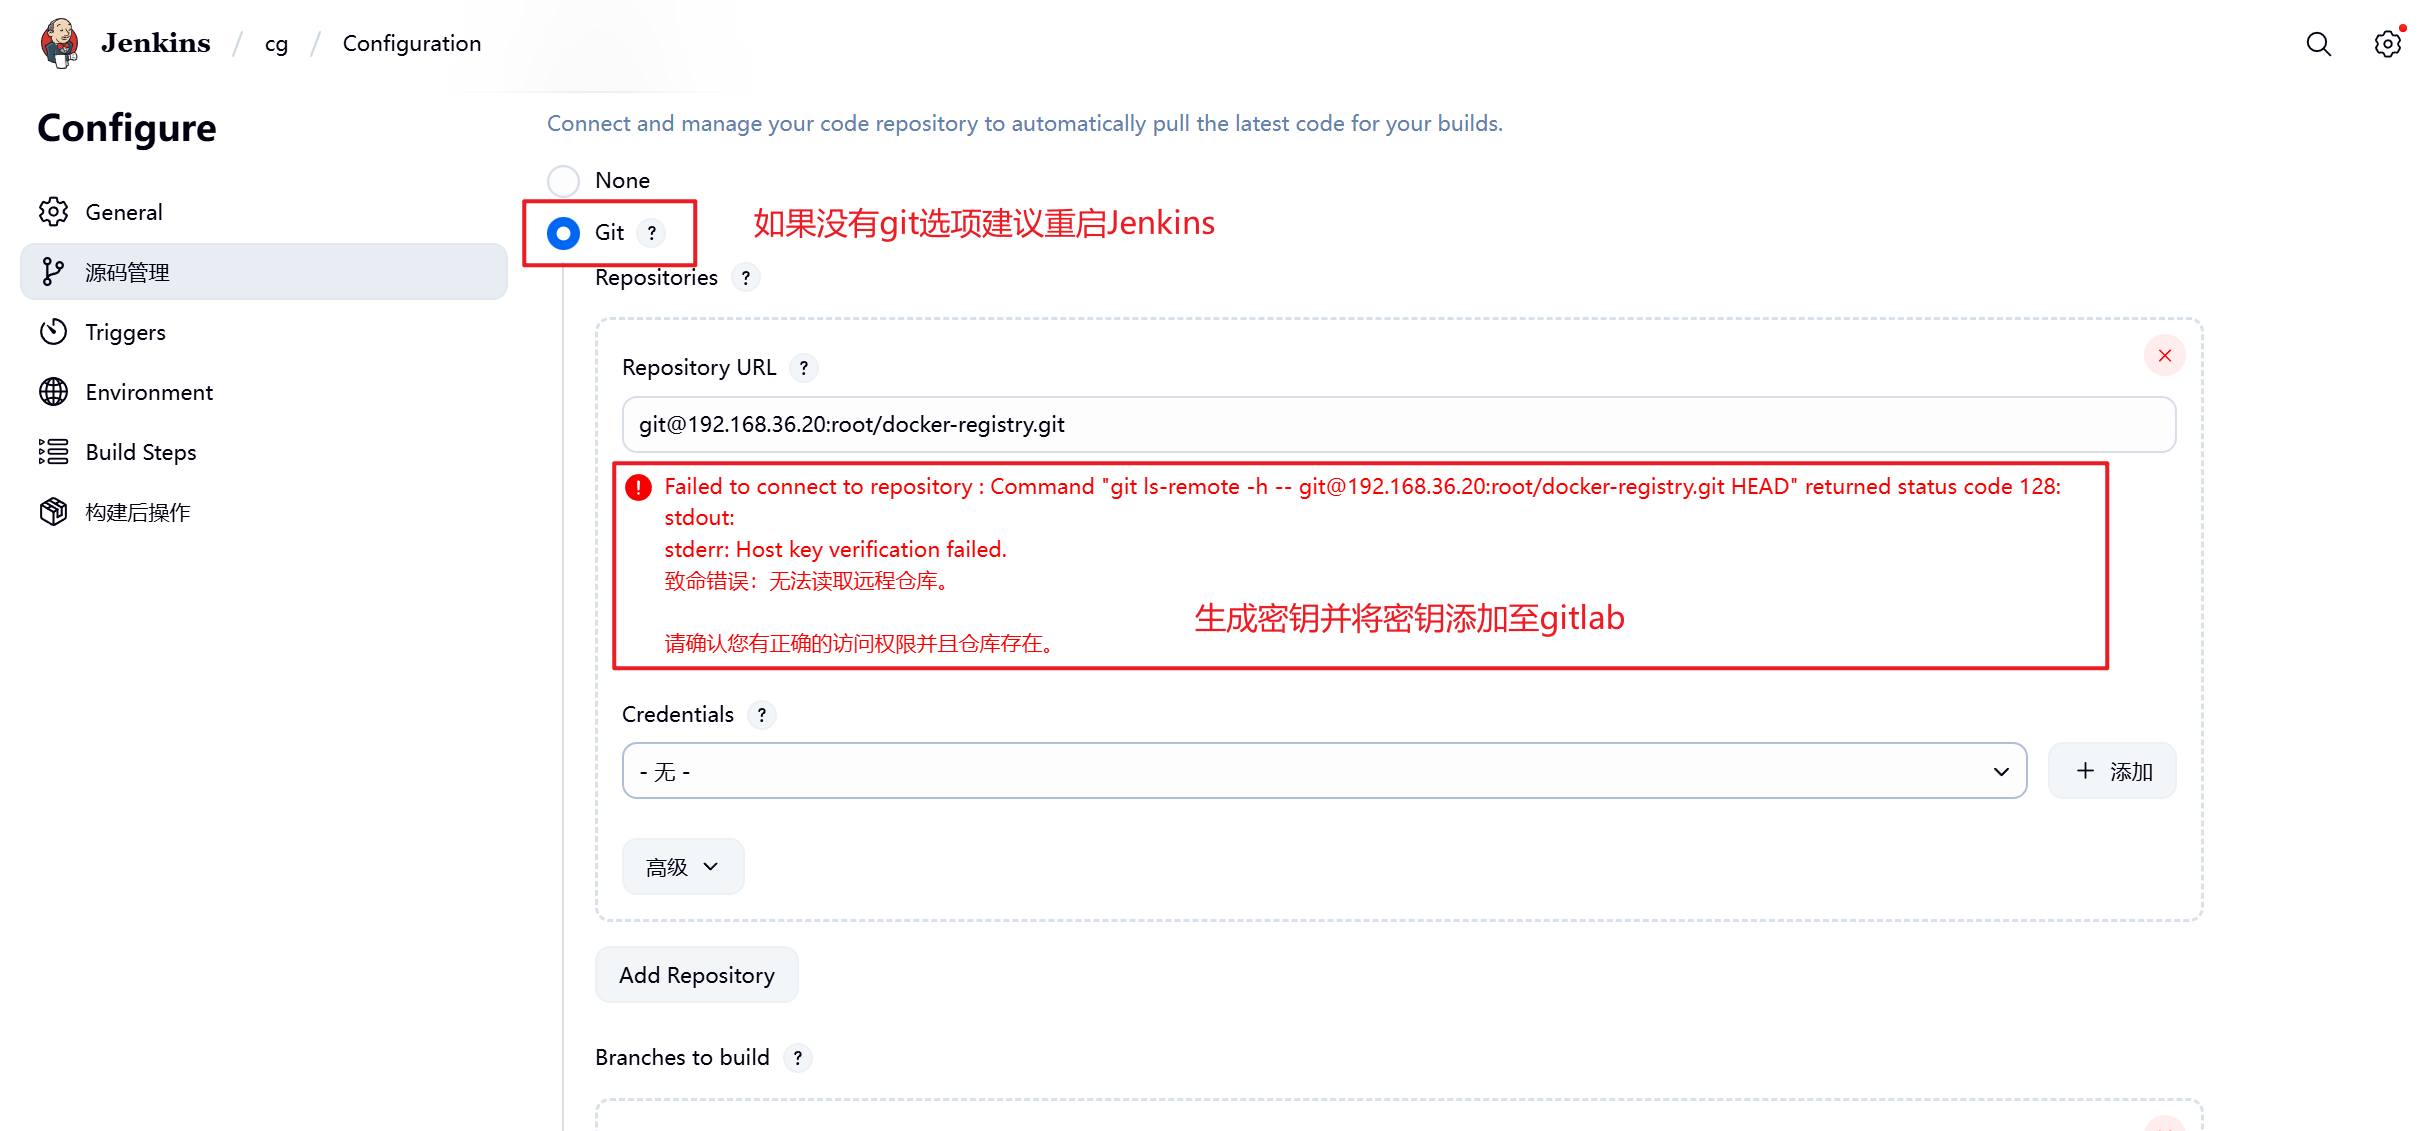
4.在Jenkins中创建密钥
[root@jenkins ~]# ssh-keygen
[root@jenkins ~]# cat /root/.ssh/id_rsa.pub
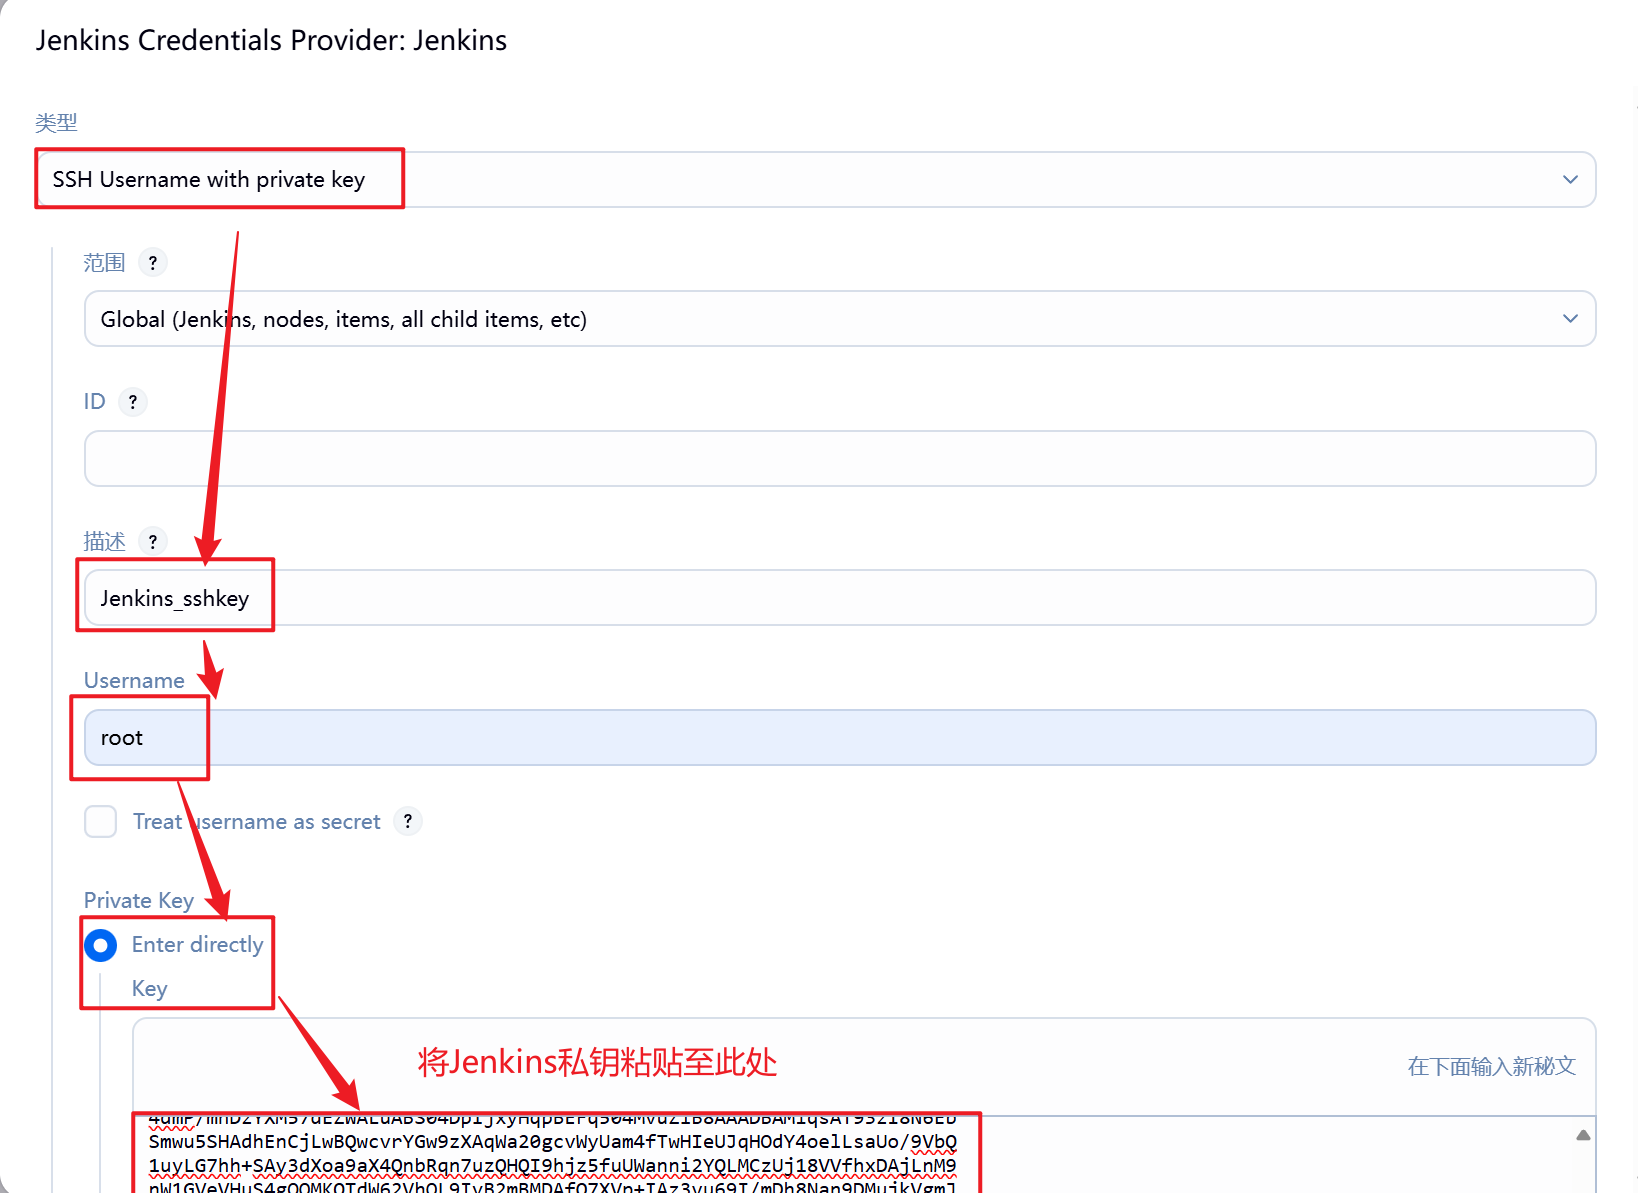
5.将密钥文件添加到gitlab中

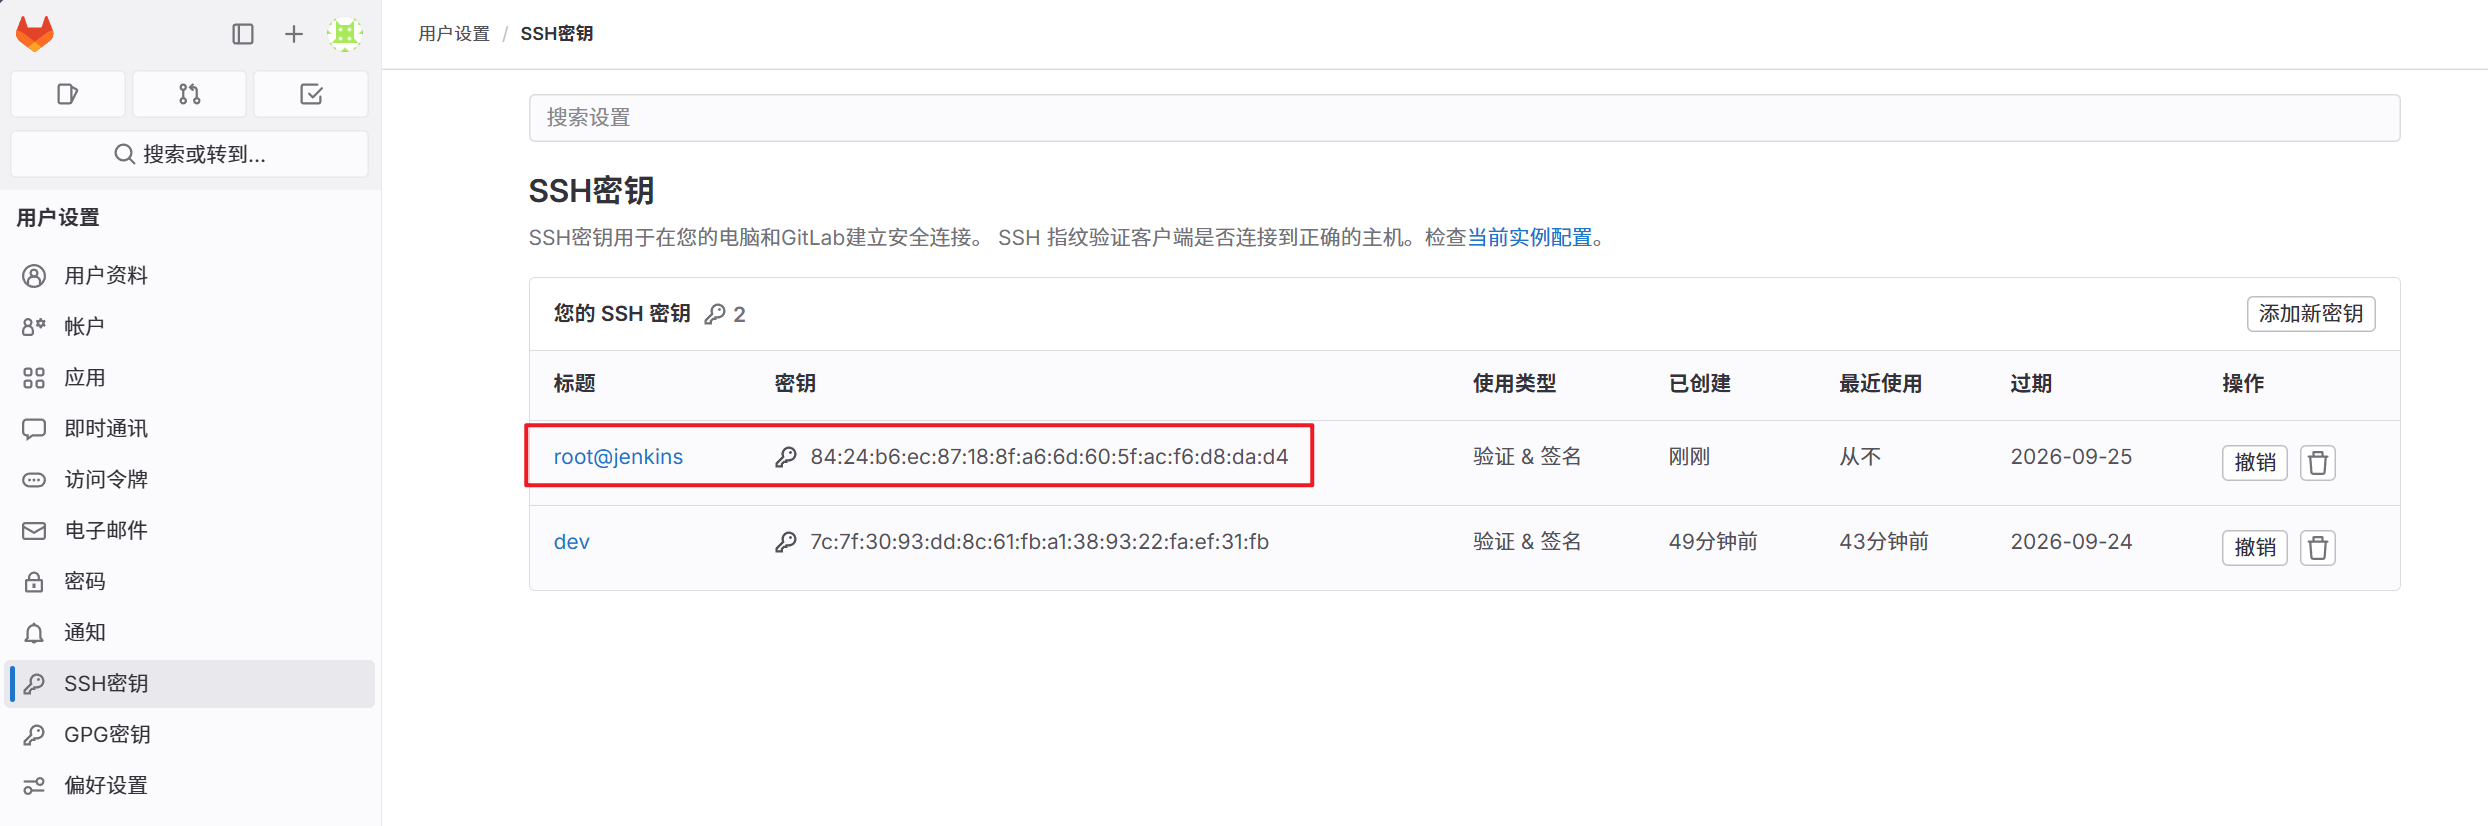
6.将Jenkins私钥填入
[root@jenkins ~]# cat /root/.ssh/id_rsa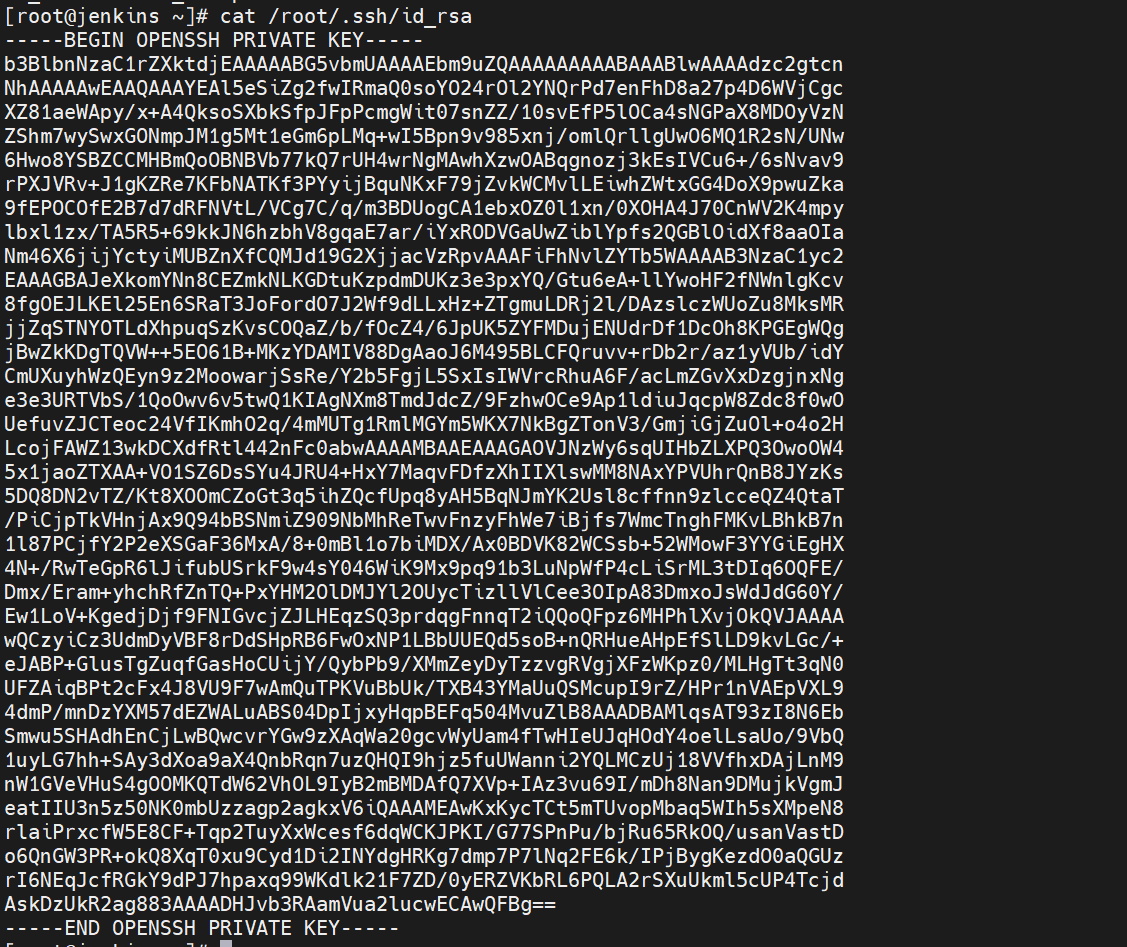
7.添加完成后报错依然存在,因为 ssh 首次连接主机是需要签名认证,需要手动输入 yes
[root@jenkins ~]# vim /etc/ssh/ssh_config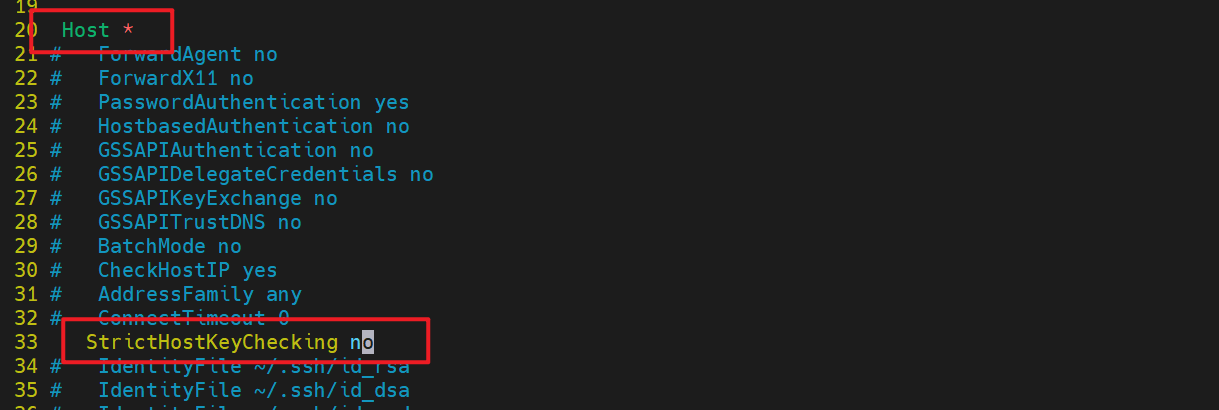
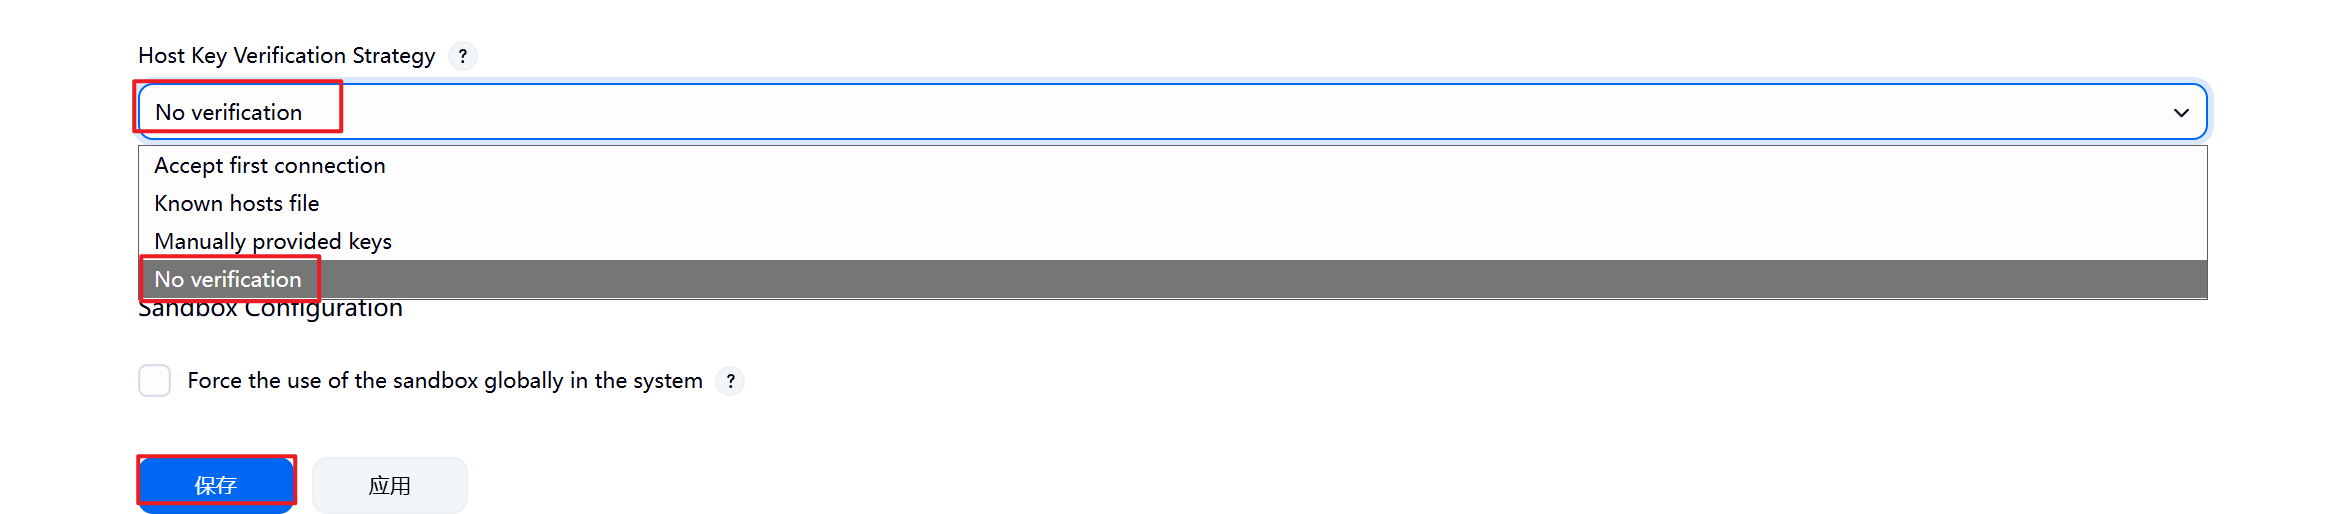
8.配置完毕后报错消失


9.到此测试成功
5.2.3 Jenkins中gitlab触发器的部署与使用
在Jenkins中配置gitlab触发器可以实现代码提交或合并请求时自动触发Jenkins流水线
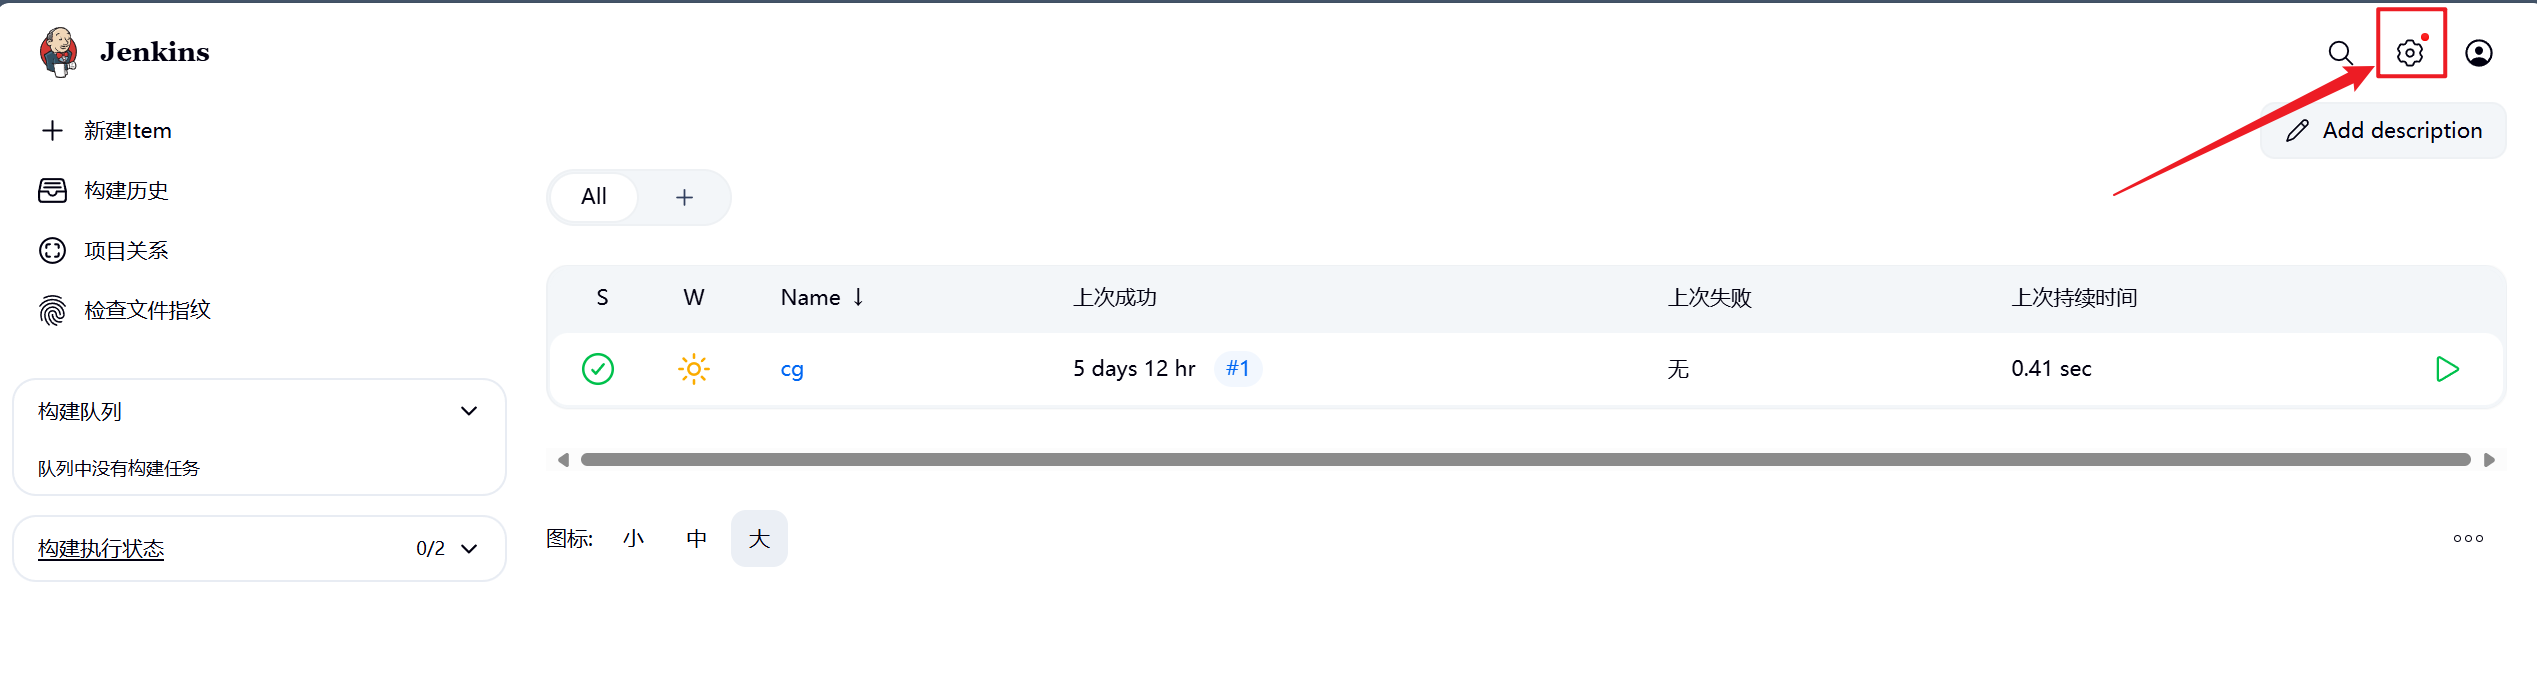
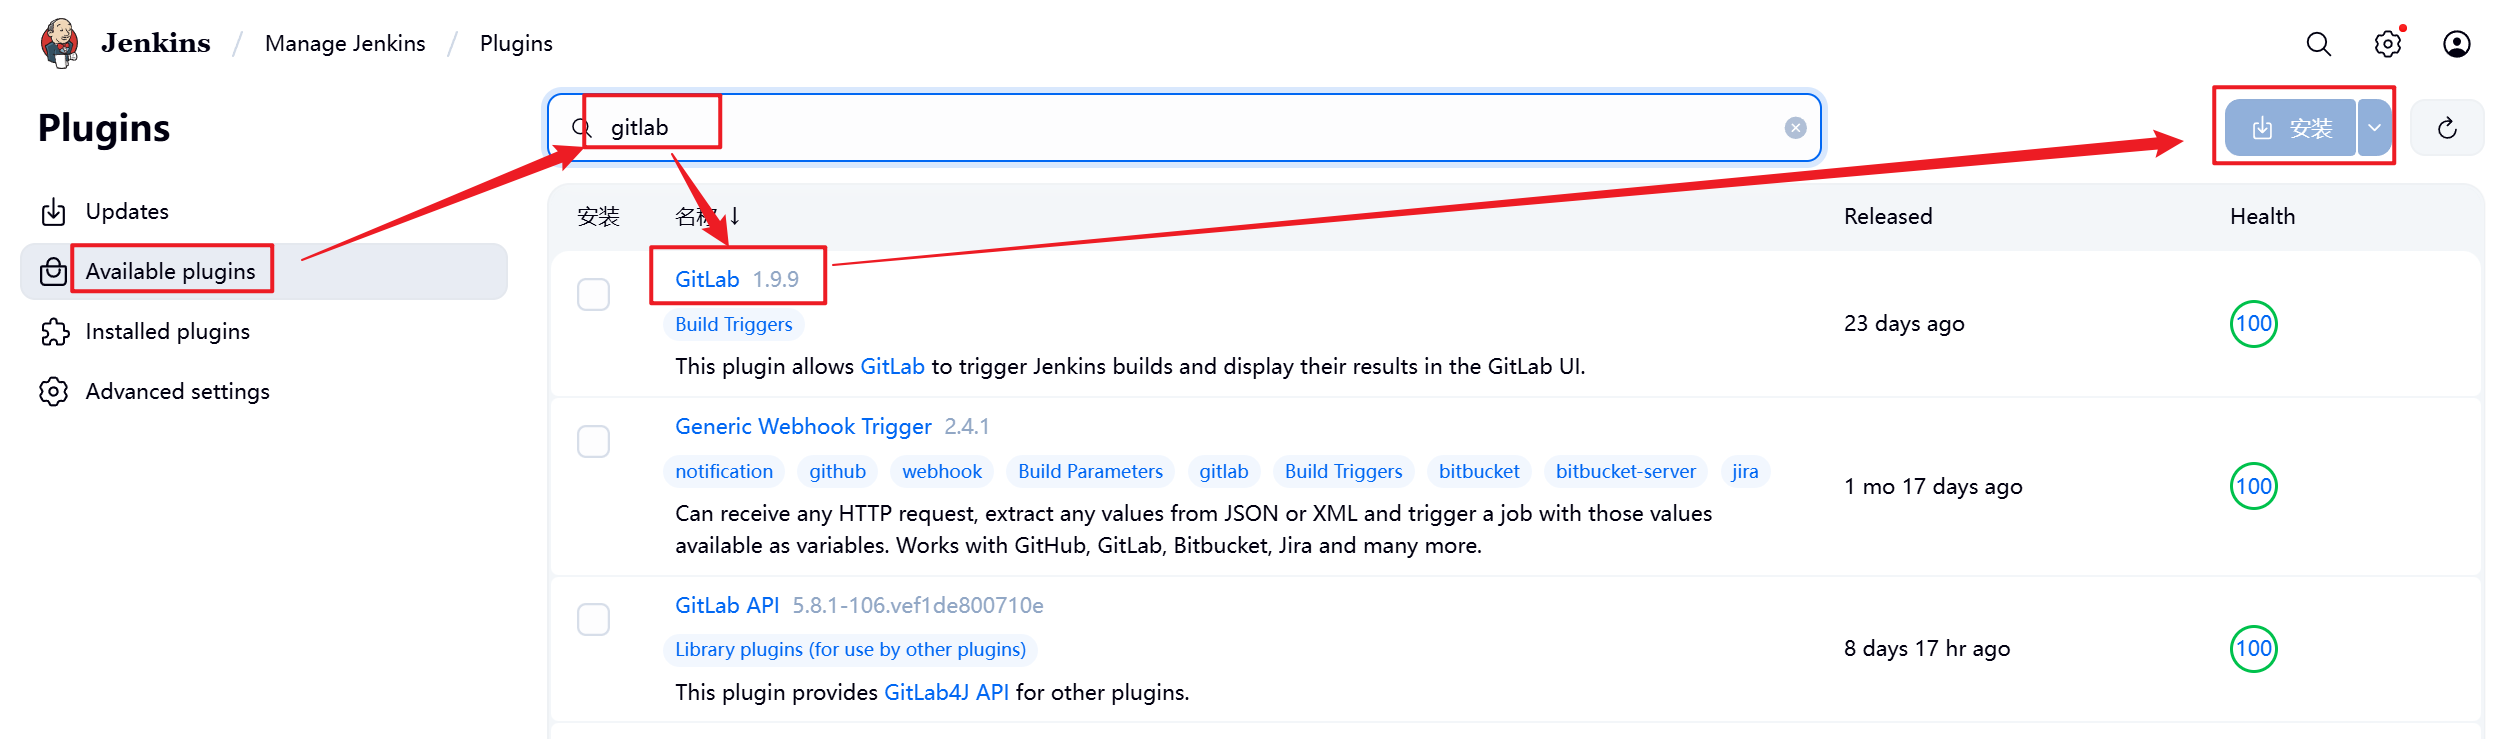
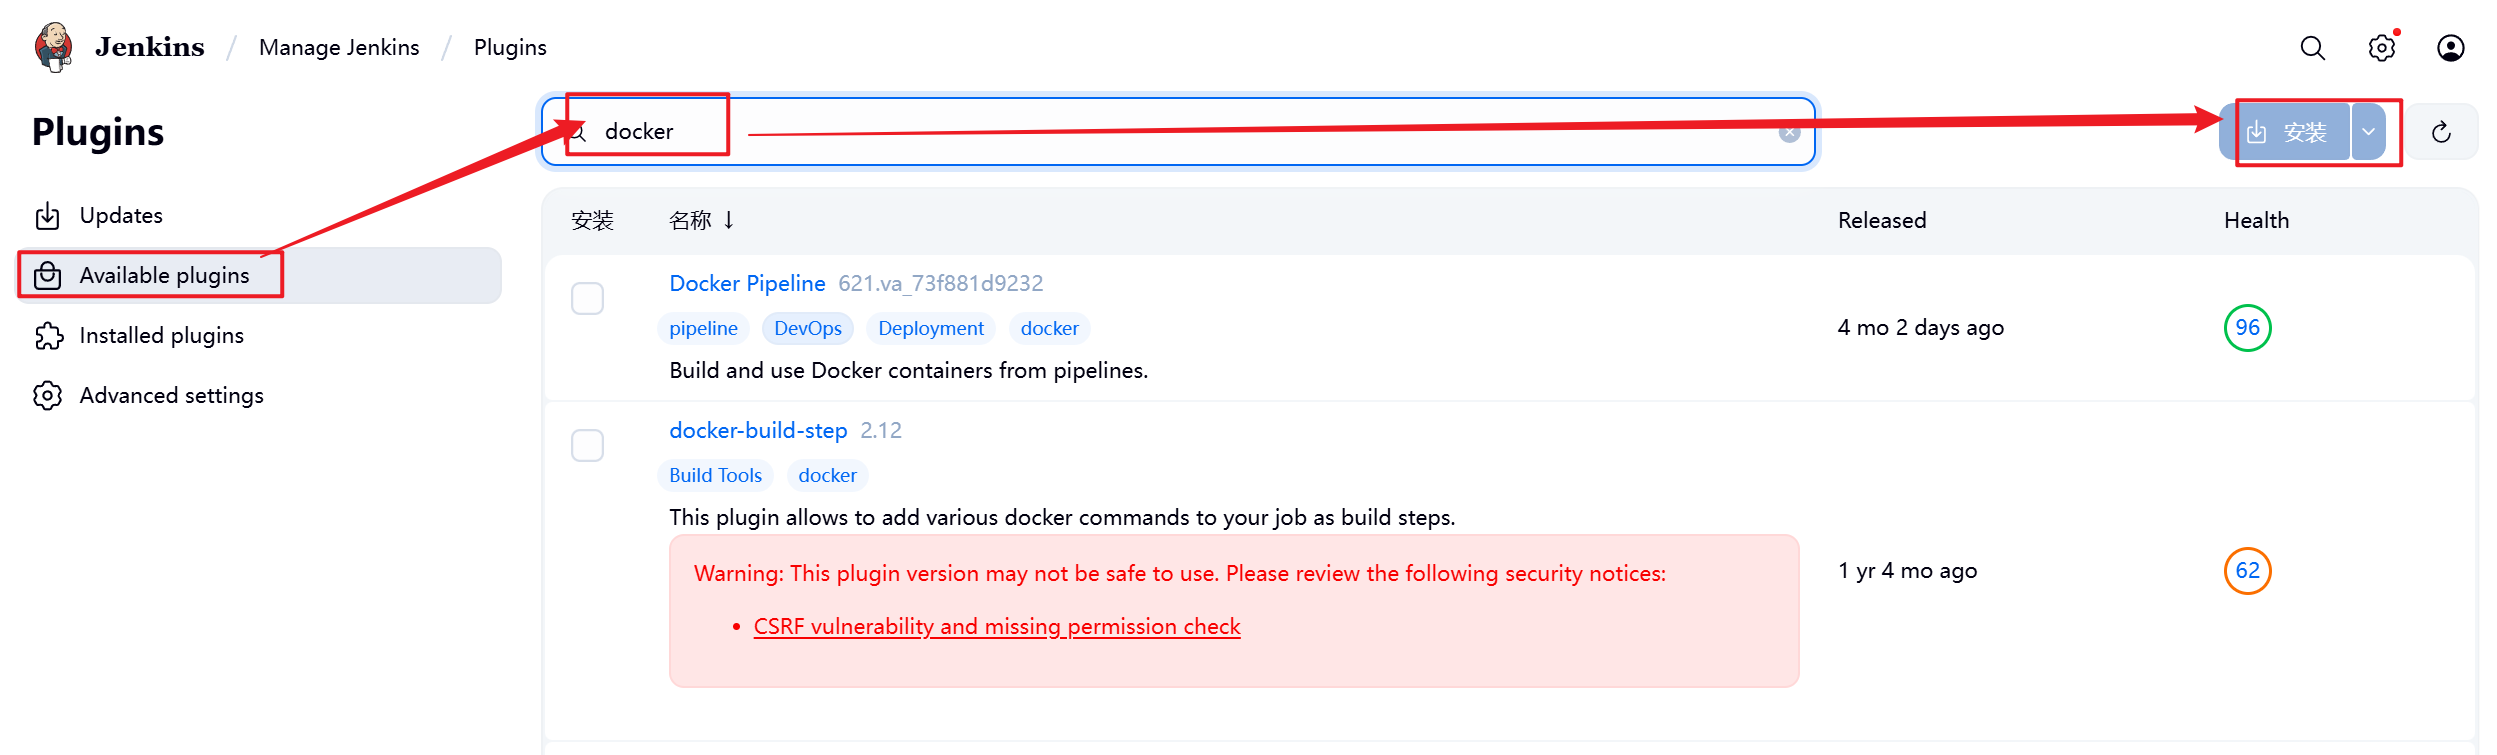
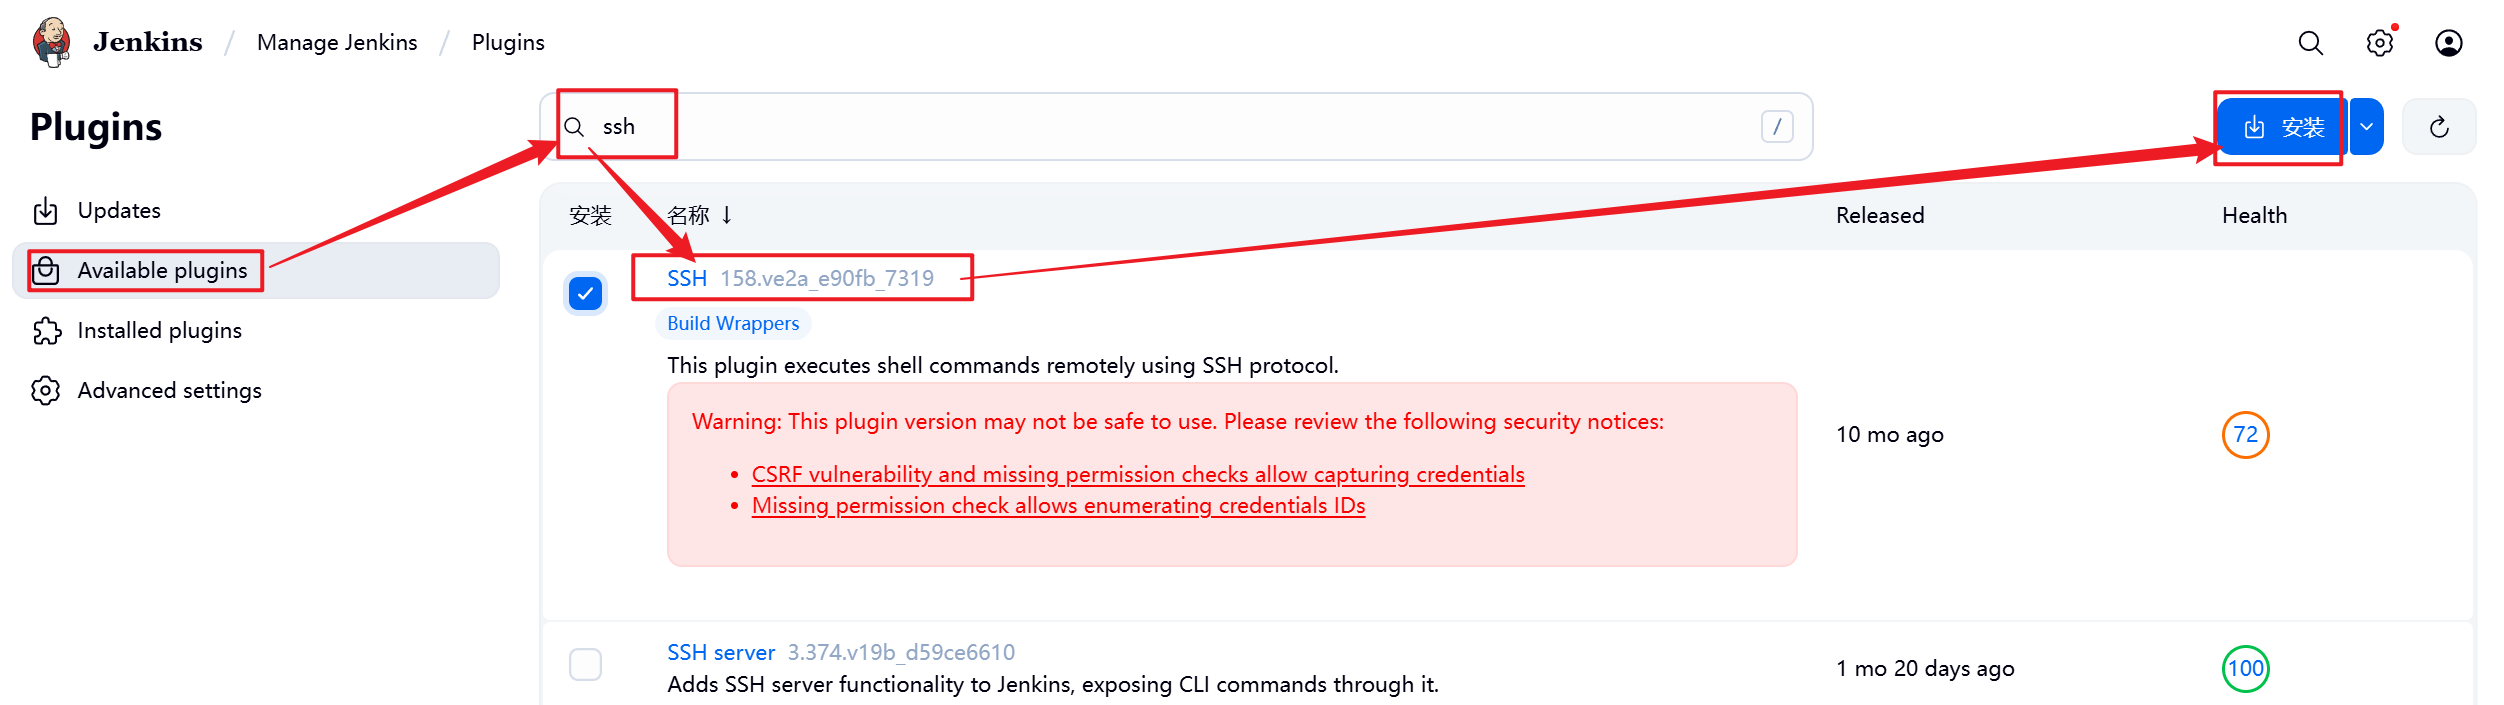
5.2.3.1 安装gitlab插件
如果需要使用gitlab触发器则需要安装gitlab插件,目前使用官方源下载比较吃力,可以直接本地部署插件即可。

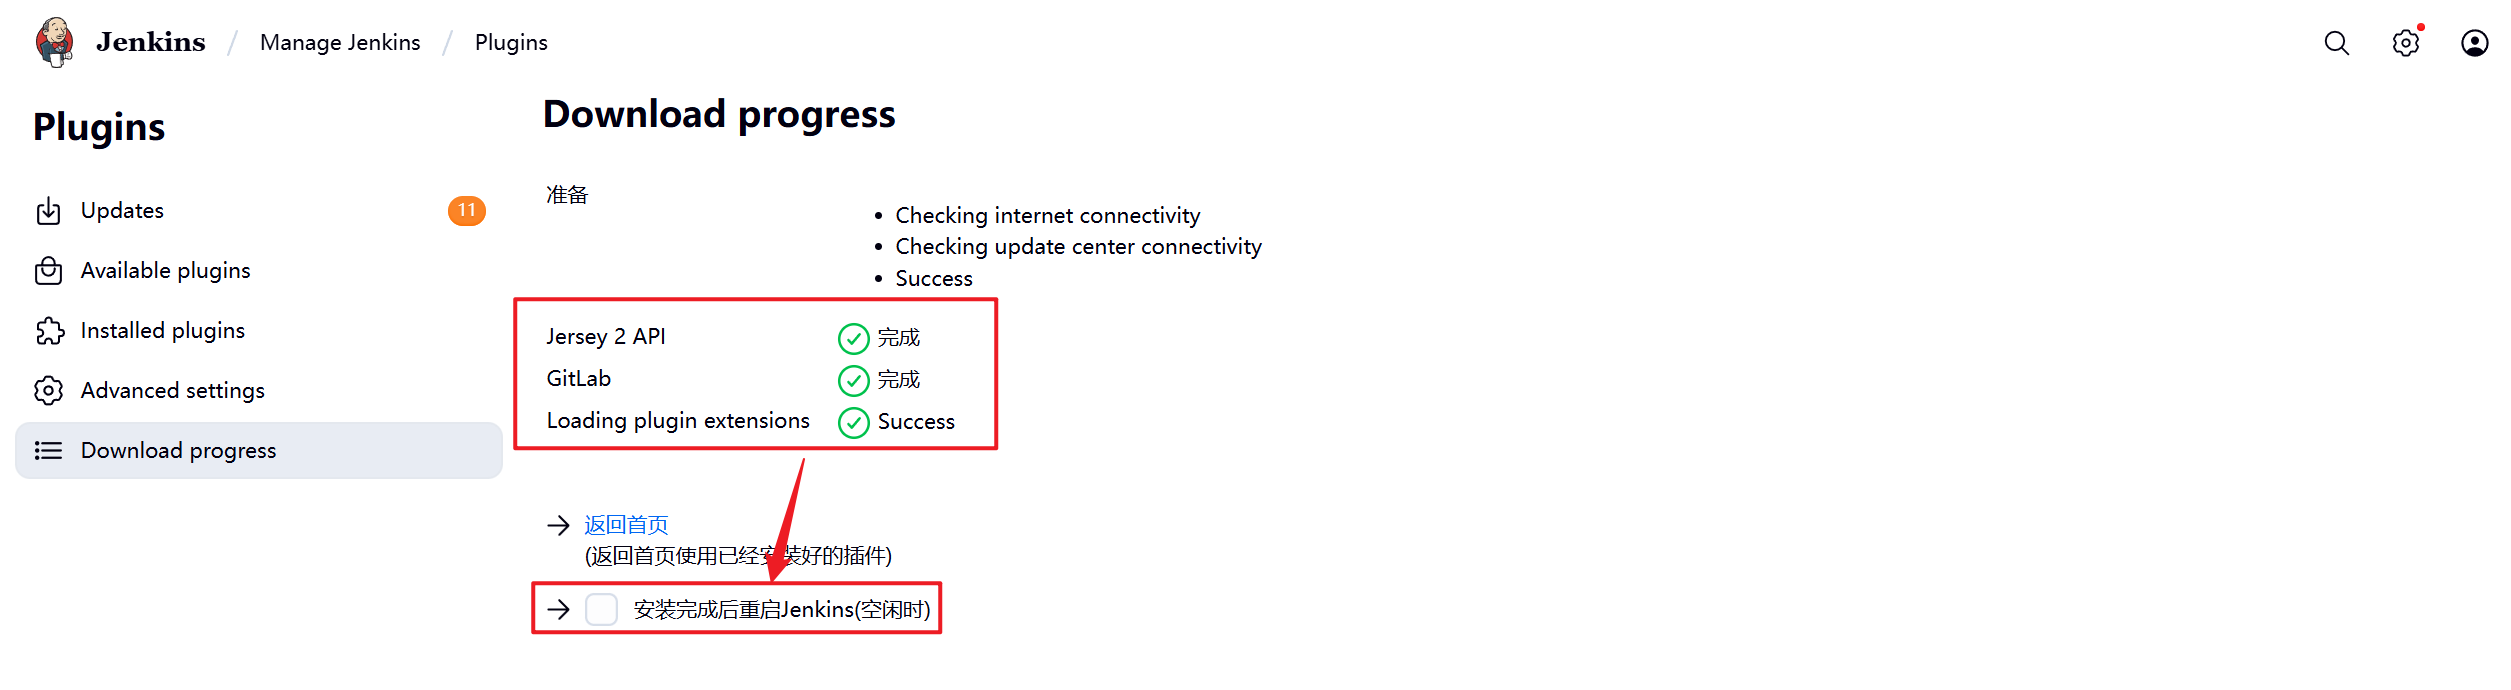
安装完成后点击重启Jenkins
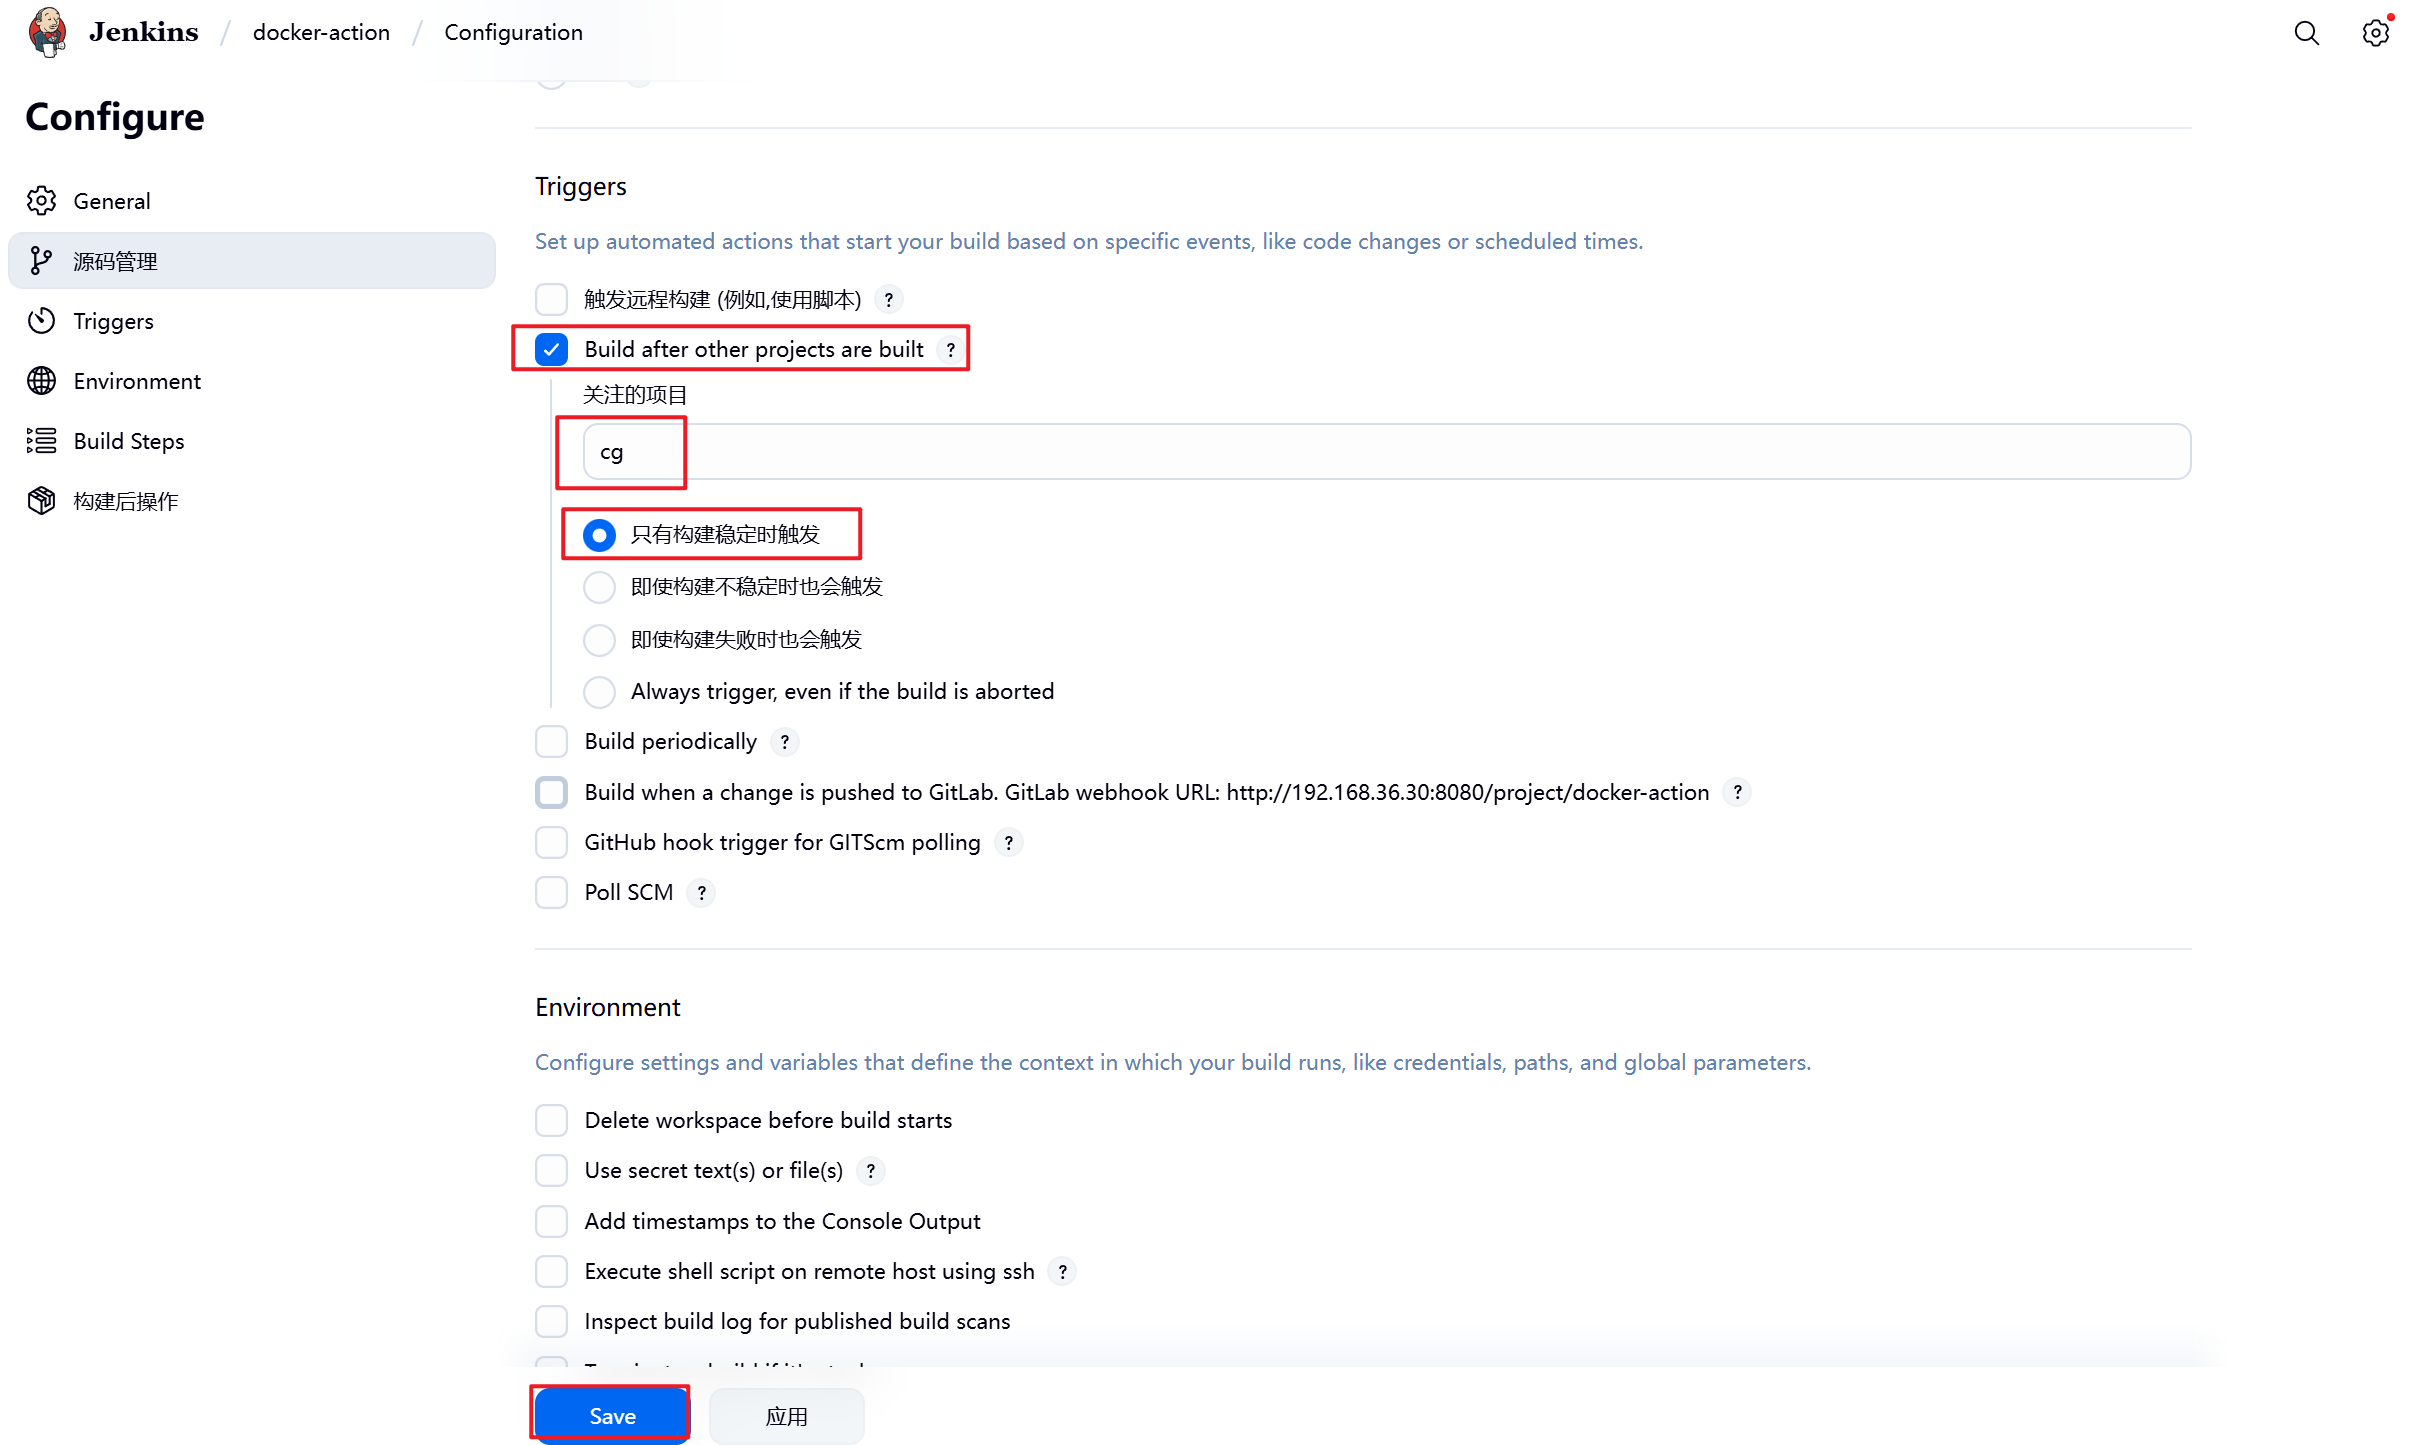
5.2.4 部署Jenkins自动触发
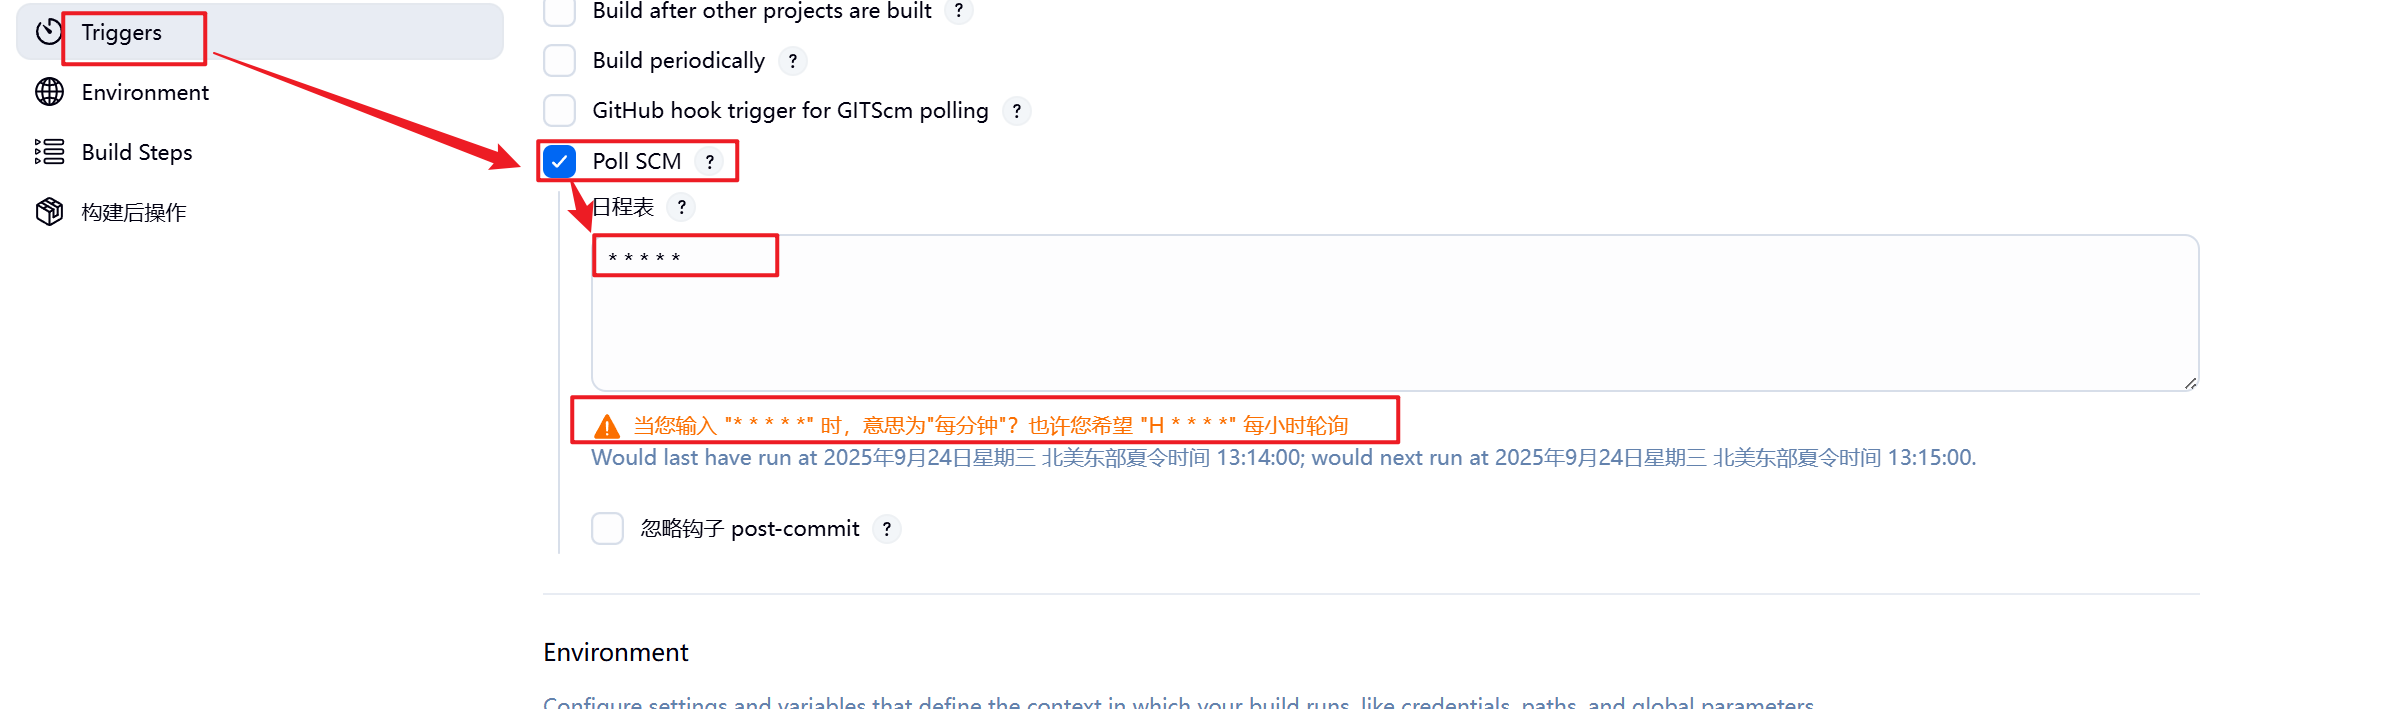
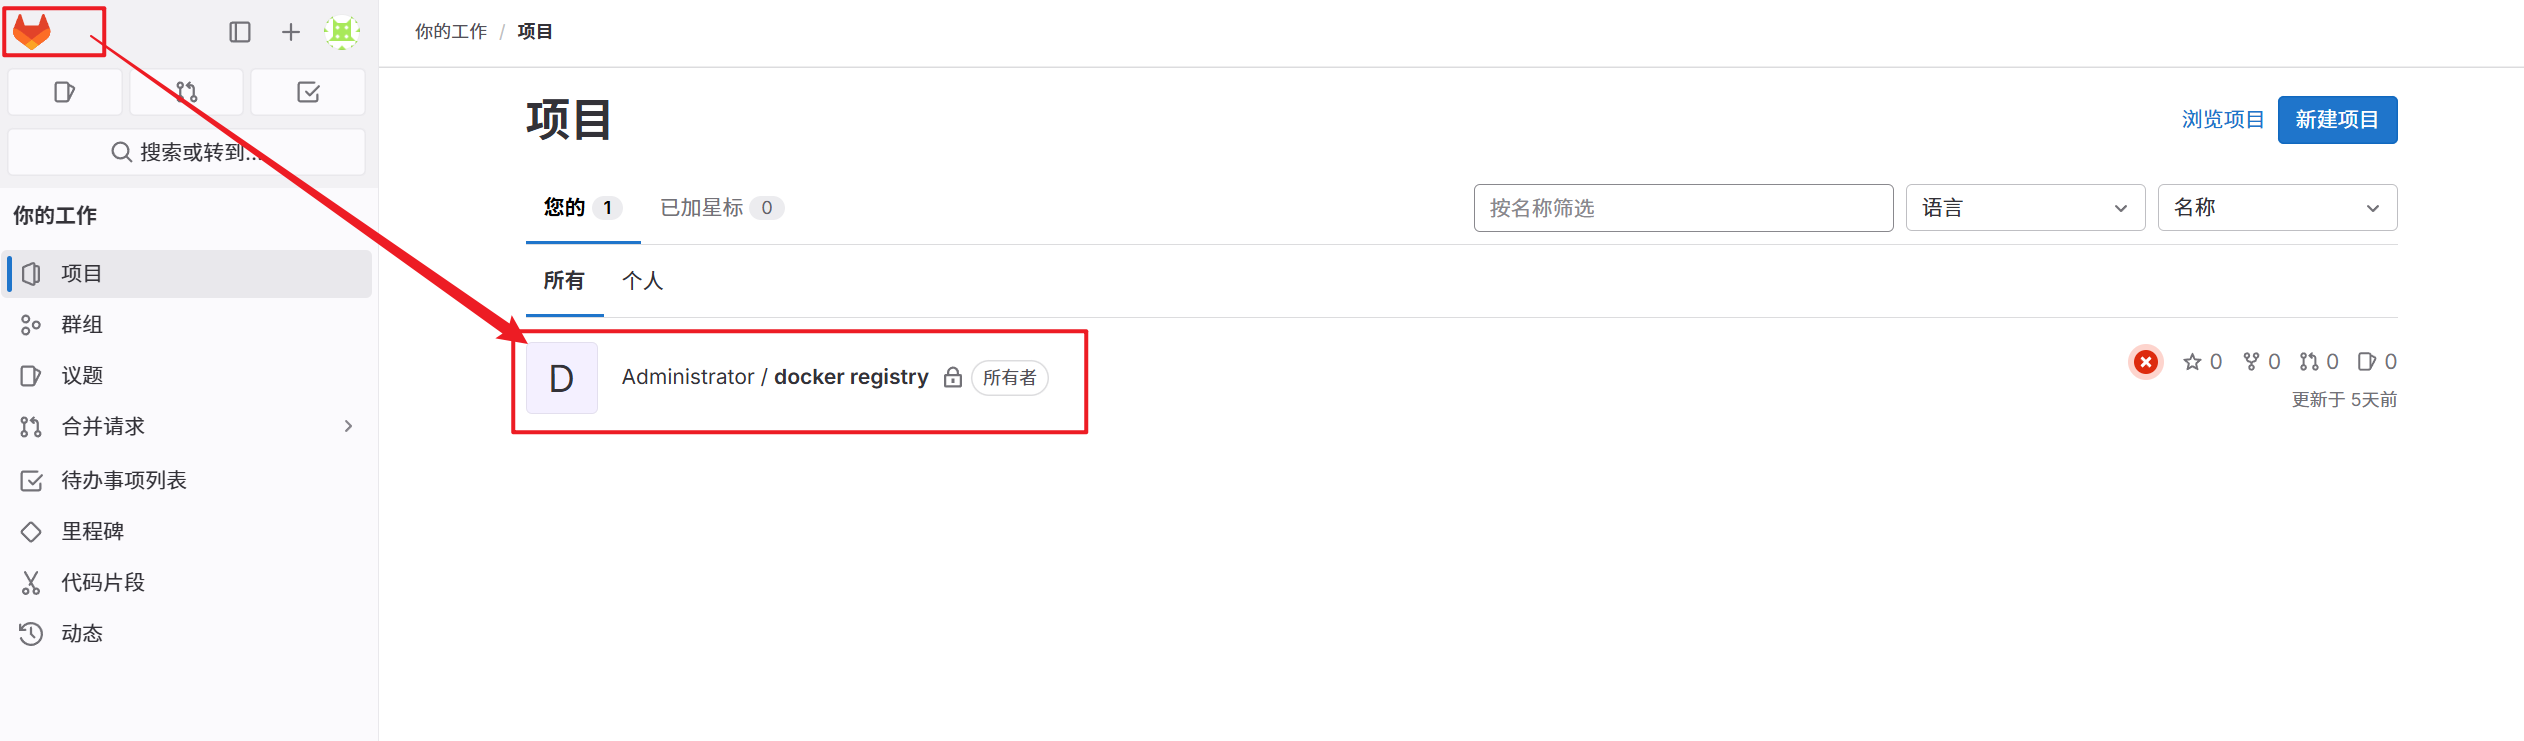
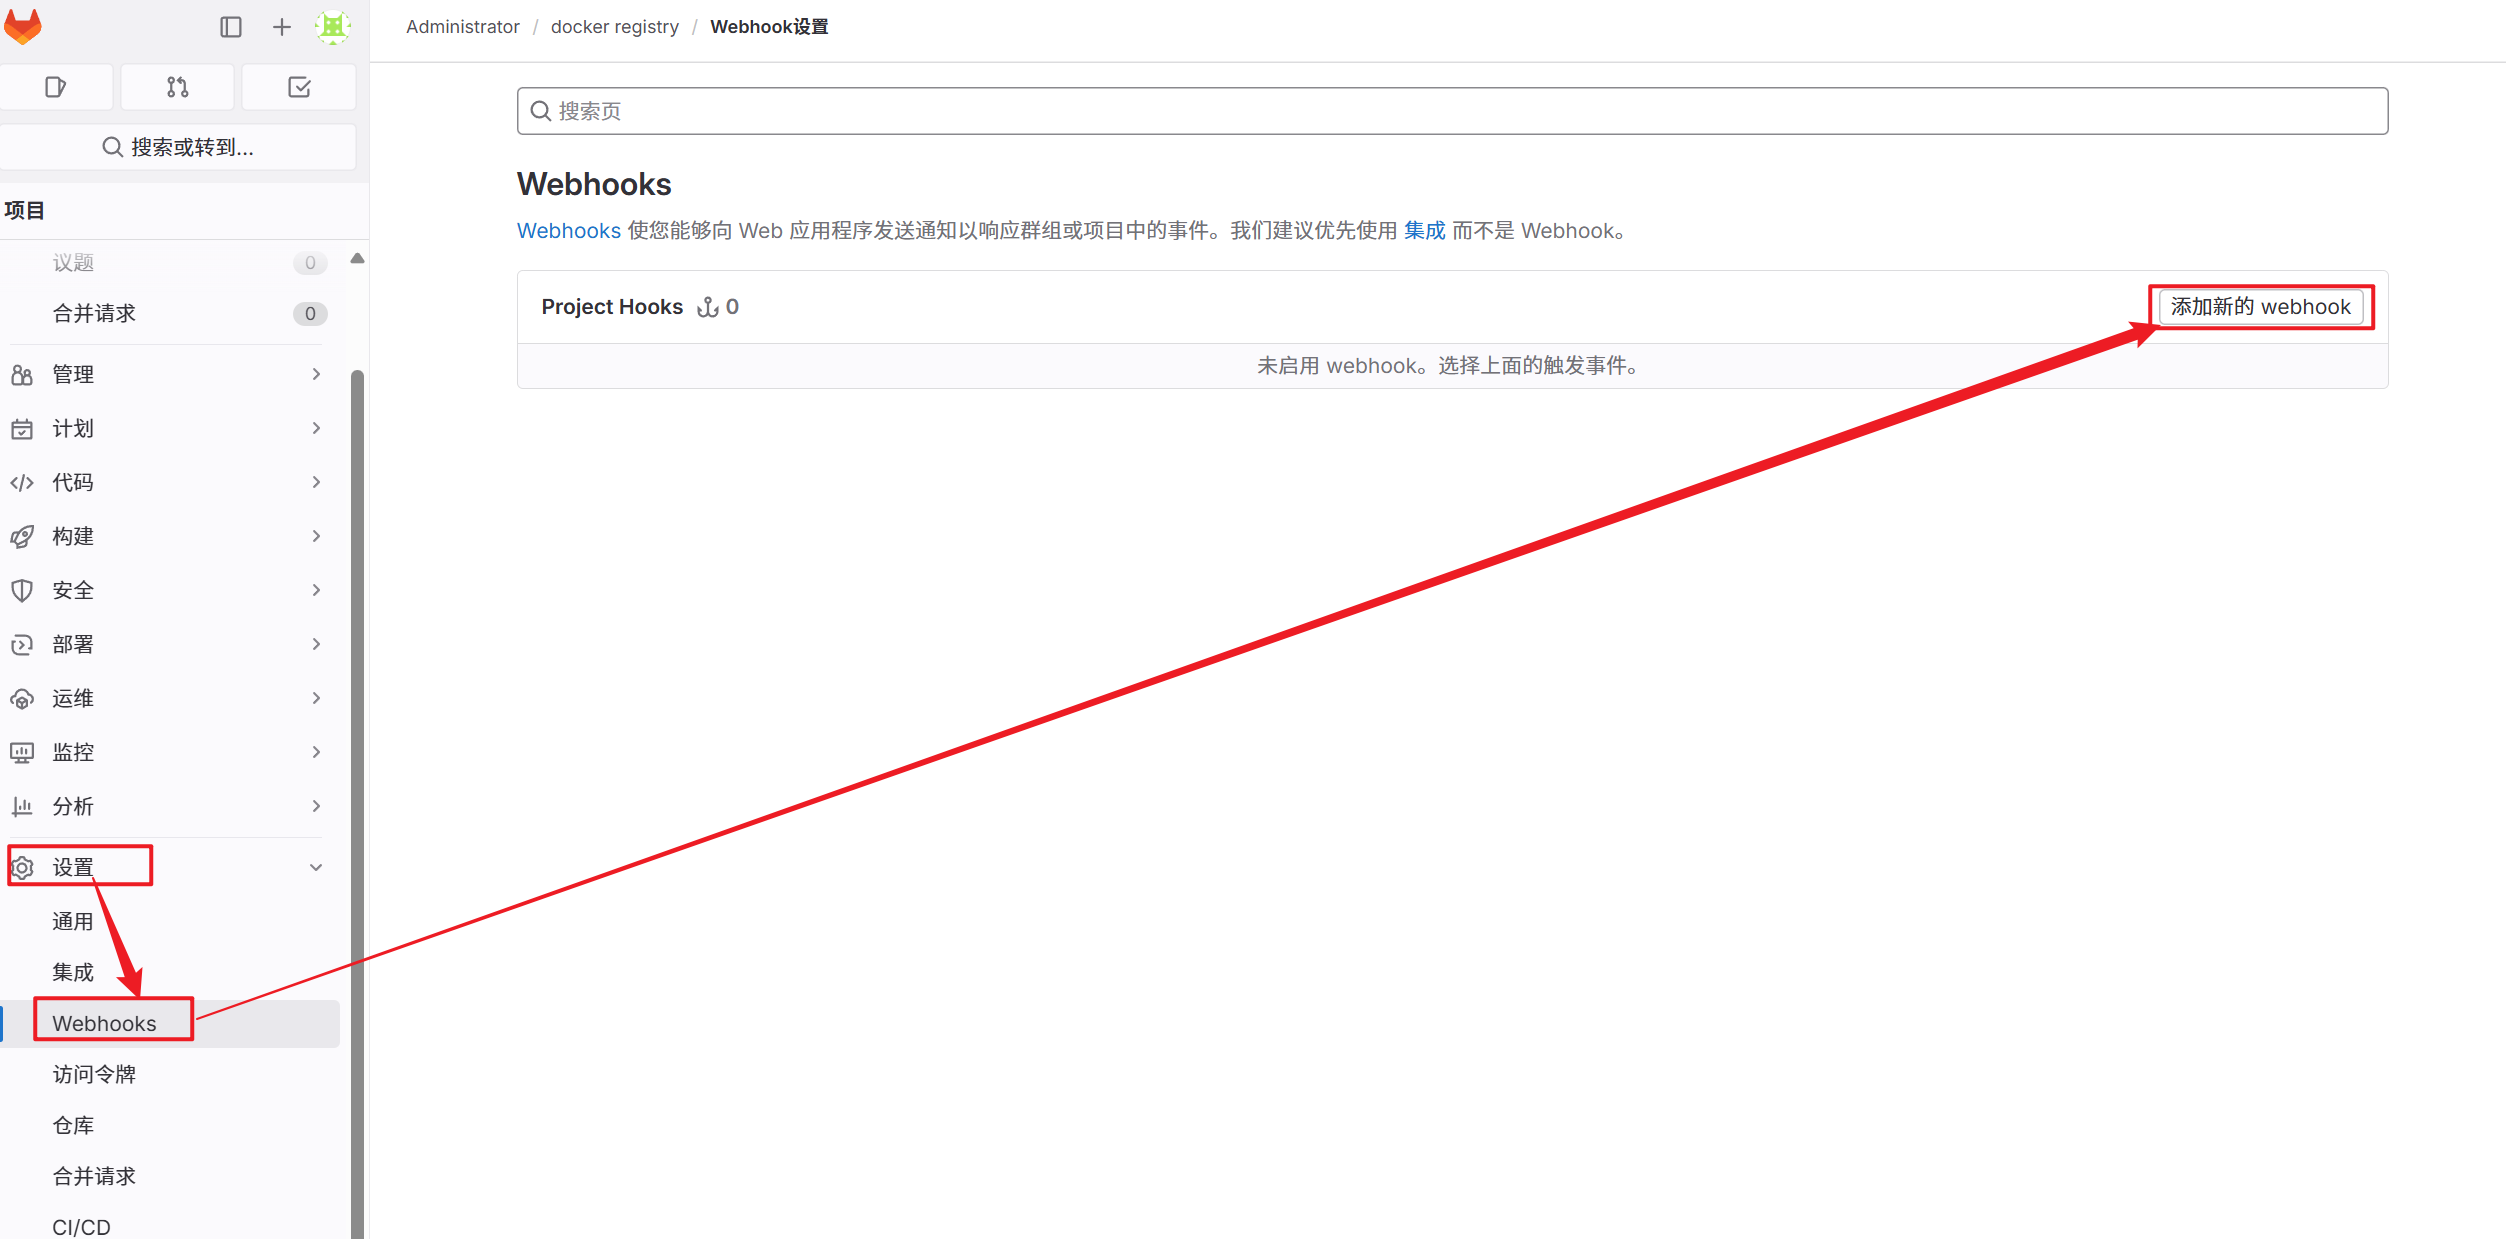
1.插件安装完毕后在Jenkins中选择之前构建的项目并配置自动触发
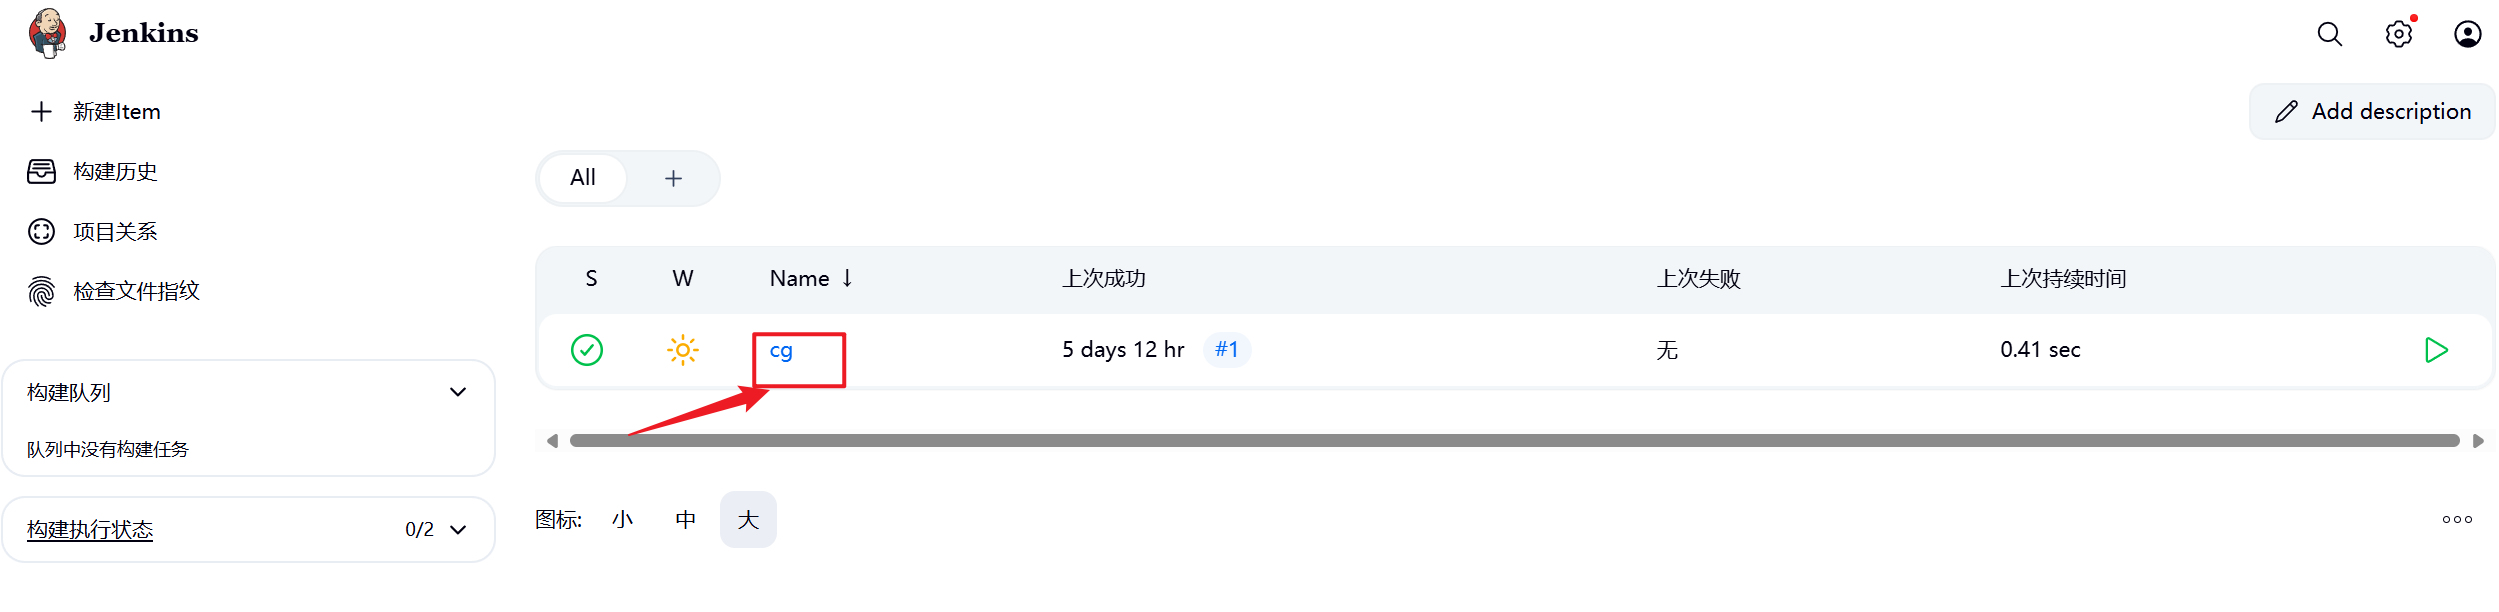
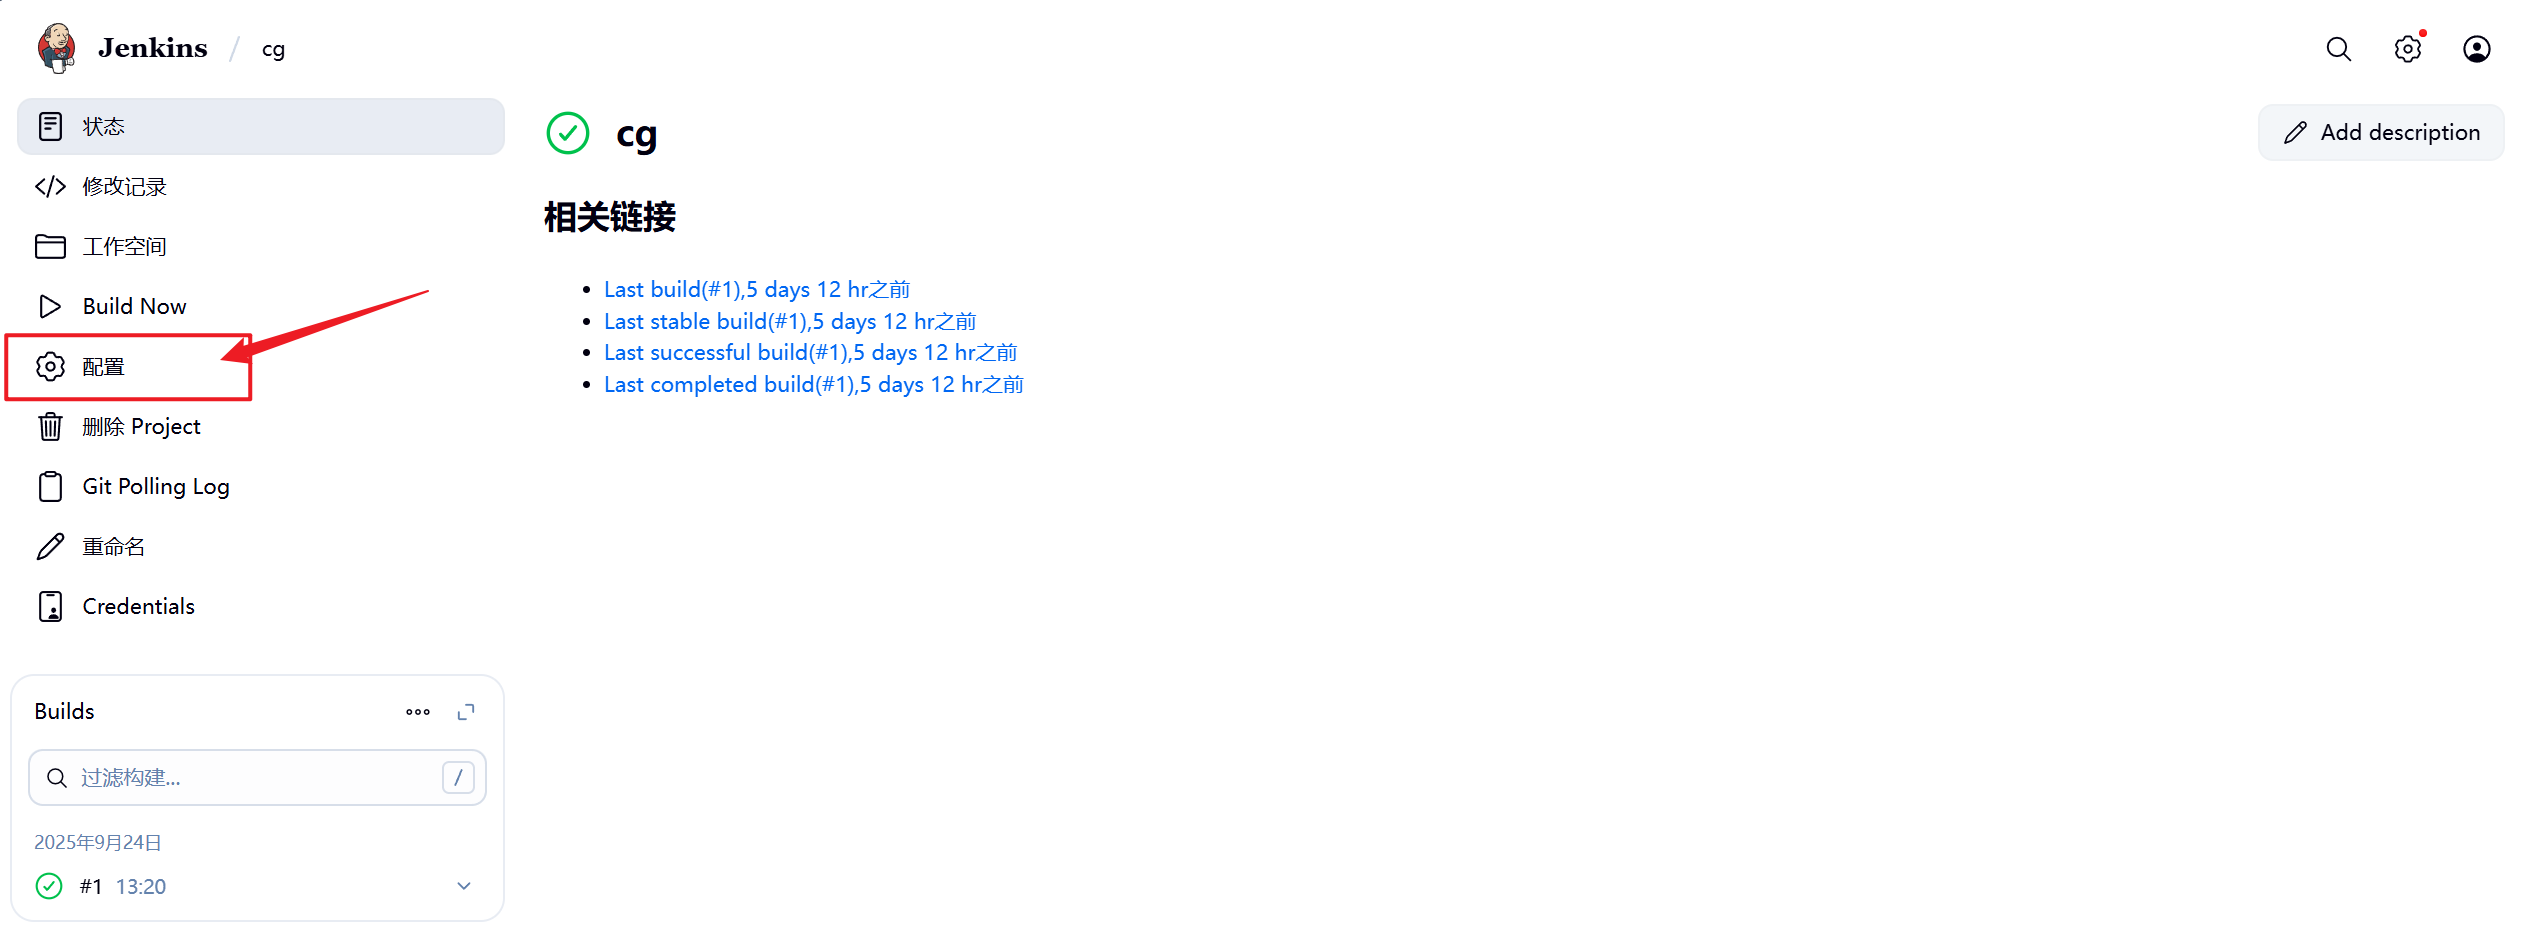
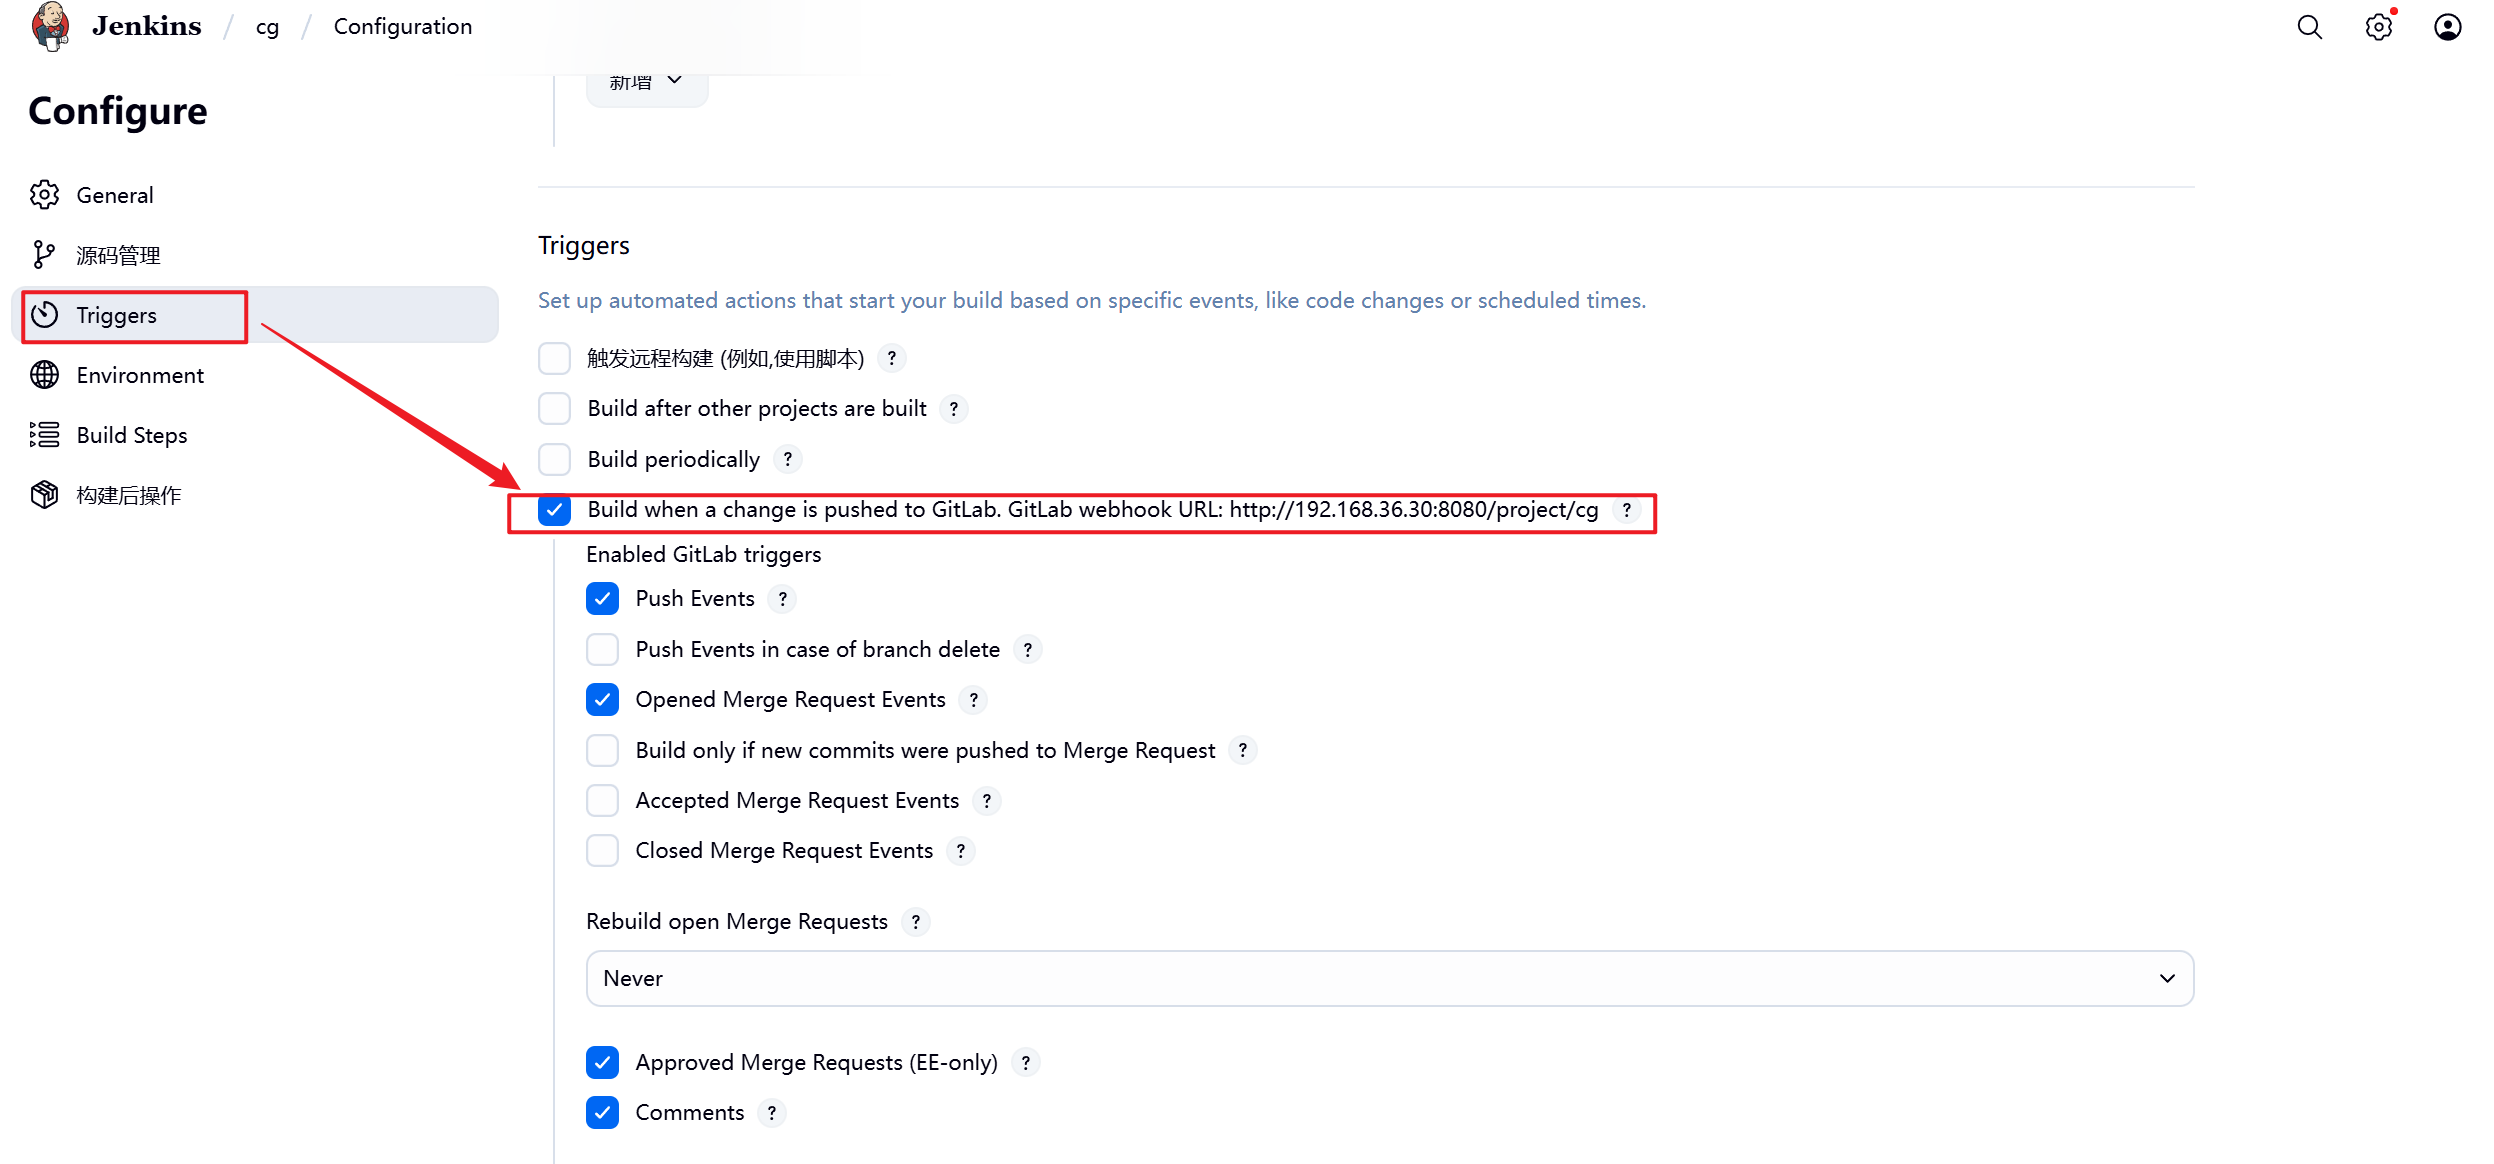
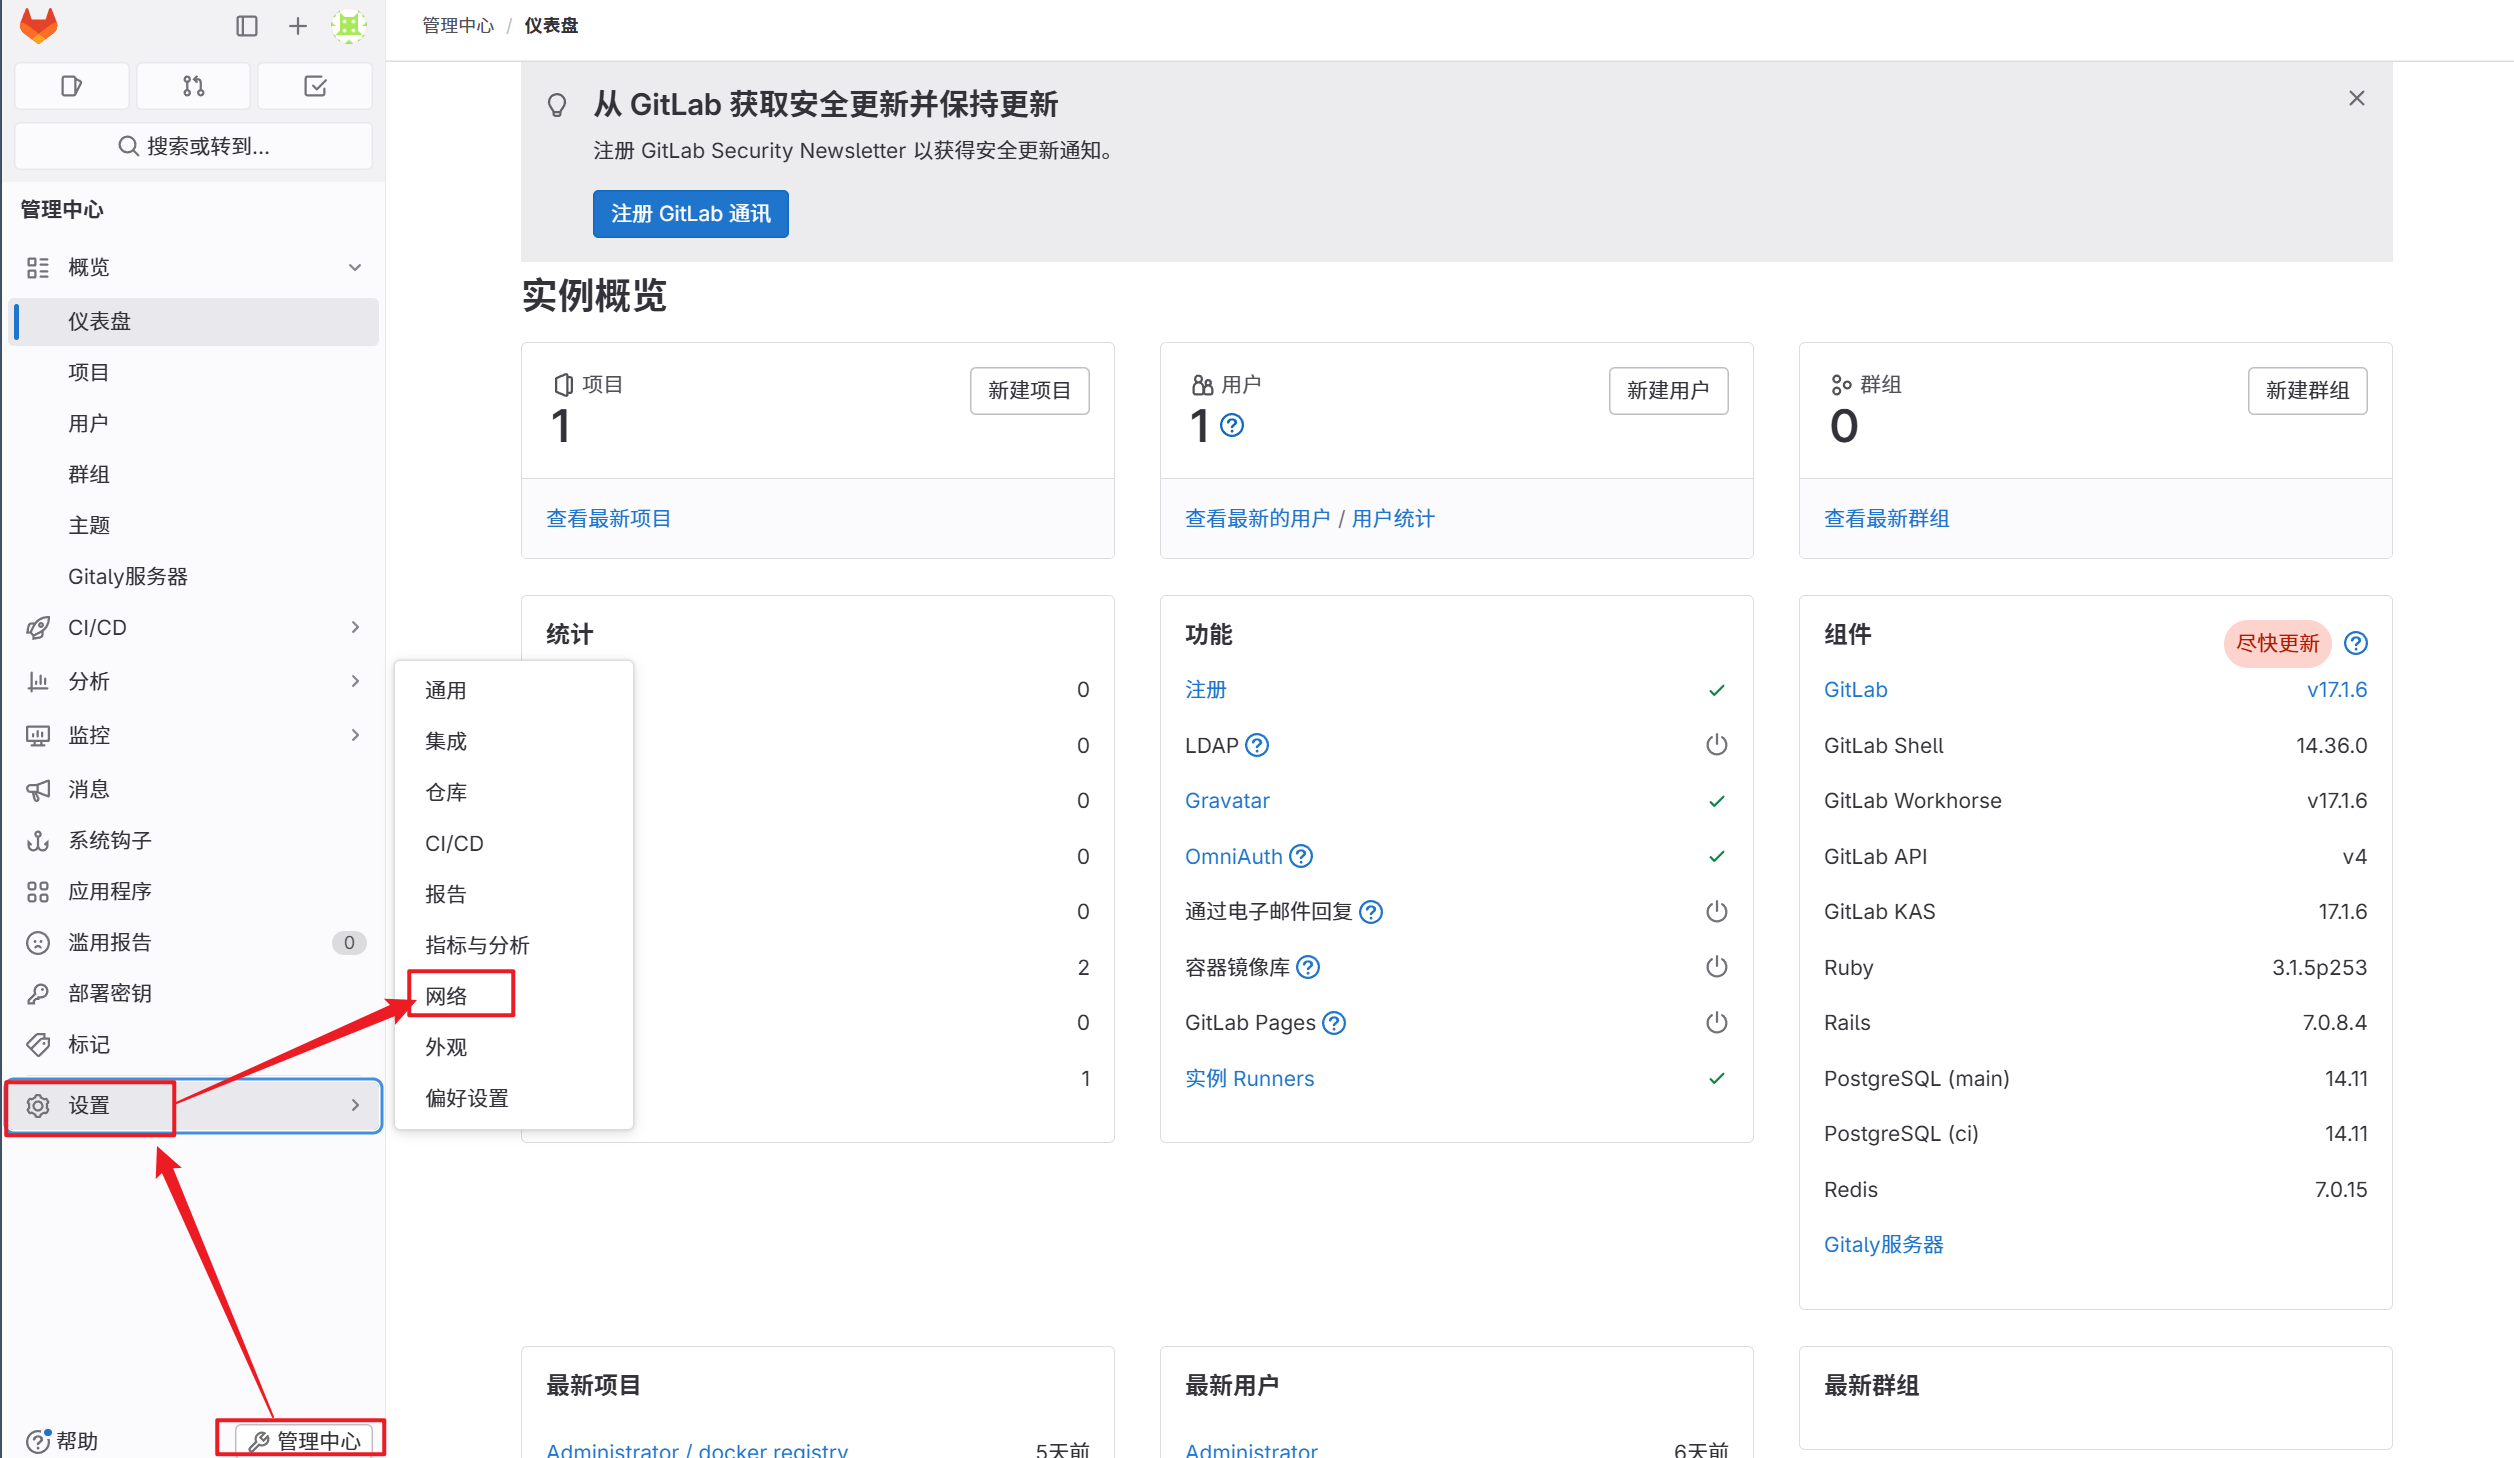
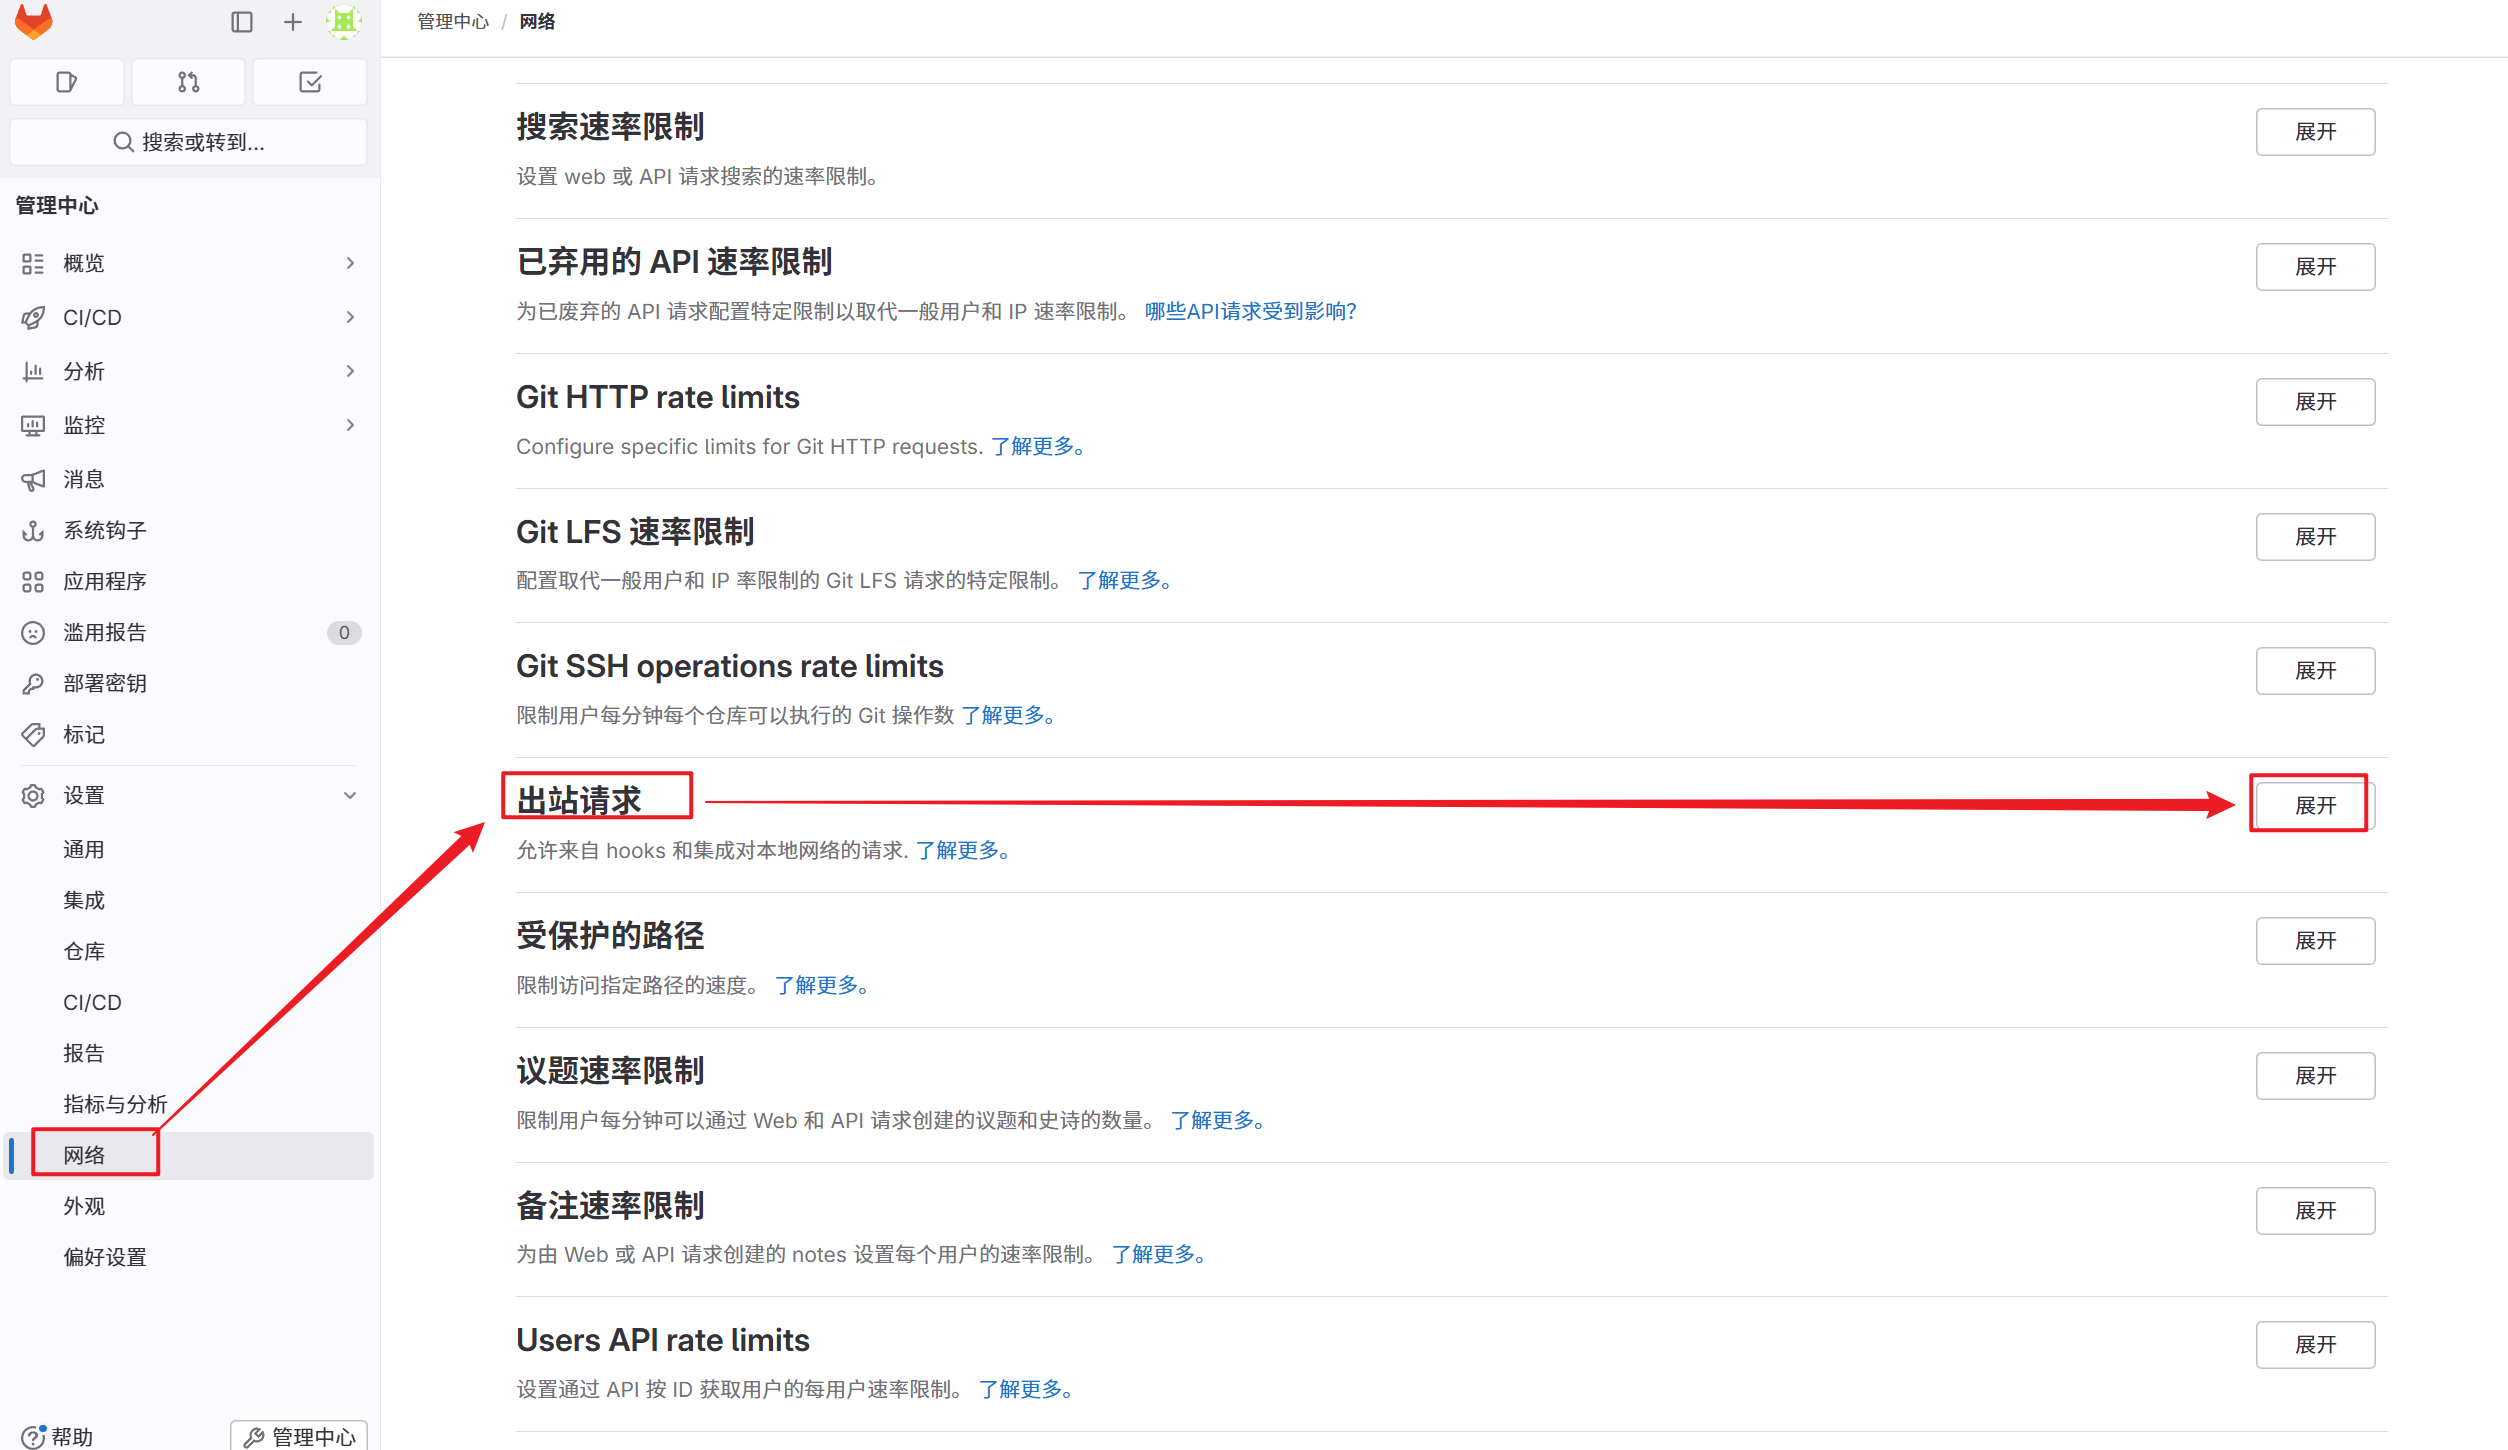
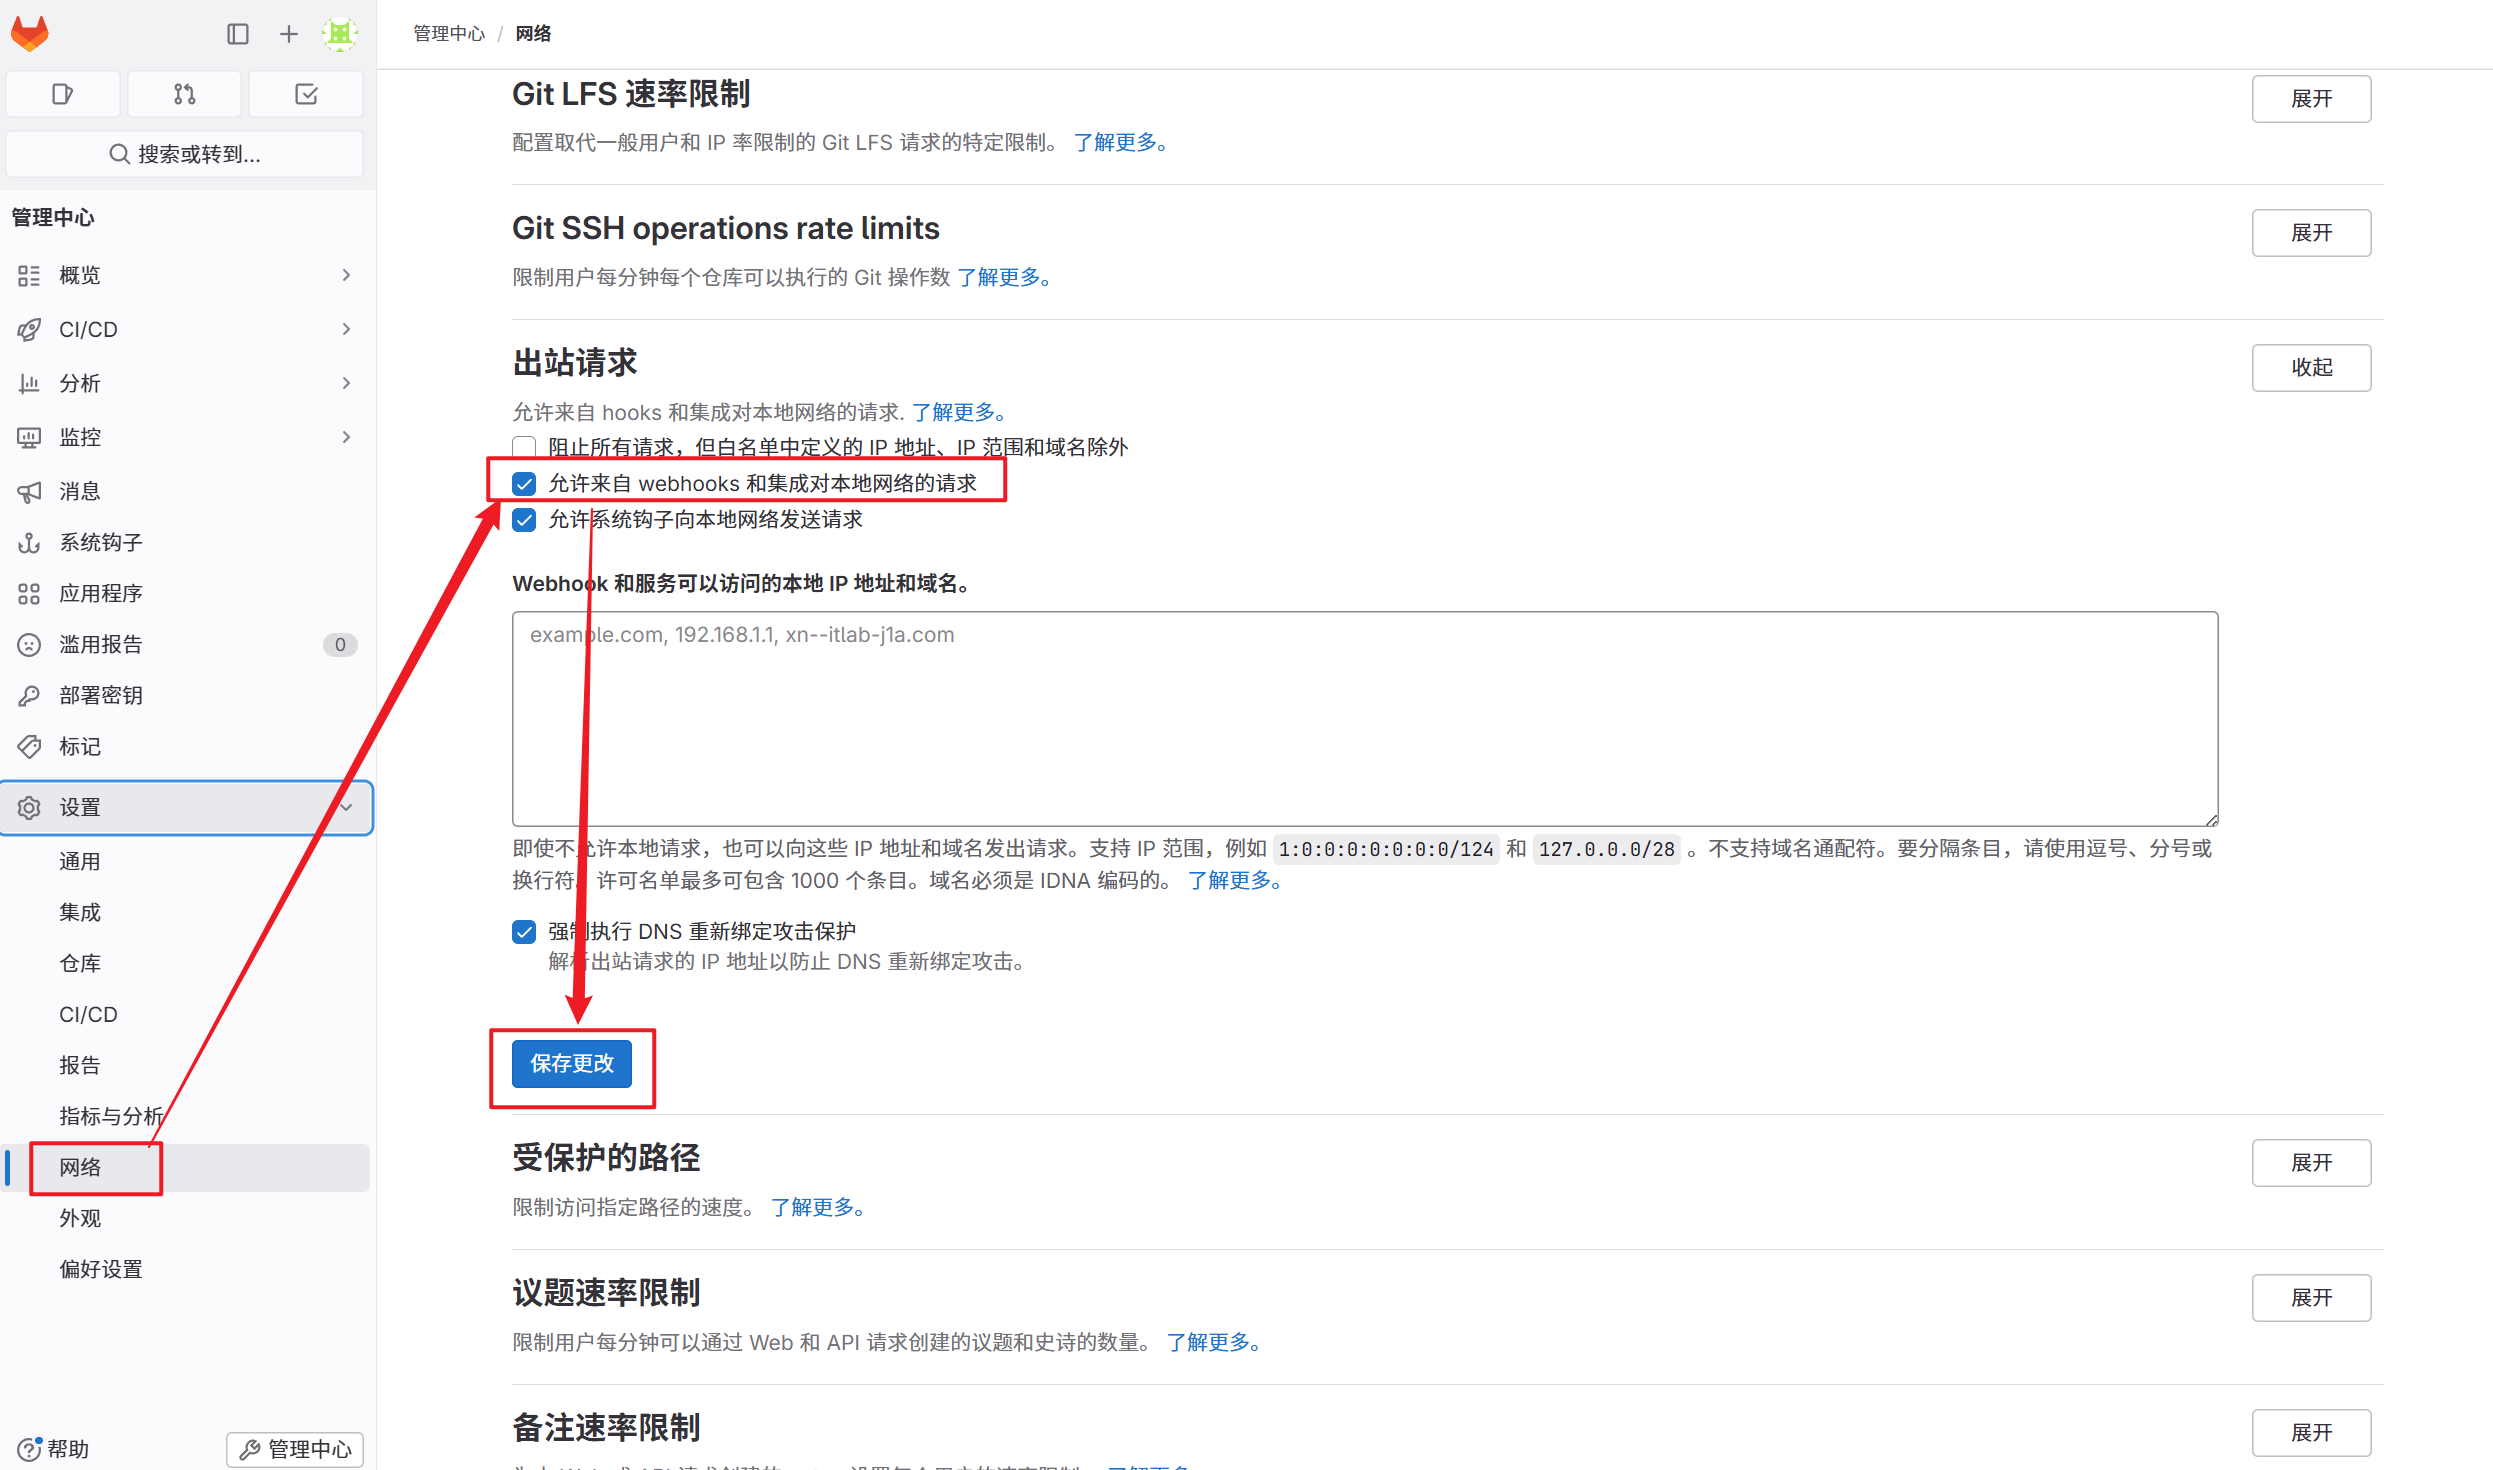
2.在gitlab中设定


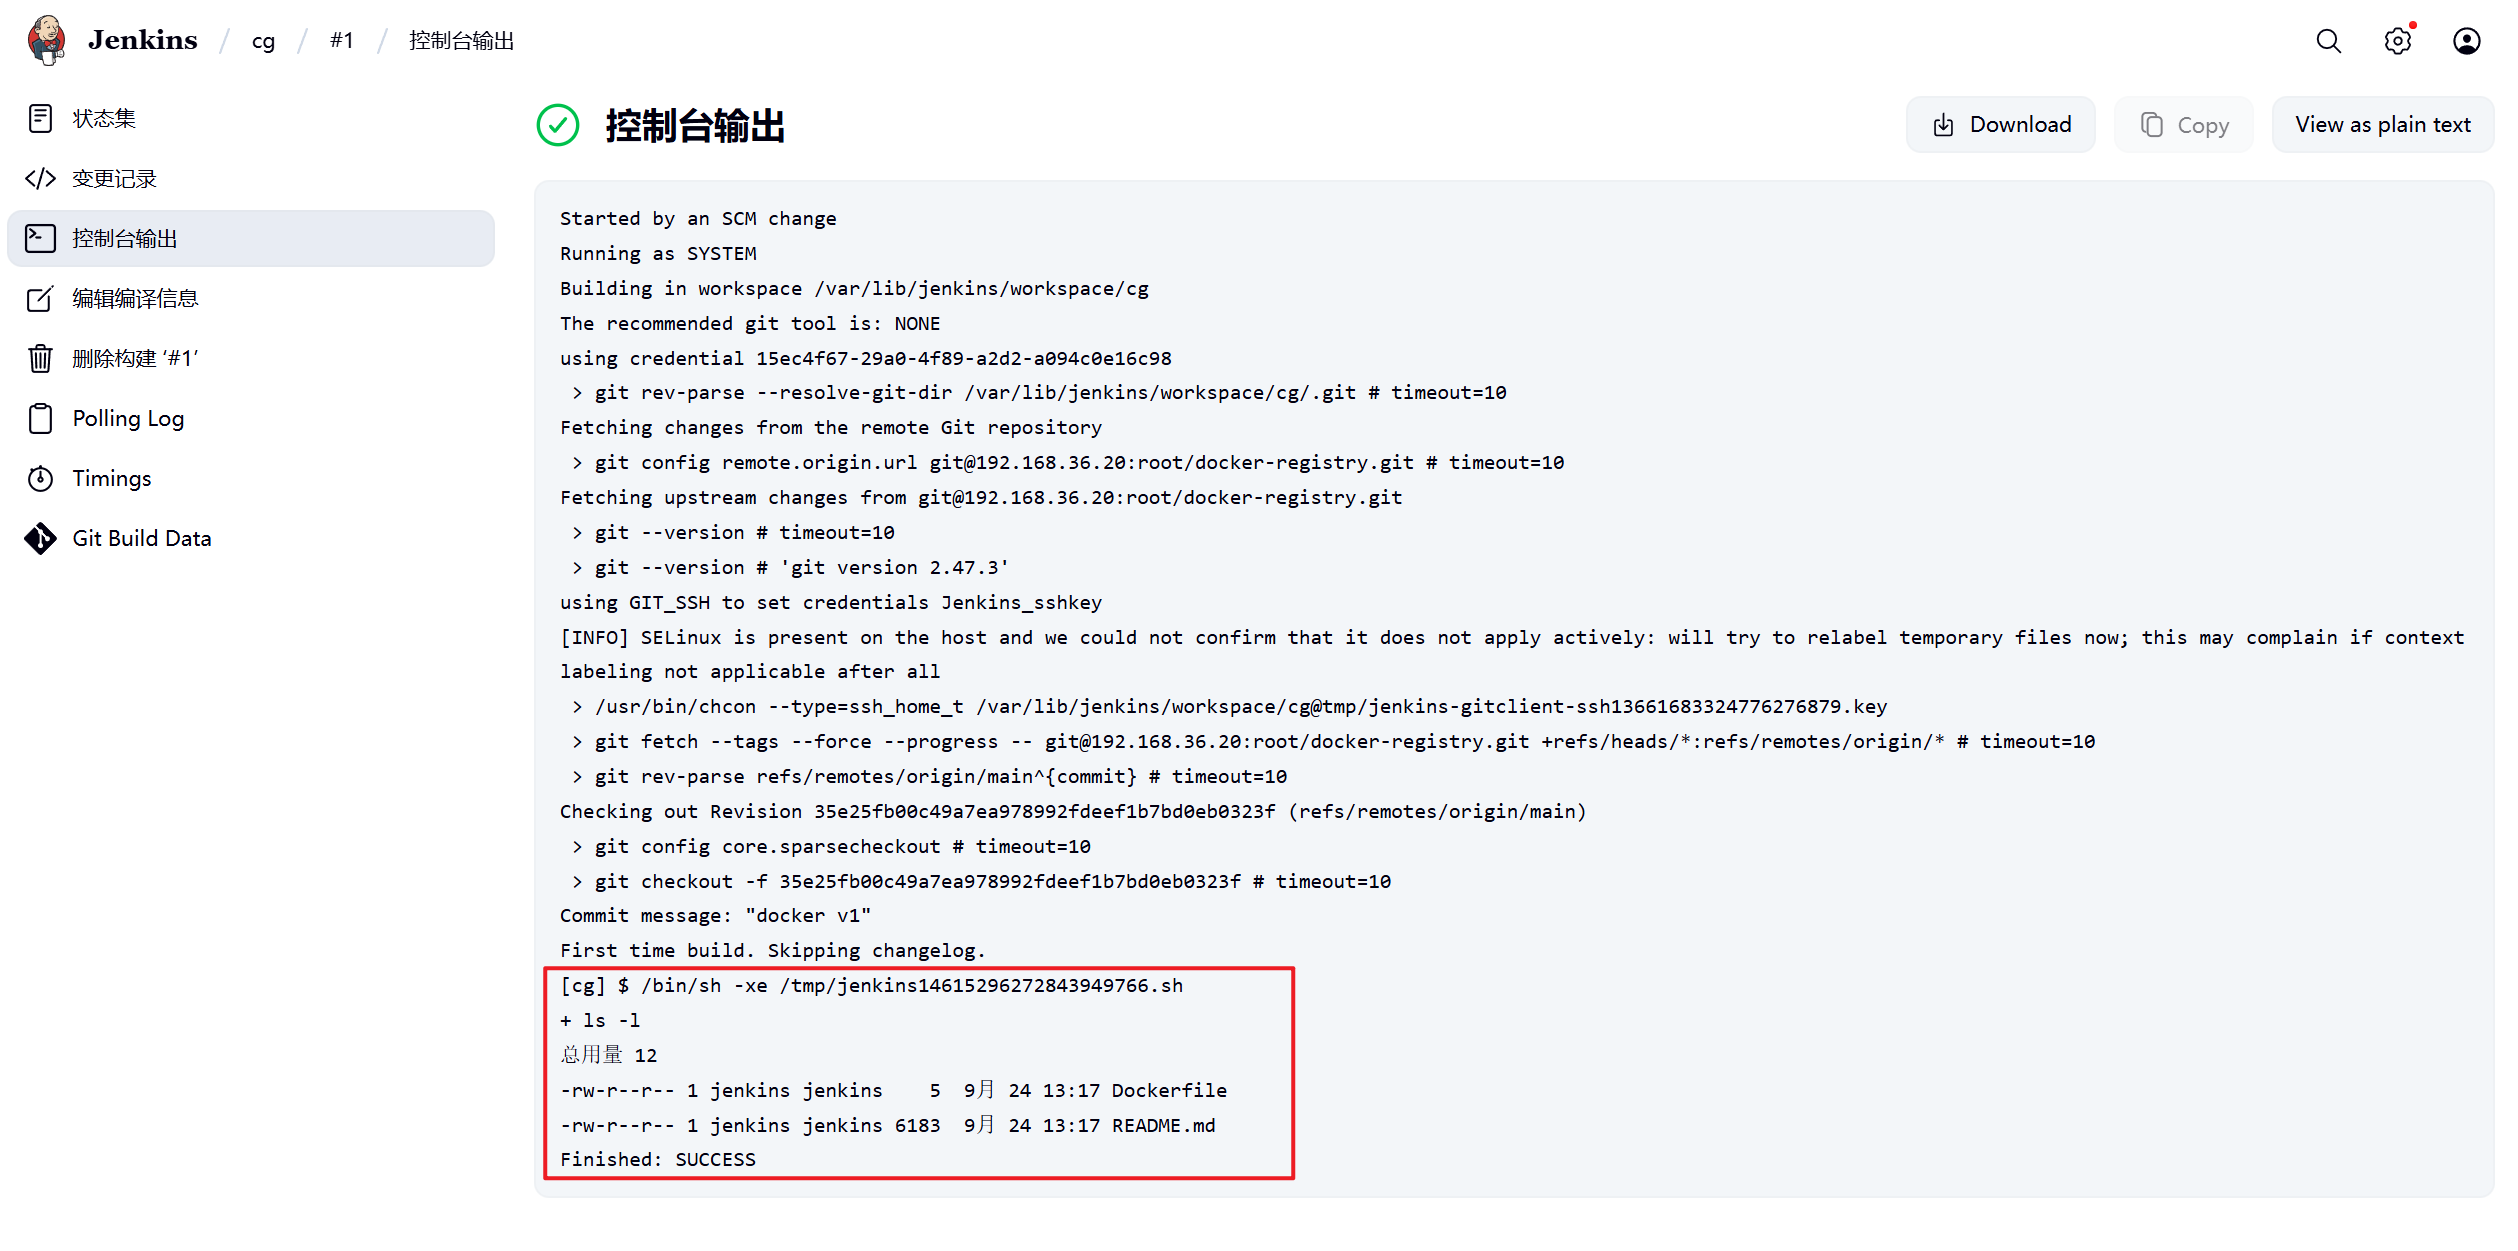
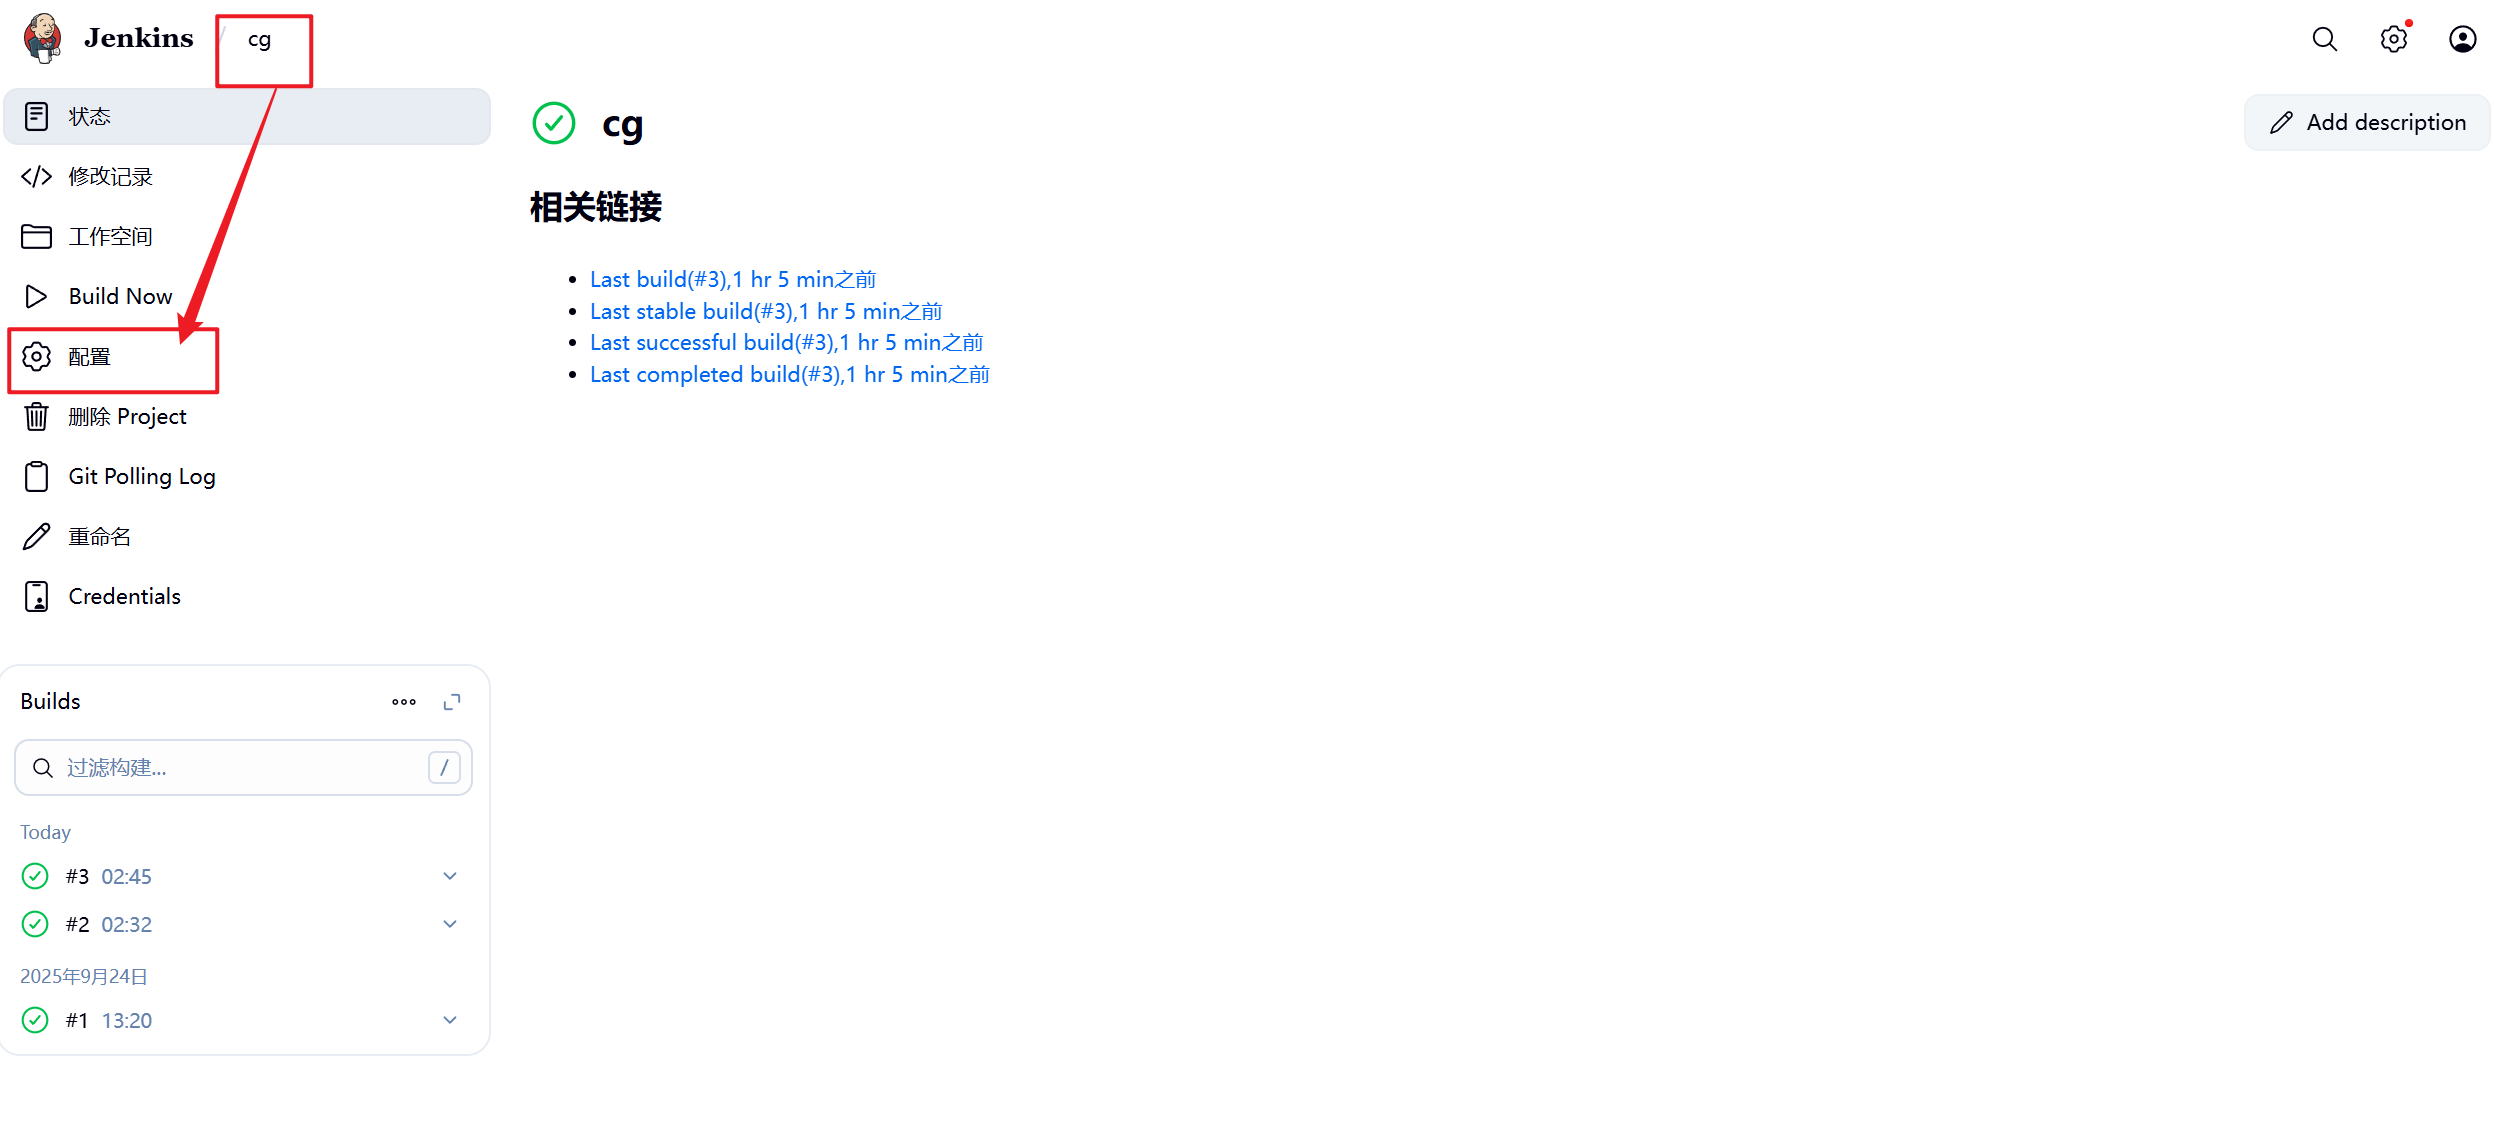
5.2.4.1 测试自动触发
[root@dev ~]# ls
公共  模板  视频  图片  文档  下载  音乐  桌面  anaconda-ks.cfg  docker-registry  vmset.sh
[root@dev ~]# cd docker-registry/
[root@dev docker-registry]# ls
Dockerfile  README.md
[root@dev docker-registry]# echo hello test > testfile
[root@dev docker-registry]# git add testfile
[root@dev docker-registry]# git commit -m "testfile v1"
[main ad8fc93] testfile v1
 1 file changed, 1 insertion(+)
 create mode 100644 testfile
[root@dev docker-registry]# git push -u origin main
枚举对象中: 4, 完成.
对象计数中: 100% (4/4), 完成.
使用 2 个线程进行压缩
压缩对象中: 100% (2/2), 完成.
写入对象中: 100% (3/3), 302 字节 | 302.00 KiB/s, 完成.
总共 3(差异 0),复用 0(差异 0),包复用 0(来自  0 个包)
To 192.168.36.20:root/docker-registry.git
   35e25fb..ad8fc93  main -> main
分支 'main' 设置为跟踪 'origin/main'。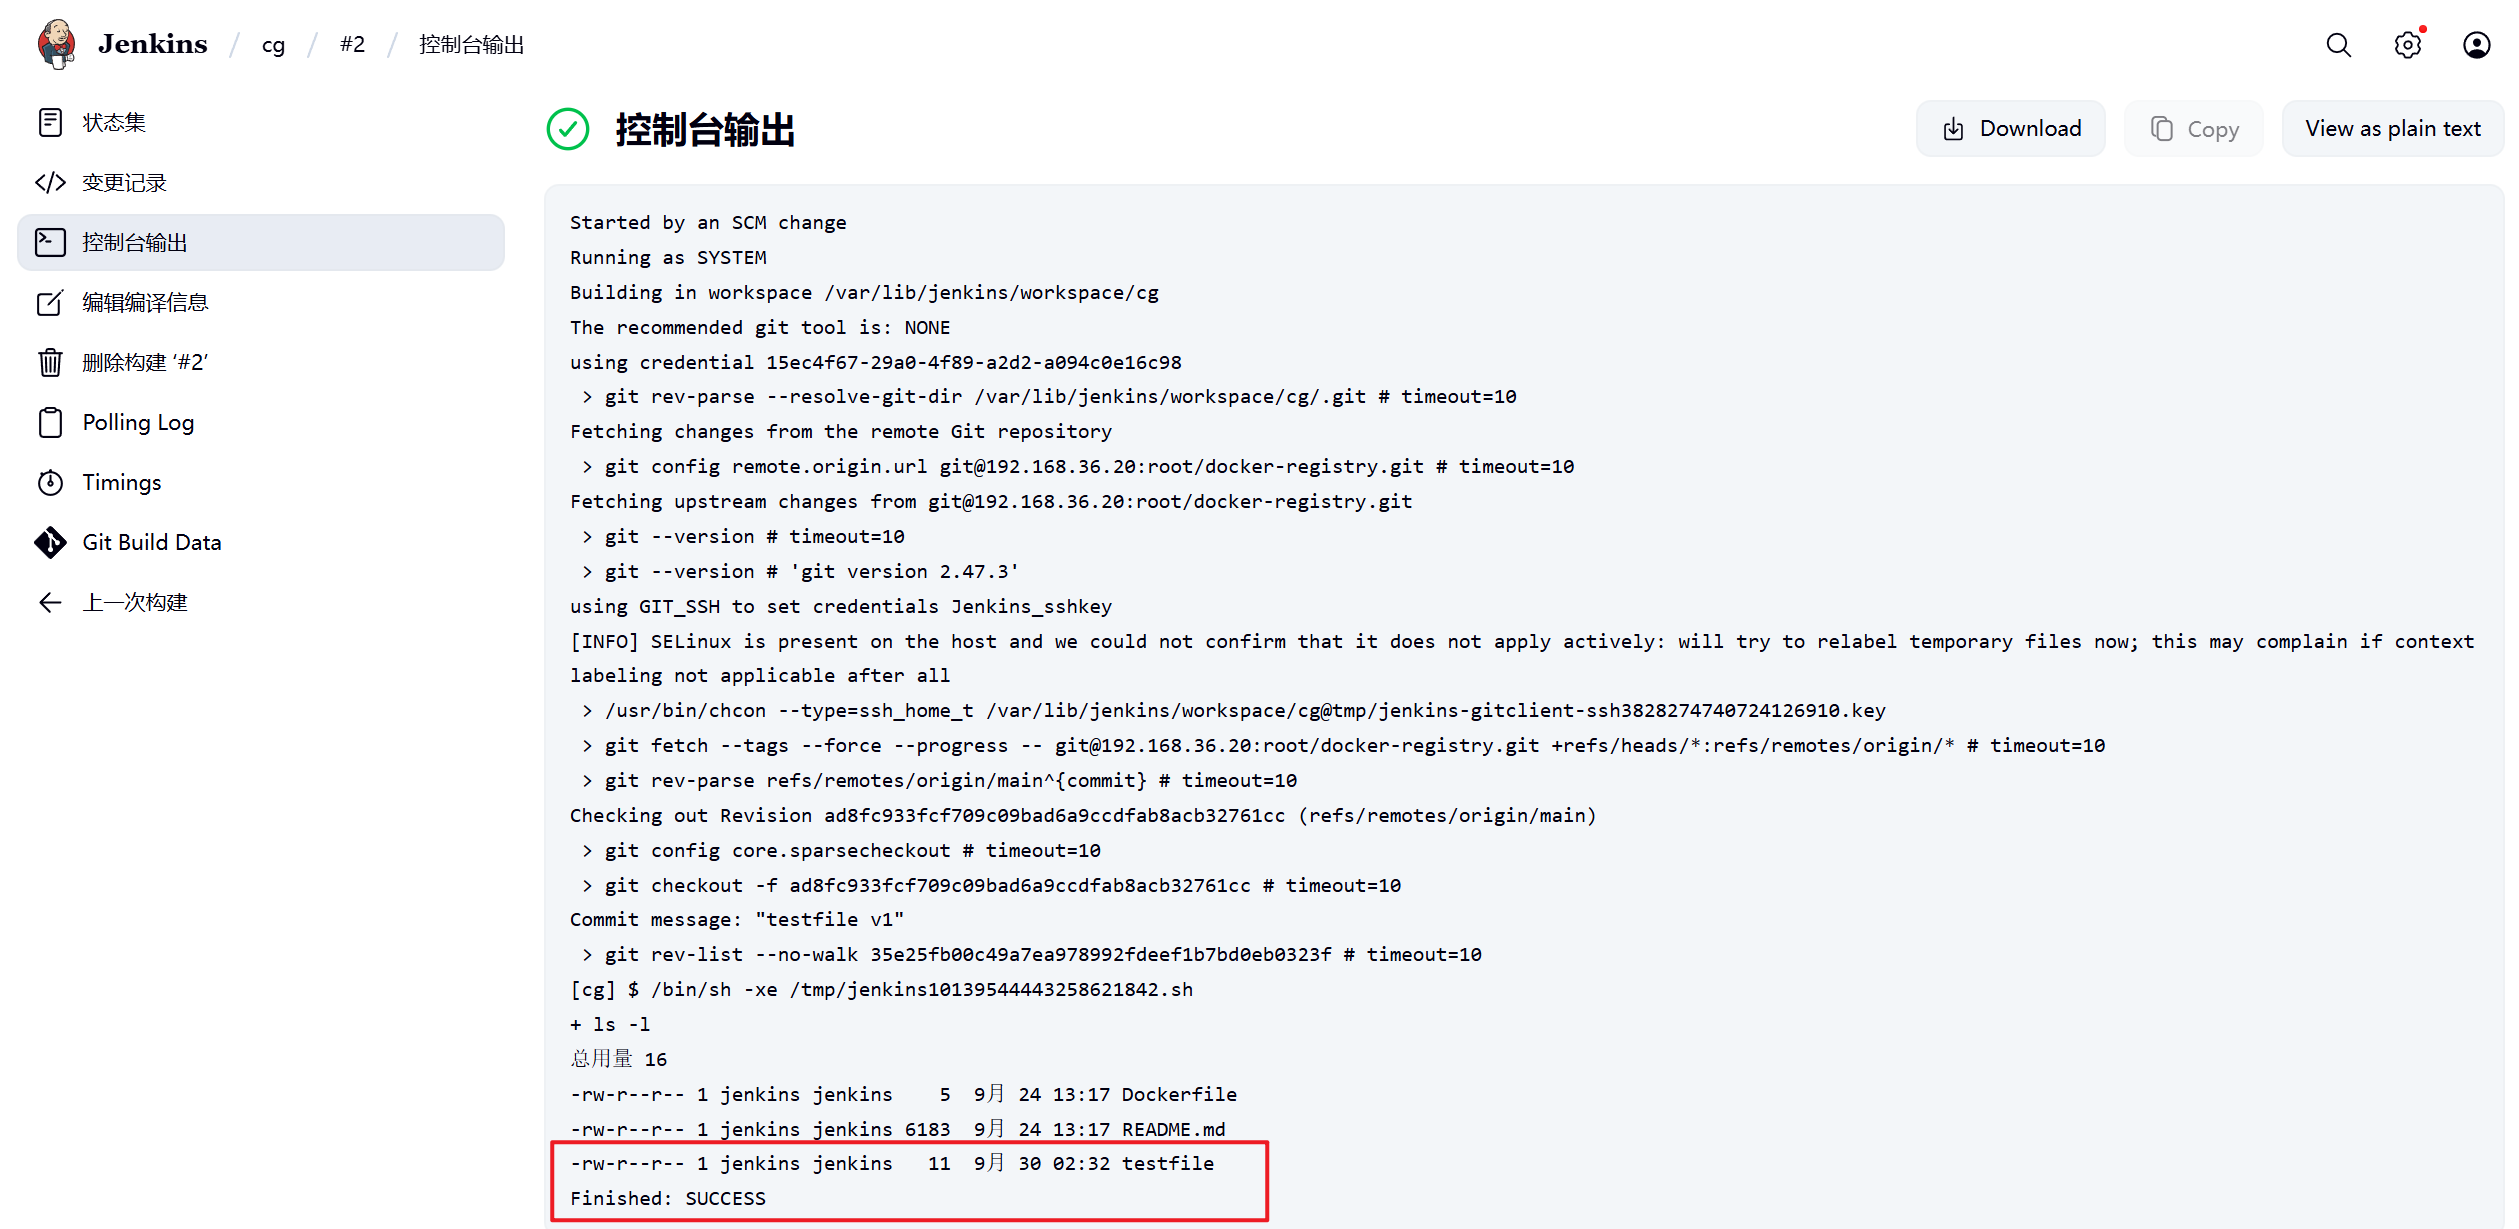
5.3 docker build 持续集成
为了让容器构建镜像可以持续集成并自动上传到harbor仓库,业务主机通过持续交付自动从仓库中下载镜像最近版本并实现业务更新

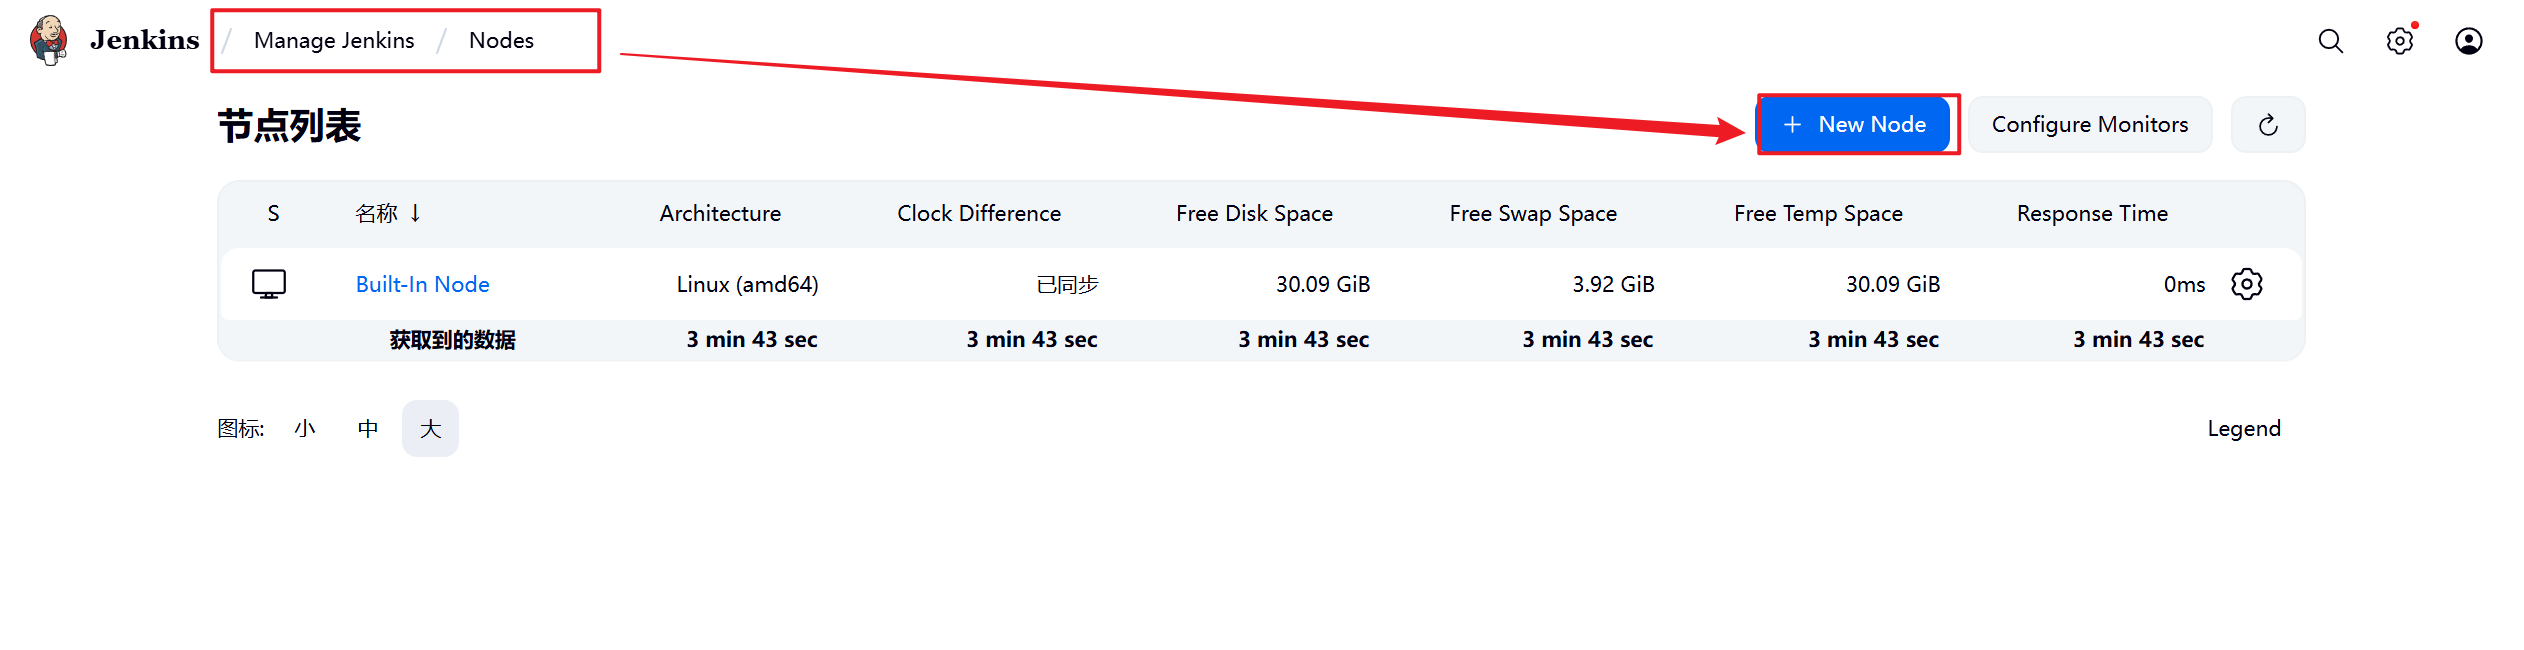
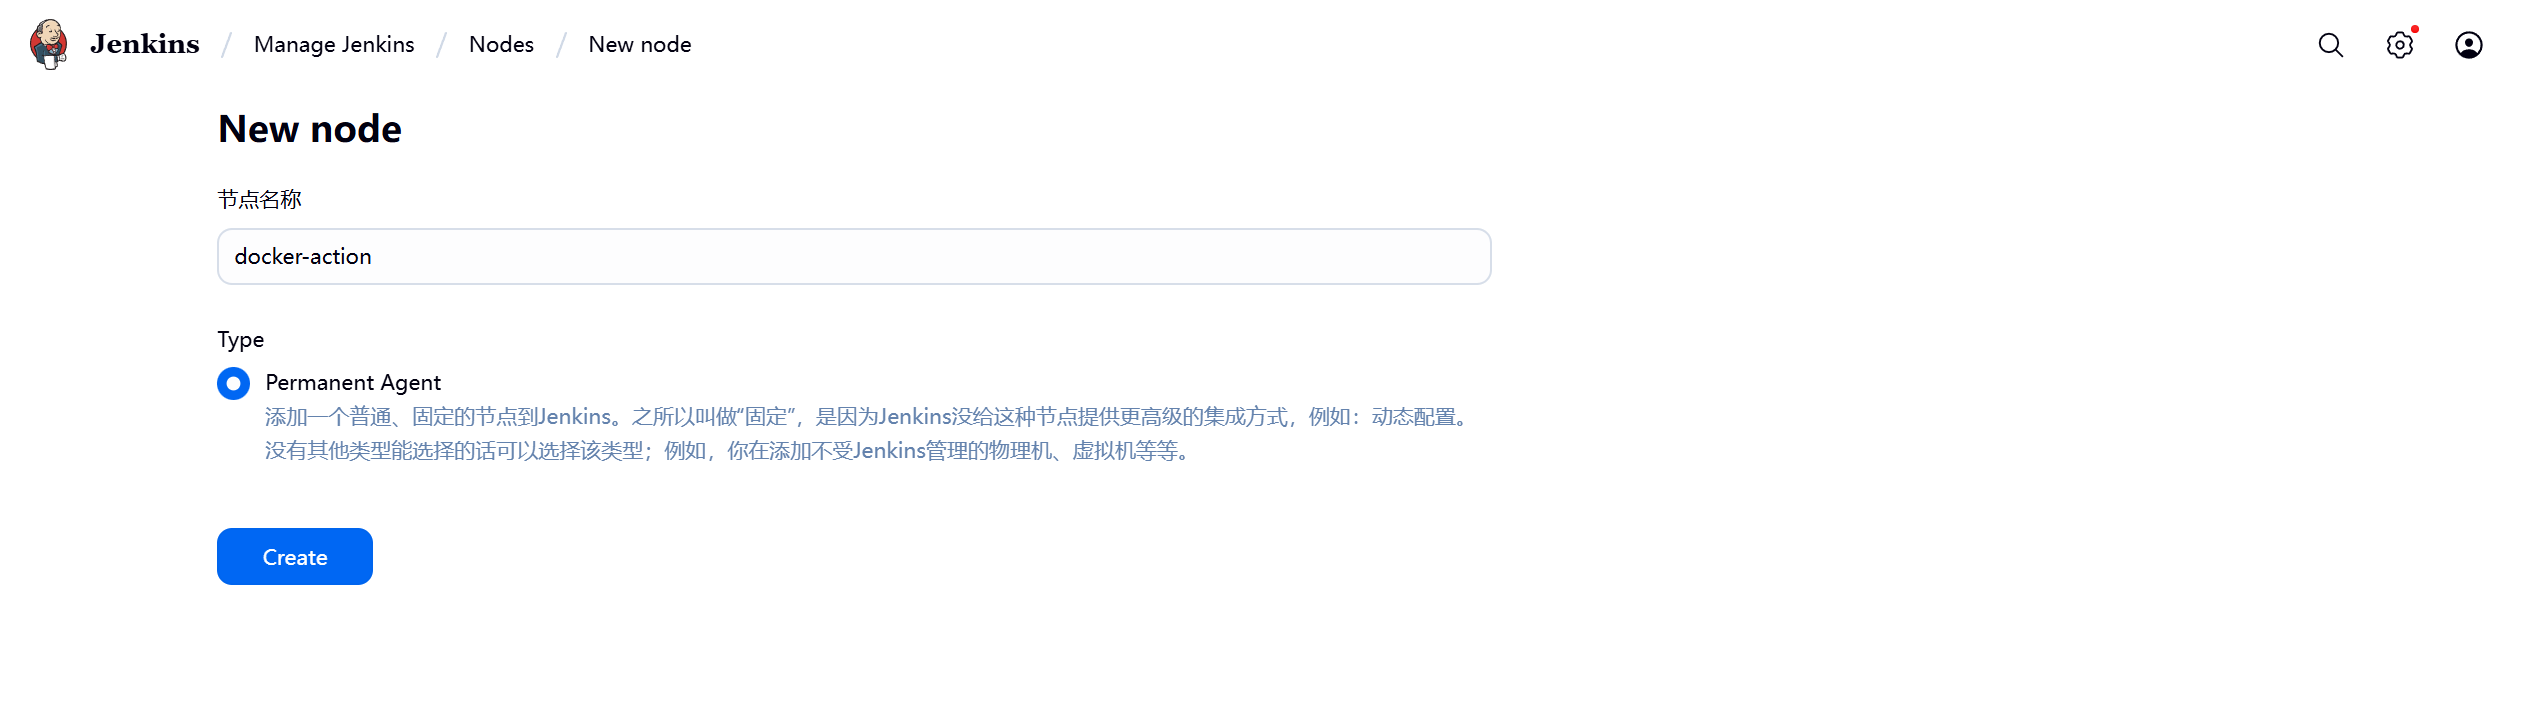
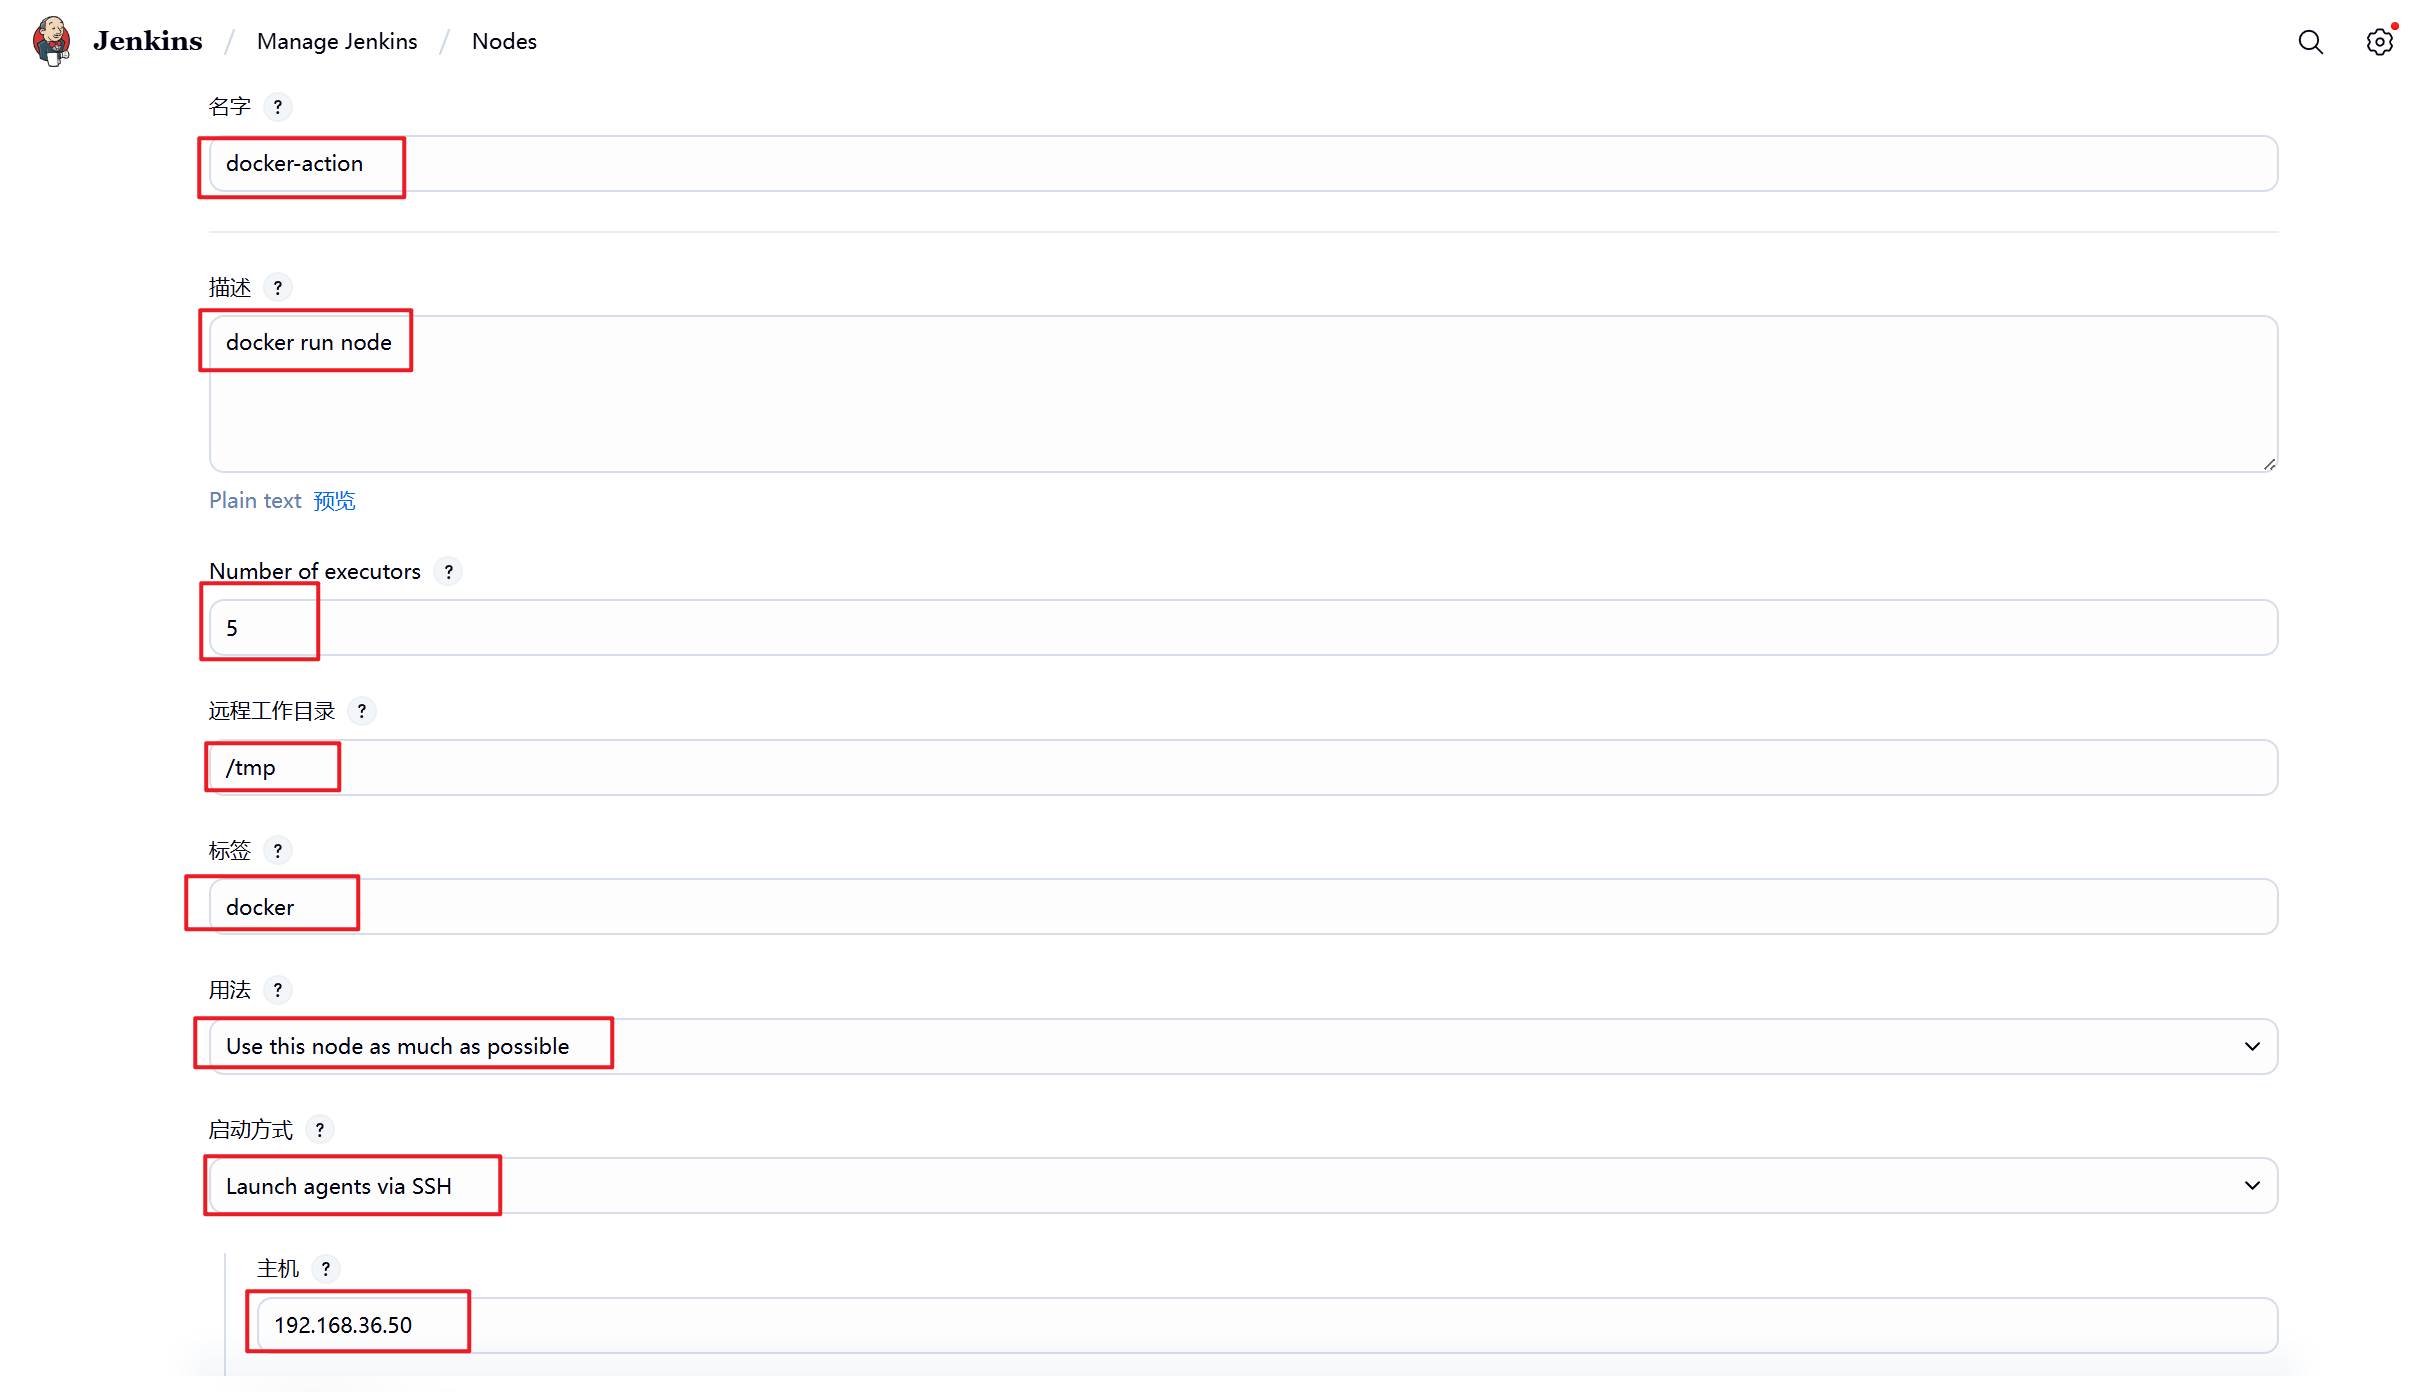
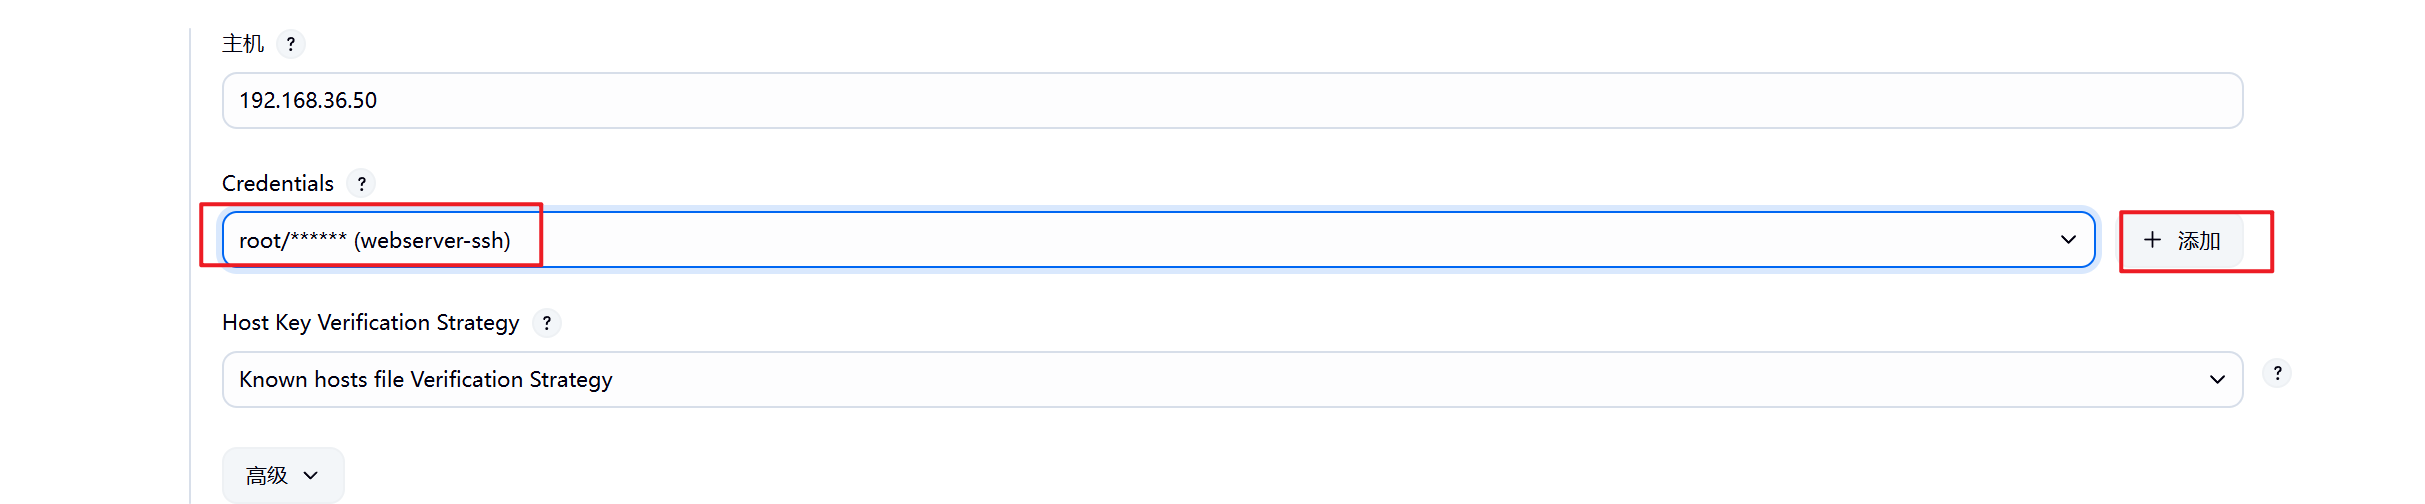
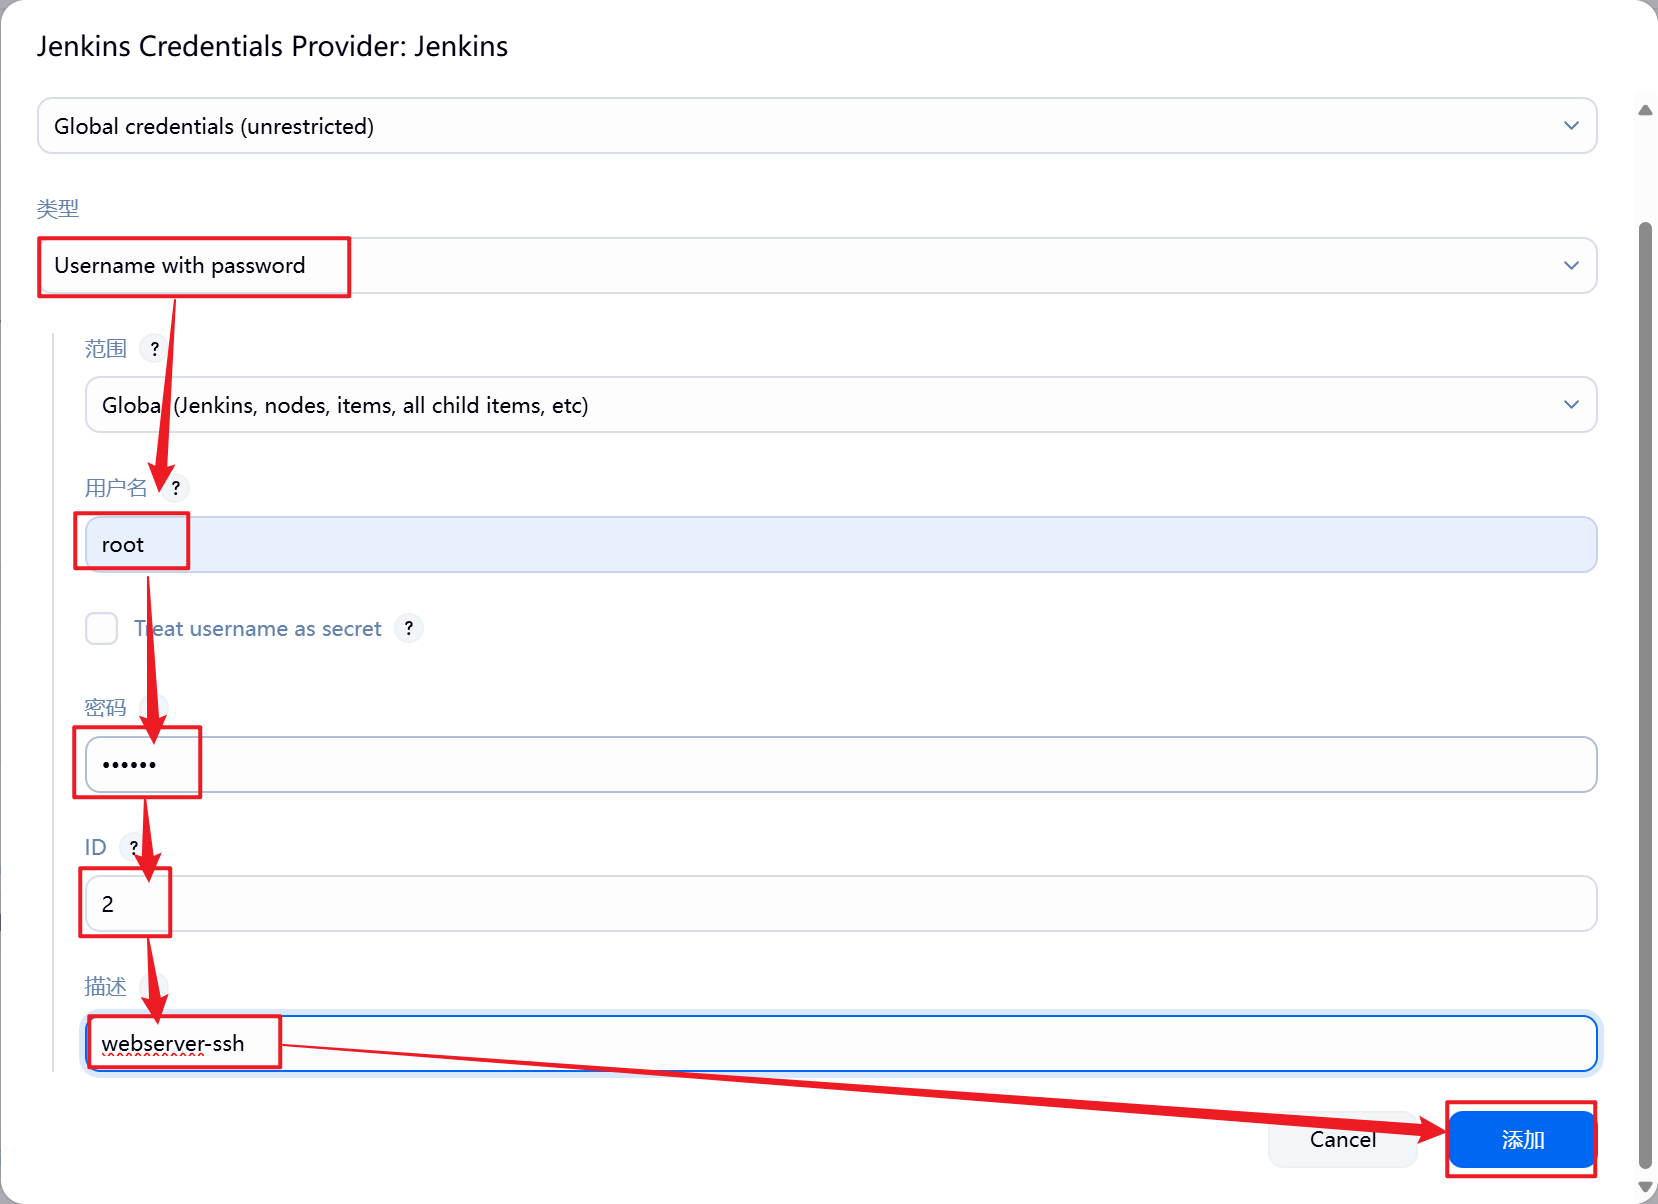
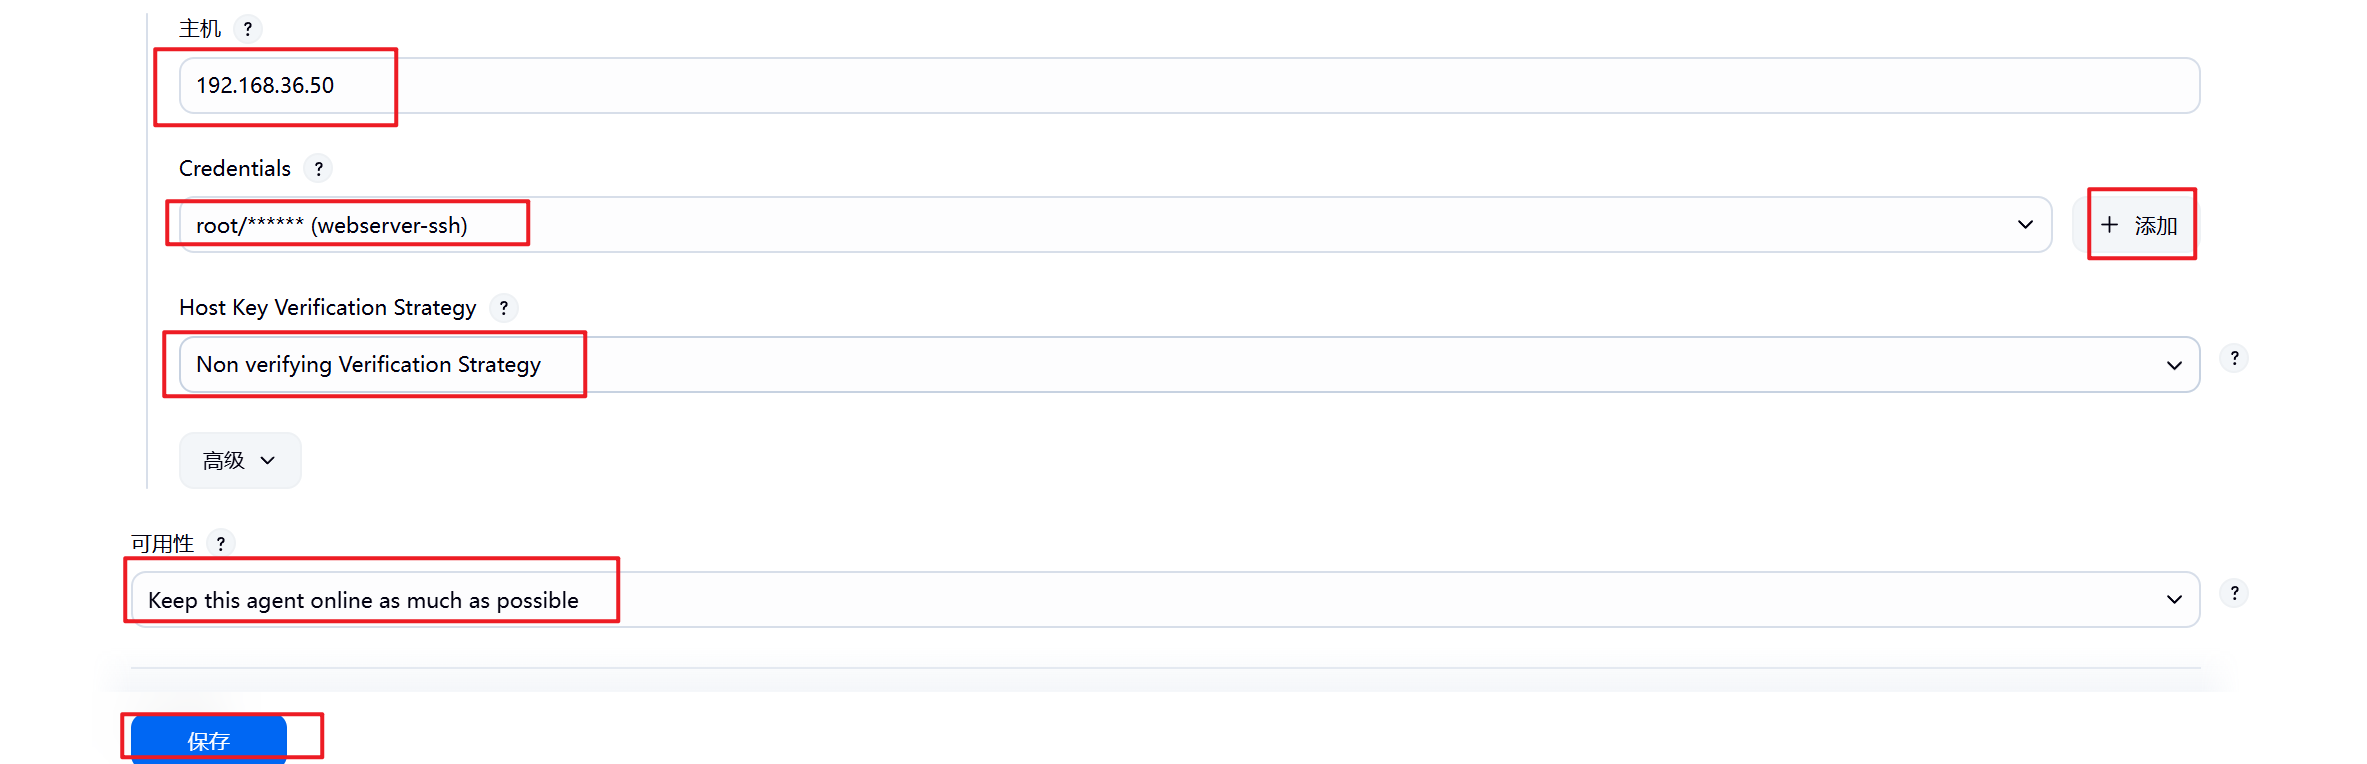
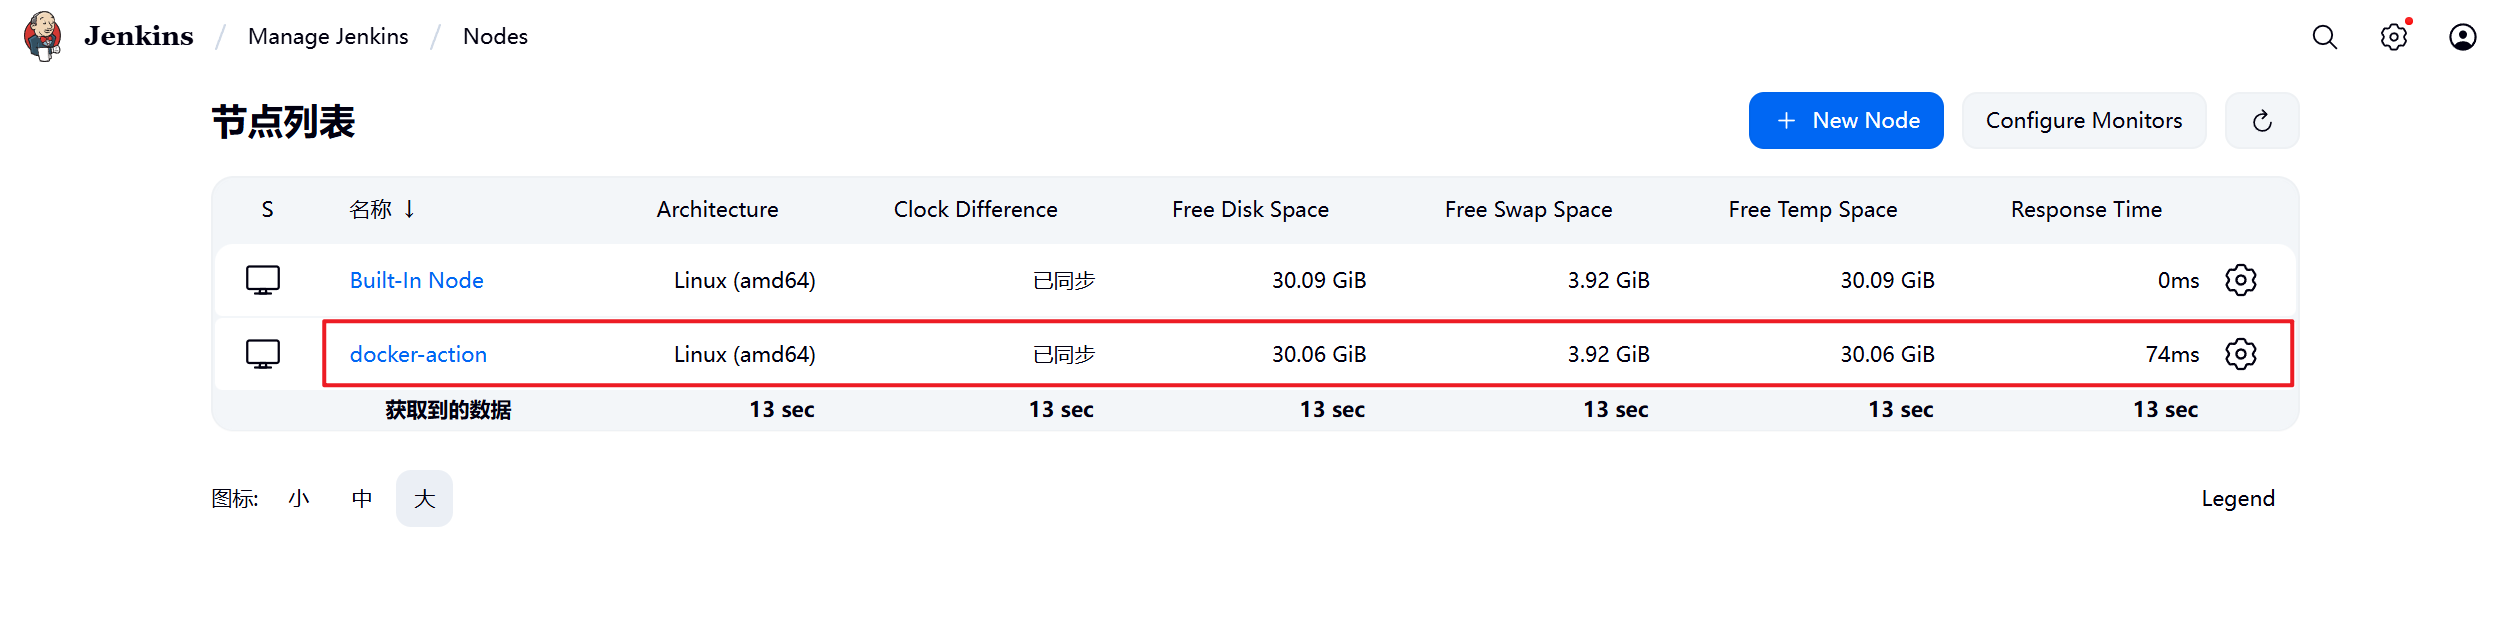
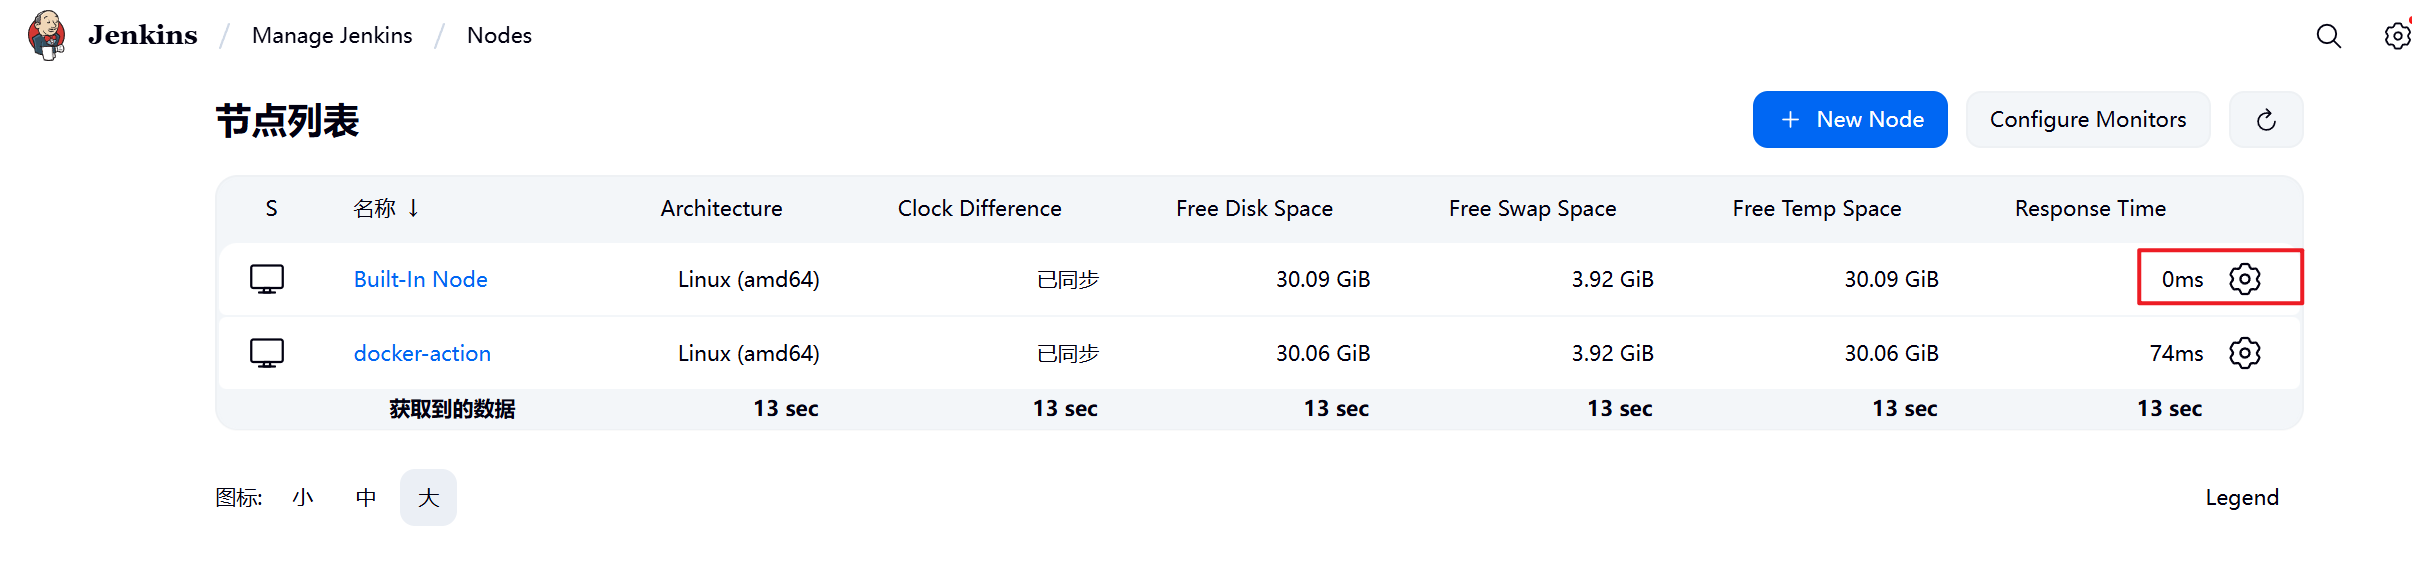
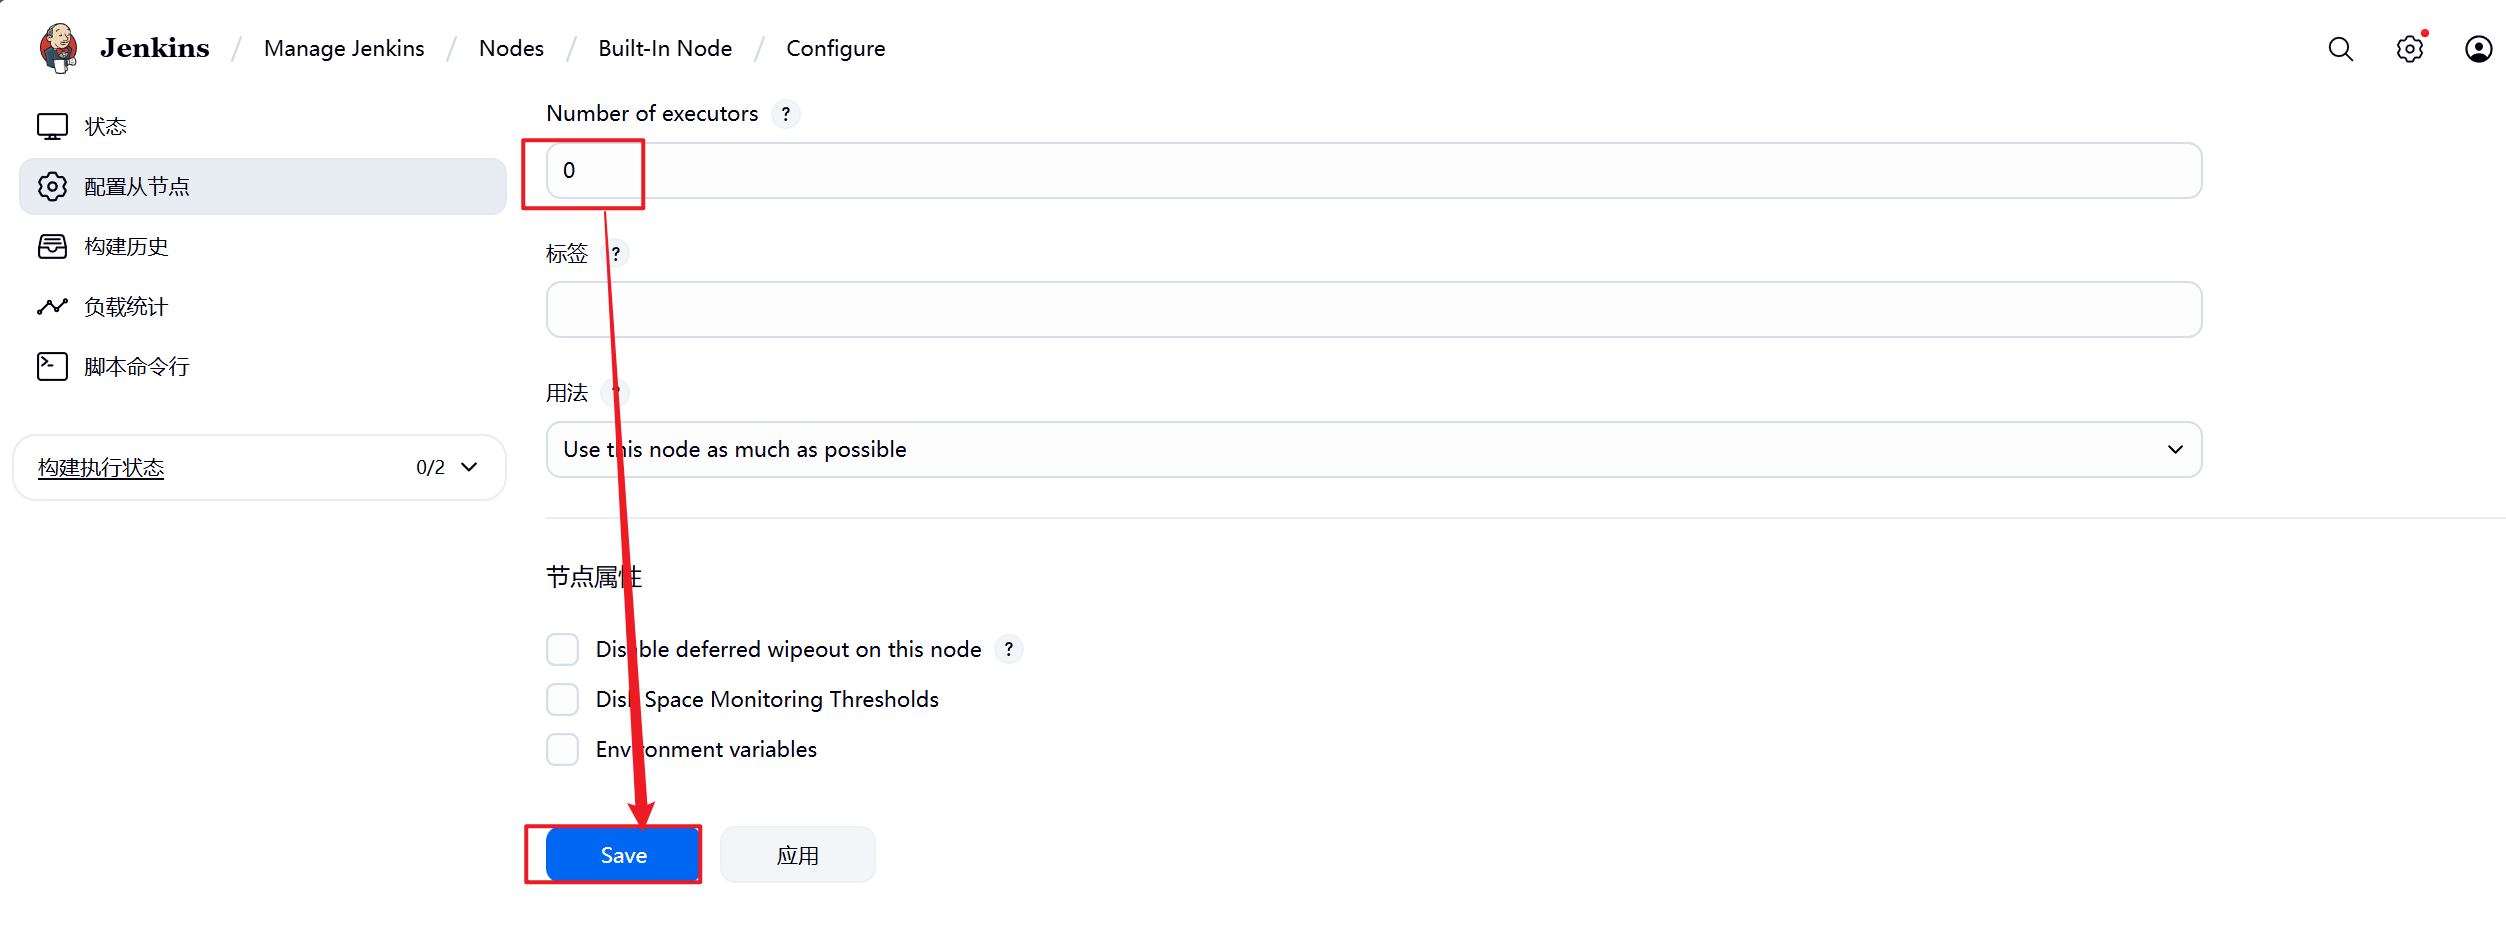
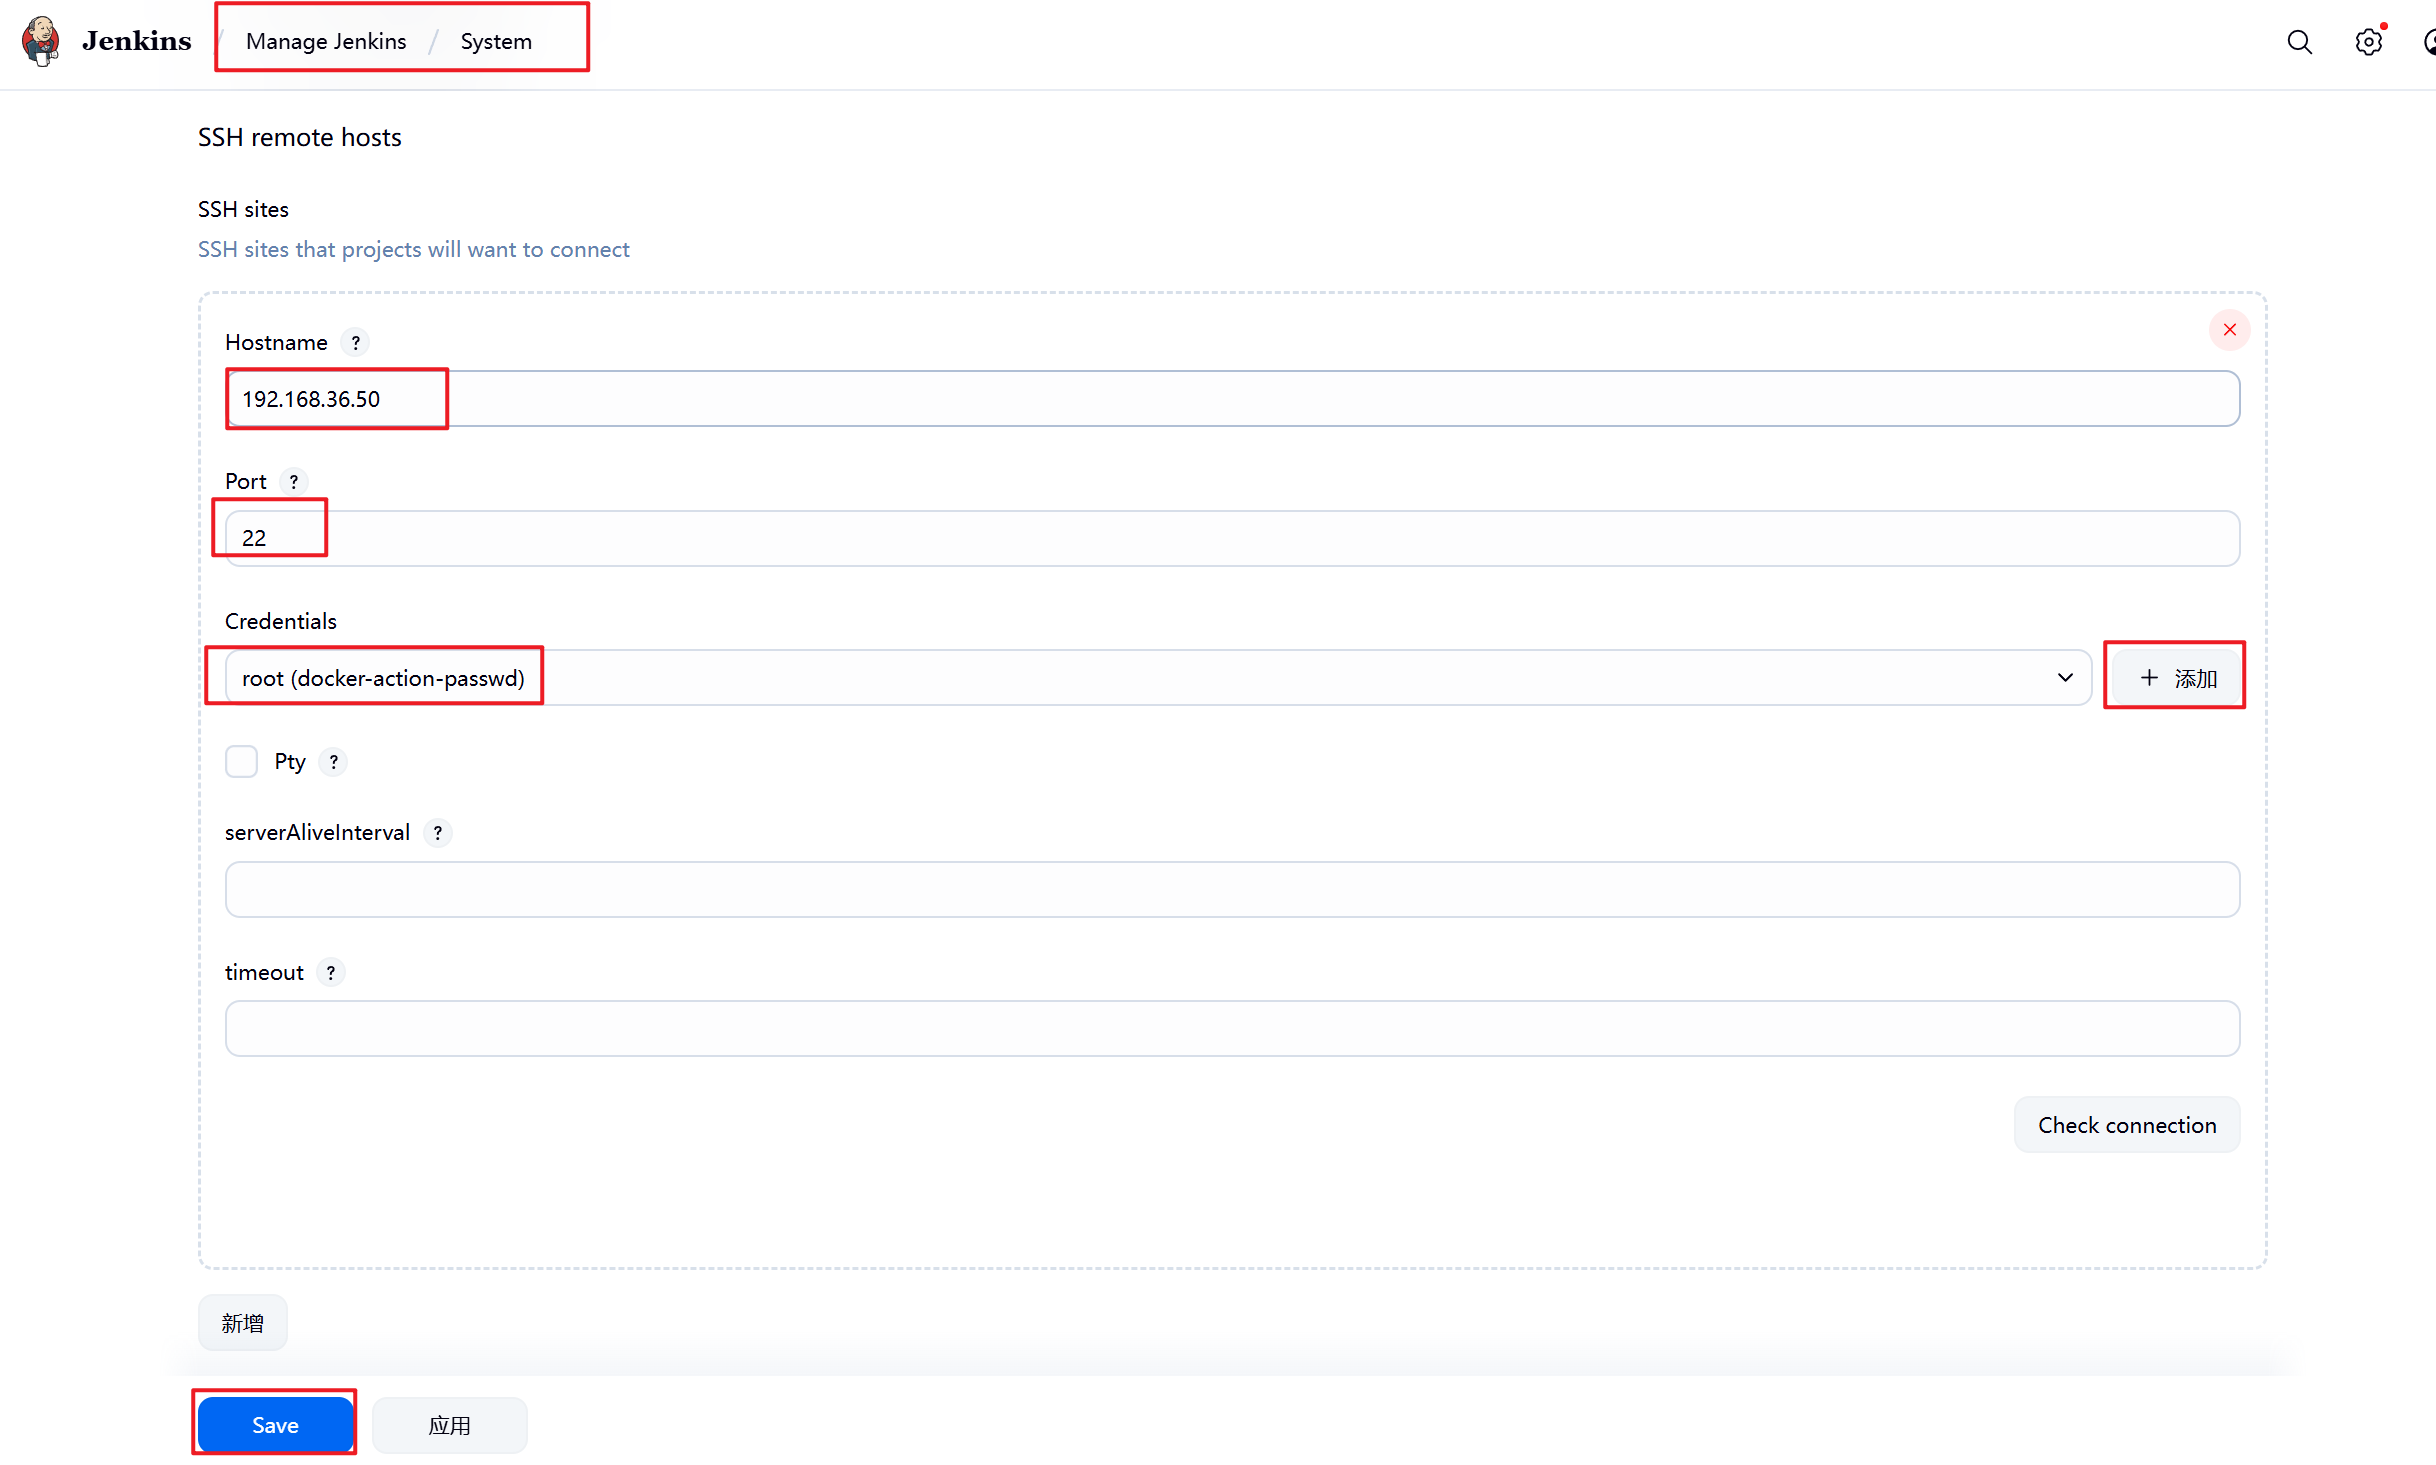
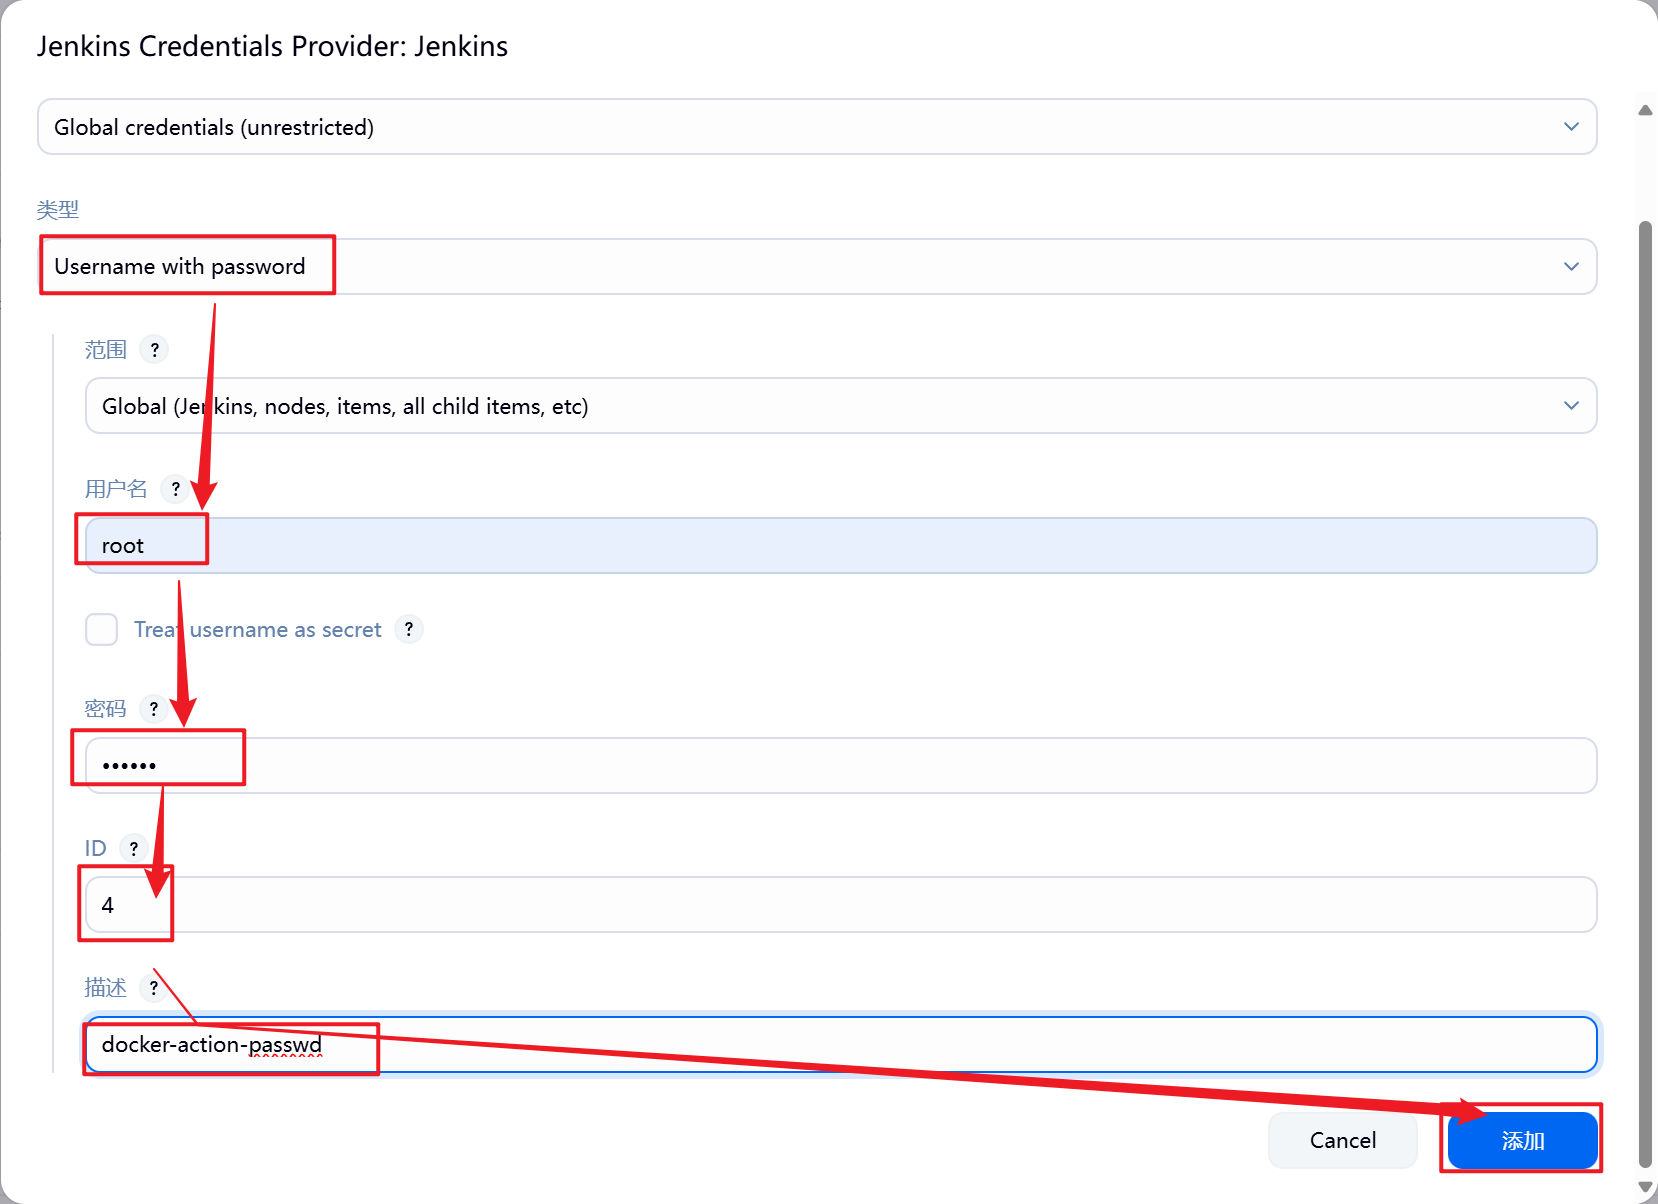
5.3.1 在Jenkins中添加registry-node
1.部署Jenkins节点
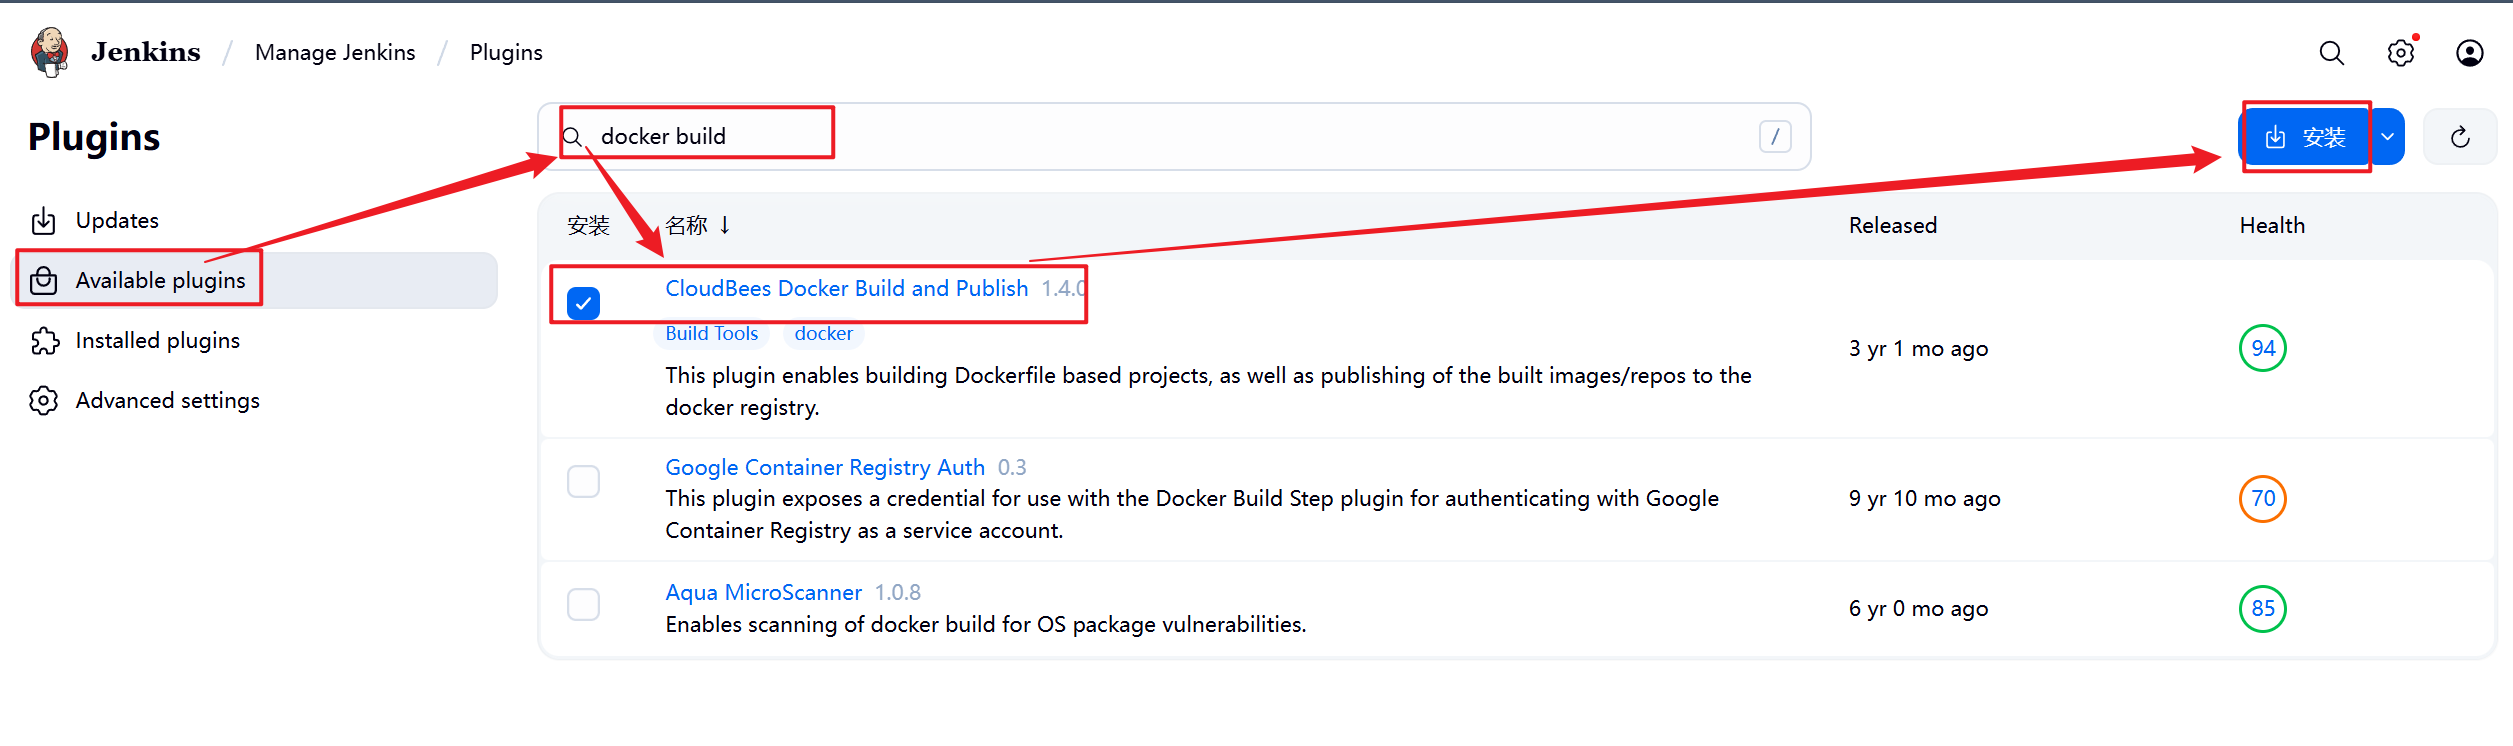
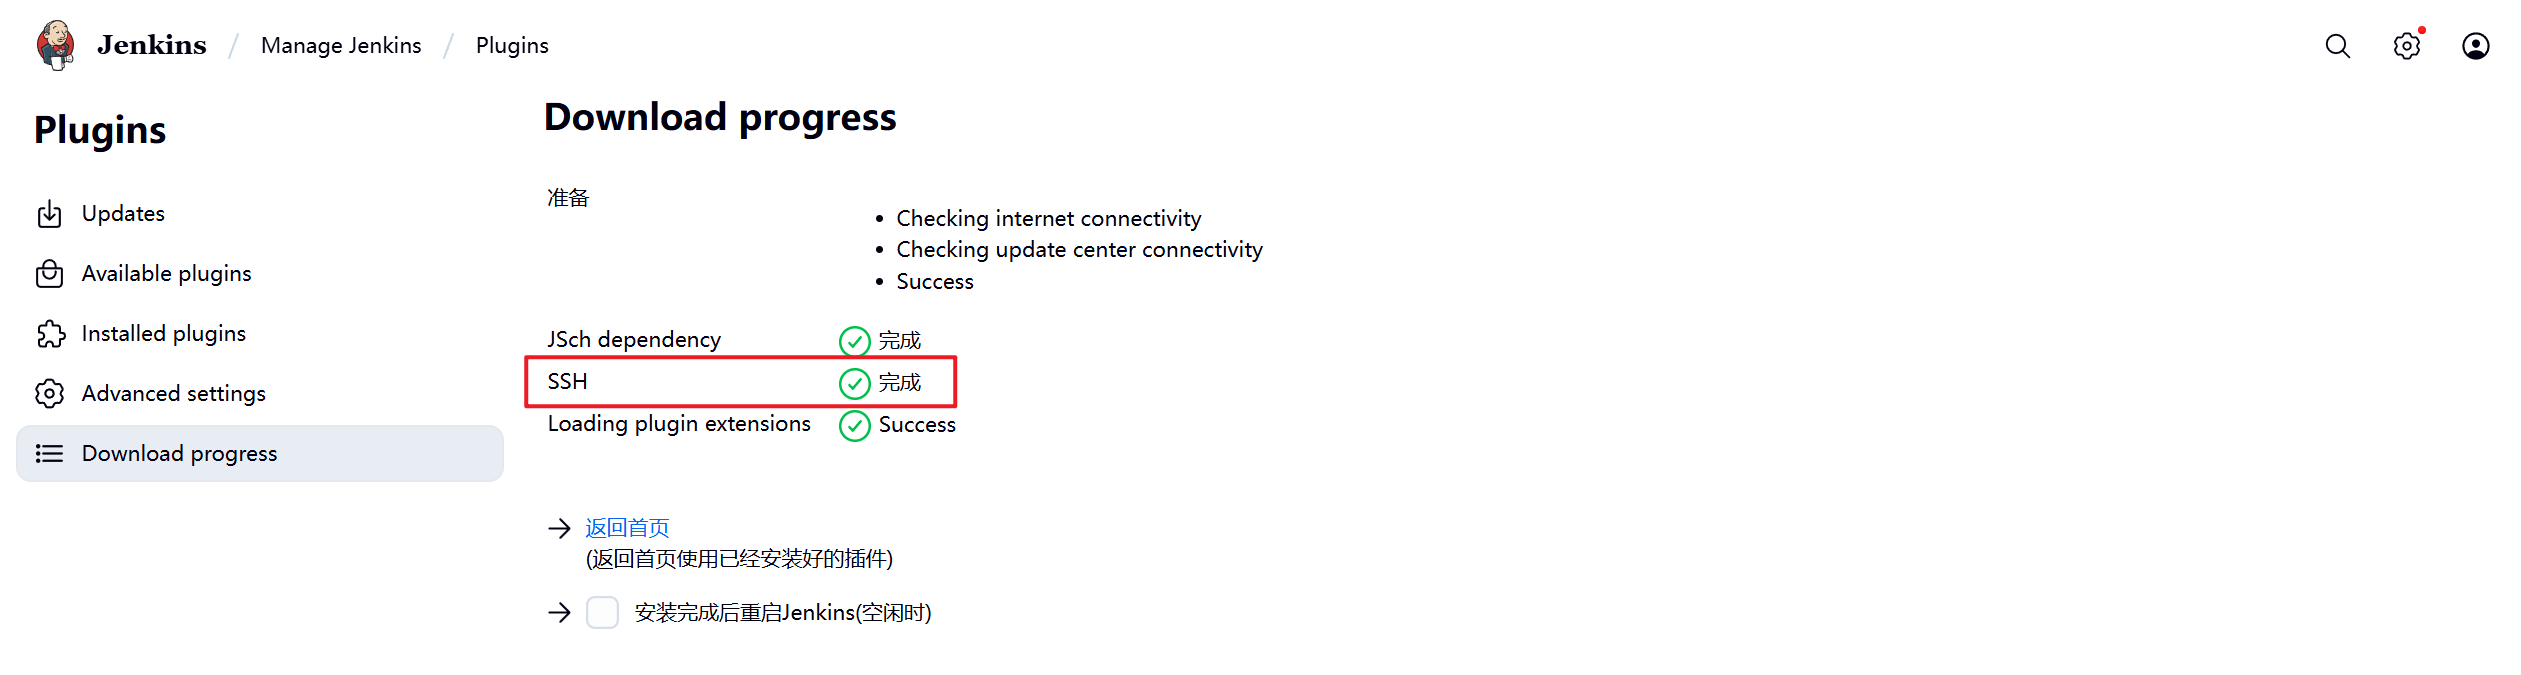
安装完后建议重启Jenkins

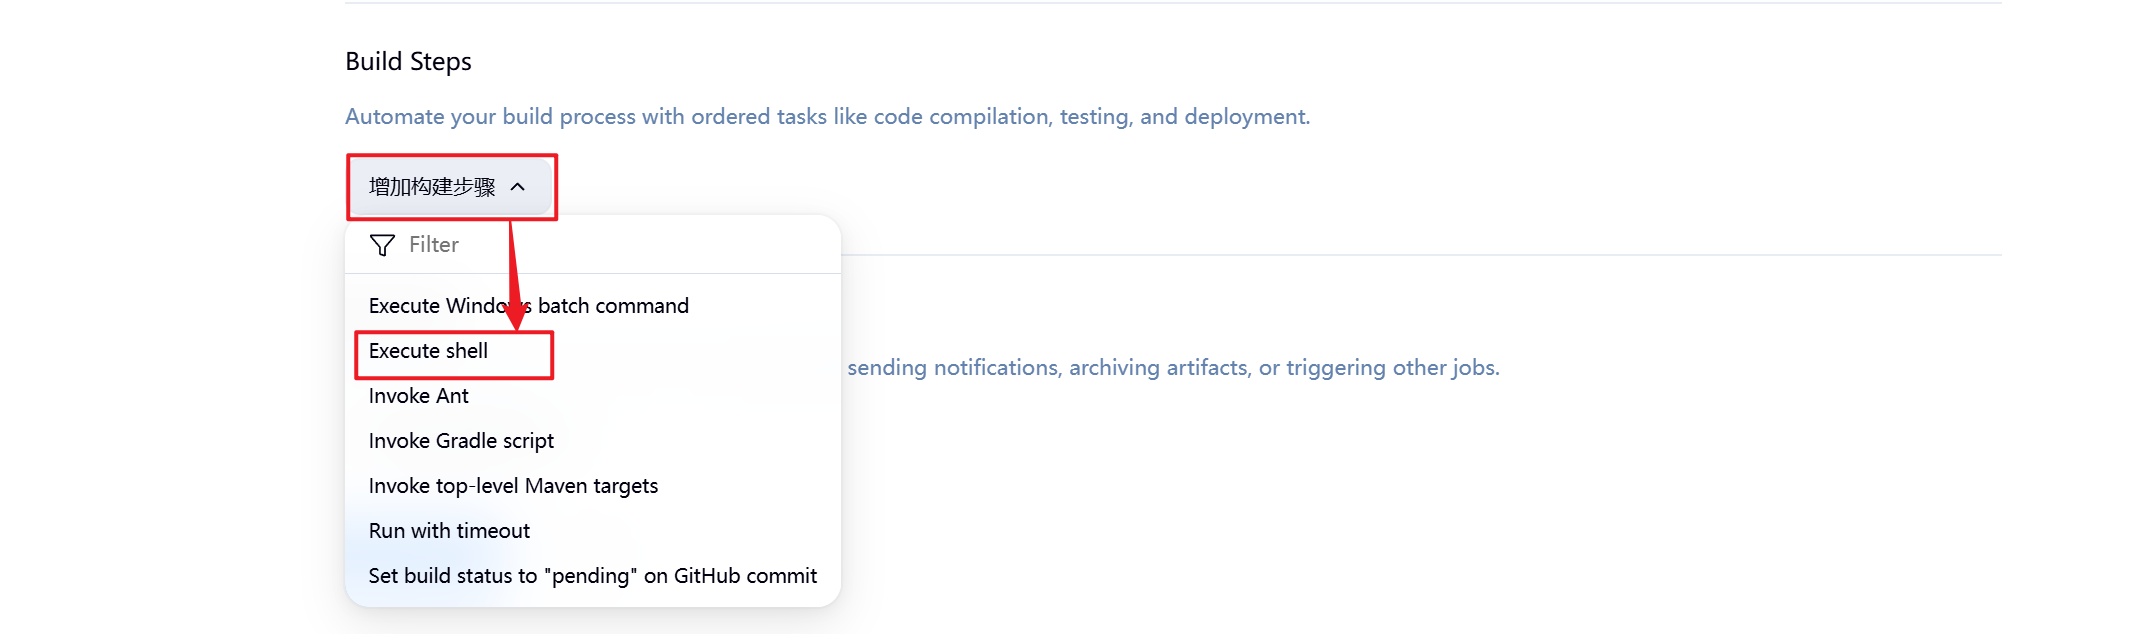
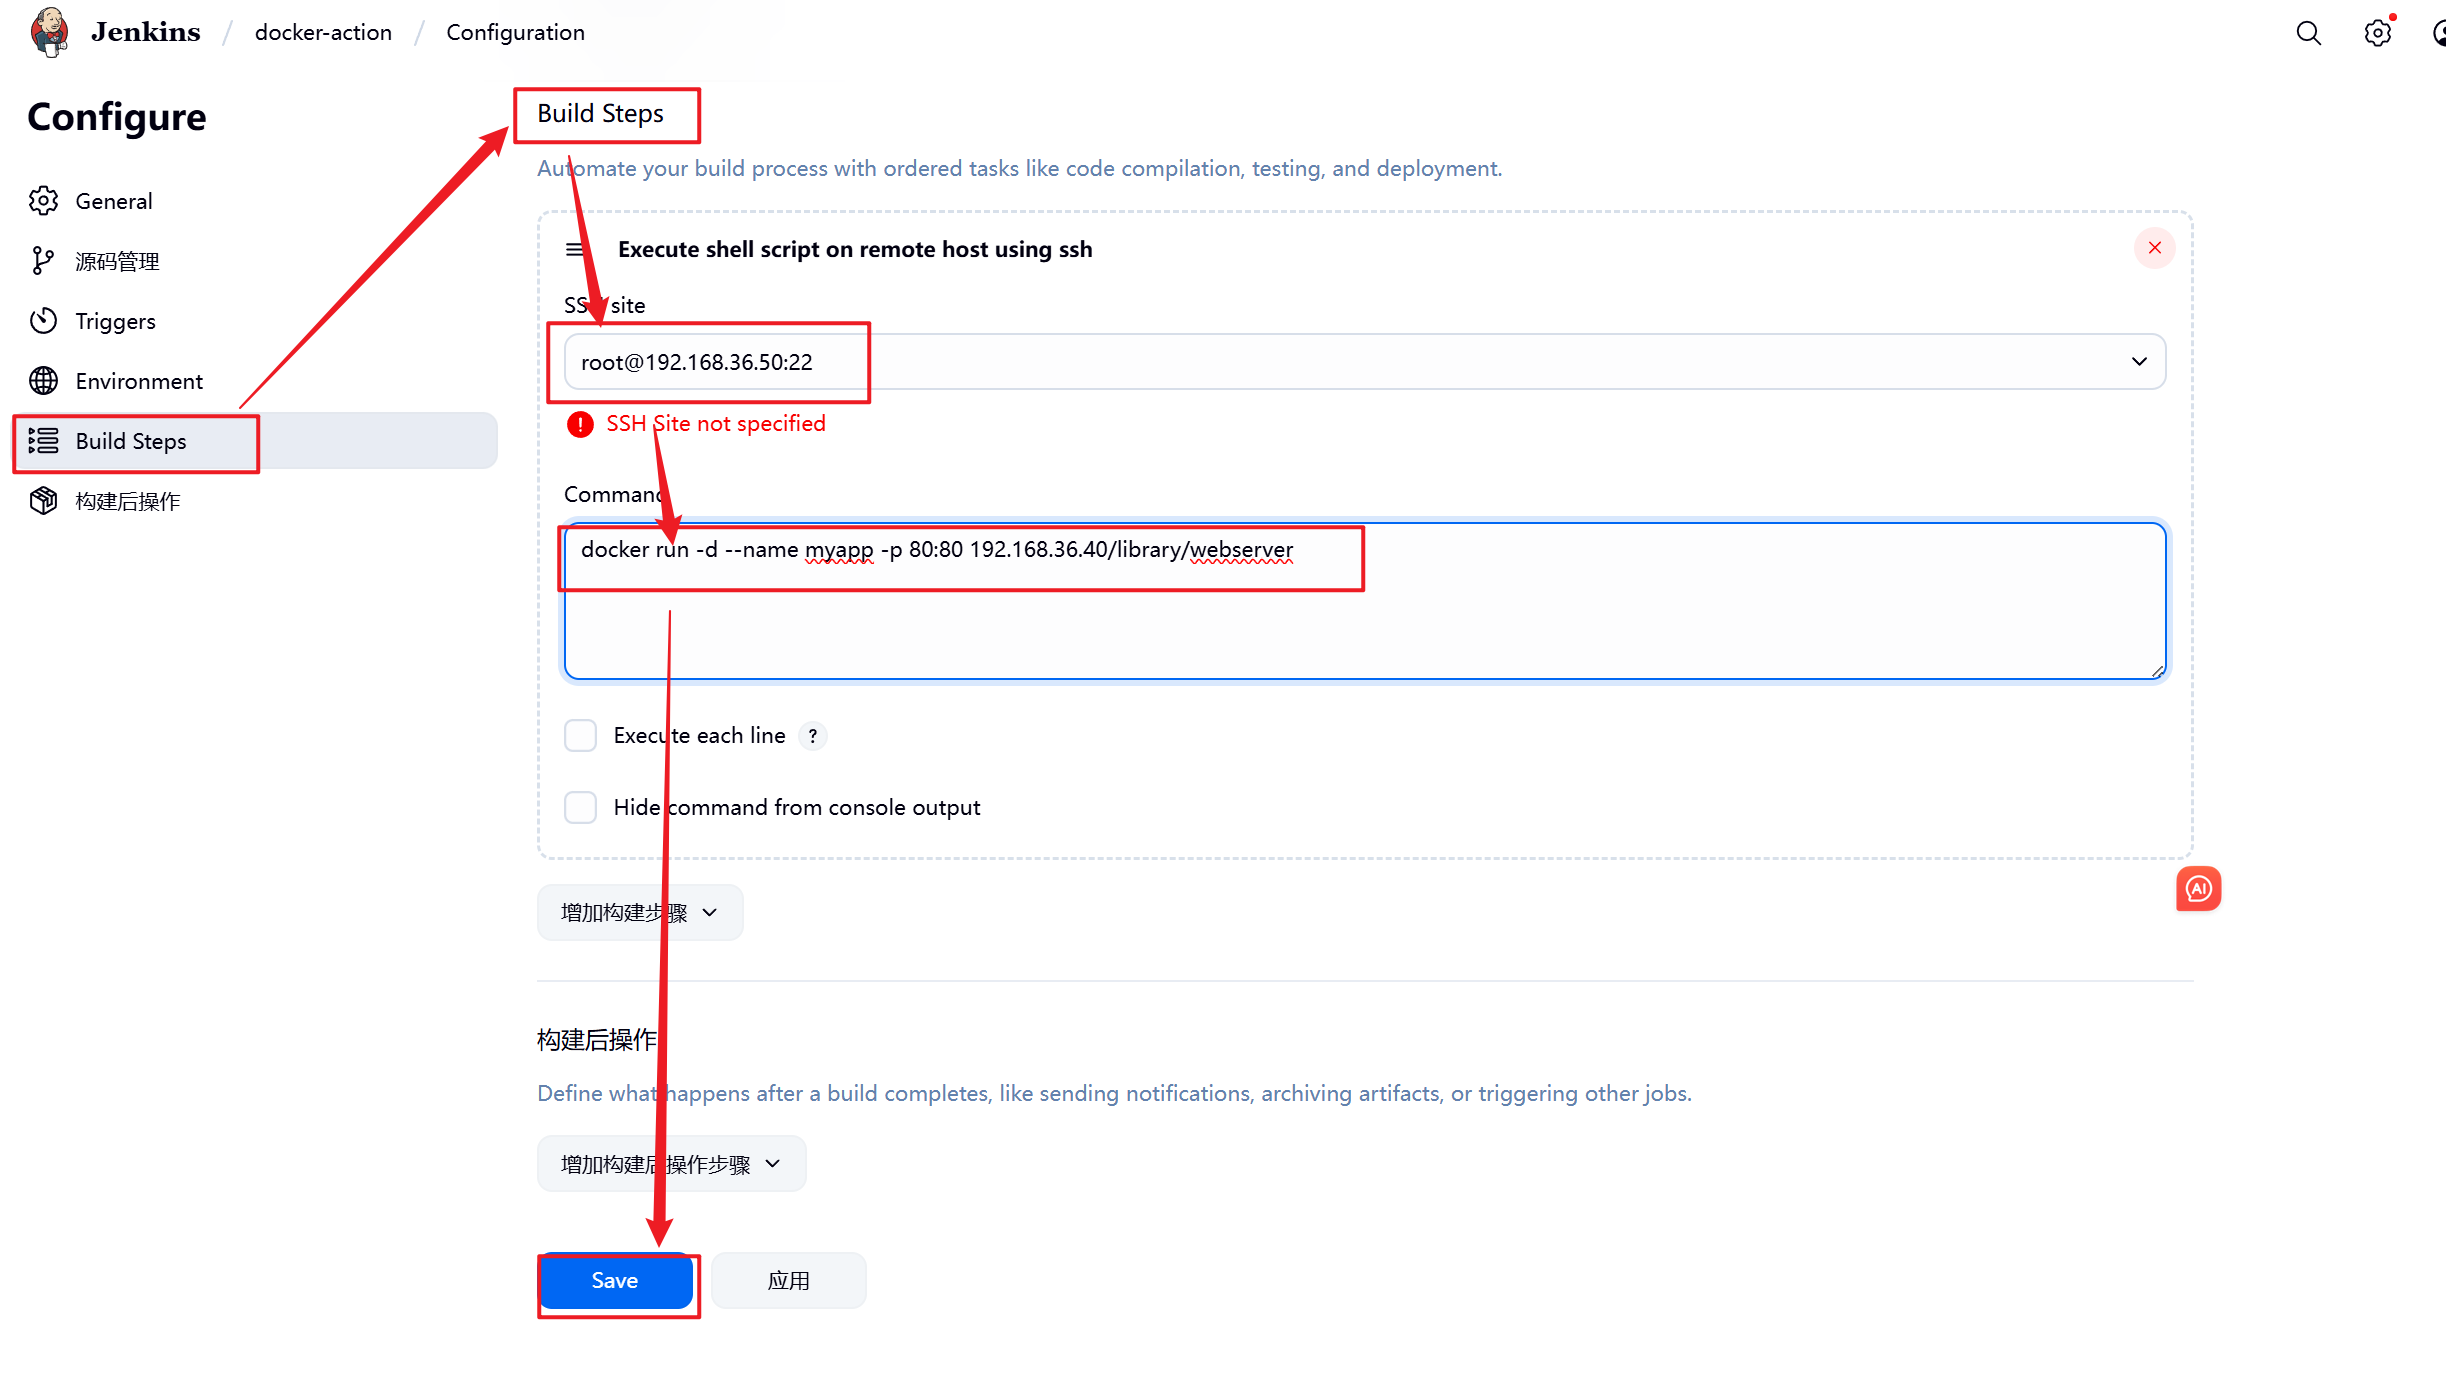
5.3.2 设置Jenkins容器构建规则
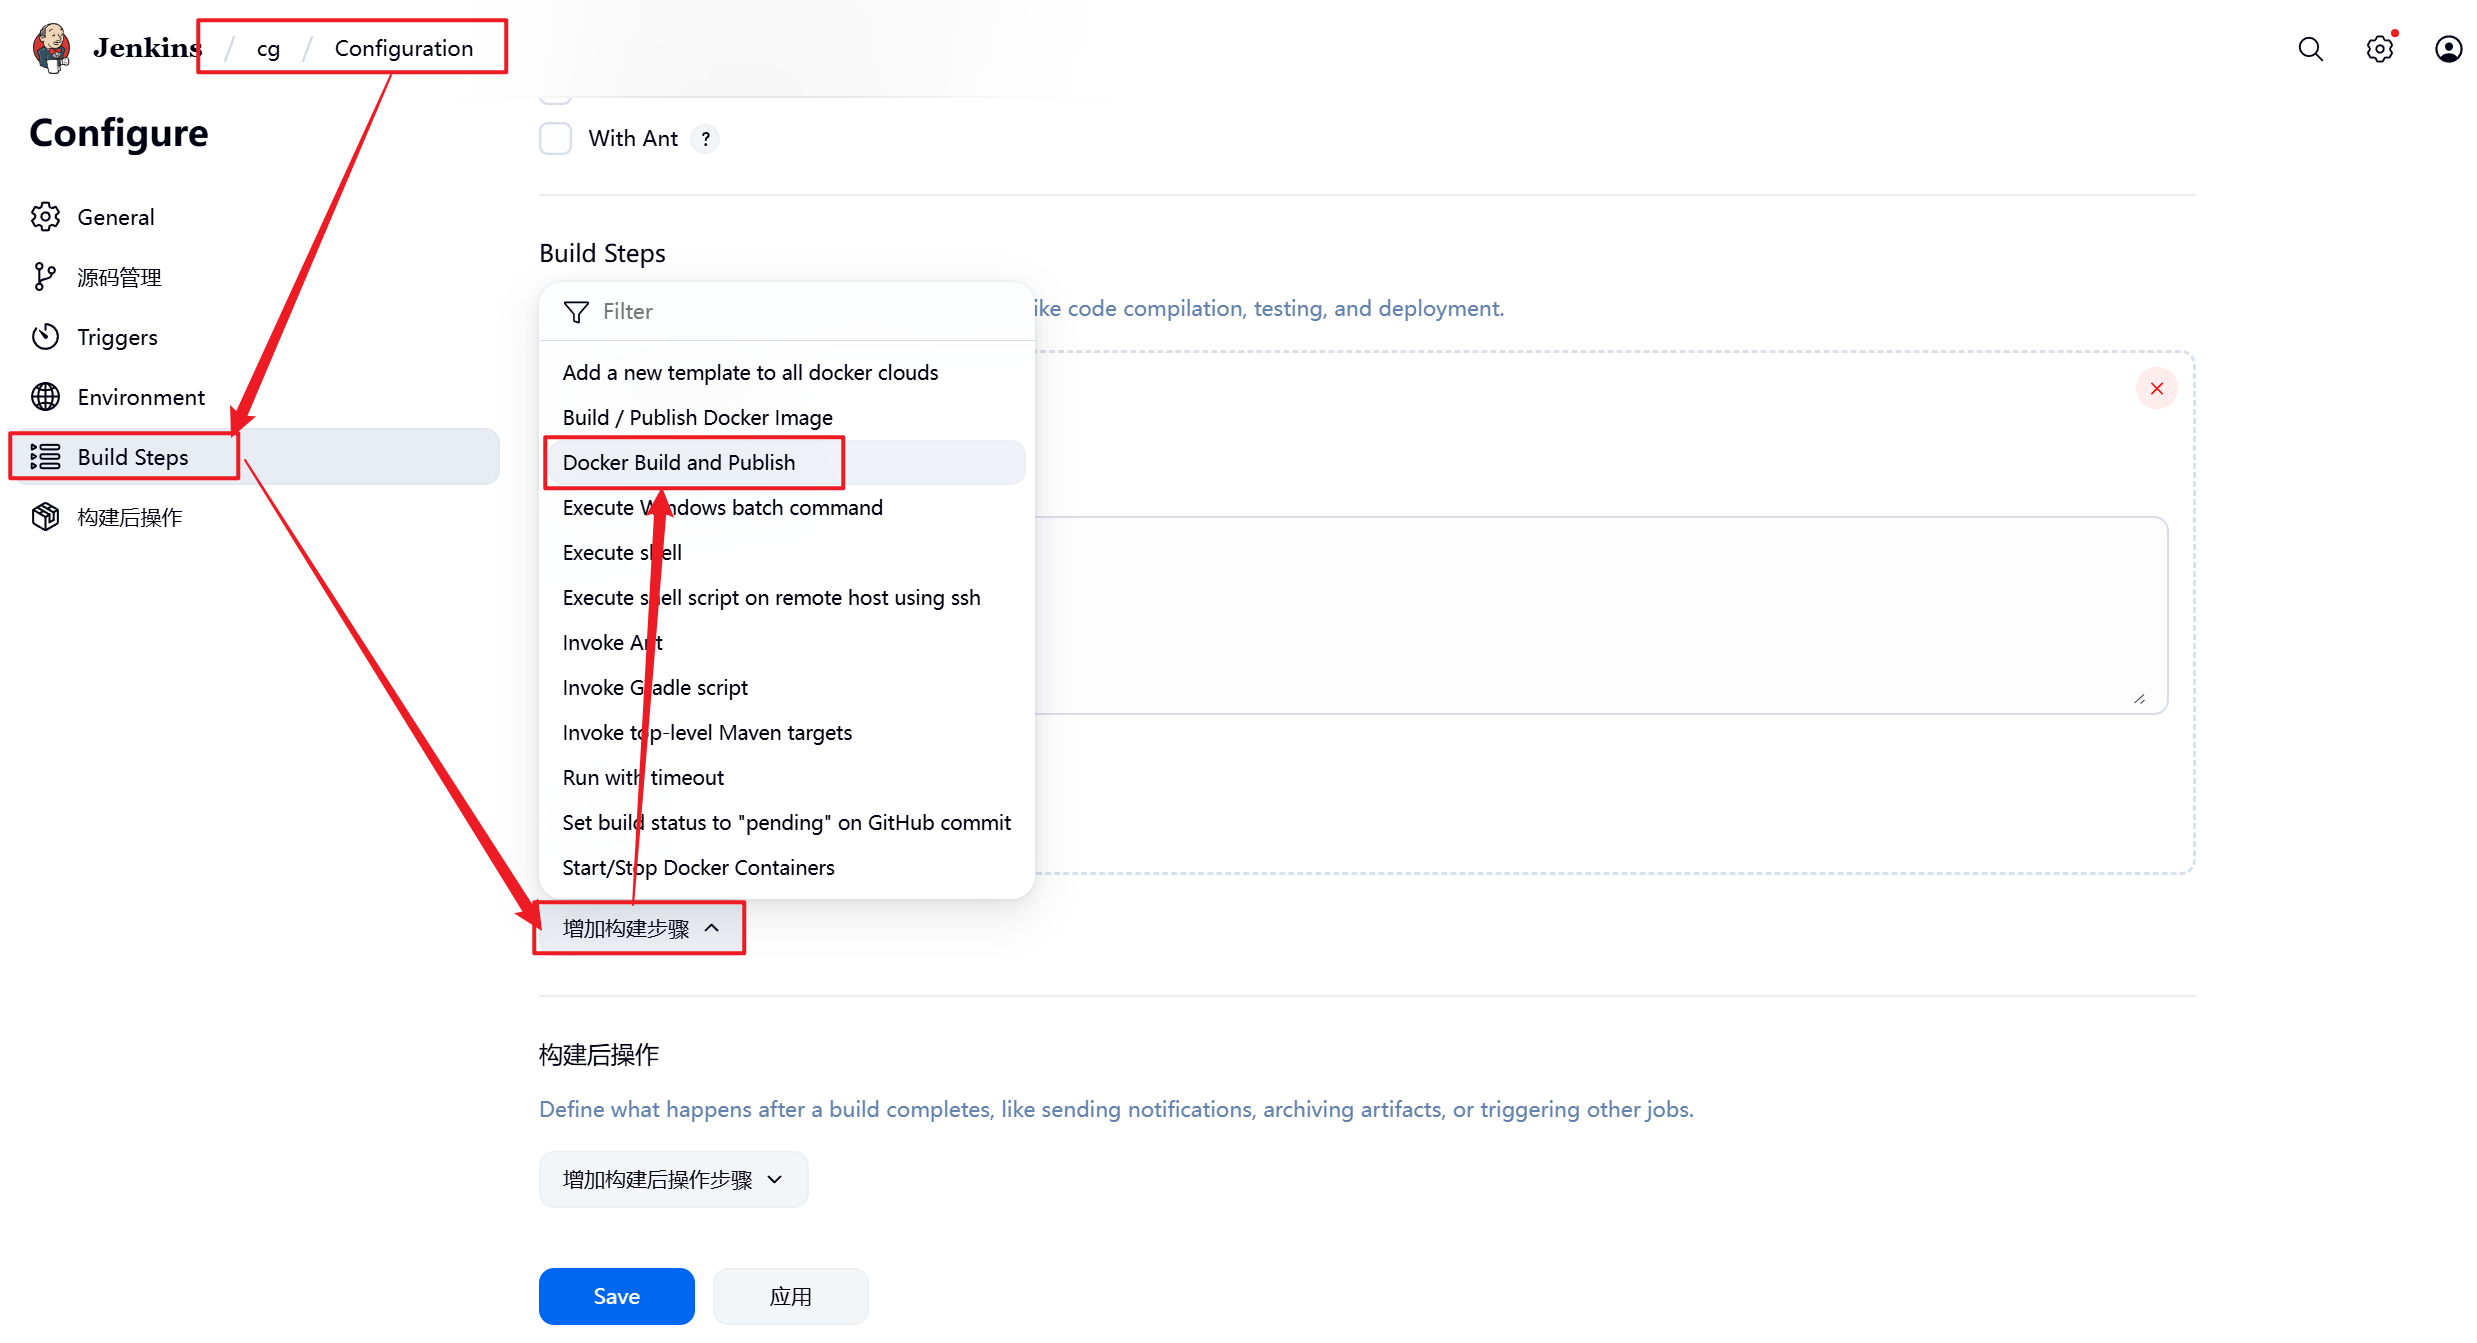
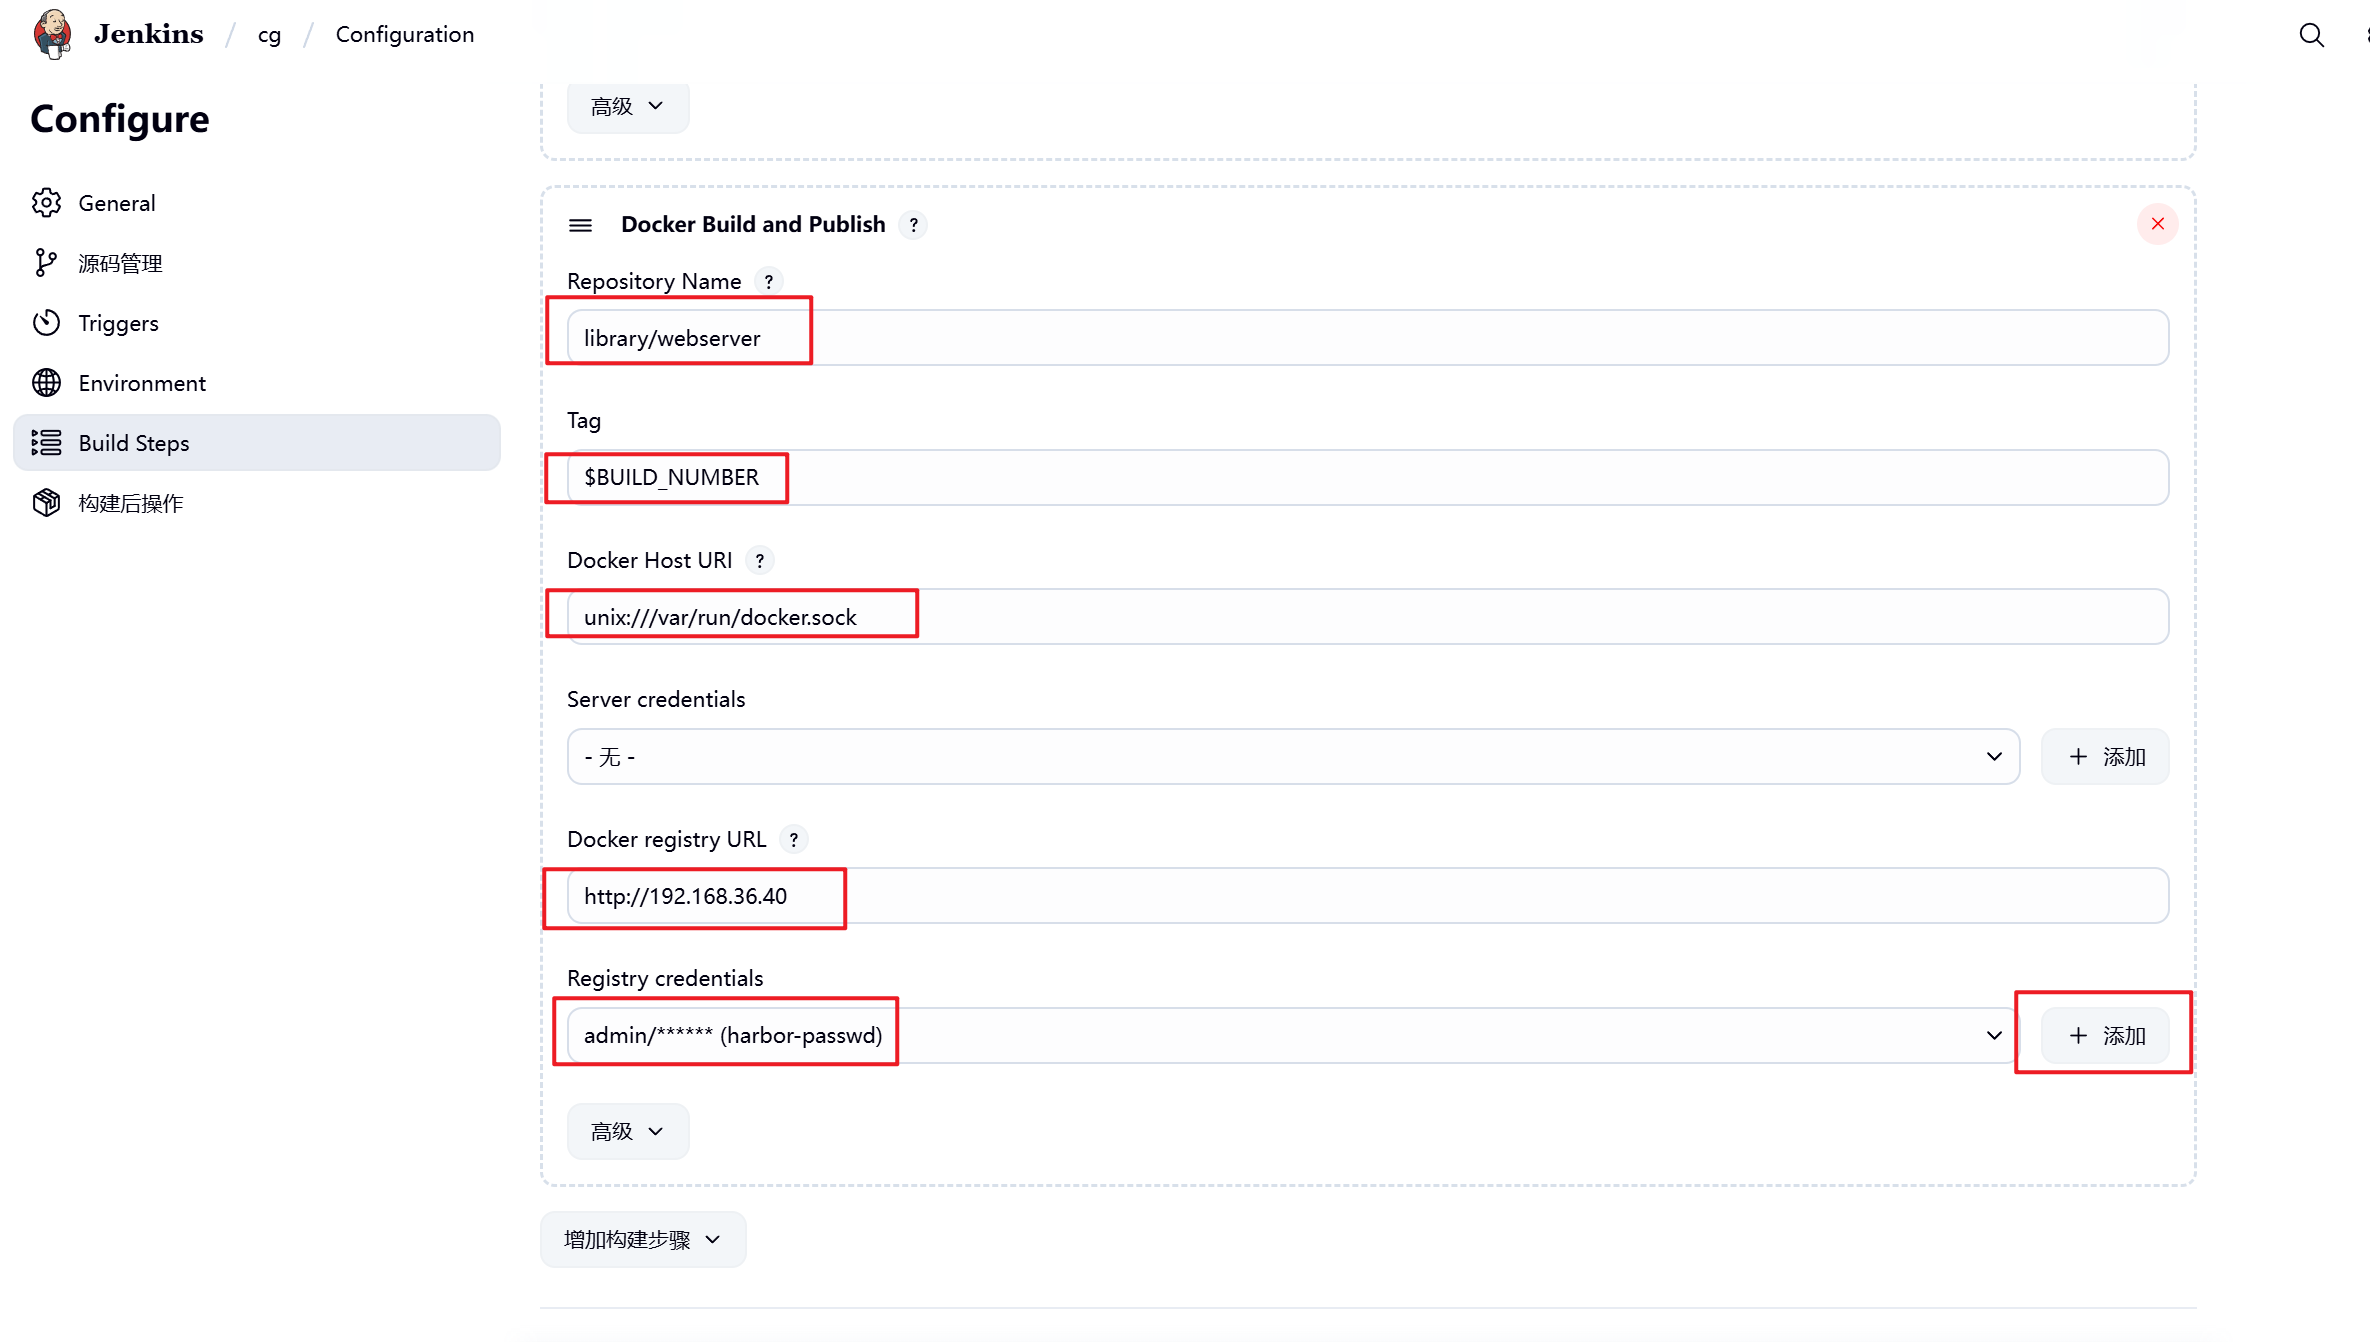

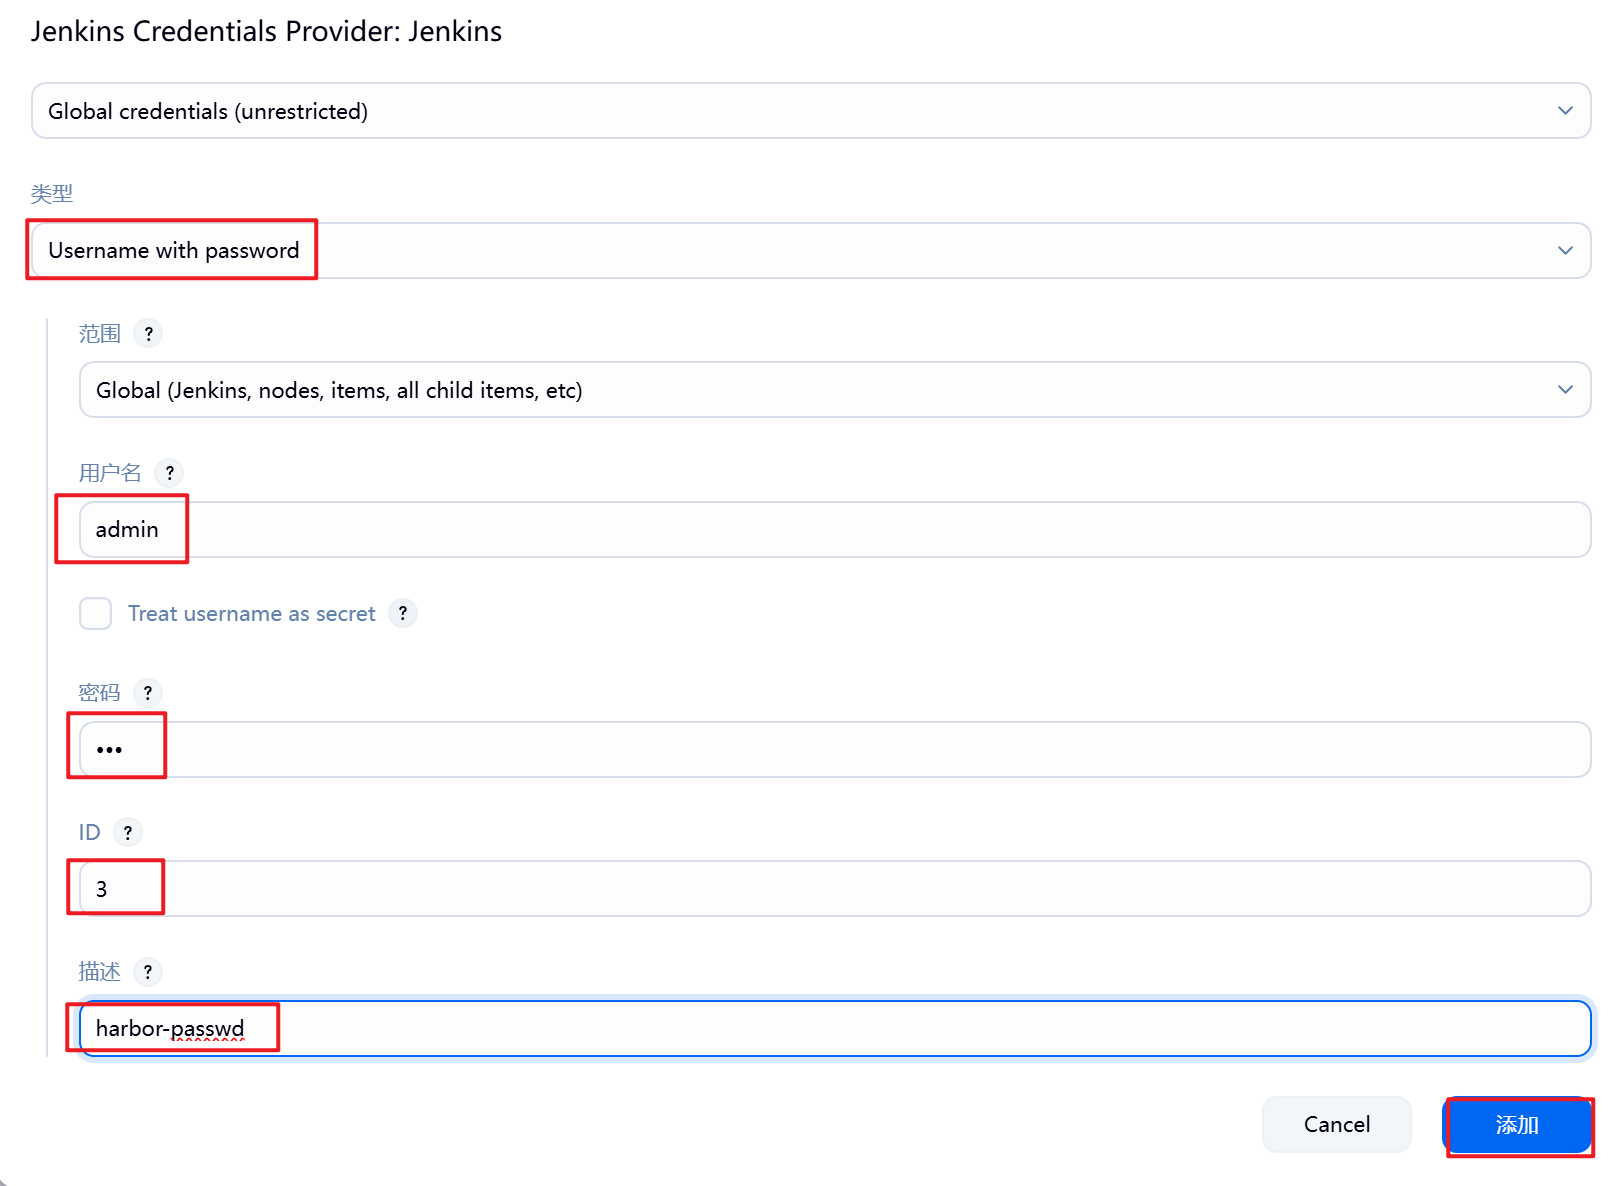
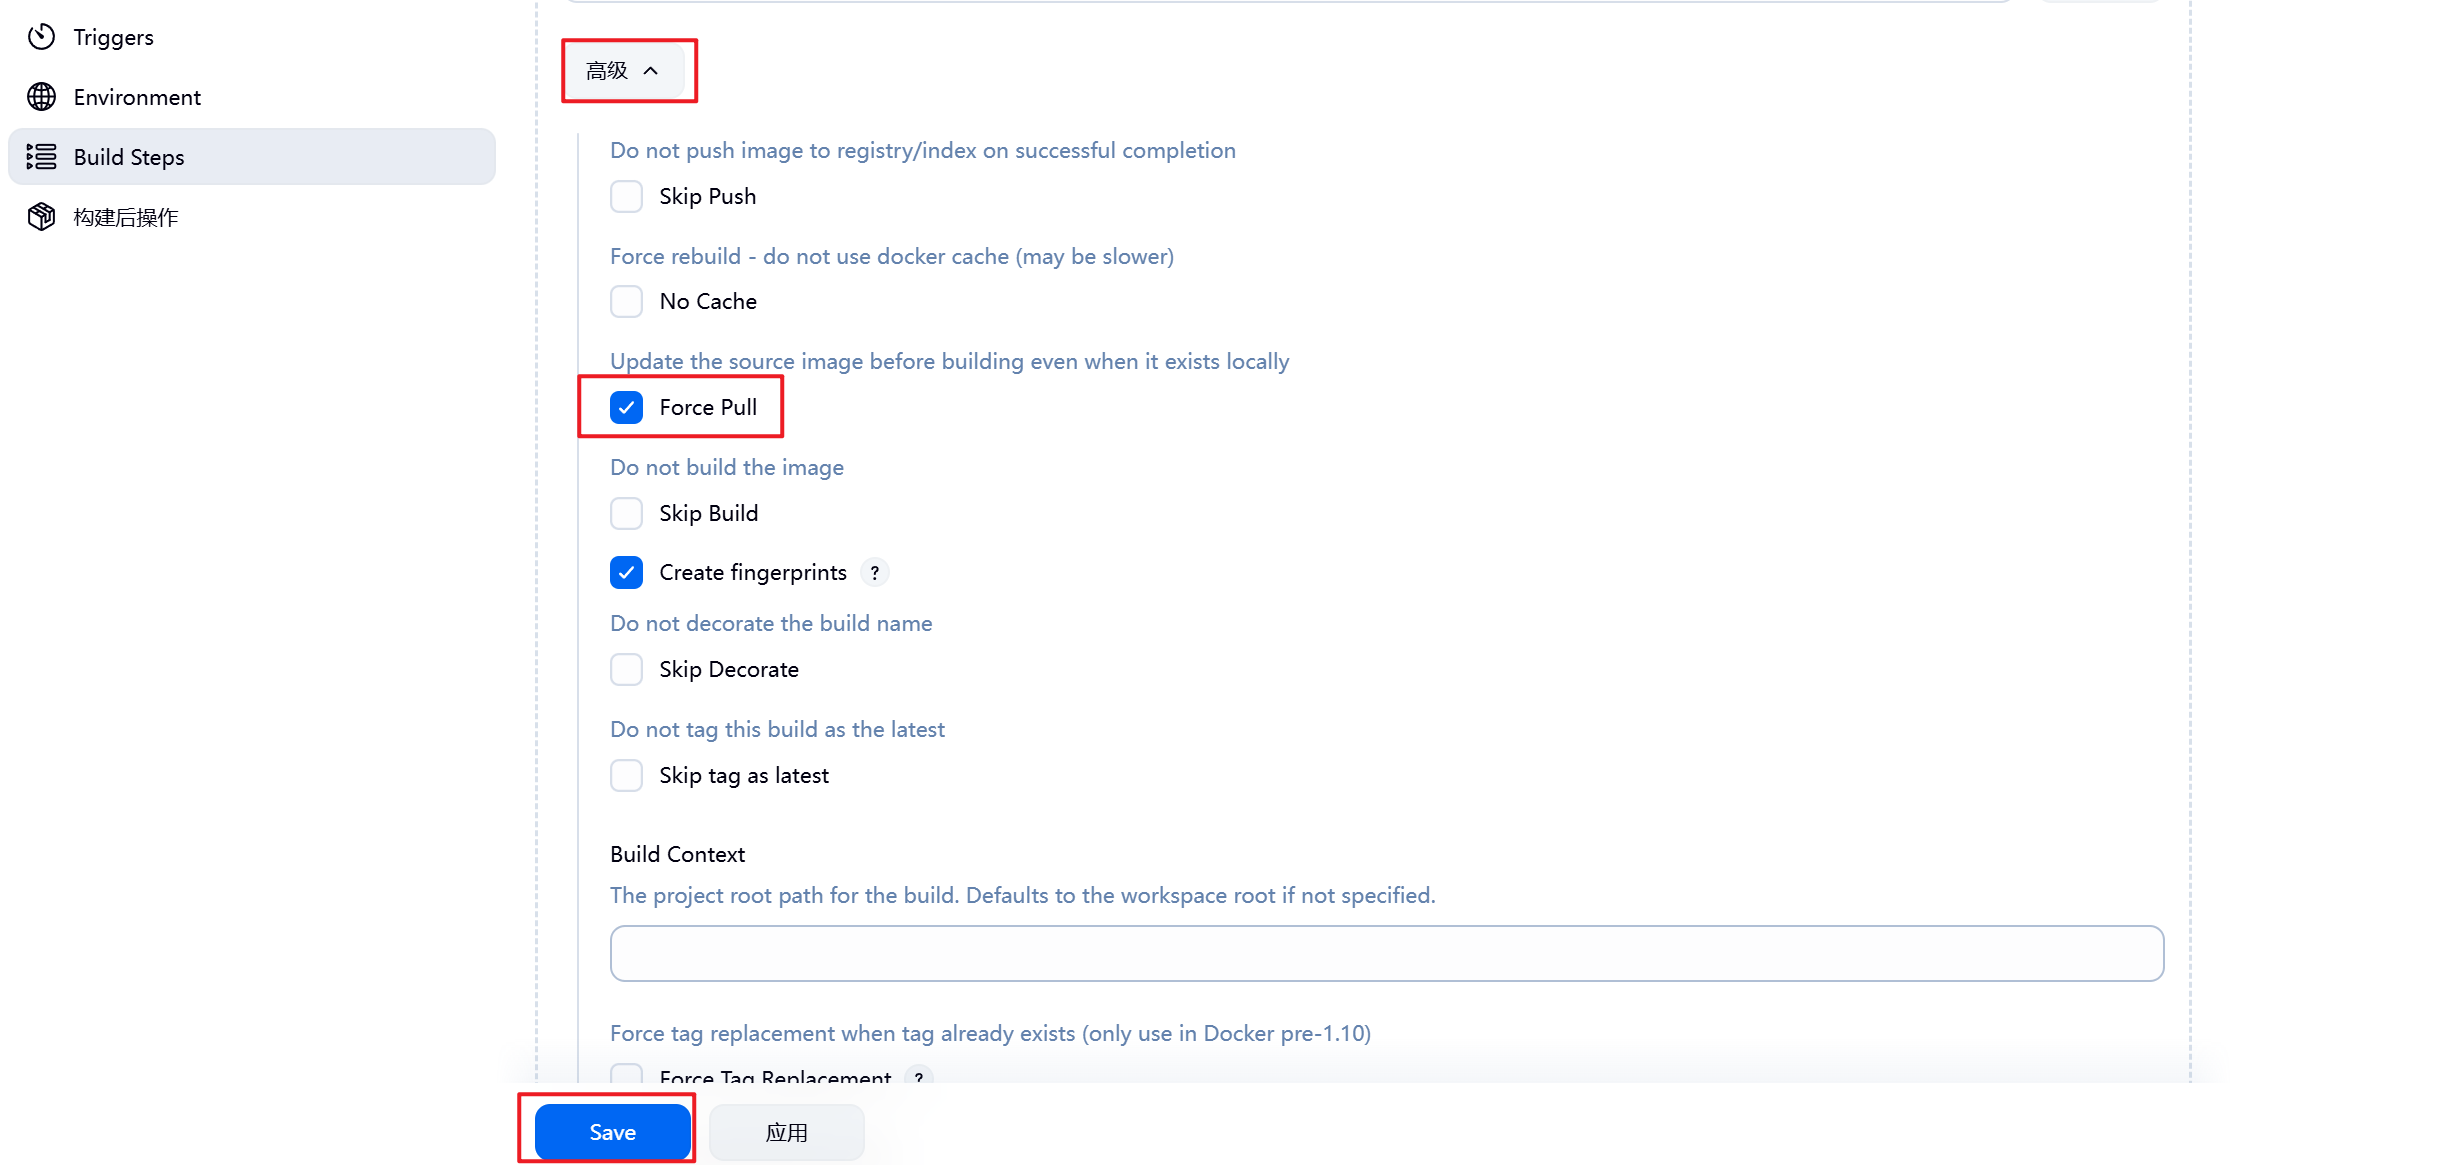
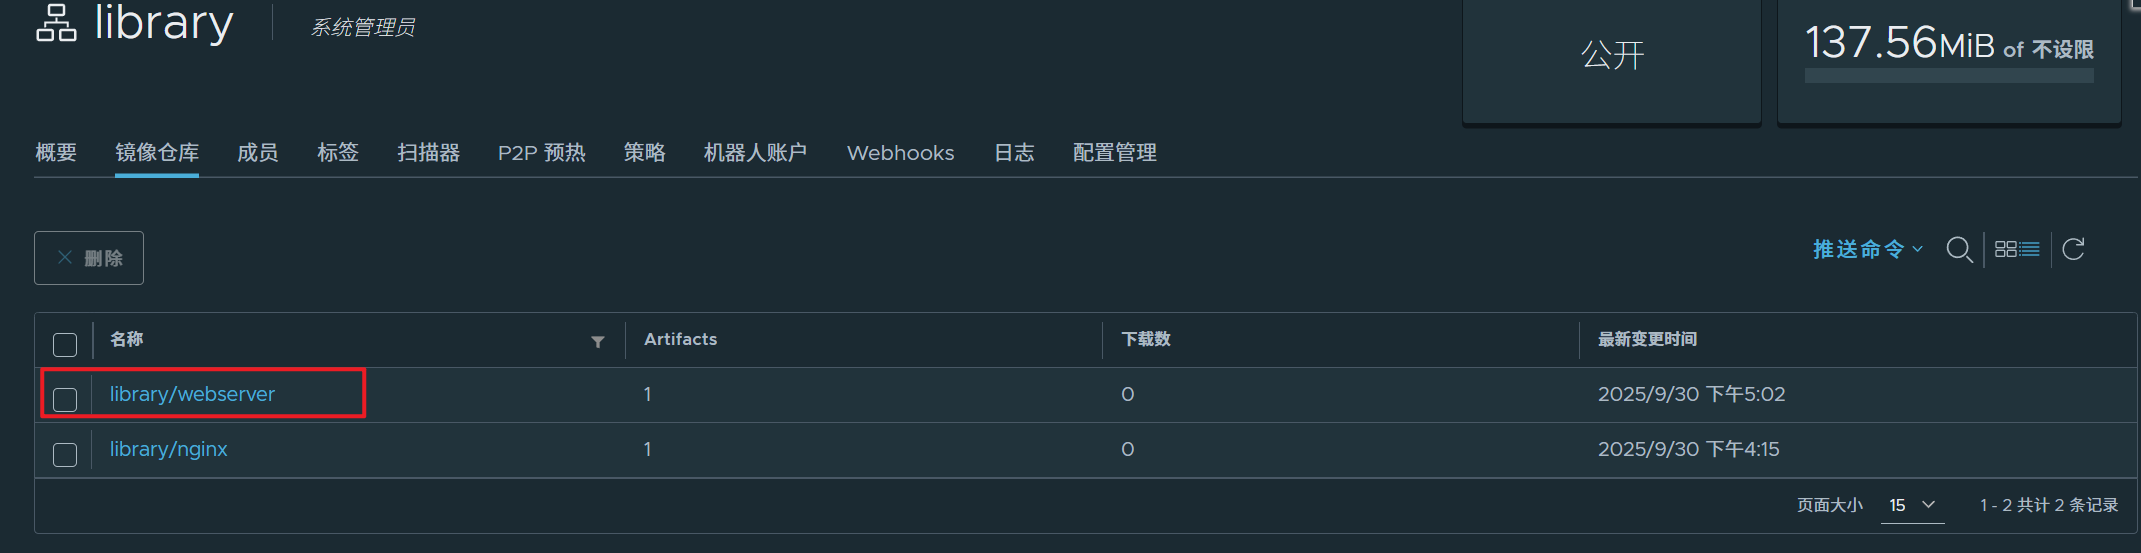
5.3.3 测试镜像构建
1.测试镜像准备
[root@harbor mnt]# ls
hgfs  nginx-latest.tar.gz  rhel9.1
[root@harbor mnt]# docker load -i nginx-latest.tar.gz
[root@harbor mnt]# docker tag nginx:latest 192.168.36.40/library/nginx
[root@harbor mnt]# docker login 192.168.36.40
[root@harbor mnt]# docker push 192.168.36.40/library/nginx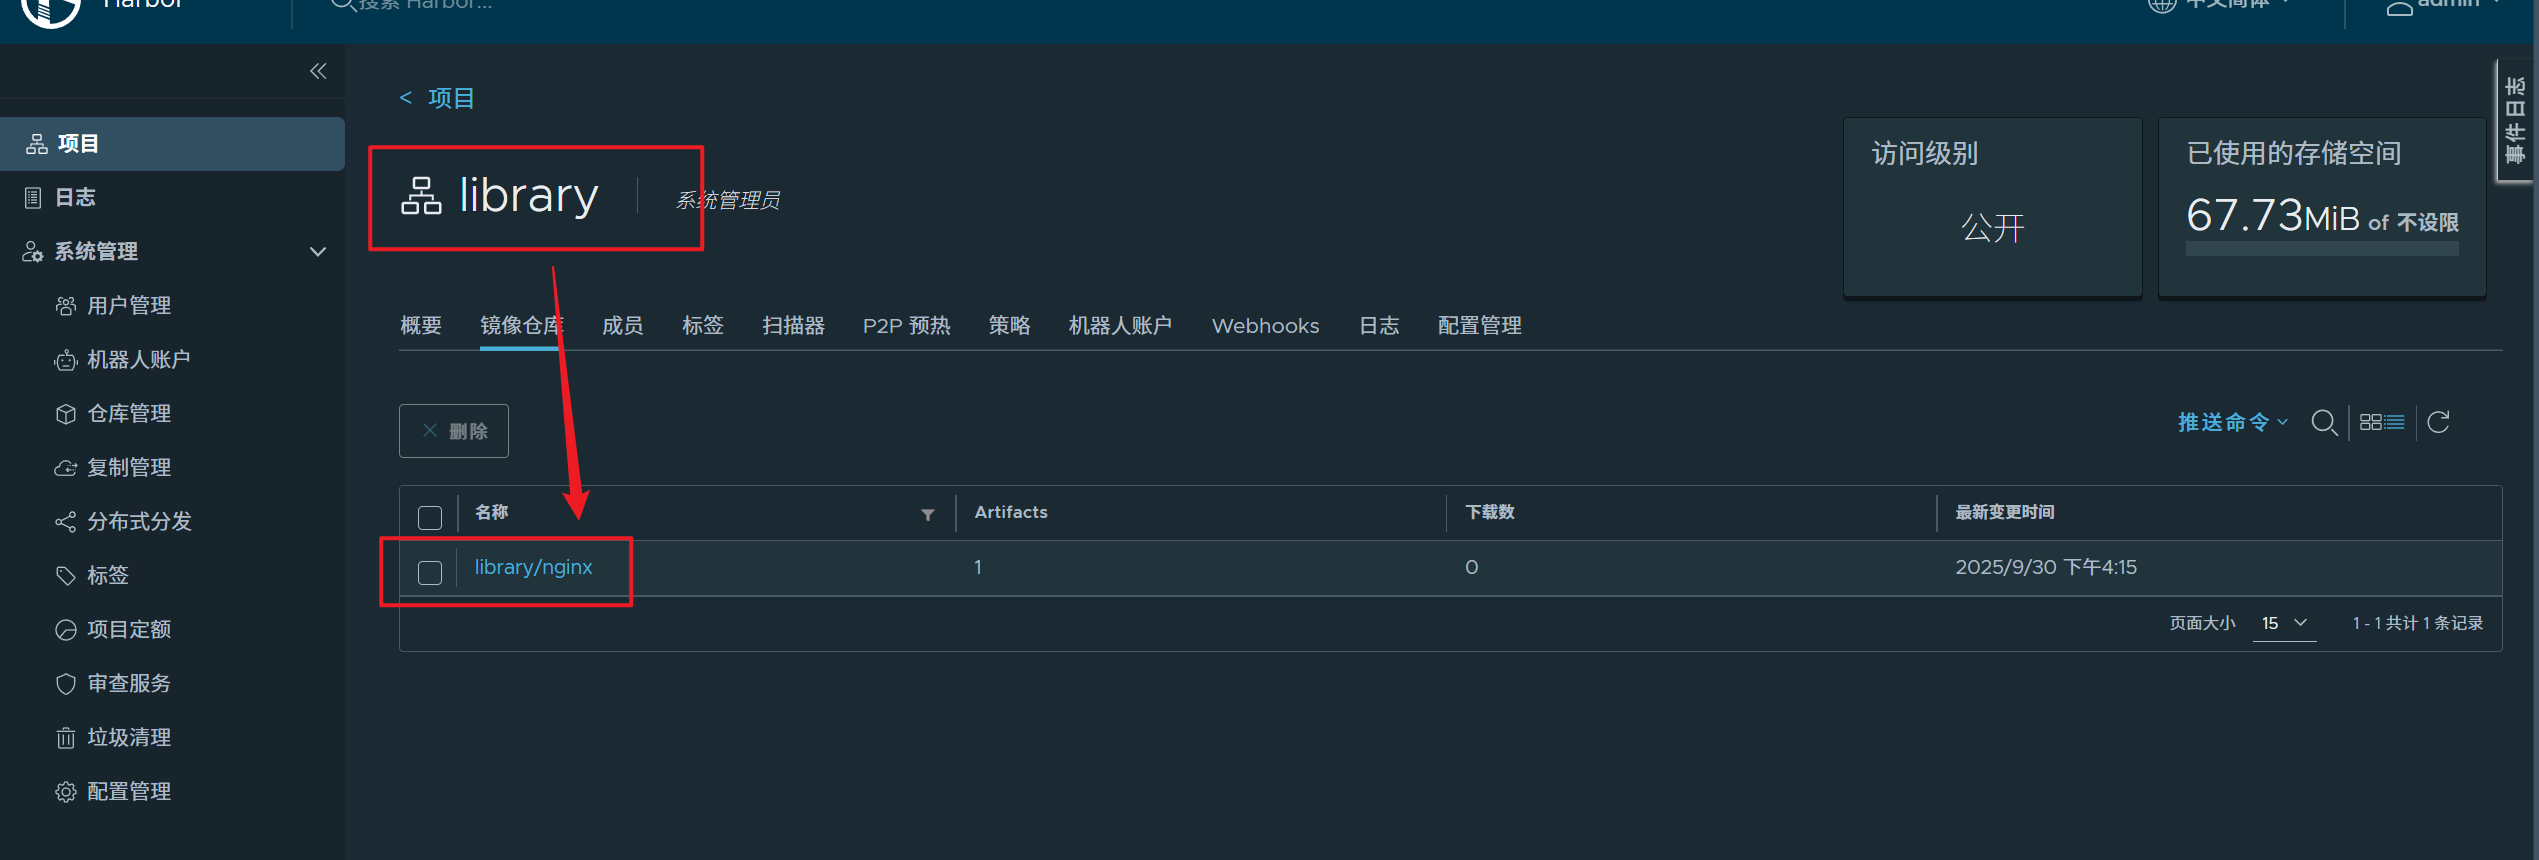
2.Dockerfile文件编写
[root@dev docker-registry]# ls
Dockerfile  README.md  test1file  testfile
[root@dev docker-registry]# vim index.html
[root@dev docker-registry]# cat index.html
www.docker.org v1
[root@dev docker-registry]# vim Dockerfile
[root@dev docker-registry]# cat Dockerfile
FROM nginx
COPY index.html /usr/share/nginx/html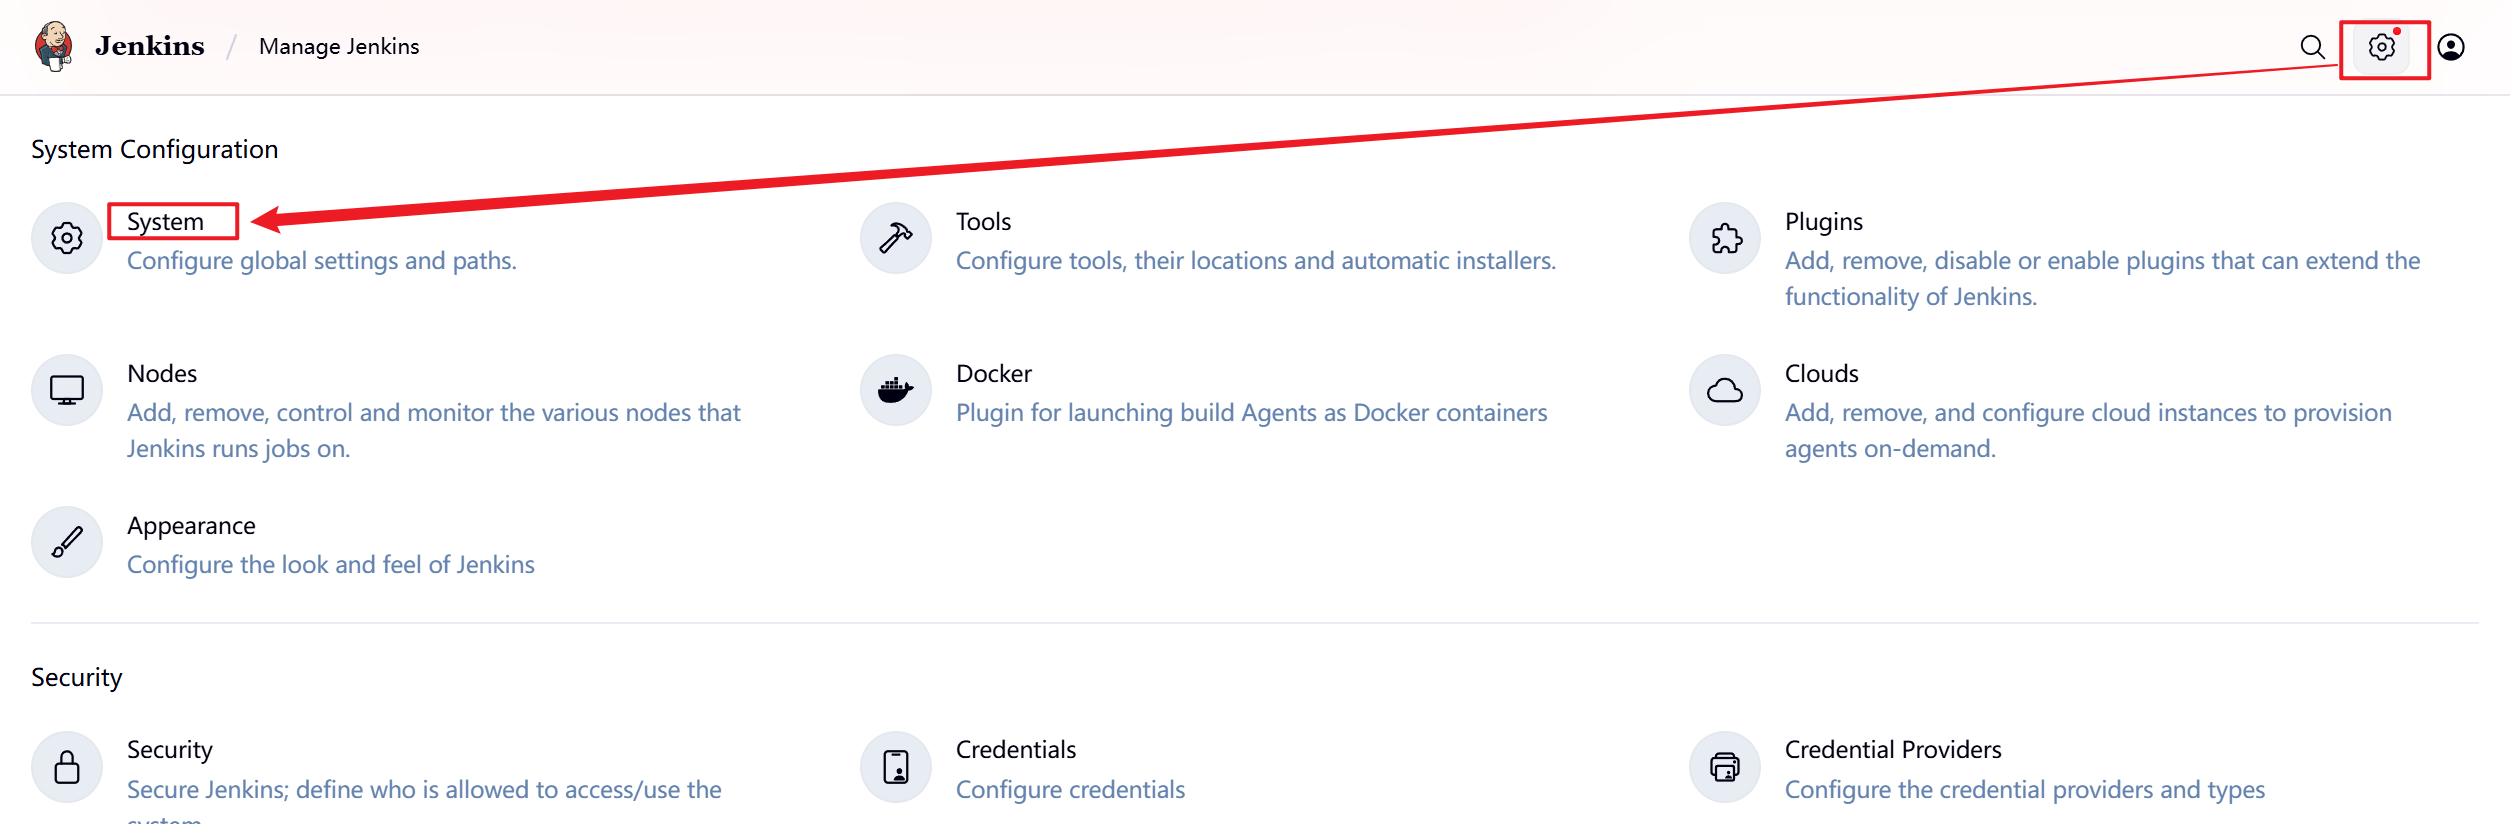

5.3.4 测试效果
1.测试之前检查,测试节点登录harbor仓库
[root@webserver ~]# docker login 192.168.36.402.推送测试文件
[root@dev docker-registry]# git add Dockerfile index.html
[root@dev docker-registry]# git commit -m "nginx v2"
[main ee9d022] nginx v2
 2 files changed, 3 insertions(+), 1 deletion(-)
 create mode 100644 index.html
[root@dev docker-registry]# git push -u origin main
枚举对象中: 6, 完成.
对象计数中: 100% (6/6), 完成.
使用 2 个线程进行压缩
压缩对象中: 100% (2/2), 完成.
写入对象中: 100% (4/4), 423 字节 | 423.00 KiB/s, 完成.
总共 4(差异 0),复用 0(差异 0),包复用 0(来自  0 个包)
To 192.168.36.20:root/docker-registry.git
   3fe6a02..ee9d022  main -> main
分支 'main' 设置为跟踪 'origin/main'。
3.访问测试主机
