一.Ansible简介
什么是Ansible?
-
ansible是新出现的自动化运维工具,基于python开发,集合了很多的运维工具(puppet、chef、func、fabric)的优点,实现了批量系统配置、批量程序部署、批量运行命令等功能。
-
ansible是基于paramiko开发的,并且基于模块化 工作,它本身没有批量部署的能力。真正具有批量部署的是ansible所运行的模块,ansible只是提供一种框架,ansible不需要在远程主机上安装client/agents,因为它们是基于ssh来和远程主机通讯的。ansible目前已经被红帽官方收购,是自动化运维工具认可度最高的。
-
更加详细的资源参考官方文档,Ansible的官方网站:Ansible Documentation
Ansible的特点(快、便捷、)
-
部署简单,只需要在主控端部署Ansible环境,被控端无需做任何操作;
-
默认使用SSH协议对设备进行管理;
-
有大量的常规运维操作模块,可实现日常绝大部分的操作;
-
配置简单、功能强大、扩展性强;
-
支持API以及自定义模块,可以通过Python轻松扩展;
-
通过Playbooks来定制强大的配置、状态管理;
-
轻量级、无需在客户端安装agent,更新时,只需在操作机上进行一次更新即可;
-
提供一个功能强大、操作性强的web管理界面和REST API接口------AWX平台。
Ansible的架构
-
Ansible:Ansible的核心程序
-
HostInventory:记录有Ansible管理的主机信息,包括端口、密码、IP地址等
-
Playbooks:"剧本"YAML格式的文件,多个任务定义在一个文件中,定义主机需要调用哪些模块来完成的功能。
-
CoreModules:核心模块,主要操作是通过调用核心模块来完成管理任务
-
CustomModules:自定义模块,完成核心模块无法完成的功能,支持多种语言。
-
ConnectionPlugins:连接插件,Ansible和Host通信使用
二.Ansible任务执行解析
ansible任务执行模式
-
ansible系统由控制主机被管节点的操作方式可以分为两类,即adhoc和playbook
-
ad-hoc模式(点对点模式)
使用单个模块,支持批量执行单条命令。ad-hoc命令是一种可以快速输入的命令,而且不需要保存起来的命令。就相当于bash中的一句话shell
- playbook模式(剧本模式)(重中之重)
剧本模式是Ansible的主要管理方式,也是Ansible功能强大的关键所在。playbook通过多个task(任务)集合完成一类功能,比如web服务的安装部署、数据库服务的批量备份等。可以简单地把playbook理解为通过组合多条ad-hoc操作的配置文件
ansible执行流程
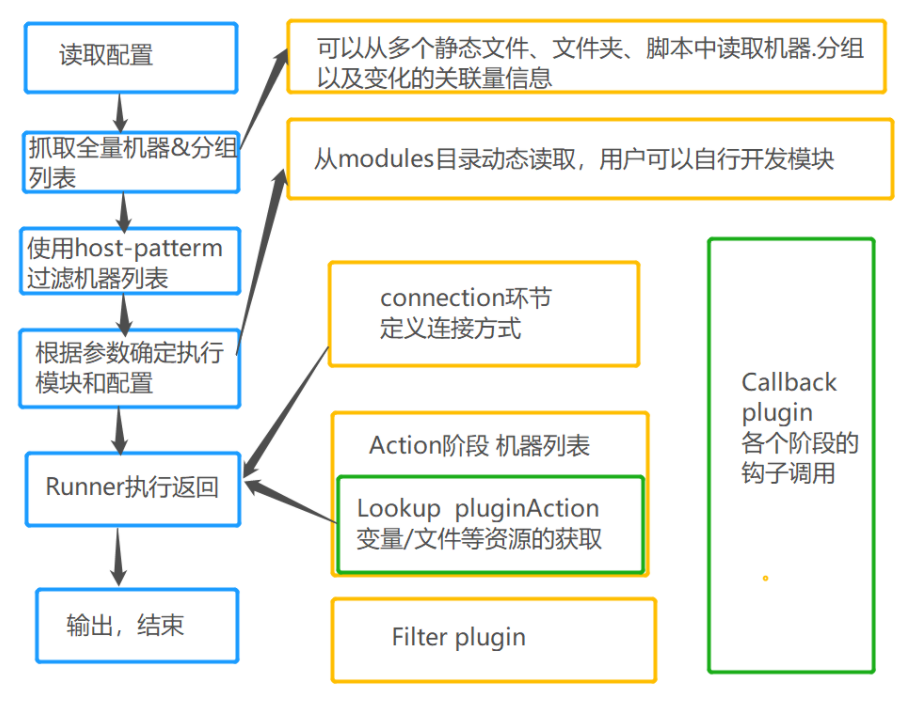
ansible命令执行过程(背会)
-
加载自己的配置文件,默认为/etc/ansible/ansible.cfg;
-
查找对应的主机配置文件,找到要执行的主机或者组;
-
加载自己对应的模块文件,如command;
-
通过ansible将模块或者命令生成对应的py文件(python脚本),并且将该文件传输到远程服务器;
-
对应执行用户的家目录.ansible/tmp/xxx/xxx.py文件;
-
给文件添加执行权限;
-
执行并且返回结果;
-
删除临时的py文件, sleep 0退出;
三.Ansible配置解析
首先连通三台虚拟机并在其中一台上安装ansible,这里我使用yum安装
bash
[root@ansible ~]# yum install -y ansibleansible的程序结构(yum安装为例)
-
配置文件目录:/etc/ansible/
-
执行文件目录:/usr/bin/
-
Lib库依赖目录:/usr/lib/pyhtonX.X/site-packages/ansible/
-
Help文档目录:/usr/share/doc/ansible-X.X.X/
-
Man文档目录:/usr/share/man/man1/
ansible的配置文件查找顺序(背会)
ansible与我们其他的服务在这一点上又很大的不同,这里的配置文件查找是从多个地方找的,顺序如下:
1.检查环境变量 ANSIBLE_CONFIG 指向的路径文件(export ANSIBLE_CONFIG=/etc/ansible/ansible.cfg);
- ~/.ansible.cfg,检查当前目录下的ansible.cfg配置文件;
3./etc/ansible.cfg检查etc目录的配置文件
ssh-keygen 是一个命令行工具,用来为 SSH(Secure Shell)协议 生成 密钥对(公钥和私钥) ,核心目的是实现 无密码登录 或 密钥认证,提升 SSH 连接的安全性和便捷性。
配置公私钥
bash
[root@ansible ~]# ssh-keygen
Generating public/private ed25519 key pair.
Enter file in which to save the key (/root/.ssh/id_ed25519):
Enter passphrase (empty for no passphrase):
Enter same passphrase again:
Your identification has been saved in /root/.ssh/id_ed25519
Your public key has been saved in /root/.ssh/id_ed25519.pub
The key fingerprint is:
SHA256:aw/M3qXvsBsX5/zcCpoq0ReOthvLKTz6E7GPFDFbtkM root@ansible
The key's randomart image is:
+--[ED25519 256]--+
|                 |
|      o E        |
|       B .       |
|      + o .      |
|       =S+ .. .  |
|      =o+.o  =   |
|     o *Boo + o  |
|      B+oB X . o.|
|    .o.=BoO+o ..+|
+----[SHA256]-----+
将你本地计算机的 SSH 公钥,复制到 IP 地址为 192.168.60.118 的远程服务器上。
核心目的
它的核心作用是为了实现后续的无密码 SSH 登录。
bash
[root@ansible ~]# ssh-copy-id 192.168.60.118
/usr/bin/ssh-copy-id: INFO: Source of key(s) to be installed: "/root/.ssh/id_ed25519.pub"
The authenticity of host '192.168.60.118 (192.168.60.118)' can't be established.
ED25519 key fingerprint is SHA256:X+lRPDF5SVMpFrSz/ZiIMiYXtyYhXkdD4W4Sgf6y+es.
This key is not known by any other names.
Are you sure you want to continue connecting (yes/no/[fingerprint])? yes
/usr/bin/ssh-copy-id: INFO: attempting to log in with the new key(s), to filter out any that are already installed
/usr/bin/ssh-copy-id: INFO: 1 key(s) remain to be installed -- if you are prompted now it is to install the new keys

Authorized users only. All activities may be monitored and reported.
root@192.168.60.118's password:

Number of key(s) added: 1

Now try logging into the machine, with:   "ssh '192.168.60.118'"
and check to make sure that only the key(s) you wanted were added.
同理与192.168.60.119服务器上的操作一致
ansible的主机清单
在配置文件中,我们提到了inventory清单,这个清单就是主机清单,里面保存的是一些ansible需要连接管理的主机列表
bash
[root@ansible ansible]# vim hosts
[webservers]
192.168.60.118
192.168.60.119
四.Ansible常用命令
bash
[root@ansible bin]# ls /usr/bin/| grep ansible
ansible
ansible-community
ansible-config
ansible-connection
ansible-console
ansible-doc
ansible-galaxy
ansible-inventory
ansible-playbook
ansible-pull
ansible-vault
ansible-inventory:
ansible-inventory是 Ansible 的一个重要组件,用于管理 Ansible 的主机清单。主机清单定义了 Ansible 将要管理的目标主机,包括主机的 IP 地址、主机名、所属的组等信息。它就像是 Ansible 的 "目标地图",告诉 Ansible 需要在哪些主机上执行任务。
基本的查看命令是
bash
[root@ansible ~]# ansible-inventory --list
{
    "_meta": {
        "hostvars": {}
    },
    "all": {
        "children": [
            "ungrouped",
            "webservers"
        ]
    },
    "webservers": {
        "hosts": [
            "192.168.60.118",
            "192.168.60.119"
        ]
    }
}
选项以 YAML 格式输出,YAML 格式对于人类阅读可能更友好一些。继续以上面的主机清单为例,YAML 格式输出可能如下:
bash
[root@ansible ~]# ansible-inventory --list --yaml
all:
  children:
    ungrouped: {}
    webservers:
      hosts:
        192.168.60.118: {}
        192.168.60.119: {}
检查主机是否在清单中
bash
[root@ansible ~]# curl 192.168.60.118
[root@ansible ~]# curl -I 192.168.60.118
五.Ansible常用模块
主机连通性测试
bash
[root@ansible ~]# ansible webservers -m ping
[WARNING]: Platform linux on host 192.168.60.118 is using the discovered Python interpreter at /usr/bin/python3, but
future installation of another Python interpreter could change this. See
https://docs.ansible.com/ansible/2.9/reference_appendices/interpreter_discovery.html for more information.
192.168.60.118 | SUCCESS => {
    "ansible_facts": {
        "discovered_interpreter_python": "/usr/bin/python3"
    },
    "changed": false,
    "ping": "pong"
}
[WARNING]: Platform linux on host 192.168.60.119 is using the discovered Python interpreter at /usr/bin/python3, but
future installation of another Python interpreter could change this. See
https://docs.ansible.com/ansible/2.9/reference_appendices/interpreter_discovery.html for more information.
192.168.60.119 | SUCCESS => {
    "ansible_facts": {
        "discovered_interpreter_python": "/usr/bin/python3"
    },
    "changed": false,
    "ping": "pong"
}
command模块
command模块可以直接在远程主机上执行命令,并且结果返回打印出来
bash
[root@ansible ~]# ansible webservers -m command -a "date"
[WARNING]: Platform linux on host 192.168.60.118 is using the discovered Python
interpreter at /usr/bin/python3, but future installation of another Python
interpreter could change this. See https://docs.ansible.com/ansible/2.9/referen
ce_appendices/interpreter_discovery.html for more information.
192.168.60.118 | CHANGED | rc=0 >>
2025年 10月 27日 星期一 22:40:55 CST
[WARNING]: Platform linux on host 192.168.60.119 is using the discovered Python
interpreter at /usr/bin/python3, but future installation of another Python
interpreter could change this. See https://docs.ansible.com/ansible/2.9/referen
ce_appendices/interpreter_discovery.html for more information.
192.168.60.119 | CHANGED | rc=0 >>
2025年 10月 28日 星期二 08:11:21 CST命令模块接受命令名称,后面是空格分隔的列表参数。给定的命令将在所有选定的节点上执行,它不会通过shell进行处理,比如$HOME和操作如"<",">","| ", " ; " ," & " (需要使用 shell模块实现这些功能)。注意,command模块不支持 | 管道命令。
shell模块
shell模块可以在远程主机上调用shell解释器运行命令,支持shell的各种功能,例如管道等
只要是shell命令都可以在通过这个模块在远程主机里面运行
bash
[root@ansible ~]# ansible webservers -m shell -a "systemctl status nginx"copy模块
这个模块用于将文件复制到远程主机上,同时支持给定的内容生成文件和修改权限等
copy模块的相关选项如下:
-
src:被复制到远程主机的本地文件。可以是绝对路径,也可以是相对路径。如果路径是一个目录,则会递归复制,用法类似于"rsync"。
-
content:用于替换"src",可以直接指定文件的值。
- dest:必选项,将源文件复制到远程主机的绝对路径。
- backup:当文件内容发生改变之后,在覆盖之前,把源文件备份,备份文件包含时间信息
- directory_mode:递归设定目录的权限,默认为系统默认权限。
- force:当目标主机包含该文件,但是内容不同时,设定为"yes",表示强制覆盖;设定为"no"表示目标主机的目标位置不存在该文件才复制。默认为"yes"
-
others:所有的file模块中的选项可以在这里使用
-
mode:设置文件权限
bash
[root@ansible ~]# ansible webservers -m copy -a "src=/root/webservers_config/nginx.conf dest=/etc/nginx backup=yes"file模块
-
file模块主要用于设置文件的属性,比如创建文件、创建连接文件、删除文件等,如下为常见的命令:
-
force:需要两种情况下强制创建软连接,一种是源文件不存在,但是之后会建立的情况下;另外一种是目标软链接已存在,需要取消之前的软链接,然后创建新的,有两个选项:yes|no。
-
path:指定创建路径
-
-
group:定义文件/目录的属组。后面可以加上mode:定义文件/目录的权限。
-
owner:定义文件/目录的属主,后面必须加上path:定义文件/目录的路径。
-
recurse:递归设置文件的属性,只对目录有效,后面跟上src:被链接的源文件路径,只应用于state=link的情况
-
dest:被链接到的路径,只应用于state=link的情况
-
mode:指定权限。
-
state:状态,有如下选项:
-
directory:如果目录不存在,就创建目录
-
file:即使文件不存在,也不会被创建;已经存在的文件可以修改文件的属性。
-
link:创建软链接
-
hard:创建硬链接
-
touch:如果文件不存在,则会创建一个新的文件,如果文件或者目录已经存在,则更新其最后修改时间
-
absent:删除目录、文件或者取消链接文件
-
创建文件
bash
[root@ansible ~]# ansible webservers -m file -a "path=3.txt state=touch"
[WARNING]: Platform linux on host 192.168.60.119 is using the discovered Python
interpreter at /usr/bin/python3, but future installation of another Python
interpreter could change this. See https://docs.ansible.com/ansible/2.9/referen
ce_appendices/interpreter_discovery.html for more information.
192.168.60.119 | CHANGED => {
    "ansible_facts": {
        "discovered_interpreter_python": "/usr/bin/python3"
    },
    "changed": true,
    "dest": "3.txt",
    "gid": 0,
    "group": "root",
    "mode": "0644",
    "owner": "root",
    "size": 0,
    "state": "file",
    "uid": 0
}
[WARNING]: Platform linux on host 192.168.60.118 is using the discovered Python
interpreter at /usr/bin/python3, but future installation of another Python
interpreter could change this. See https://docs.ansible.com/ansible/2.9/referen
ce_appendices/interpreter_discovery.html for more information.
192.168.60.118 | CHANGED => {
    "ansible_facts": {
        "discovered_interpreter_python": "/usr/bin/python3"
    },
    "changed": true,
    "dest": "3.txt",
    "gid": 0,
    "group": "root",
    "mode": "0644",
    "owner": "root",
    "size": 0,
    "state": "file",
    "uid": 0
}
创建目录
bash
[root@ansible ~]# ansible webservers -m file -a "path=/opt/dir/ state=directory"
[WARNING]: Platform linux on host 192.168.60.119 is using the discovered Python
interpreter at /usr/bin/python3, but future installation of another Python
interpreter could change this. See https://docs.ansible.com/ansible/2.9/referen
ce_appendices/interpreter_discovery.html for more information.
192.168.60.119 | CHANGED => {
    "ansible_facts": {
        "discovered_interpreter_python": "/usr/bin/python3"
    },
    "changed": true,
    "gid": 0,
    "group": "root",
    "mode": "0755",
    "owner": "root",
    "path": "/opt/dir/",
    "size": 4096,
    "state": "directory",
    "uid": 0
}
[WARNING]: Platform linux on host 192.168.60.118 is using the discovered Python
interpreter at /usr/bin/python3, but future installation of another Python
interpreter could change this. See https://docs.ansible.com/ansible/2.9/referen
ce_appendices/interpreter_discovery.html for more information.
192.168.60.118 | CHANGED => {
    "ansible_facts": {
        "discovered_interpreter_python": "/usr/bin/python3"
    },
    "changed": true,
    "gid": 0,
    "group": "root",
    "mode": "0755",
    "owner": "root",
    "path": "/opt/dir/",
    "size": 4096,
    "state": "directory",
    "uid": 0
}
fetch模块
-
fetch模块用于从远程某个主机获取(复制)文件到本地来
-
dest:用来存储文件的目录。
-
src:在远程拉取的文件,并且是一个file,不能是目录
-
bash
[root@ansible ~]# ansible webservers -m fetch -a "src=/etc/nginx/nginx.conf dest=/root/"
192.168.60.118 | CHANGED => {
    "changed": true,
    "checksum": "ec9488ee436af326ea64fa0dd34bbdc680fcc5fb",
    "dest": "/root/192.168.60.118/etc/nginx/nginx.conf",
    "md5sum": "4b28ba71c992b4c20fe3258f1a733076",
    "remote_checksum": "ec9488ee436af326ea64fa0dd34bbdc680fcc5fb",
    "remote_md5sum": null
}
192.168.60.119 | CHANGED => {
    "changed": true,
    "checksum": "ec9488ee436af326ea64fa0dd34bbdc680fcc5fb",
    "dest": "/root/192.168.60.119/etc/nginx/nginx.conf",
    "md5sum": "4b28ba71c992b4c20fe3258f1a733076",
    "remote_checksum": "ec9488ee436af326ea64fa0dd34bbdc680fcc5fb",
    "remote_md5sum": null
}
cron模块
-
cron模块用于管理crontab计划性任务的,它的语法和crontab中的语法一致
-
day=:日应该运行的工作( 1-31, *, */2, ) -
hour=:小时 ( 0-23, *, */2, ) -
minute=:分钟( 0-59, *, */2, ) -
month=:月( 1-12, *, /2, ) -
weekday=: 周 ( 0-6 for Sunday-Saturday,, ) -
job=:指明运行的命令是什么 -
name=:定时任务描述 -
reboot:任务在重启时运行,不建议使用,建议使用special_time -
special_time:特殊的时间范围,参数:reboot(重启时),annually(每年),monthly(每月),weekly(每周),daily(每天),hourly(每小时) -
state:指定状态-
present表示添加定时任务,也是默认设置,
-
absent表示删除定时任务
-
-
user:以哪个用户的身份执行
-
bash
[root@ansible ~]# ansible webservers -m cron -a "name=test minute=*/5 job='/sbin/ifconfig'"yum模块
-
yum模块主要用于软件的安装,它的选项如下
- name= :所安装的软件包的名称
-
state= :
-
present--》安装
-
latest--》安装最新的
-
absent--》卸载软件
-
-
update_cache :强制更新yum的缓存
-
conf_file :指定远程yum安装时所依赖的配置文件(安装本地已有的包)。
-
disable_pgp_check :是否禁止GPG checking,只用于present 或者 latest。
-
disablerepo :临时禁止使用yum库。只用于安装或者更新时。
-
enablerepo :临时使用的yum库。只用于安装或者更新时。
安装
bash
[root@ansible ~]# ansible webservers -m yum -a "name=redis state=present"
[WARNING]: Platform linux on host 192.168.60.118 is using the discovered Python
interpreter at /usr/bin/python3, but future installation of another Python
interpreter could change this. See https://docs.ansible.com/ansible/2.9/referen
ce_appendices/interpreter_discovery.html for more information.
192.168.60.118 | CHANGED => {
    "ansible_facts": {
        "discovered_interpreter_python": "/usr/bin/python3"
    },
    "changed": true,
    "msg": "",
    "rc": 0,
    "results": [
        "Installed: redis-7.2.11-1.oe2403sp1.x86_64"
    ]
}
[WARNING]: Platform linux on host 192.168.60.119 is using the discovered Python
interpreter at /usr/bin/python3, but future installation of another Python
interpreter could change this. See https://docs.ansible.com/ansible/2.9/referen
ce_appendices/interpreter_discovery.html for more information.
192.168.60.119 | CHANGED => {
    "ansible_facts": {
        "discovered_interpreter_python": "/usr/bin/python3"
    },
    "changed": true,
    "msg": "",
    "rc": 0,
    "results": [
        "Installed: redis-7.2.11-1.oe2403sp1.x86_64"
    ]
}
卸载
bash
[root@ansible ~]# ansible webservers -m yum -a "name=redis state=absent"service模块
-
service模块用于服务程序的管理,它的主要选项如下:
- arguments:命令行提供额外的参数
-
enabled:设置开机自启;true | false
-
name:服务名称
-
runlevel:开机启动的级别,一般不用指定。
-
sleep:在重启服务的过程中,是否等待。如在服务关闭以后等待2秒在启动。(定义在剧本当中)
-
state:有四种状态分别为
-
started(启动服务)
-
stopped(停止服务)
-
restarted(重启服务)
-
reloaded(重载服务)
-
bash
[root@ansible ~]# ansible webservers -m service -a "name=redis state=start enabled=true"user模块
-
user模块主要用来管理用户账号,它的主要选项如下所示:
- comment :用户的描述信息
-
createhome:是否创建家目录
-
force:在使用state=absent时,行为于userdel --force一致
-
group:指定基本组
-
groups:指定附加组
-
home:指定用户家目录
-
move_home:如果设置为home=时,试图将用户主目录移动到指定的目录
-
name:指定用户名
-
non_unique:该选项允许改变非唯一的用户ID值
-
password:指定用户密码,使用密文密码
-
remove:在使用state=absent时,行为是与userdel --remove一致
-
shell:指定默认的shell
-
state:设置账号状态,不指定为默认创建,指定值为absent表示删除
-
system:当创建一个用户,设置这个用户是系统用户。这个设置不能更改现有的用户
-
uid:指定用户的uid
创建用户
bash
[root@ansible ~]# ansible webservers -m user -a "name=lisi state=present"
[WARNING]: Platform linux on host 192.168.60.118 is using the discovered Python
interpreter at /usr/bin/python3, but future installation of another Python
interpreter could change this. See https://docs.ansible.com/ansible/2.9/referen
ce_appendices/interpreter_discovery.html for more information.
192.168.60.118 | CHANGED => {
    "ansible_facts": {
        "discovered_interpreter_python": "/usr/bin/python3"
    },
    "changed": true,
    "comment": "",
    "create_home": true,
    "group": 1001,
    "home": "/home/lisi",
    "name": "lisi",
    "shell": "/bin/bash",
    "state": "present",
    "system": false,
    "uid": 1001
}
[WARNING]: Platform linux on host 192.168.60.119 is using the discovered Python
interpreter at /usr/bin/python3, but future installation of another Python
interpreter could change this. See https://docs.ansible.com/ansible/2.9/referen
ce_appendices/interpreter_discovery.html for more information.
192.168.60.119 | CHANGED => {
    "ansible_facts": {
        "discovered_interpreter_python": "/usr/bin/python3"
    },
    "changed": true,
    "comment": "",
    "create_home": true,
    "group": 1001,
    "home": "/home/lisi",
    "name": "lisi",
    "shell": "/bin/bash",
    "state": "present",
    "system": false,
    "uid": 1001
}
删除用户
bash
[root@ansible ~]# ansible webservers -m user -a "name=lisi state=absent"
[WARNING]: Platform linux on host 192.168.60.119 is using the discovered Python
interpreter at /usr/bin/python3, but future installation of another Python
interpreter could change this. See https://docs.ansible.com/ansible/2.9/referen
ce_appendices/interpreter_discovery.html for more information.
192.168.60.119 | CHANGED => {
    "ansible_facts": {
        "discovered_interpreter_python": "/usr/bin/python3"
    },
    "changed": true,
    "force": false,
    "name": "lisi",
    "remove": false,
    "state": "absent"
}
[WARNING]: Platform linux on host 192.168.60.118 is using the discovered Python
interpreter at /usr/bin/python3, but future installation of another Python
interpreter could change this. See https://docs.ansible.com/ansible/2.9/referen
ce_appendices/interpreter_discovery.html for more information.
192.168.60.118 | CHANGED => {
    "ansible_facts": {
        "discovered_interpreter_python": "/usr/bin/python3"
    },
    "changed": true,
    "force": false,
    "name": "lisi",
    "remove": false,
    "state": "absent"
}
script模块
-
script模块用于将本机的脚本在被管理端的机器上运行。该模块直接指定脚本的路径即可
-
现在本机写一个脚本文件
bash
[root@ansible ~]# vim test.sh
[root@ansible ~]#
[root@ansible ~]# chmod +x test.sh
bash
[root@ansible ~]# ansible webservers -m script -a "/root/test.sh"
192.168.60.118 | CHANGED => {
    "changed": true,
    "rc": 0,
    "stderr": "Shared connection to 192.168.60.118 closed.\r\n",
    "stderr_lines": [
        "Shared connection to 192.168.60.118 closed."
    ],
    "stdout": "",
    "stdout_lines": []
}
192.168.60.119 | CHANGED => {
    "changed": true,
    "rc": 0,
    "stderr": "Shared connection to 192.168.60.119 closed.\r\n",
    "stderr_lines": [
        "Shared connection to 192.168.60.119 closed."
    ],
    "stdout": "",
    "stdout_lines": []
}
setup模块
-
setup模块主要用于收集信息,是通过调用facts组件来实现的,facts组件时Ansible用于采集被管理机器设备信息的一个功能。我们可以使用setup模块查看机器的所有facts信息,可以使用filter来查看指定信息。整个facts信息被包装在一个JSON格式的数据文件中,ansible_facts是最上层的值。
-
facts就是变量,内建变量。每个主机的各种信息,cpu个数,内存的大小等。会存在facts中的某个变量中,调用后返回很多对应主机的信息,在后面的操作中可以根据不同的信息来做不同的操作。比如redhat系列用yum安装,而debian系列用apt安装软件
-
查看信息实例,查看被管理主机的内存
调用目标主机上的所有信息
bash
[root@ansible ~]# ansible 192.168.60.118 -m setup调用目标主机的内存信息
bash
[root@ansible ~]# ansible 192.168.60.118 -m setup -a "filter='*mem*'"
[WARNING]: Platform linux on host 192.168.60.118 is using the discovered Python
interpreter at /usr/bin/python3, but future installation of another Python
interpreter could change this. See https://docs.ansible.com/ansible/2.9/referen
ce_appendices/interpreter_discovery.html for more information.
192.168.60.118 | SUCCESS => {
    "ansible_facts": {
        "ansible_memfree_mb": 36,
        "ansible_memory_mb": {
            "nocache": {
                "free": 194,
                "used": 224
            },
            "real": {
                "free": 36,
                "total": 418,
                "used": 382
            },
            "swap": {
                "cached": 10,
                "free": 2005,
                "total": 2067,
                "used": 62
            }
        },
        "ansible_memtotal_mb": 418,
        "discovered_interpreter_python": "/usr/bin/python3"
    },
    "changed": false