一、让AI触手可及
相信我们身边或多或少总是听到很多人在说大模型大模型,可大模型具体怎么用还是一道很深的门槛,我们博文也写了很多,但具体的用法和作用,使我们还面临着一个有趣的矛盾:大模型的能力越来越强,但真正能让普通用户直接使用的AI应用却少之又少。今天,我想分享我们如何用LangGraph和Gradio构建一个可视化、可配置的AI工作流系统,让非技术用户也能轻松组合各种AI能力。

今天没有太多理论,从我经历的实际场景出发,在我们开始技术讨论之前,先看一个真实场景,也是我们工作种大都有经历过的,如同我们电商公司的客服团队每天收到数百条用户反馈:
- "产品很好,但配送太慢了"
- "这个新功能太难用了"
- "界面复杂,操作繁琐"
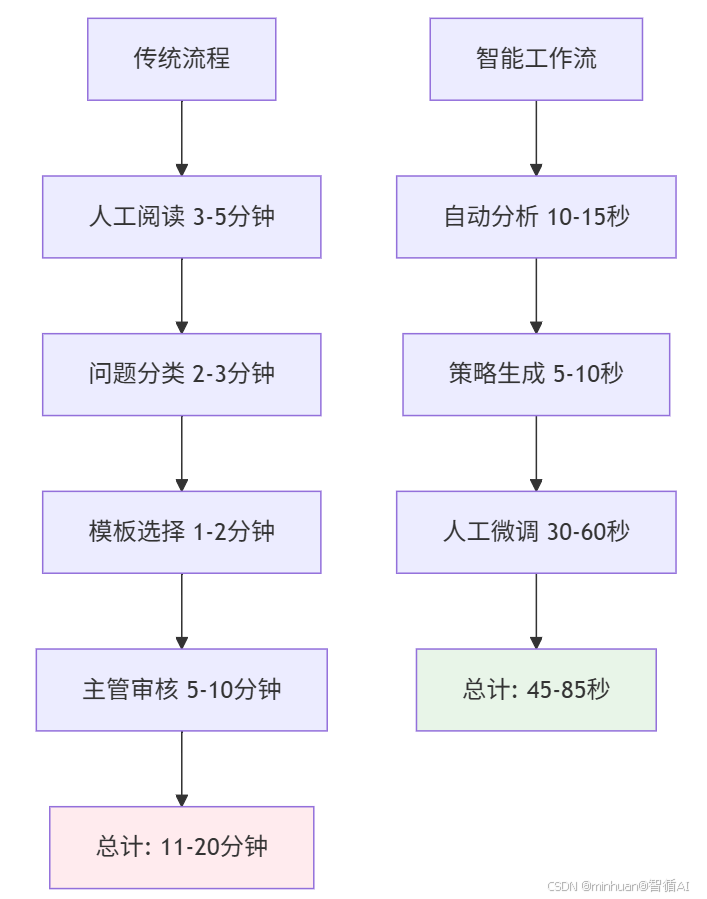
传统处理方式下,客服人员需要:
- 人工阅读并理解每条反馈(3-5分钟)
- 判断情感倾向和问题类型(2-3分钟)
- 查找回复模板或自行组织语言(1-2分钟)
- 主管审核后发送(5-10分钟)

总耗时:11-20分钟/条,且质量参差不齐
正如以上的场景,很多企业平台每天都会收到海量的用户反馈、产品评价和客户咨询。传统的人工处理方式面临着效率低下、标准不一、洞察有限三大痛点。据开放的数据统计,在客户服务实践中发现:
- 72% 的用户反馈因响应延迟而导致客户满意度下降
- 45% 的产品改进机会在人工处理过程中被遗漏
- 68% 的客服回复缺乏一致性和专业性
当用户说"这个功能太难用了",我们是选择简单回复"感谢反馈",还是抓住这个让产品变得更好的黄金机,作为产品设计者的角度,我们认真听取客户意见是很有必要的,作为开发者的角度,我们天天研究大模型,学习AI知识,为的就是要结合实际场景来体现AI的价值,也正是基于这些真实痛点,我们考虑是否有一种可以应用AI又符合我们的业务,提高我们的效率的方案,于是基于LangGraph,我们探索的考虑并构建了这个基于LangGraph的智能工作流示例,旨在展示如何通过AI技术实现用户反馈处理的自动化、智能化和标准化。
bash
# 系统核心架构
用户输入 → 预处理 → 情感分析 → 关键词提取 → 智能回复 → 输出结果
更重要的是,整个过程对用户完全透明,每个步骤都可以实时观察和配置。
二、什么是智能工作流
智能工作流是基于人工智能技术,将多个处理节点有机组合起来的自动化系统。它就像一条智能流水线,用户反馈作为原材料输入,经过各个节点的精细加工,最终产出有价值的成品。
核心技术架构
我们的系统基于以下技术栈构建:
- LangGraph:工作流编排框架,负责协调各个处理节点
- Qwen大模型:提供强大的自然语言理解能力
- Gradio:构建友好的用户交互界面
- NetworkX:生成可视化的执行流程图
效能提升对比
三、四层处理引擎
让我们通过一个具体案例,深入了解智能工作流如何运作。
1. 案例背景
用户李女士在使用某产品的新功能后,提交了如下反馈:
bash
"这个新功能太难用了,界面复杂,操作繁琐,希望能简化一下。"2. 第一层:智能预处理引擎
**功能:**文本清洗与标准化
预处理引擎首先对原始文本进行清理:
- 输入:"这个新功能太难用了!!!界面太复杂了!!"
- 输出:"这个新功能太难用了 界面太复杂了"
这个过程去除了情绪化的标点符号,统一了文本格式,为后续分析打下坚实基础。
3. 第二层:情感雷达系统
**功能:**精准识别用户情感倾向
情感分析节点基于Qwen大模型的深度理解能力,识别出:
- 情感标签:negative(负面)
- 置信度:92%
- 触发关键词:"太难用"、"复杂"、"繁琐"
更重要的是,系统能够理解这是建设性的负面反馈,而非单纯的抱怨,因此启动了高优先级处理流程。
4. 第三层:关键词挖掘机
**功能:**提取核心问题点
关键词提取节点从文本中抽取出最有价值的信息:
- 问题关键词:"界面复杂", "操作繁琐"
- 期望关键词:"简化"
- 上下文关键词:"新功能"
这四个关键词构成了完整的问题画像,为产品改进提供了明确方向。
5. 第四层:智能回复生成器
**功能:**生成策略性专业回复
基于前三层的分析结果,回复生成节点创建了这样的回复:
- "感谢您对我们新功能的坦诚反馈。我们完全理解您在界面复杂性和操作便捷性方面遇到的挑战------这确实影响了使用体验。
- 我们的产品团队已经将'界面简化'和'操作流程优化'列为优先改进项,正在制定具体的优化方案。
- 为了更精准地解决您遇到的问题,能否与我们分享:
- 哪个操作步骤让您感觉最繁琐?
- 您期望的简化方式是什么?
- 您的详细体验将直接指导我们的产品迭代方向。再次感谢您帮助我们变得更好!"
这个回复体现了情感共鸣、问题确认、行动展示、深度互动、价值肯定五个关键要素。
6. 案例展示
6.1 场景:情感分析
示例:今天天气真好,阳光明媚,心情特别愉快!
流程节点:【文本预处理】-> 【情感分析】
6.2 场景:产品反馈
示例:这个新功能太难用了,界面复杂,操作繁琐,希望能简化一下。
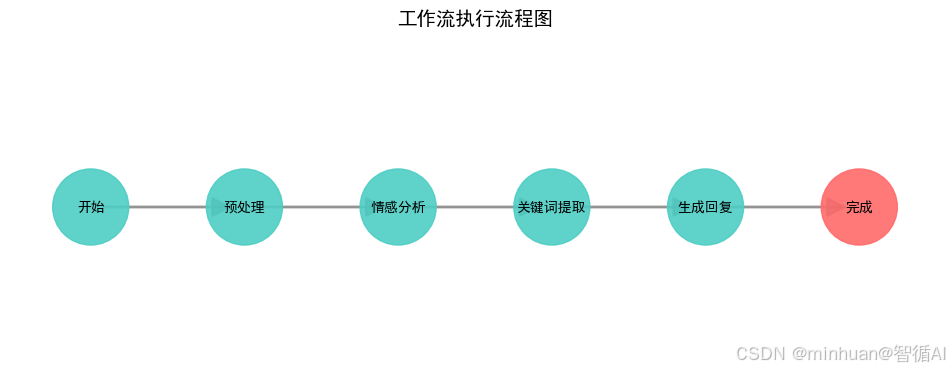
流程节点:【文本预处理】-> 【情感分析】-> 【关键词提取】
6.3 场景:内容总结
示例:人工智能是当今科技发展的重要方向,它正在改变我们的生活方式。机器学习、深度学习等技术在各个领域都有广泛应用,包括医疗、金融、教育等。未来,AI将继续推动社会进步。
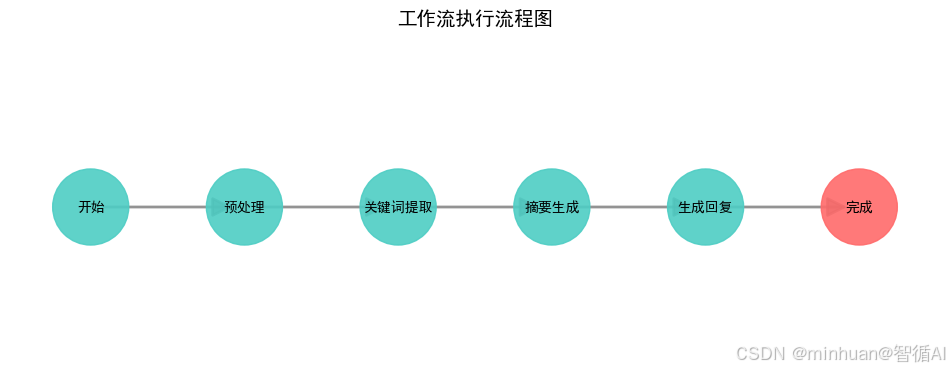
流程节点:【文本预处理】-> 【关键词提取】-> 【摘要生成】
四、示例详细说明
- 核心主题:基于 LangGraph 和 Qwen 大模型的可视化智能工作流系统
- **主要功能:**通过模块化的工作流节点处理文本,提供情感分析、关键词提取、摘要生成等功能,并实时可视化执行过程。
1. 代码分解
1.1 环境配置
python
# 配置中文字体,确保图表中的中文能正常显示
plt.rcParams['font.sans-serif'] = ['SimHei', 'Microsoft YaHei', 'DejaVu Sans']
plt.rcParams['axes.unicode_minus'] = False  # 解决负号显示问题

# 配置 Qwen API 密钥
# 注意:在实际生产环境中,建议使用环境变量而不是硬编码
dashscope.api_key = "sk-b76381c**************"
1.2 数据模型定义
python
class AgentState(TypedDict):
    """
    工作流状态数据模型
    定义在整个工作流执行过程中传递的数据结构
    """
    message: str                    # 原始用户输入消息
    processed_message: str          # 预处理后的消息
    sentiment: str                  # 情感分析结果 (positive/negative/neutral)
    response: str                   # 最终生成的回复
    keywords: str                   # 提取的关键词
    summary: str                    # 生成的摘要
1.3 大模型服务层
python
class QwenModel:
    """
    Qwen 大模型调用封装类
    负责与通义千问API进行交互,提供统一的调用接口
    """

    def __init__(self, model_name="qwen-turbo"):
        """
        初始化模型配置

        Args:
            model_name: 使用的模型名称,默认为 qwen-turbo
        """
        self.model_name = model_name

    def invoke(self, prompt: str) -> str:
        """
        调用 Qwen API 生成回复

        Args:
            prompt: 输入的提示词文本

        Returns:
            str: 模型生成的回复文本,或错误信息
        """
        try:
            # 调用通义千问生成API
            response = Generation.call(
                model=self.model_name,      # 指定模型
                prompt=prompt,              # 输入提示词
                seed=1234,                  # 随机种子,保证结果可复现
                max_tokens=1500,            # 最大生成token数
                temperature=0.7,            # 温度参数,控制随机性
                top_p=0.8                   # 核采样参数
            )

            # 检查API调用是否成功
            if response.status_code == HTTPStatus.OK:
                return response.output.text  # 返回生成的文本
            else:
                # 返回具体的错误信息
                return f"Error: {response.code} - {response.message}"

        except Exception as e:
            # 捕获并返回异常信息
            return f"API调用错误: {str(e)}"
1.4 工作流节点实现
python
class WorkflowNodes:
    """
    工作流节点处理器
    包含所有可用的文本处理节点,每个节点负责特定的处理任务
    """

    def __init__(self):
        """初始化工作流节点,创建Qwen模型实例"""
        self.llm = QwenModel("qwen-turbo")  # 使用 Qwen-turbo 模型

    def preprocess_node(self, state: AgentState) -> Dict:
        """
        预处理节点 - 文本清洗和标准化

        Args:
            state: 当前工作流状态

        Returns:
            Dict: 包含预处理后消息的字典
        """
        message = state["message"]
        # 文本标准化处理:去除首尾空格并转为小写
        processed = message.strip().lower()
        return {"processed_message": processed}

    def sentiment_node(self, state: AgentState) -> Dict:
        """
        情感分析节点 - 识别文本情感倾向

        Args:
            state: 当前工作流状态

        Returns:
            Dict: 包含情感分析结果的字典
        """
        # 优先使用预处理后的消息,如果没有则使用原始消息
        processed_message = state.get("processed_message", state["message"])

        # 构建情感分析提示词
        prompt = f"""
        分析以下文本的情感倾向,只返回以下之一:positive, negative, neutral
        文本:{processed_message}

        请直接返回情感标签,不要添加其他内容。
        """

        # 调用大模型进行情感分析
        response = self.llm.invoke(prompt)
        sentiment = response.strip().lower()

        # 后处理:确保返回标准化的情感标签
        if sentiment not in ['positive', 'negative', 'neutral']:
            if '积极' in sentiment or 'positive' in sentiment:
                sentiment = 'positive'
            elif '消极' in sentiment or 'negative' in sentiment:
                sentiment = 'negative'
            else:
                sentiment = 'neutral'

        return {"sentiment": sentiment}

    def response_node(self, state: AgentState) -> Dict:
        """
        响应生成节点 - 基于分析结果生成回复

        Args:
            state: 当前工作流状态

        Returns:
            Dict: 包含生成回复的字典
        """
        processed_message = state.get("processed_message", state["message"])
        sentiment = state.get("sentiment", "unknown")  # 默认为unknown

        # 构建回复生成提示词
        prompt = f"""
        根据用户消息和情感分析结果生成回复。

        用户消息:{processed_message}
        情感分析:{sentiment}

        请生成一个友好、合适的回复,保持自然流畅。
        """

        response = self.llm.invoke(prompt)
        return {"response": response}

    def keyword_extraction_node(self, state: AgentState) -> Dict:
        """
        关键词提取节点 - 从文本中提取核心关键词

        Args:
            state: 当前工作流状态

        Returns:
            Dict: 包含提取关键词的字典
        """
        message = state.get("processed_message", state["message"])

        prompt = f"""
        从以下文本中提取3-5个最重要的关键词:
        文本:{message}

        请以逗号分隔的形式返回关键词,不要添加其他内容。
        """

        response = self.llm.invoke(prompt)
        keywords = response.strip()

        return {"keywords": keywords}

    def summary_node(self, state: AgentState) -> Dict:
        """
        摘要生成节点 - 生成文本的简洁摘要

        Args:
            state: 当前工作流状态

        Returns:
            Dict: 包含生成摘要的字典
        """
        message = state.get("processed_message", state["message"])

        prompt = f"""
        为以下文本生成一个简洁的摘要(不超过100字):
        文本:{message}

        请直接返回摘要内容,不要添加其他说明。
        """

        response = self.llm.invoke(prompt)
        summary = response.strip()

        return {"summary": summary}
1.5 工作流管理部分
python
class WorkflowManager:
    """
    工作流管理器
    负责管理执行历史和工作流状态
    """

    def __init__(self):
        """初始化工作流管理器"""
        self.workflow_history = []  # 存储执行历史记录

    def get_execution_history(self):
        """
        获取执行历史记录

        Returns:
            list: 执行历史记录列表
        """
        return self.workflow_history

# 创建全局工作流管理器实例
workflow_manager = WorkflowManager()
1.6 示例数据配置
python
EXAMPLES = {
    "客户服务": {
        "message": "你们的产品质量很好,但是配送速度有点慢,希望能改进一下。",
        "use_preprocess": True,      # 启用预处理
        "use_sentiment": True,       # 启用情感分析
        "use_keywords": True,        # 启用关键词提取
        "use_summary": True,         # 启用摘要生成
        "custom_prompt": "作为客服代表,针对用户的反馈生成专业、友好的回复,既要感谢正面评价,也要回应改进建议。"
    },
    "情感分析": {
        "message": "今天天气真好,阳光明媚,心情特别愉快!",
        "use_preprocess": True,
        "use_sentiment": True,
        "use_keywords": False,       # 不启用关键词提取
        "use_summary": False,        # 不启用摘要生成
        "custom_prompt": "根据情感分析结果,生成一个积极向上的回应。"
    },
    "内容总结": {
        "message": "人工智能是当今科技发展的重要方向,它正在改变我们的生活方式。机器学习、深度学习等技术在各个领域都有广泛应用,包括医疗、金融、教育等。未来,AI将继续推动社会进步。",
        "use_preprocess": True,
        "use_sentiment": False,      # 不启用情感分析
        "use_keywords": True,
        "use_summary": True,
        "custom_prompt": "基于摘要和关键词,生成一个关于AI发展的简短评论。"
    },
    "产品反馈": {
        "message": "这个新功能太难用了,界面复杂,操作繁琐,希望能简化一下。",
        "use_preprocess": True,
        "use_sentiment": True,
        "use_keywords": True,
        "use_summary": False,
        "custom_prompt": "作为产品经理,回应用户的负面反馈,表达改进的决心并邀请进一步交流。"
    }
}
1.7 可视化组件部分
python
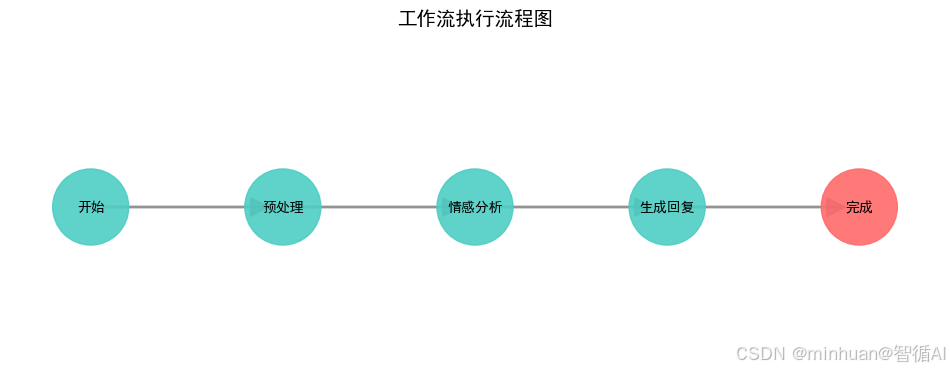
def generate_workflow_diagram(steps, current_step=None):
    """
    生成工作流执行流程图

    Args:
        steps: 步骤列表,表示工作流的执行顺序
        current_step: 当前正在执行的步骤,用于高亮显示

    Returns:
        str: 生成的流程图临时文件路径
    """
    try:
        # 创建图形和网络图对象
        plt.figure(figsize=(12, 4))
        G = nx.DiGraph()

        # 定义节点位置和样式
        pos = {}
        node_colors = []
        node_labels = {}

        # 添加节点到图中
        for i, step in enumerate(steps):
            G.add_node(step)
            # 水平排列节点
            pos[step] = (i * 2, 0)

            # 简化的节点标签显示
            if step == "开始":
                label = "开始"
            elif step == "完成":
                label = "完成"
            else:
                label = step

            node_labels[step] = label

            # 当前执行到的节点用红色高亮,其他用青色
            if step == current_step:
                node_colors.append('#FF6B6B')  # 红色高亮
            else:
                node_colors.append('#4ECDC4')  # 青色

        # 添加边连接节点
        for i in range(len(steps) - 1):
            G.add_edge(steps[i], steps[i + 1])

        # 绘制图形
        plt.clf()  # 清除之前的图形
        plt.figure(figsize=(12, 4))

        # 绘制节点
        nx.draw_networkx_nodes(G, pos,
                              node_color=node_colors,
                              node_size=3000,
                              alpha=0.9)

        # 绘制边
        nx.draw_networkx_edges(G, pos,
                              edge_color='#666666',
                              arrows=True,
                              arrowsize=30,
                              width=2,
                              alpha=0.7)

        # 绘制节点标签
        nx.draw_networkx_labels(G, pos,
                               labels=node_labels,
                               font_size=10,
                               font_weight='bold')

        # 设置标题和坐标轴
        plt.title("工作流执行流程图", fontsize=14, fontweight='bold', pad=20)
        plt.axis('off')  # 隐藏坐标轴

        # 保存到临时文件
        with tempfile.NamedTemporaryFile(suffix='.png', delete=False) as tmp_file:
            plt.savefig(tmp_file.name, format='png', dpi=100, bbox_inches='tight', facecolor='white')
            plt.close()
            return tmp_file.name

    except Exception as e:
        # 错误处理:生成占位图
        print(f"生成流程图错误: {e}")
        with tempfile.NamedTemporaryFile(suffix='.png', delete=False) as tmp_file:
            plt.figure(figsize=(8, 2))
            plt.text(0.5, 0.5, "流程图生成中...", ha='center', va='center', fontsize=16)
            plt.axis('off')
            plt.savefig(tmp_file.name, bbox_inches='tight', facecolor='white')
            plt.close()
            return tmp_file.name
1.8 用户界面部分
python
def create_custom_workflow_interface():
    """
    创建 Gradio 用户界面
    构建完整的工作流定制和可视化界面
    """

    def load_example(example_name):
        """
        加载示例数据到界面

        Args:
            example_name: 示例名称

        Returns:
            list: 示例数据的各个字段值
        """
        if example_name in EXAMPLES:
            example = EXAMPLES[example_name]
            return [
                example["message"],
                example["use_preprocess"],
                example["use_sentiment"],
                example["use_keywords"],
                example["use_summary"],
                example["custom_prompt"]
            ]
        # 如果示例不存在,返回空值
        return ["", True, True, True, True, ""]

    def execute_custom_workflow(message, use_preprocess, use_sentiment, use_keywords, use_summary, custom_prompt):
        """
        执行自定义工作流的核心函数

        Args:
            message: 用户输入的文本消息
            use_preprocess: 是否启用预处理
            use_sentiment: 是否启用情感分析
            use_keywords: 是否启用关键词提取
            use_summary: 是否启用摘要生成
            custom_prompt: 自定义提示词

        Yields:
            tuple: (执行结果文本, 流程图文件路径) 的元组
        """
        try:
            # 输入验证
            if not message.strip():
                yield " 请输入消息内容", generate_workflow_diagram(["开始"], "开始")
                return

            # 初始化工作流组件
            nodes = WorkflowNodes()
            current_state = {"message": message}
            execution_steps = []      # 记录执行的步骤
            detailed_results = {}     # 存储每个步骤的详细结果

            # 构建步骤列表用于流程图显示
            workflow_steps = ["开始"]
            current_active_step = "开始"

            # 生成初始流程图
            initial_diagram = generate_workflow_diagram(workflow_steps, current_active_step)

            # ==================== 预处理步骤 ====================
            if use_preprocess:
                workflow_steps.append("预处理")
                current_active_step = "预处理"
                # 实时更新界面显示
                yield " 正在执行预处理...", generate_workflow_diagram(workflow_steps, current_active_step)

                # 执行预处理节点
                preprocess_result = nodes.preprocess_node(current_state)
                current_state.update(preprocess_result)  # 更新状态
                execution_steps.append(" 预处理")
                detailed_results["预处理结果"] = preprocess_result.get("processed_message", "")

            # ==================== 情感分析步骤 ====================
            if use_sentiment:
                workflow_steps.append("情感分析")
                current_active_step = "情感分析"
                yield " 正在执行情感分析...", generate_workflow_diagram(workflow_steps, current_active_step)

                sentiment_result = nodes.sentiment_node(current_state)
                current_state.update(sentiment_result)
                execution_steps.append(" 情感分析")
                detailed_results["情感分析"] = sentiment_result.get("sentiment", "")

            # ==================== 关键词提取步骤 ====================
            if use_keywords:
                workflow_steps.append("关键词提取")
                current_active_step = "关键词提取"
                yield " 正在提取关键词...", generate_workflow_diagram(workflow_steps, current_active_step)

                keyword_result = nodes.keyword_extraction_node(current_state)
                current_state.update(keyword_result)
                execution_steps.append(" 关键词提取")
                detailed_results["关键词"] = keyword_result.get("keywords", "")

            # ==================== 摘要生成步骤 ====================
            if use_summary:
                workflow_steps.append("摘要生成")
                current_active_step = "摘要生成"
                yield " 正在生成摘要...", generate_workflow_diagram(workflow_steps, current_active_step)

                summary_result = nodes.summary_node(current_state)
                current_state.update(summary_result)
                execution_steps.append(" 摘要生成")
                detailed_results["摘要"] = summary_result.get("summary", "")

            # ==================== 响应生成步骤 ====================
            workflow_steps.append("生成回复")
            current_active_step = "生成回复"
            yield " 正在生成回复...", generate_workflow_diagram(workflow_steps, current_active_step)

            def custom_response_node(state):
                """
                自定义响应生成节点
                根据是否提供自定义提示词来选择生成策略
                """
                if custom_prompt:
                    # 使用用户提供的自定义提示词
                    prompt = custom_prompt
                else:
                    # 构建默认提示词,包含所有可用信息
                    base_message = state.get("processed_message", state["message"])
                    sentiment = state.get("sentiment", "")
                    keywords = state.get("keywords", "")
                    summary = state.get("summary", "")

                    prompt = f"""基于以下信息生成回复:

用户原始消息: {base_message}
"""
                    # 动态添加可用信息
                    if sentiment:
                        prompt += f"情感倾向: {sentiment}\n"
                    if keywords:
                        prompt += f"关键词: {keywords}\n"
                    if summary:
                        prompt += f"内容摘要: {summary}\n"

                    prompt += "\n请生成一个友好、专业的回复。"

                response = nodes.llm.invoke(prompt)
                return {"response": response}

            # 执行响应生成
            response_result = custom_response_node(current_state)
            current_state.update(response_result)
            execution_steps.append(" 生成回复")
            detailed_results["最终回复"] = response_result.get("response", "")

            # ==================== 完成阶段 ====================
            workflow_steps.append("完成")
            current_active_step = "完成"
            final_diagram = generate_workflow_diagram(workflow_steps, current_active_step)

            # 构建执行历史记录
            execution_record = {
                "input": message,
                "output": response_result["response"],
                "steps": execution_steps,
                "custom_prompt": custom_prompt,
                "detailed_results": detailed_results
            }
            workflow_manager.workflow_history.append(execution_record)

            # 格式化最终输出结果
            result_text = "##  执行完成!\n\n"

            # 显示每个步骤的详细结果
            for step_name, step_result in detailed_results.items():
                result_text += f"**{step_name}:**\n{step_result}\n\n"

            # 显示完整的执行流程
            result_text += f"**执行流程:** {' → '.join(execution_steps)}"

            # 返回最终结果
            yield result_text, final_diagram

        except Exception as e:
            # 错误处理
            error_text = f" 执行错误: {str(e)}"
            yield error_text, generate_workflow_diagram(["开始"], "开始")

    def show_execution_history():
        """
        显示执行历史记录

        Returns:
            str: 格式化后的历史记录文本
        """
        history = workflow_manager.get_execution_history()
        if not history:
            return " 暂无执行历史"

        # 构建历史记录显示文本
        history_text = "##  最近执行历史\n\n"
        # 只显示最近5条记录
        for i, record in enumerate(history[-5:], 1):
            history_text += f"###  执行记录 {i}\n"
            history_text += f"**输入:** {record['input']}\n\n"
            # 长文本截断处理
            if len(record['output']) > 200:
                history_text += f"**输出:** {record['output'][:200]}...\n\n"
            else:
                history_text += f"**输出:** {record['output']}\n\n"
            history_text += f"**步骤:** {' → '.join(record['steps'])}\n\n"
            if record.get('custom_prompt'):
                history_text += f"**自定义提示:** {record['custom_prompt']}\n\n"
            history_text += "---\n\n"

        return history_text

    def show_workflow_visualization():
        """
        显示工作流可视化说明

        Returns:
            str: 工作流说明文档
        """
        visualization = """
##  工作流结构

###  可用节点说明:

- **📝 预处理**: 文本清理和标准化
- **😊 情感分析**: 分析文本情感倾向 (positive/negative/neutral)
- **🔑 关键词提取**: 提取3-5个核心关键词
- **📋 摘要生成**: 生成简洁的内容摘要
- **💬 生成响应**: 基于所有信息生成最终回复

###  示例场景:

1. **客户服务**: 完整流程处理用户反馈
2. **情感分析**: 专注于情感识别和回应
3. **内容总结**: 提取关键信息和生成摘要
4. **产品反馈**: 处理负面反馈并生成改进回应

###  使用流程:

1. 选择示例或输入自定义文本
2. 配置需要启用的处理节点
3. 可选: 提供自定义提示词
4. 点击执行,观察实时流程图
5. 查看详细执行结果
"""
        return visualization
1.9 构建 Gradio 界面
python
# 创建主界面块
with gr.Blocks(title="LangGraph + Qwen 工作流定制", theme=gr.themes.Soft()) as interface:
# 界面标题
gr.Markdown("# LangGraph + Qwen 工作流定制系统")
gr.Markdown("使用通义千问大模型和可视化工作流处理文本")
# ==================== 工作流执行标签页 ====================
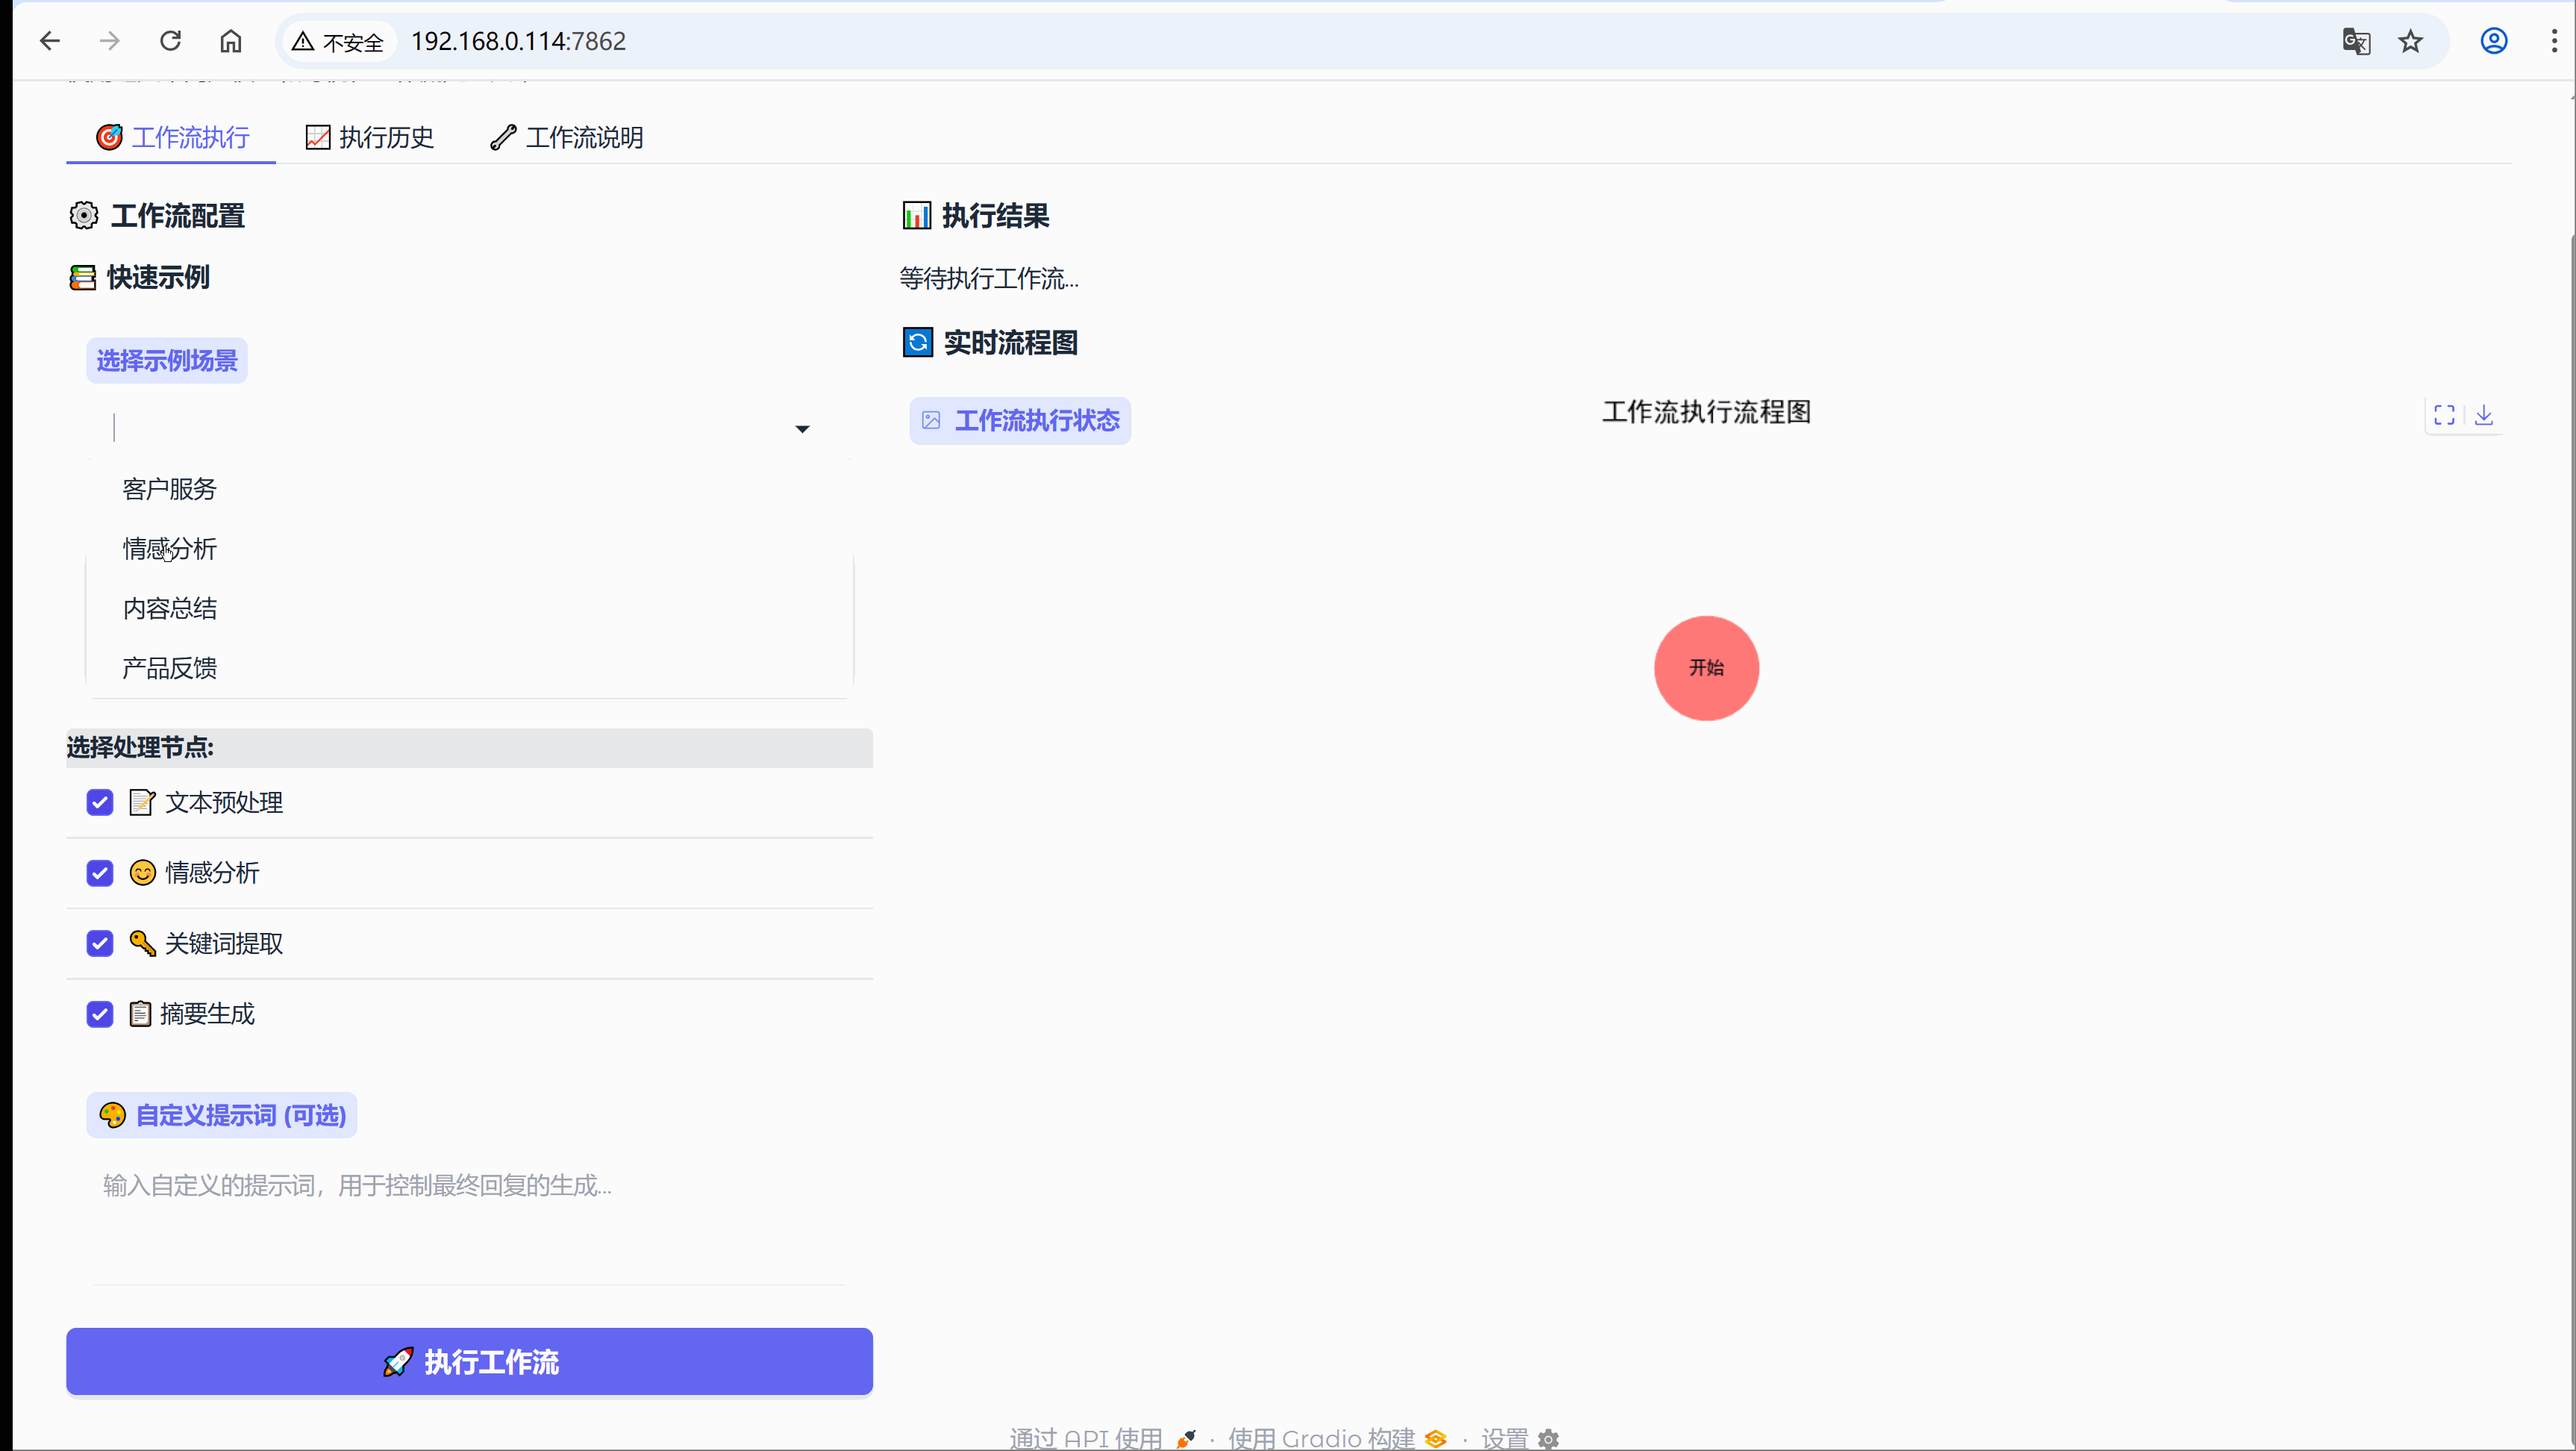
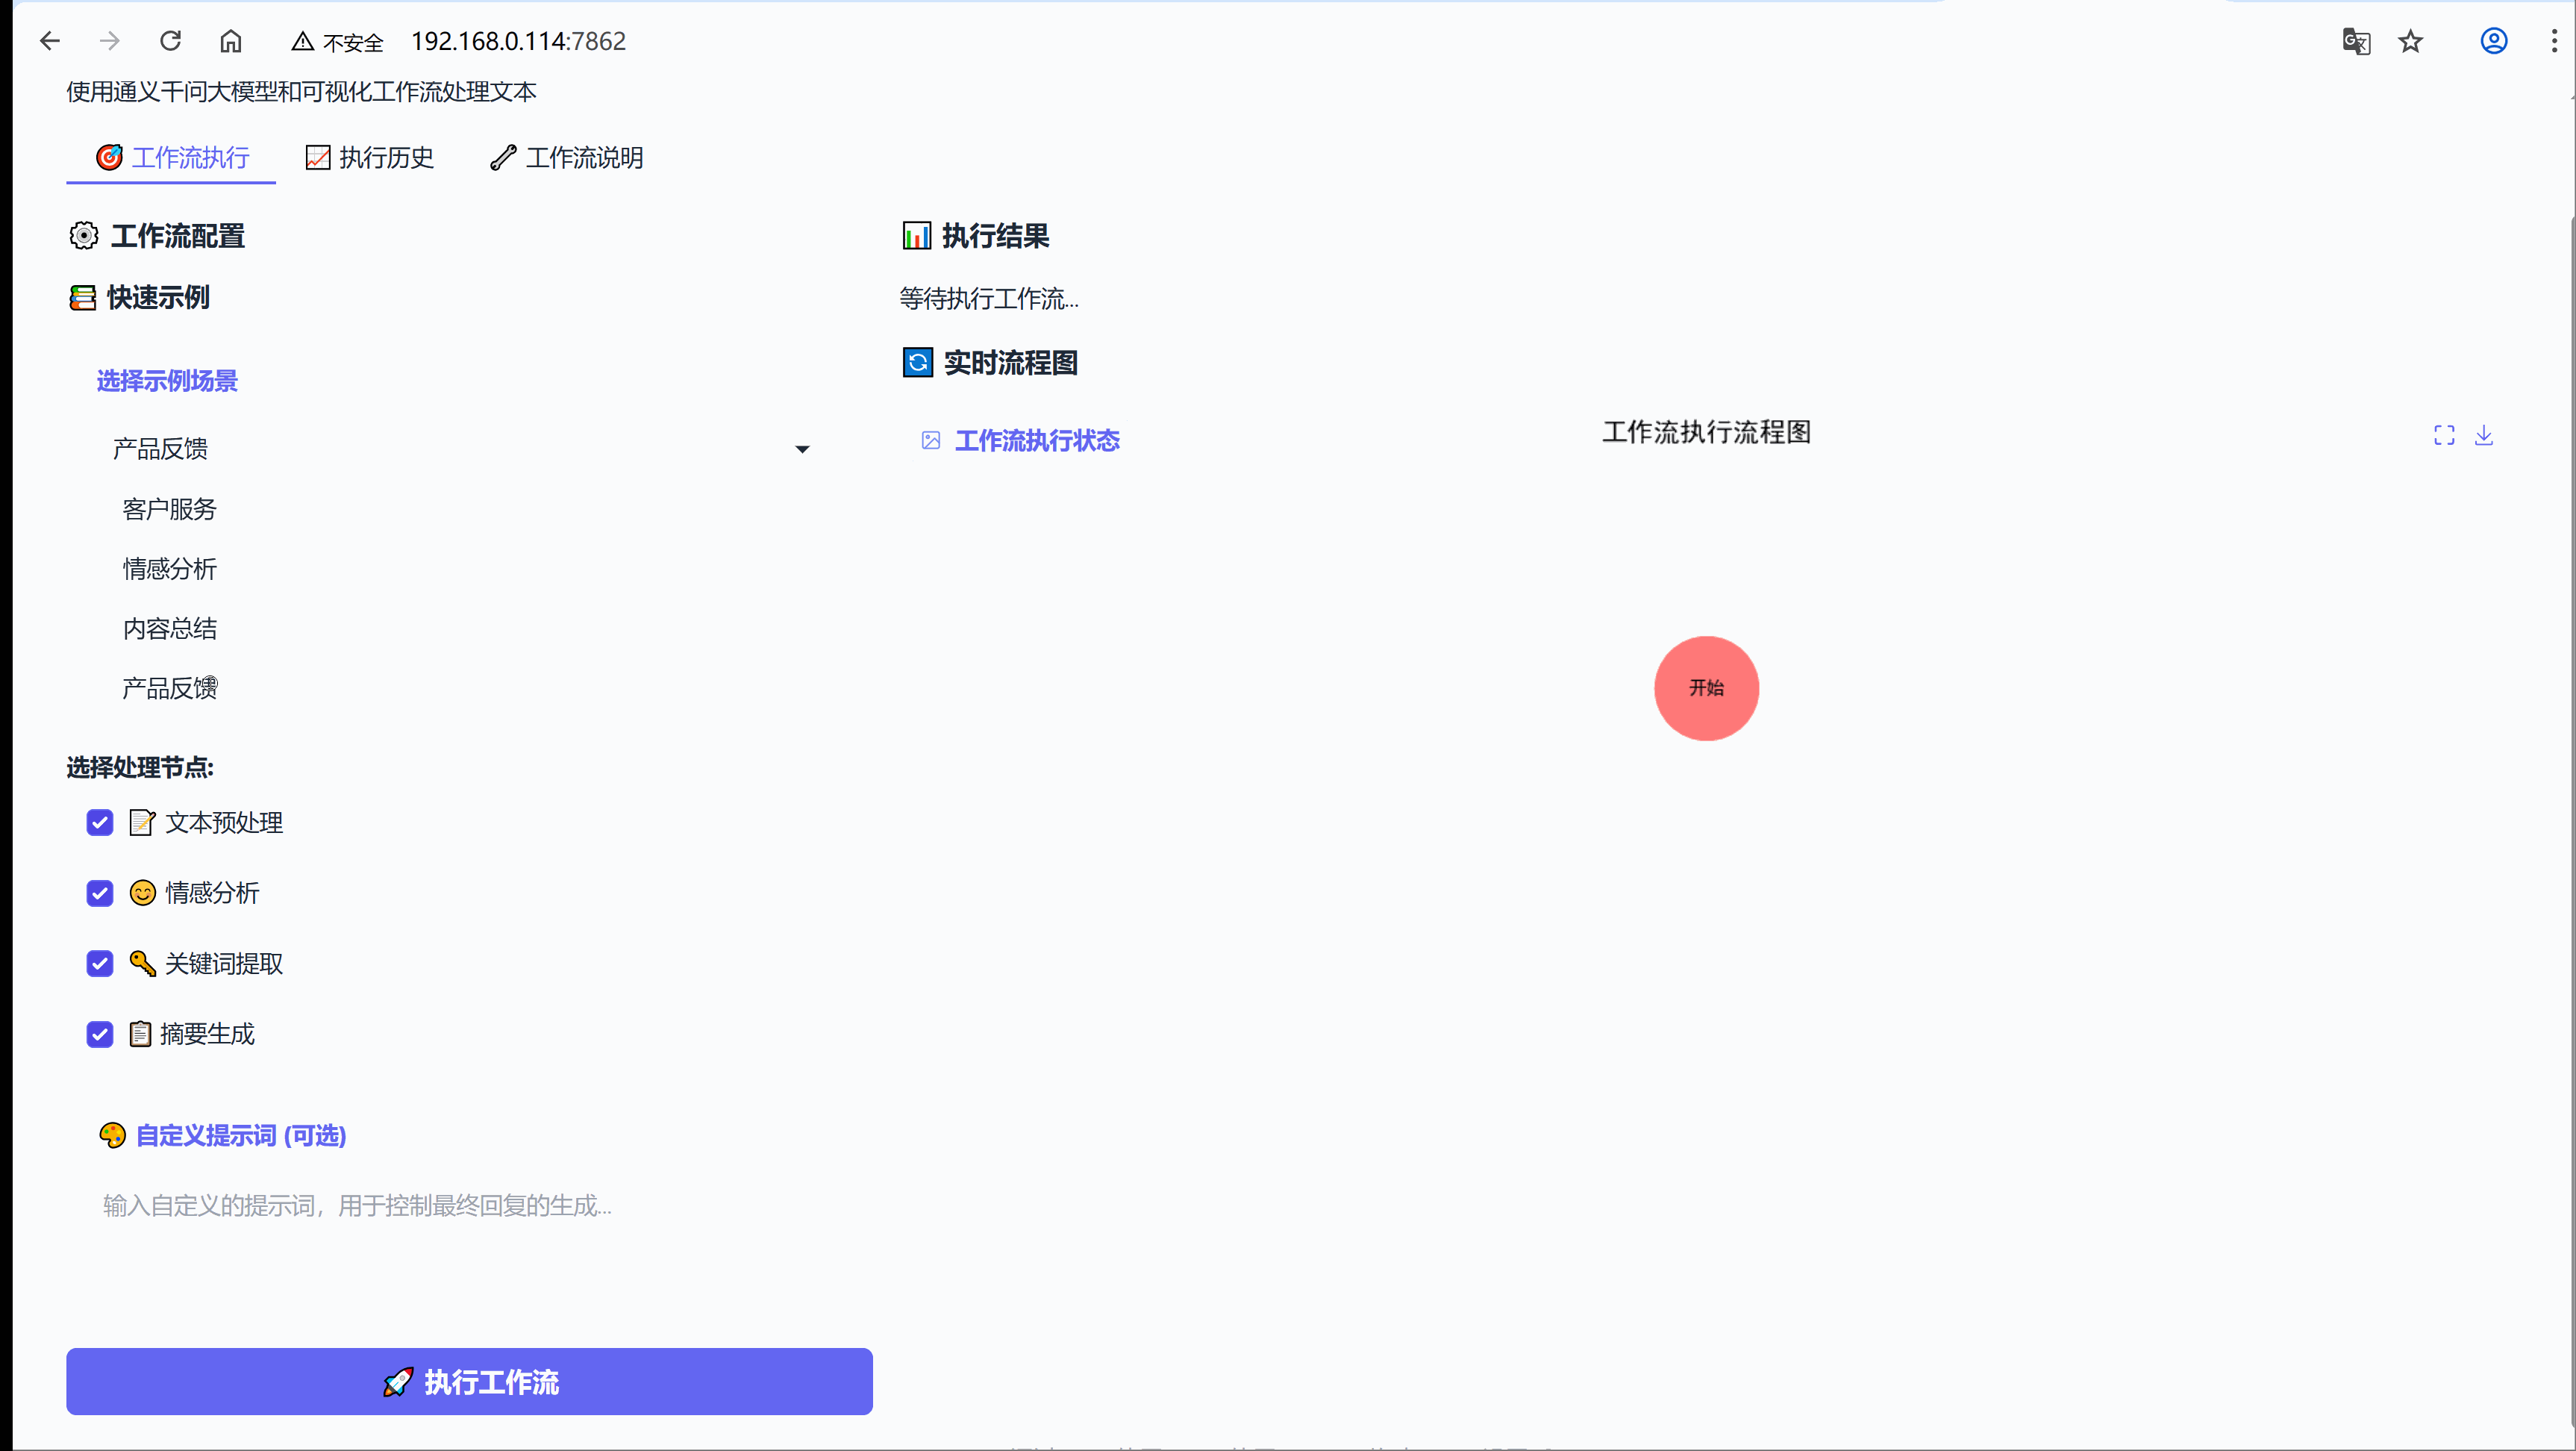
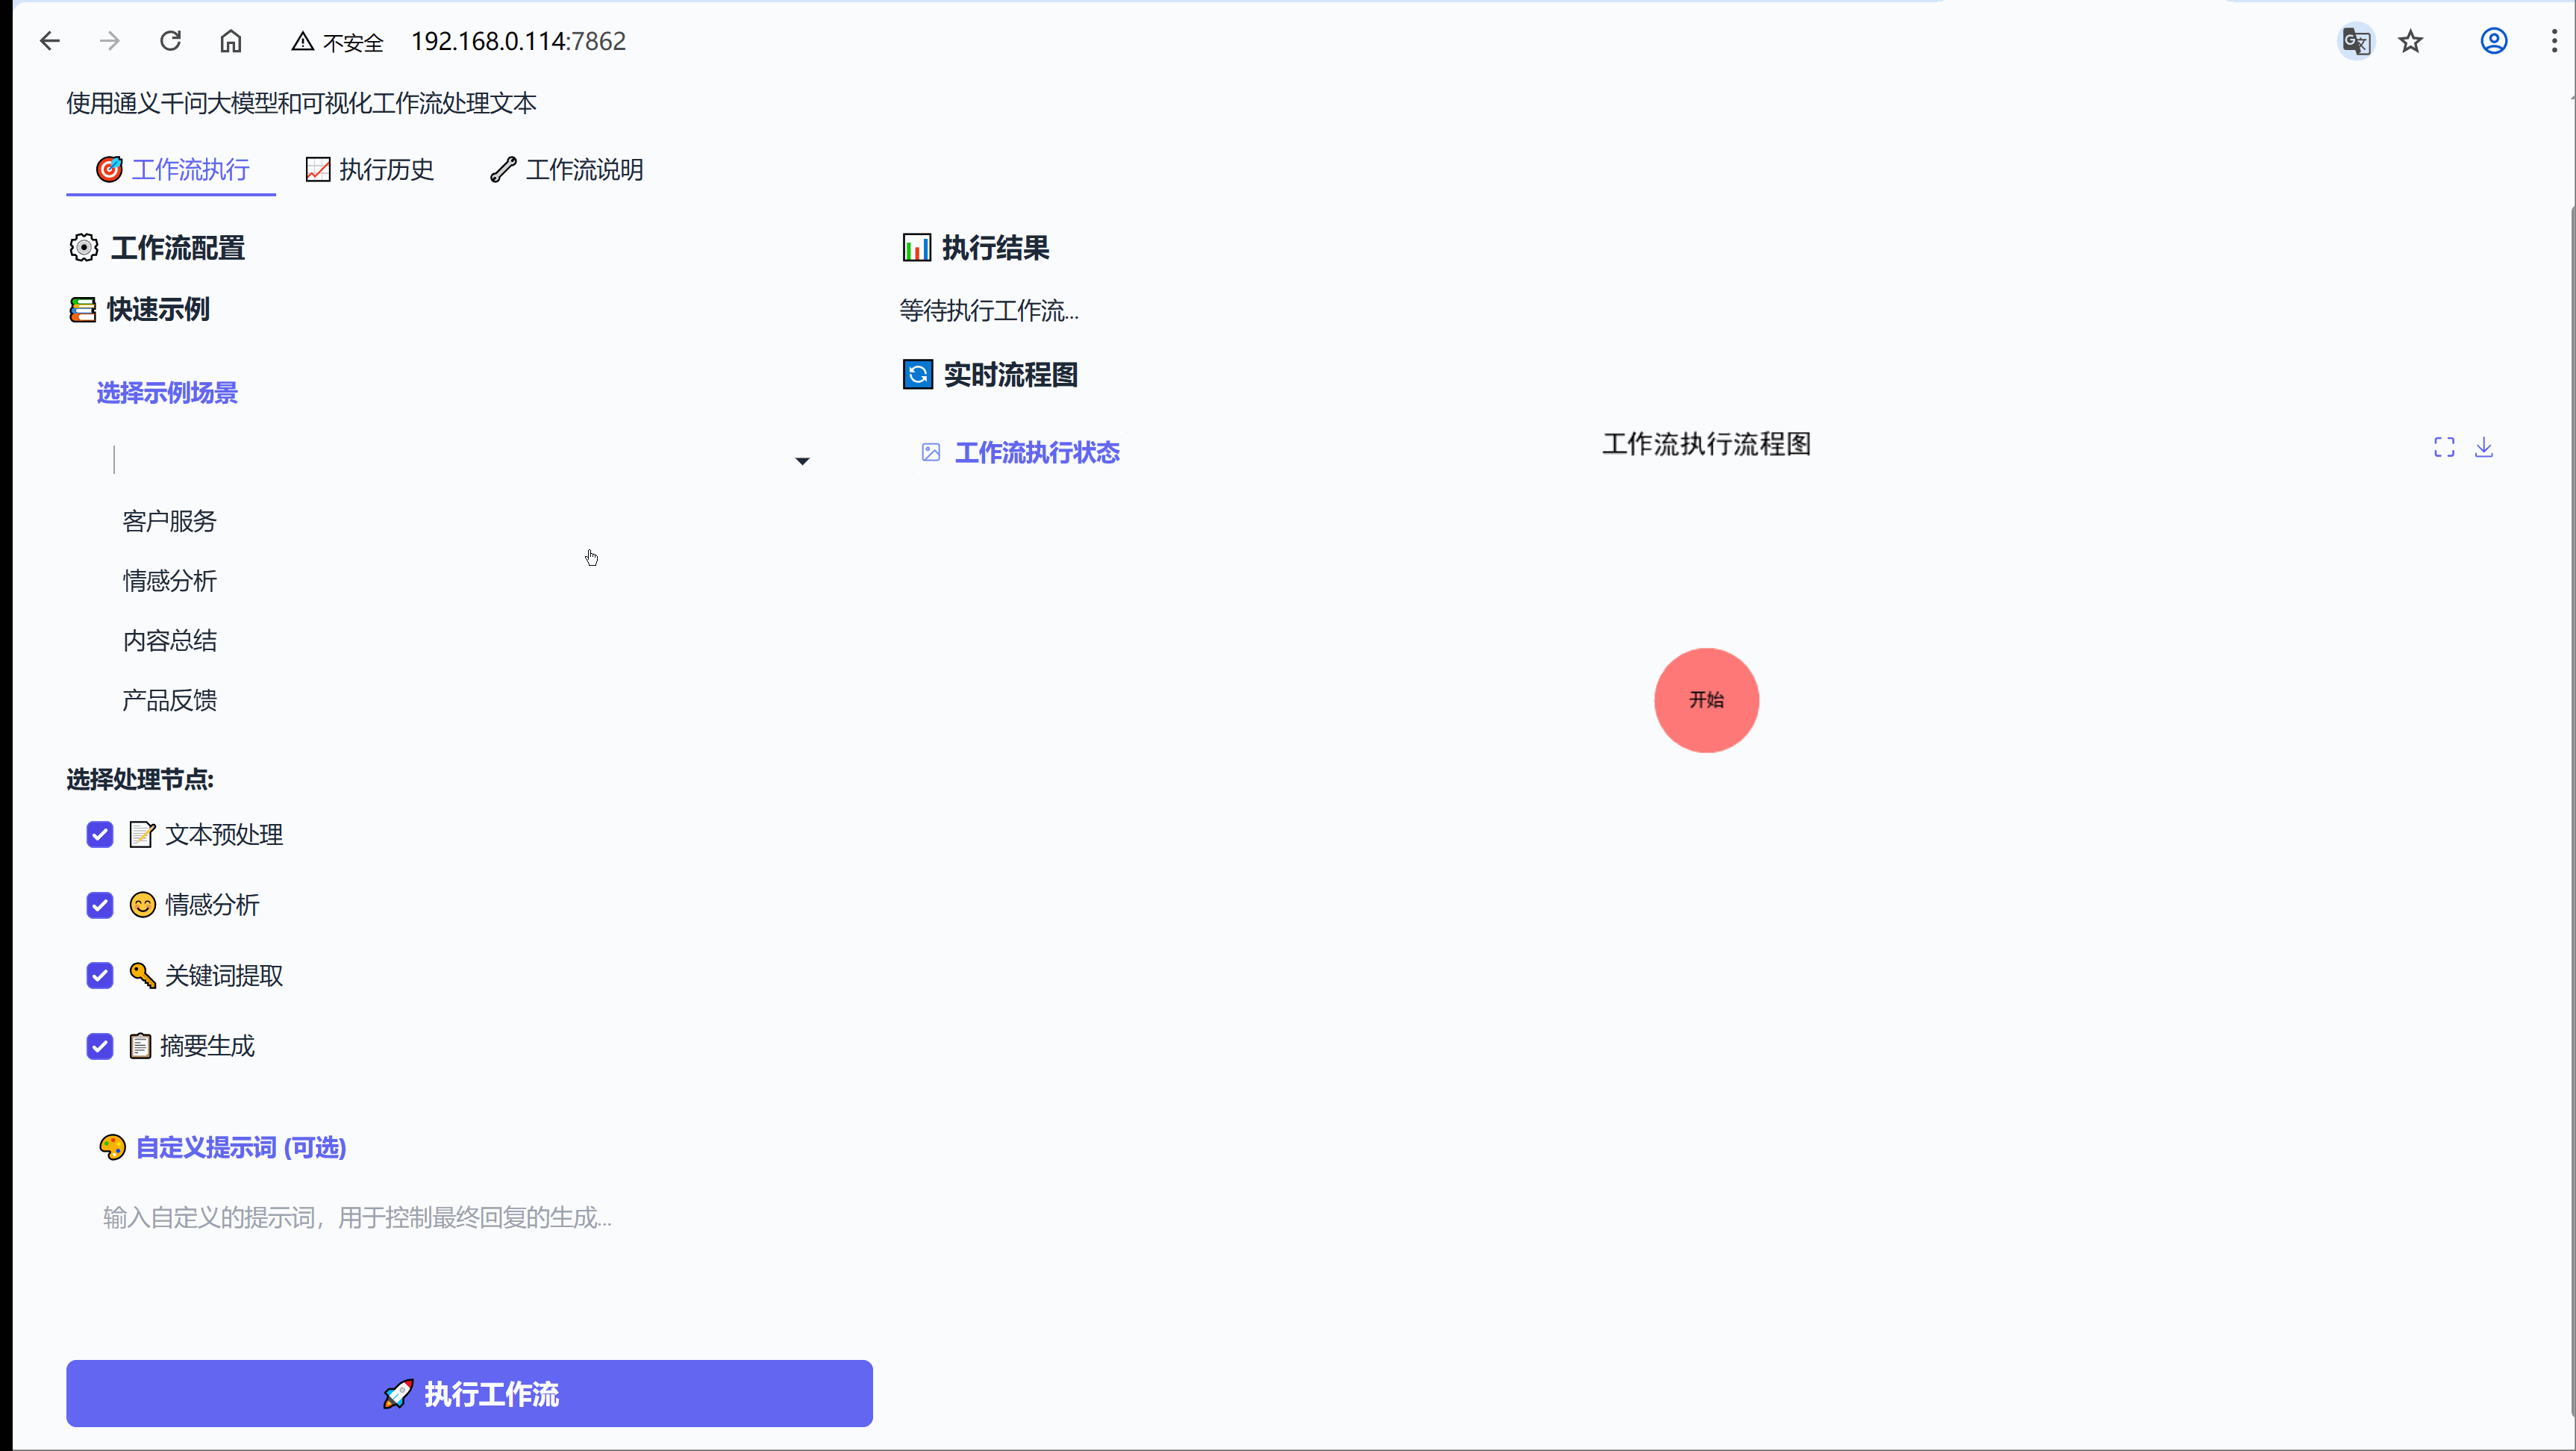
with gr.Tab(" 工作流执行"):
with gr.Row():
# 左侧配置面板
with gr.Column(scale=1):
gr.Markdown("### ⚙️ 工作流配置")
# 示例选择区域
gr.Markdown("####快速示例")
example_selector = gr.Dropdown(
choices=list(EXAMPLES.keys()), # 示例选项
label="选择示例场景",
value=None,
interactive=True
)
# 消息输入框
message_input = gr.Textbox(
label="输入消息",
placeholder="请输入您想要处理的消息...",
lines=3
)
# 节点配置区域
with gr.Group():
gr.Markdown("**选择处理节点:**")
use_preprocess = gr.Checkbox(
label="文本预处理",
value=True # 默认启用
)
use_sentiment = gr.Checkbox(
label="情感分析",
value=True
)
use_keywords = gr.Checkbox(
label="关键词提取",
value=True
)
use_summary = gr.Checkbox(
label="摘要生成",
value=True
)
# 自定义提示词输入
custom_prompt = gr.Textbox(
label="自定义提示词 (可选)",
placeholder="输入自定义的提示词,用于控制最终回复的生成...",
lines=3
)
# 执行按钮
execute_btn = gr.Button(" 执行工作流", variant="primary", size="lg")
# 右侧结果显示面板
with gr.Column(scale=2):
gr.Markdown("### 执行结果")
output_result = gr.Markdown(
label="执行结果",
value="等待执行工作流..." # 初始提示
)
# 流程图显示区域
gr.Markdown("### 实时流程图")
workflow_diagram = gr.Image(
label="工作流执行状态",
value=generate_workflow_diagram(["开始"], "开始"), # 初始流程图
height=300 # 固定高度
)
# ==================== 执行历史标签页 ====================
with gr.Tab(" 执行历史"):
with gr.Row():
history_display = gr.Markdown(
label="执行历史"
)
with gr.Row():
# 历史记录操作按钮
refresh_btn = gr.Button(" 刷新历史", variant="secondary")
clear_btn = gr.Button(" 清空历史", variant="stop")
# ==================== 工作流说明标签页 ====================
with gr.Tab(" 工作流说明"):
visualization_display = gr.Markdown(
label="工作流可视化说明"
)
# ==================== 事件绑定 ====================
# 示例选择事件:选择示例后自动填充表单
example_selector.change(
fn=load_example,
inputs=[example_selector],
outputs=[message_input, use_preprocess, use_sentiment, use_keywords, use_summary, custom_prompt]
)
# 执行按钮事件:点击后执行工作流
execute_btn.click(
fn=execute_custom_workflow,
inputs=[message_input, use_preprocess, use_sentiment, use_keywords, use_summary, custom_prompt],
outputs=[output_result, workflow_diagram]
)
# 刷新历史事件
refresh_btn.click(
fn=show_execution_history,
outputs=history_display
)
# 清空历史事件
clear_btn.click(
fn=lambda: "历史记录已清空",
outputs=history_display
)
# ==================== 界面初始化 ====================
# 界面加载时自动显示历史记录和工作流说明
interface.load(
fn=show_execution_history,
outputs=history_display
).then(
fn=show_workflow_visualization,
outputs=visualization_display
)
return interface1.10 应用启动部分
python
if __name__ == "__main__":
    """
    应用主入口点
    启动 Gradio  web 服务器
    """

    # 注意:在生产环境中建议使用环境变量配置API密钥
    # os.environ["DASHSCOPE_API_KEY"] = "your-api-key-here"

    # 启动日志
    print(" 启动 LangGraph + Qwen 工作流定制系统...")
    print(" 请确保已设置正确的 DASHSCOPE_API_KEY")

    # 创建并启动界面
    interface = create_custom_workflow_interface()
    interface.launch(
        server_name="0.0.0.0",    # 允许外部访问
        server_port=7862,         # 服务端口
        share=True                # 生成公共链接
    )
2. 代码结构说明
这个代码实现了一个完整的智能工作流系统,主要特点包括:
2.1 架构分层
- 数据层:AgentState 定义数据流
- 服务层:QwenModel 封装大模型调用
- 业务层:WorkflowNodes 实现具体处理逻辑
- 管理层:WorkflowManager 管理执行状态
- 界面层:Gradio 构建用户界面
2.2 工作流特点
- 模块化设计:每个节点独立,易于扩展
- 实时可视化:动态生成执行流程图
- 灵活配置:支持自定义节点组合
- 历史管理:完整的执行记录追踪
2.3 核心价值
- 将复杂的大模型能力封装成易用工具
- 提供直观的可视化反馈
- 支持多种文本处理场景
- 具备良好的错误处理机制
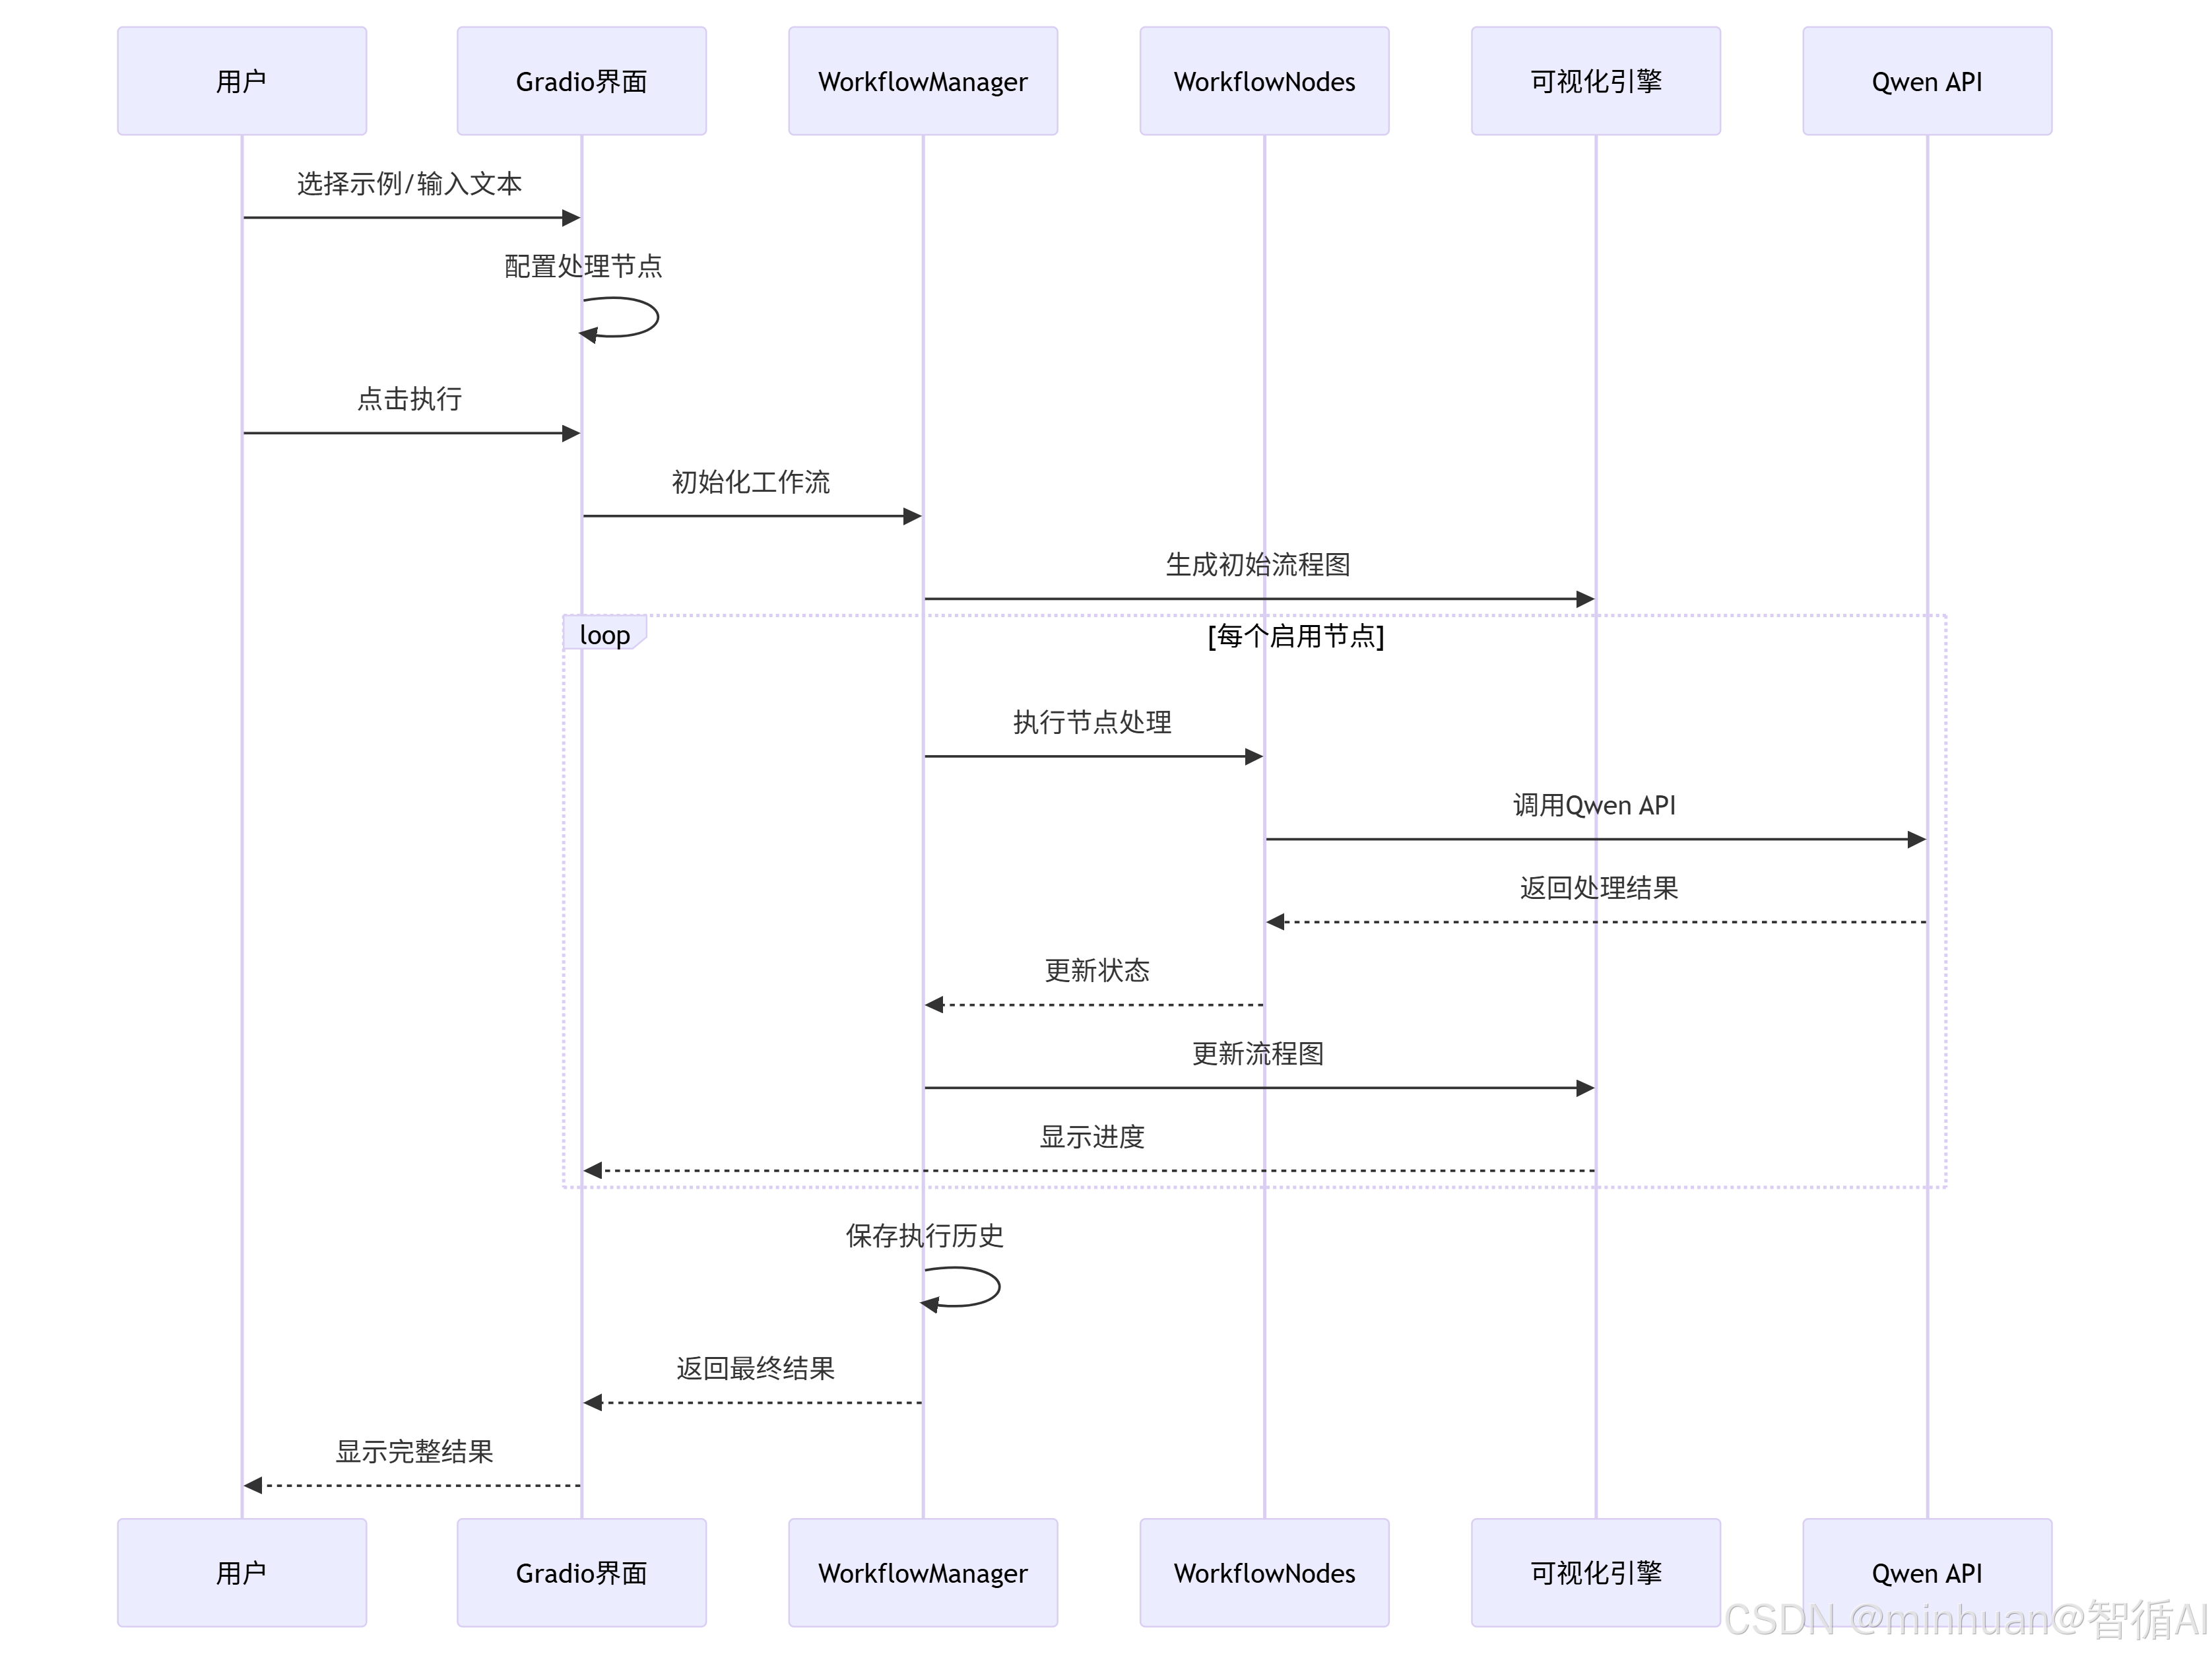
3. 系统执行流程图
4. 工作流程图
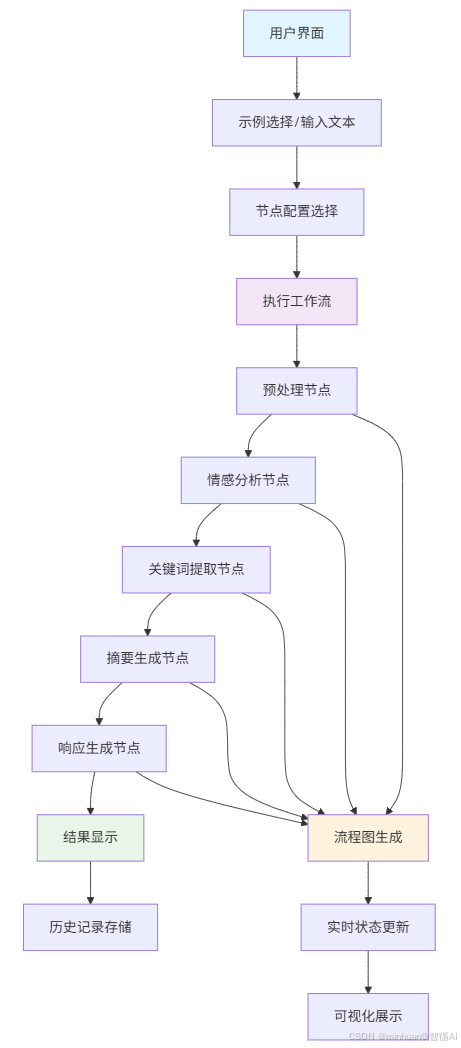
5. 核心处理流程
5.1 文本预处理流程
bash
原始文本 → 去除首尾空格 → 转为小写 → 标准化输出技术要点:简单的文本规范化,为后续NLP处理做准备
5.2 情感分析流程
bash
输入文本 → 构造提示词 → Qwen API调用 → 情感标签提取 → 结果标准化技术要点:使用提示词工程确保输出格式统一
5.3 关键词提取流程
bash
输入文本 → 关键词提取提示 → API调用 → 逗号分隔格式化 → 返回结果技术要点:限定输出格式,便于后续处理
5.4 动态可视化流程
bash
节点执行开始 → 更新步骤列表 → 生成网络图 → 高亮当前节点 → 保存图片 → 界面更新技术要点:使用NetworkX实时生成流程图,提供执行反馈
五、总结
在传统的用户反馈处理中,大多数用户声音就像投入大海的石子,激不起什么涟漪。但通过智能工作流,我们能够让每个声音都被认真倾听、深度理解、有效回应。
更重要的是,我们能够将看似普通的用户抱怨,转化为产品进步的催化剂,将成本中心转化为增长引擎。以前我们是在处理用户反馈,现在我们在与用户共同创造更好的产品。这不仅是技术的进步,更是产品理念的革新。不管是作为产品体验者的我们,还是产品开发者的我们,每个声音都值得被认真对待。