elpis之学习总结
为什么需要elpis
在日常开发中,随着客户的需求越来越多,我们不得不陷入重复的crud 工作,拿着已经封装好的组件cv之后修修补补又是一个新的组件。这就是绝大多数前端开发者所遇到的困境。为了解决这个问题,elpis 应运而生。elpis能够解决什么问题呢?
- 沉淀80%的重复工作(支持配置化),提供20%的定制开发
- 支持多个入口,一个入口即一个平台
- 系统间功能重复使用
- 支持SSR
- 全栈开发,引入BFF、devops等流程
elpis-core
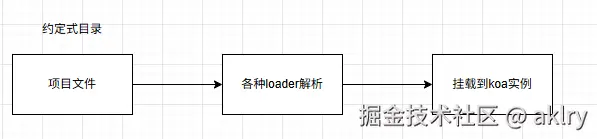
elpis-core 是elpis框架服务端的启动引擎 ,它利用koa 作为底层,通过loader 的方式结合约定式目录 将每一个目录中的文件都转换为一个对象挂载到koa实例。如图所示:
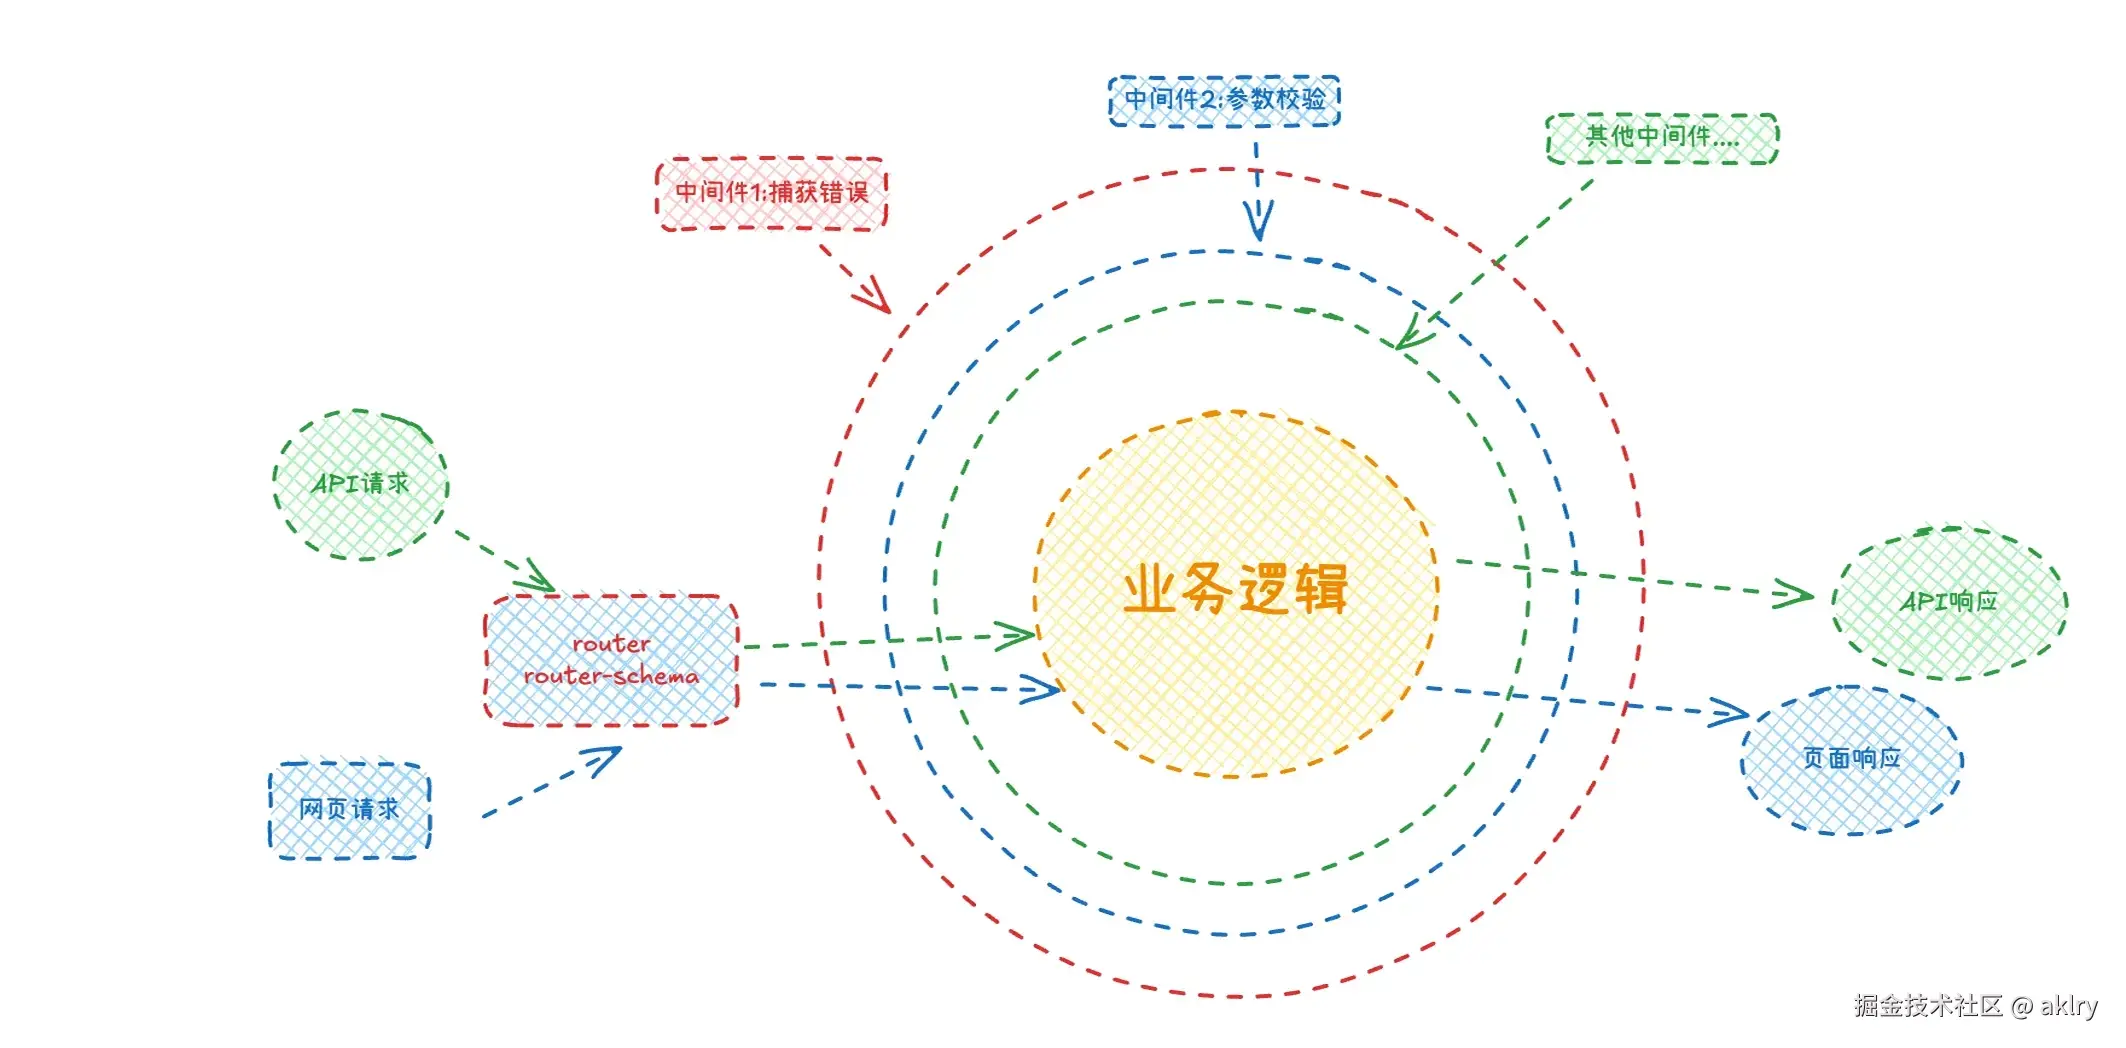
elpis-core的运行时
elpis-core的运行时是一个洋葱圈模型,如图所示:
工程化
随着前端项目越发庞大,Vue 和React等工具应运而生,但是浏览器只认识HTML、CSS、JavaScript。那怎么办呢?我们就需要一种工程化工具将浏览器不认识的文件如.vue、.jsx文件等转换成浏览器认识的JavaScript(这类工具可以是webpack、vite、rollup等等等等)。
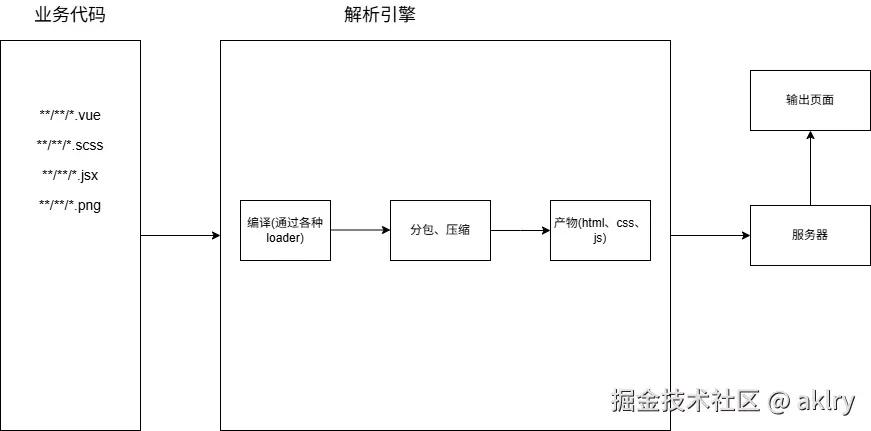
如图,工程化工具在以上流程当中充当的就是解析引擎的角色。
热更新原理
在开发环境中,不仅需要走完解析引擎编译、打包、压缩这一系列流程之外,为了能够实时感知到代码变化后页面的变化,我们需要引入一个服务器,这个服务器需要具备以下两个能力:
- 监听能力 -> 能够实时监听到文件的变化
- 通知能力 -> 在监听到文件变化后通知浏览器刷新页面
除此以外,与生产环境不同的是,开发环境最终只会产出模版文件(比如.tpl文件),剩余的资源文件(如js、css)将会以内存的方式存在于服务器当中,这种方式的好处是节省将文件写入时间,提高开发效率。
性能优化
- 构建方面
- 利用
happypack或thread-loader多线程打包,提升构建速度 - 使用
loader解析对应文件时排除掉非必要依赖(node_modules) - 利用缓存提升构建速度
- 代码方面
- 利用
mini-css-extract-plugin插件将css单独抽离 - 利用
terser-webpack-plugin插件对代码进行压缩 - 利用
optimization.splitChunks对代码进行分包,将长期不变的node_modules单独分包 - 利用
tree-shaking树摇摇掉未使用的代码依赖
领域模型
什么是领域模型
领域模型 又称dsl ,是一份通用的基础配置,通过领域模型,我们可以以其为基础,派生出很多份配置,以面向对象 的角度来谈,领域模型就是一个基类 ,通过这个基类,我们可以利用继承 的思想派生出无数个子类。比如在电商领域,我们可以定义一个基类,然后通过继承便可以派生出诸如淘宝 、拼多多 、抖音电商等站点。
领域模型的定义
利用json-schema的定义规范对字段进行描述,如下:
js
export default {
    // 模板类型,不同模板类型对应不一样的模板数据结构
    mode: 'dashboard',
    name: '', // 名称
    desc: '', // 描述
    icon: '', // 图标
    homePage: '', //首页(项目配置)
    // 头部菜单
    menu: [
        {
            key: '', // 菜单唯一描述
            name: '', // 菜单名称
            menuType: '', // 枚举值, group / module
            // 当menuType = group 时, 可填
            subMenu: [
                {
                    // 可以递归menuItem
                }
            ],
            // 当menuType = module 时, 可填
            moduleType: '', // 枚举值 schema/custom/iframe/sider
            // 当moduleType = schema 时, 可填
            schemaConfig: {
                api: '', // 数据源api 遵循RESTful规范
                // 板块数据结构
                schema: {
                    type: 'object',
                    properties: {
                        key: {
                            ...schema, // 标准schema 配置
                            type: '', // 字段类型
                            label: '', // 字段中文名
                            // 字段在table中的相关配置
                            tableOption: {
                                ...elTableColumnConfig, //标准el-table-column 配置
                                visible: true, // 默认为true(false 表示不在表单显示)
                                toFixed: 2 // 保留小数点后几位
                            },
                            // 字段在search-bar中的相关配置
                            searchOption: {
                                ...elComponentConfig, //标准el-component(form 表单组件) 配置
                                comType: '', // 配置控件类型(input/select)
                                default: '', // 默认值
                                // 当comType = select 时, 可填
                                enumList: [],
                                // 当comType = dynamicSelect 时, 可填
                                api: '' // 枚举列表数据源api 遵循RESTful规范
                            }
                        }
                    }
                },
                // table相关配置
                tableConfig: {
                    headerButtons: [
                        {
                            label: '', // 按钮中文名
                            eventKey: '', // 按钮事件名
                            eventOption: {}, // 按钮具体配置
                            ...elButtonConfig // 标准el-button配置
                        }
                    ],
                    rowButtons: [
                        {
                            label: '', // 按钮中文名
                            eventKey: '', // 按钮事件名
                            eventOption: {
                                // 当eventKey = remove 时, 可填
                                params: {
                                    // paramKey = 参数的键值
                                    // rowValueKey = 参数值 ,格式为 schema::xxx时,到table中找响应的字段
                                    paramKey: rowValueKey
                                }
                            }, // 按钮事件具体配置
                            ...elButtonConfig // 标准el-button配置
                        }
                    ]
                },
                searchConfig: {}, // search-bar相关配置
                components: {} // 模块组件相关配置
            },
            // 当moduleType = custom 时, 可填
            customConfig: {
                path: '' // 自定义路径
            },
            // 当moduleType = iframe 时, 可填
            iframeConfig: {
                path: '' // iframe路径
            },
            // 当moduleType = sider 时, 可填
            siderConfig: {
                menu: [
                    {
                        // 可递归 menuItem(除moduleType = sider)
                    }
                ]
            }
        }
    ]
}
动态组件
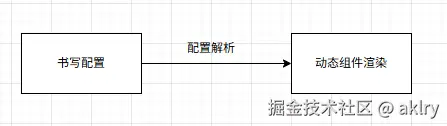
动态组件的实现思路
配置设计
json
{
    "schemaConfig": {
        "schema": {
            "type": "",
            "properties": {
                "key": {
                    "createFormOption": {
                        "comType": ""
                    },
                    "editFormOption": {
                        "comType": ""
                    },
                    "detailPanelOption": {
                        "comType": ""
                    }
                }
            }
        }
    },
    "componentConfig": {
        "createForm": {
            "title": "",
            "saveText": ""
        },
        "editForm": {
            "title": "",
            "saveText": ""
        },
        "detailPanel": {
            "mainKey": "",
            "title": ""
        }
    }
}
配置解析
js
import { ref, watch, onMounted, nextTick } from 'vue'
import { useRoute } from 'vue-router'
import { useMenuStore } from '$elpisStore/menu'

export const useSchema = () => {
    const route = useRoute()
    const menuStore = useMenuStore()
    const api = ref('')
    const tableSchema = ref({})
    const tableConfig = ref()

    const searchConfig = ref()
    const searchSchema = ref({})

    const components = ref({})

    // 通用构建方法(清除噪音)
    const buildDtoSchema = (_schema, comName) => {
        if (!_schema?.properties) return
        const dtoSchema = {
            type: 'object',
            properties: {}
        }

        // 提取有效 schema 字段信息

        for (const key in _schema.properties) {
            const props = _schema.properties[key]
            const option = props[`${comName}Option`]
            if (option) {
                let dtoProps = {}
                // 提取props中非 option 的部分, 存放到dtoProps
                for (const pKey in props) {
                    if (pKey.indexOf('Option') < 0) {
                        dtoProps[pKey] = props[pKey]
                    }
                }
                // 处理 comName Option
                dtoProps = Object.assign({}, dtoProps, { option })
                // 处理 required
                const { required } = _schema
                const isRequired = required && required.find(pKey => pKey === key)
                if (isRequired) {
                    dtoProps.option.required = true
                }
                dtoSchema.properties[key] = dtoProps
            }
        }

        return dtoSchema
    }

    // 构造schemaConfig 相关配置,传输给schemaView
    const buildData = () => {
        const { key, sider_key: siderKey } = route.query
        const mItem = menuStore.findMenuItem({
            key: 'key',
            value: siderKey ?? key
        })
        if (mItem && mItem.schemaConfig) {
            const { schemaConfig: sConfig } = mItem
            const configSchema = JSON.parse(JSON.stringify(sConfig.schema))
            api.value = sConfig.api ?? ''

            tableSchema.value = {}
            tableConfig.value = undefined
            searchConfig.value = undefined
            searchSchema.value = {}
            components.value = {}

            nextTick(() => {
                // 构建tableSchema 和 tableConfig
                tableSchema.value = buildDtoSchema(configSchema, 'table')
                tableConfig.value = sConfig.tableConfig
                // 构建searchConfig 和 searchSchema
                searchConfig.value = sConfig.searchConfig
                const dtoSearchSchema = buildDtoSchema(configSchema, 'search')
                for (const key in dtoSearchSchema.properties) {
                    if (route.query[key] !== undefined) {
                        dtoSearchSchema.properties[key].option.default = route.query[key]
                    }
                }
                searchSchema.value = dtoSearchSchema
                // 构造components = { comKey: { schema: {}, config: {} } }
                const { componentConfig } = sConfig
                if (componentConfig && Object.keys(componentConfig).length > 0) {
                    const dtoComponents = {}
                    for (const comName in componentConfig) {
                        dtoComponents[comName] = {
                            schema: buildDtoSchema(configSchema, comName),
                            config: componentConfig[comName]
                        }
                    }
                    components.value = dtoComponents
                }
            })
        }
    }

    onMounted(() => {
        buildData()
    })

    watch(
        [() => route.query.key, () => route.query.sider_key, () => menuStore.menuList],
        () => {
            buildData()
        },
        { deep: true }
    )

    return {
        api,
        tableSchema,
        tableConfig,
        searchSchema,
        searchConfig,
        components
    }
}
实现示例
- 生成组件配置对象
- 利用
<component />动态渲染组件
js
import CreateForm from './create-form/create-form.vue'
// 编写动态组件配置
const ComponentConfig = {
    createForm: {
        component: CreateForm
    }
}
export default ComponentConfig
vue
<script setup>
import ComponentConfig from './components/component-config'
// 获取动态组件对应的配置对象
const { components } = useSchema()
</script>
<template>
<!-- 完成动态组件的渲染 -->
<component
    :is="ComponentConfig[key].component"
    v-for="(item, key) in components"
    :key="key"
/>
</template>
npm包的发布
实现步骤
- 区分框架使用者与开发者的路径
- 开放入口给框架使用者
- 允许框架使用者自定义webpack配置
- webpack别名配置
- 允许框架使用者自定义组件
- 发布到npm
区分路径
使用__dirname和process.cwd()区分框架使用与开发的路径
__dirname表示当前文件所在的路径,process.cwd()表示当前程序启动的路径。对于框架使用者来说,应该使用process.cwd()。对于开发者来说,应该使用__dirname
实现示例(elpis-core的改造)
js
module.exports = {
     /**
     * 读取文件
     * @param {string} dirPath
     * @param {string} filePath
     * @param {object} app
     * @returns string[]
     */
    readFile(dirPath, filePath, app) {
        const actualPath = app ? app.businessDir : __dirname
        const assignPath = path.resolve(actualPath, dirPath)
        return glob.sync(path.resolve(assignPath, filePath))
    }
}
js
module.exports = (app) => {
    // 读取业务/app/controller下所有文件(框架使用者的目录)
    const businessFileList = readFile(`.${sep}controller`, `.${sep}**${sep}**.js`, app)
    // 读取elpis/app/controller下所有文件(开发者的目录)
    const elpisFileList = readFile(`..${sep}..${sep}app${sep}controller`, `.${sep}**${sep}**.js`)
    const controllers = {}
    const handleFile = file => {
        // 提取文件名称
        let name = path.resolve(file)
        // 截取路径
        name = subPath(name, 'controller')
        // 将custom-module/custom-controller -> customModule/customController
        name = toCamelCase(name)
        //挂载controller到app实例
        let tempController = controllers
        const names = name.split(sep) // [customModule, customController]
        for (let i = 0, len = names.length; i < len; i++) {
            if (i === len - 1) {
                const ControllerModule = require(path.resolve(file))(app)
                // 是文件
                tempController[names[i]] = new ControllerModule()
            } else {
                // 文件夹
                if (!tempController[names[i]]) {
                    tempController[names[i]] = {}
                }
                tempController = tempController[names[i]]
            }
        }
    }
    businessFileList.forEach(file => handleFile(file))
    elpisFileList.forEach(file => handleFile(file))
}
开放入口
js
const ElpisCore = require('./elpis-core')
// 引入前端工程化构建方法
const FEBuildDev = require('./app/webpack/dev')
const FEBuildProd = require('./app/webpack/prod')

module.exports = {
    /**
     * 启动 elpis
     * @param {Object} options - 项目配置,透传到ElpisCore
     */
    serverStart(options = {}) {
        const app = ElpisCore.start(options)
        return app
    },
    /**
     * 编译构建前端工程
     * @param {String} env 环境变量 dev/prod
     */
    frontedBuild(env) {
        if (env === 'dev') {
            FEBuildDev()
        } else if (env === 'prod') {
            FEBuildProd()
        }
    },
    /**
     * 服务端基础
     */
    Controller: {
        Base: require('./app/controller/base')
    },
    Service: {
        Base: require('./app/service/base')
    }
}
自定义webpack配置
框架使用者在app/webpack.config.js编写自己的webpack配置,elpis会将他与原来的webpack进行覆盖合并,代码如下:
js
// 加载业务webpack 配置
let businessWebpackConfig = {}
try {
    businessWebpackConfig = require(path.resolve(process.cwd(), './app/webpack.config.js'))
} catch (error) {
    console.error('加载业务webpack配置失败:', error)
}
开放别名给框架使用者
js
module.exports = {
    resolve: {
        alias: (() => {
            const aliasMap = {}
                const blankModulePath = path.resolve(__dirname, '../libs/blank.js')
                // dashboard 路由拓展配置
                const businessDashboardRouterConfig = path.resolve(process.cwd(), './app/pages/dashboard/router.js')
                aliasMap['$businessDashboardRouterConfig'] = fs.existsSync(businessDashboardRouterConfig)
                    ? businessDashboardRouterConfig
                    : blankModulePath
                // schema-view 组件拓展配置
                const businessComponentConfig = path.resolve(
                    process.cwd(),
                    './app/pages/dashboard/complex-view/schema-view/components/component-config.js'
                )
                aliasMap['$businessComponentConfig'] = fs.existsSync(businessComponentConfig)
                    ? businessComponentConfig
                    : blankModulePath
                // schema-search-bar 组件拓展配置
                const businessFormItemConfig = path.resolve(
                    process.cwd(),
                    './app/pages/widgets/schema-form/form-item-config.js'
                )
                aliasMap['$businessFormItemConfig'] = fs.existsSync(businessFormItemConfig)
                    ? businessFormItemConfig
                    : blankModulePath

                const businessSearchBarConfig = path.resolve(
                    process.cwd(),
                    './app/pages/widgets/schema-search-bar/schema-item-config.js'
                )
                aliasMap['$businessSearchBarConfig'] = fs.existsSync(businessSearchBarConfig)
                    ? businessSearchBarConfig
                    : blankModulePath
                return {
                    // 解决elpis框架在使用时无法找到vue的问题,表示在elpis中找vue
                    vue: require.resolve('vue'),
                    $elpisPages: path.resolve(__dirname, '../../pages'),
                    $elpisCommon: path.resolve(__dirname, '../../pages/common'),
                    $elpisWidgets: path.resolve(__dirname, '../../pages/widgets'),
                    $elpisHeaderContainer: path.resolve(
                        __dirname,
                        '../../pages/widgets/header-container/header-container.vue'
                    ),
                    $elpisSiderContainer: path.resolve(
                        __dirname,
                        '../../pages/widgets/sider-container/sider-container.vue'
                    ),
                    $elpisSchemaTable: path.resolve(__dirname, '../../pages/widgets/schema-table/schema-table.vue'),
                    $elpisSchemaForm: path.resolve(__dirname, '../../pages/widgets/schema-form/schema-form.vue'),
                    $elpisSchemaSearchBar: path.resolve(
                        __dirname,
                        '../../pages/widgets/schema-search-bar/schema-search-bar.vue'
                    ),
                    $elpisStore: path.resolve(__dirname, '../../pages/store'),
                    $elpisCurl: path.resolve(__dirname, '../../pages/common/curl.js'),
                    $elpisUtils: path.resolve(__dirname, '../../pages/common/utils.js'),
                    $elpisBoot: path.resolve(__dirname, '../../pages/boot.js'),
                    ...aliasMap
                }
        })()
    }
}
自定义组件
框架使用者在约定好的目录如app/widgets/schema-form/complex-view创建新的组件,elpis会将其合并到原本的组件配置对象中。框架使用者按照以下格式书写组件配置对象
js
const formItemConfig = {
    组件名: {
        component: Vue组件
    }
}
export default formItemConfig
js
import InputComponent from './complex-view/input/input.vue'
import InputNumberComponent from './complex-view/input-number/input-number.vue'
import SelectComponent from './complex-view/select/select.vue'
import businessFormItemConfig from '$businessFormItemConfig'
const FormItemConfig = {
    input: {
        component: InputComponent
    },
    inputNumber: {
        component: InputNumberComponent
    },
    select: {
        component: SelectComponent
    }
}
export default {
    ...businessFormItemConfig,
    ...FormItemConfig
}
发布npm包
经过以上一系列的改造之后,我们还需要使用npm link命令在本地测试一下,如果没问题才可以发布到npm,npm link的流程如下:
- 在elpis的开发目录使用
npm link - 创建一个测试目录,使用
npm link 包名链接包到本地开始测试
测试完成之后,没问题,开始发布到npm,步骤如下:
- 创建npm帐号并登录,可以在npm官网创建帐号并完成登录,也可以创建好帐号之后使用
npm login进行登录 npm config get registry确保是官方镜像npm publish,首次发布,需要加上--access public参数 表示这不是一个私有包