电商图片处理:python-flask 从一张图到多平台适配的简单方法
代码下载地址
完整代码下点击这里
一、电商卖家必看!为什么图片处理这么重要?
你是否曾经为了适配不同电商平台(淘宝、京东、拼多多等)的图片要求而烦恼?
明明拍了一张好看的产品图,却要花大量时间调整不同尺寸:一会儿要裁剪成1:1的正方形主图,一会儿要改成3:4的商品详情图,还要担心画质压缩导致产品看起来模糊不清...
作为一名电商从业者,我曾经也深受其害。直到我开发了一个简单高效的图片处理工具,今天就来分享给大家!
二、常见电商平台的图片尺寸要求
先让我们了解一下各大电商平台的图片尺寸要求(以淘宝为例):
- 主图:通常要求1:1比例,尺寸800x800像素
- 详情页图片:通常要求3:4比例,尺寸600x800像素
- 首页轮播图:通常是16:9或16:10的宽屏比例
不同平台、不同位置的图片要求可能略有不同,但掌握几种常见比例的处理方法,就能应对大多数场景。
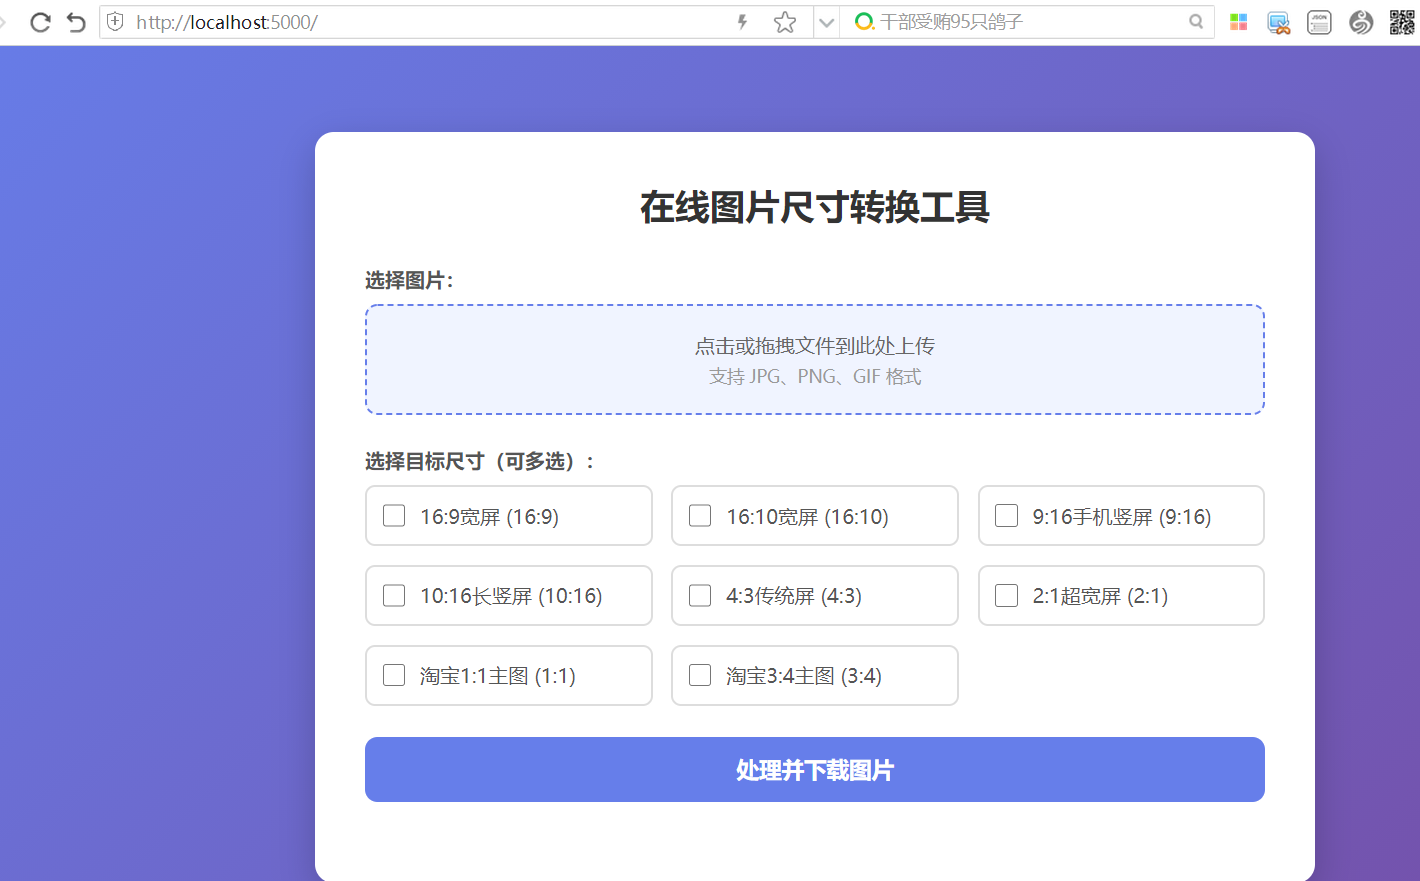
【在线效果图】
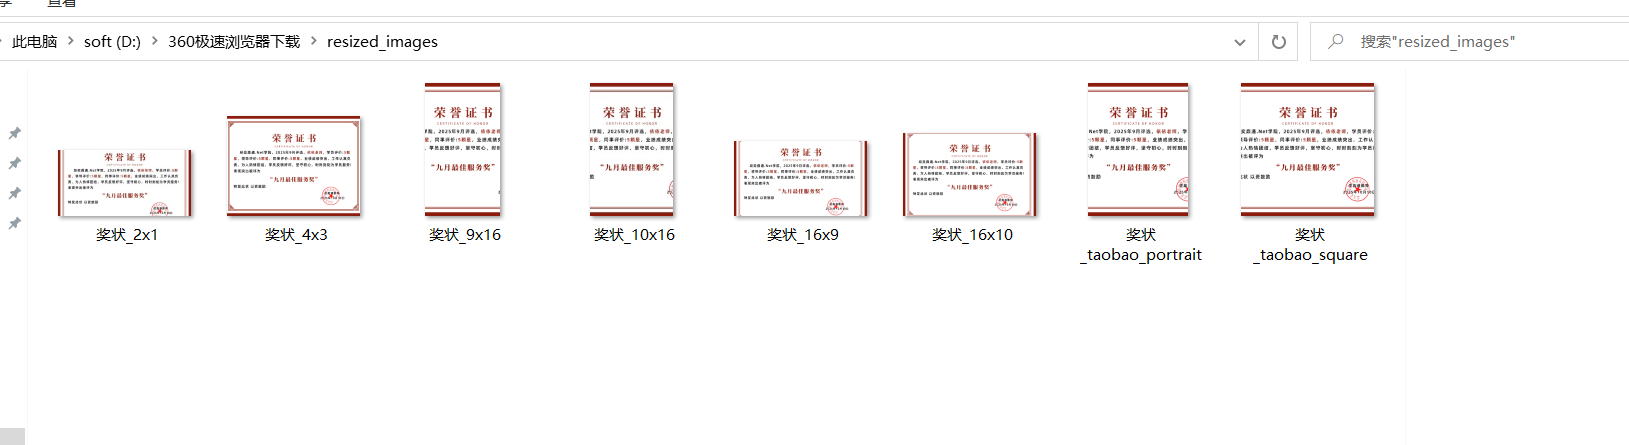
【转换后是多张图片的压缩zip文件】
三、手动处理vs自动处理:效率天差地别
以前我都是用传统的图片编辑软件手动调整,一张图改几个尺寸要花上半小时。现在,我用Python开发了一个简单的在线工具,一次上传、批量处理,几分钟就能完成所有尺寸的转换!
下面我就来详细介绍这个工具的功能和使用方法,以及背后的实现原理。
四、我开发的图片处理工具:功能介绍
我开发的这个在线图片处理工具具有以下特点:
1. 支持的图片尺寸比例
工具内置了8种常用的图片尺寸比例,覆盖了大多数电商场景:
- 16:9宽屏(1920x1080像素):适用于大多数网站横幅、视频封面
- 16:10宽屏(1920x1200像素):部分笔记本屏幕比例
- 9:16手机竖屏(1080x1920像素):适合手机端广告和展示
- 10:16长竖屏(1200x1920像素):适用于长图展示
- 4:3传统屏(1280x960像素):经典显示器比例
- 2:1超宽屏(1920x960像素):适合特殊展示场景
- 淘宝1:1主图(800x800像素):淘宝等平台的标准正方形主图
- 淘宝3:4主图(600x800像素):淘宝等平台的竖版详情图
2. 用户友好的界面设计
工具界面简洁明了,主要包括三个部分:
- 图片上传区域:支持点击上传和拖拽上传两种方式
- 尺寸选择区域:以网格布局展示所有可选尺寸,支持多选
- 操作按钮:一键处理并下载所有转换后的图片
3. 智能的图片处理功能
- 批量处理:一次上传,同时生成多种尺寸
- 自动打包:所有处理后的图片自动打包成ZIP文件供下载
- 智能裁剪:保持图片原始比例,自动从中心裁剪到目标尺寸
- 格式保留:保留原始图片格式(JPG、PNG、GIF等)
五、工具使用方法:三步完成图片转换
使用这个工具处理图片非常简单,只需要三个步骤:
1. 第一步:上传图片
在工具页面中,找到图片上传区域,可以:
- 点击上传区域选择本地图片
- 直接拖拽图片到上传区域
系统会自动显示你选择的文件名,并支持常见的图片格式(JPG、JPEG、PNG、GIF)。
2. 第二步:选择目标尺寸
在尺寸选择区域,勾选你需要的图片尺寸。可以根据不同平台的要求进行选择,支持多选。例如:
- 如果你要上传到淘宝,可以同时选择"淘宝1:1主图"和"淘宝3:4主图"
- 如果你要制作多平台素材,可以同时选择手机竖屏和宽屏比例
3. 第三步:处理并下载
点击"处理并下载图片"按钮,系统会自动:
- 上传你的图片
- 根据选择的尺寸进行处理
- 将所有转换后的图片打包成ZIP文件
- 自动开始下载文件包
整个过程通常只需要几秒钟,完成后系统会显示成功提示。
六、图片处理的核心原理揭秘
1. 保持比例缩放与智能裁剪
这个工具的核心功能是保持图片比例的同时裁剪到目标尺寸。让我们看看背后的工作原理:
当我们要将一张图片调整到特定比例时,程序会:
- 首先计算原始图片的宽高比
- 比较原始比例与目标比例
- 根据比例差异决定缩放策略:
- 如果原始图片更宽,则按目标高度缩放,然后裁剪宽度
- 如果原始图片更高,则按目标宽度缩放,然后裁剪高度
- 从图片中心位置裁剪,确保重要内容被保留
这种方法确保了图片内容不会变形,同时尽可能保留图片的核心区域。
2. 批量处理与ZIP打包
为了提高效率,工具使用了批量处理技术:
- 一次性读取原始图片到内存
- 对每个选中的尺寸进行独立处理
- 将处理后的图片保存到ZIP文件中
- 最后将ZIP文件作为整体返回给用户下载
这样用户只需要一次下载,就能获得所有需要的图片尺寸。
七、技术实现:简单介绍
如果你对技术感兴趣,下面简单介绍一下这个工具的实现方式:
1. 前端实现
前端使用了HTML、CSS和JavaScript实现,主要特点:
- 响应式设计,支持电脑和手机访问
- 拖拽上传功能,提升用户体验
- 实时反馈处理状态,显示加载动画
- 使用Fetch API与后端通信
2. 后端实现
后端使用Python和Flask框架开发,主要技术点:
- 使用Flask创建Web服务
- 使用Pillow库处理图片尺寸调整和裁剪
- 使用zipfile库创建压缩文件
- 使用临时文件管理处理过程中的数据
3. 核心代码片段
下面是图片调整尺寸的核心函数逻辑:
python
def resize_and_crop(img, target_width, target_height):
    # 获取原始尺寸
    img_width, img_height = img.size

    # 计算调整后的尺寸,保持原始比例
    img_ratio = img_width / img_height
    target_ratio = target_width / target_height

    if img_ratio > target_ratio:
        # 原始图片更宽,按高度调整,然后裁剪宽度
        new_height = target_height
        new_width = int(new_height * img_ratio)
        img = img.resize((new_width, new_height), Image.LANCZOS)
        # 从中心裁剪
        left = (new_width - target_width) // 2
        right = left + target_width
        img = img.crop((left, 0, right, target_height))
    else:
        # 原始图片更高,按宽度调整,然后裁剪高度
        new_width = target_width
        new_height = int(new_width / img_ratio)
        img = img.resize((new_width, new_height), Image.LANCZOS)
        # 从中心裁剪
        top = (new_height - target_height) // 2
        bottom = top + target_height
        img = img.crop((0, top, target_width, bottom))

    return img
八、AI大模型与图片处理:未来趋势
随着人工智能技术的快速发展,AI大模型正在为电商图片处理带来革命性的变化。下面让我们了解一下AI大模型在图片处理方面的应用和优势:
1. AI大模型如何提升图片处理效率
传统的图片处理主要基于规则和预设算法,而AI大模型则能够学习和理解图片内容,提供更智能的处理方式:
-
智能内容识别与裁剪:AI可以识别图片中的主体(如产品),并智能决定裁剪区域,确保重要内容不会被裁剪掉。相比我们之前提到的中心裁剪方法,AI能够更准确地识别和保留关键元素。
-
背景移除与替换:利用生成式AI技术,可以一键移除图片背景或替换为更符合产品风格的背景,大幅减少手动抠图的工作量。
-
自动美化与增强:AI模型可以自动调整亮度、对比度、色彩平衡等参数,使产品图片看起来更加专业和吸引人。
-
批量生成多样化图片:根据一张原始产品图,AI可以生成多个不同角度、不同场景或不同风格的变体,满足多平台展示需求。
2. 常见的AI图片处理模型和工具
目前市场上已经有多种基于大模型的图片处理工具可供电商卖家使用:
-
DALL-E/Midjourney等生成模型:可以根据描述生成产品场景图、背景图等素材。
-
CLIP/SAM等识别模型:能准确识别图片中的产品主体,为精确裁剪提供支持。
-
ImageBind等多模态模型:可以将文字、图像、视频等多种模态信息结合,生成更符合描述的图片效果。
-
商业AI图片编辑工具:如Canva的AI功能、Adobe Express、Pixelcut等,都集成了AI美化、背景移除、尺寸智能调整等功能。
3. AI与传统图片处理的结合应用
在实际应用中,AI技术和传统图片处理技术可以相互补充:
-
先用AI进行智能分析:使用AI模型分析图片内容,识别产品区域和重要元素。
-
再用传统工具进行精确调整:基于AI的分析结果,使用传统工具进行精确的尺寸调整和裁剪。
-
最后用AI进行美化和增强:对调整后的图片进行AI美化,提升整体视觉效果。
4. 实现思路:将AI能力集成到我们的工具中
如果要将AI大模型的能力集成到我们之前介绍的图片处理工具中,可以考虑以下实现思路:
python
# 伪代码:集成AI模型进行智能裁剪
def ai_powered_crop(image_path, target_width, target_height):
    # 步骤1: 使用AI模型检测图片中的重要区域
    important_regions = ai_model.detect_objects(image_path)

    # 步骤2: 确定最优裁剪区域
    optimal_crop_region = determine_optimal_crop(important_regions, target_width, target_height)

    # 步骤3: 执行裁剪操作
    result_image = crop_image(image_path, optimal_crop_region)

    # 步骤4: 使用AI进行后期美化
    enhanced_image = ai_model.enhance_image(result_image)

    return enhanced_image
5. 电商卖家使用AI图片处理的注意事项
-
保留原始风格:使用AI美化时,确保产品颜色和细节保持真实,避免过度美化导致实物与图片不符。
-
注重品牌一致性:在使用AI生成或调整图片时,保持品牌视觉风格的一致性。
-
检查平台合规性:了解各电商平台对AI生成/修改图片的政策和要求,确保合规使用。
-
定期更新模型:AI技术发展迅速,定期更新使用的模型和工具,获取更好的效果。
6. 未来展望
随着AI技术的不断进步,我们可以预见未来电商图片处理的发展方向:
-
完全自动化:从拍摄到多平台适配的全流程自动化处理。
-
个性化定制:根据不同消费者群体自动生成个性化的产品展示图片。
-
实时生成:根据用户浏览习惯和设备类型,实时生成最适合的图片尺寸和风格。
-
跨平台智能适配:自动识别目标平台要求,生成完全符合规范的图片。
虽然我们今天介绍的基础工具已经能满足大多数需求,但关注和了解AI在图片处理领域的应用,将帮助你在未来的电商竞争中保持领先优势。
九、实用技巧:提升图片处理效率
1. 拍摄技巧
-
将主体放在中心位置:由于工具是从中心裁剪的,拍摄时将产品放在画面中心可以确保重要细节不会被裁剪掉
-
预留边距:拍摄时给图片周围预留一些空间,这样在裁剪时不会损失重要内容
-
使用高分辨率:尽量使用高分辨率拍摄,这样在缩放成小尺寸时会有更好的画质
2. 处理技巧
-
批量命名:对相似产品的图片使用有规律的命名,方便后期管理
-
先预览再批量:处理大量图片前,可以先拿1-2张测试,确认效果满意后再批量处理
-
保留原图备份:始终保留原始图片的备份,以便需要时重新处理
十、常见问题解答
Q:调整后的图片会不会模糊?
A:如果原图分辨率足够高,缩小图片通常不会明显模糊;如果需要放大,可能会有轻微模糊,但一般不影响电商展示。工具使用了高质量的LANCZOS重采样算法,能最大程度保持图片质量。
Q:淘宝主图为什么推荐800x800像素?
A:这个尺寸既保证了清晰度,又不会让图片文件过大影响加载速度,同时淘宝对这个尺寸有高清放大功能支持,让买家可以更清楚地看到产品细节。
Q:如何保证裁剪不会切掉重要内容?
A:拍摄时将产品放在画面中心位置,预留足够的边距。另外,也可以先选择一个小尺寸测试,确认裁剪效果后再处理其他尺寸。
Q:这个工具支持哪些图片格式?
A:工具支持常见的图片格式,包括JPG、JPEG、PNG和GIF。处理过程会自动保留原始图片的格式。
十一、如何搭建自己的图片处理工具
如果你想自己搭建一个类似的工具,可以参考以下步骤:
- 准备环境:安装Python和必要的库(Flask、Pillow)
- 创建基础结构:设置Flask应用,创建templates文件夹存放HTML模板
- 实现图片处理功能:编写图片缩放、裁剪和打包的代码
- 设计前端界面:创建用户友好的上传和选择界面
- 测试和部署:确保功能正常后部署到服务器
详细的代码实现可以参考我上面分享的核心逻辑,根据自己的需求进行调整。
十二、写在最后
在电商运营中,高效的图片处理能帮你节省大量时间,让你把精力集中在产品选品和推广上。无论是使用现成工具还是自己动手搭建,找到适合自己的方法最重要!
希望这篇文章能帮助各位电商卖家提升工作效率。如果你有更好的图片处理技巧或工具推荐,欢迎在评论区分享交流!
最后想说:好的产品图片是电商成功的关键因素之一,花时间优化你的图片展示,绝对是值得的投资!
十三、完整代码
后端代码【python+flask】
命令行配置(推荐),推荐清华镜像源
执行以下命令将自动创建/修改pip配置文件:
python
pip config set global.index-url https://pypi.tuna.tsinghua.edu.cn/simple
pip config set global.trusted-host pypi.tuna.tsinghua.edu.cn
后台代码:
python
import os
import time
import io
import zipfile
from flask import Flask, render_template, request, send_file, jsonify
from PIL import Image
import tempfile
import shutil
import logging

# 配置日志
logging.basicConfig(level=logging.DEBUG, format='%(asctime)s - %(name)s - %(levelname)s - %(message)s')
logger = logging.getLogger(__name__)

app = Flask(__name__)

# 确保临时文件夹存在
temp_dir = os.path.join(os.path.dirname(__file__), 'temp')
os.makedirs(temp_dir, exist_ok=True)

# 支持的图片尺寸比例
image_aspect_ratios = {
    '16:9': {'width': 1920, 'height': 1080, 'name': '16:9宽屏'},  # 常见宽屏比例
    '16:10': {'width': 1920, 'height': 1200, 'name': '16:10宽屏'},  # 部分笔记本屏幕
    '9:16': {'width': 1080, 'height': 1920, 'name': '9:16手机竖屏'},  # 手机竖屏
    '10:16': {'width': 1200, 'height': 1920, 'name': '10:16长竖屏'},  # 长竖屏
    '4:3': {'width': 1280, 'height': 960, 'name': '4:3传统屏'},  # 传统屏幕比例
    '2:1': {'width': 1920, 'height': 960, 'name': '2:1超宽屏'},  # 超宽屏
    'taobao_square': {'width': 800, 'height': 800, 'name': '淘宝1:1主图'},  # 淘宝方形主图
    'taobao_portrait': {'width': 600, 'height': 800, 'name': '淘宝3:4主图'},  # 淘宝竖版主图
}

@app.route('/')
def index():
    return render_template('index.html', ratios=image_aspect_ratios)

@app.route('/process_image', methods=['POST'])
def process_image():
    try:
        # 检查是否有文件上传
        if 'image' not in request.files:
            return jsonify({'error': '请选择要上传的图片'}), 400

        file = request.files['image']
        if file.filename == '':
            return jsonify({'error': '请选择要上传的图片'}), 400

        # 检查是否选择了尺寸
        selected_ratios = request.form.getlist('ratios')
        if not selected_ratios:
            return jsonify({'error': '请至少选择一个图片尺寸'}), 400

        # 检查文件类型
        if not allowed_file(file.filename):
            return jsonify({'error': '只支持JPG、JPEG、PNG和GIF格式的图片'}), 400

        # 创建内存中的文件对象
        img = Image.open(file.stream)
        img_format = img.format or 'PNG'

        # 处理图片并创建ZIP文件
        zip_buffer = io.BytesIO()

        with zipfile.ZipFile(zip_buffer, 'w', zipfile.ZIP_DEFLATED) as zip_file:
            for ratio_key in selected_ratios:
                if ratio_key in image_aspect_ratios:
                    ratio = image_aspect_ratios[ratio_key]
                    # 调整图片尺寸,保持原始比例并裁剪到目标尺寸
                    resized_img = resize_and_crop(img, ratio['width'], ratio['height'])

                    # 保存到ZIP文件
                    img_buffer = io.BytesIO()
                    resized_img.save(img_buffer, format=img_format)
                    img_buffer.seek(0)

                    # 生成文件名
                    original_name = os.path.splitext(file.filename)[0]
                    zip_filename = f"{original_name}_{ratio_key.replace(':', 'x')}.{img_format.lower()}"
                    zip_file.writestr(zip_filename, img_buffer.read())

        # 将ZIP文件指针移到开始位置
        zip_buffer.seek(0)

        # 返回ZIP文件供下载
        return send_file(zip_buffer, as_attachment=True, download_name='resized_images.zip', mimetype='application/zip')

    except Exception as e:
        logger.error(f"处理图片时发生错误: {str(e)}")
        return jsonify({'error': f'处理失败: {str(e)}'}), 500

def allowed_file(filename):
    """检查文件扩展名是否允许"""
    ALLOWED_EXTENSIONS = {'png', 'jpg', 'jpeg', 'gif'}
    return '.' in filename and filename.rsplit('.', 1)[1].lower() in ALLOWED_EXTENSIONS

def resize_and_crop(img, target_width, target_height):
    """调整图片尺寸并裁剪到目标比例"""
    # 获取原始尺寸
    img_width, img_height = img.size

    # 计算调整后的尺寸,保持原始比例
    img_ratio = img_width / img_height
    target_ratio = target_width / target_height

    if img_ratio > target_ratio:
        # 原始图片更宽,按高度调整,然后裁剪宽度
        new_height = target_height
        new_width = int(new_height * img_ratio)
        img = img.resize((new_width, new_height), Image.LANCZOS)
        # 计算裁剪区域
        left = (new_width - target_width) // 2
        right = left + target_width
        img = img.crop((left, 0, right, target_height))
    else:
        # 原始图片更高,按宽度调整,然后裁剪高度
        new_width = target_width
        new_height = int(new_width / img_ratio)
        img = img.resize((new_width, new_height), Image.LANCZOS)
        # 计算裁剪区域
        top = (new_height - target_height) // 2
        bottom = top + target_height
        img = img.crop((0, top, target_width, bottom))

    return img

# 清理临时文件(可选,可根据需要添加定时任务)
def cleanup_temp_files():
    for file in os.listdir(temp_dir):
        file_path = os.path.join(temp_dir, file)
        try:
            if os.path.isfile(file_path):
                os.unlink(file_path)
        except Exception as e:
            print(f'清理临时文件时出错: {e}')

if __name__ == '__main__':
    app.run(debug=True, host='0.0.0.0', port=5000)
前端代码 (Html)
html
<!DOCTYPE html>
<html lang="zh-CN">
<head>
    <meta charset="UTF-8">
    <meta name="viewport" content="width=device-width, initial-scale=1.0">
    <title>在线图片尺寸转换工具</title>
    <style>
        * {
            margin: 0;
            padding: 0;
            box-sizing: border-box;
            font-family: 'Microsoft YaHei', Arial, sans-serif;
        }

        body {
            background: linear-gradient(135deg, #667eea 0%, #764ba2 100%);
            min-height: 100vh;
            display: flex;
            justify-content: center;
            align-items: center;
            padding: 20px;
        }

        .container {
            background: white;
            border-radius: 15px;
            box-shadow: 0 10px 30px rgba(0, 0, 0, 0.2);
            padding: 40px;
            width: 100%;
            max-width: 800px;
        }

        h1 {
            text-align: center;
            margin-bottom: 30px;
            color: #333;
            font-size: 28px;
        }

        .form-group {
            margin-bottom: 25px;
        }

        label {
            display: block;
            margin-bottom: 10px;
            font-weight: 600;
            color: #555;
        }

        select, button {
            width: 100%;
            padding: 12px 15px;
            border: 2px solid #ddd;
            border-radius: 10px;
            font-size: 16px;
            transition: all 0.3s ease;
        }

        select:focus {
            outline: none;
            border-color: #667eea;
        }

        .image-upload {
            width: 100%;
            padding: 20px;
            border: 2px dashed #ddd;
            border-radius: 10px;
            text-align: center;
            cursor: pointer;
            transition: all 0.3s ease;
            background: #f8f9fa;
        }

        .image-upload:hover {
            border-color: #667eea;
            background: #f0f4ff;
        }

        .image-upload input[type="file"] {
            display: none;
        }

        .upload-text {
            color: #666;
            font-size: 16px;
        }

        .selected-file {
            margin-top: 10px;
            padding: 10px;
            background: #e7f3ff;
            border-radius: 5px;
            color: #0d6efd;
            font-weight: 500;
        }

        .size-options {
            display: grid;
            grid-template-columns: repeat(auto-fill, minmax(200px, 1fr));
            gap: 15px;
        }

        .size-option {
            display: flex;
            align-items: center;
            padding: 12px;
            border: 2px solid #ddd;
            border-radius: 8px;
            cursor: pointer;
            transition: all 0.3s ease;
        }

        .size-option:hover {
            border-color: #667eea;
            background: #f0f4ff;
        }

        .size-option input[type="checkbox"] {
            margin-right: 12px;
            width: 18px;
            height: 18px;
            cursor: pointer;
        }

        .size-option label {
            margin: 0;
            cursor: pointer;
            font-weight: normal;
        }

        button {
            background: #667eea;
            color: white;
            border: none;
            cursor: pointer;
            font-weight: 600;
            padding: 14px;
            font-size: 18px;
        }

        button:hover:not(:disabled) {
            background: #5a67d8;
            transform: translateY(-2px);
        }

        button:disabled {
            background: #ccc;
            cursor: not-allowed;
            transform: none;
        }

        .result {
            margin-top: 30px;
            padding: 20px;
            border-radius: 10px;
            background: #f8f9fa;
            text-align: center;
            display: none;
        }

        .loading {
            display: inline-block;
            width: 20px;
            height: 20px;
            border: 3px solid #f3f3f3;
            border-top: 3px solid #667eea;
            border-radius: 50%;
            animation: spin 1s linear infinite;
        }

        @keyframes spin {
            0% { transform: rotate(0deg); }
            100% { transform: rotate(360deg); }
        }

        .message {
            margin-top: 15px;
            padding: 15px;
            border-radius: 5px;
            font-size: 16px;
        }

        .success {
            background: #d4edda;
            color: #155724;
            border: 1px solid #c3e6cb;
        }

        .error {
            background: #f8d7da;
            color: #721c24;
            border: 1px solid #f5c6cb;
        }

        .taobao-section {
            margin-top: 30px;
            padding: 20px;
            background: #fff5e6;
            border-radius: 10px;
            border-left: 4px solid #ff9800;
        }

        .taobao-section h3 {
            color: #e65100;
            margin-bottom: 15px;
        }

        @media (max-width: 768px) {
            .container {
                padding: 20px;
            }

            h1 {
                font-size: 24px;
            }

            .size-options {
                grid-template-columns: 1fr;
            }
        }
    </style>
</head>
<body>
    <div class="container">
        <h1>在线图片尺寸转换工具</h1>

        <form id="image-form" enctype="multipart/form-data">
            <div class="form-group">
                <label>选择图片:</label>
                <div class="image-upload">
                    <input type="file" id="image-upload" name="image" accept="image/*" required>
                    <div class="upload-text">
                        点击或拖拽文件到此处上传
                        <p style="font-size: 14px; color: #999; margin-top: 5px;">支持 JPG、PNG、GIF 格式</p>
                    </div>
                    <div id="selected-file" class="selected-file" style="display: none;"></div>
                </div>
            </div>

            <div class="form-group">
                <label>选择目标尺寸(可多选):</label>
                <div class="size-options">
                    {% for ratio_key, ratio_info in ratios.items() %}
                    <div class="size-option">
                        <input type="checkbox" id="ratio-{{ ratio_key }}" name="ratios" value="{{ ratio_key }}">
                        <label for="ratio-{{ ratio_key }}">{{ ratio_info.name }} ({{ ratio_key.replace('taobao_square', '1:1').replace('taobao_portrait', '3:4') }})</label>
                    </div>
                    {% endfor %}
                </div>
            </div>

            <div class="form-group">
                <button type="submit" id="process-image-btn">处理并下载图片</button>
            </div>
        </form>

        <div class="result" id="image-result">
            <div id="image-loading-indicator" class="loading"></div>
            <div class="message" id="image-message"></div>
        </div>
    </div>

    <script>
        // 文件上传区域的交互
        const imageUpload = document.getElementById('image-upload');
        const uploadText = document.querySelector('.upload-text');
        const selectedFileDisplay = document.getElementById('selected-file');

        imageUpload.addEventListener('change', function() {
            if (this.files && this.files[0]) {
                const filename = this.files[0].name;
                selectedFileDisplay.textContent = `已选择:${filename}`;
                selectedFileDisplay.style.display = 'block';
                uploadText.style.display = 'none';
            }
        });

        // 拖拽上传支持
        const uploadArea = document.querySelector('.image-upload');

        uploadArea.addEventListener('dragover', function(e) {
            e.preventDefault();
            this.style.backgroundColor = '#e6efff';
        });

        uploadArea.addEventListener('dragleave', function() {
            this.style.backgroundColor = '#f8f9fa';
        });

        uploadArea.addEventListener('drop', function(e) {
            e.preventDefault();
            this.style.backgroundColor = '#f8f9fa';

            if (e.dataTransfer.files && e.dataTransfer.files[0]) {
                imageUpload.files = e.dataTransfer.files;
                const filename = e.dataTransfer.files[0].name;
                selectedFileDisplay.textContent = `已选择:${filename}`;
                selectedFileDisplay.style.display = 'block';
                uploadText.style.display = 'none';
            }
        });

        // 点击上传区域也触发文件选择
        uploadArea.addEventListener('click', function() {
            imageUpload.click();
        });

        // 图片处理功能相关元素
        const imageForm = document.getElementById('image-form');
        const imageResult = document.getElementById('image-result');
        const imageLoadingIndicator = document.getElementById('image-loading-indicator');
        const imageMessage = document.getElementById('image-message');
        const processImageBtn = document.getElementById('process-image-btn');

        // 处理图片表单提交
        imageForm.addEventListener('submit', function(e) {
            e.preventDefault();

            const imageFile = document.getElementById('image-upload').files[0];
            if (!imageFile) {
                showImageMessage('请选择要上传的图片', 'error');
                return;
            }

            // 检查是否选择了尺寸
            const selectedRatios = Array.from(document.querySelectorAll('input[name="ratios"]:checked'));
            if (selectedRatios.length === 0) {
                showImageMessage('请至少选择一个图片尺寸', 'error');
                return;
            }

            // 禁用按钮,防止重复提交
            processImageBtn.disabled = true;

            // 创建FormData对象
            const formData = new FormData(imageForm);

            // 显示加载状态
            imageResult.style.display = 'block';
            imageLoadingIndicator.style.display = 'inline-block';
            imageMessage.textContent = '';

            // 发送请求到服务器
            fetch('/process_image', {
                method: 'POST',
                body: formData
            })
            .then(response => {
                imageLoadingIndicator.style.display = 'none';

                if (!response.ok) {
                    return response.json().then(errorData => {
                        throw new Error(errorData.error || '处理失败');
                    });
                }

                // 检查响应是否为ZIP文件
                const contentType = response.headers.get('content-type');
                if (contentType && contentType.includes('application/zip')) {
                    // 处理文件下载
                    return response.blob();
                } else {
                    // 处理JSON响应
                    return response.json();
                }
            })
            .then(data => {
                if (data instanceof Blob) {
                    // 创建下载链接并触发下载
                    const url = URL.createObjectURL(data);
                    const a = document.createElement('a');
                    a.href = url;
                    a.download = 'resized_images.zip';
                    document.body.appendChild(a);
                    a.click();
                    document.body.removeChild(a);
                    URL.revokeObjectURL(url);

                    showImageMessage('图片处理成功,文件已开始下载', 'success');
                } else if (data.error) {
                    showImageMessage(`处理失败:${data.error}`, 'error');
                }
            })
            .catch(error => {
                imageLoadingIndicator.style.display = 'none';
                showImageMessage(`请求失败:${error.message}`, 'error');
            })
            .finally(() => {
                // 重新启用按钮
                processImageBtn.disabled = false;
            });
        });

        // 显示图片处理消息
        function showImageMessage(text, type) {
            imageResult.style.display = 'block';
            imageMessage.textContent = text;
            imageMessage.className = `message ${type}`;

            // 3秒后自动隐藏消息(成功消息)
            if (type === 'success') {
                setTimeout(() => {
                    imageResult.style.display = 'none';
                }, 3000);
            }
        }
    </script>
</body>
</html>
代码下载地址
完整代码下点击这里