目录
[1 什么是list](#1 什么是list)
[2 list的模拟实现](#2 list的模拟实现)
[2.1 定义一个节点](#2.1 定义一个节点)
[2.2 构造函数](#2.2 构造函数)
[2.3 遍历list和迭代器的实现](#2.3 遍历list和迭代器的实现)
[2.3.1 插入函数](#2.3.1 插入函数)
[2.3.1.1 insert() 在指定位置之前插入元素](#2.3.1.1 insert() 在指定位置之前插入元素)
[2.3.1.2 头插push_front() 尾插push_back()](#2.3.1.2 头插push_front() 尾插push_back())
[2.3.2 利用迭代器遍历list](#2.3.2 利用迭代器遍历list)
[2.4 const迭代器的实现](#2.4 const迭代器的实现)
[2.5 删除指定位置的元素](#2.5 删除指定位置的元素)
[2.6 析构函数、拷贝构造、重载=](#2.6 析构函数、拷贝构造、重载=)
[2.7 完整代码 list.h](#2.7 完整代码 list.h)
1 什么是list
在C++中,list是标准模板库的一个容器,本质是带头双向循环链表,具有以下特性:
- 双向链表:每个节点包含指向前后节点的指针
- 非连续内存:逻辑结构上连续,实际上节点在内存中分散存储
- 动态大小:可以自动管理内存
与vector不同的是,list不支持随机访问,因为本质上物理结构并不连续,不能使用 操作符。插入删除操作效率高,不需要像string和vector一样挪动数据,只需改变指针指向。
使用list时要包含头文件<list>,如果在需要频繁在中间插入删除数据、大量拼接操作下适合用list,需要频繁的随机访问数据时,则不适用。总结:C++中的list是一个功能强大的双向链表,特别适合需要频繁插入删除操作的场景,要注意它随机访问性能较差的特性。
2 list的模拟实现
本文通过编写代码来实现并说明list常见的成员函数的功能,来深入了解list的底层实现。
首先自己实现list的功能,要创建一个头文件"list.h",然后创建一个命名空间来编写代码:
cpp
#include <assert.h>
namespace as
{
	class list
	{
	public:

	private:
		Node* _head;//头节点(哨兵位)
		size_t _size;//统计节点个数
	};
}
接下来的list的成员函数实现在public下完成。
2.1 定义一个节点
双向链表的一个节点由三个部分组成:数据、指向前一个节点的指针(前驱指针)、指向后一个节点的指针(后继指针)。所以我们要先创建一个类来定义链表中一个节点的结构,_data表示节点中的数据,_prev和_next来表示前驱指针和后继指针,并用初始化列表初始化。
cpp
template <class T>
struct list_node
{
	T _data;
	list_node<T>* _next;
	list_node<T>* _prev;
	list_node(const T& data = T())
		:_data(data)
		,_next(nullptr)
		,_prev(nullptr)
	{ }
};由于T可以是任意类型,这里我们给缺省值时要给T(),让其调用库里的默认构造函数,如果T是内置类型,使用值初始化,如int()用0,double()用0.0
2.2 构造函数
构造函数的实现比较简单,先生成一个头节点,也就是哨兵位,然后初始化时先令前驱指针和后继指针指向自己:
cpp
template <class T>
class list
{
	typedef list_node<T> Node;
public:
	list()
	{
		_head = new Node;
		_head->_next = _head;
		_head->_prev = _head;
		_size = 0;
	}
private:
	Node* _head;
	size_t _size;
}
2.3 遍历list和迭代器的实现
首先回顾一下在模拟实现vector时,使用迭代器遍历数组时的方法:
cpp
#include <iostream>
#include <vector>
using namespace std;

void test_vector_iterator() {
    vector<int> vec = {1, 2, 3, 4, 5};
    vector<int>::iterator it;
    for (it = vec.begin(); it != vec.end(); ++it)
    {
        cout << *it << " ";
    }
}
迭代器本质是指针,++是指针算数运算,*是对指针的解引用,由于vector的本质是顺序表,物理结构是连续的,所以利用迭代器从前到后就可以访问vector中的所有元素。
但是list的遍历就有局限性,list的物理结构并不连续,节点在内存中是分散的存储的,内存地址并不连续,在进行如上述的++it时,是在移动指针,没有移动到下一个节点。
所以如果我们想要用迭代器遍历list时,需要自己写一个迭代器的类,并且重载例如++等操作符,赋予其新的功能,来遍历list,最终打印出list中的元素。
cpp
template <class T>
struct list_iterator
{
	typedef list_node<T> Node;
	typedef list_iterator<T> Self;
	Node* _node;

	list_iterator(Node* node)
		:_node(node)
	{ }

	T& operator*()
	{
		return _node->_data;
	}

	Self& operator++()//前置++
	{
		_node = _node->_next;
		return *this;
	}

	Self operator++(int)//后置++
	{
		Self tmp(*this);
		_node = _node->_next;
		return tmp;
	}

	Self& operator--()//前置--
	{
		_node = _node->_prev;
		return *this;
	}

	Self operator--(int)//后置--
	{
		Self tmp(*this);
		_node = _node->_prev;
		return tmp;
	}

	bool operator!=(const Self& s) const
	{
		return _node != s._node;
	}

	bool operator==(const Self& s) const
	{
		return _node == s._node;
	}
};
在实现遍历之前,我们还需要在list类中实现begin(),end()以及插入函数的功能,begin()指向第一个有效元素,也就是哨兵位的下一个节点,end()指向有效元素的下一个位置,由于是双向带头循环链表,最后一个节点的下一个位置就是哨兵位,所以end()指向哨兵位。代码如下:
cpp
//使用typedef list_iterator iterator;
iterator begin()
{
	return iterator(_head->_next);
}

iterator end()
{
	return iterator(_head);
}
2.3.1 插入函数
2.3.1.1 insert() 在指定位置之前插入元素
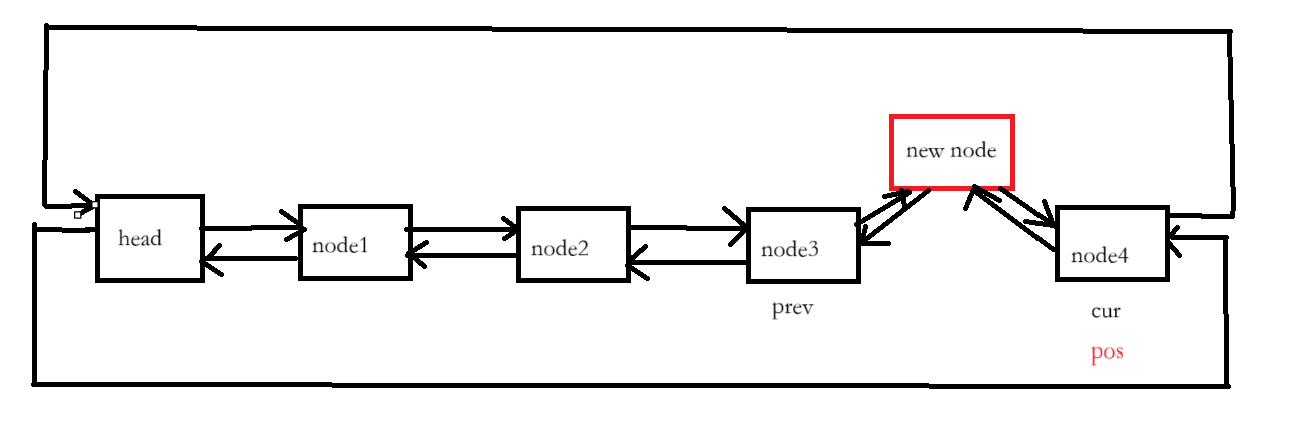
在pos位置之前插入新的节点,需改变新节点之前的节点的后继指针和新节点之后的节点的前驱指针的指向,都指向新的节点。新节点的前驱指针和后继指针分别指向前一节点和后一节点。
cpp
iterator insert(iterator pos,const T& x)
{
	Node* cur = pos._node;
	Node* prev = cur->_prev;
	Node* newnode = new Node(x);
	//prev newnode cur
	newnode->_next = cur;
	cur->_prev = newnode;
	prev->_next = newnode;
	newnode->_prev = prev;
	++_size;
	return newnode;
}
画图演示:
2.3.1.2 头插push_front() 尾插push_back()
有了insert()函数后,头插和尾插的实现很简单,只需要复用insert()即可。代码如下:
cpp
void push_back(const T& x)
{
	insert(end(), x);
}

void push_front(const T& x)
{
	insert(begin(), x);
}
2.3.2 利用迭代器遍历list
实现了插入函数和begin() end()后,测试一下,遍历list :
cpp
void test_list1()
{
	list<int> lt;
    lt.push_back(1);
    lt.push_back(2);
    lt.push_back(3);
    lt.push_back(4);
    lt.push_back(5);
    list<int>::iterator it = lt.begin();
    while (it != lt.end())
    {
	    cout << *it << " ";
	    ++it;
    }
    cout << endl;
}
调用测试函数运行结果:

可以看到通过自行实现list_iterator,可以实现list的遍历,自定义迭代器后,使用list遍历元素就像vector一样简单。
2.4 const迭代器的实现
自己实现完迭代器后,const的迭代器该如何实现呢?其实很简单,在所有不修改状态的成员函数加const即可。
cpp
	template <class T>
	struct list_const_iterator
	{
		typedef list_node<T> Node;
		typedef list_const_iterator<T> Self;
		Node* _node;

		list_const_iterator(Node* node)
			:_node(node)
		{
		}

		const T& operator*()
		{
			return _node->_data;
		}

		Self& operator++()
		{
			_node = _node->_next;
			return *this;
		}

		Self operator++(int)
		{
			Self tmp(*this);
			_node = _node->_next;
			return tmp;
		}

		Self& operator--()
		{
			_node = _node->_prev;
			return *this;
		}

		Self operator--(int)
		{
			Self tmp(*this);
			_node = _node->_prev;
			return tmp;
		}

		bool operator!=(const Self& s) const
		{
			return _node != s._node;
		}

		bool operator==(const Self& s) const
		{
			return _node == s._node;
		}
	};
实现了const迭代器之后,我们可以利用const迭代器实现一个可以打印任意容器中元素的函数:
cpp
template<class Container>
void print_container(const Container& con)
{
	typename Container::const_iterator it = con.begin();
	while (it != con.end())
	{
		cout << *it << " ";
		++it;
	}
	cout << endl;
}这里的Container是一个占位符类型名,可以替换为任何容器类型。
为什么需要typename?
- Container是模板参数,编译器在实例化前不知道它是什么
- Container::const_iterator可能是类型,也可能是静态成员
- 使用typename告诉编译器这是一个类型
使用方法:
cpp
	void test_list()
	{
		list<int> lt1;
		lt1.push_back(1);
		lt1.push_back(2);
		lt1.push_back(3);
		lt1.push_back(4);
		lt1.push_back(5);
		lt1.push_back(6);
		print_container(lt1);//输出1 2 3 4 5 6
	}
如果插入结构体类型的数据,打印时访问数据就要用到->,这时在迭代器实现中要重载->,方便访问结构体成员:
cpp
	T* operator->()
	{
		return &_node->_data;
	}
一时间可能不太好理解,这时我们结合使用样例和注释理解:
cpp
struct AA
{
public:
	AA(int a1 = 1, int a2 = 1)
		:_a1(a1)
		, _a2(a2)
	{
	}
	int _a1;
	int _a2;
};
void test_list()
{
	list<AA> lt;
	lt.push_back(AA());
	lt.push_back(AA());
	lt.push_back(AA());
	lt.push_back(AA());
	list<AA>::iterator it = lt.begin();
	while (it != lt.end())
	{
		//为了可读性省略了后一个箭头
		cout << it->_a1 << ":" << it->_a2 << endl;
		//第一个箭头调用运算符重载返回AA* 第二个箭头是原生指针解引用,取数据
		cout << it.operator->()->_a1 << ":" << it.operator->()->_a2 << endl;
		++it;
	}
}
现在实现好了const迭代器,如果仔细一想会发现普通迭代器和const迭代器的实现比较相似,const迭代器改了个名字,在一些地方添加const。有没有什么办法将普通迭代器和const迭代器合二为一呢,在使用时调用想要的迭代器。答案是有的。
cpp
template <class T,class Ref,class Ptr>
struct list_iterator
{
	typedef list_node<T> Node;
	typedef list_iterator<T,Ref,Ptr> Self;
	Node* _node;

	list_iterator(Node* node)
		:_node(node)
	{ }

	Ref operator*()
	{
		return _node->_data;
	}

	Ptr operator->()
	{
		return &_node->_data;
	}

	Self& operator++()
	{
		_node = _node->_next;
		return *this;
	}

	Self operator++(int)
	{
		Self tmp(*this);
		_node = _node->_next;
		return tmp;
	}

	Self& operator--()
	{
		_node = _node->_prev;
		return *this;
	}

	Self operator--(int)
	{
		Self tmp(*this);
		_node = _node->_prev;
		return tmp;
	}

	bool operator!=(const Self& s) const
	{
		return _node != s._node;
	}

	bool operator==(const Self& s) const
	{
		return _node == s._node;
	}
};
这是一个通用的迭代器设计,通过模板参数来同时支持普通迭代器和const迭代器。Ref和Ptr不知道是什么类型,在list类中这样定义:
cpp
template <class T>
class list
{
	typedef list_node<T> Node;
public:
	//typedef list_iterator<T> iterator;
	//typedef list_const_iterator<T> const_iterator;

	//模板集合迭代器
	//两个类,单纯类型不同,其他地方相似,想方设法使用模板
	typedef list_iterator<T, T&, T*> iterator;
	typedef list_iterator<T, const T&, const T*> const_iterator;

//......
}利用模板设计可以同时支持普通和const迭代器,避免再单独实现const迭代器的冗长代码,类型别名定义时传入相对应的类型。
2.5 删除指定位置的元素
删除pos位置的元素,先令pos位置的前后节点连接起来,再释放pos位置的节点:
cpp
iterator erase(iterator pos)
{
	assert(pos != end());
	Node* prev = pos._node->_prev;
	Node* next = pos._node->_next;
	prev->_next = next;
	next->_prev = prev;
	delete pos._node;
	--_size;

	return next;
}
在实际使用时,删除了一个位置的元素,接着使用这个迭代器,会造成迭代器失效。举一个使用的错误案例:
cpp
void test_list()
{
	list<int> lt;
	lt.push_back(1);
	lt.push_back(2);
	lt.push_back(3);
	lt.push_back(4);
	lt.push_back(5);
	lt.push_back(6);
	list<int>::iterator it = lt.begin();
	while (it != lt.end())
	{
		//删除所有偶数
		if (*it % 2 == 0)
		{
			lt.erase(it);
		}
		++it;//错误!迭代器失效
	}
	print_container(lt);
	cout << endl;
}这是因为it指向的节点被删除,再让it++,是对野指针++,这种操作是危险的,程序会崩溃。解决方法是更新一下erase的返回值,返回的是下一个的有效迭代器:
cpp
void test_list3()
{
	list<int> lt;
	lt.push_back(1);
	lt.push_back(2);
	lt.push_back(3);
	lt.push_back(4);
	lt.push_back(5);
	lt.push_back(6);
	list<int>::iterator it = lt.begin();
	while (it != lt.end())
	{
		//删除所有偶数
		if (*it % 2 == 0)
		{
			it=lt.erase(it);//删除成为野指针,再++是错误行为,所以需要接收这个返回值
            //erase返回下一个有效迭代器
		}
		else
		{
			++it;
		}
	}
	print_container(lt);
	cout << endl;
}
有了erase()的实现,对于头删和尾删的实现就很简单了,只需要复用erase()即可:
cpp
void pop_front()
{
	erase(begin());
}

void pop_back()
{
	erase(--end());
}
2.6 析构函数、拷贝构造、重载=
析构函数的实现是遍历list的所有节点,然后一个一个删除,再释放头节点,这里也要注意刚才提到的迭代器失效问题。代码如下:
cpp
//实现析构
void clear()
{
	auto it = begin();
	while (it != end())
	{
		it=erase(it);//避免迭代器失效
	}
}
~list()
{
	clear();
	delete _head;
	_head = nullptr;
}
利用push_back()来实现拷贝构造,由于尾插需要有哨兵位,需要写一个初始化函数:
cpp
//拷贝构造lt2(lt1)
void empty_init()//初始化
{
	_head = new Node;
	_head->_next = _head;
	_head->_prev = _head;
	_size = 0;
}
list(const list<T>& lt)
{
	empty_init();//想push_back要有哨兵位,所以要初始化
	for (auto& e : lt)
	{
		push_back(e);
	}
}
赋值重载的操作比较简单,lt1=lt2; 利用交换函数使得lt1和lt2资源交换,出作用域是携带lt2资源的lt1还会自动释放:
cpp
//赋值重载
void swap(list<T>& lt)
{
	std::swap(_head, lt._head);
	std::swap(_size, lt._size);
}
list<T>& operator=(list<T> lt)
{
	swap(lt);
	return *this;
}
测试代码:
cpp
void test_list()
{
list<int> lt1;
lt1.push_back(1);
lt1.push_back(2);
lt1.push_back(3);
lt1.push_back(4);
lt1.push_back(5);
lt1.push_back(6);
list<int> lt2(lt1);
print_container(lt2);
list<int> lt3;
lt3 = lt2;
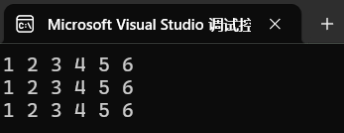
print_container(lt3);
}编译运行测试输出结果,模拟实现成功:
行文至此,list的模拟实现就结束了,下面给出完整代码
2.7 完整代码 list.h
cpp
#pragma once

#include <assert.h>
namespace as
{
	template <class T>
	struct list_node
	{
		T _data;
		list_node<T>* _next;
		list_node<T>* _prev;
		list_node(const T& data = T())
			:_data(data)
			,_next(nullptr)
			,_prev(nullptr)
		{ }
	};


	template <class T,class Ref,class Ptr>
	struct list_iterator
	{
		typedef list_node<T> Node;
		typedef list_iterator<T,Ref,Ptr> Self;
		Node* _node;

		list_iterator(Node* node)
			:_node(node)
		{ }

		Ref operator*()
		{
			return _node->_data;
		}

		Ptr operator->()
		{
			return &_node->_data;
		}

		Self& operator++()
		{
			_node = _node->_next;
			return *this;
		}

		Self operator++(int)
		{
			Self tmp(*this);
			_node = _node->_next;
			return tmp;
		}

		Self& operator--()
		{
			_node = _node->_prev;
			return *this;
		}

		Self operator--(int)
		{
			Self tmp(*this);
			_node = _node->_prev;
			return tmp;
		}

		bool operator!=(const Self& s) const
		{
			return _node != s._node;
		}

		bool operator==(const Self& s) const
		{
			return _node == s._node;
		}
	};

	template <class T>
	class list
	{
		typedef list_node<T> Node;
	public:
		//typedef list_iterator<T> iterator;
		//typedef list_const_iterator<T> const_iterator;

		//模板集合迭代器
		//两个类,单纯类型不同,其他地方相似,想方设法使用模板
		typedef list_iterator<T, T&, T*> iterator;
		typedef list_iterator<T, const T&, const T*> const_iterator;


		list()
		{
			_head = new Node;
			_head->_next = _head;
			_head->_prev = _head;
			_size = 0;
		}

		iterator begin()
		{
			return iterator(_head->_next);
		}

		iterator end()
		{
			return iterator(_head);
		}

		const_iterator begin() const
		{
			return const_iterator(_head->_next);
		}

		const_iterator end() const
		{
			return const_iterator(_head);
		}

		iterator insert(iterator pos,const T& x)
		{
			Node* cur = pos._node;
			Node* prev = cur->_prev;
			Node* newnode = new Node(x);
			//prev newnode cur
			newnode->_next = cur;
			cur->_prev = newnode;
			prev->_next = newnode;
			newnode->_prev = prev;
			++_size;
			return newnode;
		}

		void push_back(const T& x)
		{
			insert(end(), x);
		}

		void push_front(const T& x)
		{
			insert(begin(), x);
		}

		iterator erase(iterator pos)
		{
			assert(pos != end());
			Node* prev = pos._node->_prev;
			Node* next = pos._node->_next;
			prev->_next = next;
			next->_prev = prev;
			delete pos._node;
			--_size;

			return next;
		}

		void pop_front()
		{
			erase(begin());
		}

		void pop_back()
		{
			erase(--end());
		}

		size_t size() const
		{
			return _size;
		}

		bool empty() const
		{
			return _size == 0;
		}

		//实现析构
		void clear()
		{
			auto it = begin();
			while (it != end())
			{
				it=erase(it);//避免迭代器失效
			}
		}
		~list()
		{
			clear();
			delete _head;
			_head = nullptr;
		}

		//拷贝构造lt2(lt1)
		void empty_init()//初始化
		{
			_head = new Node;
			_head->_next = _head;
			_head->_prev = _head;
			_size = 0;
		}
		list(const list<T>& lt)
		{
			empty_init();//想push_back要有哨兵位,所以要初始化
			for (auto& e : lt)
			{
				push_back(e);
			}
		}

		//赋值重载
		void swap(list<T>& lt)
		{
			std::swap(_head, lt._head);
			std::swap(_size, lt._size);
		}
		list<T>& operator=(list<T> lt)
		{
			swap(lt);
			return *this;
		}
	private:
		Node* _head;
		size_t _size;
	};

	template<class Container>
	void print_container(const Container& con)
	{
		typename Container::const_iterator it = con.begin();
		while (it != con.end())
		{
			cout << *it << " ";
			++it;
		}
		cout << endl;
	}
}本文通过自己编写代码来对list的常用功能进行模拟实现。来真正理解list底层逻辑,希望对你有所帮助。如果这篇文章对你有用,可以点点赞哦,你的支持就是我写下去的动力,后续会不断地分享知识。