文章的目的为了记录使用QT QML开发学习的经历。开发流程和要点有些记忆模糊,赶紧记录,防止忘记。
相关链接:
开源 C++ QT QML 开发(四)复杂控件--Listview
开源 C++ QT QML 开发(五)复杂控件--Gridview
开源 C++ QT QML 开发(十一)通讯--TCP服务器端
开源 C++ QT QML 开发(十二)通讯--TCP客户端
开源 C++ QT QML 开发(十五)通讯--http下载
推荐链接:
开源 C# 快速开发(十六)数据库--sqlserver增删改查
本章节主要内容是:Qt 多线程编程的例子,实现了线程之间的通讯,采用信号槽通讯。
1.代码分析
2.所有源码
3.效果演示
一、代码分析
整体架构
主线程(main) ↔ ThreadController ↔ Worker(后台线程)
↓ ↓
QML界面 信号槽通信
Worker 类详细分析
构造函数 Worker::Worker()
Worker::Worker(QObject *parent)
    : QObject(parent)
    , m_count(0)  // 初始化计数器为0
{
    m_timer = new QTimer(this);  // 创建定时器,父对象为this
    connect(m_timer, &QTimer::timeout, this, &Worker::doWork);
}
功能:
初始化数据成员 m_count
创建 QTimer 用于模拟周期性工作
连接定时器超时信号到工作槽函数
关键点:
使用 this 作为父对象,但后续会被 moveToThread(),父子关系会调整
定时器在工作者线程中运行
析构函数 Worker::~Worker()
Worker::~Worker()
{
    qDebug() << "Worker: 析构函数被调用";
    if (m_timer && m_timer->isActive()) {
        m_timer->stop();  // 停止定时器
    }
}
功能:确保在对象销毁时停止定时器
开始工作 Worker::startWork()
void Worker::startWork()
{
    qDebug() << "Worker: 开始工作,线程ID:" << QThread::currentThreadId();
    m_count = 0;           // 重置计数器
    m_timer->start(1000);  // 启动1秒间隔的定时器
}
调用时机:当收到来自主线程的 startWork 信号时
作用:启动后台工作流程
停止工作 Worker::stopWork()
void Worker::stopWork()
{
    if (m_timer->isActive()) {
        m_timer->stop();  // 停止定时器
    }
    qDebug() << "Worker: 停止工作";
}
功能:立即停止后台工作
核心工作函数 Worker::doWork()
void Worker::doWork()
{
    m_count++;
    QString data = QString("后台数据 %1 - 线程ID: %2")
                   .arg(m_count)
                   .arg((quintptr)QThread::currentThreadId());

    // 发送数据到主线程
    emit dataUpdated(data);
    qDebug() << "Worker: 发送数据:" << data;

    if(m_count >= 10) {  // 限制执行10次
        stopWork();
        emit workFinished();  // 通知工作完成
    }
}
执行流程:
增加计数器
生成包含线程ID的数据字符串
发射 dataUpdated 信号将数据发送到主线程
检查是否达到执行上限,如果是则停止并通知完成
ThreadController 类详细分析
构造函数 ThreadController::ThreadController()
ThreadController::ThreadController(QObject *parent)
    : QObject(parent)
    , m_workerThread(nullptr)
    , m_worker(nullptr)
    , m_isWorking(false)
{
    // 1. 创建线程和工作对象
    m_workerThread = new QThread(this);  // 父对象为this
    m_worker = new Worker();             // 无父对象,准备移动到线程

    // 2. 关键:将工作者移动到工作线程
    m_worker->moveToThread(m_workerThread);

    // 3. 建立信号槽连接
    connect(m_workerThread, &QThread::finished, m_worker, &QObject::deleteLater);
    connect(this, &ThreadController::startWork, m_worker, &Worker::startWork);
    connect(this, &ThreadController::stopWork, m_worker, &Worker::stopWork);
    connect(m_worker, &Worker::dataUpdated, this, &ThreadController::onDataUpdated);
    connect(m_worker, &Worker::workFinished, this, &ThreadController::onWorkFinished);

    // 4. 启动线程(此时线程就绪,等待信号)
    m_workerThread->start();
    qDebug() << "ThreadController: 主线程ID:" << QThread::currentThreadId();
}
关键连接分析:
信号源 信号 接收者 槽函数 连接类型
m_workerThread finished m_worker deleteLater 自动
ThreadController startWork Worker startWork 队列
ThreadController stopWork Worker stopWork 队列
Worker dataUpdated ThreadController onDataUpdated 队列
Worker workFinished ThreadController onWorkFinished 队列
重要细节:
moveToThread(m_workerThread) 是核心,它将 Worker 的事件循环转移到新线程
所有跨线程连接自动使用 Qt::QueuedConnection
线程启动后处于等待状态,直到收到开始信号
析构函数 ThreadController::~ThreadController()
ThreadController::~ThreadController()
{
    qDebug() << "ThreadController: 析构函数被调用";

    if (m_workerThread && m_workerThread->isRunning()) {
        // 1. 停止工作
        if (m_worker) {
            m_worker->stopWork();
        }

        // 2. 优雅退出
        m_workerThread->quit();
        m_workerThread->wait(1000);  // 等待1秒

        // 3. 强制终止(如果优雅退出失败)
        if (m_workerThread->isRunning()) {
            m_workerThread->terminate();
            m_workerThread->wait();
        }
    }
}
资源清理策略:
先尝试停止工作
请求线程退出并等待
超时后强制终止
由于 m_workerThread 的父对象是 this,会自动删除
QML接口函数 ThreadController::start() 和 stop()
void ThreadController::start()
{
    if (!m_isWorking) {
        setWorking(true);      // 更新状态
        emit startWork();      // 触发后台线程开始工作
    }
}

void ThreadController::stop()
{
    if (m_isWorking) {
        emit stopWork();       // 触发后台线程停止工作
        setWorking(false);     // 更新状态
    }
}
设计模式:
作为 QML 调用的接口
先更新状态再发射信号,确保状态一致性
数据转发函数 ThreadController::onDataUpdated()
void ThreadController::onDataUpdated(const QString &data)
{
    // 在主线程中接收数据并转发给QML
    qDebug() << "ThreadController: 接收数据 -" << data;
    emit newData(data);  // 转发到QML
}
线程上下文:
在主线程中执行(因为 ThreadController 在主线程)
将从 Worker 线程接收的数据转发给 QML
工作完成处理 ThreadController::onWorkFinished()
void ThreadController::onWorkFinished()
{
    qDebug() << "ThreadController: 工作完成";
    setWorking(false);  // 更新工作状态
}
作用:处理 Worker 的自然结束(执行完10次后)
状态管理函数 ThreadController::setWorking()
void ThreadController::setWorking(bool working)
{
    if (m_isWorking != working) {
        m_isWorking = working;
        emit isWorkingChanged();  // 通知QML属性变化
        qDebug() << "ThreadController: 工作状态改变为:" << working;
    }
}
QML集成关键:
通过 emit isWorkingChanged() 通知 QML 属性已更新
QML 的 isWorking 绑定会自动更新
main.cpp 分析
int main(int argc, char *argv[])
{
    QGuiApplication app(argc, argv);

    // 1. 创建控制器(在主线程)
    ThreadController controller;

    QQmlApplicationEngine engine;

    // 2. 注册为QML上下文属性
    engine.rootContext()->setContextProperty("threadController", &controller);

    // 3. 加载QML
    engine.load(url);

    return app.exec();
}
重要点:
ThreadController controller 在主线程创建
通过 setContextProperty 暴露给 QML,名称为 threadController
完整执行流程
启动流程
QML点击开始 → threadController.start()
ThreadController → setWorking(true) + emit startWork()
Worker线程 → startWork() 启动定时器
每秒触发 → doWork() 生成数据 → emit dataUpdated()
数据流
Worker线程 → dataUpdated信号 → ThreadController主线程 → newData信号 → QML界面
停止流程
手动停止:
QML停止按钮 → threadController.stop() → emit stopWork() → Worker::stopWork()
自动停止:
Worker::doWork() (第10次) → stopWork() → emit workFinished() → ThreadController::onWorkFinished()
二、所有源码
worker.h文件源码
#ifndef WORKER_H
#define WORKER_H

#include <QObject>
#include <QThread>
#include <QDebug>
#include <QTimer>

class Worker : public QObject
{
    Q_OBJECT

public:
    explicit Worker(QObject *parent = nullptr);
    ~Worker();

public slots:
    void startWork();
    void stopWork();

private slots:
    void doWork();

signals:
    void dataUpdated(const QString &data);
    void workFinished();

private:
    QTimer *m_timer;
    int m_count;
};

#endif // WORKER_H
worker.cpp文件源码
#include "worker.h"

Worker::Worker(QObject *parent)
    : QObject(parent)
    , m_count(0)
{
    m_timer = new QTimer(this);
    connect(m_timer, &QTimer::timeout, this, &Worker::doWork);
}

Worker::~Worker()
{
    qDebug() << "Worker: 析构函数被调用";
    if (m_timer && m_timer->isActive()) {
        m_timer->stop();
    }
}

void Worker::startWork()
{
    qDebug() << "Worker: 开始工作,线程ID:" << QThread::currentThreadId();
    m_count = 0;
    m_timer->start(1000); // 每秒触发一次
}

void Worker::stopWork()
{
    if (m_timer->isActive()) {
        m_timer->stop();
    }
    qDebug() << "Worker: 停止工作";
}

void Worker::doWork()
{
    m_count++;
    QString data = QString("后台数据 %1 - 线程ID: %2").arg(m_count).arg((quintptr)QThread::currentThreadId());

    // 发送数据到主线程
    emit dataUpdated(data);
    qDebug() << "Worker: 发送数据:" << data;

    if(m_count >= 10) {
        stopWork();
        emit workFinished();
    }
}threadController.h文件源码#ifndef THREADCONTROLLER_H
#define THREADCONTROLLER_H
#include <QObject>
#include <QThread>
#include "worker.h"
class ThreadController : public QObject
{
Q_OBJECT
// 将状态属性暴露给QML
Q_PROPERTY(bool isWorking READ isWorking NOTIFY isWorkingChanged)
public:
explicit ThreadController(QObject *parent = nullptr);
~ThreadController();
// QML可调用的函数
Q_INVOKABLE void start();
Q_INVOKABLE void stop();
bool isWorking() const;
signals:
void startWork();
void stopWork();
void newData(const QString &data);
void isWorkingChanged();
private slots:
void onDataUpdated(const QString &data);
void onWorkFinished();
private:
void setWorking(bool working);
QThread *m_workerThread;
Worker *m_worker;
bool m_isWorking;
};
#endif // THREADCONTROLLER_HthreadController.cpp文件源码
#include "threadcontroller.h"
#include <QDebug>

ThreadController::ThreadController(QObject *parent)
    : QObject(parent)
    , m_workerThread(nullptr)
    , m_worker(nullptr)
    , m_isWorking(false)
{
    // 创建工作线程和工作者
    m_workerThread = new QThread(this);
    m_worker = new Worker();

    // 将工作者移动到工作线程
    m_worker->moveToThread(m_workerThread);

    // 连接信号槽 - 使用QueuedConnection确保跨线程安全
    connect(m_workerThread, &QThread::finished, m_worker, &QObject::deleteLater);
    connect(this, &ThreadController::startWork, m_worker, &Worker::startWork);
    connect(this, &ThreadController::stopWork, m_worker, &Worker::stopWork);
    connect(m_worker, &Worker::dataUpdated, this, &ThreadController::onDataUpdated);
    connect(m_worker, &Worker::workFinished, this, &ThreadController::onWorkFinished);

    // 启动线程(但不立即开始工作)
    m_workerThread->start();
    qDebug() << "ThreadController: 主线程ID:" << QThread::currentThreadId();
}

ThreadController::~ThreadController()
{
    qDebug() << "ThreadController: 析构函数被调用";

    if (m_workerThread && m_workerThread->isRunning()) {
        // 停止工作
        if (m_worker) {
            m_worker->stopWork();
        }

        // 退出线程
        m_workerThread->quit();
        m_workerThread->wait(1000); // 等待1秒

        // 如果线程仍然在运行,强制终止
        if (m_workerThread->isRunning()) {
            m_workerThread->terminate();
            m_workerThread->wait();
        }
    }
}

void ThreadController::start()
{
    if (!m_isWorking) {
        setWorking(true);
        emit startWork();
    }
}

void ThreadController::stop()
{
    if (m_isWorking) {
        emit stopWork();
        setWorking(false);
    }
}

bool ThreadController::isWorking() const
{
    return m_isWorking;
}

void ThreadController::onDataUpdated(const QString &data)
{
    // 在主线程中接收数据并转发给QML
    qDebug() << "ThreadController: 接收数据 -" << data;
    emit newData(data);
}

void ThreadController::onWorkFinished()
{
    qDebug() << "ThreadController: 工作完成";
    setWorking(false);
}

void ThreadController::setWorking(bool working)
{
    if (m_isWorking != working) {
        m_isWorking = working;
        emit isWorkingChanged();
        qDebug() << "ThreadController: 工作状态改变为:" << working;
    }
}
main.qml文件源码
import QtQuick 2.12
import QtQuick.Window 2.12
import QtQuick.Controls 2.12
import QtQuick.Layouts 1.12
import QtQuick.Dialogs 1.2

ApplicationWindow {
    id: window
    width: 500
    height: 400
    visible: true
    title: qsTr("Qt QML 多线程示例 - 基于C++实现")
    minimumWidth: 400
    minimumHeight: 300

    ColumnLayout {
        anchors.fill: parent
        anchors.margins: 20
        spacing: 25

        // 标题
        Text {
            Layout.alignment: Qt.AlignHCenter
            text: "QML + C++ 多线程演示"
            font.bold: true
            font.pixelSize: 18
            color: "#2c3e50"
        }

        // 状态显示区域
        Rectangle {
            Layout.fillWidth: true
            Layout.preferredHeight: 80
            color: threadController.isWorking ? "#d4edda" : "#f8d7da"
            border.color: threadController.isWorking ? "#c3e6cb" : "#f5c6cb"
            border.width: 2
            radius: 8

            RowLayout {
                anchors.fill: parent
                anchors.margins: 10

                // 状态指示器
                Rectangle {
                    Layout.preferredWidth: 20
                    Layout.preferredHeight: 20
                    radius: 10
                    color: threadController.isWorking ? "#28a745" : "#dc3545"
                    border.color: "#ffffff"
                    border.width: 2
                }

                ColumnLayout {
                    Layout.fillWidth: true
                    spacing: 5

                    Text {
                        text: threadController.isWorking ? "后台线程运行中" : "后台线程已停止"
                        font.bold: true
                        font.pixelSize: 16
                        color: threadController.isWorking ? "#155724" : "#721c24"
                    }

                    Text {
                        text: threadController.isWorking ?
                              "正在从后台线程接收数据..." :
                              "点击开始按钮启动后台线程"
                        font.pixelSize: 12
                        color: threadController.isWorking ? "#155724" : "#721c24"
                    }
                }
            }
        }

        // 数据显示区域
        GroupBox {
            Layout.fillWidth: true
            Layout.fillHeight: true
            title: "后台线程数据接收区"

            ScrollView {
                anchors.fill: parent

                TextArea {
                    id: dataDisplay
                    readOnly: true
                    placeholderText: "等待接收后台线程数据...\n数据将在这里显示"
                    background: Rectangle {
                        color: "#f8f9fa"
                        border.color: "#dee2e6"
                        radius: 4
                    }
                    font.family: "Courier New"
                    font.pixelSize: 12
                    selectByMouse: true
                }
            }
        }

        // 控制按钮区域
        RowLayout {
            Layout.alignment: Qt.AlignHCenter
            spacing: 20

            Button {
                text: "开始任务"
                enabled: !threadController.isWorking
                onClicked: {
                    dataDisplay.text = "开始接收后台线程数据...\n" +
                                      "================================\n";
                    threadController.start();
                }
                background: Rectangle {
                    color: parent.enabled ? "#28a745" : "#6c757d"
                    radius: 5
                }
                contentItem: Text {
                    text: parent.text
                    color: "white"
                    horizontalAlignment: Text.AlignHCenter
                    verticalAlignment: Text.AlignVCenter
                    font.bold: true
                }
            }

            Button {
                text: "停止任务"
                enabled: threadController.isWorking
                onClicked: {
                    threadController.stop();
                    dataDisplay.text += "================================\n" +
                                       "任务被手动停止\n";
                }
                background: Rectangle {
                    color: parent.enabled ? "#dc3545" : "#6c757d"
                    radius: 5
                }
                contentItem: Text {
                    text: parent.text
                    color: "white"
                    horizontalAlignment: Text.AlignHCenter
                    verticalAlignment: Text.AlignVCenter
                    font.bold: true
                }
            }

            Button {
                text: "清空显示"
                onClicked: {
                    dataDisplay.text = "";
                }
                background: Rectangle {
                    color: "#17a2b8"
                    radius: 5
                }
                contentItem: Text {
                    text: parent.text
                    color: "white"
                    horizontalAlignment: Text.AlignHCenter
                    verticalAlignment: Text.AlignVCenter
                    font.bold: true
                }
            }
        }

        // 信息提示
        Text {
            Layout.alignment: Qt.AlignHCenter
            text: "提示: 后台线程每秒发送一次数据,发送10次后自动停止"
            font.pixelSize: 11
            color: "#6c757d"
            font.italic: true
        }
    }

    // 连接来自C++的信号
    Connections {
        target: threadController
        onNewData: {
            dataDisplay.text += data + "\n";
            // 自动滚动到底部
            dataDisplay.cursorPosition = dataDisplay.length;
        }
    }

    // 关于对话框
    MessageDialog {
        id: aboutDialog
        title: "关于"
        text: "多线程示例\n\n" +
              "演示如何使用C++实现后台线程,\n" +
              "并通过信号槽与QML主线程通信。\n\n" +
              "版本 1.0"
        icon: StandardIcon.Information
    }

    // 菜单栏
    menuBar: MenuBar {
        Menu {
            title: "文件"
            MenuItem {
                text: "退出"
                onTriggered: Qt.quit()
            }
        }
        Menu {
            title: "帮助"
            MenuItem {
                text: "关于"
                onTriggered: aboutDialog.open()
            }
        }
    }
}
main.cpp文件源码
#include <QGuiApplication>
#include <QQmlApplicationEngine>
#include <QQmlContext>
#include <QDebug>
#include "threadcontroller.h"
int main(int argc, char *argv[])
{
QCoreApplication::setAttribute(Qt::AA_EnableHighDpiScaling);
QGuiApplication app(argc, argv);
// 设置应用程序信息
app.setApplicationName("QML多线程示例");
app.setApplicationVersion("1.0");
app.setOrganizationName("Example Company");
// 创建线程控制器实例
ThreadController controller;
QQmlApplicationEngine engine;
// 将控制器实例注册为QML上下文属性
engine.rootContext()->setContextProperty("threadController", &controller);
// 加载QML文件
const QUrl url(QStringLiteral("qrc:/main.qml"));
QObject::connect(&engine, &QQmlApplicationEngine::objectCreated,
&app, [url](QObject *obj, const QUrl &objUrl) {
if (!obj && url == objUrl) {
qCritical() << "QML加载失败:" << url;
QCoreApplication::exit(-1);
} else {
qDebug() << "QML界面加载成功";
}
}, Qt::QueuedConnection);
engine.load(url);
qDebug() << "应用程序启动完成";
return app.exec();
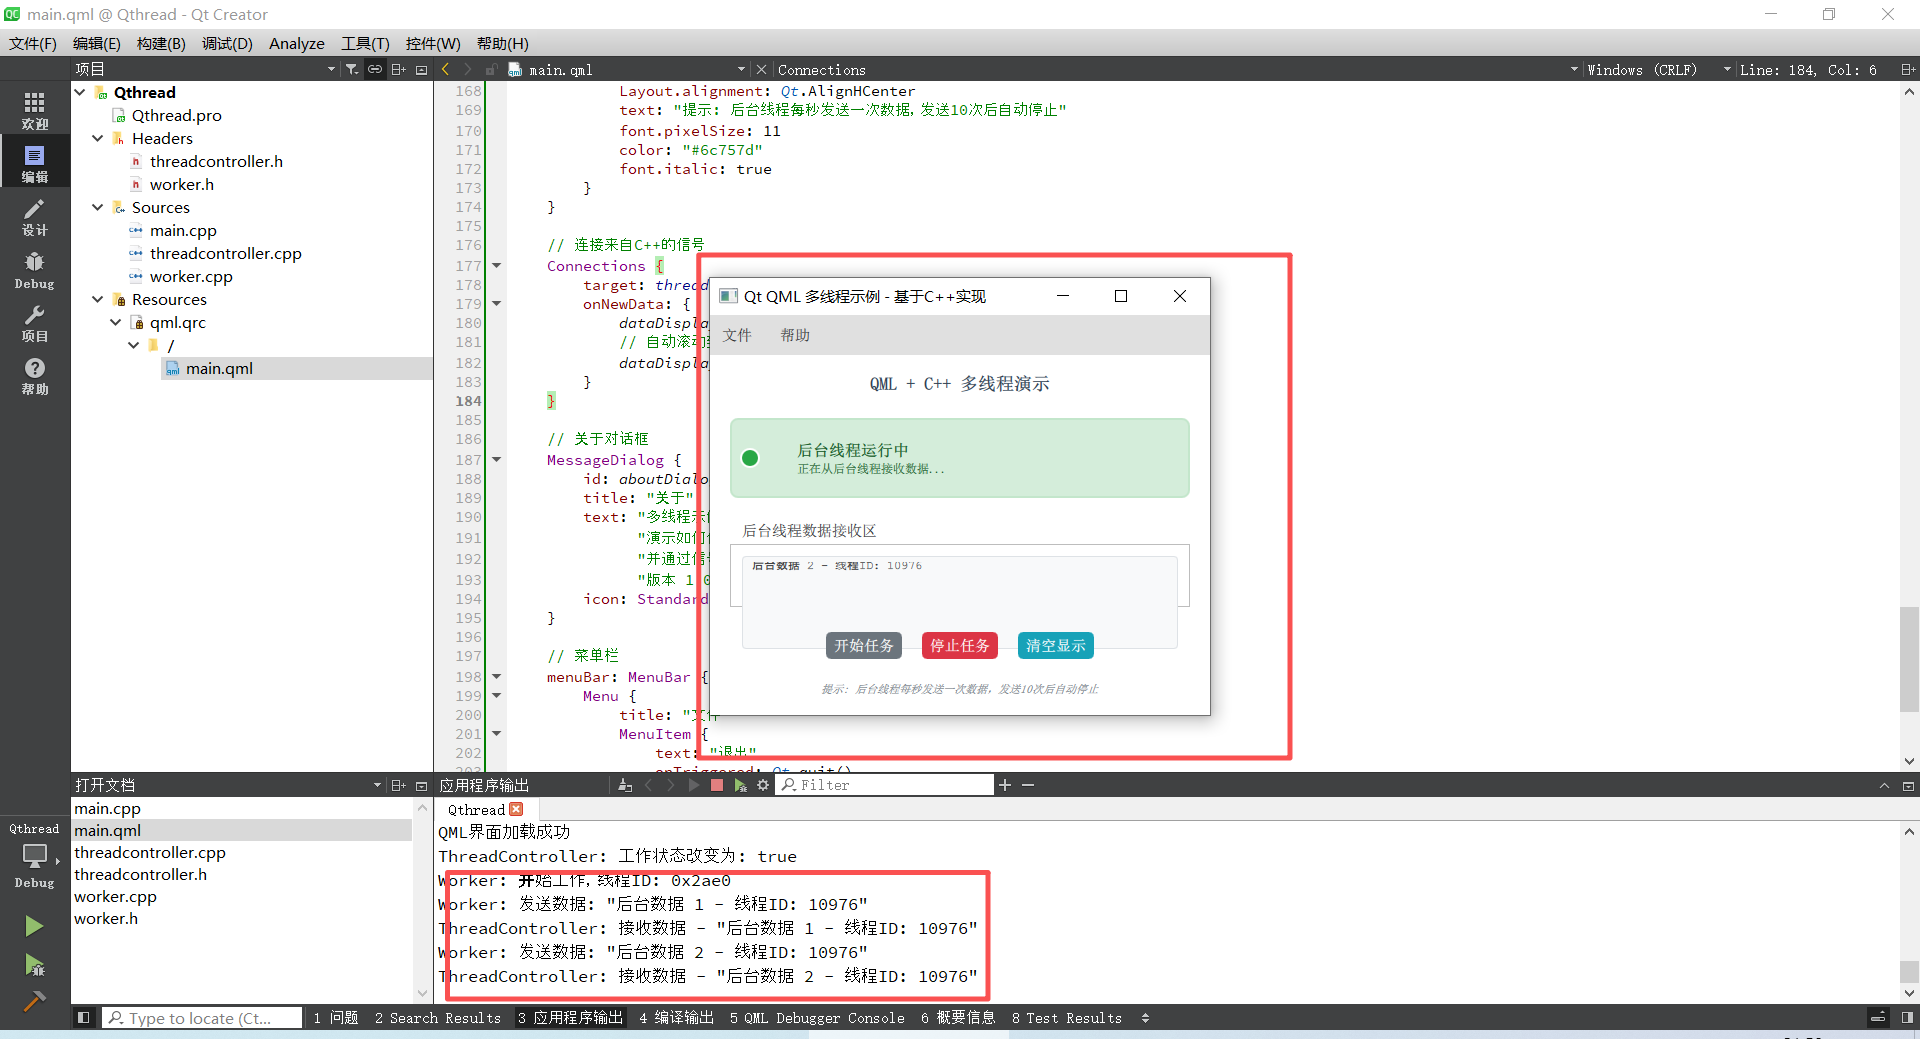
}三、效果演示
开始任务后,线程会发送数据,输出将会打印消息。