
ThymeLeaf 环境配置
ThymeLeaf 官网:https://www.thymeleaf.org/
文档:https://www.thymeleaf.org/doc/tutorials/3.0/usingthymeleaf.html
本站文档:thymeleaf-3.0.pdf
pom 依赖:
|----------------------------------------------------------------------------------------------------------------------------------------------------------|
| <!-- thymeleaf --> <dependency> <groupId>org.springframework.boot</groupId> <artifactId>spring-boot-starter-thymeleaf</artifactId> </dependency> |
导入 tymeleaf 依赖之后,配置 tymeleaf 参数,在 application.yml 配置文件中配置:
|------------------------------------------------------------------------------------------|
| spring: thymeleaf: # thymeleaf配置 cache: false # 不缓存 suffix: .html # 默认后缀就是 .html |
Controller 配置注意事项
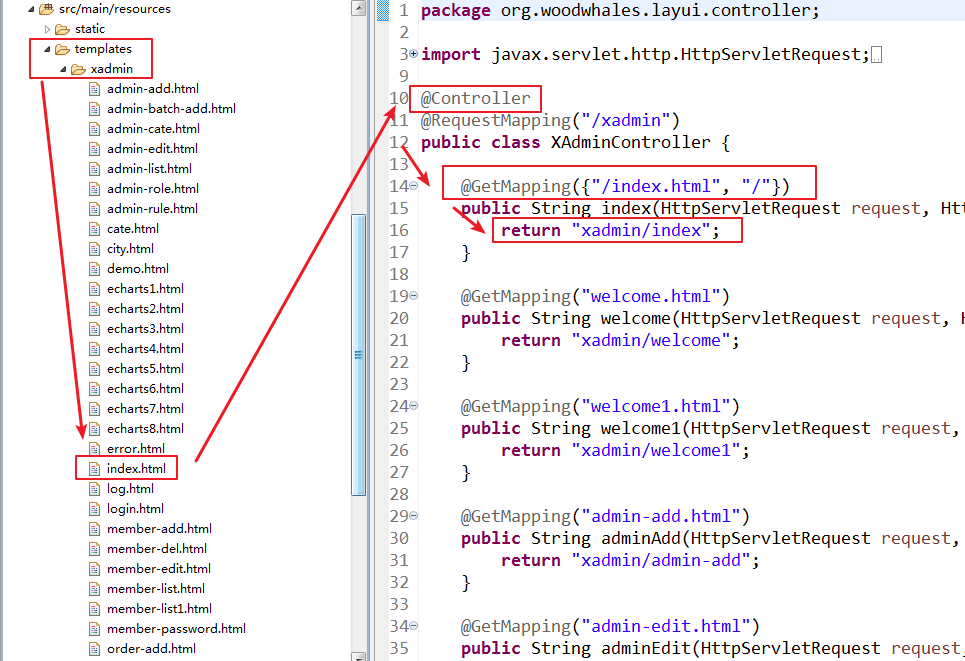
注意如果一个 controller 需要映射页面,那么不要使用 @RestController 注解,而是使用 @Controller 注解,参见下图示例:
html 标签注意事项
使用 thymeleaf 插件
如果使用的开发工具是 STS(https://spring.io/tools3/sts/all),那么可以离线安装一下 thymeleaf 插件,在页面编写的时候可以有 thymeleaf 标签提示。
插件官网:https://www.thymeleaf.org/eclipse-plugin-update-site/
离线安装包下载地址:https://github.com/thymeleaf/thymeleaf-extras-eclipse-plugin/releases
增加 xmlns 配置
注意在页面的 标签中增加 xmlns,指定为:http://www.thymeleaf.org,否则 STS 中 thymeleaf 插件无法自动提示标签:
|-----------------------------------------------------------------------|
| <!DOCTYPE html> <html xmlns:th="http://www.thymeleaf.org"> …… |
设置不解析 javascript 语句块
thymeleaf 将 js 代码中的二维数组,当做了自己的标签,进行解析,因此访问页面的时候会出现:Could not parse as expression异常。解决方案就是只需要在 javascript 标签上加th:inline="none"标签即可:
|----------------------------------------------------------|
| <script type="text/javascript" th:inline="none"> |
Layui 环境配置
layui 官网:https://www.layui.com/
本工程使用 jar 包形式引入 layui 工程:
|---------------------------------------------------------------------------------------------------------------------------------------------------------------------------------------------------------------------------------------------------------------------------------------------------------------------------------------------------------------------------------------------------------------------|
| <!-- layui --> <dependency> <groupId>org.webjars</groupId> <artifactId>layui</artifactId> <version>2.5.5</version> </dependency> <!-- jquery --> <dependency> <groupId>org.webjars</groupId> <artifactId>jquery</artifactId> <version>3.4.1</version> </dependency> <!-- droped webjars version --> <dependency> <groupId>org.webjars</groupId> <artifactId>webjars-locator-core</artifactId> </dependency> |
增加 layui 的同时,还要增加俩个其他的辅助 jar 包:
-
增加 jquery,因为 layui 依赖了 jq。
-
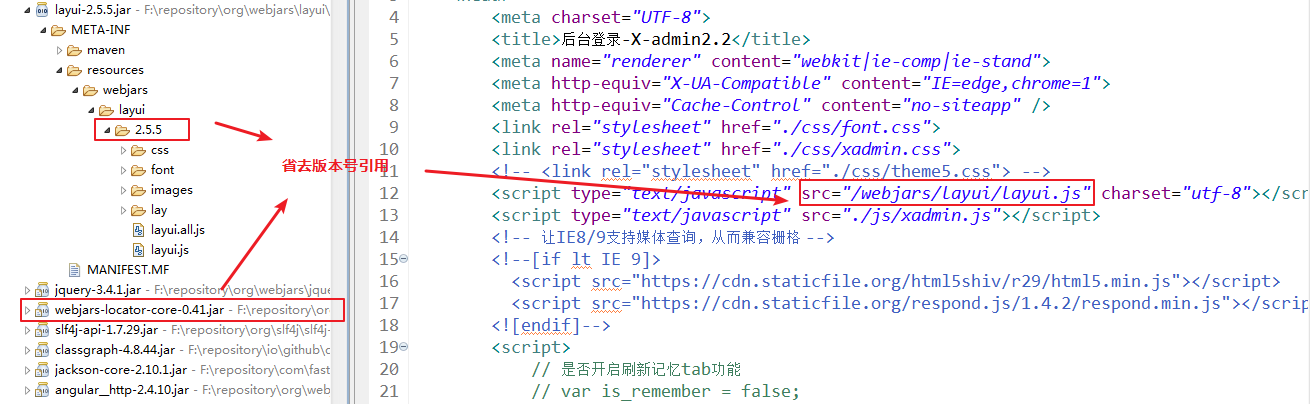
增加去掉 webjars 版本号,当在工程里引用 webjars 目录下的静态文件时不需要指定版本号。
形如:

x-admin 配置
x-admin 官网:http://x.xuebingsi.com/index/down/index.html
引入到 springboot 工程
本示例使用后台模板为:x-admin,将下载好压缩包解压,得到:
|--------------------------------------------------------------------------------------------------------------------------------------------------------------------------------------------------|
| ─X-admin ├─css ├─fonts ├─images ├─js └─lib └─layui ├─css │ └─modules │ ├─laydate │ │ └─default │ └─layer │ └─default ├─font ├─images │ └─face └─lay └─modules |
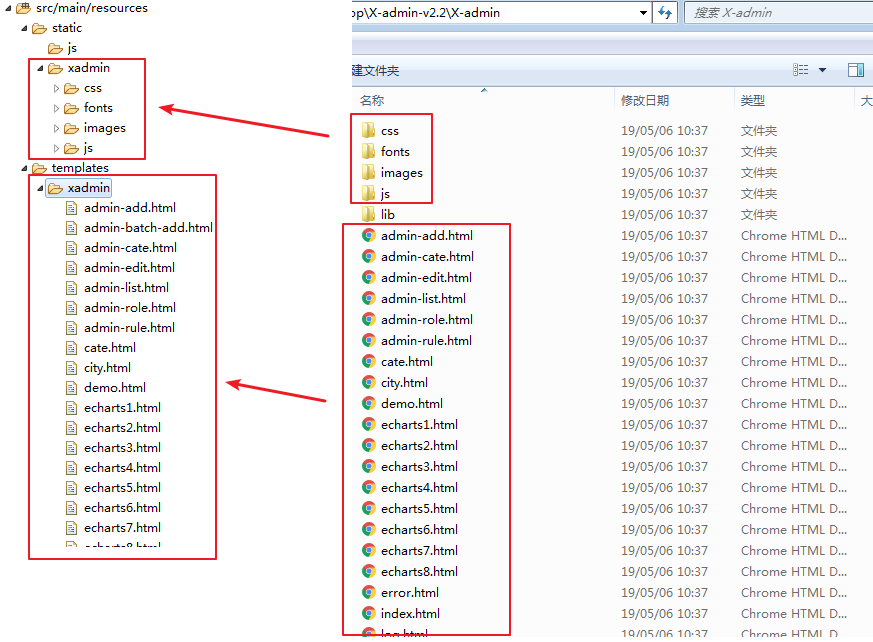
在项目的static和templates文件目录下创建xadmin文件夹:
将 js 、images、css、fonts 目录拷贝至:/src/main/resources/static/xadmin目录下,
将所有 html 页面拷贝至:src/main/resources/templates/xadmin目录下:
注意:这里不需要拷贝 lib 目录了,因为上文已经引入了 layui 的 jar 包了
页面映射路径注意事项
本示例将模板放在了 xadmin 目录下,所以首页路径映射是下面这样的:
|----------------------------------------------------------------------------------------------------------------------------------------------------------------------------------------------------------------------------------------------------------------------------------------------------------------------------------------------------------------------------------|
| @Controller @RequestMapping("/xadmin") public class XAdminController { @GetMapping({"/index.html", "/"}) public String index(HttpServletRequest request, HttpServletResponse response) { return "xadmin/index"; } @GetMapping("welcome.html") public String welcome(HttpServletRequest request, HttpServletResponse response) { return "xadmin/welcome"; } // 省略的代码 …… } |
静态资源访问路径注意事项
x-admin 模板对静态文件引用使用的是相对路径,因此需要更改一下:
|-------------------------------------------------------------------------------------------------------------------------------------------|
| <script src="./lib/layui/layui.js" charset="utf-8"></script> 修改为: <script src="/webjars/layui/layui.js" charset="utf-8"></script> |
为了保持项目"干净",每个文件末尾有个下文这样的 js 脚本,可以删除掉:
|------------------------------------------------------------------------------------------------------------------------------------------------------------------------------------------------------------------------------------------------------------------------------|
| <script>var _hmt = _hmt || []; (function() { var hm = document.createElement("script"); hm.src = "https://hm.baidu.com/hm.js?b393d153aeb26b46e9431fabaf0f6190"; var s = document.getElementsByTagName("script")[0]; s.parentNode.insertBefore(hm, s); })();</script> |
xm-select 下拉多选
官网地址:https://maplemei.gitee.io/xm-select/#/component/install
本示例运行效果:
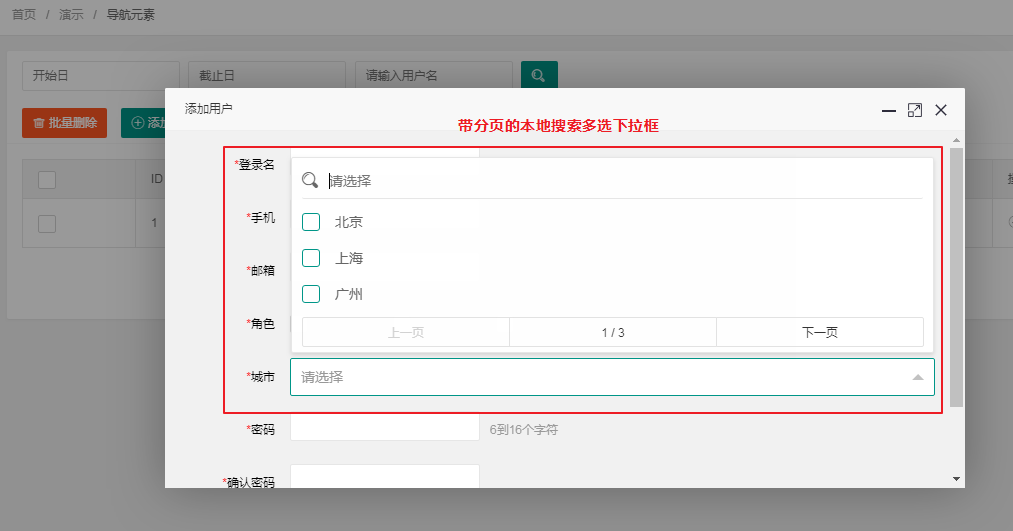
html 页面位置:src/main/resources/templates/xadmin/admin-add.html
在城市字段位置增加了下拉多选框:
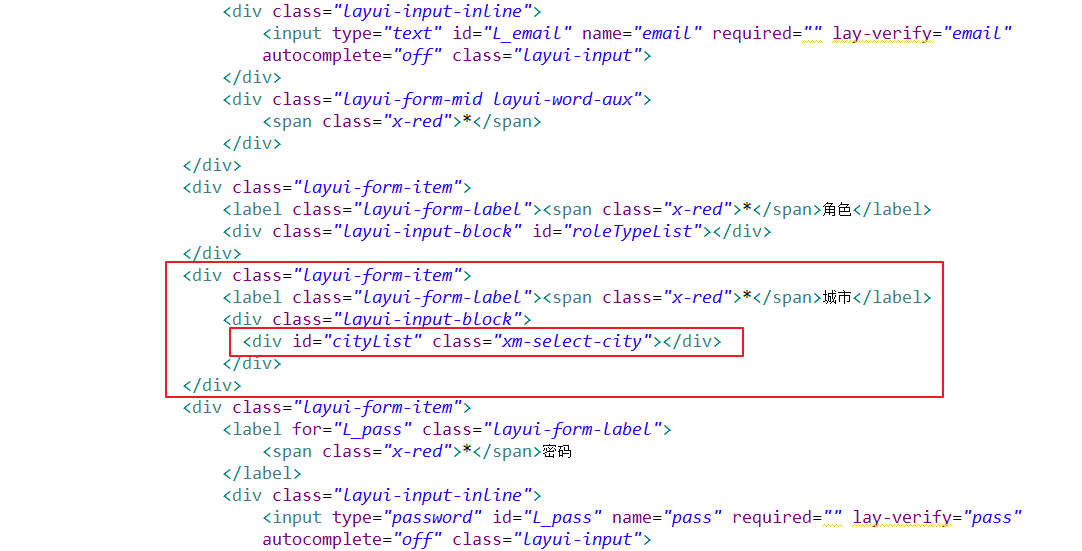
注意在页面中引入 xm-select 插件脚本:
|--------------------------------------------------------------------------|
| <script type="text/javascript" src="./js/xm-select.js"></script> |

js 脚本渲染:
|--------------------------------------------------------------------------------------------------------------------------------------------------------------------------------------------------------------------------------------------------------------------------------|
| $.ajax({ url: '/city/listAll', type: 'get', dataType:'json', contentType:"application/json", success:function(res) { xmSelect.render({ el: '#cityList', filterable: true, paging: true, pageSize: 3, size: 'medium', data: res.data }); }, error:function(res) { } }); |
后台数据响应文件位置:org.woodwhales.layui.controller.CityController.listAll()
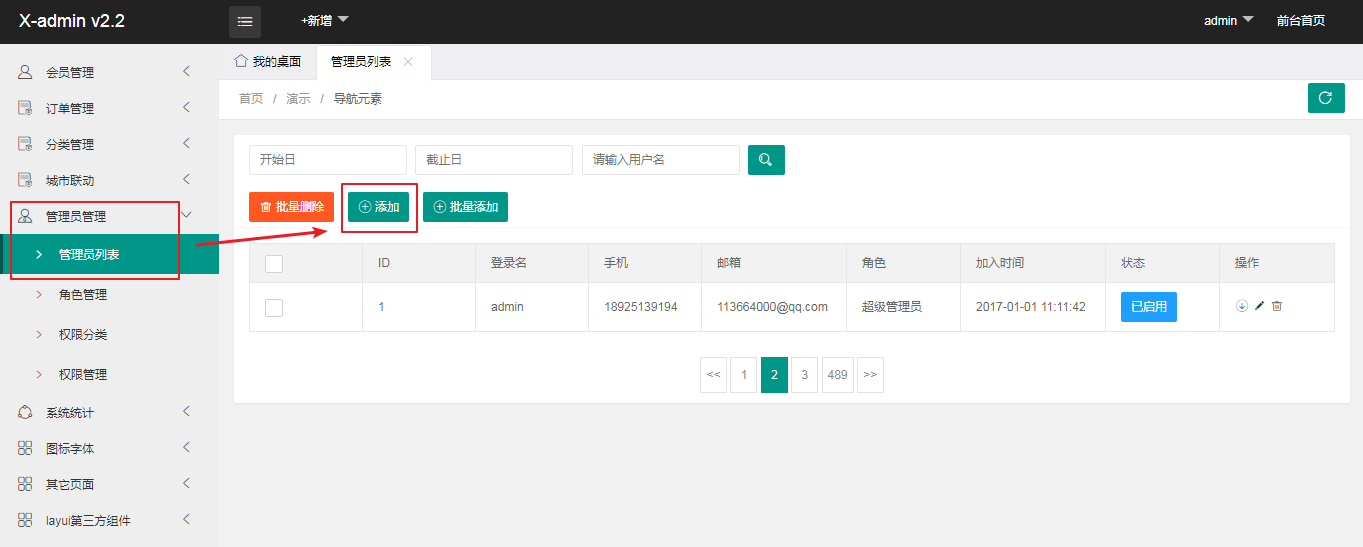
批量创建(批量提交)
本示例运行效果:
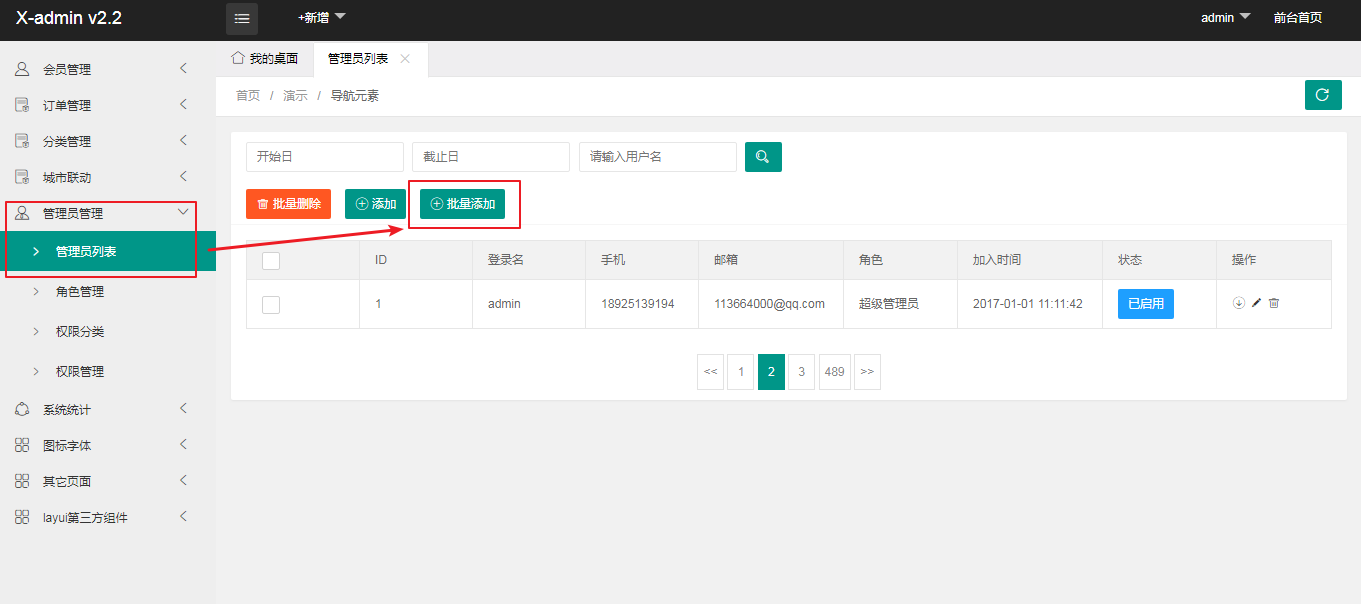
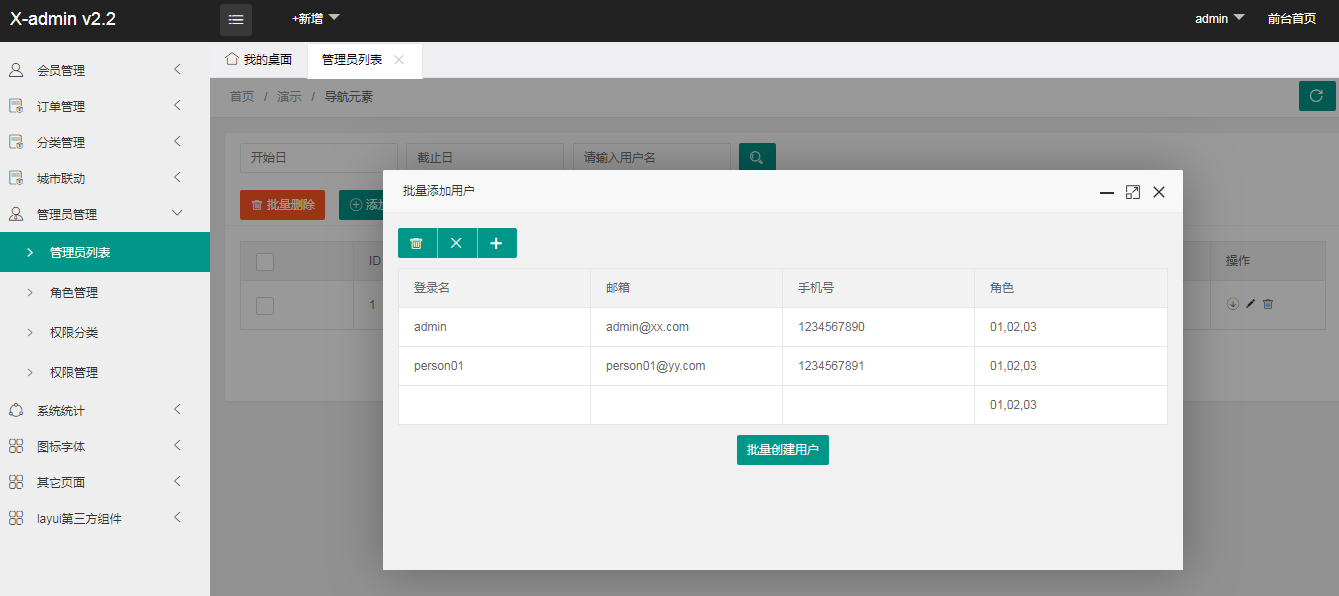
动态效果图:
由于批量操作基本上是对"同一类"用户进行批量创建,因此他们的同一类是角色,因此点击"+"按钮的时候,新增的行会取前一行的角色的值。
批量提交之后,后台会将本批次提交的结果再响应回来,创建成功的记录有"userId",创建失败的有失败原因提示。
html 页面位置:src/main/resources/templates/xadmin/admin-batch-add.html
在页面中定义一个表格 div:
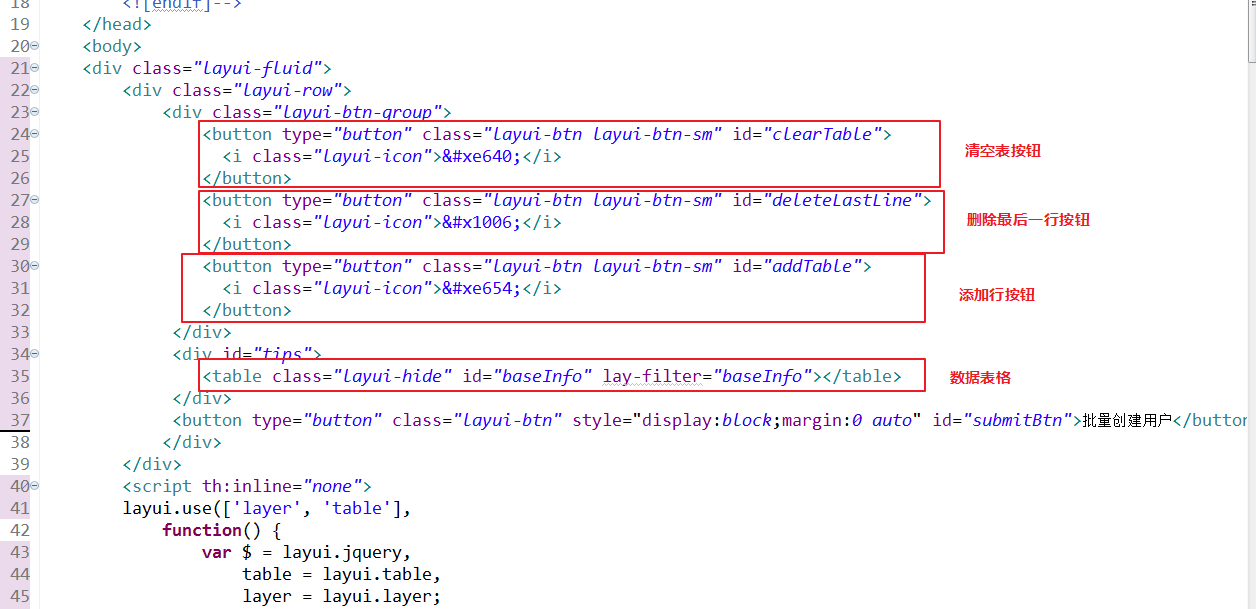
js 脚本控制:
|---------------------------------------------------------------------------------------------------------------------------------------------------------------------------------------------------------------------------------------------------------------------------------------------------------------------------------------------------------------------------------------------------------------------------------------------------------------------------------------------------------------------------------------------------------------------------------------------------------------------------------------------------------------------------------------------------------------------------------------------------------------------------------------------------------------------------------------------------------------------------------------------------------------------------------------------------------------------------------------------------------------------------------------------------------------------------------------------------------------------------------------------------------------------------------------------------------------------------------------------------------------------------------------------------------------------------------------------------------------------------------------------------------------------------------------------------------------------------------------------------------------------------------------------------------------------------------------------------------------------------------------------------------------------------------------------------------------------------------------------------------------------------------------------------------------------------------------------------------------------------------------------------------------------------------------------------------------------------------------------------------------------------------------------------------------------------------------------------------------------------------------------------------------------------------------------------------------------------------------------------------------------------------------------------------------------------------------------------------------------------------------------------------------------------------------------------------------------------------------------------------------------------------------------------------------------------------------------------------------------------------------------------------------------------------------------------------------------------------------------------------------------------------------------------------------------------------------------------------------------------------------------------------------------|
| $("#addTable").click(function(){ $('#submitBtn').removeAttr("disabled"); var oldData = table.cache["baseInfo"]; var tempRoleTypeList = oldData[oldData.length-1].roleTypeList; var tempData = {name: "", email: "", mobile: "", roleTypeList: tempRoleTypeList}; tableData.push(tempData); oldData.push(tempData); table.reload('baseInfo',{ data : oldData }); }); $("#deleteLastLine").click(function(){ var oldData = table.cache["baseInfo"]; delete oldData[oldData.length-1]; if(oldData.length == 1) { var tempData = {name: "", email: "", mobile: "", roleTypeList: ""}; oldData[0] = tempData; table.reload('baseInfo',{ data : oldData }); return; } table.reload('baseInfo',{ data : oldData }); }); $("#clearTable").click(function(){ var oldData = table.cache["baseInfo"]; for(i =0; i< oldData.length; i++) { delete oldData[i]; } var tempData = {name: "", email: "", mobile: "", roleTypeList: ""}; oldData[0] = tempData; table.reload('baseInfo',{ data : oldData }); }); $("#submitBtn").click(function(){ var brachData = table.cache["baseInfo"]; var requestData = new Array(); for (i = 0; i < brachData.length; i++) { if(isEmpty(brachData[i].name) || isEmpty(brachData[i].email) || isEmpty(brachData[i].mobile) || isEmpty(brachData[i].roleTypeList)) { layer.alert('数据列表不允许存在空值!', {icon: 5}); return; } requestData[i] = { 'name':brachData[i].name, 'email':brachData[i].email, 'mobile':brachData[i].mobile, 'roleTypeList':brachData[i].roleTypeList } } $.ajax({ url: '/user/batchCreate', type: 'post', dataType:'json', contentType:"application/json", async:true, cache:false, data:JSON.stringify({'batch' : requestData}), success:function(res) { console.log(res.data); var tableHtml = '<div style="padding:10px;">'; tableHtml += '<div class="layui-form">'; tableHtml += '<table class="layui-table" lay-skin="row">'; tableHtml += '<thead>'; tableHtml += '<tr>'; tableHtml += '<th>姓名</th>'; tableHtml += '<th>邮箱</th>'; tableHtml += '<th>手机号</th>'; tableHtml += '<th>角色</th>'; tableHtml += '<th>用户帐号</th>'; tableHtml += '<th>失败原因</th>'; tableHtml += '</tr>'; tableHtml += '</thead>'; for(i=0; i<res.data.length; i++) { console.log(res.data[i]); console.log(res.data[i].name); var tempTr = '<tr>'; tempTr += '<td>' + res.data[i].name + '</td>'; tempTr += '<td>' + res.data[i].email + '</td>'; tempTr += '<td>' + res.data[i].mobile + '</td>'; tempTr += '<td>' + res.data[i].roleTypeList + '</td>'; tempTr += '<td>' + res.data[i].userId + '</td>'; tempTr += '<td>' + res.data[i].errorMsg + '</td>'; tempTr += '</tr>'; tableHtml += tempTr; } tableHtml += '</table></div>'; tableHtml += '<div>'; layer.open({ type: 1, area: ['100%', '100%'], shade: 0.6, //遮罩透明度 title: false, fixed: true, closeBtn: 0, maxmin: false, resize: false, shadeClose: true, anim: 0, content: tableHtml }); }, error:function(data) { } }); }); |
另外,为了判断表格中的数据全部不允许为空,定义了判断字符串是否为空函数:
|----------------------------------------------------------------------------------------------------------------------------------|
| function isEmpty(obj) { if(typeof obj == "undefined" || obj == null || obj == ""){ return true; }else{ return false; } } |
后台数据响应文件位置:org.woodwhales.layui.controller.UserController.batchCreate(BatchCreateRequestBody)
动态加载复选框
本示例运行效果:
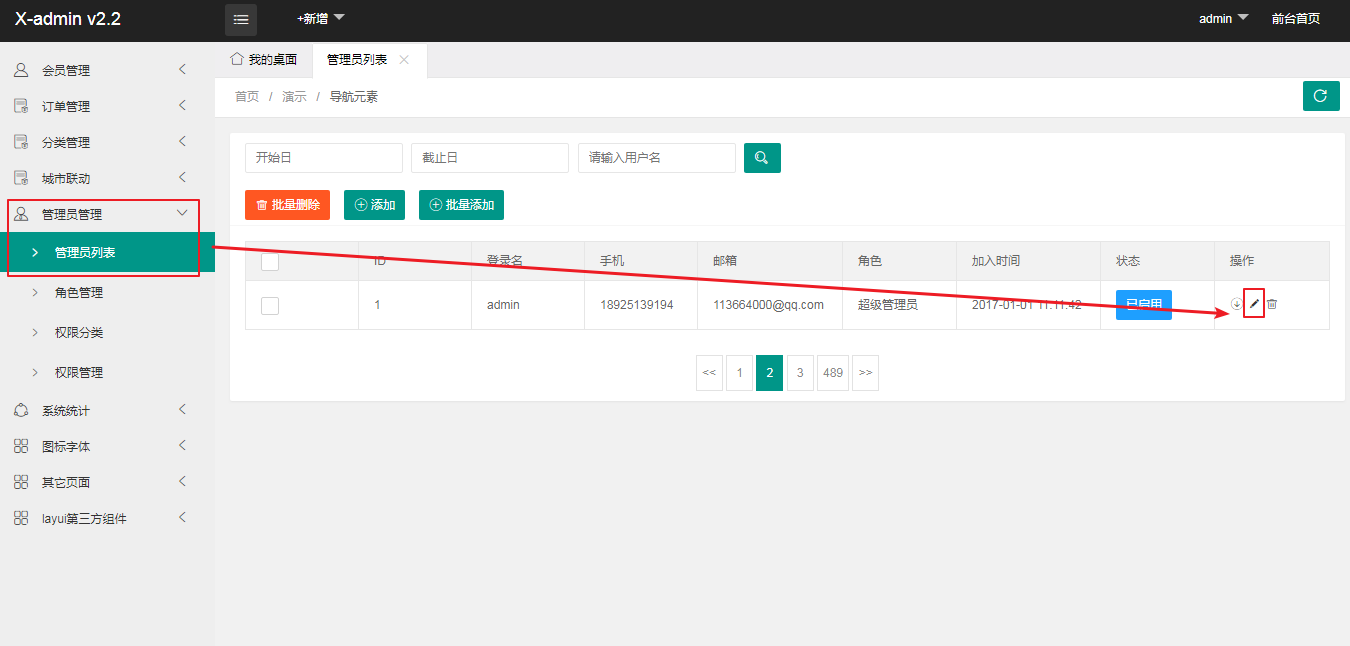
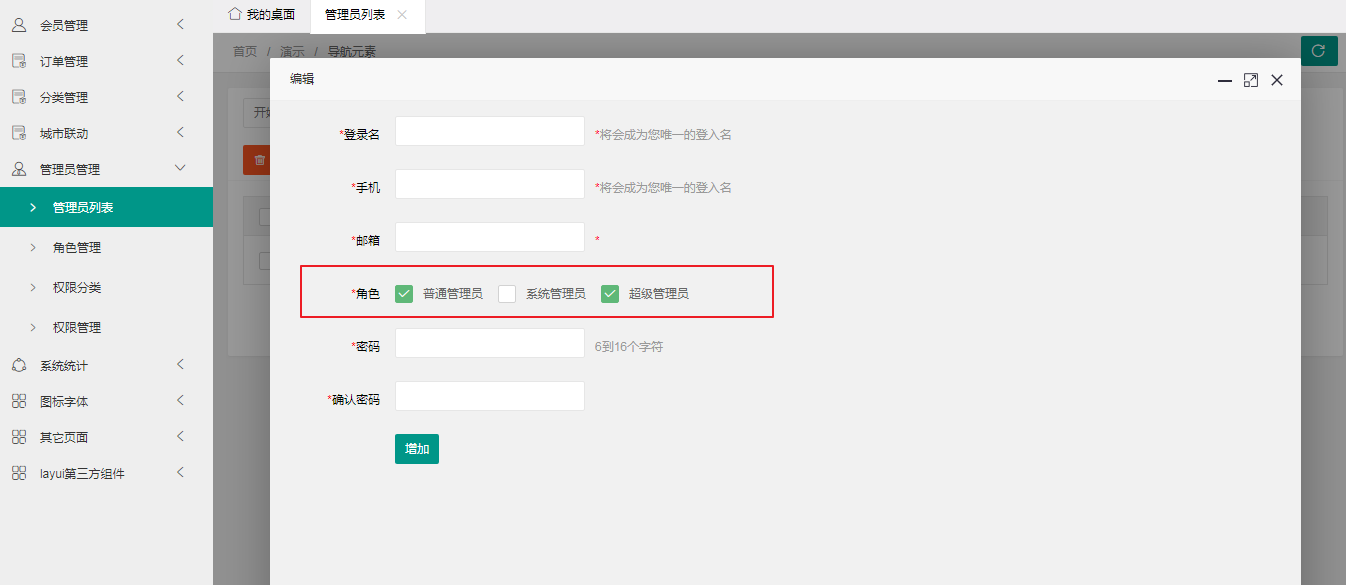
html 页面位置:/springboot-layui-tymeleaf-demo/src/main/resources/templates/xadmin/admin-edit.html
在页面中的"角色"字段位置增加自定义的复选框 div:
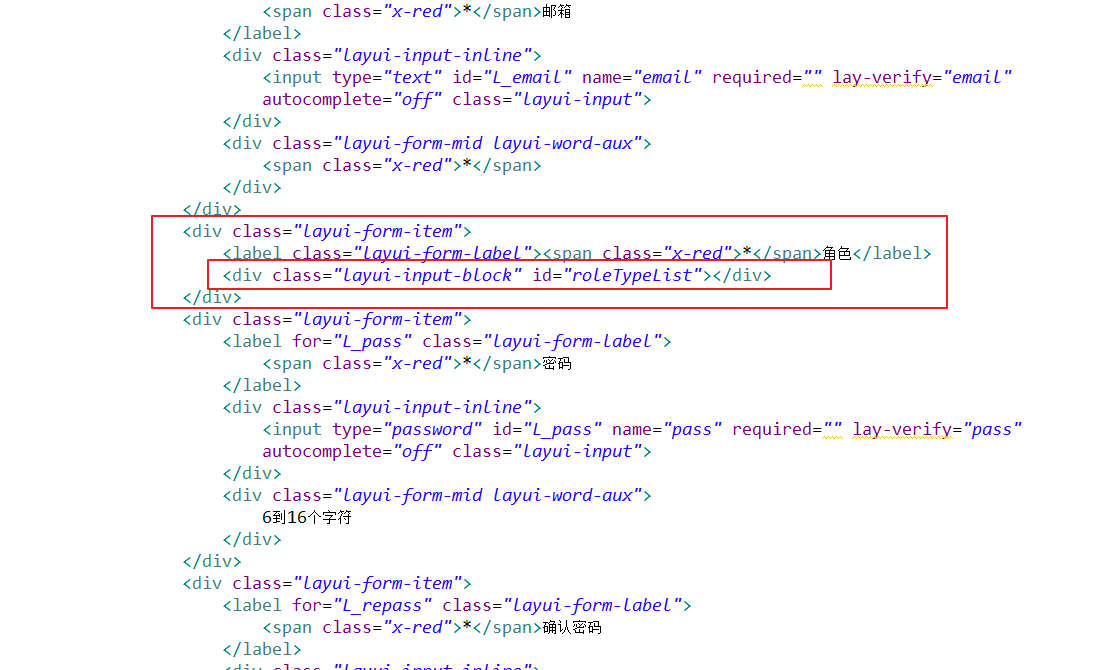
js 脚本渲染:
注意使用 jq 改变了原始 div 的元素属性,一定要记得刷新表单:form.render();
|----------------------------------------------------------------------------------------------------------------------------------------------------------------------------------------------------------------------------------------------------------------------------------------------------------------------------------------------------------------------------------------------------------------------------------------------------------------------------------------------------------------------------------------------------------------------------------------------------------------------------------------------------------------------------------------------------------------------------------------------------------------------------------------------------------------------------------------------------------------------------------------------------------------------------------------------------------------------------------------------------------------------------------------------------------------------------|
| $(function(){ // 获取角色信息列表(数据字典) $.ajax({ url: '/roleType/listAll', type: 'get', dataType:'json', contentType:"application/json", success:function(res) { var roleTypeList = res.data; // 获取 checkbox 父 div,遍历追加元素,最后刷新表单 for(i=0; i<roleTypeList.length;i++) { var tmepHtml = '<input type="checkbox" name="roleTypeCheckBox" value="'+roleTypeList[i].id+'" lay-skin="primary" title="'+roleTypeList[i].name+'">' $("#roleTypeList").append(tmepHtml); } form.render(); }, error:function(res) { } }); // 获取用户信息 $.ajax({ url: '/user/userId_1', type: 'get', dataType:'json', contentType:"application/json", success:function(res) { var roleTypeList = res.data.roleTypeList; // 遍历所有的checkbox(数据字典), // 将每一个元素和用户数据对象中的所属角色匹配, // 匹配到了就设置已选中,最后刷新表单 $("input[name='roleTypeCheckBox']").each(function(i){ var roleTypeId = $(this).val(); console.log('roleTypeId', roleTypeId); for(i=0; i<roleTypeList.length; i++) { if(roleTypeList[i].id == roleTypeId) { $(this).attr("checked","''"); break; } } }); form.render(); }, error:function(res) { } }); }); |
后台数据响应文件位置:
-
角色类型数据字典:
org.woodwhales.layui.controller.RoleRTypeController.listAll() -
用户详情:
org.woodwhales.layui.controller.UserController.queryUserById(String)
源码 github 地址:springboot-layui-tymeleaf-demo