zabbix安装
1、环境准备(RHEL9系统)
(1)关闭防火墙和selinux配置了IP能过ping通外网
powershell
[root@ansible ~]# systemctl stop firewalld.service
[root@ansible ~]# systemctl disable firewalld.service
Removed "/etc/systemd/system/multi-user.target.wants/firewalld.service".
Removed "/etc/systemd/system/dbus-org.fedoraproject.FirewallD1.service".
[root@ansible ~]# getenforce
Disabled
[root@ansible ~]# systemctl status firewalld.service
○ firewalld.service - firewalld - dynamic firewall daemon
     Loaded: loaded (/usr/lib/systemd/system/firewalld.service; disabled; >
     Active: inactive (dead) since Wed 2025-10-15 10:49:32 CST; 28s ago
   Duration: 30.923s
       Docs: man:firewalld(1)
   Main PID: 866 (code=exited, status=0/SUCCESS)
        CPU: 1.519s

Oct 15 10:49:01 ansible.example.com systemd[1]: Starting firewalld - dynam>
Oct 15 10:49:01 ansible.example.com systemd[1]: Started firewalld - dynami>
Oct 15 10:49:32 ansible.example.com systemd[1]: Stopping firewalld - dynam>
Oct 15 10:49:32 ansible.example.com systemd[1]: firewalld.service: Deactiv>
Oct 15 10:49:32 ansible.example.com systemd[1]: Stopped firewalld - dynami>
Oct 15 10:49:32 ansible.example.com systemd[1]: firewalld.service: Consume>

[root@server ~]# ip a
1: lo: <LOOPBACK,UP,LOWER_UP> mtu 65536 qdisc noqueue state UNKNOWN group default qlen 1000
    link/loopback 00:00:00:00:00:00 brd 00:00:00:00:00:00
    inet 127.0.0.1/8 scope host lo
       valid_lft forever preferred_lft forever
    inet6 ::1/128 scope host
       valid_lft forever preferred_lft forever
2: ens160: <BROADCAST,MULTICAST,UP,LOWER_UP> mtu 1500 qdisc mq state UP group default qlen 1000
    link/ether 00:0c:29:3f:4c:f9 brd ff:ff:ff:ff:ff:ff
    altname enp3s0
    inet 192.168.100.100/24 brd 192.168.100.255 scope global noprefixroute ens160
       valid_lft forever preferred_lft forever
    inet6 fe80::20c:29ff:fe3f:4cf9/64 scope link noprefixroute
       valid_lft forever preferred_lft forever

[root@ansible ~]# ping www.baidu.com
PING www.a.shifen.com (183.2.172.17) 56(84) bytes of data.
64 bytes from 183.2.172.17 (183.2.172.17): icmp_seq=1 ttl=128 time=25.7 ms
64 bytes from 183.2.172.17 (183.2.172.17): icmp_seq=2 ttl=128 time=26.7 ms
64 bytes from 183.2.172.17 (183.2.172.17): icmp_seq=3 ttl=128 time=26.3 ms
^C
--- www.a.shifen.com ping statistics ---
3 packets transmitted, 3 received, 0% packet loss, time 2004ms
rtt min/avg/max/mdev = 25.687/26.219/26.664/0.403 ms
(2)配置本地yum源,加载光驱,并下载lrzsz
powershell
[root@server ~]# mount /dev/cdrom /mnt
mount: /mnt: WARNING: source write-protected, mounted read-only.
[root@server ~]# cd /etc/yum.repos.d/
[root@server yum.repos.d]# ls
redhat.repo  server.repo
[root@server yum.repos.d]# rm -rf *
[root@server yum.repos.d]# vim server.repo
[root@server yum.repos.d]# cat server.repo
[aa]
name=aa1
baseurl=file:///mnt/BaseOS
enabled=1
gpgcheck=0

[bb]
name=bb1
baseurl=file:///mnt/AppStream
enabled=1
gpgcheck=0
[root@server ~]# yum -y install lrzsz
[root@server ~]# bash
2、安装zabbix源
(1)导入zabbix压缩包文件
powershell
[root@server ~]# rz -E
rz waiting to receive.
[root@server ~]# ls
anaconda-ks.cfg  Public
Desktop          rhel-9.2-x86_64-dvd.iso
Documents        Templates
Downloads        Videos
Music            zabbix-release-7.0-2.el9.noarch.rpm
Pictures
[root@server ~]# rpm -Uvh zabbix-release-7.0-2.el9.noarch.rpm
warning: zabbix-release-7.0-2.el9.noarch.rpm: Header V4 RSA/SHA512 Signature, key ID b5333005: NOKEY
Verifying...                          ################################# [100%]
Preparing...                          ################################# [100%]
Updating / installing...
   1:zabbix-release-7.0-2.el9         ################################# [100%]
[root@server ~]# cd /etc/yum.repos.d/
[root@server yum.repos.d]# ls
redhat.repo  server.repo  zabbix.repo
(2)将zabbix的源换成阿里源(更改三个baseurl,更改完成后如下)
powershell
[root@server yum.repos.d]# vim /etc/yum.repos.d/zabbix.repo
[root@server yum.repos.d]# cat /etc/yum.repos.d/zabbix.repo
[zabbix]
name=Zabbix Official Repository - $basearch
baseurl=https://mirrors.aliyun.com/zabbix/zabbix/7.0/rocky/9/$basearch/
enabled=1
gpgcheck=1
gpgkey=file:///etc/pki/rpm-gpg/RPM-GPG-KEY-ZABBIX-B5333005

[zabbix-non-supported]
name=Zabbix Official Repository non-supported - $basearch
baseurl=https://mirrors.aliyun.com/zabbix/non-supported/rhel/9/$basearch/
enabled=1
gpgkey=file:///etc/pki/rpm-gpg/RPM-GPG-KEY-ZABBIX-08EFA7DD
gpgcheck=1

[zabbix-sources]
name=Zabbix Official Repository source code - $basearch
baseurl=https://repo.zabbix.com/zabbix/7.0/rocky/9/SRPMS
enabled=0
gpgkey=file:///etc/pki/rpm-gpg/RPM-GPG-KEY-ZABBIX-B5333005
gpgcheck=1
3、安装zabbix server、web前端、agent
powershell
[root@server ~]# yum install zabbix-server-mysql zabbix-web-mysql zabbix-nginx-conf zabbix-sql-scripts zabbix-selinux-policy zabbix-agent -y
[root@server ~]# rpm -q zabbix-server-mysql
zabbix-server-mysql-7.0.19-release1.el9.x86_64
[root@server ~]# rpm -q zabbix-web-mysql
zabbix-web-mysql-7.0.19-release1.el9.noarch
[root@server ~]# rpm -q zabbix-nginx-conf
zabbix-nginx-conf-7.0.19-release1.el9.noarch
[root@server ~]# rpm -q zabbix-sql-scripts
zabbix-sql-scripts-7.0.19-release1.el9.noarch
[root@server ~]# rpm -q zabbix-selinux-policy
zabbix-selinux-policy-7.0.19-release1.el9.x86_64
[root@server ~]# rpm -q zabbix-agent
zabbix-agent-7.0.19-release1.el9.x86_64
4、配置数据库
(1)安装数据库
powershell
[root@server ~]# yum -y install mariadb-server mariadb
[root@server ~]# systemctl restart mariadb
[root@server ~]# systemctl enable mariadb
Created symlink /etc/systemd/system/mysql.service → /usr/lib/systemd/system/mariadb.service.
Created symlink /etc/systemd/system/mysqld.service → /usr/lib/systemd/system/mariadb.service.
Created symlink /etc/systemd/system/multi-user.target.wants/mariadb.service → /usr/lib/systemd/system/mariadb.service.
(2)启动数据库服务,并初始化数据库
powershell
[root@server ~]# mysql_secure_installation

NOTE: RUNNING ALL PARTS OF THIS SCRIPT IS RECOMMENDED FOR ALL MariaDB
      SERVERS IN PRODUCTION USE!  PLEASE READ EACH STEP CAREFULLY!

In order to log into MariaDB to secure it, we'll need the current
password for the root user. If you've just installed MariaDB, and
haven't set the root password yet, you should just press enter here.

Enter current password for root (enter for none):
OK, successfully used password, moving on...

Setting the root password or using the unix_socket ensures that nobody
can log into the MariaDB root user without the proper authorisation.

You already have your root account protected, so you can safely answer 'n'.

Switch to unix_socket authentication [Y/n] y
Enabled successfully!
Reloading privilege tables..
 ... Success!


You already have your root account protected, so you can safely answer 'n'.

Change the root password? [Y/n] y
New password:
Re-enter new password:
Password updated successfully!
Reloading privilege tables..
 ... Success!


By default, a MariaDB installation has an anonymous user, allowing anyone
to log into MariaDB without having to have a user account created for
them.  This is intended only for testing, and to make the installation
go a bit smoother.  You should remove them before moving into a
production environment.

Remove anonymous users? [Y/n] y
 ... Success!

Normally, root should only be allowed to connect from 'localhost'.  This
ensures that someone cannot guess at the root password from the network.

Disallow root login remotely? [Y/n] n
 ... skipping.

By default, MariaDB comes with a database named 'test' that anyone can
access.  This is also intended only for testing, and should be removed
before moving into a production environment.

Remove test database and access to it? [Y/n] y
 - Dropping test database...
 ... Success!
 - Removing privileges on test database...
 ... Success!

Reloading the privilege tables will ensure that all changes made so far
will take effect immediately.

Reload privilege tables now? [Y/n] y
 ... Success!

Cleaning up...

All done!  If you've completed all of the above steps, your MariaDB
installation should now be secure.

Thanks for using MariaDB!
(3)配置数据库并导入zabbix表数据
powershell
[root@server ~]# mysql -uroot -predhat
Welcome to the MariaDB monitor.  Commands end with ; or \g.
Your MariaDB connection id is 12
Server version: 10.5.16-MariaDB MariaDB Server

Copyright (c) 2000, 2018, Oracle, MariaDB Corporation Ab and others.

Type 'help;' or '\h' for help. Type '\c' to clear the current input statement.

MariaDB [(none)]> create database zabbix character set utf8mb4 collate utf8mb4_bin;
Query OK, 1 row affected (0.002 sec)

MariaDB [(none)]> create user zabbix@localhost identified by 'redhat';
Query OK, 0 rows affected (0.003 sec)

MariaDB [(none)]> grant all privileges on zabbix.* to zabbix@localhost;
Query OK, 0 rows affected (0.001 sec)

MariaDB [(none)]> set global log_bin_trust_function_creators = 1;
Query OK, 0 rows affected (0.000 sec)

MariaDB [(none)]> flush privileges;
Query OK, 0 rows affected (0.001 sec)

MariaDB [(none)]> show databases;
+--------------------+
| Database           |
+--------------------+
| information_schema |
| mysql              |
| performance_schema |
| zabbix             |
+--------------------+
4 rows in set (0.001 sec)

MariaDB [(none)]> exit
Bye
[root@server ~]# zcat /usr/share/zabbix-sql-scripts/mysql/server.sql.gz | mysql --default-character-set=utf8mb4 -uzabbix -predhat zabbix
[root@server ~]# mysql -uroot -predhat
Welcome to the MariaDB monitor.  Commands end with ; or \g.
Your MariaDB connection id is 14
Server version: 10.5.16-MariaDB MariaDB Server

Copyright (c) 2000, 2018, Oracle, MariaDB Corporation Ab and others.

Type 'help;' or '\h' for help. Type '\c' to clear the current input statement.

MariaDB [(none)]> show databases;
+--------------------+
| Database           |
+--------------------+
| information_schema |
| mysql              |
| performance_schema |
| zabbix             |
+--------------------+
4 rows in set (0.001 sec)

MariaDB [(none)]> use zabbix;
Reading table information for completion of table and column names
You can turn off this feature to get a quicker startup with -A

Database changed
MariaDB [zabbix]> show tables;
+----------------------------+
| Tables_in_zabbix           |
+----------------------------+
| acknowledges               |
| actions                    |
| alerts                     |
| auditlog                   |
| autoreg_host               |
| changelog                  |
......
......
(4)导入数据库架构后禁用log_bin_trust_function_creators选项
powershell
MariaDB [zabbix]> set global log_bin_trust_function_creators = 0;
Query OK, 0 rows affected (0.000 sec)

MariaDB [zabbix]> flush privileges;
Query OK, 0 rows affected (0.002 sec)

MariaDB [zabbix]> exit
Bye
5、配置zabbix并启动服务
powershell
[root@server ~]# vim /etc/zabbix/zabbix_server.conf
ListenPort=10051       //取消注释
DBHost=localhost         //取消注释
DBName=zabbix            //取消注释
DBUser=zabbix             //取消注释
DBPassword=redhat              //设置密码
DBSocket=/var/lib/mysql/mysql.sock    //设置路径
ListenIP=0.0.0.0         //取消注释

//编辑配置文件 /etc/nginx/conf.d/zabbix.conf 取消注释并设置"listen"和"server_name"指令
[root@server ~]# vim /etc/nginx/conf.d/zabbix.conf
        listen          8080;          //取消注释
        server_name     example.com;        //取消注释

//启动zabbix-server zabbix-agent nginx php-fpm服务
[root@server ~]# systemctl restart zabbix-server zabbix-agent nginx php-fpm
[root@server ~]# systemctl enable zabbix-server zabbix-agent nginx php-fpm
Created symlink /etc/systemd/system/multi-user.target.wants/zabbix-server.service → /usr/lib/systemd/system/zabbix-server.service.
Created symlink /etc/systemd/system/multi-user.target.wants/zabbix-agent.service → /usr/lib/systemd/system/zabbix-agent.service.
Created symlink /etc/systemd/system/multi-user.target.wants/nginx.service → /usr/lib/systemd/system/nginx.service.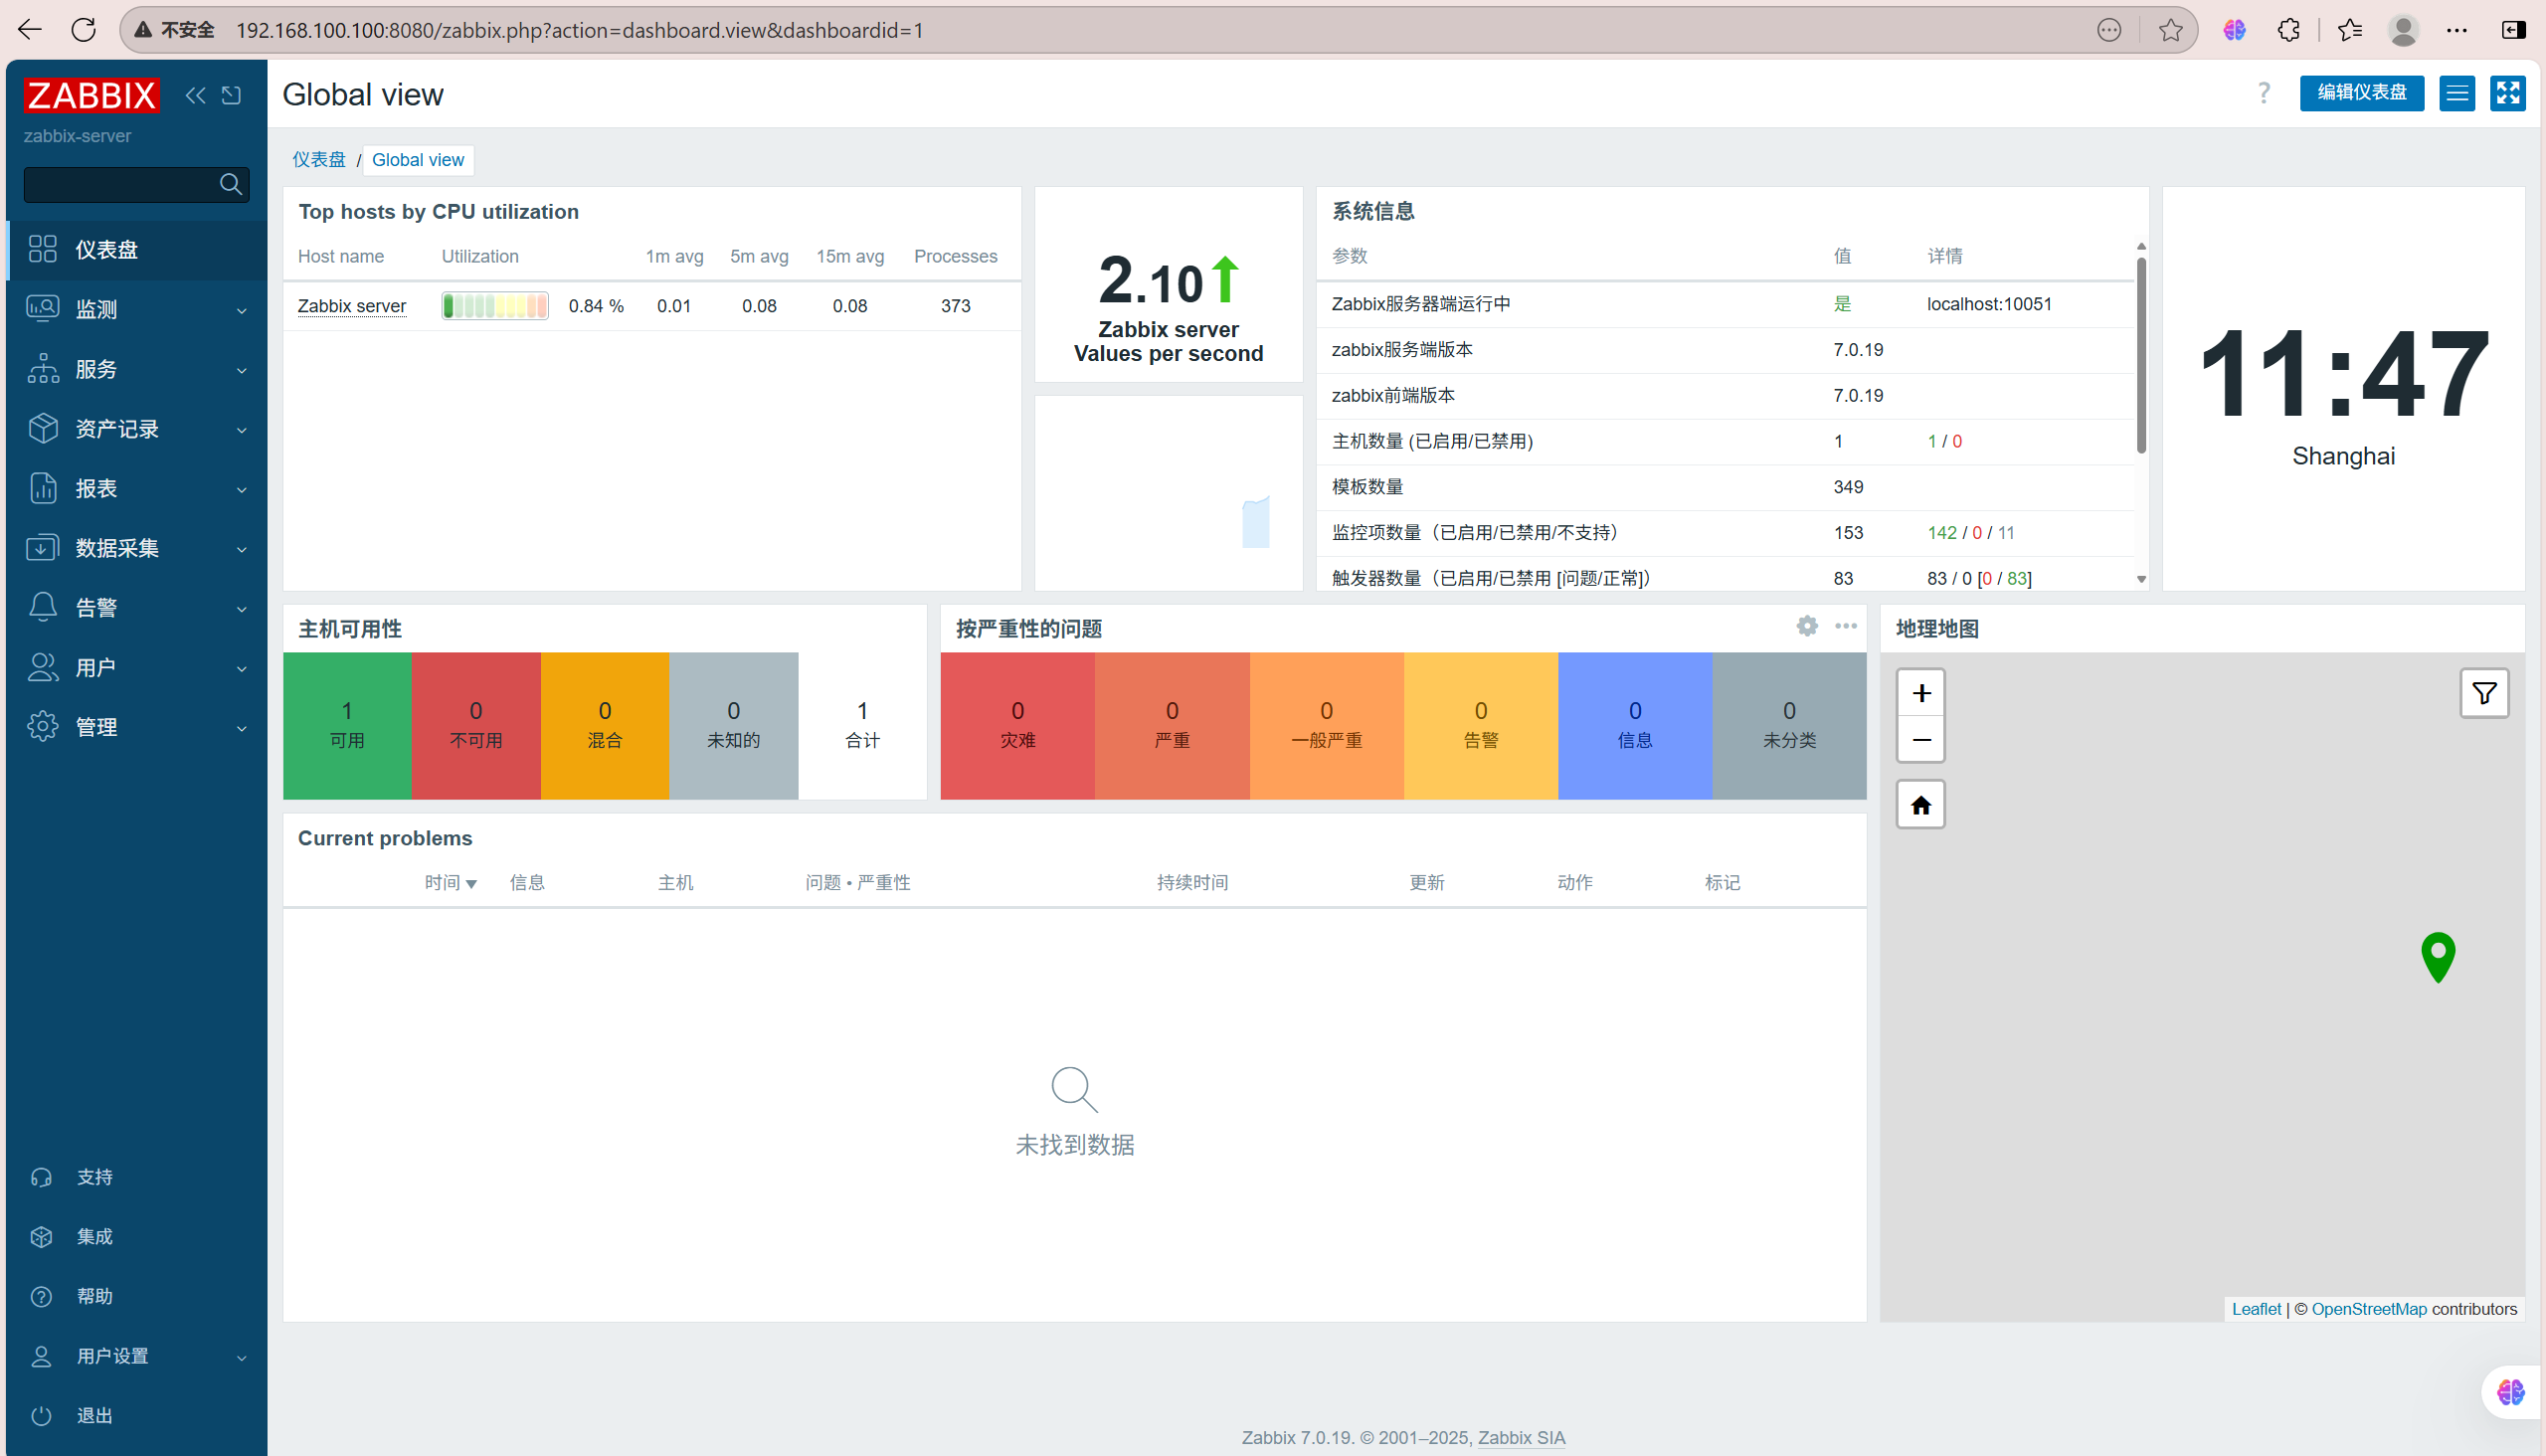
Created symlink /etc/systemd/system/multi-user.target.wants/php-fpm.service → /usr/lib/systemd/system/php-fpm.service.6、浏览器访问http://192.168.100.100:8080
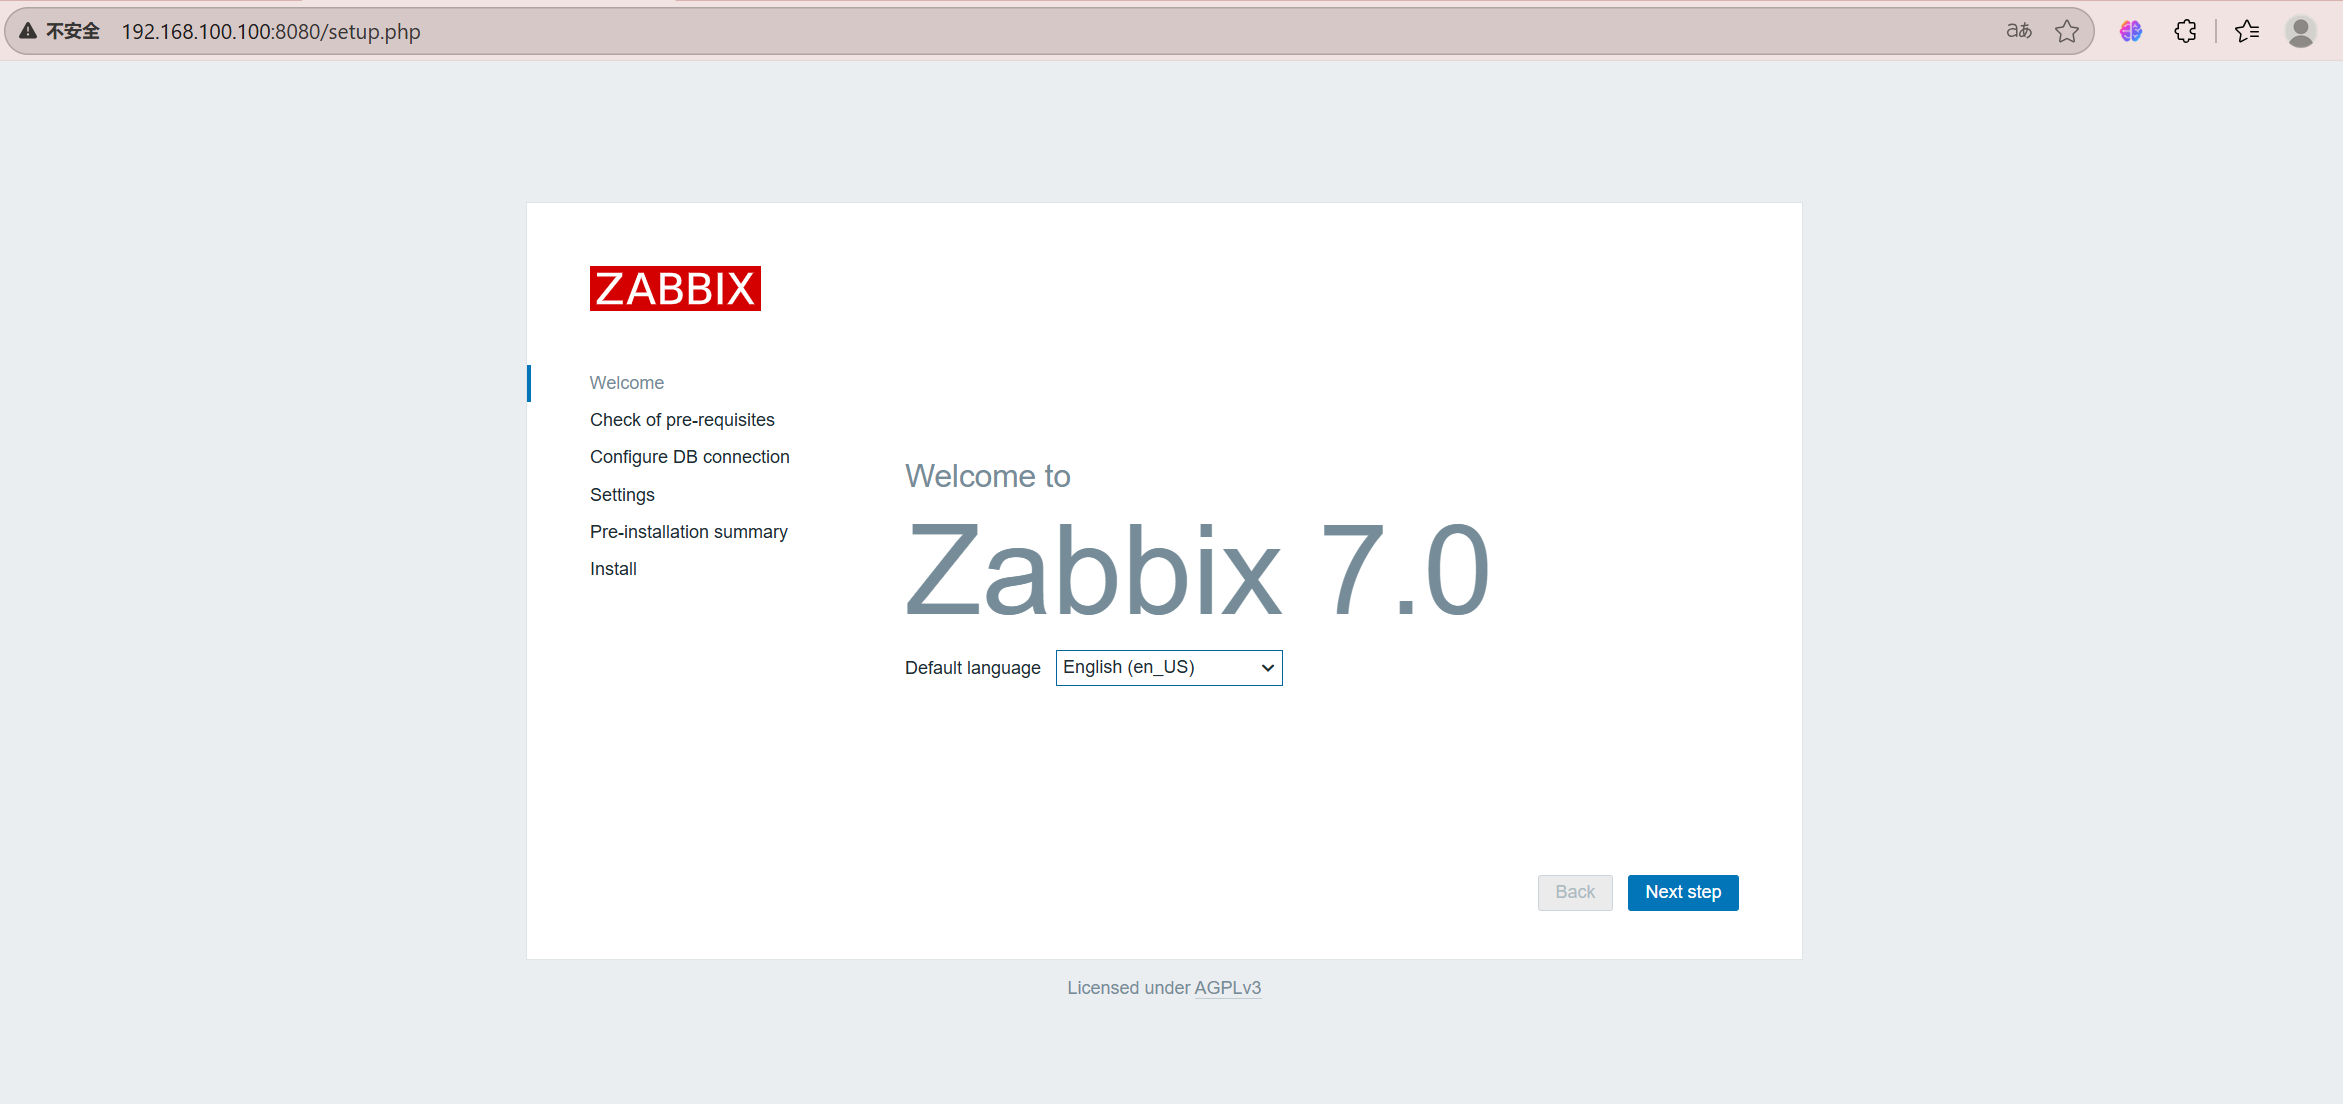
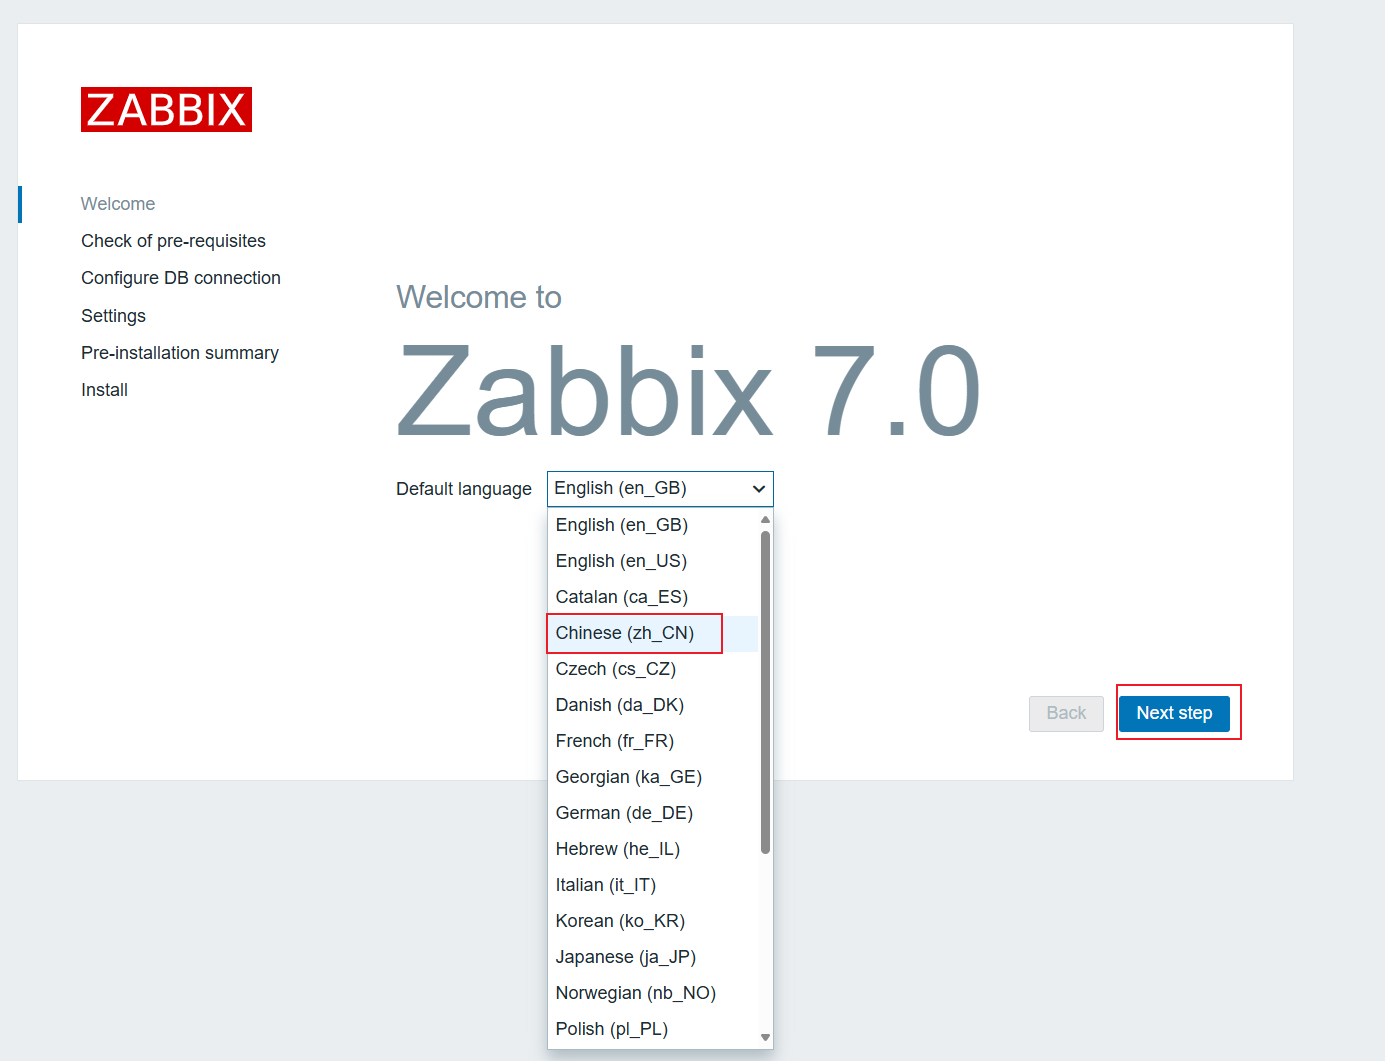
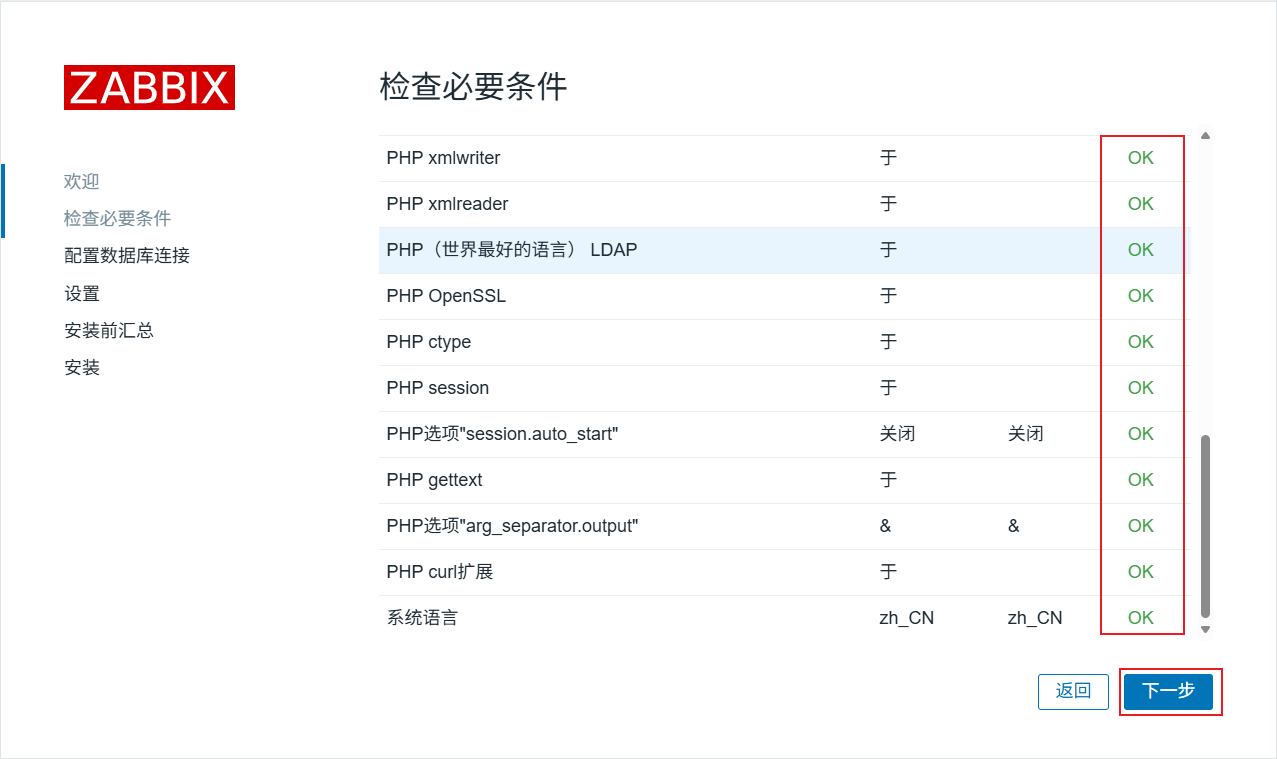
检查是否都OK,然后下一步
数据库端口,密码为redhat

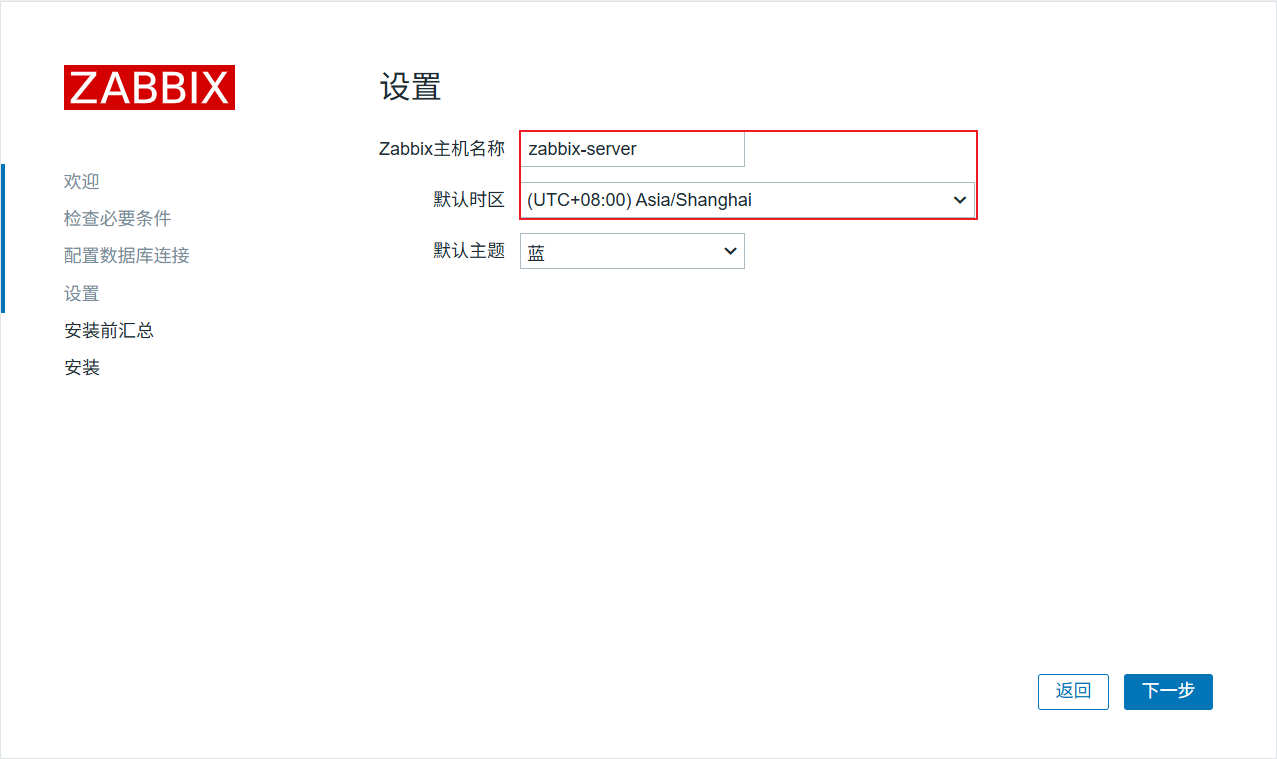
主机名称自定义,时区选择亚洲上海
默认账号为Admin,密码为zabbix
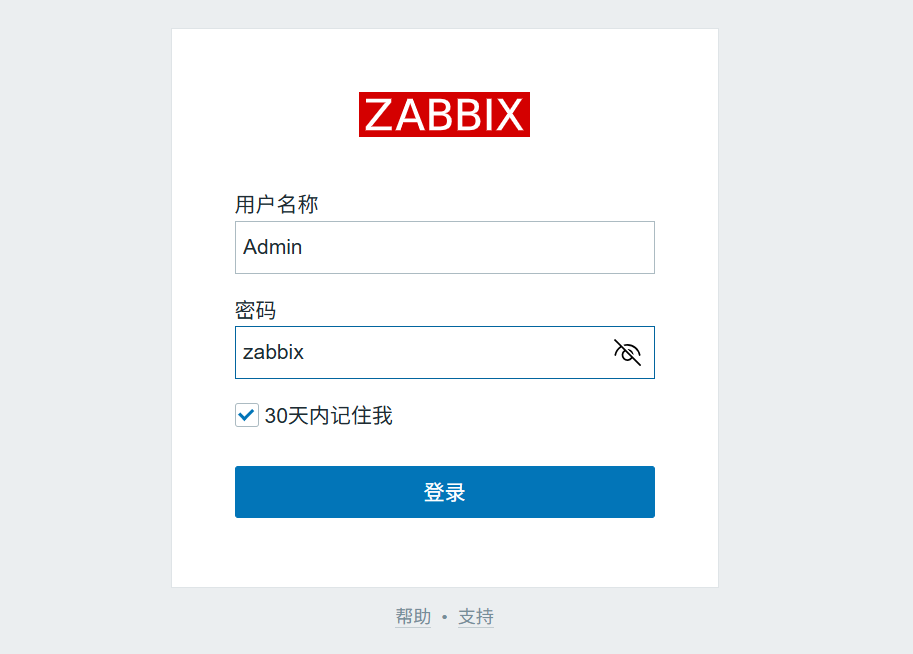
成功登录
7、解决中文乱码问题
1、找到windows下的简体 楷体 常规字体 C:\Windows\Fonts
2、将简体 楷体 常规字体文件复制出来(复制到桌面)
3、上传到Linux系统中的/usr/share/zabbix/assets/fonts (可以直接拖进去)
4、替换原先的字体文件即可 mv simkai.ttf graphfont.ttf
powershell
[root@server ~]# cd /usr/share/zabbix/assets/fonts/
[root@server fonts]# ls
graphfont.ttf zabbix-icons.ttf zabbix-icons.woff2
zabbix-icons.svg zabbix-icons.woff
[root@server fonts]# rz -E
rz waiting to receive.
[root@server fonts]# ls
graphfont.ttf zabbix-icons.svg zabbix-icons.woff
simkai.ttf zabbix-icons.ttf zabbix-icons.woff2
[root@server fonts]# mv simkai.ttf graphfont.ttf
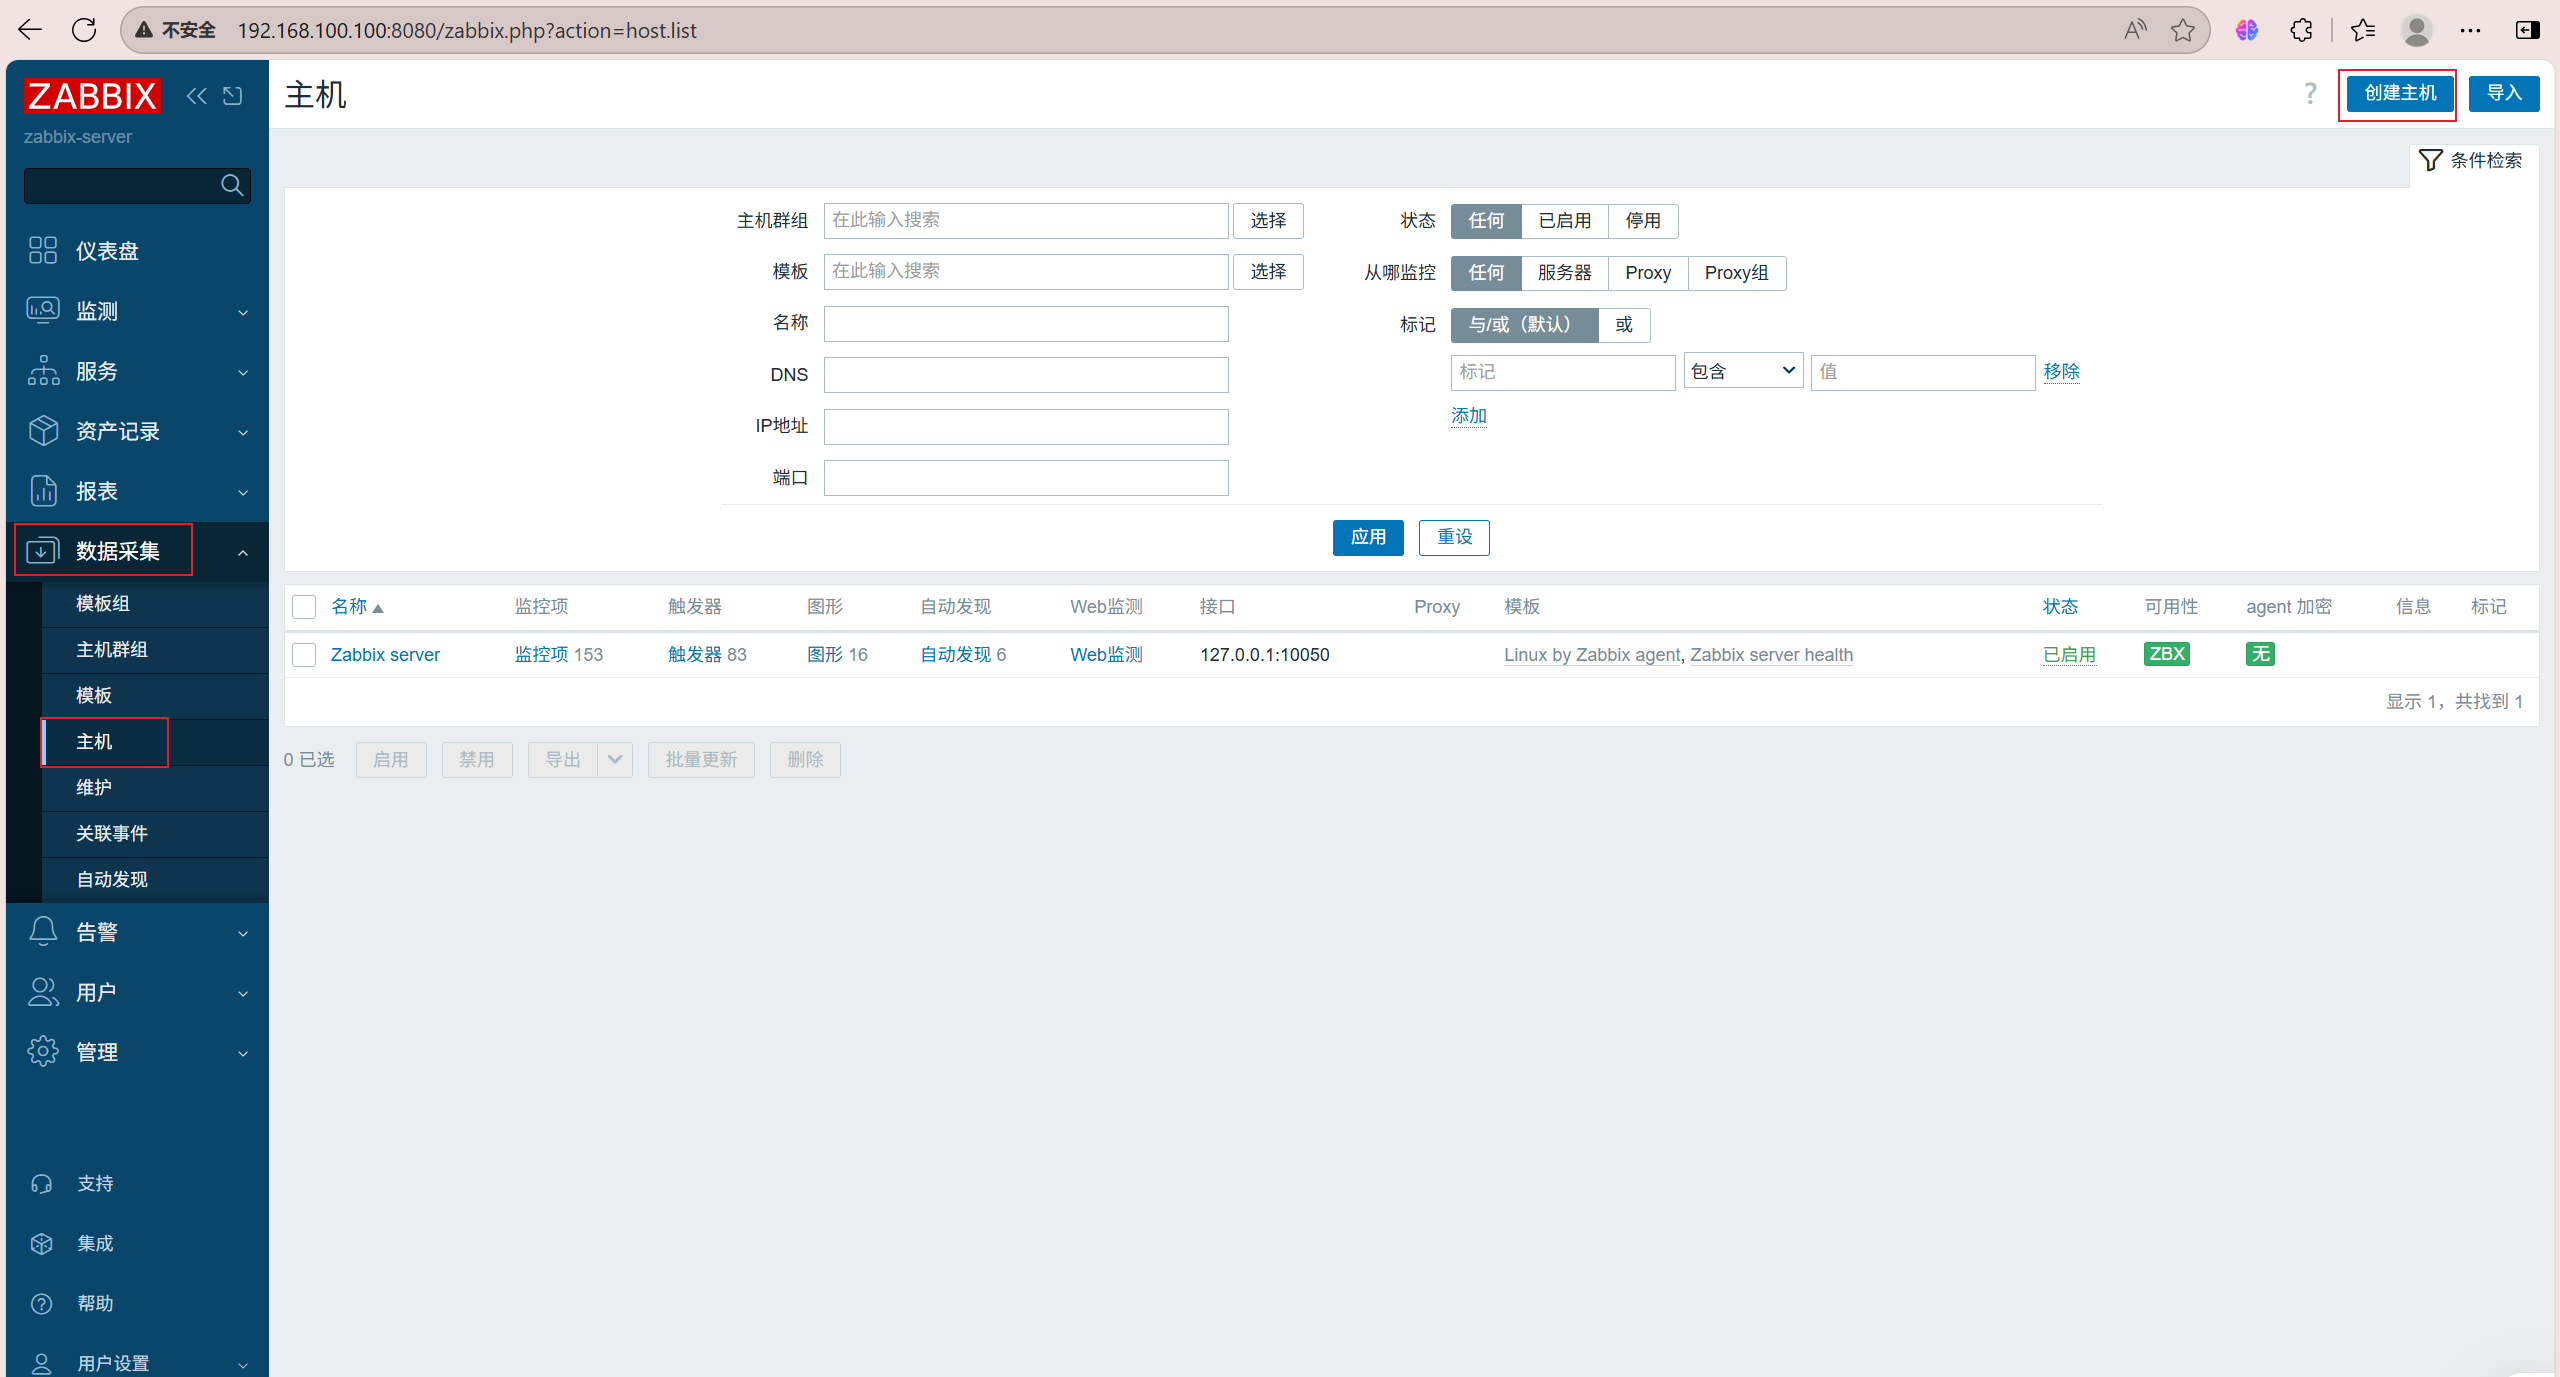
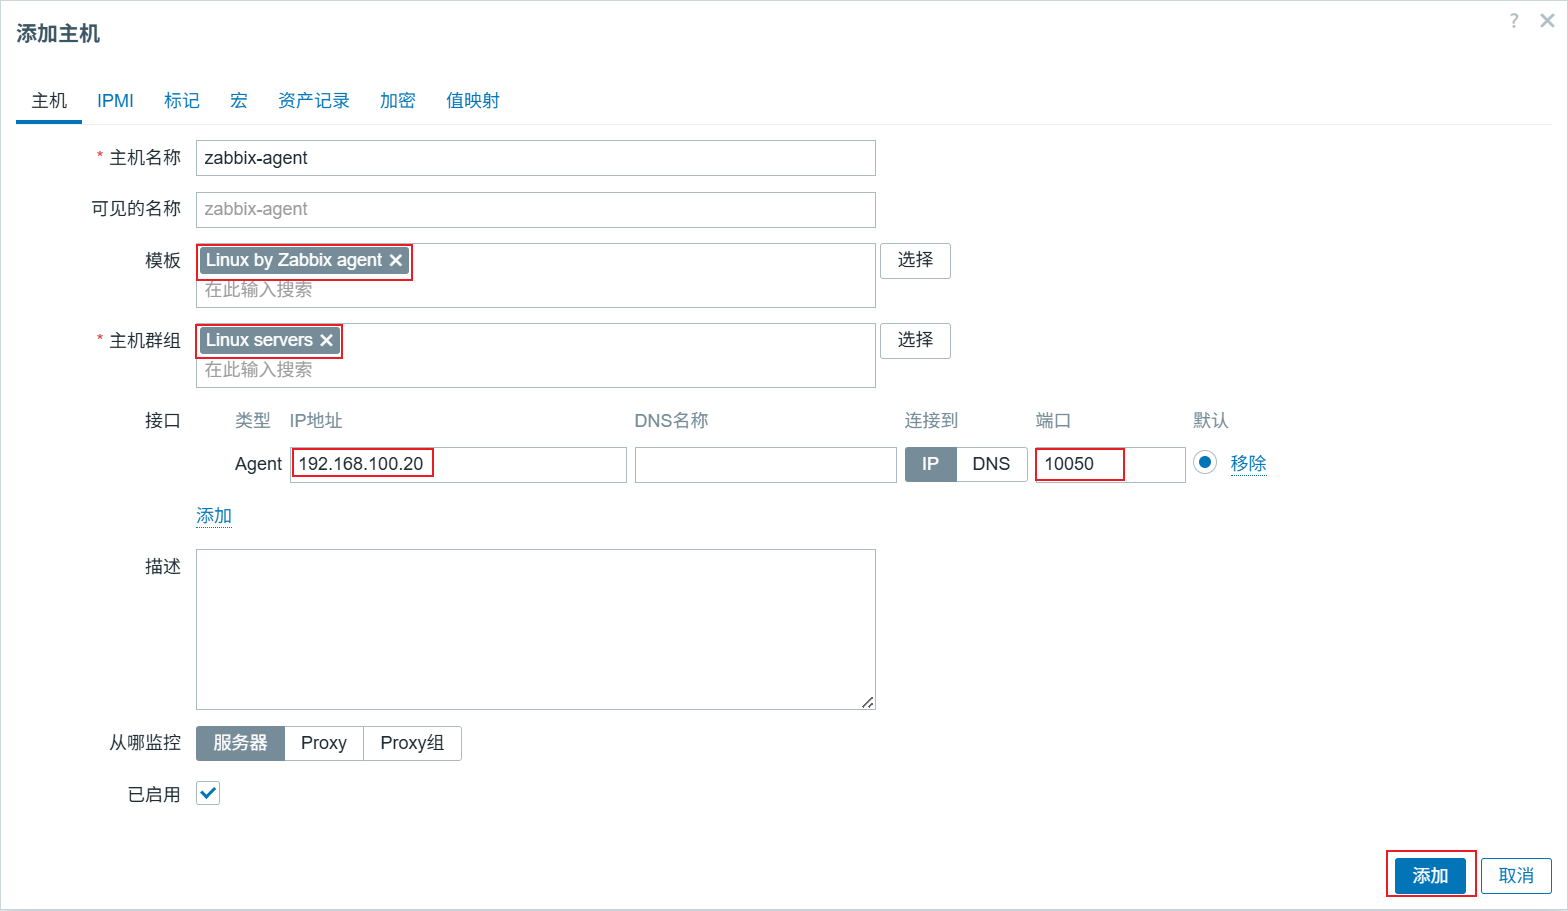
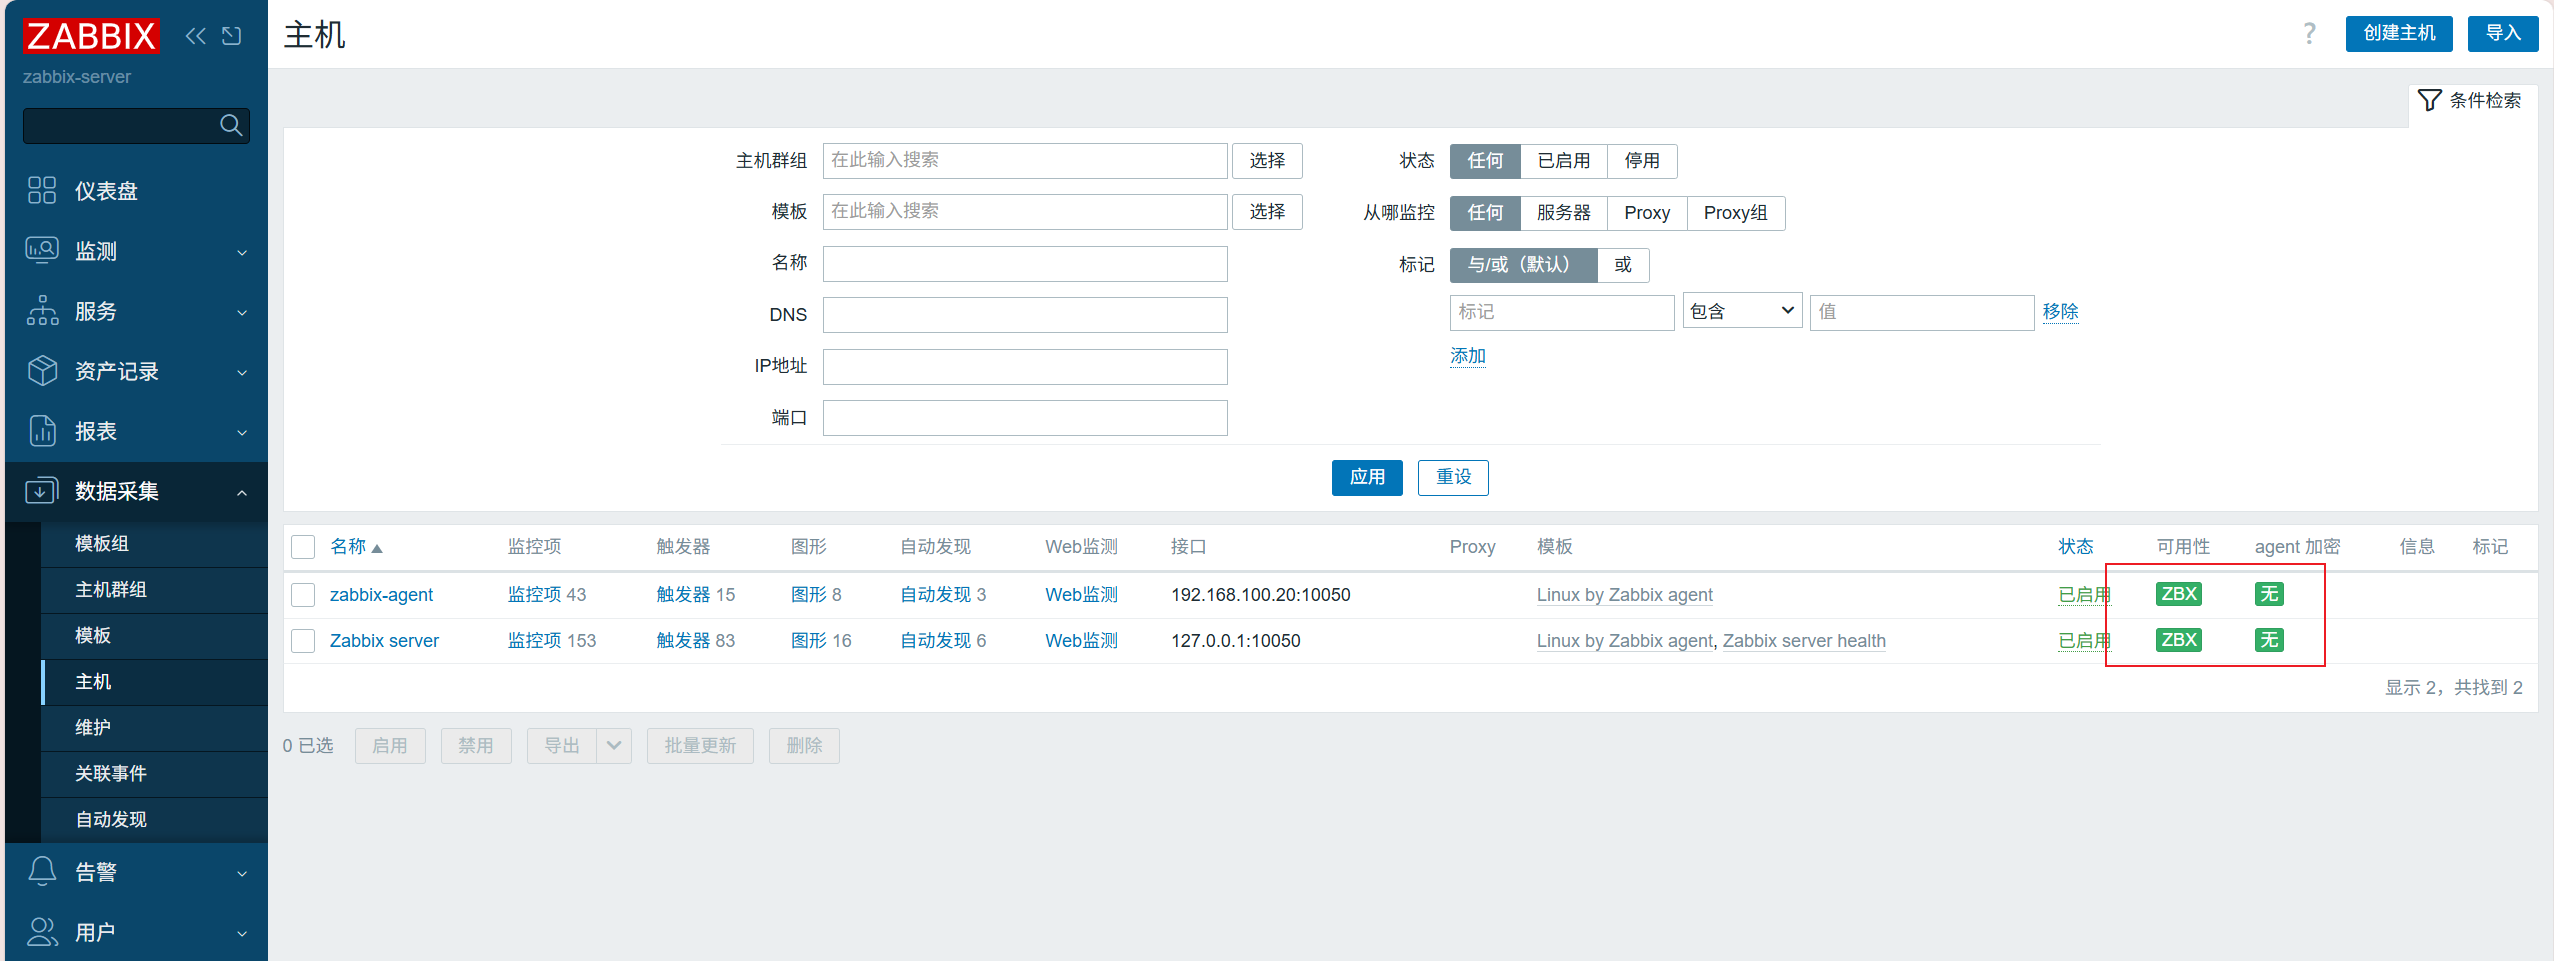
mv: overwrite 'graphfont.ttf'? y8、监控远程Linux服务器
(1)防火墙selinux关闭,能够与外网通信,配置网络源
powershell
[root@stw2 ~]# systemctl status firewalld.service
● firewalld.service - firewalld - dynamic firewall daemon
Loaded: loaded (/usr/lib/systemd/system/firewalld.service; disabled; vendor preset: enabled)
Active: inactive (dead)
Docs: man:firewalld(1)
[root@stw2 ~]# getenforce
Disabled
[root@stw2 ~]# ping www.baidu.com
PING www.a.shifen.com (183.2.172.177) 56(84) bytes of data.
64 bytes from 183.2.172.177 (183.2.172.177): icmp_seq=1 ttl=128 time=24.4 ms
64 bytes from 183.2.172.177 (183.2.172.177): icmp_seq=2 ttl=128 time=31.5 ms
^C
--- www.a.shifen.com ping statistics ---
2 packets transmitted, 2 received, 0% packet loss, time 1002ms
rtt min/avg/max/mdev = 24.495/28.039/31.583/3.544 ms
[root@stw2 ~]# cd /etc/yum.repos.d/
[root@stw2 yum.repos.d]# ls
CentOS-Base.repo CentOS-Debuginfo.repo CentOS-Media.repo CentOS-Vault.repo
CentOS-CR.repo CentOS-fasttrack.repo CentOS-Sources.repo
[root@stw2 yum.repos.d]# rm -rf *
[root@stw2 yum.repos.d]# wget -O /etc/yum.repos.d/CentOS-Base.repo https://mirrors.aliyun.com/repo/Centos-7.repo
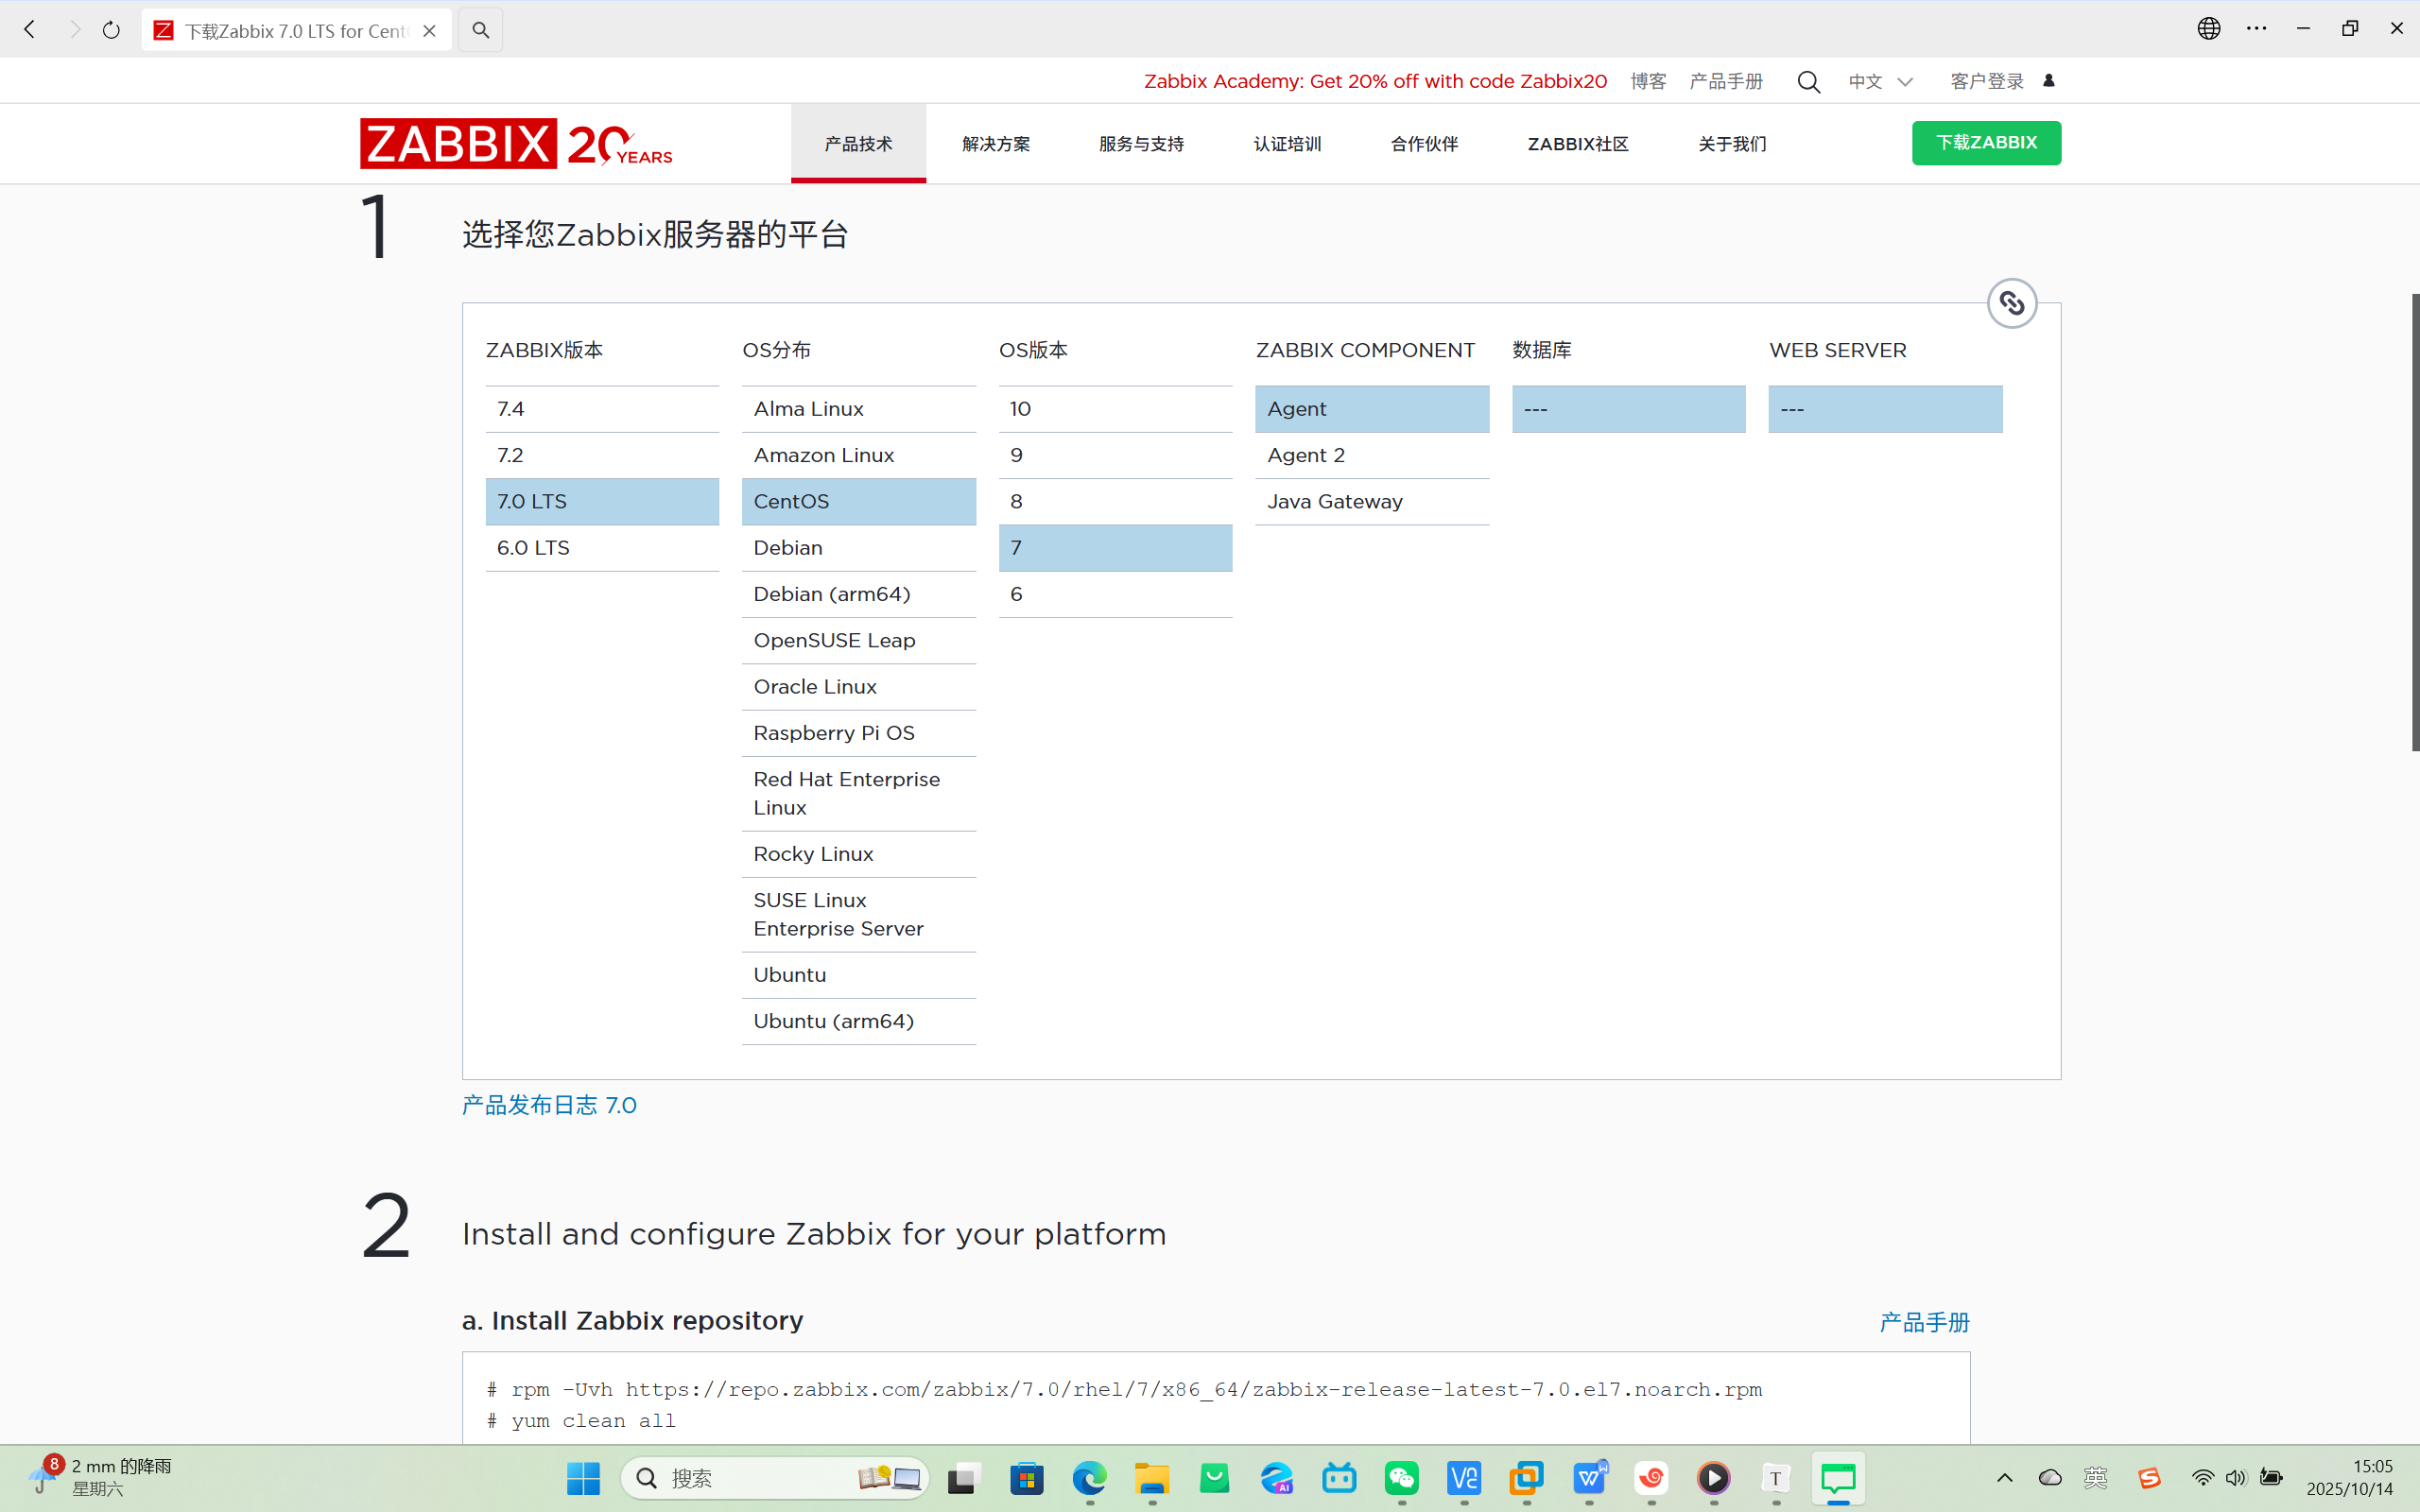
[root@stw2 yum.repos.d]# yum -y install epel-release(2)根据官网,下载zabbix-agent之前先下载rpm -Uvh https://repo.zabbix.com/zabbix/7.0/rhel/7/x86_64/zabbix-release-latest-7.0.el7.noarch.rpm
powershell
[root@stw2 ~]# rpm -Uvh https://repo.zabbix.com/zabbix/7.0/rhel/7/x86_64/zabbix-release-latest-7.0.el7.noarch.rpm
Retrieving https://repo.zabbix.com/zabbix/7.0/rhel/7/x86_64/zabbix-release-latest-7.0.el7.noarch.rpm
warning: /var/tmp/rpm-tmp.fSSPQm: Header V4 RSA/SHA512 Signature, key ID b5333005: NOKEY
Preparing...                          ################################# [100%]
Updating / installing...
   1:zabbix-release-7.0-5.el7         ################################# [100%]
[root@stw2 ~]# cd /etc/yum.repos.d/
[root@stw2 yum.repos.d]# ls
CentOS-Base.repo  epel.repo  epel-testing.repo  zabbix.repo
[root@stw2 yum.repos.d]# yum -y install zabbix-agent
(3)修改配置文件
powershell
[root@stw2 ~]# vim /etc/zabbix/zabbix_agentd.conf
//将127.0.0.1更换
Server=192.168.100.100 				zabbix服务器的IP,agent被动监控(默认模式)
ServerActive=192.168.100.100 			zabbix服务器的IP,agent主动监控
Hostname=zabbix-agent

[root@stw2 ~]# systemctl restart zabbix-agent
[root@stw2 ~]# systemctl enable zabbix-agent
Created symlink from /etc/systemd/system/multi-user.target.wants/zabbix-agent.service to /usr/lib/systemd/system/zabbix-agent.service.
[root@stw2 ~]# hostnamectl set-hostname zabbix-agent.example.com
[root@stw2 ~]# bash
[root@zabbix-agent ~]#