文章目录
一、绘制文本
OpenCV 绘制文本主要使用函数 cv::putText()。
cpp
void cv::putText(
    cv::Mat& img,                 // 输入图像
    const std::string& text,      // 要绘制的文字
    cv::Point org,                // 起始位置(左下角)
    int fontFace,                 // 字体类型
    double fontScale,             // 字体缩放比例(越大字越大)
    cv::Scalar color,             // 颜色(B,G,R)
    int thickness = 1,            // 线宽
    int lineType = LINE_8,        // 线型,常用 LINE_AA 抗锯齿
    bool bottomLeftOrigin = false // true时y轴反向
);
常用字体类型(fontFace):
- FONT_HERSHEY_SIMPLEX:普通无衬线字体(最常用)
- FONT_HERSHEY_PLAIN:小号字体
- FONT_HERSHEY_DUPLEX:普通字体(比 SIMPLEX 稍粗)
- FONT_HERSHEY_COMPLEX:复杂字体
- FONT_HERSHEY_TRIPLEX:更复杂的字体
- FONT_HERSHEY_COMPLEX_SMALL:小号复杂字体
- FONT_HERSHEY_SCRIPT_SIMPLEX:手写体
- FONT_HERSHEY_SCRIPT_COMPLEX:复杂手写体
示例代码:
cpp
#include <opencv2/opencv.hpp>
using namespace cv;

int main() {
    // 创建黑色背景图像
    Mat img = Mat::zeros(Size(800, 400), CV_8UC3);

    // 在图像上绘制不同字体文字
    putText(img, "FONT_HERSHEY_SIMPLEX", Point(50, 50),
            FONT_HERSHEY_SIMPLEX, 1.0, Scalar(255, 255, 255), 2, LINE_AA);

    putText(img, "FONT_HERSHEY_COMPLEX", Point(50, 100),
            FONT_HERSHEY_COMPLEX, 1.0, Scalar(0, 255, 0), 2, LINE_AA);

    putText(img, "FONT_HERSHEY_SCRIPT_SIMPLEX", Point(50, 150),
            FONT_HERSHEY_SCRIPT_SIMPLEX, 1.2, Scalar(0, 255, 255), 2, LINE_AA);

    // 绘制红色数字
    putText(img, "12345", Point(50, 220),
            FONT_HERSHEY_DUPLEX, 2.0, Scalar(0, 0, 255), 3, LINE_AA);

    // 显示结果
    imshow("OpenCV Text Demo", img);
    waitKey(0);
    return 0;
}
OpenCV 自带的 putText() 不支持中文,因为它的字体库只支持 ASCII。
要绘制中文文字,可以使用以下方式之一:
- Qt 或 Windows GDI 绘制文字(结合 QImage / HDC);
- 使用 cv::freetype 模块(需要额外安装 FreeType 支持);
- 将中文先转为图像(例如用 QPainter 或 Pillow),再贴回 OpenCV 图像。
例如使用 FreeType 支持中文:
cpp
#include <opencv2/opencv.hpp>
#include <opencv2/freetype.hpp>
using namespace cv;

int main() {
    Mat img = Mat::zeros(Size(800, 400), CV_8UC3);

    // 创建 FreeType 字体渲染器(需要 freetype 模块)
    Ptr<freetype::FreeType2> ft2 = freetype::createFreeType2();
    ft2->loadFontData("C:/Windows/Fonts/simhei.ttf", 0);  // 黑体字体路径

    ft2->putText(img, "你好,OpenCV!", Point(50, 200),
                 60, Scalar(0, 255, 255), FILLED, LINE_AA, false);

    imshow("Chinese Text Demo", img);
    waitKey(0);
    return 0;
}
二、绘制直线
在 OpenCV 中绘制直线一般使用 cv::line 函数;它的函数原型如下。
函数原型:
cpp
void cv::line(
    cv::InputOutputArray img,     // 要绘制的图像
    cv::Point pt1,                // 直线起点
    cv::Point pt2,                // 直线终点
    const cv::Scalar& color,      // 直线颜色 (B, G, R)
    int thickness = 1,            // 线宽,默认1
    int lineType = cv::LINE_8,    // 线型,8连通/4连通/抗锯齿
    int shift = 0                 // 小数点位数,用于亚像素坐标
);
示例代码:
cpp
#include <opencv2/opencv.hpp>
using namespace cv;
int main()
{
// 创建一张黑色背景图像
Mat image = Mat::zeros(400, 400, CV_8UC3);
// 起点和终点
Point pt1(50, 50);
Point pt2(350, 350);
// 绘制一条红色直线
line(image, pt1, pt2, Scalar(0, 0, 255), 2, LINE_AA);
// 显示图像
imshow("Line Example", image);
waitKey(0);
return 0;
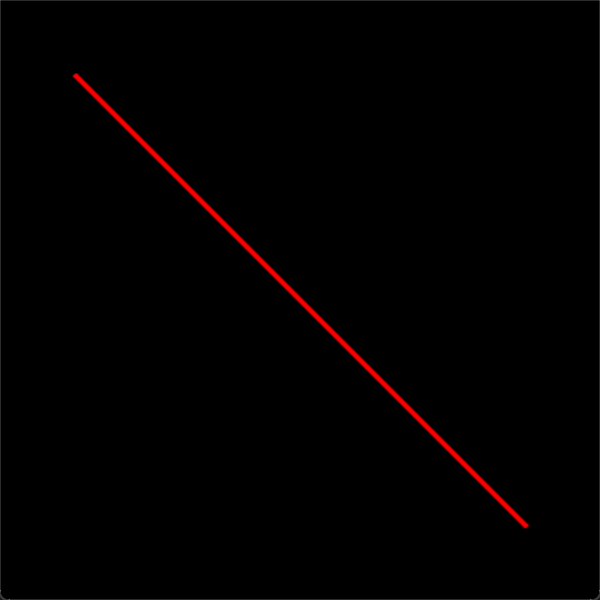
}输出结果:
三、绘制矩形
在 OpenCV 里绘制矩形使用 cv::rectangle 函数;函数原型如下。
函数原型:
cpp
void cv::rectangle(
    cv::InputOutputArray img,     // 要绘制的图像
    cv::Point pt1,                // 矩形左上角点
    cv::Point pt2,                // 矩形右下角点
    const cv::Scalar& color,      // 颜色 (B, G, R)
    int thickness = 1,            // 线宽,-1 表示填充
    int lineType = cv::LINE_8,    // 线型
    int shift = 0                 // 小数点位数(亚像素坐标用)
);
示例代码:
cpp
#include <opencv2/opencv.hpp>
using namespace cv;
int main()
{
// 创建一张黑色背景图像
Mat image = Mat::zeros(400, 400, CV_8UC3);
// 定义矩形的两个对角点
Point pt1(50, 50); // 左上角
Point pt2(300, 300); // 右下角
// 绘制绿色矩形边框
rectangle(image, pt1, pt2, Scalar(0, 255, 0), 2, LINE_AA);
// 绘制一个填充的蓝色矩形
rectangle(image, Point(100, 100), Point(200, 200), Scalar(255, 0, 0), -1);
// 显示图像
imshow("Rectangle Example", image);
waitKey(0);
return 0;
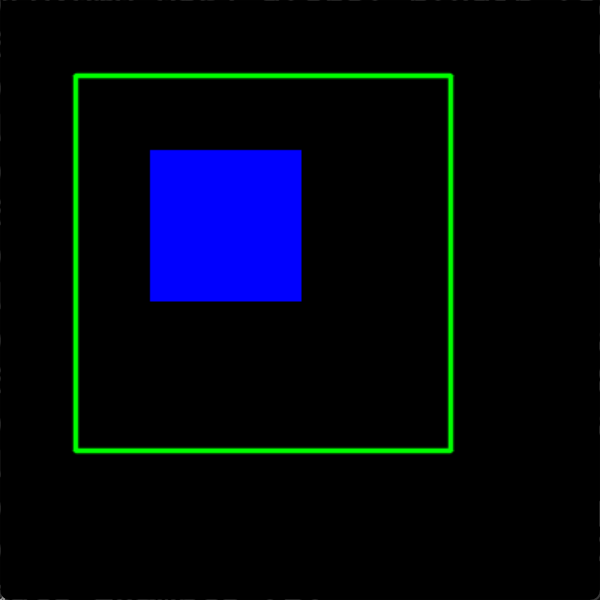
}输出结果如下:
四、绘制圆形
在 OpenCV 中绘制圆形可以使用 cv::circle 函数;下面是你详细说明用法和示例,
函数原型:
cpp
void cv::circle(
    cv::InputOutputArray img,  // 要绘制的图像
    cv::Point center,          // 圆心坐标
    int radius,                // 半径
    const cv::Scalar& color,   // 颜色 (B,G,R)
    int thickness = 1,         // 线宽,-1 表示填充
    int lineType = cv::LINE_8, // 线型(8连通/4连通/抗锯齿)
    int shift = 0              // 坐标小数点位数
);
示例代码:
cpp
#include <opencv2/opencv.hpp>
using namespace cv;
int main()
{
// 创建黑色背景图
Mat image = Mat::zeros(400, 400, CV_8UC3);
// 绘制边框圆(红色,线宽2)
circle(image, Point(200, 200), 100, Scalar(0, 0, 255), 2, LINE_AA);
// 绘制填充圆(蓝色)
circle(image, Point(200, 200), 50, Scalar(255, 0, 0), -1, LINE_AA);
imshow("Circle Example", image);
waitKey(0);
return 0;
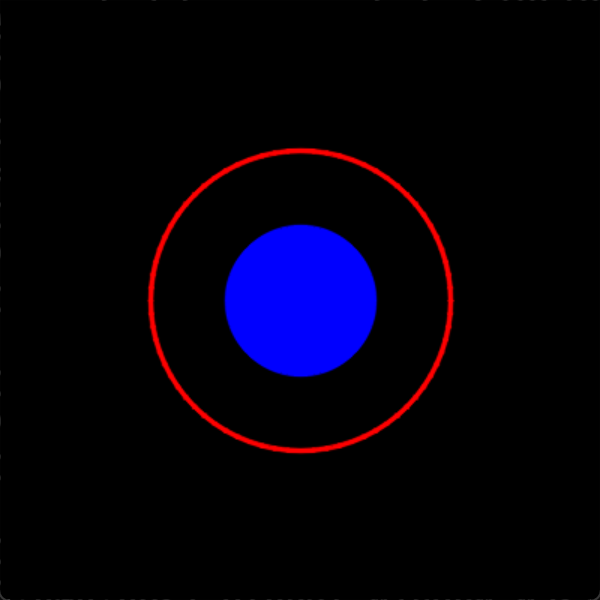
}输出结果如下:
五、绘制椭圆形
在 OpenCV 中绘制椭圆形可以使用 cv::ellipse 函数;下面是详细说明用法和示例。
函数原型:
cpp
void cv::ellipse(
    cv::InputOutputArray img,     // 要绘制的图像
    cv::Point center,             // 椭圆中心
    cv::Size axes,                // 椭圆长轴和短轴的一半 (width/2, height/2)
    double angle,                 // 椭圆旋转角度(逆时针,以 x 轴为基准)
    double startAngle,            // 椭圆弧起始角度
    double endAngle,              // 椭圆弧结束角度
    const cv::Scalar& color,      // 颜色 (B, G, R)
    int thickness = 1,            // 线宽,-1 表示填充
    int lineType = cv::LINE_8,    // 线型(8连通/4连通/抗锯齿)
    int shift = 0                 // 坐标小数点位数
);
示例代码:
cpp
#include <opencv2/opencv.hpp>
using namespace cv;
int main()
{
// 创建黑色背景图
Mat image = Mat::zeros(400, 400, CV_8UC3);
// 绘制边框椭圆(绿色,线宽2)
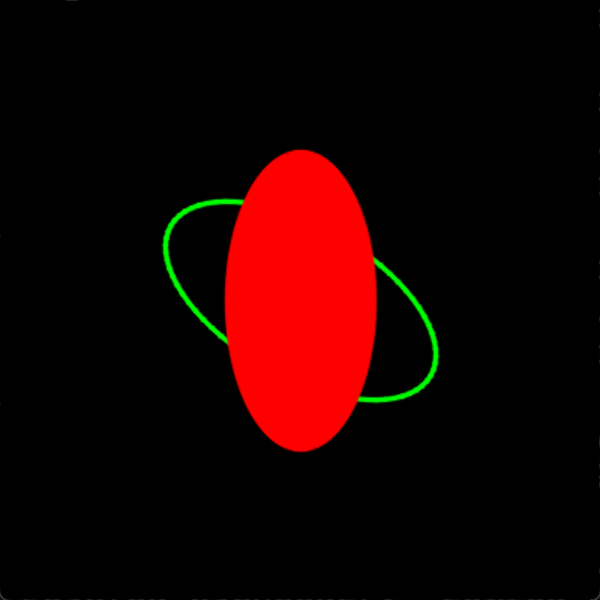
ellipse(image, Point(200, 200), Size(100, 50), 30, 0, 360, Scalar(0, 255, 0), 2, LINE_AA);
// 绘制填充椭圆(红色)
ellipse(image, Point(200, 200), Size(50, 100), 0, 0, 360, Scalar(0, 0, 255), -1, LINE_AA);
imshow("Ellipse Example", image);
waitKey(0);
return 0;
}输出结果如下所示:
六、绘制多边形
绘制多边形边框:cv::polylines
cpp
void cv::polylines(
cv::InputOutputArray img, // 要绘制的图像
const std::vector<std::vector<cv::Point>>& pts, // 多边形点集合
bool isClosed, // 是否闭合
const cv::Scalar& color, // 颜色 (B, G, R)
int thickness = 1, // 线宽
int lineType = cv::LINE_8, // 线型
int shift = 0 // 坐标小数点位数
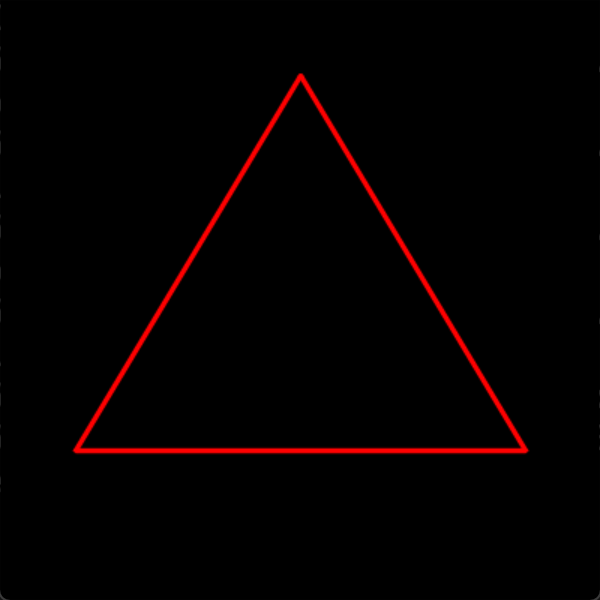
);示例:绘制闭合三角形
cpp
#include <opencv2/opencv.hpp>
using namespace cv;

int main()
{
    Mat image = Mat::zeros(400, 400, CV_8UC3);

    std::vector<Point> triangle = { Point(50, 300), Point(200, 50), Point(350, 300) };

    // 注意 polylines 需要一个 vector<vector<Point>>
    polylines(image, std::vector<std::vector<Point>>{triangle}, true, Scalar(0, 0, 255), 2, LINE_AA);

    imshow("Polygon Example", image);
    waitKey(0);
    return 0;
}
输出结果如下所示:
填充多边形:cv::fillPoly
cpp
void cv::fillPoly(
cv::InputOutputArray img,
const std::vector<std::vector<cv::Point>>& pts,
const cv::Scalar& color,
int lineType = LINE_8,
int shift = 0,
Point offset = Point()
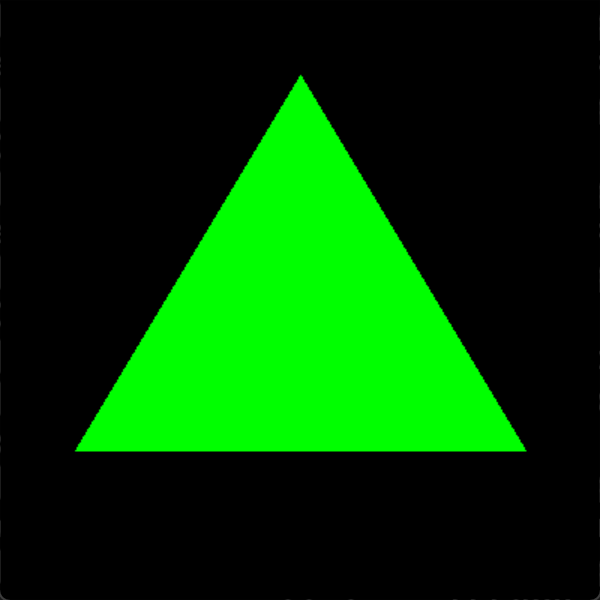
);示例:填充三角形
cpp
#include <opencv2/opencv.hpp>
using namespace cv;

int main()
{
    Mat image = Mat::zeros(400, 400, CV_8UC3);

    std::vector<Point> triangle = { Point(50, 300), Point(200, 50), Point(350, 300) };

    fillPoly(image, std::vector<std::vector<Point>>{triangle}, Scalar(0, 255, 0));

    imshow("Filled Polygon Example", image);
    waitKey(0);
    return 0;
}
输出结果如下所示:
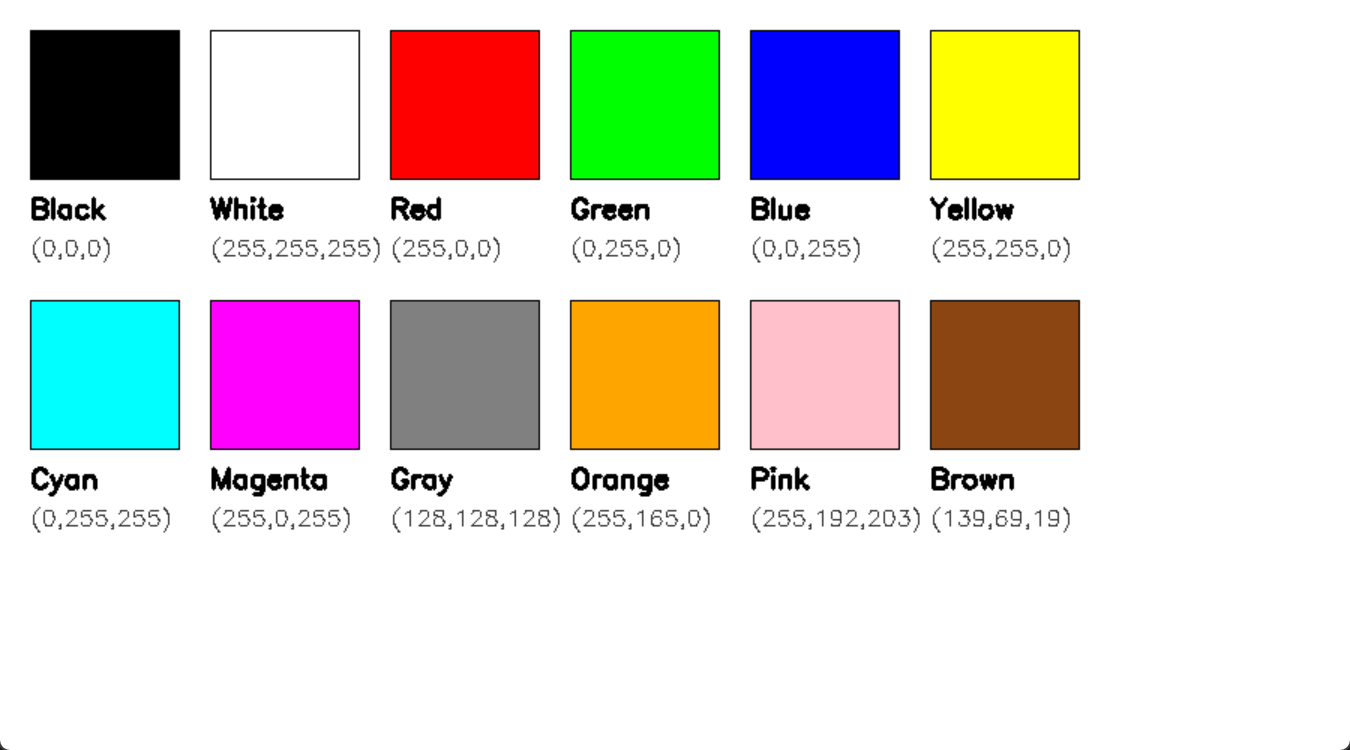
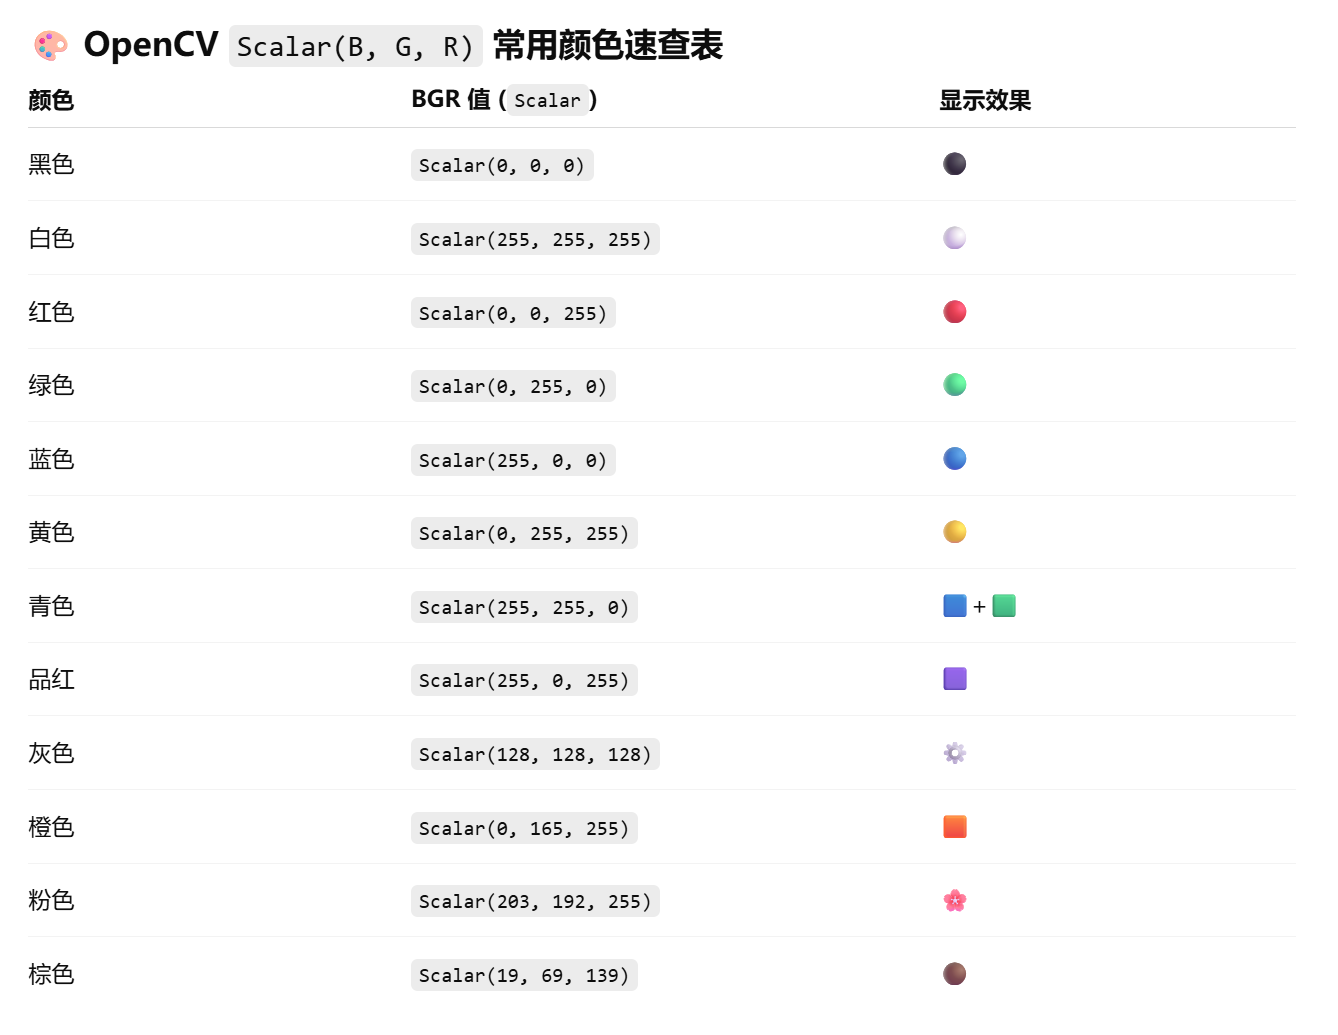
七、常用颜色速查表
注意:OpenCV 使用的是 BGR 顺序(不是 RGB)。
示例代码:
cpp
#include <opencv2/opencv.hpp>
using namespace cv;
using namespace std;

// 宏:按直觉方式写 RGB(r,g,b)
#define RGB(r, g, b) cv::Scalar((b), (g), (r))

struct ColorDef {
    string name;
    Scalar color;
    int r, g, b;
};

// 全局变量
Mat img;
vector<Rect> colorBlocks;
vector<ColorDef> colors;

// 鼠标回调函数
void onMouse(int event, int x, int y, int, void*)
{
    if (event == EVENT_LBUTTONDOWN)
    {
        for (size_t i = 0; i < colorBlocks.size(); i++)
        {
            if (colorBlocks[i].contains(Point(x, y)))
            {
                string info = colors[i].name + " RGB(" +
                              to_string(colors[i].r) + "," +
                              to_string(colors[i].g) + "," +
                              to_string(colors[i].b) + ")";
                cout << "You clicked: " << info << endl;

                // 修改窗口标题
							setWindowTitle("RGB Color Palette - " + info, "RGB Color Palette - " + info);
                break;
            }
        }
    }
}

int main()
{
    // 初始化颜色表
    colors = {
        {"Black",   RGB(0, 0, 0),       0,   0,   0},
        {"White",   RGB(255, 255, 255), 255, 255, 255},
        {"Red",     RGB(255, 0, 0),     255, 0,   0},
        {"Green",   RGB(0, 255, 0),     0,   255, 0},
        {"Blue",    RGB(0, 0, 255),     0,   0,   255},
        {"Yellow",  RGB(255, 255, 0),   255, 255, 0},
        {"Cyan",    RGB(0, 255, 255),   0,   255, 255},
        {"Magenta", RGB(255, 0, 255),   255, 0,   255},
        {"Gray",    RGB(128, 128, 128), 128, 128, 128},
        {"Orange",  RGB(255, 165, 0),   255, 165, 0},
        {"Pink",    RGB(255, 192, 203), 255, 192, 203},
        {"Brown",   RGB(139, 69, 19),   139, 69,  19}
    };

    int width = 900, height = 500;
    img = Mat(height, width, CV_8UC3, Scalar(255, 255, 255));

    int blockSize = 100; // 色块大小
    int margin = 20;     // 边距

    // 绘制调色板
    for (size_t i = 0; i < colors.size(); i++)
    {
        int row = i / 6;  // 每行 6 个
        int col = i % 6;

        int x = margin + col * (blockSize + margin);
        int y = margin + row * (blockSize + 80);

        Rect rect(x, y, blockSize, blockSize);
        colorBlocks.push_back(rect);

        // 绘制色块
        rectangle(img, rect, colors[i].color, FILLED);

        // 边框
        rectangle(img, rect, Scalar(0, 0, 0), 1);

        // 显示颜色名
        putText(img, colors[i].name, Point(x, y + blockSize + 25),
                FONT_HERSHEY_SIMPLEX, 0.6, Scalar(0, 0, 0), 2);

        // 显示 RGB 数值
        char rgbText[50];
        sprintf(rgbText, "(%d,%d,%d)", colors[i].r, colors[i].g, colors[i].b);
        putText(img, rgbText, Point(x, y + blockSize + 50),
                FONT_HERSHEY_SIMPLEX, 0.5, Scalar(50, 50, 50), 1);
    }

    // 显示窗口
    namedWindow("RGB Color Palette", WINDOW_AUTOSIZE);
    setMouseCallback("RGB Color Palette", onMouse, nullptr);

    imshow("RGB Color Palette", img);
    waitKey(0);
    return 0;
}
输出结果如下所示: