1、之前的文章提到,我们的系统启动时可设置包含两个分区,一个是FAT32包含系统启动的引导分区、一个是EXT4的文件分区。我们基于Alinx的提供debain8制作了定制化的文件系统。
**那么是否可以用ubuntu来制作文件系统呢?当然是可以的!**本次移植Ubuntu 16.04
https://blog.csdn.net/qq_37912811/article/details/147782010![]() https://blog.csdn.net/qq_37912811/article/details/1477820102、ubuntu-base获取
https://blog.csdn.net/qq_37912811/article/details/1477820102、ubuntu-base获取
Ubuntu的移植非常简单,不需要我们编译任何东西,因为Ubuntu官方已经将根文件系统制作了!我们只需要简单配置一下Ubuntu官方提供的base根文件系统,使其在我们的开发板上跑起来即可。因此我们首先需要下载Ubuntu-base根文件系统。下面是下载地址:
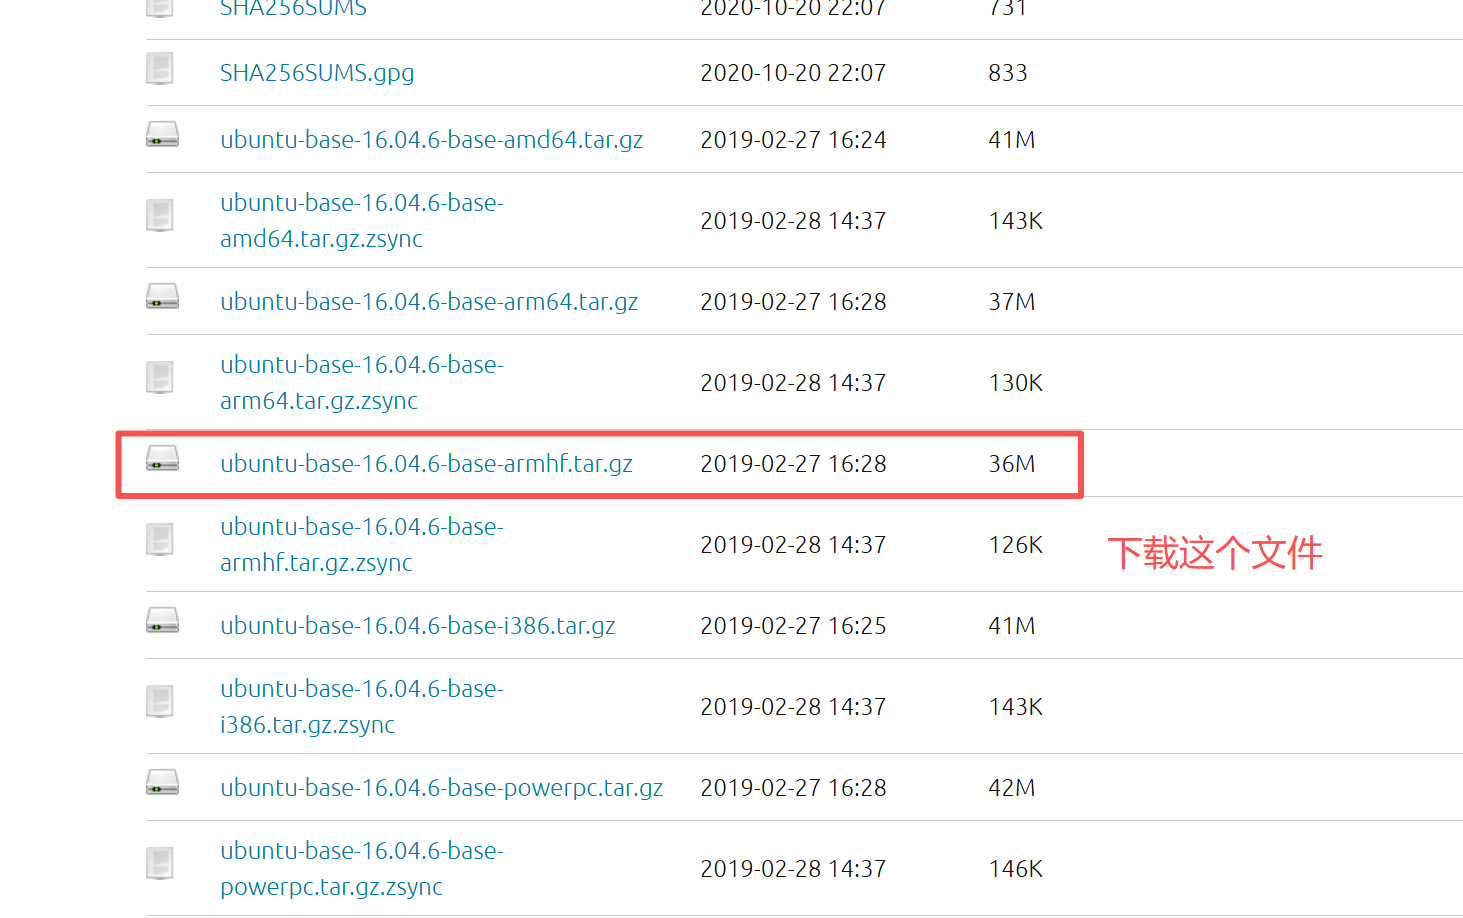
**注意:**Ubuntu针对不同的CPU架构提供相应的ubuntu base根文件系统,有amd64(64位X86)、armhf、i386(32位X86)、powerpc、ppc64el等系统的。ZYNQ的PS端是两个Cortex-A9核的CPU,并且有硬件浮点运算单元,因此选择armhf版本。
3、解压缩ubuntu base根文件系统
在ubuntu系统中,解压该文件到/home/yangzheng/Downloads/ubuntu_rootfs文件夹下
bash
mkdir ubuntu_rootfs
sudo tar -xzf ubuntu-base-16.04.6-base-armhf.tar.gz -C ubuntu_rootfs/
4、在Ubuntu下安装qemu模拟器
我们可以在PC的Ubuntu系统上使用这个工具运行待移植的Ubuntu-base
bash
sudo apt-get install qemu-user-static将刚刚安装的qemu-user-static拷贝到我们解压出来的ubuntu base根文件系统中,也就是ubuntu_rootfs/usr/bin目录下,命令如下:
bash
cd ubuntu_rootfs
sudo cp /usr/bin/qemu-arm-static ./usr/bin/
5、指定ubuntu base根文件系统的软件源
在设置软件源之前先将Ubuntu主机下的DNS配置文件/etc/resolv.conf拷贝到根文件系统中,命令如下:
bash
sudo cp /etc/resolv.conf ./etc/resolv.conf打开ubuntu-base根文件系统的ubuntu_rootfs/etc/apt/sources.list文件(使用vim打开)。首先将此文件中已有的内容全部删除,然后再添加在新的软件源,譬如国内常用的清华源、中科大源等等,这些软件源可以直接在网上查找。
bash
sudo vim sources.list
bash
deb http://mirrors.tuna.tsinghua.edu.cn/ubuntu-ports/ xenial-updates main restricted universe multiverse

deb http://mirrors.tuna.tsinghua.edu.cn/ubuntu-ports/ xenial-security main restricted universe multiverse

deb http://mirrors.tuna.tsinghua.edu.cn/ubuntu-ports/ xenial-backports main restricted universe multiverse

deb http://mirrors.tuna.tsinghua.edu.cn/ubuntu-ports/ xenial-proposed main restricted universe multiverse

deb http://mirrors.tuna.tsinghua.edu.cn/ubuntu-ports/ xenial main restricted universe multiverse
6、Ubuntu上挂在Ubuntu base
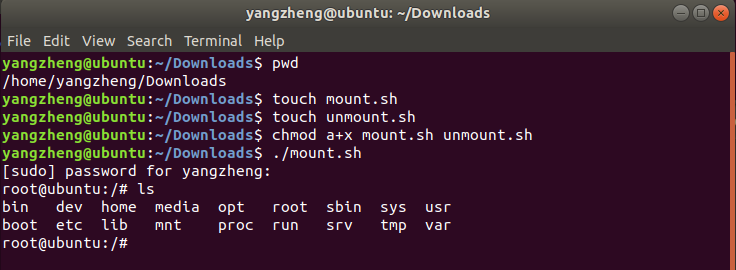
接下来将上面制作的根文件系统挂载的主机上,需要挂载proc、sys、dev、dev/pts等文件系统,最后使用chroot将主机的根文件系统切换到我们前面制作的根文件系统中。这里我们通过两个脚本文件来完成挂载和卸载操作,首先是挂载脚本mount.sh,回到/home/yangzheng/Downloads目录,在该目录下创建一个名为mount.sh的shell脚本
bash
touch mount.sh然后在里面输入如下所示内容:
bash
sudo mount -t proc /proc /home/yangzheng/Downloads/ubuntu_rootfs/proc

sudo mount -t sysfs /sys /home/yangzheng/Downloads/ubuntu_rootfs/sys

sudo mount -o bind /dev /home/yangzheng/Downloads/ubuntu_rootfs/dev

sudo mount -o bind /dev/pts /home/yangzheng/Downloads/ubuntu_rootfs/dev/pts

sudo chroot /home/yangzheng/Downloads/ubuntu_rootfs
命令当中使用到的路径信息,大家根据自己的实际情况进行配置即可!mount.sh脚本编写完成之后,再创建一个名为unmount.sh的卸载脚本文件
bash
touch unmount.sh在里面输入如下所示内容:
bash
sudo umount /home/yangzheng/Downloads/ubuntu_rootfs/dev/pts

sudo umount /home/yangzheng/Downloads/ubuntu_rootfs/dev

sudo umount /home/yangzheng/Downloads/ubuntu_rootfs/sys

sudo umount /home/yangzheng/Downloads/ubuntu_rootfs/proc
最后给予mount.sh和unmount.sh这两个shell脚本可执行权限,命令如下:
bash
chmod a+x mount.sh unmount.sh7、在主机上挂载Ubuntu base
将制作的根文件系统挂载到主机下,输入如下命令:
bash
./mount.sh挂载成功如下所示:
(1)安装常用的命令和软件
bash
sudo apt update
sudo apt install sudo vim net-tools ethtool ifupdown wireless-tools rsyslog htop iputils-ping udhcpc wget make -y

# 安装 SSH 服务 (多次尝试,不然可能会失败!)
sudo apt-get update
sudo apt-get -f install
sudo apt-get install openssh-server

# 忽略网络服务
sudo systemctl mask networking.service

# 安装perl
sudo apt-get update
sudo apt-get install perl libperl-dev build-essential
必须配置网络服务,否则启动时自检非常慢!
(2)设置开机启动SSH服务、TCF服务
- 手动在
/etc/rc.local中添加启动命令
编辑 /etc/rc.local(如果不存在就创建):
bash
sudo vim /etc/rc.local写入内容
bash
#!/bin/sh -e
# start SSH
/etc/init.d/ssh start
exit 0
添加权限
bash
sudo chmod +x /etc/rc.local安装TCF服务
(3)必须添加一个用户
Ubuntu-base根文件系统默认只有一个root用户,后面我们移植到开发板启动的时候,直接登录root用户是登录不上去的,我也不知道为什么。所以这里我们需要添加一个普通用户,执行下面这条命令添加一个名为zynq的普通用户:
bash
adduser zynq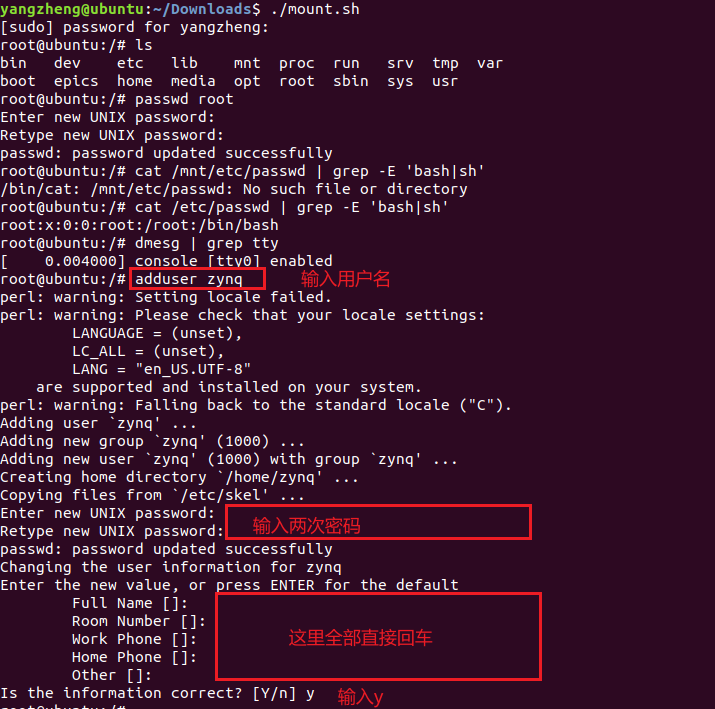
用户添加完成之后,需要设置zynq用户可以使用sudo命令,也就是该用户可以使用root用户的身份执行相应的命令,我们需要修改/etc/sudoers文件,首先打开该文件。
bash
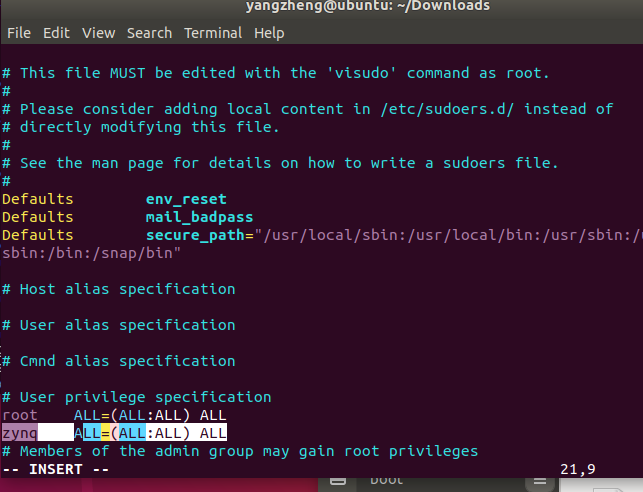
vim /etc/sudoers找到"root ALL=(ALL:ALL) ALL"这一行,在该行下面添加"zynq ALL=(ALL:ALL) ALL",如下所示:
(4)设置本机名称和IP地址
bash
echo "ALIENTEK-ZYNQ" > /etc/hostname

echo "127.0.0.1 localhost" >> /etc/hosts

echo "127.0.1.1 ALIENTEK-ZYNQ" >> /etc/hosts
(5)配置串口终端和网络dhcp
ubuntu根文件系统在开发板上启动以后我们通常也希望串口终端正常工作。首先确定自己所使用的串口设备文件,假设的USB调试串口对应的设备文件为ttyPS0,我们需要添加一个名为getty@ttyPS0.service的链接,链接到getty@.service服务上,输入如下命令:
bash
ln -s /lib/systemd/system/getty@.service /etc/systemd/system/getty.target.wants/getty@ttyPS0.service设置好以后接下来我们需要配置开发板启动之后能够打开网络设备、启用网络功能,使用网线将开发板网口连接到路由器,开机启动实现自动分配ip地址,打开/etc/network/interfaces配置文件,注释掉"source-directory /etc/network/interfaces.d"行,并添加如下内容:
bash
auto eth0
# 动态IP
iface eth0 inet dhcp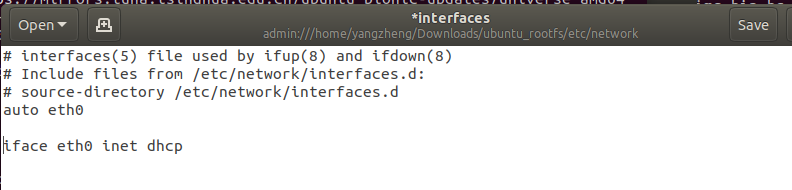
8、整个ubuntu-base根文件系统到这里就构建、配置完成了,退出ubuntu-base根文件系统了,输入如下命令退出:
bash
exit

./unmount.sh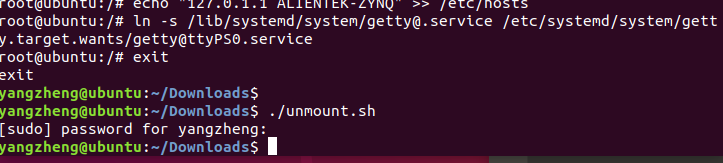
9、将ubuntu_rootfs目录下所有文件拷贝到SD卡的ext4分区
bash
sudo rm -rfd /media/yangzheng/rootfs/* //首先删除SD启动卡根文件系统分区原有的内容


sudo cp -a ./ubuntu_rootfs/* /media/yangzheng/rootfs/ //拷贝ubuntu_rootfs目录下的所有文件到ext4分区


sync  //同步
10、制作boot.bin与image.ub
(1)切记需要将PL侧的USB0打开,不然没有串口。
(2)build后将两个文件移动至SD卡的FAT分区下。
11、启动系统
(1)将SD卡插入最小系统板
(2)等待系统自检
(3)输入用户名:zynq
(4)输入密码:root
(5)由于关闭了网络服务,因此在开机时需要输入网络命令才可以上网:
bash
#  192.168.137.68是你开发板的IP
sudo ifconfig eth0 192.168.137.68 netmask 255.255.255.0 up

#  192.168.137.1是你的一个可以上网的IP
sudo ip route add default via 192.168.137.1

# 验证网络
ping 8.8.8.8
12、进入系统安装epics7.0.5
https://blog.csdn.net/qq_37912811/article/details/147769028![]() https://blog.csdn.net/qq_37912811/article/details/147769028下载7.0.5版本epics
https://blog.csdn.net/qq_37912811/article/details/147769028下载7.0.5版本epics
bash
#下载epics
cd /.

mkdir epics

cd /epics/

wget https://epics.anl.gov/download/base/base-7.0.5.tar.gz
bash
#解压并重命名

tar vxfz base-7.0.5.tar.gz

mv base-7.0.5 base
需要注意的就是时间和权限问题,其余过程一样。
bash
# 设置统一时间
sudo find . -type f -exec touch {} +

# 再次编译
make

# 为zynq用户加入文件夹修改权限
sudo chown -R zynq:zynq /epics/base
13、文件系统我已经给大家移植好了,欢迎下载!