前言
ApplicationWindow是一个已经具备基础ui的窗口,和Window同样都是顶层窗口,如果希望实现标题栏、菜单栏这种快速开发的导航功能的话可以选择它。
StackView是一种可以将任意QML页面进行堆栈压入的多层显示窗口,适用于需要进行翻页等操作的场景。
一、ApplicationWindow
ApplicationWindow 是 QtQuick.Controls 2 给你的"成品主窗口"------自带标题栏、菜单栏、工具栏、状态栏、键盘焦点链、平台窗口生命周期信号,不需要再包一层 Window,直接当根节点用。
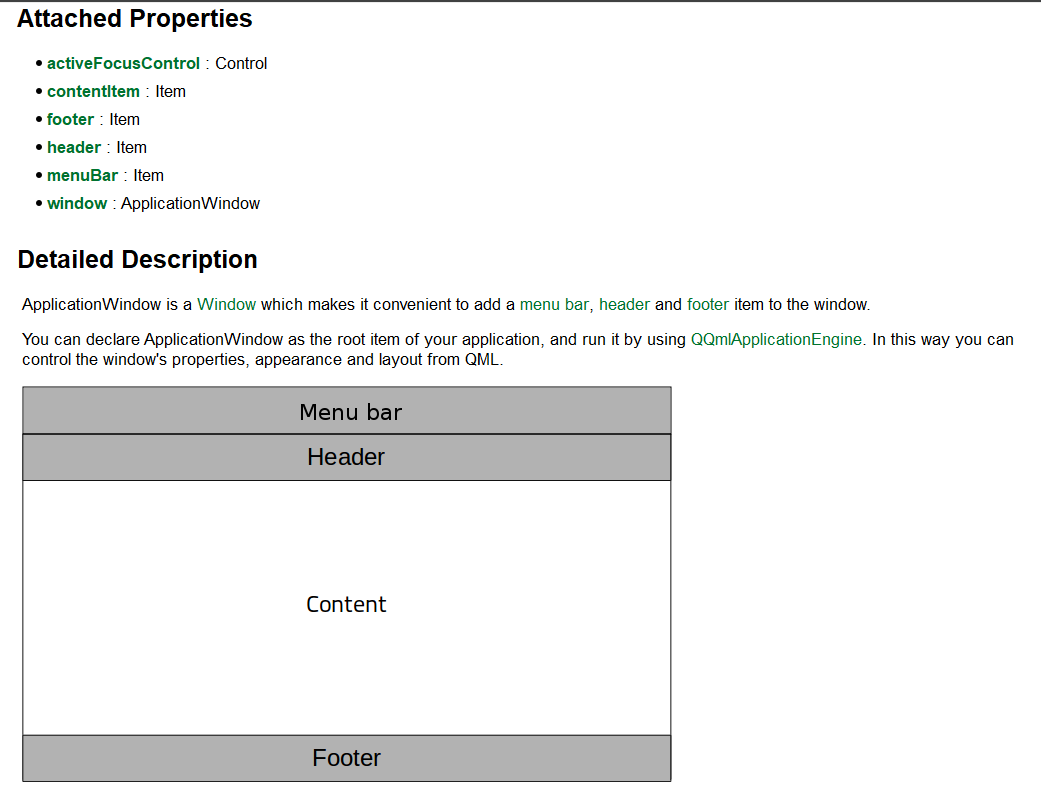
ApplicationWindow是一个窗口,可以方便地在窗口中添加菜单栏、页眉和页脚项。
您可以将ApplicationWindow声明为应用程序的根项,并使用QQmlApplicationEngine运行它。通过这种方式,您可以从QML控制窗口的属性、外观和布局。
二、StackView
StackView = QML 的"页面导航栈"
- 一条指令
push(item)把任意 QML 页面压栈,自动动画切换 pop()出栈回退,深度任意- 自带生命周期:页面可动态创建/销毁,也可缓存
- 有信号
currentItemChanged/depthChanged监听导航 - 支持滑动、淡入淡出等过渡动画,也能自定义
一句话:
"QML 世界的 QStackedWidget + 历史栈 + 动画 三合一。"
它和QWidget中的QStackedWidegt属于同一个概念的产物都是用于进行翻页操作的。这里给出它们的总结对比:
| 维度 | QML StackView | QWidget QStackedWidget |
|---|---|---|
| 底层类型 | QQuickItem(场景图节点) |
QWidget(经典窗体) |
| 使用语言 | QML + JS | C++ / QtWidgets |
| 页面内容 | 任意 QML 组件(矩形、列表、复杂 UI) | 任意 QWidget(按钮、表格、自定义窗体) |
| 切换方式 | 命令式 push(item) / pop() / replace() 支持动画、传参、回退栈 |
索引式 setCurrentIndex(int) 或 setCurrentWidget(QWidget*) 无内建动画、无栈概念 |
| 动画 | 内置滑动、淡入淡出等,可自定义 | 无 (需自己写 QPropertyAnimation) |
| 生命周期 | 自动创建/销毁(可缓存) | 所有页面一次性构造,只隐藏不销毁(除非手动删除) |
| 导航栈 | 真正的"后进先出"栈,可多级回退 | 仅当前索引,没有历史栈 |
| 信号 | currentItemChanged / depthChanged / pushCompleted 等 |
currentChanged(int) |
| 性能 | 动态实例化,内存占用小 | 一次性构造,切换快但初始慢 |
| 平台限制 | Qt Quick 场景 | 经典 Widget 场景 |
三、测试例子
代码:
cpp
import QtQuick 2.14
import QtQuick.Controls 2.14
import QtQuick.Window 2.14
import QtQuick.Layouts 1.12

ApplicationWindow {
    id: mainWindow
    visible: true
    width: 480
    height: 320
    title: qsTr("QmlApplicationWindow")
    color: "#f5f5f5"                     // 客户区背景

    /* 1. 菜单栏 */
    menuBar: MenuBar {
        Menu {
            title: qsTr("文件")
            MenuItem { text: qsTr("打开"); onTriggered: console.log("打开") }
            MenuItem { text: qsTr("退出"); onTriggered: Qt.quit() }
        }
        Menu {
            title: qsTr("帮助")
            MenuItem { text: qsTr("关于"); onTriggered: console.log("关于") }
        }
        MenuSeparator{
            height: 2
        }
        Menu {
            title: qsTr("New")
            Action{
                id: newActionId
                text: "New"
//                icon.source: ""
                onTriggered: console.log("New")
            }
            Action{
                id: saveActionId
                text: "Save"
//                icon.source: ""
                onTriggered: console.log("Save")
            }
        }
    }

    /* 2. 工具栏 */
    header/*toolBar*/: ToolBar {
        RowLayout {
            anchors.fill: parent
            ToolButton { action: newActionId }
            ToolButton { action: saveActionId }
            Item { Layout.fillWidth: true }   // 弹簧
            Label { text: "简易工具栏" }
        }
    }

    /* 3. 客户区内容 */
    StackView{
        id: stackId
        anchors.fill: parent
        initialItem: Rectangle{ color: "grey" }
    }

    footer: TabBar{
        id: tabBarId
        width: parent.width

        TabButton{
            text: "Red"
            onClicked: function(){
                stackId.pop()
                stackId.push(redRect)
                console.log("Numbers of stack items: " + stackId.depth)
            }
        }

        TabButton{
            text: "Green"
            onClicked: function(){
                stackId.pop()
                stackId.push(greenRect)
                console.log("Numbers of stack items: " + stackId.depth)
            }
        }

        TabButton{
            text: "Blue"
            onClicked: function(){
                stackId.pop()
                stackId.push(Qt.createQmlObject('import QtQuick 2.14; Rectangle {color: "blue"}', stackId))
                console.log("Numbers of stack items: " + stackId.depth)
            }
        }

        TabButton{
            text: "Orange"
            onClicked: function(){
                stackId.pop()
                stackId.push("Orange.qml")
                console.log("Numbers of stack items: " + stackId.depth)
            }
        }

        TabButton{
            text: "Pop"
            onClicked: function(){
                stackId.pop()
                console.log("Numbers of stack items: " + stackId.depth)
            }
        }
    }


    /* 4. 关闭前确认 */
    onClosing: function(closeEvent) {
        closeEvent.accepted = false;          // 先阻止
        console.log("用户点 × 了,可弹窗确认");
        // 这里写弹窗逻辑,若确认再 Qt.quit()
    }


    /* ① 内联 Component */
    Component {
        id: redRect
        Rectangle { color: "red" }
    }
    Component {
        id: greenRect
        Rectangle { color: "green" }
    }
}
运行效果:
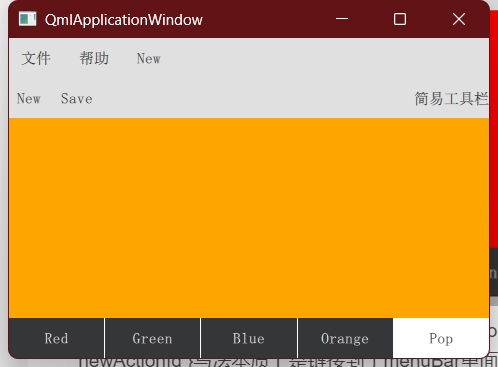
1.最上面的是菜单栏menuBar,header页眉里的ToolButton { action: newActionId }写法本质上是链接到了menuBar里面的一个action行为。
2.footer页脚里放置了多个TabButton,是为了切换StackView里的页面,采用的是在信号处理器里动态堆栈压入的方式。
3.StackView{initialItem: Rectangle{ color: "grey" }}这给了一个初始项,正常pop是会保留最后一个项的,不会把它出栈掉的。所以打印出来的当前栈深度一直都是2。
四、总结
本节算是对QQuickControls的一个补充总结,介绍了ApplicationWindow和StackView。至此,我认为已经学习到了基本的控件和布局方式。下一节开始将学习一些常用的功能弹窗。