【Android】布局优化:include、merge、ViewStub的使用及注意事项
在 Android 布局优化中,include、merge 和 ViewStub 是三种常用的布局标签。include 主要用于布局重用,merge 一般和 include 配合使用,它可以减少布局嵌套层级,而 ViewStub 则提供了按需加载的功能,当需要时才会将 ViewStub 中的布局加载到内存,提高了程序初始化效率,下面分别介绍它们的使用方法:
一、include
在 Android 开发中,<include> 标签用于实现布局复用。我们通常会将一些通用的界面元素单独抽取到一个独立的布局文件中,然后通过 <include> 标签在其他布局中进行引用。这样不仅方便对相同视图进行统一维护和修改,也有效提高了布局的重用性与开发效率。
举个栗子,以标题栏为例,抽取布局如下:
my_title_layout.xml
xml
<?xml version="1.0" encoding="utf-8"?>
<RelativeLayout xmlns:android="http://schemas.android.com/apk/res/android"
    android:layout_width="match_parent"
    android:layout_height="wrap_content"
    android:background="#00BCD4">

    <ImageButton
        android:id="@+id/back_btn"
        android:layout_width="48dp"
        android:layout_height="48dp"
        android:src="@drawable/ic_back"
        android:backgroundTint="#00FFFFFF"/>

    <TextView
        android:id="@+id/title_tv"
        android:layout_width="wrap_content"
        android:layout_height="wrap_content"
        android:layout_centerVertical="true"
        android:layout_marginStart="20dp"
        android:layout_toEndOf="@+id/back_btn"
        android:gravity="center"
        android:text="我的title"
        android:textSize="18sp" />

</RelativeLayout>
使用也很简单,如下:
xml
<?xml version="1.0" encoding="utf-8"?>
<LinearLayout xmlns:android="http://schemas.android.com/apk/res/android"
    android:id="@+id/main"
    android:layout_width="match_parent"
    android:layout_height="match_parent"
    android:orientation="vertical">

    <include layout="@layout/my_title_layout"/>

</LinearLayout>
注意事项
include 使用有几点需要注意:
- 当同一个 XML 布局文件中包含多个
<include>标签时,建议为每个<include>单独设置id属性。否则,在代码中通过findViewById()获取子视图时,只能找到第一个被引入的布局及其内部控件,后续的<include>所对应的视图将无法正确访问。 - 如果被引入的布局文件的根视图 本身定义了
android:id,而<include>标签也设置了android:id,则建议保持两者一致。否则在代码中通过findViewById()访问根视图时,可能会出现返回null的情况。 - 在
<include>标签中,我们可以重写被引入布局中的所有 layout 属性 ,但无法重写普通的非 layout 属性(如背景颜色、文字大小等)。需要特别注意的是,若要在<include>标签中对 layout 属性进行重写,必须同时显式指定layout_width和layout_height,否则所覆写的属性将不会生效。
二、merge
merge标签可用于减少视图层级来优化布局,可以配合include使用,如果include标签的父布局 和 include布局的根容器是相同类型的,那么根容器的可以使用merge代替。<include>标签存在着一个不好的地方,可能会导致产生多余的布局嵌套。举个栗子:
my_choice_layout.xml
xml
<?xml version="1.0" encoding="utf-8"?>
<LinearLayout xmlns:android="http://schemas.android.com/apk/res/android"
    android:layout_width="match_parent"
    android:layout_height="match_parent"
    android:orientation="vertical">

    <Button
        android:id="@+id/ok"
        android:layout_width="match_parent"
        android:layout_height="wrap_content"
        android:layout_marginEnd="40dp"
        android:layout_marginStart="40dp"
        android:text="确定"/>

    <Button
        android:id="@+id/cancel"
        android:layout_width="match_parent"
        android:layout_height="wrap_content"
        android:layout_marginEnd="40dp"
        android:layout_marginStart="40dp"
        android:text="取消"/>

</LinearLayout>
这里定义了两个按钮,在布局中引用:
xml
<?xml version="1.0" encoding="utf-8"?>
<LinearLayout xmlns:android="http://schemas.android.com/apk/res/android"
    android:id="@+id/main"
    android:layout_width="match_parent"
    android:layout_height="match_parent"
    android:orientation="vertical">

    <include layout="@layout/my_title_layout"/>

    <EditText
        android:layout_width="match_parent"
        android:layout_height="wrap_content"
        android:hint="输入"
        android:layout_margin="40dp"/>

    <include layout="@layout/my_choice_layout"/>

</LinearLayout>
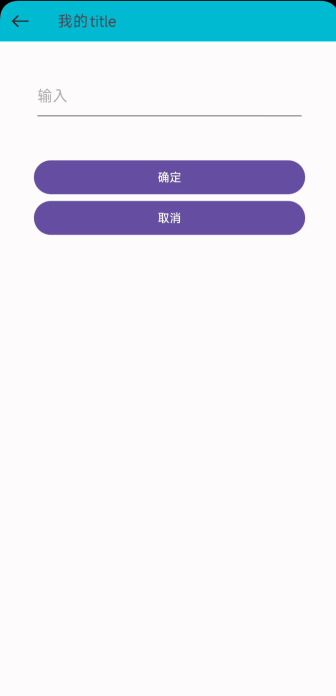
运行结果如下:

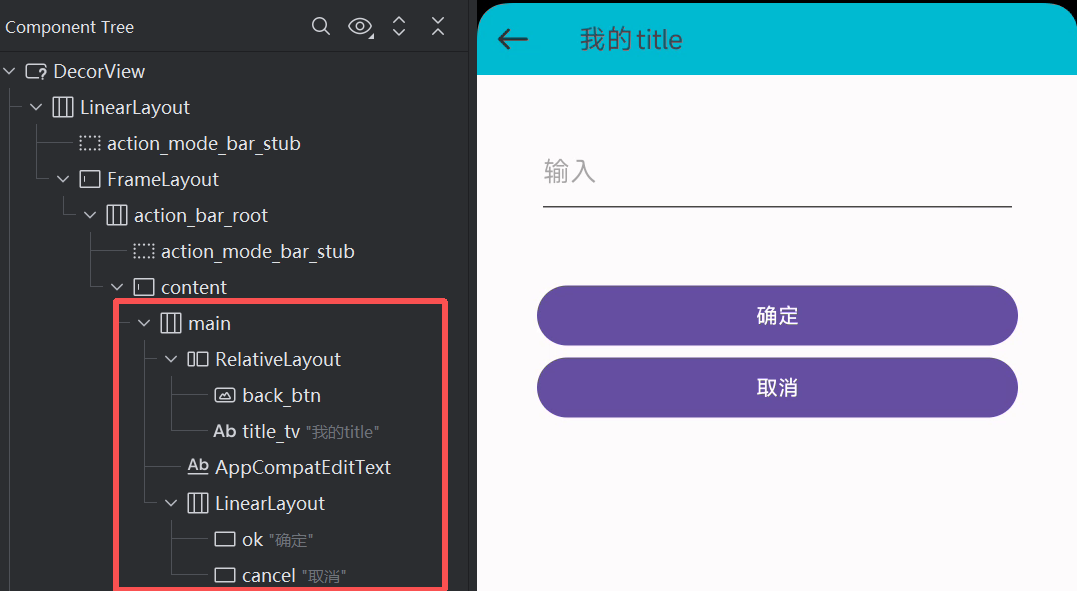
看起来没什么问题,其实不知不觉中我们多嵌套了一层布局。我们用工具查看一下此时布局结构:

其实这种情况下:在主界面中,<include>标签的parent ViewGroup与包含的layout根容器 ViewGroup 是相同的类型,这里都是LinearLayout,那么则可以将包含的 layout 根容器 ViewGroup 使用<merge>标签代替,从而减少一层 ViewGroup 的嵌套,提升UI渲染性能。
修改my_choice_layout.xml代码如下:
xml
<?xml version="1.0" encoding="utf-8"?>
<merge xmlns:android="http://schemas.android.com/apk/res/android">

    <Button
        android:id="@+id/ok"
        android:layout_width="match_parent"
        android:layout_height="wrap_content"
        android:layout_marginEnd="40dp"
        android:layout_marginStart="40dp"
        android:text="确定"/>

    <Button
        android:id="@+id/cancel"
        android:layout_width="match_parent"
        android:layout_height="wrap_content"
        android:layout_marginEnd="40dp"
        android:layout_marginStart="40dp"
        android:text="取消"/>

</merge>
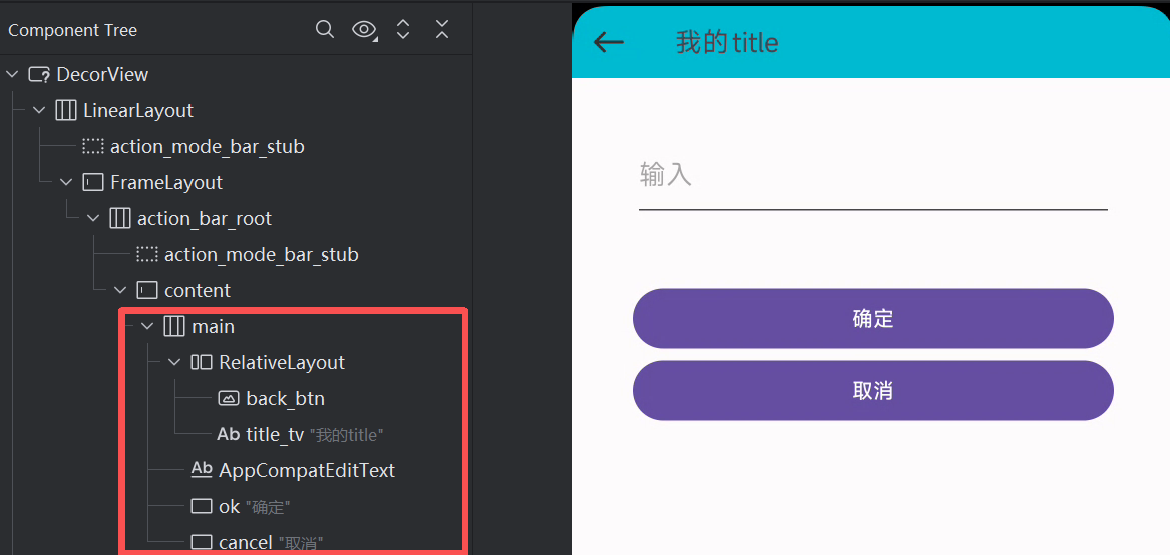
此时布局结构如下:

可以看到,这里去除了多余的嵌套。
注意事项
- 如果一个布局文件的根容器是
FrameLayout,且没有设置background、padding等属性,那么完全可以使用<merge>来替代它。因为 Activity 的默认ContentView外层本身就是一个FrameLayout,此时再嵌套一层FrameLayout会造成多余的层级。使用<merge>可以让布局内容直接插入到父容器中,从而减少渲染层次,提升性能。 - 由于
<merge>并非一个实际的View对象,因此在通过LayoutInflater.inflate()手动加载时必须为其指定父容器,并且第三个参数要传入true,表示将子视图立即附加到父容器中。 <merge>只能作为布局文件的根节点使用,不能嵌套在其他布局中。如果它出现在非根层级位置,Android Studio 会直接报错或在运行时崩溃。此外,ViewStub引用的布局文件中禁止使用<merge>作为根节点 ,因为ViewStub会通过inflate()动态创建视图,而<merge>无法独立生成视图对象,这会导致InflateException异常。- 与普通布局不同,当使用
<include>引入一个以<merge>为根的布局时,不能在<include>标签中重写布局属性(如layout_width、layout_height),因为<merge>没有自己的根容器,这些属性会被直接忽略。
三、ViewStub
在实际开发中,我们经常会遇到这样的情况:页面中存在一些在初始化阶段暂时不需要显示的布局。虽然可以通过将它们的可见性设置为 invisible 或 gone 来隐藏,但这些布局在界面加载时依然会被解析与创建,从而增加页面的初始化开销。为了解决这一问题,Android 提供了一个轻量级的解决方案 ------ ViewStub 。它是一个不可见、尺寸为 0 的占位视图 ,具备 懒加载(延迟加载) 的特性。ViewStub 虽然存在于视图层级结构中,但只有在调用 setVisibility() 或 inflate() 方法时才会真正加载并替换成目标布局,因此不会影响页面的初始渲染性能。
举个栗子:
extra_layout.xml
xml
<?xml version="1.0" encoding="utf-8"?>
<LinearLayout xmlns:android="http://schemas.android.com/apk/res/android"
    android:layout_width="match_parent"
    android:layout_height="match_parent"
    android:orientation="vertical">

    <EditText
        android:id="@+id/et_1"
        android:layout_width="match_parent"
        android:layout_height="wrap_content"
        android:layout_marginEnd="40dp"
        android:layout_marginStart="40dp"
        android:hint="学号"/>

    <EditText
        android:id="@+id/et_2"
        android:layout_width="match_parent"
        android:layout_height="wrap_content"
        android:layout_marginEnd="40dp"
        android:layout_marginStart="40dp"
        android:hint="班级"/>

</LinearLayout>
这里设置两个输入框,作为要延迟加载的布局。
布局中使用:
xml
<?xml version="1.0" encoding="utf-8"?>
<LinearLayout xmlns:android="http://schemas.android.com/apk/res/android"
    android:id="@+id/main"
    android:layout_width="match_parent"
    android:layout_height="match_parent"
    android:orientation="vertical">

    <include layout="@layout/my_title_layout"/>

    <EditText
        android:layout_width="match_parent"
        android:layout_height="wrap_content"
        android:hint="姓名"
        android:layout_marginTop="40dp"
        android:layout_marginStart="40dp"
        android:layout_marginEnd="40dp"/>

    <Button
        android:id="@+id/btn_more"
        android:layout_width="wrap_content"
        android:layout_height="wrap_content"
        android:text="更多"
        android:layout_gravity="end"/>

    <ViewStub
        android:id="@+id/view_stub"
        android:layout="@layout/extra_layout"
        android:layout_width="match_parent"
        android:layout_height="wrap_content" />

    <include layout="@layout/my_choice_layout"/>

</LinearLayout>
在代码中加载:
java
public class MainActivity extends AppCompatActivity {

    private EditText editText1;
    private EditText editText2;

    @Override
    protected void onCreate(Bundle savedInstanceState) {
        super.onCreate(savedInstanceState);
        EdgeToEdge.enable(this);
        setContentView(R.layout.activity_main);
        ViewCompat.setOnApplyWindowInsetsListener(findViewById(R.id.main), (v, insets) -> {
            Insets systemBars = insets.getInsets(WindowInsetsCompat.Type.systemBars());
            v.setPadding(systemBars.left, systemBars.top, systemBars.right, systemBars.bottom);
            return insets;
        });

        Button button = (Button) findViewById(R.id.btn_more);
        button.setOnClickListener(v -> {
            ViewStub viewStub = (ViewStub) findViewById(R.id.view_stub);
            if(viewStub != null) {
                View view = viewStub.inflate();
                editText1 = view.findViewById(R.id.et_1);
                editText1 = view.findViewById(R.id.et_2);
            }
        });
    }
}
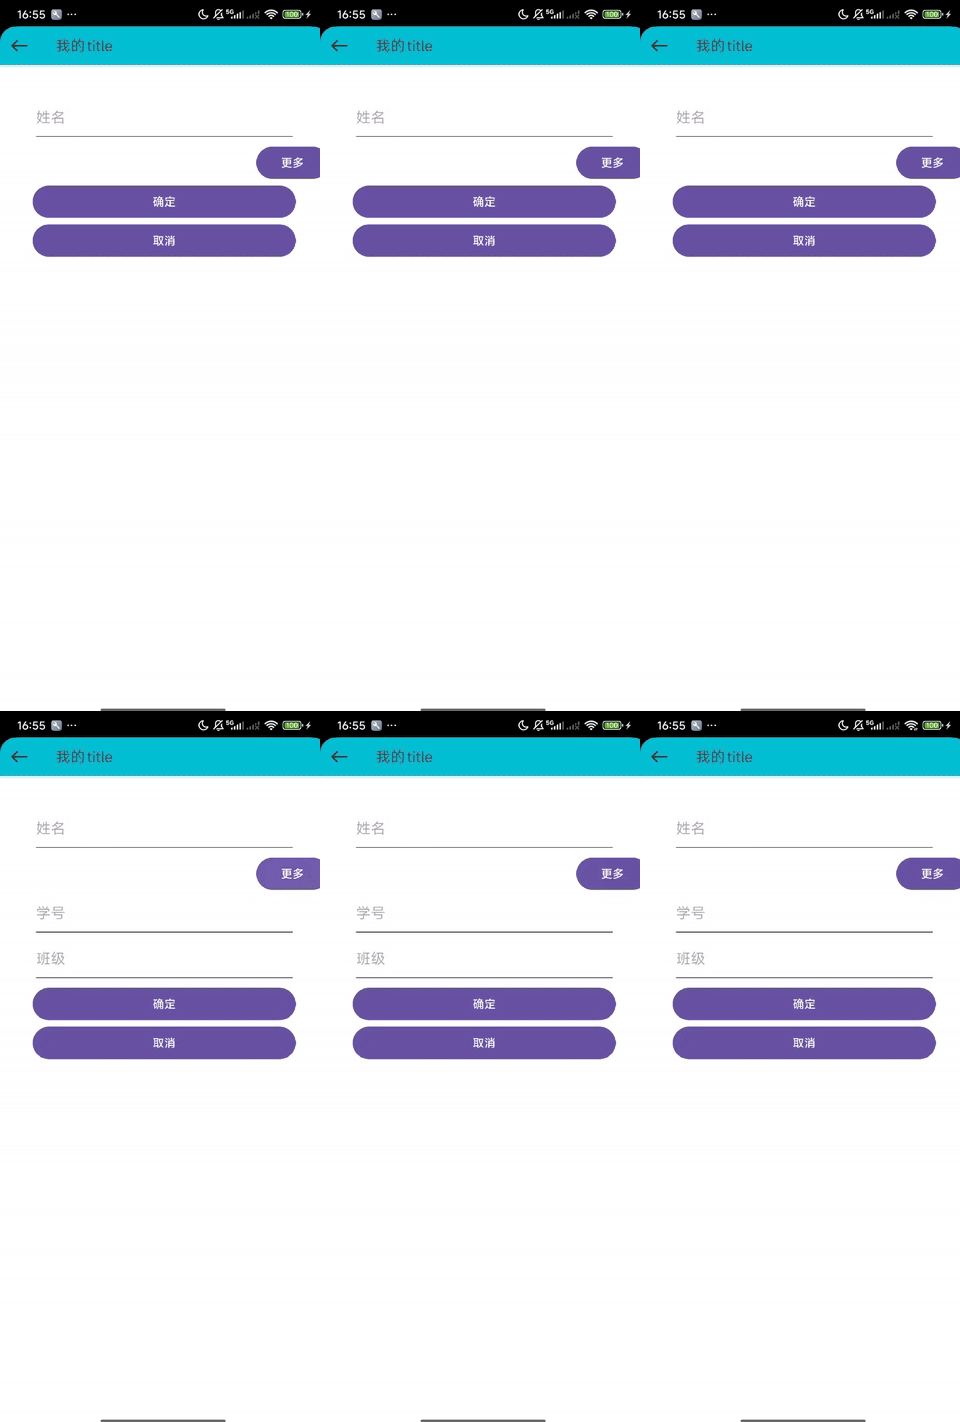
运行程序,效果如下:

注意事项
- 由于
ViewStub不是一个实际的视图容器,因此它在加载布局时不支持使用<merge>作为根布局。因此这有可能导致加载出来的布局存在着多余的嵌套结构。 ViewStub的懒加载机制决定了它在第一次调用inflate()或设置setVisibility(View.VISIBLE)后会被实际布局替换,并从视图树中移除。因此,同一个 ViewStub 不能被重复加载 。如果第二次调用inflate(),系统会抛出IllegalStateException异常。若需多次显示该布局,建议保存inflate()返回的视图引用,通过setVisibility()控制显示与隐藏。- 虽然
ViewStub自身不参与绘制,也几乎不占用空间,但它仍然是一个有效的视图占位符。因此,布局文件中若未显式声明android:layout_width和android:layout_height,系统在解析时会抛出异常。
视图树中移除。因此,同一个 ViewStub 不能被重复加载 。如果第二次调用inflate(),系统会抛出IllegalStateException异常。若需多次显示该布局,建议保存inflate()返回的视图引用,通过setVisibility()控制显示与隐藏。 - 虽然
ViewStub自身不参与绘制,也几乎不占用空间,但它仍然是一个有效的视图占位符。因此,布局文件中若未显式声明android:layout_width和android:layout_height,系统在解析时会抛出异常。