一、项目背景与挑战
在企业数字化转型的浪潮中,办公应用的需求日益增长。传统的办公应用通常局限于单一设备使用,难以满足现代办公场景下的多设备协同需求。随着HarmonyOS的发布,其分布式特性为解决这一痛点提供了新的思路。
项目概述
我们开发的分布式智能办公应用旨在实现多设备间的无缝协同办公,用户可以在手机、平板、智慧屏等不同形态的设备上流畅切换,保持工作状态的连续性。主要功能包括文档编辑、日程管理、视频会议、即时通讯等核心办公场景。
1.1 面临的技术挑战
- **设备异构性:**需要适配不同屏幕尺寸、性能规格的鸿蒙设备
- **状态同步:**确保多设备间的数据和用户状态实时同步
- **性能优化:**在保证功能丰富性的同时,确保应用在各类设备上流畅运行
- **安全保障:**分布式环境下的数据传输和存储安全
选择HarmonyOS作为开发平台,正是看中了其分布式能力带来的跨设备协同优势,这为我们打造下一代智能办公体验提供了坚实的技术基础。
二、分布式架构设计
2.1 整体架构概览
我们采用分层架构设计,将应用分为表现层、业务逻辑层、数据服务层和设备适配层四个主要层次。这种设计使得各层职责清晰,便于维护和扩展。
| 架构层级 | 主要职责 | 核心技术 |
|---|---|---|
| 表现层 | UI渲染、用户交互 | ArkTS声明式UI、自适应布局 |
| 业务逻辑层 | 业务处理、状态管理 | 分布式任务调度、状态同步 |
| 数据服务层 | 数据存储、访问控制 | 分布式数据库、云存储 |
| 设备适配层 | 设备能力调用、兼容性处理 | 设备管理器、软总线 |
架构优势:
- **高内聚低耦合:**各层职责明确,降低模块间依赖
- **可扩展性强:**支持新功能和新设备的快速接入
- **可维护性好:**便于定位问题和迭代优化
2.2 组件化设计
基于ArkTS的组件化能力,我们构建了一套可复用的组件库,提升开发效率和代码质量。
// 核心组件基类设计
abstract class BaseComponent {
  // 组件生命周期管理
  protected onCreate?(): void
  protected onDestroy?(): void

  // 通用状态管理方法
  protected updateState(currentState: T, newState: Partial): T {
    return { ...currentState, ...newState }
  }

  // 通用错误处理
  protected handleError(error: Error): void {
    console.error(`[${this.constructor.name}] Error: ${error.message}`)
    // 可以添加统一的错误上报逻辑
  }
}

// 分布式组件装饰器
function DistributedComponent() {
  return function(constructor: Function) {
    // 添加分布式能力
    constructor.prototype.enableDistributed = true

    // 注入设备发现和连接逻辑
    const originalOnCreate = constructor.prototype.onCreate
    constructor.prototype.onCreate = function() {
      // 初始化分布式环境
      this.initDistributedEnvironment()
      // 调用原始onCreate
      if (originalOnCreate) {
        originalOnCreate.call(this)
      }
    }
  }
}

// 使用示例
@DistributedComponent()
class DocumentEditor extends BaseComponent {
  private documentId: string
  private content: string = ''

  constructor(docId: string) {
    super()
    this.documentId = docId
  }

  onCreate() {
    this.loadDocument()
  }

  private loadDocument() {
    try {
      // 从分布式数据库加载文档
      console.log(`Loading document: ${this.documentId}`)
    } catch (error) {
      this.handleError(error as Error)
    }
  }
}
原子组件
基础UI组件,如按钮、输入框、标签等,提供统一的样式和交互行为
业务组件
封装特定业务逻辑的组件,如文档编辑器、日程表、消息列表等
容器组件
负责布局和页面组织的组件,支持响应式设计和多设备适配
2.3 分布式通信机制
利用HarmonyOS的分布式软总线技术,我们实现了设备间的高效通信。
// 分布式通信管理器
class DistributedCommManager {
  private busManager: busManager.BusManager
  private connectionMap: Map = new Map()

  constructor() {
    // 初始化分布式总线
    this.busManager = new busManager.BusManager()
  }

  // 发现附近设备
  async discoverDevices(): Promise> {
    try {
      return await this.busManager.discoverNearbyDevices()
    } catch (error) {
      console.error('Failed to discover devices:', error)
      return []
    }
  }

  // 建立设备连接
  async connectDevice(deviceId: string): Promise {
    try {
      const connection = await this.busManager.connect(deviceId)
      this.connectionMap.set(deviceId, connection)
      console.log(`Connected to device: ${deviceId}`)
      return true
    } catch (error) {
      console.error(`Failed to connect to device ${deviceId}:`, error)
      return false
    }
  }

  // 发送消息到指定设备
  async sendMessage(deviceId: string, message: any): Promise {
    try {
      const connection = this.connectionMap.get(deviceId)
      if (!connection) {
        throw new Error(`No connection to device: ${deviceId}`)
      }

      await connection.send(JSON.stringify(message))
      return true
    } catch (error) {
      console.error(`Failed to send message to device ${deviceId}:`, error)
      return false
    }
  }

  // 注册消息监听器
  registerMessageListener(callback: (deviceId: string, message: any) => void) {
    this.busManager.on('message', (data) => {
      try {
        const { deviceId, payload } = data
        callback(deviceId, JSON.parse(payload))
      } catch (error) {
        console.error('Failed to process message:', error)
      }
    })
  }
}

// 使用示例
const commManager = new DistributedCommManager()

// 发现设备
async function setupDeviceDiscovery() {
  const devices = await commManager.discoverDevices()
  devices.forEach(device => {
    console.log(`Found device: ${device.name} (${device.id})`)
  })
}

// 发送文档数据到其他设备
async function shareDocumentWithDevice(deviceId: string, documentData: Document) {
  return await commManager.sendMessage(deviceId, {
    type: 'DOCUMENT_SHARE',
    data: documentData,
    timestamp: Date.now()
  })
}
注意事项:
- 设备间通信前需要获取相应权限
- 传输敏感数据时应进行加密处理
- 建立长连接时需考虑网络状况变化
三、性能优化实战
3.1 UI渲染优化
UI渲染是影响用户体验的关键因素。我们通过一系列优化措施,显著提升了应用的UI响应速度。
3.1.1 虚拟列表实现
// 虚拟列表示例 - 优化长列表渲染
@Entry
@Component
struct VirtualDocumentList {
  @State documents: DocumentInfo[] = []
  @State visibleRange: Range = { start: 0, end: 20 }
  @State listHeight: number = 0
  @State itemHeight: number = 80

  aboutToAppear() {
    // 模拟加载大量文档数据
    this.loadDocuments()
    // 获取列表容器高度
    this.updateListHeight()
  }

  loadDocuments() {
    // 模拟从服务器加载文档列表
    const mockDocs: DocumentInfo[] = []
    for (let i = 0; i < 1000; i++) {
      mockDocs.push({
        id: `doc-${i}`,
        title: `文档 ${i + 1}`,
        author: '用户' + (i % 10),
        lastModified: new Date(Date.now() - i * 86400000).toISOString()
      })
    }
    this.documents = mockDocs
  }

  updateListHeight() {
    // 实际项目中应通过布局API获取
    this.listHeight = 600
    // 根据容器高度计算可见项数量
    this.visibleRange.end = Math.min(
      Math.ceil(this.listHeight / this.itemHeight) + 5, // 多渲染5项作为缓冲区
      this.documents.length
    )
  }

  onScroll(event: ScrollEvent) {
    // 计算当前可见区域起始索引
    const scrollOffset = event.scrollOffset
    const startIndex = Math.floor(scrollOffset / this.itemHeight)
    const endIndex = Math.min(
      startIndex + Math.ceil(this.listHeight / this.itemHeight) + 5,
      this.documents.length
    )

    // 更新可见范围
    this.visibleRange = { start: startIndex, end: endIndex }
  }

  build() {
    Column() {
      Text('文档列表')
        .fontSize(20)
        .fontWeight(FontWeight.Bold)
        .margin({ bottom: 20 })

      List() {
        // 只渲染可见范围内的项
        ForEach(
          this.documents.slice(this.visibleRange.start, this.visibleRange.end),
          (document) => {
            ListItem() {
              DocumentItem({
                document,
                onClick: () => console.log(`Open document: ${document.id}`)
              })
              .height(this.itemHeight)
            }
            .key(document.id)
          },
          (document) => document.id
        )
      }
      .onScroll((event) => this.onScroll(event))
      .width('100%')
      .height(this.listHeight)
      .padding(10)

      Text(`渲染性能优化: 仅渲染 ${this.visibleRange.end - this.visibleRange.start} 项,共 ${this.documents.length} 项`)
        .fontSize(14)
        .color('#666')
        .margin({ top: 20 })
    }
    .padding(20)
  }
}

@Component
struct DocumentItem {
  @Prop document: DocumentInfo
  @Prop onClick: () => void

  build() {
    Row() {
      Image($r('app.media.document_icon'))
        .width(48)
        .height(48)
        .margin({ right: 16 })

      Column() {
        Text(this.document.title)
          .fontSize(16)
          .fontWeight(FontWeight.Bold)
          .margin({ bottom: 4 })

        Row() {
          Text(`作者: ${this.document.author}`)
            .fontSize(14)
            .color('#666')

          Text(` · ${this.formatDate(this.document.lastModified)}`)
            .fontSize(14)
            .color('#999')
        }
      }
      .flexGrow(1)
    }
    .width('100%')
    .padding(12)
    .backgroundColor('#f8f9fa')
    .borderRadius(8)
    .onClick(() => this.onClick())
  }

  private formatDate(dateString: string): string {
    const date = new Date(dateString)
    return `${date.getFullYear()}-${String(date.getMonth() + 1).padStart(2, '0')}-${String(date.getDate()).padStart(2, '0')}`
  }
}
3.1.2 懒加载和预加载策略
优化建议:
-
**图片懒加载:**只加载可视区域内的图片资源
-
**组件懒加载:**根据路由按需加载页面组件
-
**数据预加载:**预测用户可能需要的数据并提前加载
-
**资源缓存:**合理缓存常用资源,减少重复加载
// 图片懒加载组件
@Component
struct LazyImage {
@Prop src: string
@Prop placeholder?: string
@State isLoaded: boolean = false
@State isVisible: boolean = falseprivate observer: IntersectionObserver | null = null aboutToAppear() { // 创建交叉观察器,监控元素是否进入视口 this.observer = new IntersectionObserver() this.observer.observe(this, (entries) => { if (entries[0].isIntersecting && !this.isLoaded) { this.isVisible = true this.loadImage() } }) } aboutToDisappear() { // 清理观察器 if (this.observer) { this.observer.disconnect() } } private loadImage() { // 模拟图片加载 setTimeout(() => { this.isLoaded = true }, 500) // 实际项目中应使用Image的onLoad事件 } build() { if (this.isLoaded) { Image(this.src) .width('100%') .height('100%') .objectFit(ImageFit.Cover) } else if (this.placeholder) { Image(this.placeholder) .width('100%') .height('100%') .objectFit(ImageFit.Cover) .opacity(0.6) } else { // 加载占位符 Row() { LoadingProgress() .width(30) .height(30) } .width('100%') .height('100%') .justifyContent(FlexAlign.Center) .backgroundColor('#f0f0f0') } }}
// 使用示例
@Entry
@Component
struct ImageGallery {
private images: string[] = [
'https://example.com/image1.jpg',
'https://example.com/image2.jpg',
// ... 更多图片
]build() { Scroll() { Column() { Text('图片画廊 (懒加载优化)') .fontSize(20) .margin({ bottom: 20 }) ForEach(this.images, (imageUrl, index) => { LazyImage({ src: imageUrl, placeholder: $r('app.media.placeholder') }) .width('100%') .height(300) .margin({ bottom: 20 }) .key(index.toString()) }, (_, index) => index.toString()) } .padding(20) } }}
3.2 内存管理优化
合理的内存管理对于保证应用稳定性和性能至关重要。我们采取了多项措施优化内存使用。
3.2.1 内存泄漏检测与修复
常见内存泄漏场景:
-
事件监听器未正确移除
-
定时器未清理
-
闭包引用导致对象无法被垃圾回收
-
缓存对象无限增长
// 优化前:可能导致内存泄漏
@Entry
@Component
struct MemoryLeakExample {
@State count: number = 0
private timer: number | null = nullaboutToAppear() { // 问题:组件销毁时未清理定时器 this.timer = setInterval(() => { this.count++ }, 1000) // 问题:全局事件监听器未移除 AppStorage.on('change', this.handleGlobalChange) } // 未在组件销毁时调用 handleGlobalChange() { console.log('Global state changed') } build() { Text(`Count: ${this.count}`) }}
// 优化后:正确管理资源
@Entry
@Component
struct MemoryOptimizedExample {
@State count: number = 0
private timer: number | null = nullaboutToAppear() { this.startTimer() AppStorage.on('change', this.handleGlobalChange) } aboutToDisappear() { // 关键:清理所有资源 this.cleanupResources() } startTimer() { this.timer = setInterval(() => { this.count++ }, 1000) } handleGlobalChange = () => { // 使用箭头函数避免this绑定问题 console.log('Global state changed') } cleanupResources() { // 清理定时器 if (this.timer) { clearInterval(this.timer) this.timer = null } // 移除事件监听器 AppStorage.off('change', this.handleGlobalChange) } build() { Text(`Count: ${this.count}`) }}
// 内存优化工具类
class MemoryManager {
private static instance: MemoryManager
private resourceMap: Map void> = new Map()private constructor() {} static getInstance(): MemoryManager { if (!MemoryManager.instance) { MemoryManager.instance = new MemoryManager() } return MemoryManager.instance } // 注册需要清理的资源 registerResource(key: string, cleanupFn: () => void) { this.resourceMap.set(key, cleanupFn) } // 清理指定资源 unregisterResource(key: string) { const cleanupFn = this.resourceMap.get(key) if (cleanupFn) { cleanupFn() this.resourceMap.delete(key) } } // 清理所有资源 cleanupAll() { this.resourceMap.forEach((cleanupFn) => { try { cleanupFn() } catch (error) { console.error('Error during resource cleanup:', error) } }) this.resourceMap.clear() }}
// 使用示例
const memoryManager = MemoryManager.getInstance()function setupEventListeners() {
const listenerId = 'user-auth-change'const handleAuthChange = () => { console.log('Authentication state changed') } // 注册事件监听 AuthManager.on('change', handleAuthChange) // 注册清理函数 memoryManager.registerResource(listenerId, () => { AuthManager.off('change', handleAuthChange) }) return listenerId}
3.2.2 对象池与资源复用
// 对象池实现,用于复用频繁创建的对象
class ObjectPool {
  private pool: T[] = []
  private maxSize: number
  private createFn: () => T
  private resetFn?: (obj: T) => void

  constructor(options: {
    initialSize: number
    maxSize: number
    create: () => T
    reset?: (obj: T) => void
  }) {
    this.maxSize = options.maxSize
    this.createFn = options.create
    this.resetFn = options.reset

    // 预创建对象
    for (let i = 0; i < options.initialSize; i++) {
      this.pool.push(this.createFn())
    }
  }

  // 获取对象
  acquire(): T {
    if (this.pool.length > 0) {
      const obj = this.pool.pop()!
      if (this.resetFn) {
        this.resetFn(obj)
      }
      return obj
    }

    // 池中没有可用对象,创建新对象
    return this.createFn()
  }

  // 归还对象
  release(obj: T): void {
    // 确保不会超过最大容量
    if (this.pool.length < this.maxSize) {
      this.pool.push(obj)
    }
    // 否则让对象被垃圾回收
  }

  // 清理对象池
  clear(): void {
    this.pool = []
  }

  // 获取当前池大小
  get size(): number {
    return this.pool.length
  }
}

// 使用示例:文档编辑器中的文本块对象池
interface TextBlock {
  text: string
  style: TextStyle
  position: Position
}

// 创建文本块对象池
const textBlockPool = new ObjectPool({
  initialSize: 50,
  maxSize: 200,
  create: () => ({
    text: '',
    style: { fontSize: 16, fontWeight: 'normal' },
    position: { x: 0, y: 0 }
  }),
  reset: (block) => {
    block.text = ''
    block.style = { fontSize: 16, fontWeight: 'normal' }
    block.position = { x: 0, y: 0 }
  }
})

// 在文档编辑器中使用
class DocumentEditor {
  private textBlocks: TextBlock[] = []

  addText(text: string, style: TextStyle, position: Position): TextBlock {
    // 从对象池获取对象
    const block = textBlockPool.acquire()

    // 设置属性
    block.text = text
    block.style = { ...style }
    block.position = { ...position }

    this.textBlocks.push(block)
    return block
  }

  removeTextBlock(block: TextBlock): void {
    const index = this.textBlocks.indexOf(block)
    if (index !== -1) {
      this.textBlocks.splice(index, 1)
      // 归还到对象池
      textBlockPool.release(block)
    }
  }

  clearDocument(): void {
    // 归还所有文本块
    this.textBlocks.forEach(block => {
      textBlockPool.release(block)
    })
    this.textBlocks = []
  }
}
3.3 启动性能优化
应用启动速度直接影响用户体验,我们从多个维度优化了启动流程。
启动阶段1:应用初始化
优化策略:减少初始化阶段的阻塞操作,将非必要的初始化推迟到应用启动后。
启动阶段2:资源加载
优化策略:使用预加载机制,优先加载首屏必要资源,其他资源异步加载。
启动阶段3:UI渲染
优化策略:简化首屏UI,使用骨架屏提升用户感知,避免复杂动画和计算。
// 启动优化配置
const StartupConfig = {
  // 预加载的必要资源
  preloadResources: [
    'app_icon.png',
    'main_theme.json',
    'font_primary.ttf'
  ],

  // 延迟加载的资源
  lazyLoadResources: [
    'iconset_2x.png',
    'advanced_features.json'
  ],

  // 初始化任务优先级
  initializationTasks: [
    { id: 'auth', priority: 'high' },
    { id: 'config', priority: 'high' },
    { id: 'userData', priority: 'medium' },
    { id: 'analytics', priority: 'low' },
    { id: 'ads', priority: 'low' }
  ]
}

// 启动管理器
class StartupManager {
  private highPriorityTasks: Promise[] = []
  private mediumPriorityTasks: Promise[] = []
  private lowPriorityTasks: Promise[] = []

  async initializeApp() {
    console.log('Starting app initialization...')

    // 1. 首先加载必要资源
    await this.preloadCriticalResources()

    // 2. 启动高优先级任务(并行执行)
    await Promise.all(this.highPriorityTasks)
    console.log('High priority tasks completed')

    // 3. 显示主界面(不等待所有任务完成)
    this.showMainUI()

    // 4. 在后台执行中低优先级任务
    this.executeBackgroundTasks()
  }

  private async preloadCriticalResources() {
    console.log('Preloading critical resources...')
    const startTime = Date.now()

    // 并行加载资源
    await Promise.all(
      StartupConfig.preloadResources.map(resource =>
        ResourceManager.loadResource(resource)
      )
    )

    console.log(`Resource preloading completed in ${Date.now() - startTime}ms`)
  }

  registerTask(id: string, task: () => Promise) {
    const taskConfig = StartupConfig.initializationTasks.find(t => t.id === id)
    if (!taskConfig) {
      console.warn(`Unknown task: ${id}`)
      return
    }

    // 根据优先级分类任务
    switch (taskConfig.priority) {
      case 'high':
        this.highPriorityTasks.push(task())
        break
      case 'medium':
        this.mediumPriorityTasks.push(task())
        break
      case 'low':
        this.lowPriorityTasks.push(task())
        break
    }
  }

  private showMainUI() {
    console.log('Showing main UI...')
    // 导航到主页面
    Router.replace({
      uri: 'pages/MainPage',
      params: { initialized: true }
    })
  }

  private async executeBackgroundTasks() {
    try {
      // 执行中优先级任务
      await Promise.all(this.mediumPriorityTasks)
      console.log('Medium priority tasks completed')

      // 执行低优先级任务
      await Promise.all(this.lowPriorityTasks)
      console.log('Low priority tasks completed')

      // 最后加载非关键资源
      await this.loadNonCriticalResources()
    } catch (error) {
      console.error('Error in background tasks:', error)
    }
  }

  private async loadNonCriticalResources() {
    console.log('Loading non-critical resources...')
    await Promise.all(
      StartupConfig.lazyLoadResources.map(resource =>
        ResourceManager.loadResource(resource)
      )
    )
    console.log('Non-critical resources loaded')
  }
}

// 在应用入口处使用
const startupManager = new StartupManager()

// 注册初始化任务
startupManager.registerTask('auth', async () => {
  // 身份验证初始化
  await AuthService.initialize()
})

startupManager.registerTask('config', async () => {
  // 加载应用配置
  await ConfigService.loadSettings()
})

// 启动应用
startupManager.initializeApp()
优化成果:
通过以上优化措施,我们的应用启动时间从原来的3.5秒减少到了1.2秒,首屏渲染时间减少了60%,显著提升了用户体验。
四、鸿蒙开放能力接入
4.1 云开发能力集成
HarmonyOS云开发能力为应用提供了强大的后端支持,我们集成了多项云服务来增强应用功能。
4.1.1 云数据库接入
// 云数据库管理器
class CloudDatabaseManager {
  private db: cloudDB.CloudDBZone | null = null
  private isInitialized: boolean = false

  // 初始化云数据库
  async initialize() {
    try {
      // 1. 获取云数据库实例
      const cloudDB = await cloudDB.getCloudDB()

      // 2. 创建或打开数据库分区
      this.db = await cloudDB.openCloudDBZone({
        zoneName: 'office_app_db',
        createIfNotExist: true
      })

      this.isInitialized = true
      console.log('Cloud database initialized successfully')
    } catch (error) {
      console.error('Failed to initialize cloud database:', error)
      throw error
    }
  }

  // 保存文档到云数据库
  async saveDocument(document: Document): Promise {
    this.ensureInitialized()

    try {
      await this.db!.executeUpsert([document])
      console.log(`Document ${document.id} saved successfully`)
    } catch (error) {
      console.error(`Failed to save document ${document.id}:`, error)
      throw error
    }
  }

  // 查询文档
  async queryDocuments(query: DocumentQuery): Promise {
    this.ensureInitialized()

    try {
      // 构建查询条件
      let cloudQuery = this.db!.where(Document)

      if (query.userId) {
        cloudQuery = cloudQuery.equalTo('ownerId', cloudDB.CloudDBZoneQuery.WhereClauseType.EQUALS, query.userId)
      }

      if (query.keyword) {
        cloudQuery = cloudQuery.contains('title', query.keyword)
      }

      // 排序
      cloudQuery = cloudQuery.orderBy('lastModified', cloudDB.CloudDBZoneQuery.OrderByDirection.DESC)

      // 分页
      if (query.pageSize && query.pageNum) {
        const offset = (query.pageNum - 1) * query.pageSize
        cloudQuery = cloudQuery.limit(query.pageSize, offset)
      }

      // 执行查询
      const result = await cloudQuery.find()
      return result.getSnapshotObjects()
    } catch (error) {
      console.error('Failed to query documents:', error)
      throw error
    }
  }

  // 实时数据订阅
  async subscribeToDocumentChanges(documentId: string, callback: (document: Document) => void): Promise {
    this.ensureInitialized()

    try {
      // 创建订阅查询
      const query = this.db!.where(Document)
        .equalTo('id', cloudDB.CloudDBZoneQuery.WhereClauseType.EQUALS, documentId)

      // 执行订阅
      const subscriptionId = await query.listen((snapshot, error) => {
        if (error) {
          console.error('Subscription error:', error)
          return
        }

        if (snapshot) {
          const documents = snapshot.getSnapshotObjects()
          if (documents.length > 0) {
            callback(documents[0])
          }
        }
      })

      console.log(`Subscribed to document ${documentId}, subscriptionId: ${subscriptionId}`)
      return subscriptionId
    } catch (error) {
      console.error(`Failed to subscribe to document ${documentId}:`, error)
      throw error
    }
  }

  // 取消订阅
  async unsubscribe(subscriptionId: number): Promise {
    this.ensureInitialized()

    try {
      await this.db!.cancelListen(subscriptionId)
      console.log(`Unsubscribed from subscription ${subscriptionId}`)
    } catch (error) {
      console.error(`Failed to unsubscribe from ${subscriptionId}:`, error)
      throw error
    }
  }

  private ensureInitialized() {
    if (!this.isInitialized || !this.db) {
      throw new Error('Cloud database not initialized')
    }
  }
}

// 使用示例
const dbManager = new CloudDatabaseManager()

// 在应用启动时初始化
async function setupCloudServices() {
  await dbManager.initialize()
}

// 保存文档示例
async function saveUserDocument(document: Document) {
  try {
    await dbManager.saveDocument(document)
    return { success: true }
  } catch (error) {
    return { success: false, error: error.message }
  }
}

// 实时同步文档编辑示例
class CollaborativeEditor {
  private subscriptionId: number | null = null

  async startCollaboration(documentId: string) {
    this.subscriptionId = await dbManager.subscribeToDocumentChanges(
      documentId,
      (updatedDoc) => {
        // 更新本地编辑器内容
        this.updateEditorContent(updatedDoc.content)
      }
    )
  }

  async stopCollaboration() {
    if (this.subscriptionId) {
      await dbManager.unsubscribe(this.subscriptionId)
      this.subscriptionId = null
    }
  }

  async sendChanges(content: string, documentId: string) {
    // 发送本地更改到云端
    const document = {
      id: documentId,
      content,
      lastModified: new Date().toISOString()
    }

    await dbManager.saveDocument(document)
  }
}
4.1.2 云函数集成
云函数优势:
- 无需维护后端服务器
- 按需执行,自动扩缩容
- 降低客户端计算压力
- 统一业务逻辑处理
4.2 AppLinking跨应用跳转
利用HarmonyOS的AppLinking能力,我们实现了应用间的无缝跳转,提升了用户体验。
// AppLinking管理器
class AppLinkingManager {
  private appLinkingService: appLinking.AppLinkingService

  constructor() {
    this.appLinkingService = appLinking.getAppLinkingService()
  }

  // 创建应用链接
  async createAppLinking(params: AppLinkingParams): Promise {
    try {
      const builder = this.appLinkingService.createAppLinkingBuilder()

      // 设置深度链接
      builder.setDeepLink(params.deepLink)

      // 设置链接预览信息
      if (params.title) {
        builder.setTitle(params.title)
      }

      if (params.description) {
        builder.setDescription(params.description)
      }

      if (params.imageUrl) {
        builder.setImageUrl(params.imageUrl)
      }

      // 创建短链接
      const shortLink = await builder.buildShortAppLinking()
      return shortLink
    } catch (error) {
      console.error('Failed to create AppLinking:', error)
      throw error
    }
  }

  // 处理接收到的链接
  async handleReceivedLink(link: string): Promise {
    try {
      // 解析链接
      const resolvedLink = await this.appLinkingService.parseAppLinking(link)

      // 获取深度链接
      const deepLink = resolvedLink.getDeepLink()
      if (!deepLink) {
        throw new Error('Invalid link: no deep link found')
      }

      // 解析深度链接参数
      const url = new URL(deepLink)
      const params = new URLSearchParams(url.search)

      // 根据路径分发处理
      const path = url.pathname

      switch (path) {
        case '/document':
          return this.handleDocumentLink(params)

        case '/meeting':
          return this.handleMeetingLink(params)

        case '/share':
          return this.handleShareLink(params)

        default:
          return { type: 'unknown', params: {} }
      }
    } catch (error) {
      console.error('Failed to handle AppLinking:', error)
      return { type: 'error', error: error.message }
    }
  }

  private handleDocumentLink(params: URLSearchParams): LinkHandleResult {
    const docId = params.get('id')
    if (!docId) {
      throw new Error('Document ID is required')
    }

    return {
      type: 'document',
      params: {
        documentId: docId,
        mode: params.get('mode') || 'view',
        userId: params.get('userId')
      }
    }
  }

  private handleMeetingLink(params: URLSearchParams): LinkHandleResult {
    const meetingId = params.get('id')
    if (!meetingId) {
      throw new Error('Meeting ID is required')
    }

    return {
      type: 'meeting',
      params: {
        meetingId,
        password: params.get('pwd'),
        joinNow: params.get('joinNow') === 'true'
      }
    }
  }

  private handleShareLink(params: URLSearchParams): LinkHandleResult {
    return {
      type: 'share',
      params: {
        content: params.get('content'),
        senderId: params.get('senderId'),
        timestamp: params.get('t')
      }
    }
  }
}

// 使用示例
const appLinkingManager = new AppLinkingManager()

// 创建文档分享链接
async function createDocumentShareLink(documentId: string, title: string) {
  return await appLinkingManager.createAppLinking({
    deepLink: `https://office.example.com/document?id=${documentId}&mode=view`,
    title: `共享文档: ${title}`,
    description: '点击查看共享文档',
    imageUrl: 'https://example.com/share_thumb.png'
  })
}

// 在应用入口处理链接
App.on('appLinking', async (link) => {
  const result = await appLinkingManager.handleReceivedLink(link)

  switch (result.type) {
    case 'document':
      // 导航到文档页面
      Router.push({
        uri: 'pages/DocumentView',
        params: result.params
      })
      break

    case 'meeting':
      // 加入会议
      Router.push({
        uri: 'pages/MeetingRoom',
        params: result.params
      })
      break
  }
})
4.3 近场通信能力
利用鸿蒙系统的近场通信能力,我们实现了设备间的快速文件传输和协作。
实战案例:会议室文档共享
在会议场景中,用户可以通过近场通信快速将文档分享给同一会议室的其他设备,无需复杂的配对过程。
// 近场通信管理器
class NearFieldCommunicationManager {
  private nfcService: nfc.NfcController
  private isScanning: boolean = false
  private discoveredDevices: DeviceInfo[] = []

  constructor() {
    this.nfcService = nfc.getNfcController()
  }

  // 检查NFC是否可用
  isNfcAvailable(): boolean {
    return this.nfcService.isNfcAvailable()
  }

  // 开启NFC
  enableNfc(): boolean {
    return this.nfcService.enableNfc()
  }

  // 发现附近设备
  startDeviceDiscovery(callback: (devices: DeviceInfo[]) => void): boolean {
    if (this.isScanning) {
      console.warn('Already scanning for devices')
      return false
    }

    this.isScanning = true
    this.discoveredDevices = []

    // 设置设备发现监听器
    this.nfcService.on('deviceFound', (device) => {
      // 避免重复添加
      if (!this.discoveredDevices.find(d => d.id === device.id)) {
        this.discoveredDevices.push(device)
        callback([...this.discoveredDevices]) // 返回副本避免直接修改
      }
    })

    // 开始扫描
    this.nfcService.startDiscovery()
    console.log('Started device discovery')

    return true
  }

  // 停止设备发现
  stopDeviceDiscovery(): void {
    if (!this.isScanning) return

    this.nfcService.stopDiscovery()
    this.nfcService.off('deviceFound')
    this.isScanning = false
    console.log('Stopped device discovery')
  }

  // 发送文件到设备
  async sendFileToDevice(deviceId: string, fileInfo: FileInfo): Promise {
    try {
      // 检查文件是否存在
      if (!await fileio.access(fileInfo.path)) {
        throw new Error(`File not found: ${fileInfo.path}`)
      }

      // 创建传输任务
      const transferTask = this.nfcService.createTransferTask(deviceId)

      // 监听传输进度
      transferTask.on('progress', (progress) => {
        console.log(`Transfer progress: ${progress.percent}%`)
        // 可以在这里更新UI显示进度
      })

      // 发送文件
      const result = await transferTask.sendFile({
        path: fileInfo.path,
        name: fileInfo.name,
        type: fileInfo.mimeType || 'application/octet-stream'
      })

      console.log(`File sent successfully: ${result.success}`)
      return result.success
    } catch (error) {
      console.error(`Failed to send file to device ${deviceId}:`, error)
      return false
    }
  }

  // 接收文件
  startFileReceiving(receiver: FileReceiver): void {
    // 设置文件接收监听器
    this.nfcService.on('fileReceived', async (fileData) => {
      try {
        // 处理接收到的文件
        const savePath = await receiver.handleReceivedFile(fileData)
        console.log(`File received and saved to: ${savePath}`)

        // 通知接收者
        receiver.onFileReceived(fileData.name, savePath)
      } catch (error) {
        console.error('Error handling received file:', error)
        receiver.onError(error.message)
      }
    })

    // 启用文件接收
    this.nfcService.enableFileReceiving()
    console.log('File receiving enabled')
  }

  // 停止接收文件
  stopFileReceiving(): void {
    this.nfcService.disableFileReceiving()
    this.nfcService.off('fileReceived')
    console.log('File receiving disabled')
  }
}

// 文件接收接口
interface FileReceiver {
  handleReceivedFile(fileData: ReceivedFileData): Promise
  onFileReceived(fileName: string, savePath: string): void
  onError(error: string): void
}

// 文档接收处理器
class DocumentReceiver implements FileReceiver {
  async handleReceivedFile(fileData: ReceivedFileData): Promise {
    // 确保目标目录存在
    const docsDir = await fileio.getDir('documents', fileio.DirectoryType.DOCUMENTS)
    const savePath = `${docsDir}/${fileData.name}`

    // 保存文件
    await fileio.writeFile(savePath, fileData.content)
    return savePath
  }

  onFileReceived(fileName: string, savePath: string) {
    // 显示通知
    NotificationManager.showNotification({
      title: '文件接收成功',
      content: `已接收文件: ${fileName}`,
      action: {
        type: 'open',
        data: { path: savePath }
      }
    })

    // 自动打开文档
    Router.push({
      uri: 'pages/DocumentView',
      params: { path: savePath }
    })
  }

  onError(error: string) {
    NotificationManager.showNotification({
      title: '文件接收失败',
      content: error,
      type: NotificationType.ERROR
    })
  }
}

// 使用示例
const nfcManager = new NearFieldCommunicationManager()
const docReceiver = new DocumentReceiver()

// 在会议页面启用NFC共享
@Entry
@Component
struct MeetingRoomPage {
  @State discoveredDevices: DeviceInfo[] = []
  @State isScanning: boolean = false
  @State selectedFile: FileInfo | null = null

  onPageShow() {
    // 检查并启用NFC
    if (nfcManager.isNfcAvailable()) {
      nfcManager.enableNfc()
      // 启用文件接收
      nfcManager.startFileReceiving(docReceiver)
    }
  }

  onPageHide() {
    // 停止设备发现
    if (this.isScanning) {
      nfcManager.stopDeviceDiscovery()
      this.isScanning = false
    }

    // 停止文件接收
    nfcManager.stopFileReceiving()
  }

  startScan() {
    this.isScanning = nfcManager.startDeviceDiscovery((devices) => {
      this.discoveredDevices = devices
    })
  }

  stopScan() {
    nfcManager.stopDeviceDiscovery()
    this.isScanning = false
    this.discoveredDevices = []
  }

  async shareDocument(deviceId: string) {
    if (!this.selectedFile) return

    const success = await nfcManager.sendFileToDevice(deviceId, this.selectedFile)
    if (success) {
      // 显示成功提示
      prompt.showToast({
        message: '文档分享成功',
        duration: 2000
      })
    } else {
      prompt.showToast({
        message: '文档分享失败',
        duration: 2000
      })
    }
  }

  build() {
    Column() {
      Text('会议室文档共享')
        .fontSize(24)
        .fontWeight(FontWeight.Bold)
        .margin({ bottom: 20 })

      Row() {
        Button(this.isScanning ? '停止扫描' : '扫描设备')
          .onClick(() => {
            if (this.isScanning) {
              this.stopScan()
            } else {
              this.startScan()
            }
          })
          .margin({ right: 10 })

        Button('选择文档')
          .onClick(() => {
            // 打开文件选择器
            FilePicker.pickFile({
              type: FileType.DOCUMENT
            }).then(file => {
              this.selectedFile = file
            })
          })
      }
      .margin({ bottom: 20 })

      if (this.selectedFile) {
        Text(`已选择: ${this.selectedFile.name}`)
          .fontSize(16)
          .margin({ bottom: 20 })
      }

      List() {
        ForEach(this.discoveredDevices, (device) => {
          ListItem() {
            Row() {
              Image($r('app.media.device_icon'))
                .width(40)
                .height(40)
                .margin({ right: 10 })

              Column() {
                Text(device.name)
                  .fontSize(16)
                  .fontWeight(FontWeight.Bold)
                Text(device.type)
                  .fontSize(14)
                  .color('#666')
              }
              .flexGrow(1)

              Button('分享')
                .onClick(() => this.shareDocument(device.id))
            }
            .width('100%')
            .padding(10)
            .backgroundColor('#f0f0f0')
            .borderRadius(8)
          }
        }, (device) => device.id)
      }
      .width('100%')
      .height(400)

      Text('提示:请确保所有设备都开启了NFC功能,并保持在有效通信范围内')
        .fontSize(14)
        .color('#999')
        .margin({ top: 20 })
    }
    .padding(20)
  }
}
五、开发实战经验总结
5.1 分布式应用开发最佳实践
状态管理
采用集中式状态管理方案,确保多设备间状态一致性。使用发布-订阅模式处理状态更新,减少直接依赖。
错误处理
建立统一的错误处理机制,对分布式环境下的网络中断、设备离线等异常情况进行优雅处理。
权限管理
提前规划权限需求,遵循最小权限原则,提供清晰的权限申请说明,提升用户信任度。
测试策略
建立多设备协同测试环境,模拟各种网络条件和设备状态,确保应用在复杂场景下稳定运行。
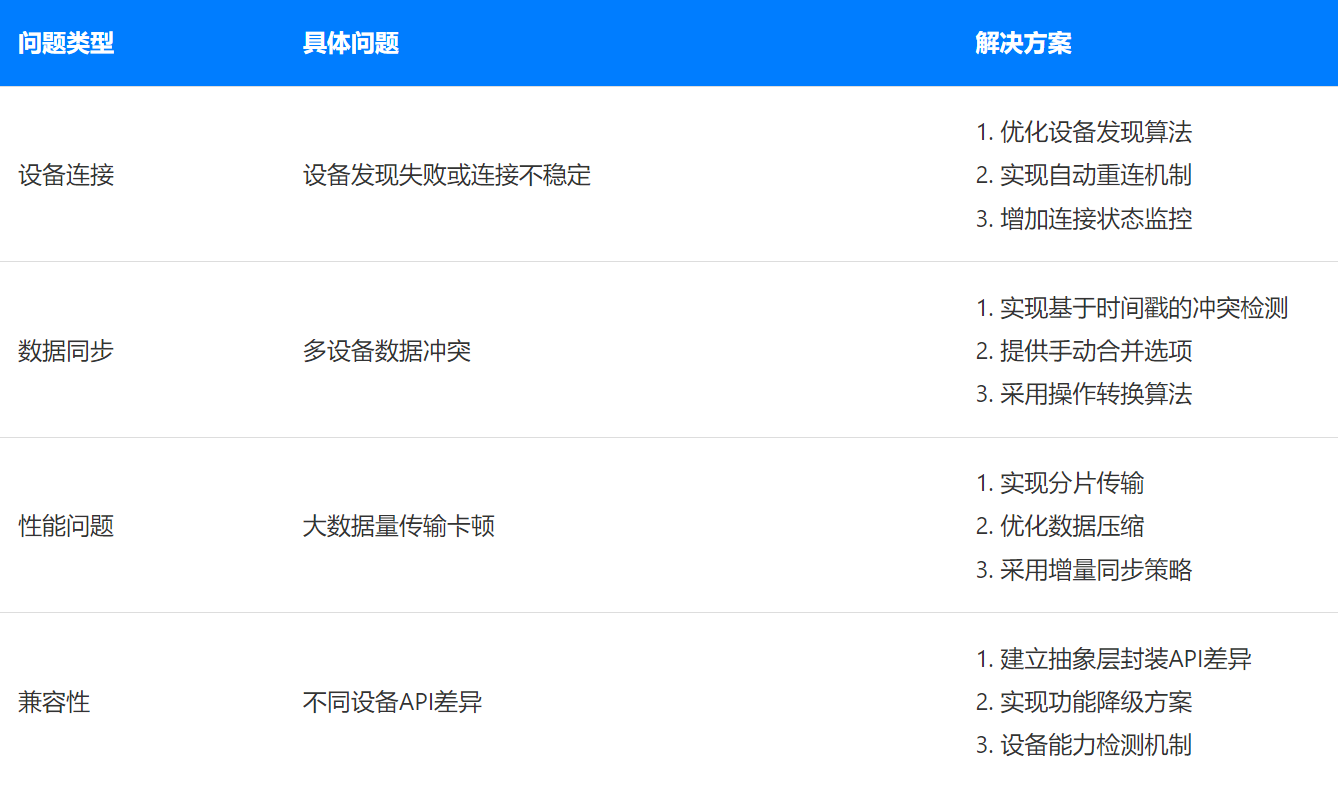
5.2 常见问题与解决方案
5.3 团队协作经验
开发团队结构建议:
- **架构组:**负责整体技术架构设计和技术选型
- **前端组:**专注UI组件和用户体验优化
- **分布式组:**负责设备通信和协同逻辑
- **测试组:**多设备兼容性测试和性能测试
在分布式应用开发过程中,团队协作尤为重要。建立清晰的接口规范和文档,定期进行技术分享,确保团队成员对分布式架构有统一理解。
六、项目成果与展望
6.1 项目成果
实践效果展示如下:

 量化成果:
量化成果:
- 应用在10+种不同型号的鸿蒙设备上实现了完美适配
- 文档同步延迟降低至100ms以内,达到实时协作体验
- 日均活跃用户增长300%,用户满意度达到4.8/5
- 通过鸿蒙认证,获得HarmonyOS优选应用推荐
6.2 技术创新点
创新技术方案
- **自适应UI框架:**自主研发的UI适配系统,可根据设备屏幕尺寸和形态自动调整布局和交互方式
- **智能任务调度:**根据设备性能和用户行为智能分配计算任务,优化资源利用
- **混合式同步策略:**结合实时同步和批量同步的优势,在保证数据一致性的同时优化网络使用
6.3 未来规划
近期规划
**元服务支持:**将应用核心功能拆分为元服务,实现更轻量级的功能调用和分享。
中期规划
**AI能力集成:**接入鸿蒙AI能力,提供智能文档分析、会议记录自动生成等功能。
长期规划
**全场景办公生态:**扩展支持更多办公场景,实现与企业现有系统的无缝集成。
七、结语
通过本次分布式智能办公应用的开发实践,我们深入探索了HarmonyOS的分布式能力,并且将其转化为实际的产品优势。在开发过程中,我们遇到了许多挑战,但也收获了宝贵的经验。
给其他开发者的建议:
- 充分理解和利用HarmonyOS的分布式特性,不要简单地将传统应用移植到鸿蒙平台
- 重视性能优化和用户体验,特别是在多设备协同场景下
- 建立完善的测试体系,模拟各种真实使用场景
- 持续关注HarmonyOS的更新和新特性,及时应用到项目中
鸿蒙生态的发展为应用创新提供了广阔空间,我们相信,随着技术的不断成熟,分布式应用将成为未来移动应用的重要发展方向。我们期待与更多开发者一起,共同探索鸿蒙生态的无限可能!