1、引入依赖项
xml
    <properties>
        <maven.compiler.source>8</maven.compiler.source>
        <maven.compiler.target>8</maven.compiler.target>
        <project.build.sourceEncoding>UTF-8</project.build.sourceEncoding>
        <grpc.version>1.64.2</grpc.version>
    </properties>
    <dependencies>
        <!-- @Slf4j日志-->
<!--        <dependency>-->
<!--            <groupId>org.projectlombok</groupId>-->
<!--            <artifactId>lombok</artifactId>-->
<!--            <version>1.18.28</version>-->
<!--        </dependency>-->

        <!-- @Slf4j日志【这里没有SpringBoot自动引入依赖, 手动引入全部依赖】-->
        <dependency>
            <groupId>org.slf4j</groupId>
            <artifactId>slf4j-api</artifactId>
            <version>1.8.0-beta4</version>
        </dependency>
        <dependency>
            <groupId>org.slf4j</groupId>
            <artifactId>slf4j-log4j12</artifactId>
            <version>1.8.0-beta4</version>
        </dependency>
        <dependency>
            <groupId>log4j</groupId>
            <artifactId>log4j</artifactId>
            <version>1.2.17</version>
        </dependency>

        <!-- gRPC 和 Protocol Buffers 的依赖-->
        <dependency>
            <groupId>io.grpc</groupId>
            <artifactId>grpc-netty-shaded</artifactId>
            <version>${grpc.version}</version>
        </dependency>
        <dependency>
            <groupId>io.grpc</groupId>
            <artifactId>grpc-protobuf</artifactId>
            <version>${grpc.version}</version>
        </dependency>
        <dependency>
            <groupId>io.grpc</groupId>
            <artifactId>grpc-stub</artifactId>
            <version>${grpc.version}</version>
        </dependency>
        <dependency>
            <groupId>io.grpc</groupId>
            <artifactId>grpc-util</artifactId>
            <version>${grpc.version}</version>
        </dependency>
        <dependency>
            <groupId>com.google.api.grpc</groupId>
            <artifactId>proto-google-common-protos</artifactId>
            <version>2.17.0</version>
        </dependency>

        <!--添加 annotation 注解相关的依赖-->
        <dependency>
            <groupId>javax.annotation</groupId>
            <artifactId>javax.annotation-api</artifactId>
            <version>1.3.2</version>
        </dependency>
        <!--添加 Protobuf 依赖, 确保 Protobuf 插件版本与 protobuf-java 版本兼容-->
        <dependency>
            <groupId>com.google.protobuf</groupId>
            <artifactId>protobuf-java</artifactId>
<!--            <version>3.22.3</version>-->
            <version>4.33.0</version>
        </dependency>

    </dependencies>


    <build>
        <extensions>
            <extension>
                <groupId>kr.motd.maven</groupId>
                <artifactId>os-maven-plugin</artifactId>
                <version>1.5.0.Final</version>
            </extension>
        </extensions>
        <plugins>
            <!--  reuse when you need to update grpc model  -->
            <plugin>
                <groupId>org.xolstice.maven.plugins</groupId>
                <artifactId>protobuf-maven-plugin</artifactId>
                <version>0.6.1</version>
                <configuration>
<!--                    <protocArtifact>com.google.protobuf:protoc:3.22.3:exe:${os.detected.classifier}</protocArtifact>-->
                    <protocArtifact>com.google.protobuf:protoc:4.33.0:exe:${os.detected.classifier}</protocArtifact>
                    <pluginId>grpc-java</pluginId>
                    <pluginArtifact>io.grpc:protoc-gen-grpc-java:1.64.2:exe:${os.detected.classifier}</pluginArtifact>
                </configuration>
                <executions>
                    <execution>
                        <goals>
                            <goal>compile</goal>
                            <goal>compile-custom</goal>
                        </goals>
                    </execution>
                </executions>
            </plugin>
        </plugins>
    </build>
2、编写 my_service.proto 文件
java
syntax = "proto3";

package com.ctsi.grpc.proto;

// 创建一个.proto文件来定义你的 gRPC 服务和消息:
//     代码定义了一个名为 MyService 的服务,其中有一个名为 BidirectionalStream 的方法,它接收一个MyRequest流并返回一个MyResponse流。
//     MyRequest和MyResponse都包含一个名为message的字段。

// 进入项目的根目录,命令行运行以下命令,生成Java代码:
//     protoc -I./ --java_out=./src/main/java/ --grpc-java_out=./src/main/java/ ./src/main/java/com/ctsi/grpc/proto/my_service.proto

// 说明:执行上述命令,系统需安装:1、安装 protoc  2、安装 gRPC Java 插件,参考: https://zhuanlan.zhihu.com/p/1893702967716213732

service MyService {
  rpc BidirectionalStream (stream MyRequest) returns (stream MyResponse) {}
}

message MyRequest {
  string message = 1;
}

message MyResponse {
  string message = 1;
}
3、生成Java代码(生成协议)
3.1 安装 protoc
Protobuf 的 GitHub 地址:https://github.com/protocolbuffers/protobuf/releases
我们可以下载其中的windows版本的来使用,解压到任意非中文目录下,其中的bin目录中的protoc.exe可以帮助我们编译:
3.2 安装插件 protoc-gen-grpc-java
插件下载地址:https://link.zhihu.com/?target=https%3A//repo1.maven.org/maven2/io/grpc/protoc-gen-grpc-java/1.64.2/
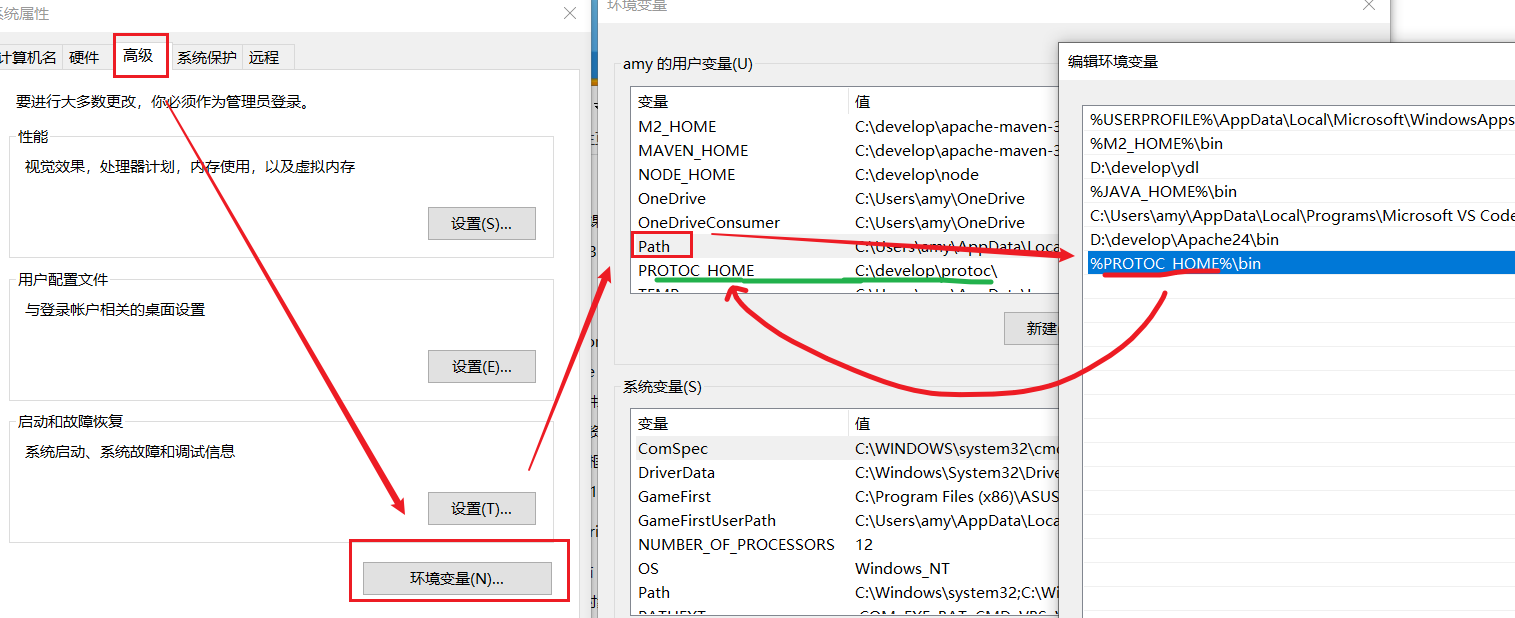
选择自己的系统环境匹配的文件下载,下载后解压到和protoc同样的目录,因为这个目录已经添加到环境变量path中,否则你得再添加一个path环境变量
3.3 进入项目的根目录,运行以下命令,生成Java代码(生成协议)
bash
protoc -I./ --java_out=./src/main/java/ --grpc-java_out=./src/main/java/ ./src/main/java/com/ctsi/grpc/proto/my_service.proto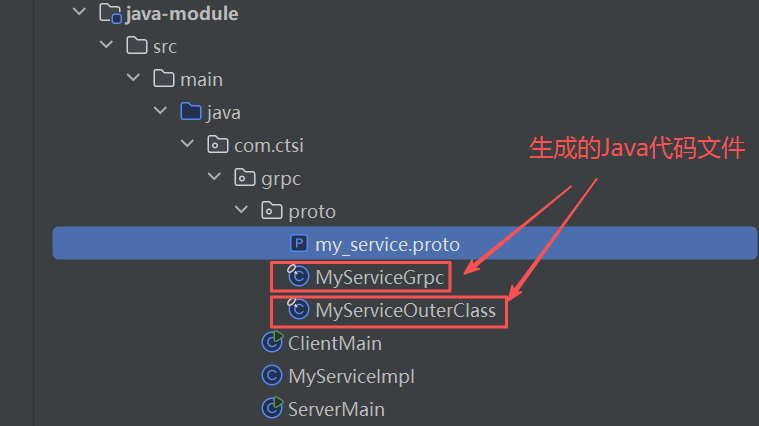
4、编写实现服务接口的类 MyServiceImpl
该段代码实现了MyServiceGrpc.MyServiceImplBase抽象类,并重写了bidirectionalStream方法。该方法返回一个StreamObserver对象,用于处理客户端发送的流式请求,并反馈流式响应。
java
package com.ctsi.grpc;

import com.ctsi.grpc.proto.MyServiceGrpc;
import io.grpc.stub.StreamObserver;

import com.ctsi.grpc.proto.MyServiceOuterClass.MyRequest;
import com.ctsi.grpc.proto.MyServiceOuterClass.MyResponse;

/**
 * 该类实现了MyServiceGrpc.MyServiceImplBase抽象类,并重写了bidirectionalStream方法。
 */
public class MyServiceImpl extends MyServiceGrpc.MyServiceImplBase {

    /**
     * 该方法返回一个StreamObserver对象,用于处理客户端发送的流式请求,并发送流式响应。
     *
     * @param responseObserver 发送流式响应给客户端
     * @return StreamObserver对象,用于接收客户端发送的流式请求,并发送流式响应。
     */
    @Override
    public StreamObserver<MyRequest> bidirectionalStream(StreamObserver<MyResponse> responseObserver) {

        return new StreamObserver<MyRequest>() {

            @Override
            public void onNext(MyRequest request) {
                // 接收客户端发来的消息
                String message = request.getMessage();
                System.out.println("服务端收到消息: " + message);
                // 构造并发送响应消息
                MyResponse response = MyResponse.newBuilder().setMessage("Hello, " + message).build();
                responseObserver.onNext(response);
            }

            @Override
            public void onError(Throwable t) {
                // 处理错误
                responseObserver.onError(t);
            }

            @Override
            public void onCompleted() {
                // 完成双向流
                responseObserver.onCompleted();
            }
        };
    }
}
5、编写一个gRPC服务器的类,并启动
创建一个gRPC服务器,并将 MyServiceImpl 服务添加到服务器中。服务器监听50051端口,并在启动后等待终止
java
package com.ctsi.grpc;

import io.grpc.Server;
import io.grpc.ServerBuilder;
import java.io.IOException;

public class Server{

    public static void main(String[] args) throws IOException, InterruptedException {

        Server server = ServerBuilder.forPort(50051)
                .addService(new MyServiceImpl())
                .build();

        /// 服务端启动
        server.start();
        System.out.println("Server started");

        /// 服务端阻塞等待
        server.awaitTermination();
        System.out.println("Server stoped !");
    }
}
6、编写一个gRPC客户端的类,并启动
创建一个GRPC客户端来调用上面的服务
java
package com.ctsi.grpc;
import com.ctsi.grpc.proto.MyServiceGrpc;
import com.ctsi.grpc.proto.MyServiceOuterClass;
import io.grpc.ManagedChannel;
import io.grpc.ManagedChannelBuilder;
import io.grpc.stub.StreamObserver;
import java.util.concurrent.CountDownLatch;
import java.util.concurrent.TimeUnit;
public class ClientMain {
final static CountDownLatch finishLatch = new CountDownLatch(1);
public static void main(String[] args) throws Exception {
ManagedChannel channel = ManagedChannelBuilder.forTarget("localhost:50051").usePlaintext().build();
MyServiceGrpc.MyServiceStub stub = MyServiceGrpc.newStub(channel);
/// 定义一个流观察者,用于接收消息
StreamObserver<MyServiceOuterClass.MyResponse> streamObserver = new StreamObserver<MyServiceOuterClass.MyResponse>() {
@Override
public void onNext(MyServiceOuterClass.MyResponse myResponse) {
System.out.println("客户端收到消息:" + myResponse.getMessage());
}
@Override
public void onError(Throwable throwable) {
}
@Override
public void onCompleted() {
System.out.println("finished......");
finishLatch.countDown();
}
};
/// 定义一个双向流观察者,用于发送/接收消息
StreamObserver<MyServiceOuterClass.MyRequest> requestObserver = stub.bidirectionalStream(streamObserver);
try {
for (int i = 0; i < 10; ++i) {
MyServiceOuterClass.MyRequest request = MyServiceOuterClass.MyRequest.newBuilder().setMessage("this is client-" + i).build();
// 发送消息
requestObserver.onNext(request);
}
} catch (Exception e) {
System.out.println(e.getMessage());
}
// Mark the end of requests
requestObserver.onCompleted();
finishLatch.await(10, TimeUnit.MINUTES);
}
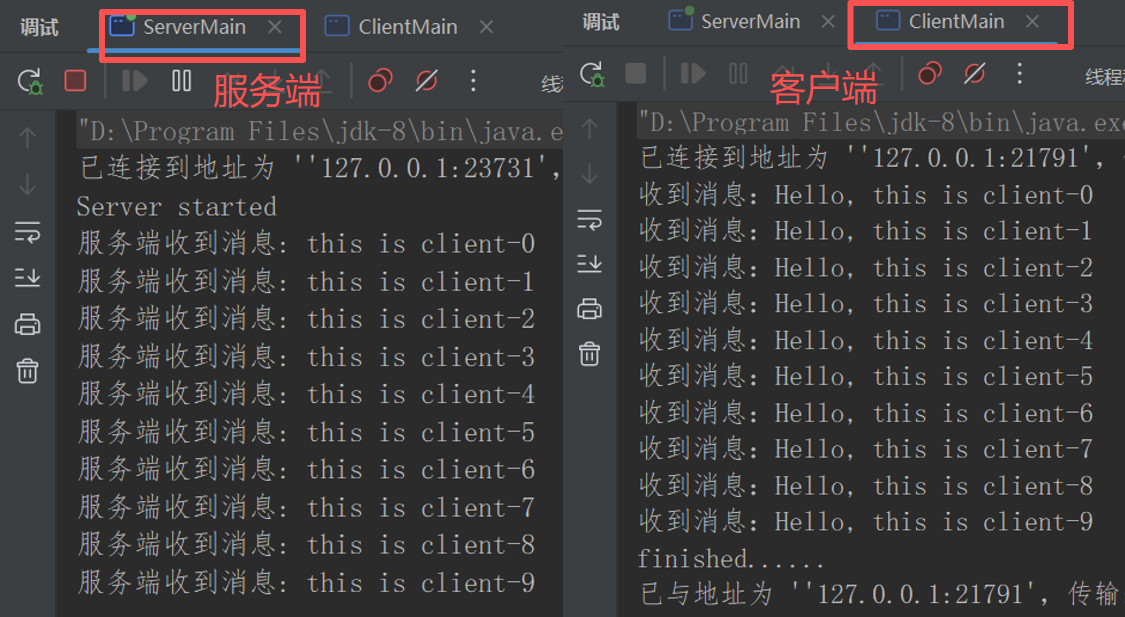
}服务端和客户端的运行日志