Elasticsearch分布式部署
- [一、 主机](#一、 主机)
- 二、系统初始化
- 三、部署Elasticsearch
-
- [1. 下载Elasticsearch](#1. 下载Elasticsearch)
- [2. 配置修改](#2. 配置修改)
-
- [2.1. JVM参数修改](#2.1. JVM参数修改)
- [2.2. elasticsearch配置修改](#2.2. elasticsearch配置修改)
- [3. 启动集群](#3. 启动集群)
-
- [3.1. 注册集群节点](#3.1. 注册集群节点)
- [3.2. 查看集群状态](#3.2. 查看集群状态)
- [3.3. 查看主节点](#3.3. 查看主节点)
- 四、部署kibana
-
-
- [1. 下载kibana](#1. 下载kibana)
- [2. 配置文件修改](#2. 配置文件修改)
-
- [2.1. 创建自签名证书](#2.1. 创建自签名证书)
- [2.2. 重置内置用户密码](#2.2. 重置内置用户密码)
- [2.3. 主配置文件修改](#2.3. 主配置文件修改)
- [2.4. 启动kibana](#2.4. 启动kibana)
-
一、 主机
| ip | 主机名 |
|---|---|
| 192.168.25.250 | ES01 |
| 192.168.25.130 | ES02 |
| 192.168.25.131 | ES03 |
二、系统初始化
所有主机执行:
systemctl disable firewalld --now
sed -i 's/SELINUX=enforcing/SELINUX=disabled/g' /etc/selinux/config
setenforce 0
swapoff -a && sed -i "s/^[^#]*swap*/#&/g" /etc/fstab
groupadd elasticsearch
useradd elasticsearch
useradd -g elasticsearch elasticsearch
echo "elasticsearch" | passwd --stdin elasticsearch
echo "elasticsearch    ALL=(ALL)    NOPASSWD: ALL" >> /etc/sudoers.d/elasticsearch
echo "
# 设置elasticsearch用户进程能打开的最大文件句柄
elasticsearch  -  nofile  65535
# 设置elasticsearch用户进程锁定使用物理内存
elasticsearch soft memlock unlimited
elasticsearch hard memlock unlimited
# 设置elasticsearch 用户进程创建的最大线程数
elasticsearch soft nproc 4096
elasticsearch hard  nproc 4096
# 不限制elasticsearch用户创建文件的大小
elasticsearch soft fsize unlimited
elasticsearch hard  fsize unlimited
"  >> /etc/security/limits.conf
# 重新登录shell终端生效
echo "
# 设置个进程可创建的最大内存映射区域数量
vm.max_map_count=262144
# 设置tcp重传个数
net.ipv4.tcp_retries2=5
"  >> /etc/sysctl.conf
# 立即生效
sysctl -p
hosts配置:
echo "192.168.25.250	ES01
192.168.25.130	ES02
192.168.25.131	ES03 " >> /etc/hosts
三、部署Elasticsearch
1. 下载Elasticsearch
所有主机执行:
mkdir /opt/es && cd /opt/es
wget https://artifacts.elastic.co/downloads/elasticsearch/elasticsearch-9.1.5-linux-x86_64.tar.gz
tar -zxvf elasticsearch-9.1.5-linux-x86_64.tar.gz
chown elasticsearch.elasticsearch * -R
su elasticsearch
cd elasticsearch-9.1.5
2. 配置修改
2.1. JVM参数修改
所有主机执行:
config/jvm.options.d/custom_jvm.options:
clike
# 统一内存堆栈大小,不可超过物理内存50%
-Xms2g
-Xmx2g

# 使用G1 垃圾回收
-XX:+UseG1GC

# es 运行时产生的临时可执行文件
-Djava.io.tmpdir=/home/elasticsearch/es/tmp

# 指定gc参数及日志文件存放地址
-Xlog:gc*,gc+age=trace,safepoint:file=/home/elasticsearch/es/logs/gc.log:utctime,level,pid,tags:filecount=32,filesize=64m

#  JVM 内存溢出时,将日志文件写入指的目录下
-XX:HeapDumpPath=/home/elasticsearch/es/HeapDump
目录文件提前下载:
mkdir -pv /home/elasticsearch/es/tmp
mkdir -pv /home/elasticsearch/es/HeapDump
mkdir -pv /home/elasticsearch/es/data
mkdir -pv /home/elasticsearch/es/logs
2.2. elasticsearch配置修改
ES01:
config/elasticsearch.yml:
clike
# 集群名称
cluster.name: elasticsearch-cluster

# 节点角色
node.roles: [master, data]

# 节点名称
node.name: ES01

# 设置日志和数据存储目录,建议是设置到es目录外,应为es升级会删除数据
path.data: /home/elasticsearch/es/data
path.logs: /home/elasticsearch/es/logs

# 锁定es必须使用物理内存
bootstrap.memory_lock: true

# 设置网络接口和端口绑定
network.host: 0.0.0.0
http.port: 9200

# 设置选举使用的9300端口绑定到本地所有接口上
transport.host: 0.0.0.0

# 设置是否允许使用通配符删除索引
action.destructive_requires_name: false

# 客户端通过http接口发送给 Elasticsearch 的请求体最大值
http.max_content_length: 100mb
启动elasticsearch,生成安全配置
./bin/elasticsearch停止elasticsearch,新增集群配置
clike
# 集群名称
cluster.name: elasticsearch-cluster

# 节点角色
node.roles: [master, data]

# 节点名称
node.name: ES01

# 设置日志和数据存储目录,建议是设置到es目录外,应为es升级会删除数据
path.data: /home/elasticsearch/es/data
path.logs: /home/elasticsearch/es/logs

# 锁定es必须使用物理内存
bootstrap.memory_lock: true

# 设置网络接口和端口绑定
network.host: 0.0.0.0
http.port: 9200

# 设置选举使用的9300端口绑定到本地所有接口上
transport.host: 0.0.0.0

# 设置是否允许使用通配符删除索引
action.destructive_requires_name: false

# 客户端通过http接口发送给 Elasticsearch 的请求体最大值
http.max_content_length: 100mb

#----------------------- BEGIN SECURITY AUTO CONFIGURATION -----------------------
#
# The following settings, TLS certificates, and keys have been automatically
# generated to configure Elasticsearch security features on 23-10-2025 19:29:37
#
# --------------------------------------------------------------------------------

# Enable security features
xpack.security.enabled: true

xpack.security.enrollment.enabled: true

# Enable encryption for HTTP API client connections, such as Kibana, Logstash, and Agents
xpack.security.http.ssl:
  enabled: true
  keystore.path: certs/http.p12

# Enable encryption and mutual authentication between cluster nodes
xpack.security.transport.ssl:
  enabled: true
  verification_mode: certificate
  keystore.path: certs/transport.p12
  truststore.path: certs/transport.p12
# Create a new cluster with the current node only
# Additional nodes can still join the cluster later
# 节点发现
cluster.initial_master_nodes: ["ES01","ES02","ES03"]
# 哪些节点可以参与主节点选举
discovery.seed_hosts: ["192.168.25.250:9300", "192.168.25.130:9300", "192.168.25.131:9300"]
#----------------------- END SECURITY AUTO CONFIGURATION -------------------------
重新启动:
./bin/elasticsearch获取节点注册令牌:
./bin/elasticsearch-create-enrollment-token -s node
clike
eyJ2ZXIiOiI4LjE0LjAiLCJhZHIiOlsiMTkyLjE2OC4yNS4yNTA6OTIwMCJdLCJmZ3IiOiJiZDVkNzg1MWQwNWYwNjg0NjZjZGJhYmEzZDJhNzcwMWQ4NzAyMmQ5MjZkN2I1YmY4NDRjNDUyNzc1MTkxMzk5Iiwia2V5IjoiWEt1U0Vwb0JPRjNJZlNRQTJ0eXE6dzg0UlZkZEltdTJTcTFnTW1IVVpkQSJ9其他节点配置文件:
ES02:
clike
# 集群名称
cluster.name: elasticsearch-cluster

# 节点角色
node.roles: [master, data]

# 节点名称
node.name: ES02

# 设置日志和数据存储目录,建议是设置到es目录外,应为es升级会删除数据
path.data: /home/elasticsearch/es/data
path.logs: /home/elasticsearch/es/logs

# 锁定es必须使用物理内存
bootstrap.memory_lock: true

# 设置网络接口和端口绑定
network.host: 0.0.0.0
http.port: 9200

# 设置选举使用的9300端口绑定到本地所有接口上
transport.host: 0.0.0.0

# 设置是否允许使用通配符删除索引
action.destructive_requires_name: false

# 客户端通过http接口发送给 Elasticsearch 的请求体最大值
http.max_content_length: 100mbES03:
clike
# 集群名称
cluster.name: elasticsearch-cluster

# 节点角色
node.roles: [master, data]

# 节点名称
node.name: ES03

# 设置日志和数据存储目录,建议是设置到es目录外,应为es升级会删除数据
path.data: /home/elasticsearch/es/data
path.logs: /home/elasticsearch/es/logs

# 锁定es必须使用物理内存
bootstrap.memory_lock: true

# 设置网络接口和端口绑定
network.host: 0.0.0.0
http.port: 9200

# 设置选举使用的9300端口绑定到本地所有接口上
transport.host: 0.0.0.0

# 设置是否允许使用通配符删除索引
action.destructive_requires_name: false

# 客户端通过http接口发送给 Elasticsearch 的请求体最大值
http.max_content_length: 100mb
3. 启动集群
3.1. 注册集群节点
使用ES01生成的注册节点的令牌,启动ES02,ES03节点生成配置:
./bin/elasticsearch --enrollment-token eyJ2ZXIiOiI4LjE0LjAiLCJhZHIiOlsiMTkyLjE2OC4yNS4yNTA6OTIwMCJdLCJmZ3IiOiJiZDVkNzg1MWQwNWYwNjg0NjZjZGJhYmEzZDJhNzcwMWQ4NzAyMmQ5MjZkN2I1YmY4NDRjNDUyNzc1MTkxMzk5Iiwia2V5IjoiWEt1U0Vwb0JPRjNJZlNRQTJ0eXE6dzg0UlZkZEltdTJTcTFnTW1IVVpkQSJ9 生成的配置如下:
节点生成配置后之前在需要启动就直接
./bin/elasticsearch -d启动即可
clike
#----------------------- BEGIN SECURITY AUTO CONFIGURATION -----------------------
#
# The following settings, TLS certificates, and keys have been automatically
# generated to configure Elasticsearch security features on 23-10-2025 19:43:06
#
# --------------------------------------------------------------------------------

# Enable security features
xpack.security.enabled: true

xpack.security.enrollment.enabled: true

# Enable encryption for HTTP API client connections, such as Kibana, Logstash, and Agents
xpack.security.http.ssl:
  enabled: true
  keystore.path: certs/http.p12

# Enable encryption and mutual authentication between cluster nodes
xpack.security.transport.ssl:
  enabled: true
  verification_mode: certificate
  keystore.path: certs/transport.p12
  truststore.path: certs/transport.p12
# Discover existing nodes in the cluster
discovery.seed_hosts: ["192.168.25.250:9300", "192.168.25.130:9300"]

#----------------------- END SECURITY AUTO CONFIGURATION -------------------------
3.2. 查看集群状态
集群模式必须保存两个ES节点正常运行、如果只剩下一个ES集群将无法工作。
./bin/elasticsearch-reset-password -u elastic -i重置elasticsearch密码
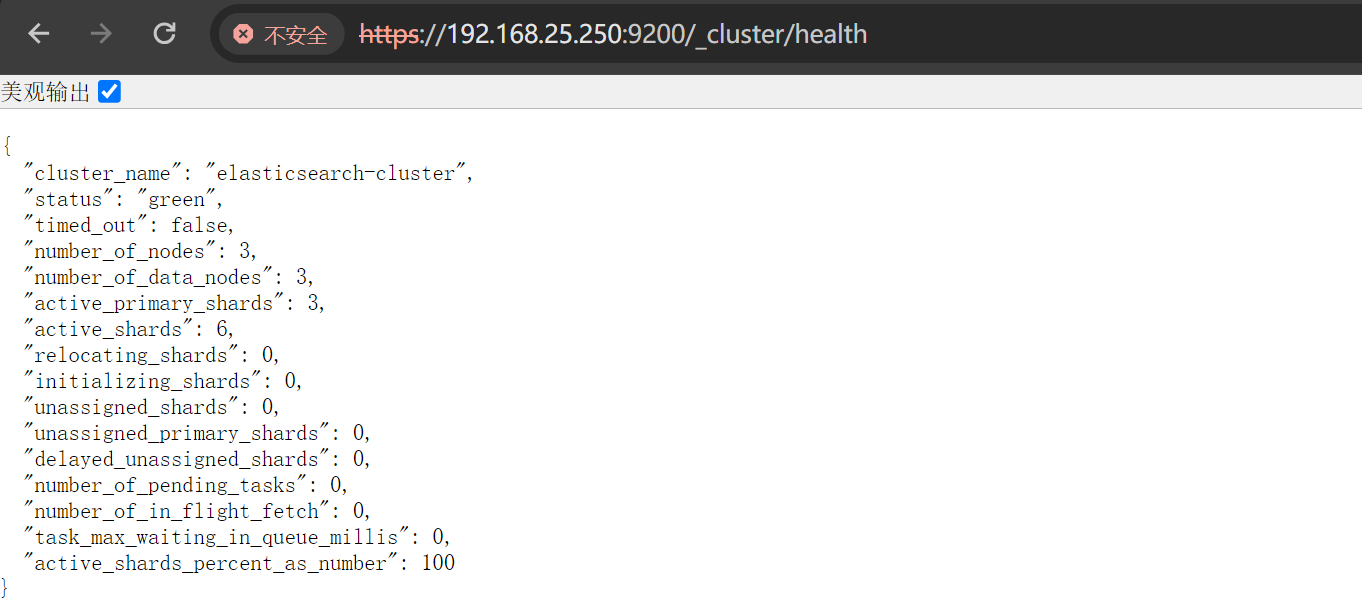
"status": "green":green集群状态正常"number_of_nodes": 3:总节点数为3"active_primary_shards": 3:活动的节点"number_of_data_nodes": 3:数据节点
3.3. 查看主节点
curl -u elastic:Elastic@2025 -k https://localhost:9200/_cat/master?v
clike
id                     host           ip             node
Hhe2U0ksT8WTiwfkKXCrIA 192.168.25.130 192.168.25.130 ES02
当前ES02为主节点
四、部署kibana
1. 下载kibana
cd /opt/es
sudo wget https://artifacts.elastic.co/downloads/kibana/kibana-9.1.5-linux-x86_64.tar.gz
sudo tar -zxvf kibana-9.1.5-linux-x86_64.tar.gz
sudo chown elasticsearch.elasticsearch kibana-9.1.5 -R
cd kibana-9.1.5
2. 配置文件修改
2.1. 创建自签名证书
mkdir ssl && cd ssl
# 创建CA 私钥
openssl genrsa -out ca.key 2048
# 创建CA 自签名证书、即CA 根证书
openssl req -x509 -new -nodes -key ca.key -sha256 -days 36500 -out ca.crt -subj "/C=CN/ST=FUJIAN/L=XIAMEN/O=elastic/CN=elastic"
# 创建服务器 私钥
openssl genrsa -out kibana-server.key 2048
# 创建证书请求
openssl req -new -key kibana-server.key -out kibana-server.csr -subj "/C=CN/ST=FUJIAN/L=XIAMEN/O=elastic-server/CN=elastic-server"
# 使用CA 私钥对证书请求进行签名,并生成kibana-server.crt 证书、信任ca.crt 根证书
openssl x509 -req -in kibana-server.csr -CA ca.crt -CAkey ca.key -CAcreateserial -out kibana-server.crt -days 36500
2.2. 重置内置用户密码
# 在ES生成kibana_system密码
./bin/elasticsearch-reset-password -u kibana_system -b
clike
Password for the [kibana_system] user successfully reset.
New value: OVV3s3fuI*BExIn8Hz9I
2.3. 主配置文件修改
config/kibana.yml:
clike
# 接口地址和端口号
server.port: 5601
server.host: "0.0.0.0"  # 允许所有IP访问
# 公网域名(若通过域名访问,建议配置,如 "https://kibana.example.com")
# server.publicBaseUrl: ""
# 限制客户端请求体大小(5MB,合理,避免大请求攻击)
server.maxPayload: 5242880
# Kibana服务名(自定义,便于识别)
server.name: "kibana-server"
# =================== System: Logging ===================
# 日志级别(info 适合生产,平衡信息量和性能)
logging.root.level: info
# 日志输出器(仅保留滚动文件配置,支持按大小轮转)
logging.appenders.default:
  type: rolling-file
  fileName: logs/kibana.log  # 日志路径,当前路径下
  policy:
    type: size-limit
    size: 100mb  # 单文件100MB
  strategy:
    type: numeric
    max: 10  # 保留10个历史文件(总约1GB)
  layout:
    type: json  # JSON格式,便于日志分析
# =================== System: Other ===================
# 自定义数据目录
path.data: data  # 数据路径(当前目录下的data)
# 性能指标采样间隔/ms
ops.interval: 5000
# 界面语言
i18n.locale: "zh-CN"
# PID文件路径(系统标准目录,更规范)
# pid.file: kibana.pid             # pid文件路径
# =================== Saved Objects: Migrations ===================
# 迁移配置(生产环境优化)
migrations.batchSize: 500  # 单批迁移500个对象,降低内存压力
migrations.maxBatchSizeBytes: 90mb  # 小于ES的http.max_content_length(默认100mb)
migrations.retryAttempts: 15  # 重试次数

# 新增配置
server.ssl.enabled: true
server.ssl.certificate: /opt/es/kibana-9.1.5/ssl/kibana-server.crt
server.ssl.key: /opt/es/kibana-9.1.5/ssl/kibana-server.key
2.4. 启动kibana
这里是引用
./bin/kibana访问:ip:5601