视频:第16.1讲 platform设备驱动实验-驱动的分离与分层_哔哩哔哩_bilibili
文档:《【正点原子】I.MX6U嵌入式Linux驱动开发指南V1.81.pdf》五十四章
一、驱动的分离与分层
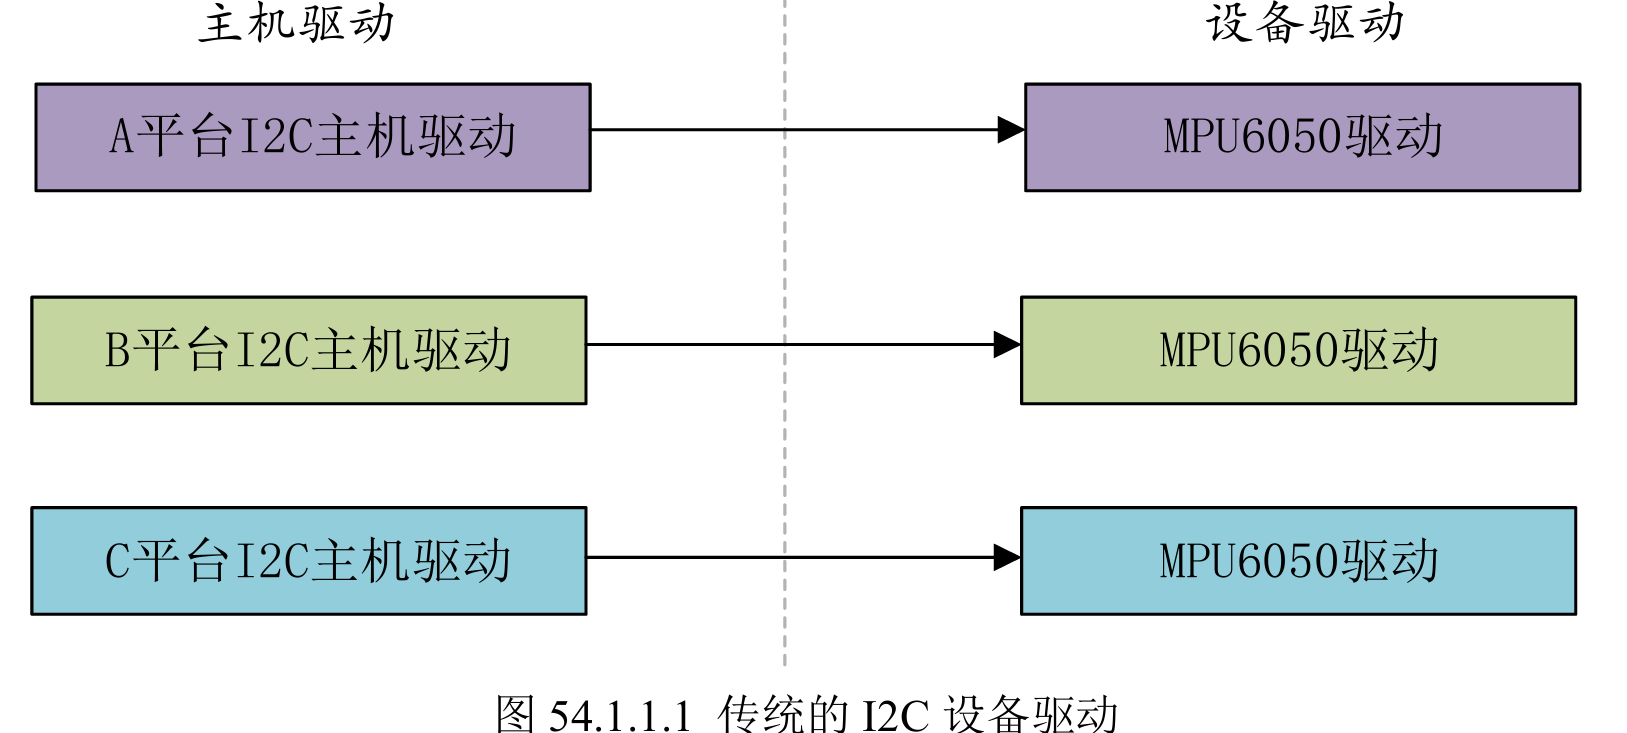
如果把传感器的驱动都写到一个.c文件里面,里面有传感器初始化、对某些开发板的IIC初始化巴拉巴拉,这时候想要将这个代码移植到另一个板子上 就需要很多修改。
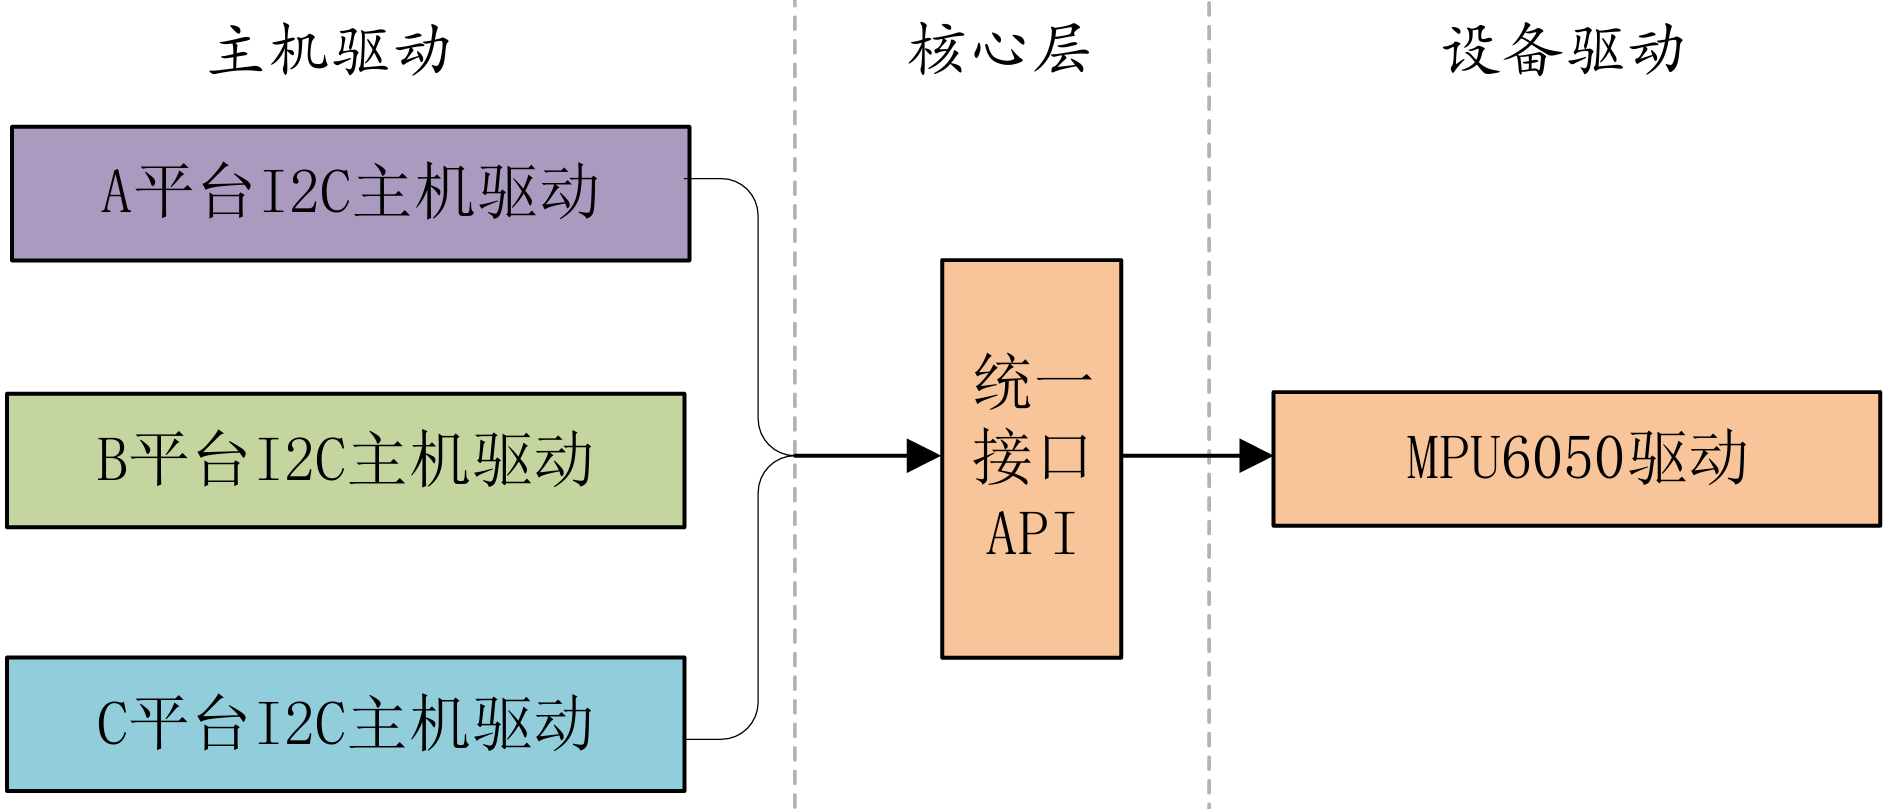
进行了分离后,就会有专门进行IIC初始化的文件,对外提供统一的接口,传感器初始化文件直接调用这个接口。移植时,只需要换成对应开发板的IIC文件即可。即主机控制器驱动和设备驱动分离。
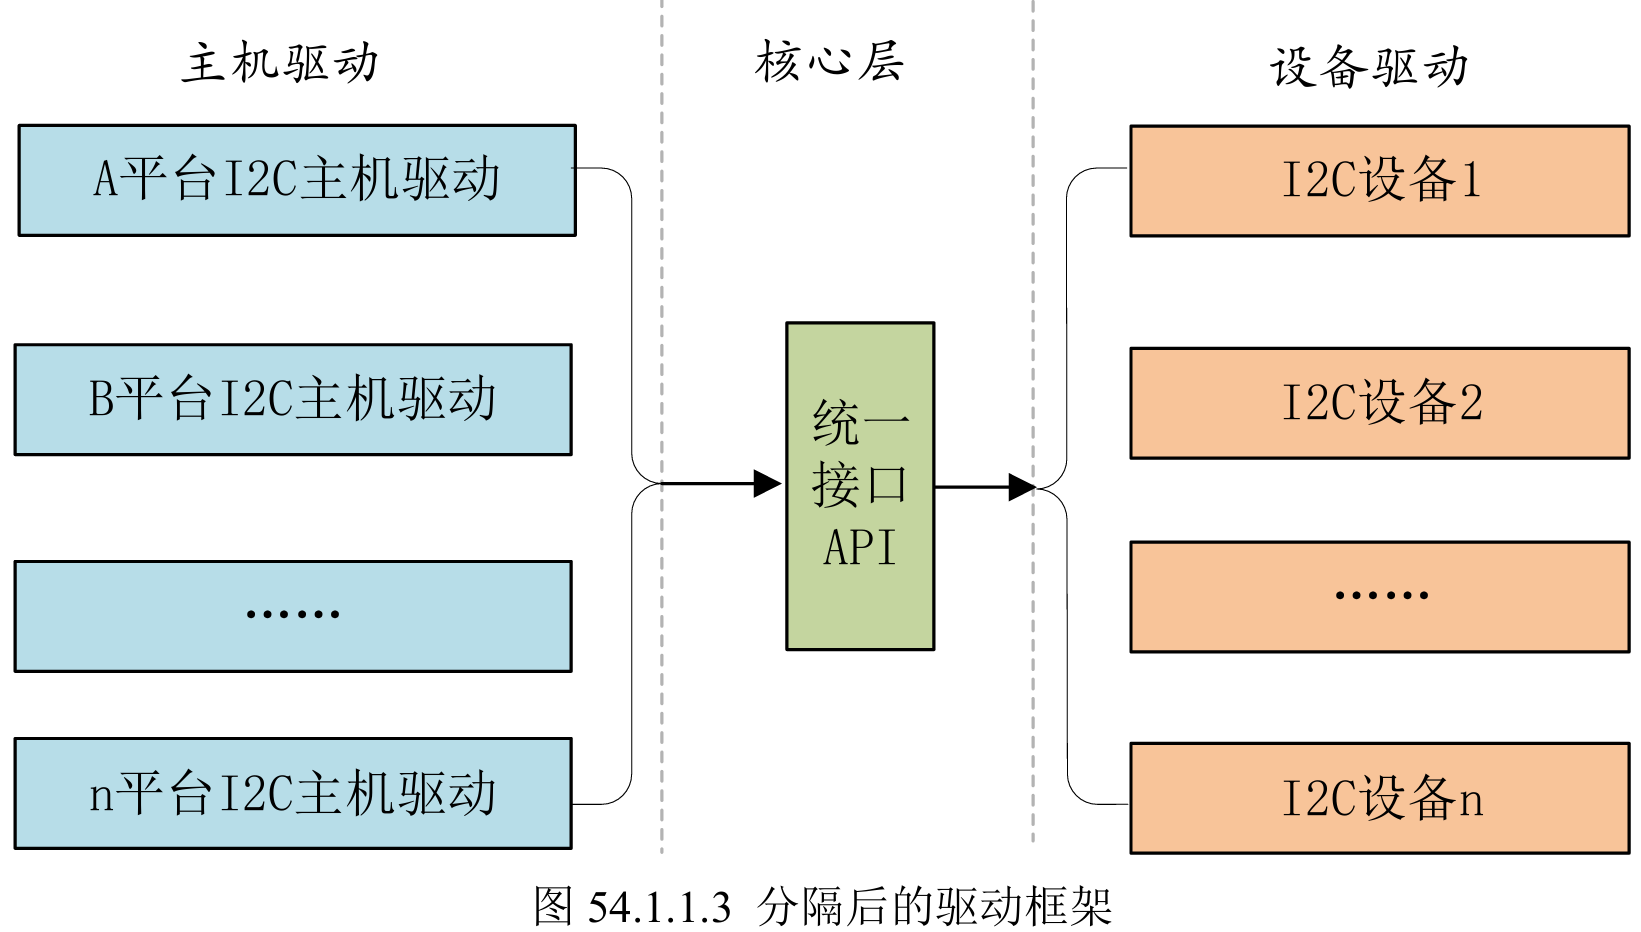
也就是《开发指南》中的三张图:
↓
在实际的驱动开发中,主机控制器驱动和设备驱动一般都已经由各自的厂家写好,我们只需要提供设备信息即可,比如设备连接到了哪个I2C接口上,I2C的速度是多少等等。相当于将设备信息从设备驱动中剥离,驱动使用标准方法去获取到设备信息(比如从设备树中获取),然后根据获取到的设备信息来初始化设备。
而总线则负责将两者联系起来。当向系统注册驱动 时,总线就会在右侧的设备中查找有没有匹配的设备;当向系统中注册设备时,总线就会在左侧的驱动中查找看有没有匹配的设备。

二、总线-驱动-设备
视频:第16.2讲 platform设备驱动实验-驱动、总线和设备
驱动的分离与分层衍生出 "总线-驱动-设备" 框架。
总线部分代码已由内核提供,我们需要编写驱动和设备 部分。驱动 指设备的驱动,设备指的是设备属性,如地址范围、IIC器件地址和速度等。
2.1 总线
总线主要用于匹配总线下的设备和驱动。
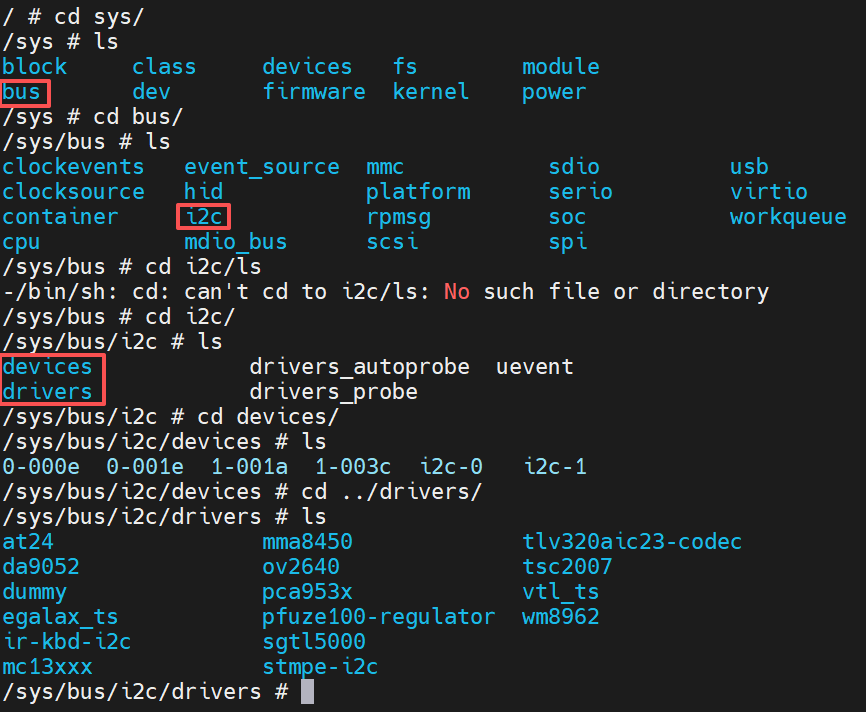
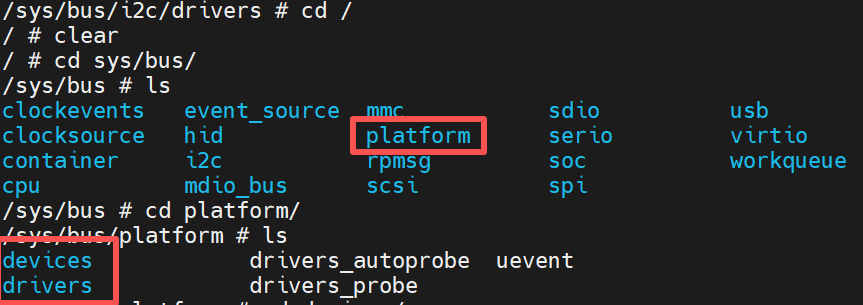
开发板的/sys/bus里面存储了许多总线。进入i2c总线文件夹/sys/bus/i2c/,里面有devices和drivers文件夹,对应i2c总线的设备和驱动。
2.1.1 总线的数据类型
cpp
// 定义在include\linux\device.h
struct bus_type {
	const char		*name;        // 总线名
	const char		*dev_name;    // 总线上设备的默认名字前缀
	struct device		*dev_root;// 总线下所有设备的根目录设备指针(可选)
	struct device_attribute	*dev_attrs;	/* use dev_groups instead */
	const struct attribute_group **bus_groups;  // 总线的属性集合
	const struct attribute_group **dev_groups;  // 总线上设备的属性集合
	const struct attribute_group **drv_groups;  // 总线上驱动的属性集合

	int (*match)(struct device *dev, struct device_driver *drv);
        // 非常重要。每个总线都必须实现。
        // 此函数用于进行设备和驱动之间的匹配,总线就是使用match函数来根据注册的设备 /
        // 来查找对应的驱动,或者根据注册的驱动来查找相应的设备,因此每一条总线都必须实现此函数
        // match函数的两个参数:dev和drv分别为device和device_driver类型,即设备和驱动

	int (*uevent)(struct device *dev, struct kobj_uevent_env *env); //向用户空间发送热插拔事件
	int (*probe)(struct device *dev);    // 找到匹配驱动时会被调用,用于设备初始化
	int (*remove)(struct device *dev);   // 设备移除或驱动卸载时会被调用,用于清理操作
	void (*shutdown)(struct device *dev);// 系统关机或重启时调用

	int (*online)(struct device *dev);   // 标记设备上线
	int (*offline)(struct device *dev);  // 标记设备下线

	int (*suspend)(struct device *dev, pm_message_t state); // 挂起时调用
	int (*resume)(struct device *dev);  // 恢复时调用

	const struct dev_pm_ops *pm;  // 电源管理操作集合,可以取代上面的suspend和resume

	const struct iommu_ops *iommu_ops;

	struct subsys_private *p;
	struct lock_class_key lock_key;
};
2.1.2 注册、卸载总线
cpp
int bus_register(struct bus_type *bus)
void bus_unregister(struct bus_type *bus)
2.2 驱动
2.2.1 驱动的数据类型
cpp
// 定义在include\linux\device.h
struct device_driver {
	const char		*name;
	struct bus_type		*bus;
	struct module		*owner;
	const char		*mod_name;	/* used for built-in modules */
	bool suppress_bind_attrs;	/* disables bind/unbind via sysfs */
	const struct of_device_id	*of_match_table;
	const struct acpi_device_id	*acpi_match_table;
	int (*probe) (struct device *dev);
	int (*remove) (struct device *dev);
	void (*shutdown) (struct device *dev);
	int (*suspend) (struct device *dev, pm_message_t state);
	int (*resume) (struct device *dev);
	const struct attribute_group **groups;
	const struct dev_pm_ops *pm;
	struct driver_private *p;
};
2.2.2 注册、卸载驱动
cpp
// 定义在drivers\base\driver.c
int driver_register(struct device_driver *drv)
void driver_unregister(struct device_driver *drv)
2.2.3 调用关系/执行顺序
调用太多,这里就不放完整代码了,看看就行。调用关系如下:
cpp
// 注册驱动→挂载到总线→遍历总线设备→匹配设备和驱动→绑定关系→调用probe

int driver_register(struct device_driver *drv)
// 注册驱动入口函数
    └──int bus_add_driver(struct device_driver *drv)
        // 把驱动添加到它所属总线的驱动链表中
        └──int driver_attach(struct decive_driver *drv)
            // 查找bus上的所有设备
            └──int bus_for_each_dev(............)
                // 遍历总线上所有已注册的设备
                └──static int __driver_attach(struct device *dev, void *data)
                    // 尝试把一个设备和驱动绑定
                    └──static inline int driver_match_device(struct device_driver *drv, struct device *dev)
                        // 检查驱动和设备是否匹配
                        └──static int really_probe(struct device *dev, struct device_driver *drv)
                            // 真正的探测函数,一旦匹配成功就会调用
                            └──若匹配,则执行dev_probe // 最终要执行的probe函数
2.3 设备
2.3.1 设备的数据类型
cpp
// 定义在include\linux\device.h
struct device {
	struct device		*parent;
	struct device_private	*p;
	struct kobject kobj;
	const char		*init_name; /* initial name of the device */
	const struct device_type *type;
	struct mutex		mutex;	/* mutex to synchronize calls to its driver. */
	struct bus_type	*bus;		/* type of bus device is on */
	struct device_driver *driver;	/* which driver has allocated this device */
    ............
};
2.3.2 注册、卸载设备
cpp
// 定义在drivers\base\core.c
int device_register(struct device *dev)
void device_unregister(struct device *dev)
三、platform平台驱动模型
视频:第16.3讲 platform设备驱动实验-platform总线简介1
IIC、SPI、USB是有具体的总线的,但是定时器、LCD等没有具体的总线,为此内核提供了一个虚拟的总线:platform总线,以及对应的platform驱动、platform设备。
3.1 platform总线
3.1.1 注册
cpp
int __init platform_bus_init(void) //其核心就是调用了bus_register,注册的内容就是platform_bus_type3.1.2 数据类型------platform_bus_type
cpp
// 定义在drivers/base/platform.c
struct bus_type platform_bus_type = {
	.name		= "platform",         // 总线名
	.dev_groups	= platform_dev_groups,// 设备属性集合
	.match		= platform_match,     // 匹配函数,匹配设备和驱动。详见3.4
	.uevent		= platform_uevent,
	.pm		= &platform_dev_pm_ops,
    // 总线级的.probe是可选的。如果总线没有提供.probe,
    // 设备模型会回退调用驱动自己的.probe(也就是3.2.1中platform_driver中的probe)
};
3.2 platform驱动
3.2.1 数据类型------platform_driver
(本次实验只需要定义probe和remove就够了)
cpp
// 定义在include/linux/platform_device.h
struct platform_driver {
	int (*probe)(struct platform_device *);    // 匹配成功就会调用
	int (*remove)(struct platform_device *);   // 设备移除或驱动卸载时会被调用,用于清理操作
	void (*shutdown)(struct platform_device *);// 系统关机或重启时调用
	int (*suspend)(struct platform_device *, pm_message_t state);// 挂起时调用
	int (*resume)(struct platform_device *);   // 恢复时调用
	struct device_driver driver;               // 基类
	const struct platform_device_id *id_table; // 第三种匹配方式用到的id_table。具体结构体定义在include\linux\mod_devicetable.h
	bool prevent_deferred_probe;
};
其中:
3.2.1.1 成员device_driver的定义
(本次实验只需要用到name和of_match_table)
cpp
// 定义在include/linux/device.h
struct device_driver {
	const char		    *name; // 驱动名,在没有设备树的情况下用于和设备匹配。
	struct bus_type		*bus;

	struct module		*owner;
	const char		*mod_name;	/* used for built-in modules */

	bool suppress_bind_attrs;	/* disables bind/unbind via sysfs */

	const struct of_device_id	*of_match_table;  // 用于有设备树时的匹配
	const struct acpi_device_id	*acpi_match_table;

	int (*probe) (struct device *dev);
	int (*remove) (struct device *dev);
	void (*shutdown) (struct device *dev);
	int (*suspend) (struct device *dev, pm_message_t state);
	int (*resume) (struct device *dev);
	const struct attribute_group **groups;

	const struct dev_pm_ops *pm;

	struct driver_private *p;
};
3.2.1.2 成员of_match_table的定义
cpp
// 定义在include/linux/mod_devicetable.h
struct of_device_id {
	char	name[32];
	char	type[32];
	char	compatible[128]; // 用于和设备树中的节点的compatible属性进行匹配
	const void *data;
};
3.2.2 注册和卸载
cpp
// 定义在include\linux\platform_device.h
// 在向内核注册驱动时,如果匹配成功,会直接调用probe函数
#define platform_driver_register(drv) \
	__platform_driver_register(drv, THIS_MODULE)

// 定义在drivers\base\platform.c
void platform_driver_unregister(struct platform_driver *drv)
// drv:要卸载的platform驱动
3.3 platform设备
3.3.1 数据类型------platform_device
cpp
// 定义在include/linux/platform_device.h
struct platform_device {
	const char	*name;  // 设备名,用于和驱动匹配
	int		id;         //
	bool	id_auto;
	struct device	dev;//
	u32		num_resources;    // 资源数量,表示下一行resource资源的大小
	struct resource	*resource;// 设备信息,如外设寄存器等

	const struct platform_device_id	*id_entry;
	char *driver_override; /* Driver name to force a match */

	/* MFD cell pointer */
	struct mfd_cell *mfd_cell;

	/* arch specific additions */
	struct pdev_archdata	archdata;
};
// 实际编写代码时,并不是所有成员都需要配置,可以根据具体需要配置
其中:
3.3.1.1 成员struct device的定义
cpp
// 定义在include/linux/device.h
struct device {
	struct device		*parent;

	struct device_private	*p;

	struct kobject kobj;
	const char		*init_name; /* initial name of the device */
	const struct device_type *type;

	struct mutex		mutex;	/* mutex to synchronize calls to
					 * its driver.
					 */

	struct bus_type	*bus;		/* type of bus device is on */
	struct device_driver *driver;	/* which driver has allocated this
					   device */
	void		*platform_data;	/* Platform specific data, device
					   core doesn't touch it */
	void		*driver_data;	/* Driver data, set and get with
					   dev_set/get_drvdata */
	struct dev_pm_info	power;
	struct dev_pm_domain	*pm_domain;

#ifdef CONFIG_PINCTRL
	struct dev_pin_info	*pins;
#endif

#ifdef CONFIG_NUMA
	int		numa_node;	/* NUMA node this device is close to */
#endif
	u64		*dma_mask;	/* dma mask (if dma'able device) */
	u64		coherent_dma_mask;/* Like dma_mask, but for
					     alloc_coherent mappings as
					     not all hardware supports
					     64 bit addresses for consistent
					     allocations such descriptors. */
	unsigned long	dma_pfn_offset;

	struct device_dma_parameters *dma_parms;

	struct list_head	dma_pools;	/* dma pools (if dma'ble) */

	struct dma_coherent_mem	*dma_mem; /* internal for coherent mem
					     override */
#ifdef CONFIG_DMA_CMA
	struct cma *cma_area;		/* contiguous memory area for dma
					   allocations */
#endif
	/* arch specific additions */
	struct dev_archdata	archdata;

	struct device_node	*of_node; /* associated device tree node */
	struct fwnode_handle	*fwnode; /* firmware device node */

	dev_t			devt;	/* dev_t, creates the sysfs "dev" */
	u32			id;	/* device instance */

	spinlock_t		devres_lock;
	struct list_head	devres_head;

	struct klist_node	knode_class;
	struct class		*class;
	const struct attribute_group **groups;	/* optional groups */

	void	(*release)(struct device *dev);
	struct iommu_group	*iommu_group;

	bool			offline_disabled:1;
	bool			offline:1;
};
3.3.1.2 成员resource的定义
cpp
struct resource {
	resource_size_t start; // 起始地址
	resource_size_t end;   // 终止地址
	const char *name;
	unsigned long flags;   // 标志该resource是什么类型的资源。资源类型定义在include/linux/ioport.h
	struct resource *parent, *sibling, *child;
};
3.3.2 注册和卸载
cpp
无设备树时,需要编写设备注册文件,并使用platform_device_register注册设备
有设备树时,直接修改设备树的设备节点即可。系统启动时会解析设备树并自动将其还原为platform_device结构体
// 定义在drivers\base\platform.c
int platform_device_register(struct platform_device *pdev)
// 当设备与platform驱动匹配时,就会执行platform_driver->probe函数

// 定义在drivers\base\platform.c
void platform_device_unregister(struct platform_device *pdev)
// pdev:要注销的platform设备
3.4 match匹配函数和几种匹配方式
视频:第16.4讲 platform设备驱动实验-platform总线简介2
上面3.1.2 platform_bus_type例子中的platform_match就是匹配函数。具体的定义如下,提供了四种匹配方式:
cpp
// 定义在drivers/base/platform.c
static int platform_match(struct device *dev, struct device_driver *drv)
{
	struct platform_device *pdev = to_platform_device(dev);
	struct platform_driver *pdrv = to_platform_driver(drv);

	/* When driver_override is set, only bind to the matching driver */
	if (pdev->driver_override)
		return !strcmp(pdev->driver_override, drv->name);

	/* Attempt an OF style match first */
    // OF类型匹配,即设备树采用的匹配方式
	if (of_driver_match_device(dev, drv)) // 这个函数定义在include/linux/of_device.h
		return 1;
    // 设备驱动结构体device_driver中有个of_match_table成员变量,保存着驱动的compatible匹配表
    // 设备树中的每个设备节点的compatible属性会和of_match_table表中的所有成员比较
    // 如果有相同的条目就表示设备和此驱动匹配
    // 设备和驱动匹配成功以后,就会调用bus_type中的probe函数
    // device_driver结构体定义在include/linux/device.h
    // of_match_table则是of_device_id类型的(定义在include\linux\mod_devicetable.h)
    // 匹配表compatible就是of_device_id的成员,是一个char[128]数组


	/* Then try ACPI style match */
    // ACPI匹配
	if (acpi_driver_match_device(dev, drv))
		return 1;
    // 每个ACPI设备在ACPI表中都会有硬件ID等属性,驱动程序会列出驱动支持的ID,以此判断是否匹配


	/* Then try to match against the id table */
    // id列表匹配
	if (pdrv->id_table)
		return platform_match_id(pdrv->id_table, pdev) != NULL;
    // 设备驱动结构体platform_driver有个成员变量id_table,保存了很多id信息
    // 存放着这个驱动所支持的设备类型

	/* fall-back to driver name match */
    // name字段匹配
	return (strcmp(pdev->name, drv->name) == 0);
    // 如果第三种匹配方式的id_table不存在的话,直接比较驱动和设备的name字段
    // 如果相等的话就匹配成功
}
3.5 platform_get_resource
在没有设备树的情况下,设备信息都保存在platform_device。platform_driver需要获取设备信息,就要用到platform_get_resource函数
cpp
// 定义在drivers/base/platform.c
struct resource *platform_get_resource(struct platform_device *dev, unsigned int type, unsigned int num)
// 类型resource:这个resource和3.3.1中的resource一样
// dev:  获取哪一个设备的信息
// type: 资源类型,与resource结构体中的flag一样,表示是什么类型的资源。资源类型定义在include/linux/ioport.h
// index:resource下标索引。目标resource可能是数组组成的多个设备,由index指定具体哪个设备。
//        如果只有一个设备就填0
四、实验代码
4.1 无设备树
主要写platform_driver和platform_device
4.1.1 文件结构
cpp
18_PLATFORM(工作区)
└── 18_platform
    ├── .vscode
    │   ├── c_cpp_properties.json
    │   └── settings.json
    ├── leddevice.c
    ├── leddriver.c
    ├── 18_platform.code-workspace
    ├── newchrledAPP.c
    └── Makefile
4.1.2 Makefile
bash
CFLAGS_MODULE += -w

KERNELDIR := /home/for/linux/imx6ull/linux/linux-imx-rel_imx_4.1.15_2.1.0_ga_alientek  # 内核路径
# KERNELDIR改成自己的 linux-imx-rel_imx_4.1.15_2.1.0_ga_alientek文件路径(这个文件从正点原子"01、例程源码"中直接搜,cp到虚拟机里面)

CURRENT_PATH := $(shell pwd)	# 当前路径

obj-m := leddevice.o 		# 编译文件
obj-m += leddriver.o

build: kernel_modules			# 编译模块

kernel_modules:
	$(MAKE) -C $(KERNELDIR) M=$(CURRENT_PATH) modules
clean:
	$(MAKE) -C $(KERNELDIR) M=$(CURRENT_PATH) clean
4.1.3 设备部分 leddevice.c
这个文件的功能相当于替代设备树。
cpp
#include <linux/module.h>
#include <linux/kernel.h>
#include <linux/init.h>
#include <linux/platform_device.h>


/* 寄存器物理地址 */
#define CCM_CCGR1_BASE         (0x020C406C)
#define SW_MUX_GPIO1_IO03_BASE (0x020E0068)
#define SW_PAD_GPIO1_IO03_BASE (0x020E02F4)
#define GPIO1_DR_BASE          (0x0209C000)
#define GPIO1_GDIR_BASE        (0x0209C004)
#define REGISTER_LENGTH        4   // 地址长度


// 释放
void leddevice_release(struct device * dev){
    printk("leddevice release\r\n");
}

//
// 5个寄存器,需要设置5个resource
static struct resource led_resources[] = {
    [0] = {
        .start = CCM_CCGR1_BASE,  // 起始地址
        .end   = CCM_CCGR1_BASE + REGISTER_LENGTH - 1, // 终止地址
        .flags = IORESOURCE_MEM,  // 寄存器类型
    },
    [1] = {
        .start = SW_MUX_GPIO1_IO03_BASE,
        .end   = SW_MUX_GPIO1_IO03_BASE + REGISTER_LENGTH - 1,
        .flags = IORESOURCE_MEM,
    },
    [2] = {
        .start = SW_PAD_GPIO1_IO03_BASE,
        .end   = SW_PAD_GPIO1_IO03_BASE + REGISTER_LENGTH - 1,
        .flags = IORESOURCE_MEM,
    },
    [3] = {
        .start = GPIO1_DR_BASE,
        .end   = GPIO1_DR_BASE + REGISTER_LENGTH - 1,
        .flags = IORESOURCE_MEM,
    },
    [4] = {
        .start = GPIO1_GDIR_BASE,
        .end   = GPIO1_GDIR_BASE + REGISTER_LENGTH - 1,
        .flags = IORESOURCE_MEM,
    },
};


static struct platform_device leddevice={
    .name = "imx6ull_led", // 设备名,用于和驱动进行匹配
    .id   = -1, // 表示设备没有id号
    .dev  = {
        .release = &leddevice_release, //释放该platform device时执行
    },
    .num_resources =  ARRAY_SIZE(led_resources),
    .resource = led_resources,
};


// 加载设备
static int __init leddevice_init(void){
    platform_device_register(&leddevice);
    return 0;
}

// 卸载设备
static void __exit leddevice_exit(void){
    platform_device_unregister(&leddevice);
}

module_init(leddevice_init);
module_exit(leddevice_exit);
MODULE_LICENSE("GPL");
4.1.4 驱动部分 leddriver.c
驱动部分基本Linux驱动开发笔记(四)的实验代码修改
更新了:
修改了部分设备变量的命名
增加了platform_driver结构体及其remove、probe函数
将原来驱动入口/驱动注册函数的功能移到probe函数中。驱动入口函数只负责调用platform驱动注册函数platform_driver_register
将原来驱动出口/驱动卸载函数的功能移到remove函数中。驱动出口函数只负责调用platform驱动卸载函数platform_driver_unregister
cpp
#include <linux/module.h>
#include <linux/kernel.h>
#include <linux/init.h>
#include <linux/platform_device.h>
#include <linux/fs.h>
#include <linux/uaccess.h>
#include <linux/io.h>
#include <linux/cdev.h>
#include <linux/kdev_t.h>
#include <linux/stat.h>
#include <linux/device.h>


/* 地址映射后的虚拟地址指针 */
static void __iomem *IMX6U_CCM_CCGR1;
static void __iomem *SW_MUX_GPIO1_IO03;
static void __iomem *SW_PAD_GPIO1_IO03;
static void __iomem *GPIO1_DR;
static void __iomem *GPIO1_GDIR;

/* LED状态 */
#define LEDOFF 0
#define LEDON  1

#define PLATFORM_NAME "platled" // 设备名
#define PLATFORM_COUNT 1          // led设备数量

/////////////////////////////////////////////////////

/* 设备结构体 */
struct newchrled_dev{
    struct cdev cdev;
    dev_t devid;            /* 设备号 */
    int major;              /* 主设备号 */
    int minor;              /* 此设备号 */
    struct class *class;    /* 类 */
    struct device *device;  /* 设备 */
};

struct newchrled_dev newchrled; /* led设备 */

/////////////////////////////////////////////////////

// LED状态翻转
static void led_swtich(u8 sta){
    u32 val = 0;
    if(sta == LEDOFF){
        /* 关灯 */
        printk("turn off\r\n");
        val = readl(GPIO1_DR);  // 32bit读取函数
        val |= (1 << 3);       // 将bit3置为高电平,关闭LED
        writel(val, GPIO1_DR);
    }
    else if(sta == LEDON){
        /* 开灯 */
        val = readl(GPIO1_DR);  // 32bit读取函数
        val &= ~(1 << 3);       // 将bit3置为低电平,打开LED
        writel(val, GPIO1_DR);
        printk("turn on\r\n");
    }
}

static int newchrled_open(struct inode *inode, struct file *filp){
    return 0;
}
static int newchrled_release(struct inode *inode, struct file *filp){
    return 0;
}
static ssize_t newchrled_write(struct file *filp, const char __user *buf, size_t count, loff_t *ppos){
    int retvalue;
    unsigned char databuf[1];
    retvalue = copy_from_user(databuf, buf, count);
    if(retvalue < 0){
        printk("kernel write fauled!\r\n");
        return -EFAULT;
    }

    led_swtich(databuf[0]);
    return 0;
}

/* 字符设备操作集合 */
static const struct file_operations newchrled_fops = {
    .owner = THIS_MODULE,
    .write = newchrled_write,
    .open = newchrled_open,
    .release = newchrled_release,
};

///////////////////////////////////////////////////////


// 匹配成功就会执行probe
static int led_probe(struct platform_device *dev){
    unsigned int val = 0;
    int i = 0, ret = 0;

    printk("led driver prob\r\n");
    struct resource *ledsource[5];
    for(i=0; i<5; i++){
        ledsource[i] = platform_get_resource(dev, IORESOURCE_MEM, i);
        if(ledsource[i] == NULL)return -EINVAL;
        // resource_size
    }

    // 地址映射
    IMX6U_CCM_CCGR1 = ioremap(ledsource[0]->start, resource_size(ledsource[0])); // 这里resource_size(ledsource[0]=4
    SW_MUX_GPIO1_IO03 = ioremap(ledsource[1]->start, resource_size(ledsource[1]));
    SW_PAD_GPIO1_IO03 = ioremap(ledsource[2]->start, resource_size(ledsource[2]));
    GPIO1_DR = ioremap(ledsource[3]->start, resource_size(ledsource[3]));
    GPIO1_GDIR = ioremap(ledsource[4]->start, resource_size(ledsource[4]));

    // 初始化
    val = readl(IMX6U_CCM_CCGR1);  // 32bit读取函数
    val &= ~(3 << 26); // 清除26、27位的数据为0,其余位保持不变。  其中3的二进制为11,~为取反操作。
    val |= 3 << 26;    // 将26、27位置为1
    writel(val, IMX6U_CCM_CCGR1);   // 将 val 写入 IMX6U_CCM_CCGR1,使能CCM_CCGR1的gpio1时钟。

    writel(0x5, SW_MUX_GPIO1_IO03); // 复用GPIO1------IO03
    writel(0x10B0, SW_PAD_GPIO1_IO03); //设置GPIO1_IO03电气属性

    val = readl(GPIO1_GDIR);  // 32bit读取函数
    val |= 1 << 3;  // 设置PIO1_IO03为output。 将GPIO1_GDIR第3位 置为1
    writel(val, GPIO1_GDIR);

    // 关灯
    val = readl(GPIO1_DR);  // 32bit读取函数
    val |= (1 << 3);       // 将bit3置为高电平,关闭LED
    writel(val, GPIO1_DR);

    // 分配设备号
    if (newchrled.major){ // 如果已经给定主设备号
        newchrled.devid = MKDEV(newchrled.major, 0);
        ret = register_chrdev_region(newchrled.devid, PLATFORM_COUNT, PLATFORM_NAME);
    }
    else{ // 没有给定主设备号
        ret = alloc_chrdev_region(&newchrled.devid, 0, PLATFORM_COUNT, PLATFORM_NAME);
        newchrled.major = MAJOR(newchrled.devid);
        newchrled.minor = MINOR(newchrled.devid);
    }
    if (ret < 0)
    {
        printk("newchrled chrdev_region error!\r\n");
        return -1;
    }
    printk("devid = %d:%d\r\n", newchrled.major, newchrled.minor);

    // 注册字符设备
    newchrled.cdev.owner = THIS_MODULE;
    cdev_init(&newchrled.cdev, &newchrled_fops);
    ret = cdev_add(&newchrled.cdev, newchrled.devid, PLATFORM_COUNT);

    // 自动创建设备节点
    newchrled.class = class_create(THIS_MODULE, PLATFORM_NAME); // 创建类
    if(IS_ERR(newchrled.class)){
        return PTR_ERR(newchrled.class);
    }

    newchrled.device = device_create(newchrled.class, NULL, newchrled.devid, NULL, PLATFORM_NAME); // 创建设备
    if(IS_ERR(newchrled.device)){
        return PTR_ERR(newchrled.device);
    }

    return 0;
}


static int led_remove(struct platform_device * dev){
    printk("led driver remove\r\n");

    // 删除字符设备
    cdev_del(&newchrled.cdev);

    // 注销设备号
    unregister_chrdev_region(newchrled.devid, PLATFORM_COUNT);

    // 删除类
    device_destroy(newchrled.class,newchrled.devid);
    class_destroy(newchrled.class);

    return 0;
}

// platform驱动结构体
static struct platform_driver led_driver = {
    .driver = {
        .name   = "imx6ull_led", // 驱动名,用于和设别匹配
    },
    .remove = led_remove,
    .probe  = led_probe,
};
///////////////////////////////////////////////////////////////////


// 加载驱动
static int __init leddriver_init(void){
    return platform_driver_register(&led_driver);
}

// 卸载驱动
static void __exit leddriver_exit(void){
    platform_driver_unregister(&led_driver);
}

module_init(leddriver_init);
module_exit(leddriver_exit);
MODULE_LICENSE("GPL");
4.1.5 应用程序
应用程序直接把Linux驱动开发笔记(四)实验的应用程序搬过来。只有调用方式发生改变。
cpp
#include<stdio.h>
#include<unistd.h>
#include<sys/types.h>
#include<sys/stat.h>
#include<fcntl.h>
#include<stdlib.h>
#include<string.h>

/*
 * @description    : main主程序
 * @param - argc   : argv数组元素个数
 * @param - argv   : 具体参数
 * @return         : 0 成功; else失败
 * 调用   ./newchrledAPP <filename> <0:1>  0关灯,1开灯
 * ./newchrledAPP /dev/platled 0  关灯
 * ./newchrledAPP /dev/platled 1  开灯
 */

#define LEDOFF 0
#define LEDON  1

int main(int argc, char *argv[]){

    if(argc != 3){  // 判断用法是否错误
        printf("Error Usage!\r\n");
        return -1;
    }

    char *filename;
    int fd = 0;
    unsigned char databuf[1];
    int retvalue = 0;

    filename = argv[1];
    fd = open(filename, O_RDWR);  // 读写模式打开驱动文件filename

    if(fd <0){
        printf("file %s open failed!\r\n");
        return -1;
    }

    databuf[0] = atoi(argv[2]);  // char 2 int

    retvalue = write(fd, databuf, sizeof(databuf));   // 缓冲区数据写入fd
    if(retvalue <0){
        printf("LED Control Failed!\r\n");
        close(fd);
        return -1;
    }

    close(fd);
    return 0;
}
4.1.6 测试
bash
# VSCODE终端
make
arm-linux-gnueabihf-gcc newchrledAPP.c -o newchrledAPP
sudo cp leddevice.ko leddriver.ko newchrledAPP /.../linux/nfs/rootfs/lib/modules/4.1.15/


# 串口
cd /lib/modules/4.1.15/
depmod
modprobe leddevice.ko
modprobe leddriver.ko  # 此时应当能看到输出led driver prob
                       # 说明执行了platform_driver的prob函数,匹配成功

ls /sys/bus/platform/devices/  # 此时应当能看到设备imx6ull_led
ls /sys/bus/platform/drivers/  # 此时应当能看到驱动imx6ull_led

./newchrledAPP /dev/platled 1  # 此时开发板红灯亮起
./newchrledAPP /dev/platled 0  # 此时开发板红灯熄灭

rmmod leddriver.ko    # 此时应能看到输出"led driver remove",说明执行了platform_driver的remove函数
rmmod leddevice.ko    # 此时应能看到输出"leddevice release",说明执行了platform_device的release函数
可以看到

4.2 有设备树
有设备树以后就不需要向总线注册设备了,直接修改设备树即可。
设备和驱动匹配成功后,就会把设备树对应节点的信息直接转为platform_device结构体的信息,不需要手动传。
4.2.1 文件结构
有了设备树,可以直接删掉leddevice.c了。
bash
19_DTSPLATFORM(工作区)
└── 19_dtsplatform
    ├── .vscode
    │   ├── c_cpp_properties.json
    │   └── settings.json
    ├── leddriver.c
    ├── 19_dtsplatform.code-workspace
    ├── newchrledAPP.c
    └── Makefile
4.2.2 Makefile
bash
CFLAGS_MODULE += -w

KERNELDIR := /.../linux/imx6ull/linux/linux-imx-rel_imx_4.1.15_2.1.0_ga_alientek  # 内核路径
# KERNELDIR改成自己的 linux-imx-rel_imx_4.1.15_2.1.0_ga_alientek文件路径(这个文件从正点原子"01、例程源码"中直接搜,cp到虚拟机里面)

CURRENT_PATH := $(shell pwd)	# 当前路径

obj-m := leddriver.o 			# 编译文件

build: kernel_modules			# 编译模块

kernel_modules:
	$(MAKE) -C $(KERNELDIR) M=$(CURRENT_PATH) modules
clean:
	$(MAKE) -C $(KERNELDIR) M=$(CURRENT_PATH) clean
4.2.3 修改设备树
修改内容与Linux驱动开发笔记(六)3.1部分一致:
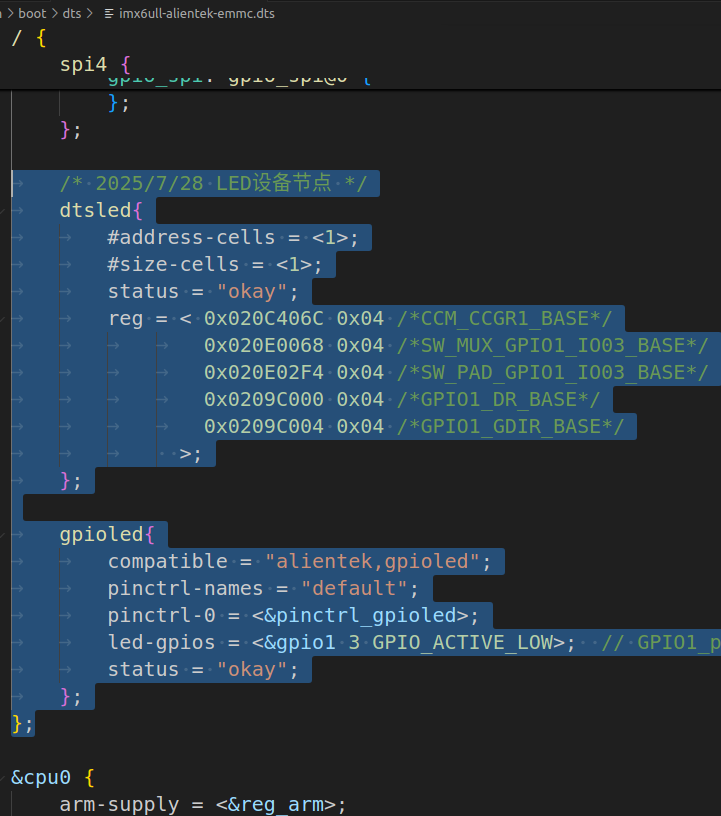
①在arch/arm/boot/dts/imx6ull-alientek-emmc.dts文件的设备树根节点最后添加LED设备节点:
bash
	/* 2025/7/28 LED设备节点 */
	dtsled{
		#address-cells = <1>;
		#size-cells = <1>;
		status = "okay";
		reg = < 0x020C406C 0x04 /*CCM_CCGR1_BASE*/
				0x020E0068 0x04 /*SW_MUX_GPIO1_IO03_BASE*/
				0x020E02F4 0x04 /*SW_PAD_GPIO1_IO03_BASE*/
				0x0209C000 0x04 /*GPIO1_DR_BASE*/
				0x0209C004 0x04 /*GPIO1_GDIR_BASE*/
			  >;
	};
	gpioled{
		compatible = "alientek,gpioled";
		pinctrl-names = "default";
		pinctrl-0 = <&pinctrl_gpioled>;
		led-gpios = <&gpio1 3 GPIO_ACTIVE_LOW>;  // GPIO1_pin3 低电平有效
		status = "okay";
	};
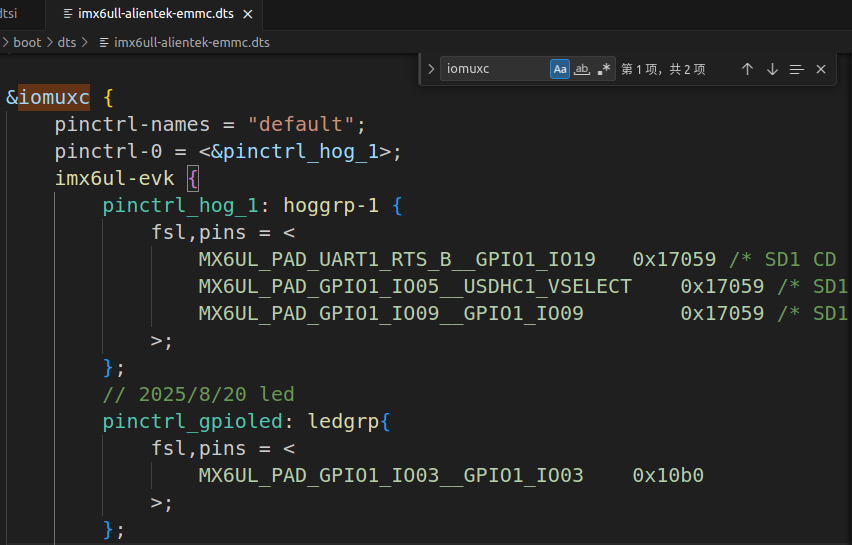
② 在imx6ull-alientek-emmc.dts文件中找到&iomuxc节点,在里面的imx6ul-evk里加入新的pinctrl:
bash
		pinctrl_gpioled: ledgrp{
			fsl,pins = <
				MX6UL_PAD_GPIO1_IO03__GPIO1_IO03	0x10b0
			>;
		};
③ 编译、复制到tftproot,然后重启开发板:
bash
make dtbs
sudo cp arch/arm/boot/dts/imx6ull-alientek-emmc.dtb /.../tftpboot/ -f
4.2.4 驱动 leddriver.c
代码内容基本与Linux驱动开发笔记(六)3.2.2一致,只是添加了platform_driver相关代码。并将驱动入口函数的内容移到probe函数中、将驱动出口函数的内容移到remove函数中。
cpp
#include <linux/module.h>
#include <linux/platform_device.h>
#include <linux/of.h>
#include <linux/of_device.h>
#include <linux/mod_devicetable.h>
#include <linux/kernel.h>
#include <linux/init.h>
#include <linux/fs.h>
#include <linux/uaccess.h>
#include <linux/cdev.h>
#include <linux/device.h>
#include <linux/of_gpio.h>

/* LED状态 */
#define LEDOFF 0
#define LEDON  1

#define PLATFORM_NAME "platled" // 设备名
#define PLATFORM_COUNT 1          // led设备数量

/////////////////////////////////////////////////////

/* 设备结构体 */
struct newchrled_dev{
    struct cdev cdev;
    dev_t devid;            /* 设备号 */
    int major;              /* 主设备号 */
    int minor;              /* 此设备号 */
    struct class *class;    /* 类 */
    struct device *device;  /* 设备 */
    struct device_node *nd;
    int led_gpio;
};
struct newchrled_dev newchrled; /* led设备 */

/////////////////////////////////////////////////////

static ssize_t newchrled_write(struct file *filp, const char __user *buf, size_t count, loff_t *ppos){
    int ret;
    unsigned char databuf[1];
    struct newchrled_dev *dev = filp->private_data;

    ret = copy_from_user(databuf, buf, count);
    if(ret < 0){
        return -EINVAL;
    }
    if(databuf[0] == LEDON){ //开灯
        gpio_set_value(dev->led_gpio, 0); // 低电平开灯
    } else if(databuf[0] == LEDOFF){
        gpio_set_value(dev->led_gpio, 1); // 高电平关灯
    }

    return 0;
}
static int newchrled_open(struct inode *inode, struct file *filp){
    filp->private_data = &newchrled;
    return 0;
}
static int newchrled_release(struct inode *inode, struct file *filp){
    return 0;
}

/* 字符设备操作集合 */
static const struct file_operations newchrled_fops = {
    .owner = THIS_MODULE,
    .write = newchrled_write,
    .open = newchrled_open,
    .release = newchrled_release,
};

///////////////////////////////////////////////////////


// 匹配成功就会执行probe
static int led_probe(struct platform_device *dev){
    printk("led probe\r\n");

    int ret = 0;

    /* 1.注册字符设备驱动 */
    newchrled.devid = 0;
    if(newchrled.devid){
        newchrled.devid = MKDEV(newchrled.devid, 0);
        register_chrdev_region(newchrled.devid, PLATFORM_COUNT, PLATFORM_NAME);
    } else {
        alloc_chrdev_region(&newchrled.devid, 0, PLATFORM_COUNT, PLATFORM_NAME);
        newchrled.major = MAJOR(newchrled.devid);
        newchrled.minor = MINOR(newchrled.devid);
    }

    /* 2.初始化cdev */
    newchrled.cdev.owner = THIS_MODULE;
    cdev_init(&newchrled.cdev, &newchrled_fops);

    /* 3.添加cdev */
    cdev_add(&newchrled.cdev, newchrled.devid, PLATFORM_COUNT); // 错误处理先略过了

    /* 4.创建类 */
    newchrled.class = class_create(THIS_MODULE, PLATFORM_NAME);
    if(IS_ERR(newchrled.class)){
        return PTR_ERR(newchrled.class);
    }

    /* 5.创建设备 */
    newchrled.device = device_create(newchrled.class, NULL, newchrled.devid, NULL, PLATFORM_NAME);
    if(IS_ERR(newchrled.device)){
        return PTR_ERR(newchrled.device);
    }

    /* 1.获取设备节点 */
    // newchrled.nd = of_find_node_by_path("/gpioled");  // 找到刚才在imx6ull-alientek-emmc.dts根节点下加入的gpioled节点
    // if(newchrled.nd == NULL){
    //     ret = -EINVAL;
    //     goto fail_findnode;
    // }
    newchrled.nd = dev->dev.of_node;
    // platform_device类型中的device结构体成员中已经包括了of_node(device_node类型)
    // 可以直接读取,不需要再手动寻找of_find_node_by_path


    /* 2.获取LED对应的GPIO */  // 也就是节点中led-gpios那一行内容
    newchrled.led_gpio = of_get_named_gpio(newchrled.nd, "led-gpios", 0);
    if(newchrled.led_gpio < 0){
        printk("can't find led_gpio\r\n");
        ret = -EINVAL;
        goto fail_findnode;
    }
    printk("led_gpio num = %d\r\n",newchrled.led_gpio);

    /*  3.申请IO */
    ret = gpio_request(newchrled.led_gpio, "led-gpios");
    if(ret){
        printk("Failed to request the led gpio\r\n");
        ret = -EINVAL;
        goto fail_findnode;
    }

    /* 4.使用IO,设置为输出 */
    ret = gpio_direction_output(newchrled.led_gpio, 1);
    if(ret){
        goto fail_setoutput; // 如果代码走到这一步,一定已经成功进行了IO申请,因此这里错误处理时需要释放IO
    }

    /* 5.输出高电平,关灯 */
    gpio_set_value(newchrled.led_gpio, 1);

    return 0;

fail_setoutput:
    gpio_free(newchrled.led_gpio);
fail_findnode:
    return ret;
}


static int led_remove(struct platform_device * dev){
    printk("led remove\r\n");

    gpio_set_value(newchrled.led_gpio, 1); // 高电平 关灯

    /* 注销字符设备驱动 */
    cdev_del(&newchrled.cdev);
    unregister_chrdev_region(newchrled.devid, PLATFORM_COUNT);

    device_destroy(newchrled.class, newchrled.devid);
    class_destroy(newchrled.class);

    gpio_free(newchrled.led_gpio);

    return 0;
}

static const struct of_device_id led_of_match[] = {
    {.compatible = "alientek,gpioled"}, // 要和新增的设备数节点gpio中的compatible匹配
    { /* sentinel */ }, // 哨兵元素
    // 后面可以接更多的{.compatible = "............"}
};

// platform驱动结构体
static struct platform_driver led_driver = {
    .driver = {
        .name = "imx6ull_led", // 无设备树时使用name与设备进行匹配
        .of_match_table = led_of_match, // 有设备树时进行匹配
    },
    .probe = led_probe,
    .remove = led_remove,
};

///////////////////////////////////////////////////////////////////


// 加载驱动
static int __init leddriver_init(void){
    return platform_driver_register(&led_driver);
}

// 卸载驱动
static void __exit leddriver_exit(void){
    platform_driver_unregister(&led_driver);
}

module_init(leddriver_init);
module_exit(leddriver_exit);
MODULE_LICENSE("GPL");
4.2.5 应用程序newchrledAPP.c
newchrledAPP.c与4.1.5完全一致。
cpp
#include<stdio.h>
#include<unistd.h>
#include<sys/types.h>
#include<sys/stat.h>
#include<fcntl.h>
#include<stdlib.h>
#include<string.h>

/*
 * @description    : main主程序
 * @param - argc   : argv数组元素个数
 * @param - argv   : 具体参数
 * @return         : 0 成功; else失败
 * 调用   ./newchrledAPP <filename> <0:1>  0关灯,1开灯
 * ./newchrledAPP /dev/platled 0  关灯
 * ./newchrledAPP /dev/platled 1  开灯
 */

#define LEDOFF 0
#define LEDON  1

int main(int argc, char *argv[]){

    if(argc != 3){  // 判断用法是否错误
        printf("Error Usage!\r\n");
        return -1;
    }

    char *filename;
    int fd = 0;
    unsigned char databuf[1];
    int retvalue = 0;

    filename = argv[1];
    fd = open(filename, O_RDWR);  // 读写模式打开驱动文件filename

    if(fd <0){
        printf("file %s open failed!\r\n");
        return -1;
    }

    databuf[0] = atoi(argv[2]);  // char 2 int

    retvalue = write(fd, databuf, sizeof(databuf));   // 缓冲区数据写入fd
    if(retvalue <0){
        printf("LED Control Failed!\r\n");
        close(fd);
        return -1;
    }

    close(fd);
    return 0;
}
4.6.测试
首先检查设备树中是否有我们新增的goioled节点,并查看其compatible信息:
bash
ls /sys/firmware/devicetree/base/   # 应当能找到gpioled节点
cat /sys/firmware/devicetree/base/gpioled/compatible   # 应当显示alientek,gpioled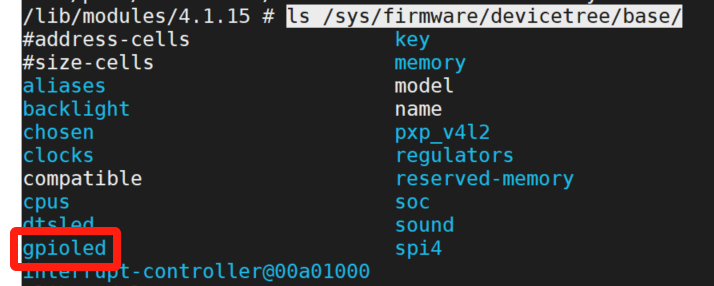

bash
# VSCODE终端
make
arm-linux-gnueabihf-gcc newchrledAPP.c -o newchrledAPP
sudo cp leddriver.ko newchrledAPP /.../linux/nfs/rootfs/lib/modules/4.1.15/

# 串口
cd /lib/modules/4.1.15/
depmod
modprobe leddriver.ko  # 此时应输出led probe,说明匹配成功
./newchrledAPP /dev/platled 1  # 开灯
./newchrledAPP /dev/platled 0  # 关灯
rmmod leddriver.ko     # 此时应输出led remove