Three.js 粒子特效实战①:用 Three.Quarks 打造拟真火焰喷射
Three.js 粒子特效实战②:用 Three.Quarks 实现喷泉效果
在很多特效网站上都有粒子重组的功能
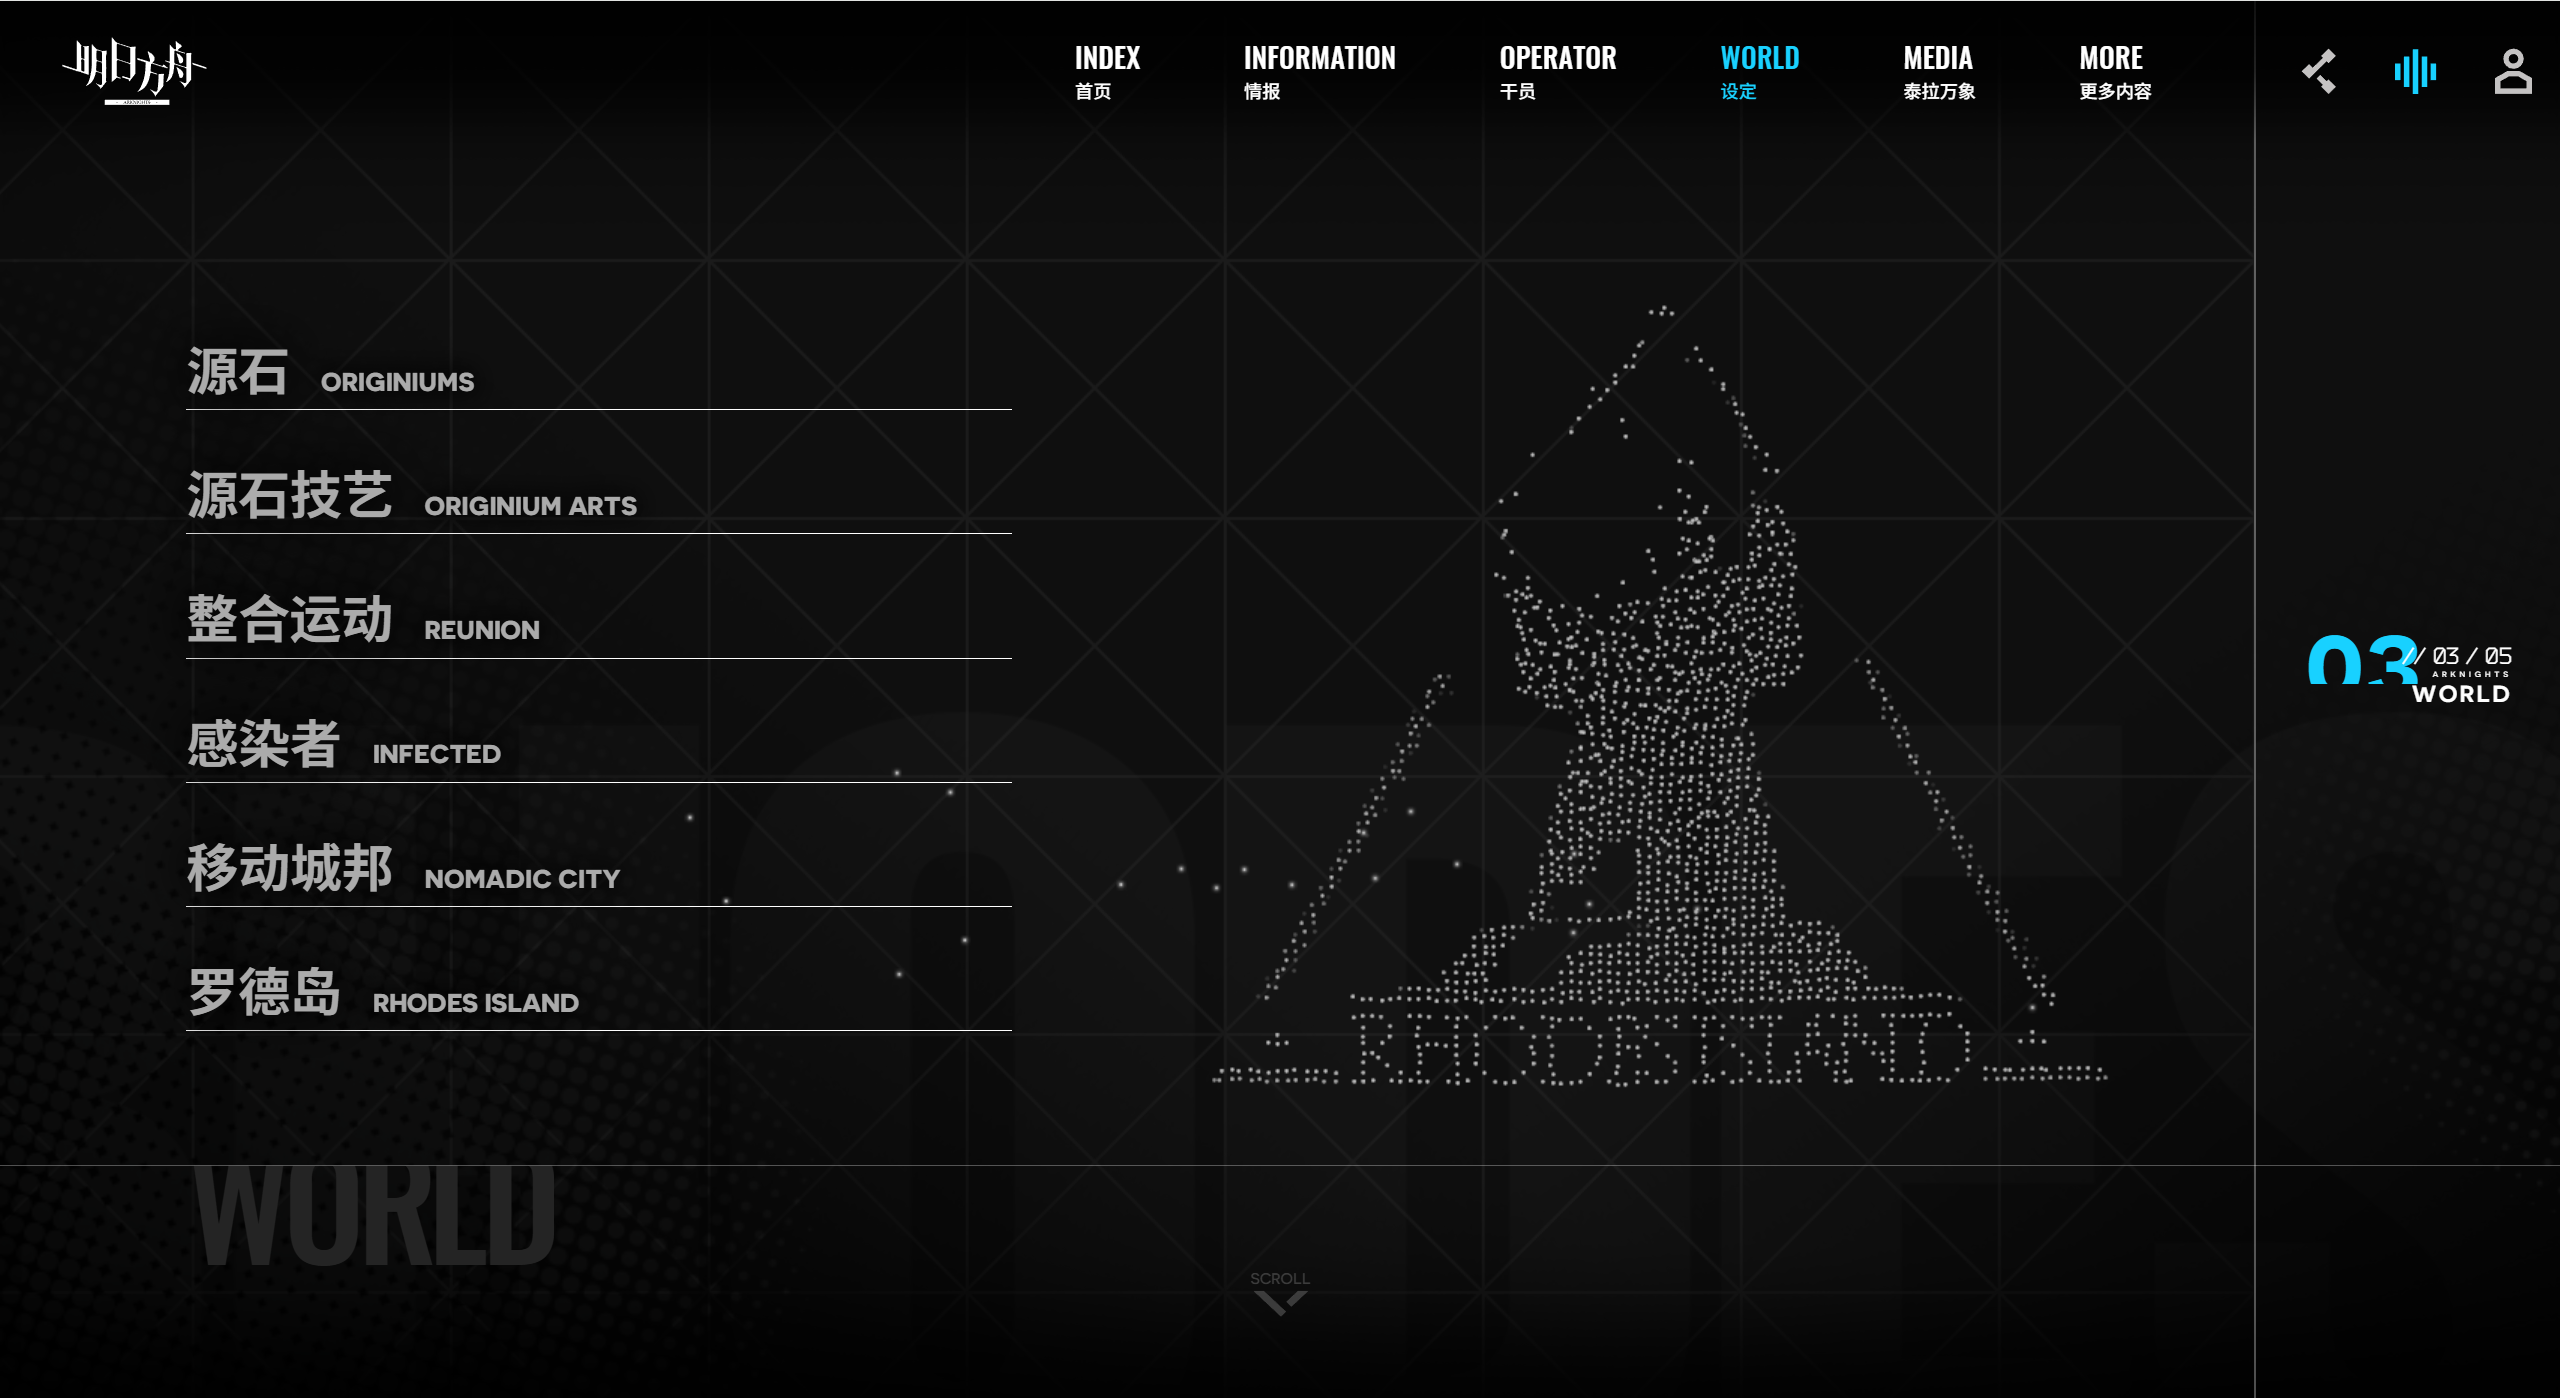
使用quark能够很简单的实现基本的粒子重组效果
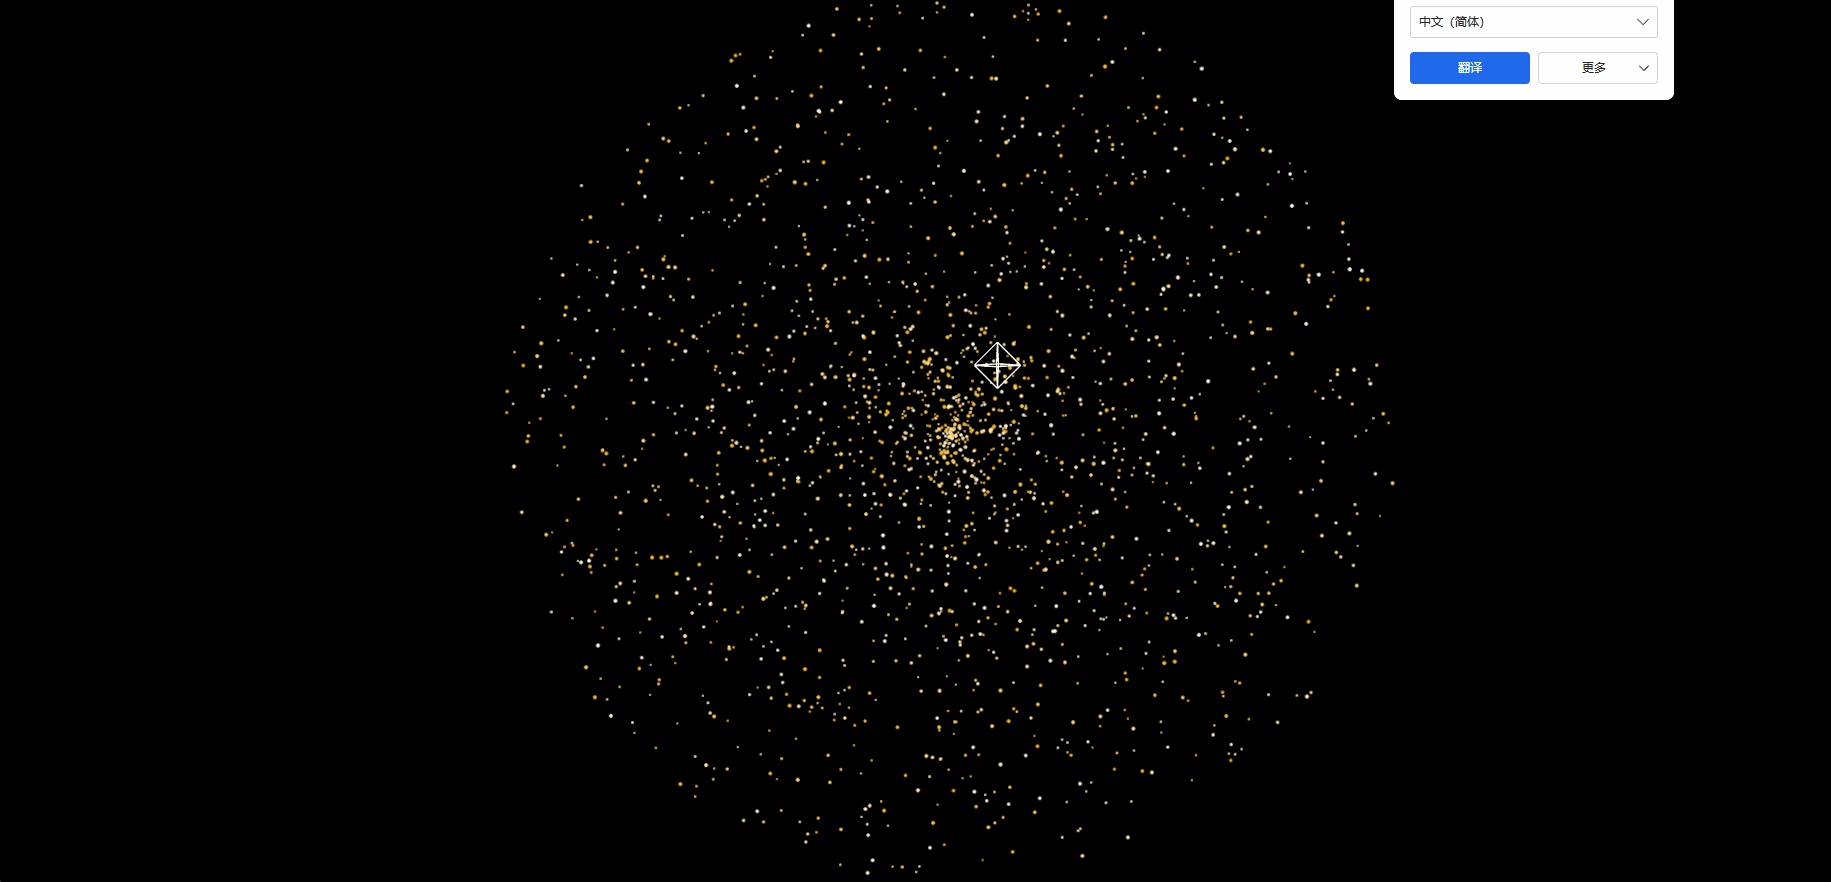
实现效果
实现源码
基本环境搭建省略
// 使用canvas创建文字纹理的函数
function createTextTexture(text, options = {}) {
// 默认配置
const config = {
width: 256,
height: 256,
fontSize: 48,
fontFamily: "Arial",
color: "#ffffff",
backgroundColor: "transparent",
textAlign: "center",
textBaseline: "middle",
...options,
};
// 创建canvas元素
const canvas = document.createElement("canvas");
canvas.width = config.width;
canvas.height = config.height;
// 获取绘图上下文
const context = canvas.getContext("2d");
// 设置背景色
if (config.backgroundColor !== "transparent") {
context.fillStyle = config.backgroundColor;
context.fillRect(0, 0, config.width, config.height);
} else {
// 透明背景需要清除画布
context.clearRect(0, 0, config.width, config.height);
}
// 设置文字样式
context.font = `${config.fontSize}px ${config.fontFamily}`;
context.fillStyle = config.color;
context.textAlign = config.textAlign;
context.textBaseline = config.textBaseline;
// 计算多行文本的绘制
const lines = text.split("\n");
const lineHeight = config.fontSize * 1.2;
const totalHeight = lines.length * lineHeight;
const startY = (config.height - totalHeight) / 2 + config.fontSize / 2;
// 绘制每一行文字
lines.forEach((line, index) => {
const y = startY + index * lineHeight;
context.fillText(line, config.width / 2, y);
});
// 创建THREE.Texture
const texture = new THREE.CanvasTexture(canvas);
texture.needsUpdate = true;
return texture;
}
// -----------------------------------------实现粒子效果---------------------------------------
let batchRenderer;
const addParticle = async () => {
const group = new THREE.Group();
// 创建粒子系统批量渲染器
batchRenderer = new BatchedParticleRenderer();
group.add(batchRenderer);
const loader = new THREE.TextureLoader();
const texture = loader.load("/src/assets/texture/point.png");
const particles = new ParticleSystem({
// 粒子动画的时间
duration: 14,
// 粒子是否循环播放
looping: true,
// 粒子开始的时间
startLife: new ConstantValue(22),
// 粒子开始的速度
startSpeed: new ConstantValue(0),
startSize: new IntervalValue(0.1, 0.2),
startColor: new RandomColor(
new THREE.Vector4(1, 1, 1, 1),
new THREE.Vector4(1, 0.7, 0, 1)
),
worldSpace: true,
// 粒子最大的数量
maxParticles: 2500,
emissionOverTime: new ConstantValue(0),
// 每次发射为0,但是初始就有2000个粒子
emissionBursts: [
{
time: 0,
count: new ConstantValue(2000),
probability: 1,
},
],
shape: new CircleEmitter({
radius: 20, // Radius of the circle
thickness: 1, // 0 = edge only, 1 = full area
arc: Math.PI * 2, // Emission arc angle (in radians)
spread: 0,
}),
material: new THREE.MeshBasicMaterial({
map: texture,
transparent: true,
}),
});
// 使用createTextTexture函数创建文字纹理,传入你想要的字符串
const textTexture1 = createTextTexture("新中地教育", {
width: 200,
height: 50,
fontSize: 26,
color: "#ffffff",
backgroundColor: "transparent",
});
const textTexture2 = createTextTexture("祝各位同学", {
width: 200,
height: 50,
fontSize: 26,
color: "#ffffff",
backgroundColor: "transparent",
});
const textTexture3 = createTextTexture("工作顺利", {
width: 200,
height: 50,
fontSize: 26,
color: "#ffffff",
backgroundColor: "transparent",
});
// 用这张图片的像素点来创建 TextureSequencer,阈值是透明度 0.2 的像素。
//TextureSequencer 的三个参数分别是 scaleX、scaleY 和位置。
const seq1 = new TextureSequencer(0.15, 0.15, new THREE.Vector3(-10, 0, 0));
seq1.fromImage(textTexture1.image, 0.2);
const seq2 = new TextureSequencer(0.15, 0.15, new THREE.Vector3(-20, 0, 0));
seq2.fromImage(textTexture2.image, 0.2);
const seq3 = new TextureSequencer(0.15, 0.15, new THREE.Vector3(-10, 0, 0));
seq3.fromImage(textTexture3.image, 0.2);
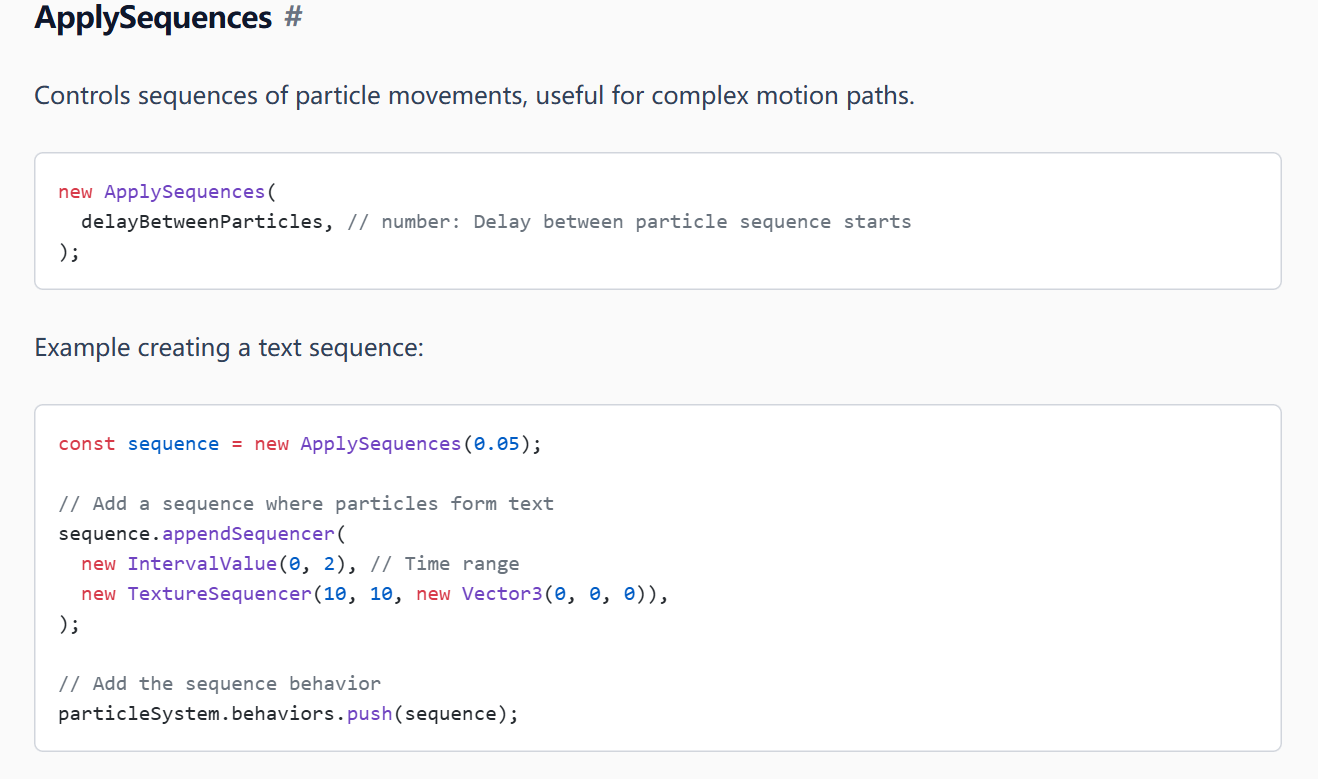
// ApplySequences 的参数是每个粒子运动的时间间隔,间隔 0.001 秒移动下个粒子。
const applySeq = new ApplySequences(0.001);
applySeq.appendSequencer(new IntervalValue(1.0, 2.0), seq1);
applySeq.appendSequencer(new IntervalValue(5.0, 6.0), seq2);
applySeq.appendSequencer(new IntervalValue(9.0, 10.0), seq3);
particles.addBehavior(applySeq);
group.add(particles.emitter);
batchRenderer.addSystem(particles);
scene.add(group);
};
addParticle();
const clock = new THREE.Clock();
renderer.setAnimation(() => {
const delta = clock.getDelta();
renderer.render(scene, camera);
// 渲染循环中更新粒子
if (batchRenderer) {
batchRenderer.update(delta);
}
});实现原理
这里同样是需要设置粒子的行为模式
核心api:
- TextureSequencer :负责 定义粒子如何按照纹理图案排列 ,它分析纹理图像的像素信息,将粒子定位在纹理的不透明区域。
- ApplySequences :作为粒子系统的一种行为(behavior), 负责控制何时应用哪个 TextureSequencer ,管理多个序列器及其应用的时间间隔。
具体用法
1.我们需要准备一张图片,这里可以用quark官方的文字图片或者自己用canvas去构造一个文字图,我这里选择了第二种,用canvas构造three的texture的方法在网上有很多
// 使用createTextTexture函数创建文字纹理,传入你想要的字符串,返回一个THREE.Texture
const textTexture1 = createTextTexture("新中地教育", {
	width: 200,
	height: 50,
	fontSize: 26,
	color: "#ffffff",
	backgroundColor: "transparent",
});
2.得到材质之后,将材质构造TextureSequencer,然后设置这个Sequencer的运行时间在1s--->2s,最后将ApplySequences添加到行为模式中
  const seq1 = new TextureSequencer(0.15, 0.15, new THREE.Vector3(-10, 0, 0));
  seq1.fromImage(textTexture1.image, 0.2);

  //   ApplySequences 的参数是每个粒子运动的时间间隔,间隔 0.001 秒移动下个粒子。
  const applySeq = new ApplySequences(0.001);
  applySeq.appendSequencer(new IntervalValue(1.0, 2.0), seq1);

  particles.addBehavior(applySeq);
3.这里我们有三个文字,可以分为三个TextureSequencer去构造
  const textureParam={
    width: 200,
    height: 50,
    fontSize: 26,
    color: "#ffffff",
    backgroundColor: "transparent",
  }
  // 使用createTextTexture函数创建文字纹理,传入你想要的字符串
  const textTexture1 = createTextTexture("新中地教育", textureParam);

  const textTexture2 = createTextTexture("祝各位同学", textureParam);

  const textTexture3 = createTextTexture("工作顺利", textureParam);

// 用这张图片的像素点来创建 TextureSequencer,阈值是透明度 0.2 的像素。
  //TextureSequencer 的三个参数分别是 scaleX、scaleY 和位置。
  const seq1 = new TextureSequencer(0.15, 0.15, new THREE.Vector3(-10, 0, 0));
  seq1.fromImage(textTexture1.image, 0.2);

  const seq2 = new TextureSequencer(0.15, 0.15, new THREE.Vector3(-20, 0, 0));
  seq2.fromImage(textTexture2.image, 0.2);

  const seq3 = new TextureSequencer(0.15, 0.15, new THREE.Vector3(-10, 0, 0));
  seq3.fromImage(textTexture3.image, 0.2);

  //   ApplySequences 的参数是每个粒子运动的时间间隔,间隔 0.001 秒移动下个粒子。
  const applySeq = new ApplySequences(0.001);
  applySeq.appendSequencer(new IntervalValue(1.0, 2.0), seq1);
  applySeq.appendSequencer(new IntervalValue(5.0, 6.0), seq2);
  applySeq.appendSequencer(new IntervalValue(9.0, 10.0), seq3);
  particles.addBehavior(applySeq);
辅助函数:createTextTexture
// 使用canvas创建文字纹理的函数
function createTextTexture(text, options = {}) {
  // 默认配置
  const config = {
    width: 256,
    height: 256,
    fontSize: 48,
    fontFamily: "Arial",
    color: "#ffffff",
    backgroundColor: "transparent",
    textAlign: "center",
    textBaseline: "middle",
    ...options,
  };

  // 创建canvas元素
  const canvas = document.createElement("canvas");
  canvas.width = config.width;
  canvas.height = config.height;

  // 获取绘图上下文
  const context = canvas.getContext("2d");

  // 设置背景色
  if (config.backgroundColor !== "transparent") {
    context.fillStyle = config.backgroundColor;
    context.fillRect(0, 0, config.width, config.height);
  } else {
    // 透明背景需要清除画布
    context.clearRect(0, 0, config.width, config.height);
  }

  // 设置文字样式
  context.font = `${config.fontSize}px ${config.fontFamily}`;
  context.fillStyle = config.color;
  context.textAlign = config.textAlign;
  context.textBaseline = config.textBaseline;

  // 计算多行文本的绘制
  const lines = text.split("\n");
  const lineHeight = config.fontSize * 1.2;
  const totalHeight = lines.length * lineHeight;
  const startY = (config.height - totalHeight) / 2 + config.fontSize / 2;

  // 绘制每一行文字
  lines.forEach((line, index) => {
    const y = startY + index * lineHeight;
    context.fillText(line, config.width / 2, y);
  });

  // 创建THREE.Texture
  const texture = new THREE.CanvasTexture(canvas);
  texture.needsUpdate = true;

  return texture;
}