使用自定义数据集微调Qwen/Qwen3-VL-2B-Instruct模型
1.使用autodl平台搭建系统环境
环境为
PyTorch 2.3.0
Python 3.12(ubuntu22.04)
CUDA 12.1
2.下载模型
python
from modelscope import snapshot_download
model_dir = snapshot_download('Qwen/Qwen3-VL-2B-Instruct')
3.将下载好的模型文件转移到自己定义的目录中
4.安装库
在安装过程中遇到一个问题,autodl已经配置的pip镜像,但是速度还是很慢,将其手动切换为清华源就快了很多,比较疑惑。不知道是不是我那台主机的问题。
bash
pip install git+https://github.com/huggingface/transformers accelerate
pip install qwen-vl-utils[decord]==0.0.8
pip install sentencepiece==0.2.0 datasets==2.18.0 peft==0.13.2 swanlab==0.6.5 -i https://pypi.tuna.tsinghua.edu.cn/simple
5.创建Qwen文件夹,将下载的Qwen模型转移到该目录下
如果找不到下载的文件目录,可以在根目录下输入下面命令,来查看
bash
du-h6.在新建的Qwen目录下载github下的Qwen仓库代码
bash
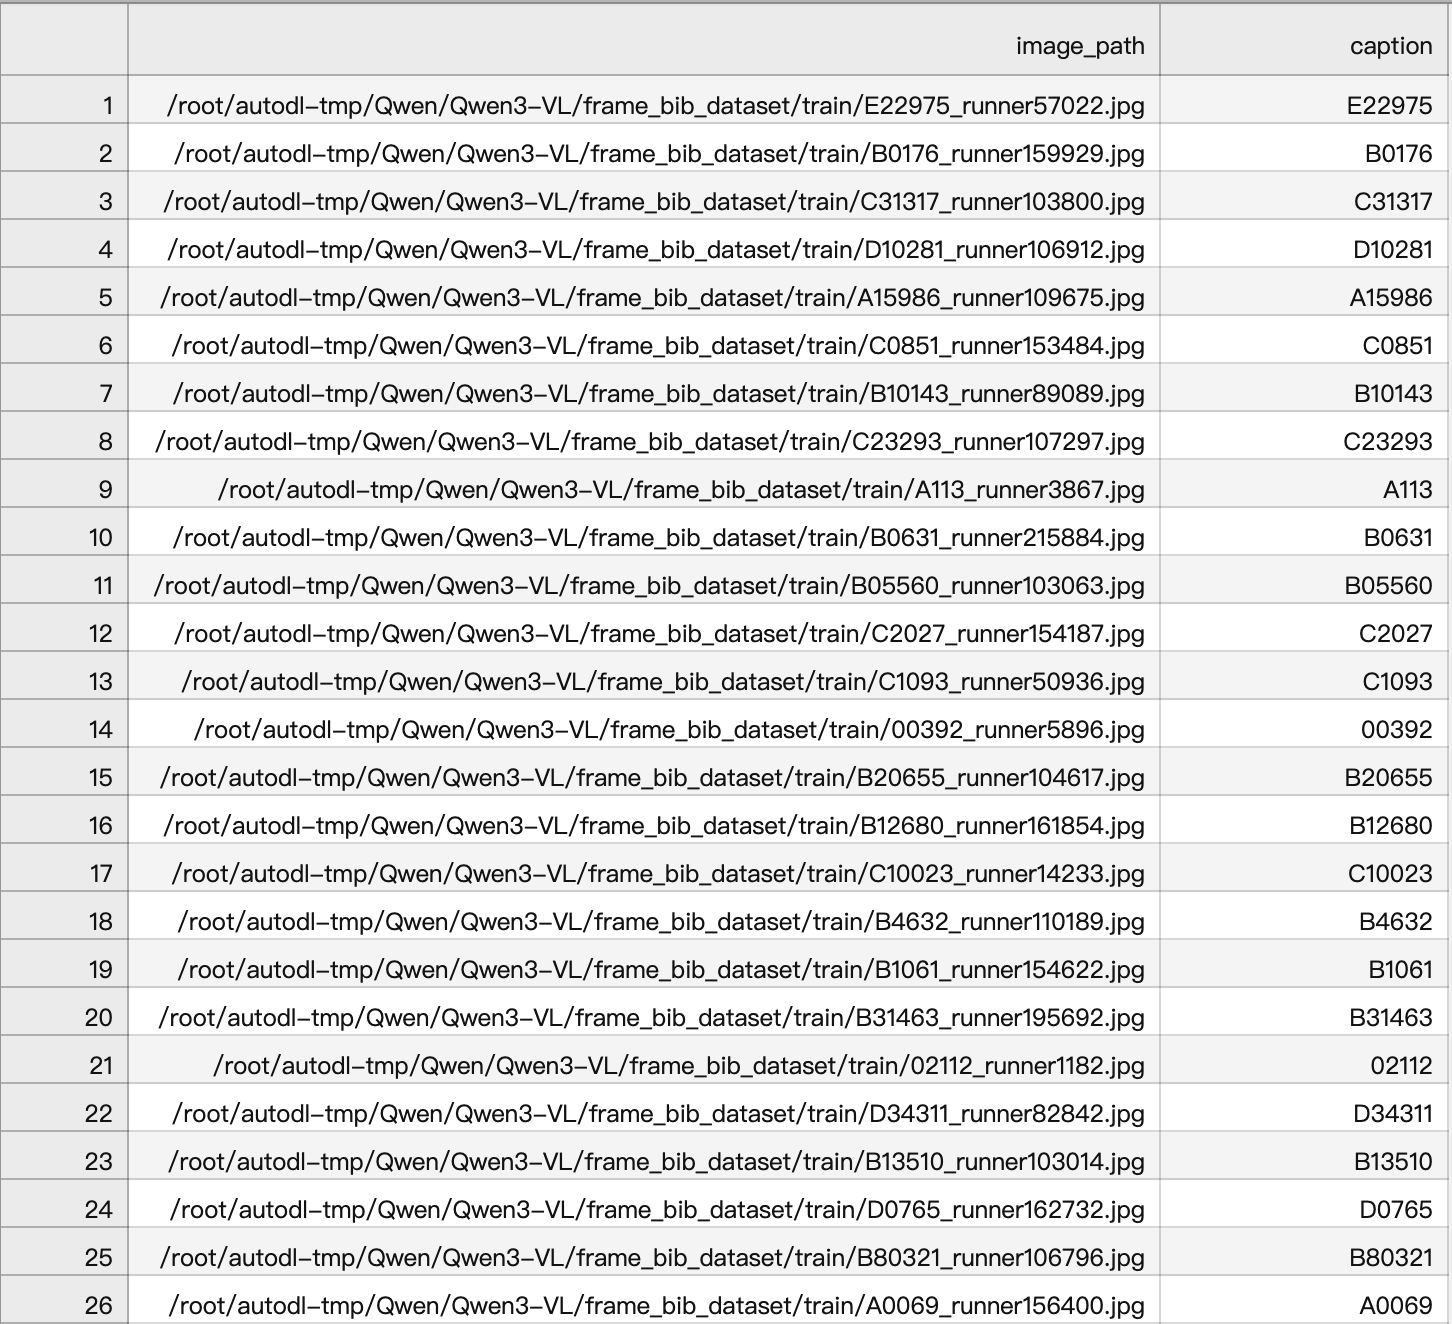
git clone https://github.com/QwenLM/Qwen3-VL.git7.我的任务为字符识别任务,将数据处理为csv文件,如果不出来也可以只要最终生成json文件一致即可。
csv文件,image_path为图片路径,captain为要识别的字符结果(target)
将csv文件处理为json文件

csv转json文件代码,可根据自己的数据调整代码,只要最终输出格式和json一样就行
python
import pandas as pd
import json
import os

# 读取第一步生成的CSV文件
csv_path = 'csv文件路径'
if not os.path.exists(csv_path):
    raise FileNotFoundError(f"未找到CSV文件:{csv_path},请先运行第一步代码")

df = pd.read_csv(csv_path)
conversations = []

# 转换为指定格式的对话数据
for i in range(len(df)):
    conversations.append({
        "id": f"marathon_{i+1}",  # 自定义ID格式
        "conversations": [
            {
                "from": "user",
                # 用视觉标记包裹图片路径(与你提供的示例格式一致)
                "value": f"图片中号码布字符为多少: <|vision_start|>{df.iloc[i]['image_path']}<|vision_end|>"
            },
            {
                "from": "assistant",
                "value": df.iloc[i]['caption']  # 号码布字符作为回复
            }
        ]
    })

# 保存为JSON文件
json_path = '保存的json文件.json'
with open(json_path, 'w', encoding='utf-8') as f:
    json.dump(conversations, f, ensure_ascii=False, indent=2)

print(f"JSON文件生成完成,保存路径:{os.path.abspath(json_path)}")
7.处理完后开始训练,训练代码如下
python
import torch
from datasets import Dataset
from modelscope import snapshot_download, AutoTokenizer
from swanlab.integration.transformers import SwanLabCallback
from qwen_vl_utils import process_vision_info
from peft import LoraConfig, TaskType, get_peft_model, PeftModel
from transformers import (
    TrainingArguments,
    Trainer,
    DataCollatorForSeq2Seq,
    Qwen3VLForConditionalGeneration,
    AutoProcessor,
)
import swanlab
import json


def process_func(example):
    """
    将数据集进行预处理
    """
    MAX_LENGTH = 8192
    input_ids, attention_mask, labels = [], [], []
    conversation = example["conversations"]
    input_content = conversation[0]["value"]
    output_content = conversation[1]["value"]
    file_path = input_content.split("<|vision_start|>")[1].split("<|vision_end|>")[0]  # 获取图像路径
    messages = [
        {
            "role": "user",
            "content": [
                {
                    "type": "image",
                    "image": f"{file_path}",
                    "resized_height": 280,
                    "resized_width": 280,
                },
                {"type": "text", "text": "图片字符为多少"},
            ],
        }
    ]
    text = processor.apply_chat_template(
        messages, tokenize=False, add_generation_prompt=True
    )  # 获取文本
    image_inputs, video_inputs = process_vision_info(messages)  # 获取数据数据(预处理过)
    inputs = processor(
        text=[text],
        images=image_inputs,
        videos=video_inputs,
        padding=True,
        return_tensors="pt",
    )
    inputs = {key: value.tolist() for key, value in inputs.items()} #tensor -> list,为了方便拼接
    instruction = inputs

    response = tokenizer(f"{output_content}", add_special_tokens=False)


    input_ids = (
            instruction["input_ids"][0] + response["input_ids"] + [tokenizer.pad_token_id]
    )

    attention_mask = instruction["attention_mask"][0] + response["attention_mask"] + [1]
    labels = (
            [-100] * len(instruction["input_ids"][0])
            + response["input_ids"]
            + [tokenizer.pad_token_id]
    )
    if len(input_ids) > MAX_LENGTH:  # 做一个截断
        input_ids = input_ids[:MAX_LENGTH]
        attention_mask = attention_mask[:MAX_LENGTH]
        labels = labels[:MAX_LENGTH]

    input_ids = torch.tensor(input_ids)
    attention_mask = torch.tensor(attention_mask)
    labels = torch.tensor(labels)
    inputs['pixel_values'] = torch.tensor(inputs['pixel_values'])
    inputs['image_grid_thw'] = torch.tensor(inputs['image_grid_thw']).squeeze(0)  #由(1,h,w)变换为(h,w)
    return {"input_ids": input_ids, "attention_mask": attention_mask, "labels": labels,
            "pixel_values": inputs['pixel_values'], "image_grid_thw": inputs['image_grid_thw']}

# 在modelscope上下载Qwen2-VL模型到本地目录下
# model_dir = snapshot_download("Qwen/Qwen2-VL-2B-Instruct", cache_dir="./", revision="master")

# 使用Transformers加载模型权重
tokenizer = AutoTokenizer.from_pretrained("/root/autodl-tmp/Qwen/Qwen3-VL-2B-Instruct", use_fast=False, trust_remote_code=True)
processor = AutoProcessor.from_pretrained("/root/autodl-tmp/Qwen/Qwen3-VL-2B-Instruct")

model = Qwen3VLForConditionalGeneration.from_pretrained("/root/autodl-tmp/Qwen/Qwen3-VL-2B-Instruct", device_map="auto", torch_dtype=torch.bfloat16, trust_remote_code=True,)
model.enable_input_require_grads()  # 开启梯度检查点时,要执行该方法

train_ds = Dataset.from_json("marathon_data_train_vl.json")
train_dataset = train_ds.map(process_func)

# 配置LoRA
config = LoraConfig(
    task_type=TaskType.CAUSAL_LM,
    target_modules=["q_proj", "k_proj", "v_proj", "o_proj", "gate_proj", "up_proj", "down_proj"],
    inference_mode=False,  # 训练模式
    r=64,  # Lora 秩
    lora_alpha=16,  # Lora alaph,具体作用参见 Lora 原理
    lora_dropout=0.05,  # Dropout 比例
    bias="none",
)

# 获取LoRA模型
peft_model = get_peft_model(model, config)

# 配置训练参数
args = TrainingArguments(
    output_dir="./output/Qwen3-VL-2B",
    per_device_train_batch_size=4,
    gradient_accumulation_steps=4,
    logging_steps=10,
    logging_first_step=5,
    num_train_epochs=1,
    save_steps=200,
    learning_rate=1e-4,
    save_on_each_node=True,
    gradient_checkpointing=True,
    report_to="none",
)

# 设置SwanLab回调
swanlab_callback = SwanLabCallback(
    project="Qwen3-VL-finetune",
    experiment_name="qwen3-vl-marathon-bib",
    config={
        "model": "https://modelscope.cn/models/Qwen/Qwen3-VL-2B-Instruct",
        # "dataset": "https://modelscope.cn/datasets/modelscope/coco_2014_caption/quickstart",
        "github": "https://github.com/datawhalechina/self-llm",
        "prompt": "图片中字符为多少: ",
        "train_data_number": 15157,
        "lora_rank": 64,
        "lora_alpha": 16,
        "lora_dropout": 0.05,
    },
)

# 配置Trainer
trainer = Trainer(
    model=peft_model,
    args=args,
    train_dataset=train_dataset,
    data_collator=DataCollatorForSeq2Seq(tokenizer=tokenizer, padding=True),
    callbacks=[swanlab_callback],
)

# 开启模型训练
trainer.train()
在运行过程中,遇到磁盘空间满了的问题,因为autodl给的系统盘只有30G,我微调一个模型,数据集为1万多条时就将该系统盘完全占满。
因为在数据加载时,使用的datasets库,该库在系统盘下安装,导致在加载模型时缓存就保存到系统盘中,因此需要将数据加载的缓存转移到系统盘中,因为系统盘可以扩容。
只需要在train代码的最顶端加入下面代码,将其转移到autodl-tmp文件下即可,autodl-tmp即为其系统盘根目录。
python
import os
os.environ["HF_DATASETS_CACHE"] = "/root/autodl-tmp/huggingface/datasets"
os.environ["TRANSFORMERS_CACHE"] = "/root/autodl-tmp/huggingface/models"
8.运行代码即可开始微调大模型

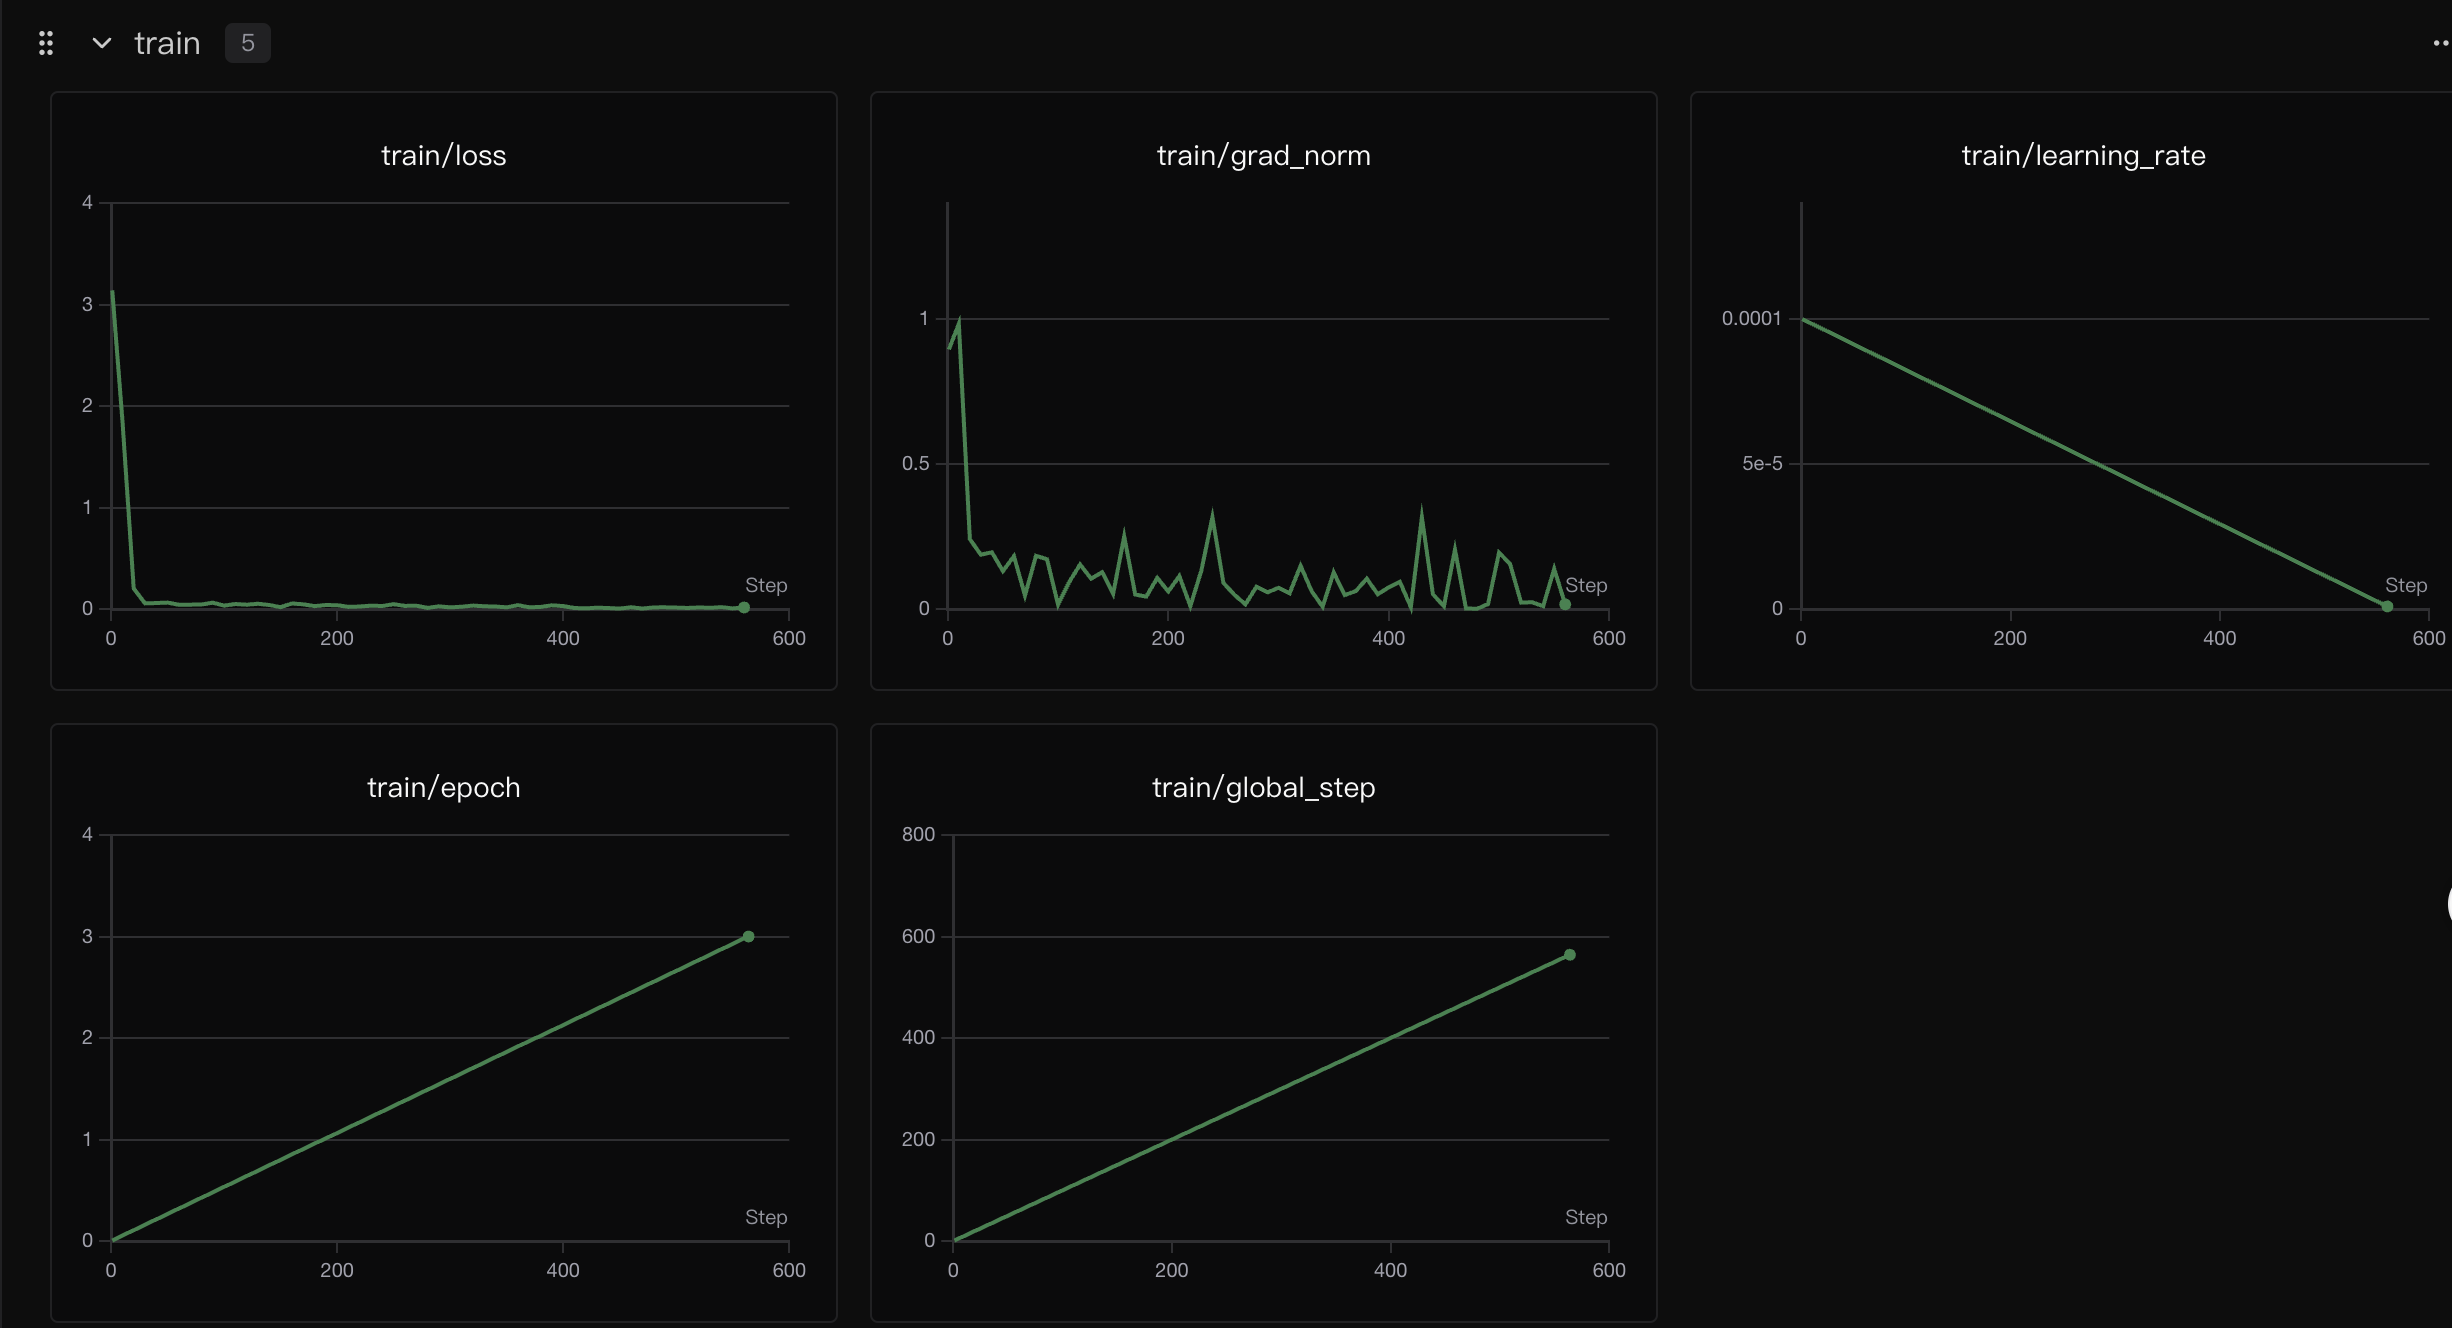
9.运行该代码需要创建SwanLab的个人账号,该平台用于显示当前微调模型的情况,如学习率,损失函数等。
10.对训练好后的模型进行预测,预测代码如下
python
import torch
from datasets import Dataset
from modelscope import snapshot_download, AutoTokenizer
from swanlab.integration.transformers import SwanLabCallback
from qwen_vl_utils import process_vision_info
from peft import LoraConfig, TaskType, get_peft_model, PeftModel
from transformers import (
    TrainingArguments,
    Trainer,
    DataCollatorForSeq2Seq,
    Qwen2_5_VLForConditionalGeneration,
    AutoProcessor,
)
import swanlab
import json
from PIL import Image
import os

def predict(messages, model):
    # 准备推理
    text = processor.apply_chat_template(
        messages, tokenize=False, add_generation_prompt=True
    )
    image_inputs, video_inputs = process_vision_info(messages)
    inputs = processor(
        text=[text],
        images=image_inputs,
        videos=video_inputs,
        padding=True,
        return_tensors="pt",
    )
    inputs = inputs.to("cuda")

    # 生成输出
    generated_ids = model.generate(**inputs, max_new_tokens=128)
    generated_ids_trimmed = [
        out_ids[len(in_ids) :] for in_ids, out_ids in zip(inputs.input_ids, generated_ids)
    ]
    output_text = processor.batch_decode(
        generated_ids_trimmed, skip_special_tokens=True, clean_up_tokenization_spaces=False
    )

    return output_text[0]

# 使用Transformers加载模型权重
tokenizer = AutoTokenizer.from_pretrained("/root/autodl-tmp/Qwen/Qwen2.5-VL-3B-Instruct", use_fast=False, trust_remote_code=True)
processor = AutoProcessor.from_pretrained("/root/autodl-tmp/Qwen/Qwen2.5-VL-3B-Instruct")

model = Qwen2_5_VLForConditionalGeneration.from_pretrained("/root/autodl-tmp/Qwen/Qwen2.5-VL-3B-Instruct", device_map="auto", torch_dtype=torch.bfloat16, trust_remote_code=True,)

swanlab.init(
    project="marathon_number_prediction",  # 自定义项目名称(可修改)
    experiment_name="predict_test",  # 实验名称(可修改)
    description=""  # 可选:添加实验描述
)

# 配置测试参数
val_config = LoraConfig(
    task_type=TaskType.CAUSAL_LM,
    target_modules=["q_proj", "k_proj", "v_proj", "o_proj", "gate_proj", "up_proj", "down_proj"],
    inference_mode=True,  # 训练模式
    r=64,  # Lora 秩
    lora_alpha=16,  # Lora alaph,具体作用参见 Lora 原理
    lora_dropout=0.05,  # Dropout 比例
    bias="none",
)

# 获取测试模型
val_peft_model = PeftModel.from_pretrained(model, model_id="./output/Qwen2.5-VL-3B/checkpoint-564", config=val_config)

# 读取测试数据
with open("marathon_data_val_vl.json", "r") as f:
    test_dataset = json.load(f)

test_image_list = []
count = 0
for item in test_dataset:
    input_image_prompt = item["conversations"][0]["value"]
    # 去掉前后的<|vision_start|>和<|vision_end|>
    origin_image_path = input_image_prompt.split("<|vision_start|>")[1].split("<|vision_end|>")[0]

    messages = [{
        "role": "user",
        "content": [
            {
            "type": "image",
            "image": origin_image_path
            },
            {
            "type": "text",
            "text": "图中字符为多少:"
            }
        ]}]

    response = predict(messages, val_peft_model)
    messages.append({"role": "assistant", "content": f"{response}"})
    if bib_number == messages[-1]["content"]:
        count += 1
    print(messages[-1])
    origin_image = Image.open(origin_image_path).convert("RGB")
    test_image_list.append(swanlab.Image(origin_image, caption=response))
swanlab.log({"Prediction": test_image_list})

swanlab.finish()
该显示结果也在swanlab上,如果不想也可将其上传关闭即可。
总结
上面的微调也只是很简单了一种,很多都是调库,大模型的学习也才刚刚开始。
参考博文如下,感谢这两位大神的帖子。
上面的代码是在该博文的基础上进行修改