通过一个小案例来学习DragTarget
效果图
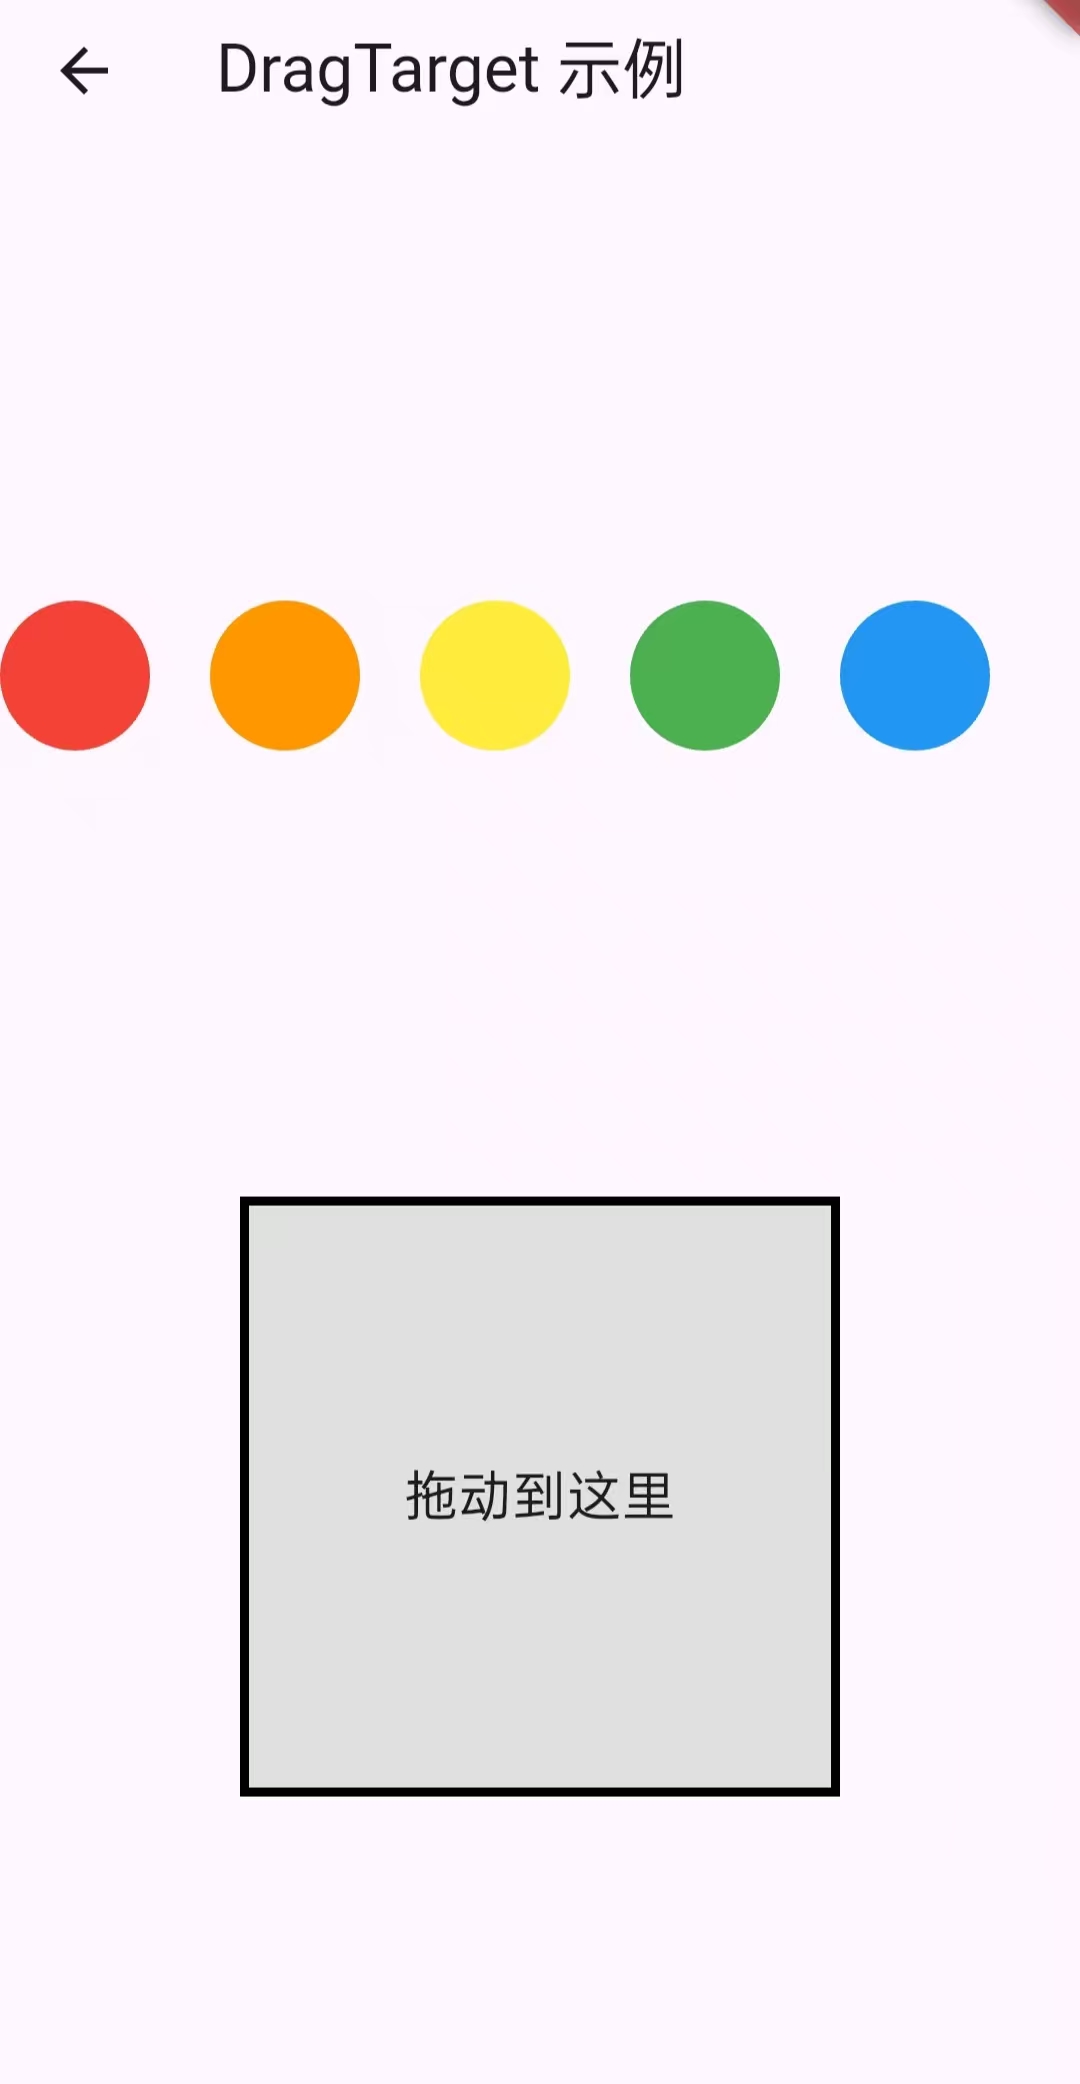
概念:DragTarget<T> 是一个 拖拽目标组件 ,用于接受 Draggable<T> 拖放的数据。
它通常与 Draggable 或 LongPressDraggable 搭配使用。当用户拖动一个可拖拽组件并释放时,如果释放位置在 DragTarget 区域内,该目标可以选择是否接受该数据。Draggable 的默认触发方式就是长按!
核心组件
| 组件 | 功能 |
|---|---|
| Draggable | 可拖拽的组件,会产生一个拖拽中的 "影子" widget |
| DragTarget | 接收拖拽数据的目标区域 |
| LongPressDraggable | 长按后触发拖拽 |
拖拽过程:
Dart
1.用户拖动 Draggable

2.系统调用目标 DragTarget 的 onWillAccept → 判断是否接受

3.如果接受,则在 onAccept 中拿到数据并更新状态
DragTarget关键参数
| 参数名 | 类型 | 说明 |
|---|---|---|
| builder | Widget Function(BuildContext, List<T?>, List<dynamic>) |
构建显示区域,通常根据拖入状态动态变化 |
| onWillAccept | bool Function(T?)? |
当拖拽进入目标区域时触发,返回是否接受 |
| onAccept | void Function(T) |
当放下时触发,正式接收数据 |
| onLeave | void Function(T?)? |
当拖拽离开时触发 |
| onAcceptWithDetails | void Function(DragTargetDetails<T>)? |
提供详细信息(如拖拽位置) |
声明流程图
Dart
Draggable 拖动中
   ↓
DragTarget.onWillAccept 触发 → 返回 true/false
   ↓
如果返回 true
 → builder 刷新,显示"可接收状态"
   ↓
用户放开手指
 → onAccept / onAcceptWithDetails 调用
 → builder 再次刷新为最终状态
总结
Dart
DragTarget
 ┣━ 概念:拖拽目标组件
 ┣━ 生命周期:onWillAccept → onAccept → onLeave
 ┣━ 参数:builder, onWillAccept, onAccept, onLeave
 ┣━ 配套组件:Draggable / LongPressDraggable
 ┣━ 使用场景:
 │   ┣━ 拖放排序
 │   ┣━ 拖放分类
 │   ┣━ 拼图游戏
 │   ┣━ 文件拖入
 ┣━ 架构:
 │   ┣━ Provider/BLoC 管理拖放状态
 │   ┣━ UI层仅负责展示
 ┗━ 实战技巧:
     ┣━ feedback半透明
     ┣━ builder动态变化
     ┗━ 用泛型区分不同拖拽类型
小案例的实现步骤
1.定义一个颜色颜色参数
Dart
Color? _targetColor;2.定义一个返回圆形的函数,提高代码复用效率
Dart
Widget _buildColorBox(Color color) => Container(
    width: 50,
    height: 50,
    decoration: BoxDecoration(
      color: color,
      shape: BoxShape.circle,
    ),
  );
3.建造主题UI,先构建可以拖动的圆形颜色块
Dart
// 可拖动的圆形颜色块
          Row(
            children: [
              Draggable<Color>(
                data: Colors.red, //1.传递的数据(把数据给接收的容器)
                feedback: _buildColorBox(Colors.red.withOpacity(0.5)), //2.拖拽时跟随手指的组件(跟随手指的半透明的颜色圆形)
                childWhenDragging: _buildColorBox(Colors.grey), //3.拖拽时原位置的显示(当手指拖拽的时候,原本显示红色的颜色块变成灰色的,增强交互性)
                child: _buildColorBox(Colors.red), //正常状态显示的内容,没有拖动显示的组件和颜色,
              ),
              SizedBox(width: 20,),

              Draggable<Color>(
                data: Colors.orange, //1.传递的数据
                feedback: _buildColorBox(Colors.orange.withOpacity(0.5)), //2.拖拽时跟随手指的组件
                childWhenDragging: _buildColorBox(Colors.grey), //3.拖拽时原位置的显示
                child: _buildColorBox(Colors.orange), //正常状态显示的内容
              ),
              SizedBox(width: 20,),

              Draggable<Color>(
                data: Colors.yellow, //1.传递的数据
                feedback: _buildColorBox(Colors.yellow.withOpacity(0.5)), //2.拖拽时跟随手指的组件
                childWhenDragging: _buildColorBox(Colors.grey), //3.拖拽时原位置的显示
                child: _buildColorBox(Colors.yellow), //正常状态显示的内容
              ),
              SizedBox(width: 20,),

              Draggable<Color>(
                data: Colors.green, //1.传递的数据
                feedback: _buildColorBox(Colors.green.withOpacity(0.5)), //2.拖拽时跟随手指的组件
                childWhenDragging: _buildColorBox(Colors.grey), //3.拖拽时原位置的显示
                child: _buildColorBox(Colors.green), //正常状态显示的内容
              ),
              SizedBox(width: 20,),

              Draggable<Color>(
                data: Colors.blue, //1.传递的数据
                feedback: _buildColorBox(Colors.blue.withOpacity(0.5)), //2.拖拽时跟随手指的组件
                childWhenDragging: _buildColorBox(Colors.grey), //3.拖拽时原位置的显示
                child: _buildColorBox(Colors.blue), //正常状态显示的内容
              ),
            ],
          ),
4.定义接收的容器
Dart
// 拖放目标(接收颜色的容器)
DragTarget<Color>(
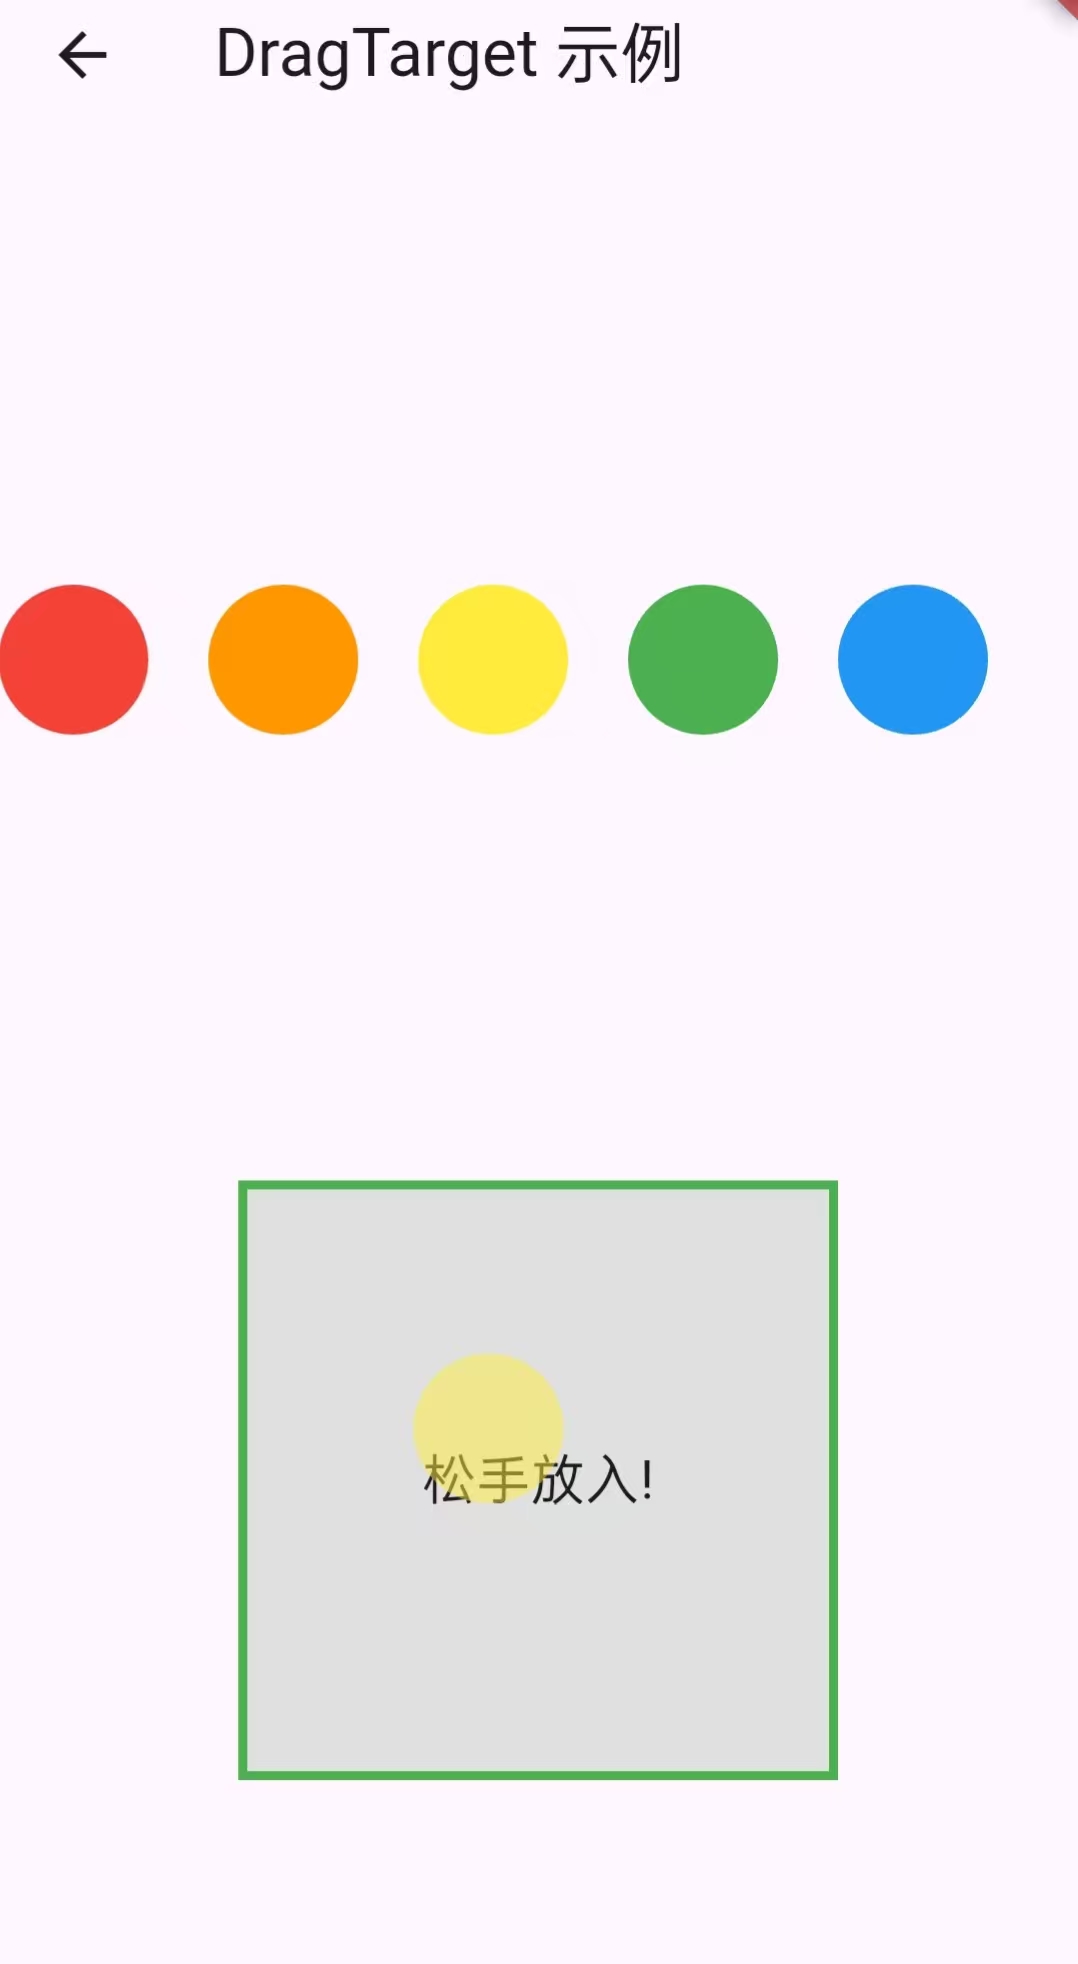
onWillAccept: (color) {
//return true; 接收所有颜色
return color == Colors.blue || color == Colors.red || color == Colors.yellow;//接收指定颜色(这里只有蓝,红,绿拖拽过去,容器的颜色会改变)
},
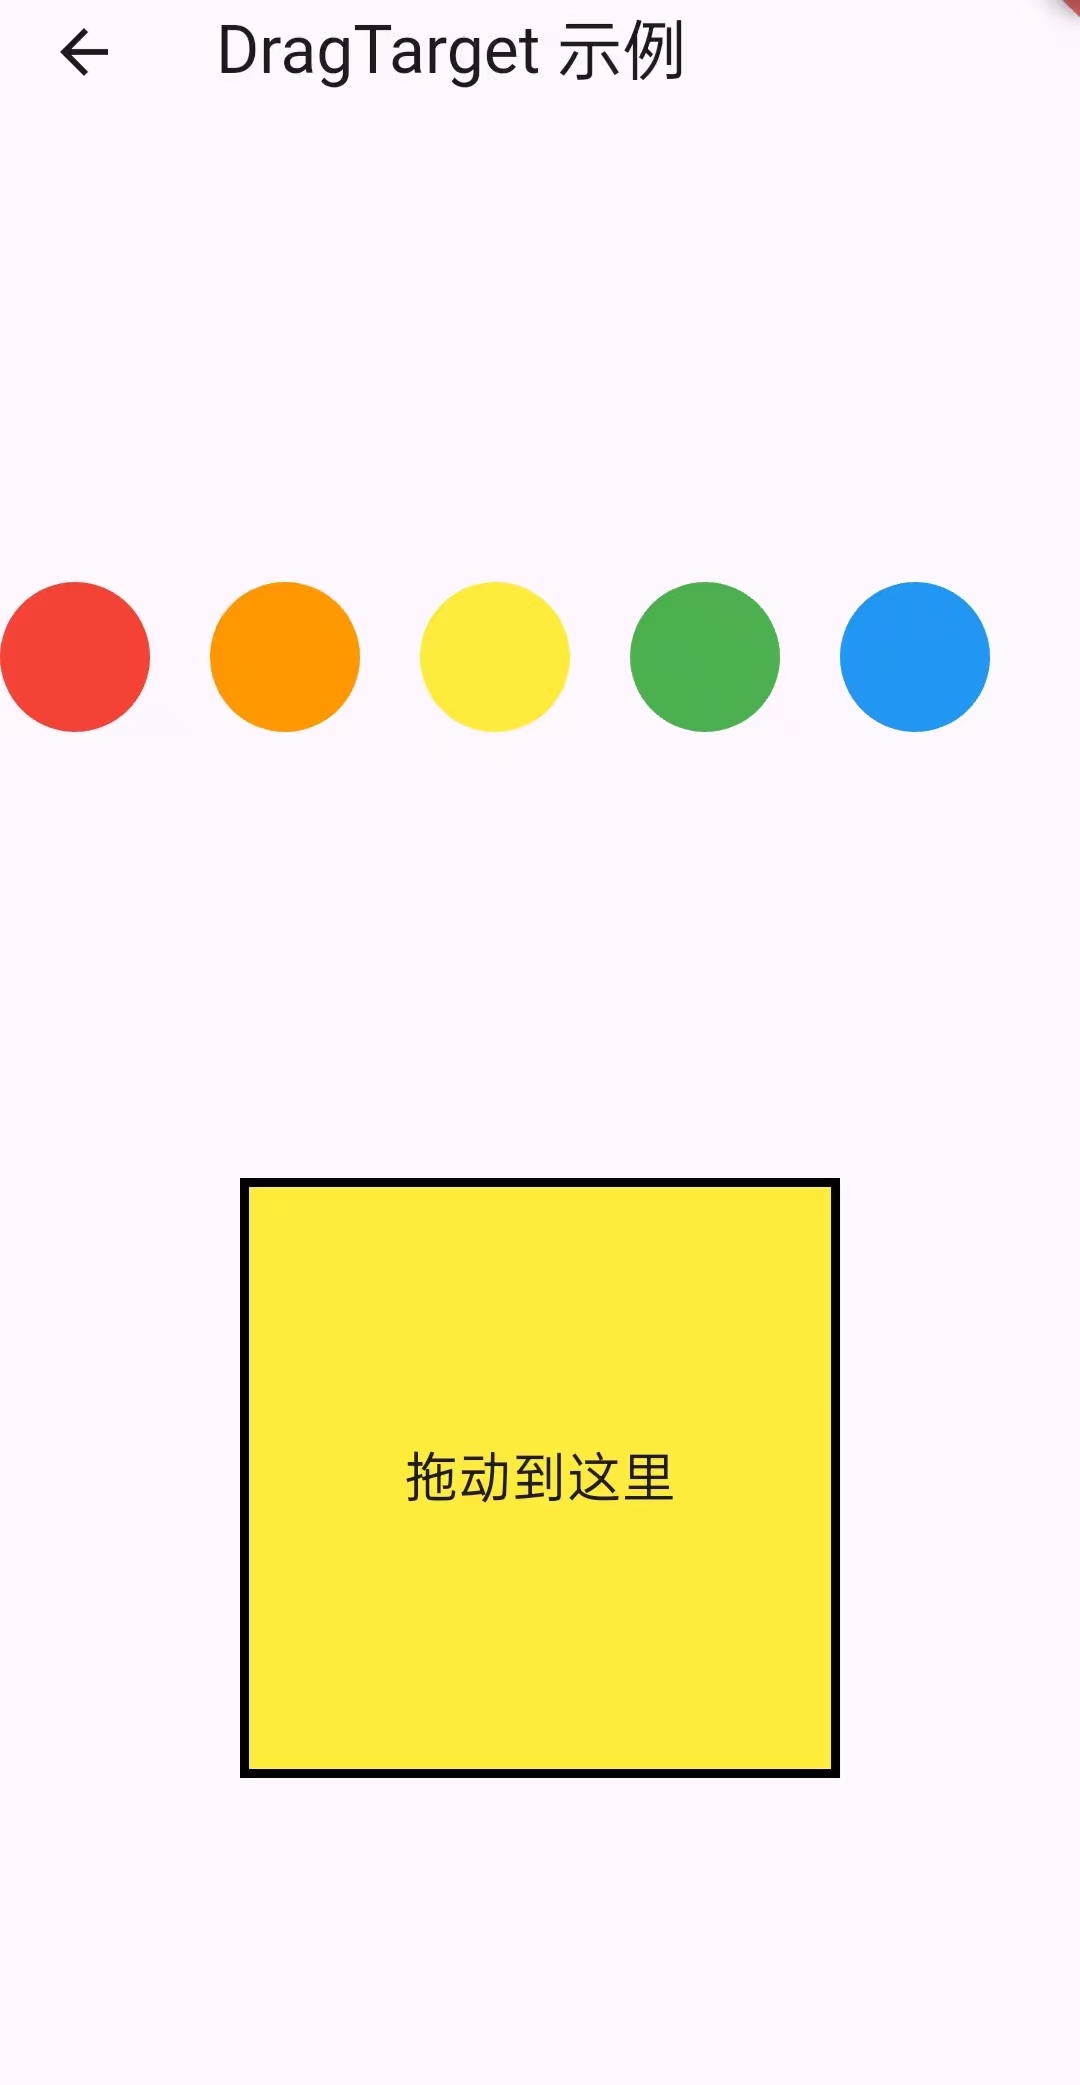
onAccept: (color) { //接收数据后的处理
setState(() => _targetColor = color);
},
onLeave: (data) { //拖拽离开时
debugPrint("离开目标区");
},
builder: (context, candidateData, rejectedData) { //构建接收颜色容器的UI
return Container(
//容器大小
width: 200,
height: 200,
decoration: BoxDecoration(
color: _targetColor ?? Colors.grey[300], //区域内颜色
border: Border.all( //边界颜色
color: candidateData.isNotEmpty ? Colors.green : Colors.black,
width: 3,
),
),
alignment: Alignment.center,
child: Text(
candidateData.isNotEmpty ? "松手放入!" : "拖动到这里",
style: const TextStyle(fontSize: 18),
),
);
},
),UI架构
Dart
Scaffold
├── AppBar
└── Column
    ├── Row (拖拽源层)
    │   ├── Draggable<Color> (红)
    │   ├── Draggable<Color> (橙)
    │   ├── Draggable<Color> (黄)
    │   ├── Draggable<Color> (绿)
    │   └── Draggable<Color> (蓝)
    │
    └── DragTarget<Color> (目标层)
        └── Container (可视化层)
            ├── 颜色背景
            ├── 动态边框
            └── 文字提示
架构层级图
Dart
用户交互层 (UI)
    ↓
组件层 (Draggable + DragTarget)
    ↓
状态管理层 (State)
    ↓
数据流层 (Color 数据传递)
数据流向图
Dart
Draggable (数据源)
    ↓ (传递 Color 数据)
DragTarget (接收器)
    ↓ (触发状态更新)
setState()
    ↓ (重建UI)
界面更新
数据完整流向
Dart
1.数据初始化

// 状态变量初始化
Color? _targetColor;  // 初始值: null

// 数据源定义
Draggable<Color>(
  data: Colors.red,    // 静态数据绑定
  // ...
)

2.拖拽开始阶段

用户长按颜色圆块 → Draggable 激活
    ↓
反馈系统启动:
- feedback: 半透明圆块跟随手指
- childWhenDragging: 原位置变灰色

3.拖拽经过阶段

用户拖拽到目标区域上方 → DragTarget 检测
    ↓
builder 被调用,参数变化:
candidateData: [] → [Colors.red]  // 包含当前拖拽的数据
    ↓
视觉反馈:边框变绿色 + 文字提示变化

4.决策放置阶段

用户松开手指 → onWillAccept 验证
    ↓
验证逻辑:
color == Colors.blue || color == Colors.red || color == Colors.yellow
    ↓
返回 true(接受) 或 false(拒绝)

5.数据接收阶段

验证通过 → onAccept 执行
    ↓
setState(() => _targetColor = color)  // 状态更新
    ↓
_targetColor 从 null 变为 Colors.red
    ↓
触发界面重建
代码实例
Dart
import 'package:flutter/material.dart';
import 'package:flutter/services.dart';


class DemoPage extends StatefulWidget {
  const DemoPage({super.key});

  @override
  State<DemoPage> createState() => _DemoPageState();
}

class _DemoPageState extends State<DemoPage> {
  Color? _targetColor;

  //颜色盒子构建函数
  Widget _buildColorBox(Color color) => Container(
    width: 50,
    height: 50,
    decoration: BoxDecoration(
      color: color,
      shape: BoxShape.circle,
    ),
  );

  @override
  Widget build(BuildContext context) {
    return Scaffold(
      appBar: AppBar(title: const Text("DragTarget 示例")),
      body: Column(
        mainAxisAlignment: MainAxisAlignment.spaceEvenly,

        children: [
          // 可拖动的圆形颜色块
          Row(
            children: [
              Draggable<Color>(
                data: Colors.red, //1.传递的数据(把数据给接收的容器)
                feedback: _buildColorBox(Colors.red.withOpacity(0.5)), //2.拖拽时跟随手指的组件(跟随手指的半透明的颜色圆形)
                childWhenDragging: _buildColorBox(Colors.grey), //3.拖拽时原位置的显示(当手指拖拽的时候,原本显示红色的颜色块变成灰色的,增强交互性)
                child: _buildColorBox(Colors.red), //正常状态显示的内容,没有拖动显示的组件和颜色,
              ),
              SizedBox(width: 20,),

              Draggable<Color>(
                data: Colors.orange, //1.传递的数据
                feedback: _buildColorBox(Colors.orange.withOpacity(0.5)), //2.拖拽时跟随手指的组件
                childWhenDragging: _buildColorBox(Colors.grey), //3.拖拽时原位置的显示
                child: _buildColorBox(Colors.orange), //正常状态显示的内容
              ),
              SizedBox(width: 20,),

              Draggable<Color>(
                data: Colors.yellow, //1.传递的数据
                feedback: _buildColorBox(Colors.yellow.withOpacity(0.5)), //2.拖拽时跟随手指的组件
                childWhenDragging: _buildColorBox(Colors.grey), //3.拖拽时原位置的显示
                child: _buildColorBox(Colors.yellow), //正常状态显示的内容
              ),
              SizedBox(width: 20,),

              Draggable<Color>(
                data: Colors.green, //1.传递的数据
                feedback: _buildColorBox(Colors.green.withOpacity(0.5)), //2.拖拽时跟随手指的组件
                childWhenDragging: _buildColorBox(Colors.grey), //3.拖拽时原位置的显示
                child: _buildColorBox(Colors.green), //正常状态显示的内容
              ),
              SizedBox(width: 20,),

              Draggable<Color>(
                data: Colors.blue, //1.传递的数据
                feedback: _buildColorBox(Colors.blue.withOpacity(0.5)), //2.拖拽时跟随手指的组件
                childWhenDragging: _buildColorBox(Colors.grey), //3.拖拽时原位置的显示
                child: _buildColorBox(Colors.blue), //正常状态显示的内容
              ),
            ],
          ),

          // 拖放目标(接收颜色的容器)
          DragTarget<Color>(
            onWillAccept: (color) {

              //return true; 接收所有颜色

              return color == Colors.blue || color == Colors.red || color == Colors.yellow;//接收指定颜色(这里只有蓝,红,绿拖拽过去,容器的颜色会改变)
            },
            onAccept: (color) { //接收数据后的处理
              setState(() => _targetColor = color);
            },
            onLeave: (data) { //拖拽离开时
              debugPrint("离开目标区");
            },

            builder: (context, candidateData, rejectedData) { //构建接收颜色容器的UI
              return Container(
                //容器大小
                width: 200,
                height: 200,
                decoration: BoxDecoration(
                  color: _targetColor ?? Colors.grey[300], //区域内颜色

                  border: Border.all( //边界颜色
                    color: candidateData.isNotEmpty ? Colors.green : Colors.black,
                    width: 3,
                  ),
                ),
                alignment: Alignment.center,
                child: Text(
                  candidateData.isNotEmpty ? "松手放入!" : "拖动到这里",
                  style: const TextStyle(fontSize: 18),
                ),
              );
            },
          ),
        ],
      ),
    );
  }


}