一、云计算的起源
1.AWS 简介
- 亚马逊的技术团队最早于2002年开始探索云计算的潜力,推出了亚马逊简单存储服务(S3) ,允许开发者在互联网上存储数据,并通过HTTP访问。2006年,亚马逊正式推出了Amazon Web Services。这一创新打破了传统IT基础设施的成本与管理局限,允许企业按需租用计算能力。
- AWS的成功激发了更多公司进入云计算市场不仅促进了云计算的发展,也使得更多企业开始转向云服务,减少了传统IT基础设施的投资和运维成本,推动了"云优先"的发展趋势。通过AWS,亚马逊将云计算转变为一种标准化的商业服务,极大地推动了技术创新,改变了企业如何使用计算资源的方式。
2.什么是云计算
- 云计算(Cloud Computing)是一种通过互联网提供计算资源的模式。它允许用户按需访问共享的计算资源(如服务器、存储、网络、数据库等),而不需要像传统方式那样拥有、维护或管理这些硬件和软件资源。
3.云计算的特征
-
按需自服务(On-demand self-service)
用户可以根据需要动态地获得计算资源,如存储空间、计算能力等,而无需人工干预。用户可以随时、根据需求进行资源的扩展或缩减。
-
广泛的网络访问(Broad network access)
云计算服务通过互联网提供,可以从任何支持网络的设备(如智能手机、笔记本电脑、桌面计算机等)访问。这种灵活性使得用户能够随时随地使用服务。
-
资源池化(Resource pooling)
云服务商将多个用户的计算资源集中在共享的数据中心,通过虚拟化技术实现资源池化。资源可以根据需求动态分配给不同的客户,形成多租户模式。
-
弹性(Elasticity)
云计算平台可以根据实际需求自动扩展或缩减计算资源。例如,某个网站在流量突然增加时,云平台可以自动增加计算和存储资源,反之则减少,从而提高效率,降低成本。
-
计量服务(Measured service)
用户根据使用的资源量(如存储空间、计算时间等)付费。这种按需付费模式使得云计算非常具有成本效益,用户可以避免不必要的支出。
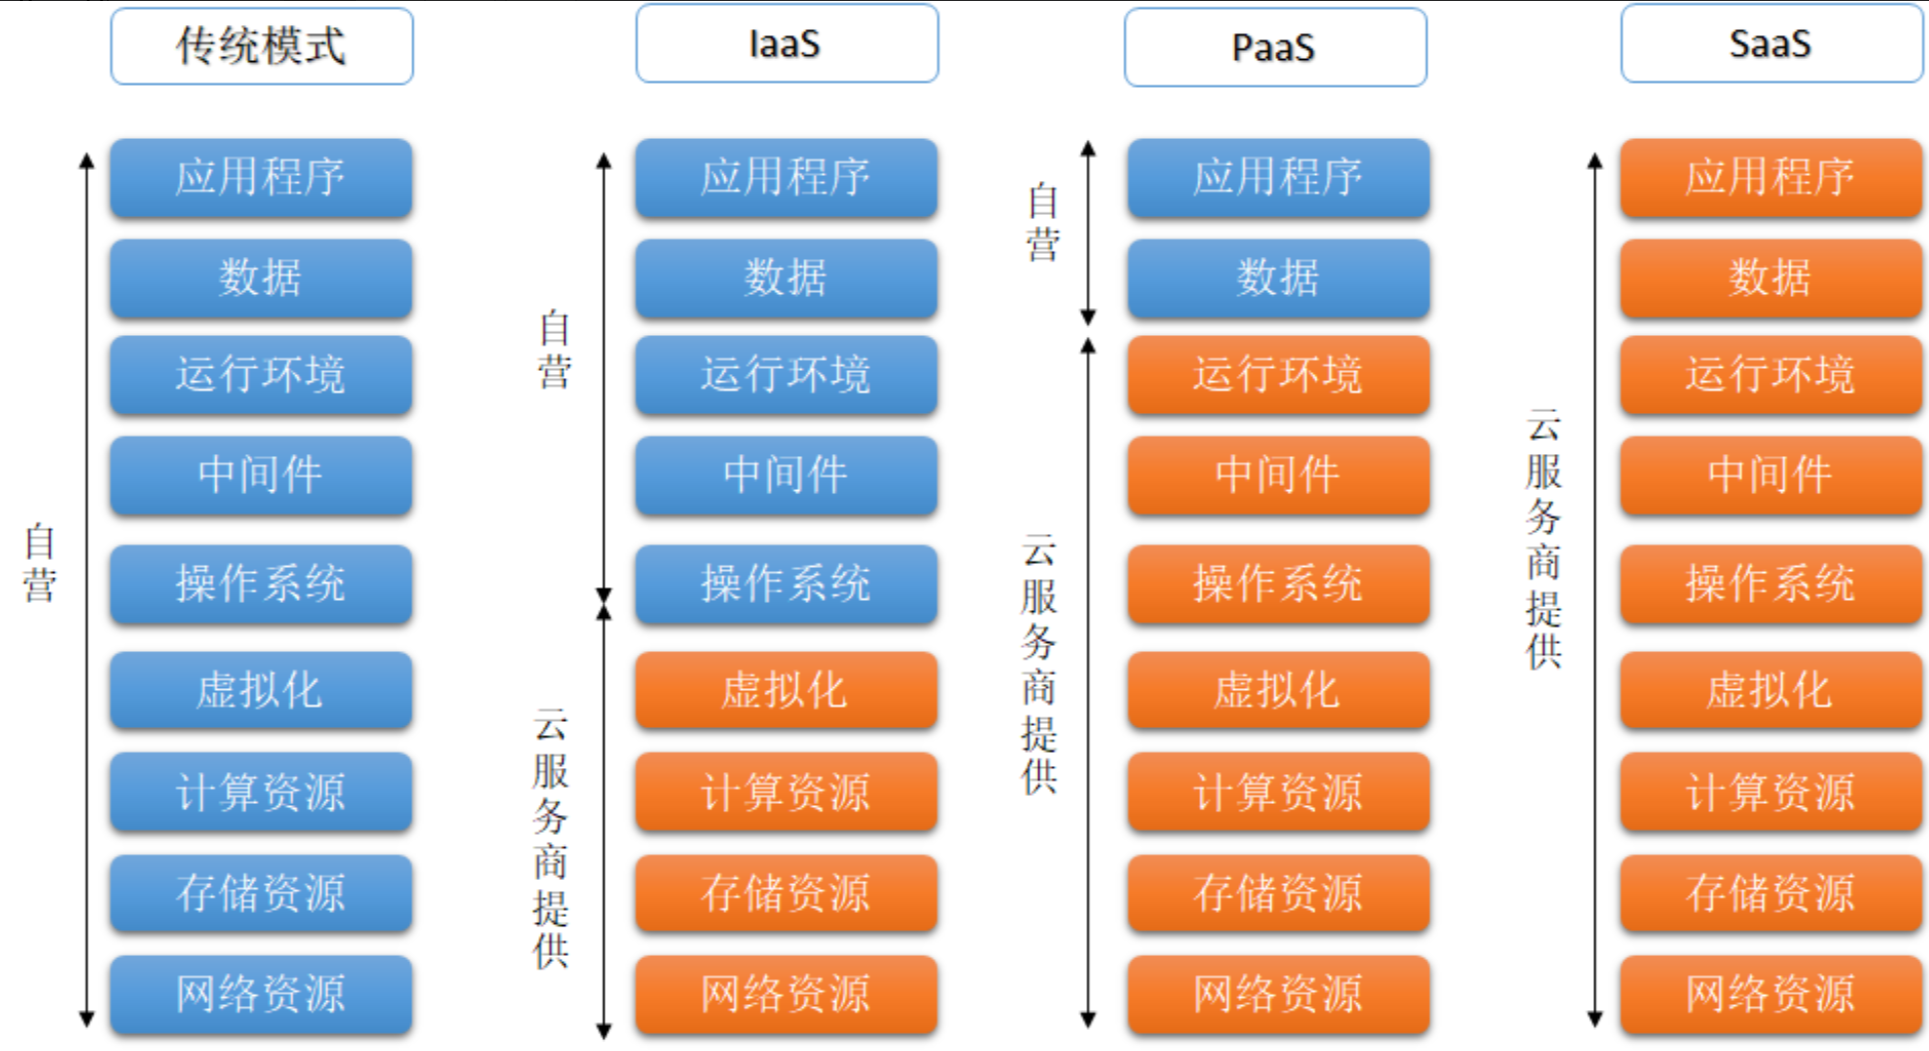
4.云计算的服务模型
云计算通常分为三个主要的服务模型:
- 基础设施即服务(IaaS, Infrastructure as a Service)
- 平台即服务(PaaS, Platform as a Service)
- 软件即服务(SaaS, Software as a Service)
具体图解:
二、Docker 简介
1.服务模型的特征
IAAS服务
- 使用KVM(kernel-based virtual machine)创建和管理虚拟机------虚拟机个数较少
- 使用openstack(VM管理平台)管理虚拟机------虚拟机较多
PAAS服务
-
单个容器使用docker去实现
-
多个容器使用容器编排(kubernetesk8s/ACK阿里云)
SAAS服务
- 开箱即用,注册后就可以使用
2.Docker容器化技术
注:在容器化技术出现之前,应用部署通常需要部署在不同的环境中(开发、测试、语法、生产),容易产生各种各样的报错
(1)名词解释
- 容器:应用在容器中运行(类似于虚拟机,是一个轻量级虚拟化)
- 镜像:应用+依赖
- 关联:做好镜像,让镜像运行起来,变成容器,使其可以运行在不同的环境中
(2)容器的特征和优点
- 快速部署应用,快速启动,高效利用系统资源
- 应用部署时不需要依赖底层操作系统环境,运行环境一致
- 应用所有的依赖都被放在镜像中,迁移、维护和扩展更轻松
- 方便持续交付和部署
(3)Docker基本实现原理
- 资源隔离(name space):命名空间,提供容器间的隔离
- 资源限额(cgroup):限制容器资源的使用上限
- 分层存储(UFS):联合文件系统,提供文件和镜像的存储
3.容器与虚拟机的区别
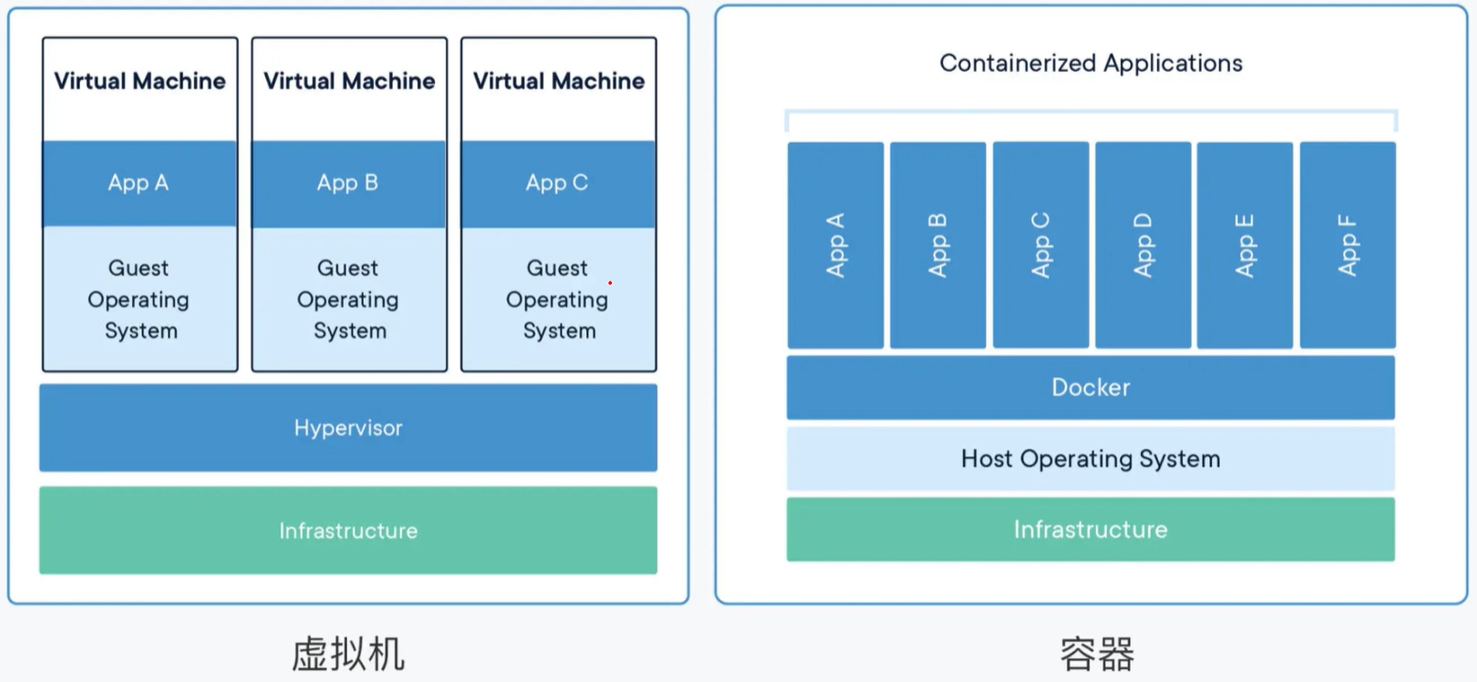
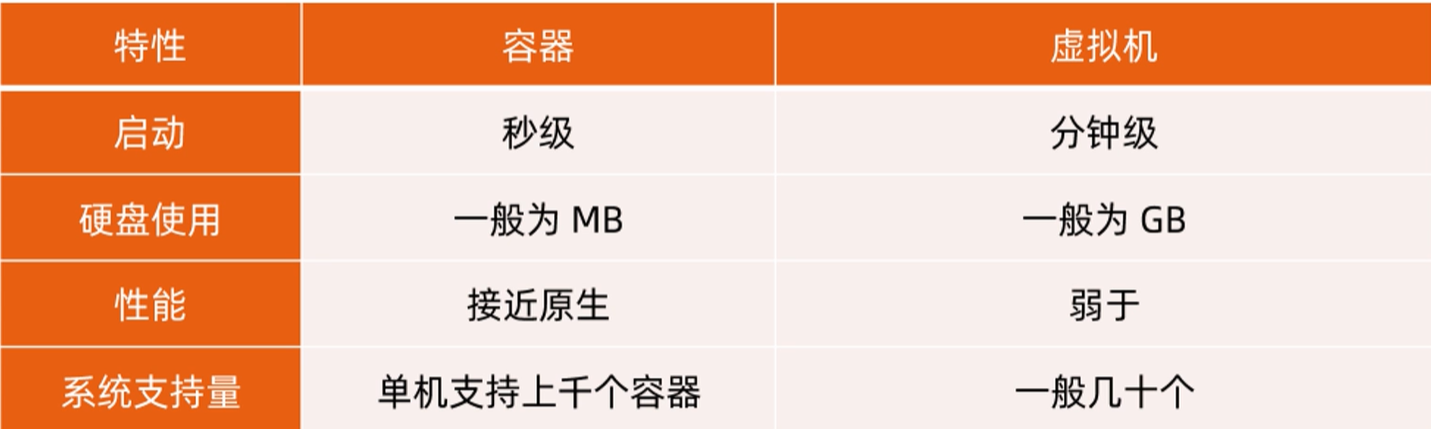
注:容器虚拟化的是操作系统而不是硬件,容器之间是共享同一套操作系统资源的。虚拟机技术是虚拟出一套硬件后,在其上运行一个完整操作系统。因此容器的隔离级别会稍低一些
4.Docker容器三要素
- 镜像(image)------ 特殊的文件系统
- 容器(container)------ 镜像运行时的实体
- 仓库(repo)------ 集中存放镜像文件的地方
注:从仓库中下载镜像,运行镜像后得到容器,再将容器部署到操作系统环境当中
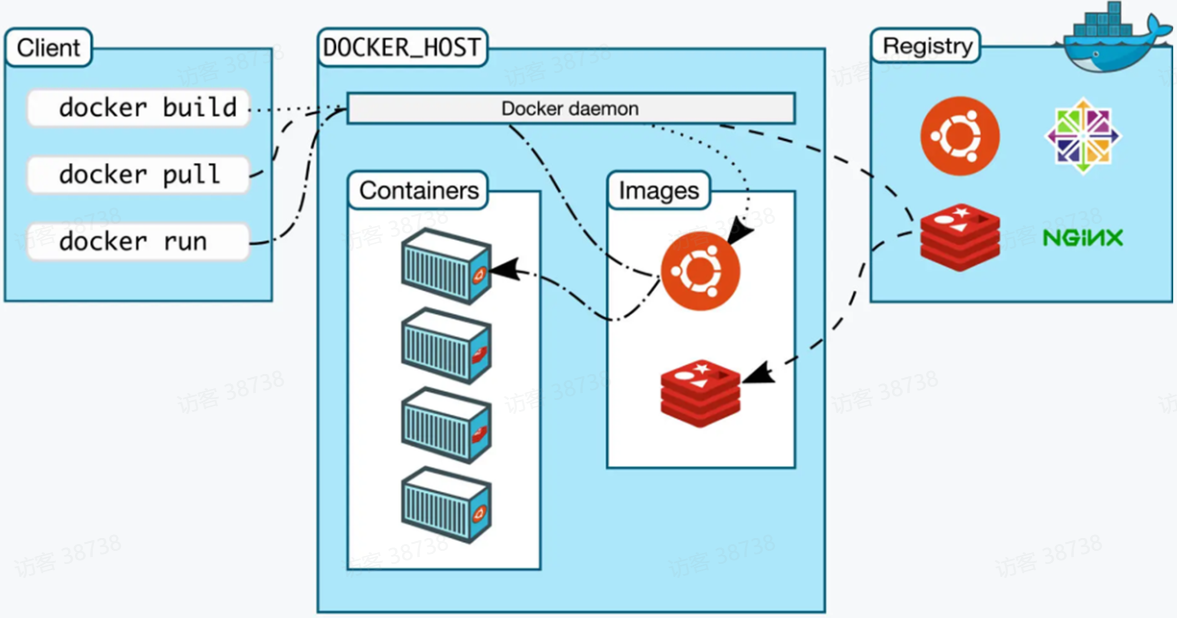
5.Docker架构
Docker 使用客户端-服务器 (C/S) 架构模式,即可使用远程 API 来管理服务端和创建容器
6.Docker 常用命令
- docker rm 删除容器 = docker container rm
- docker rmi 删除镜像 = docker image rm
- docker info 守护进程的系统资源设置
- docker search Docker仓库的查询
- docker pull Docker仓库的下载
- docker ps 容器的查询
- docker run 容器的创建启动
- docker start/stop 容器的启动/停止
- docker images 查看镜像
三、Docker 安装
注:Docker是用go语言写的,编译完成后的二进制文件
1.添加Docker仓库
# 安装 dnf-utils
[root@localhost ~]# dnf -y install dnf-utils
# 添加阿里云 Docker CE 仓库
[root@localhost ~]# dnf config-manager --add-repo http://mirrors.aliyun.com/docker-ce/linux/centos/docker-ce.repo
注:docker发行版本,docker-ce是社区版,docker-ee是企业版
2.指定安装版本
注:在企业中经常指定安装版本
在线安装
# 查看所有版本
[root@localhost ~]# dnf list docker-ce --showduplicates | sort -r
# 安装
[root@localhost ~]# dnf install docker-ce-3:27.5.1 docker-ce-cli-1:27.5.1 containerd.io docker-buildx-plugin docker-compose-plugin

# docker-ce       服务端  docker daemon
# docker-ce-cli   客户端
# containerd.io   服务端 依赖
# docker-buildx-plugin  插件
# docker-compose-plugin 插件
离线安装
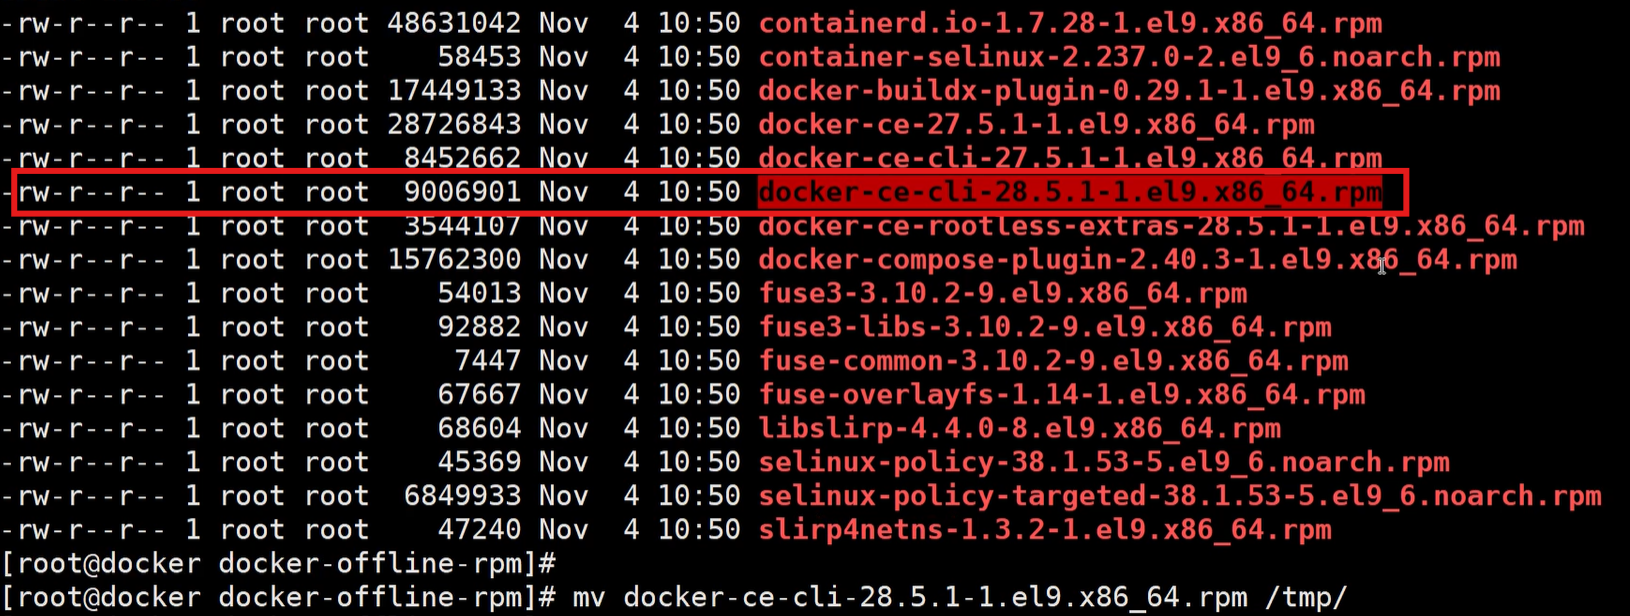
# 下载离线rpm包,不执行安装步骤
[root@localhost ~]# dnf download --resolve docker-ce-3:27.5.1 docker-ce-cli-1:27.5.1 containerd.io docker-buildx-plugin docker-compose-plugin
# 在没有互联网的环境下安装rpm包
[root@localhost ~]# dnf localinstall *.rpm
注:在安装的时候容易出现两个客户端包,需要删掉其中一个
启动Docker
[root@localhost ~]# systemctl enable --now docker
# 查看当前版本
[root@localhost ~]# docker version
Client: Docker Engine - Community
 Version:           27.5.1
 API version:       1.47
 Go version:        go1.22.11
 Git commit:        9f9e405
 Built:             Wed Jan 22 13:42:47 2025
 OS/Arch:           linux/amd64
 Context:           default
补充:二进制安装(仅限了解)
# 访问官网仓库 https://download.docker.com/linux/static/stable/x86_64/ 下载二进制文件
$ wget https://download.docker.com/linux/static/stable/x86_64/docker-27.5.1.tgz
$ tar xvf docker-27.5.1.tgz
$ mv docker/* /usr/bin/

# 启动Docker服务
$ cat << EOF > /usr/lib/systemd/system/containerd.service
[Unit]
Description=containerd container runtime
Documentation=https://containerd.io
After=network.target local-fs.target

[Service]
ExecStartPre=-/sbin/modprobe overlay
ExecStart=/usr/bin/containerd

Type=notify
Delegate=yes
KillMode=process
Restart=always
RestartSec=5
# Having non-zero Limit*s causes performance problems due to accounting overhead
# in the kernel. We recommend using cgroups to do container-local accounting.
LimitNPROC=infinity
LimitCORE=infinity
LimitNOFILE=infinity
# Comment TasksMax if your systemd version does not supports it.
# Only systemd 226 and above support this version.
TasksMax=infinity
OOMScoreAdjust=-999

[Install]
WantedBy=multi-user.target
EOF

$ cat << EOF > /usr/lib/systemd/system/docker.service
[Unit]
Description=Docker Application Container Engine
Documentation=https://docs.docker.com
After=network-online.target firewalld.service containerd.service
Wants=network-online.target
Requires=containerd.service

[Service]
Type=notify
# the default is not to use systemd for cgroups because the delegate issues still
# exists and systemd currently does not support the cgroup feature set required
# for containers run by docker
ExecStart=/usr/bin/dockerd
ExecReload=/bin/kill -s HUP
TimeoutSec=0
RestartSec=2
Restart=always

# Note that StartLimit* options were moved from "Service" to "Unit" in systemd 229.
# Both the old, and new location are accepted by systemd 229 and up, so using the old location
# to make them work for either version of systemd.
StartLimitBurst=3

# Note that StartLimitInterval was renamed to StartLimitIntervalSec in systemd 230.
# Both the old, and new name are accepted by systemd 230 and up, so using the old name to make
# this option work for either version of systemd.
StartLimitInterval=60s

# Having non-zero Limit*s causes performance problems due to accounting overhead
# in the kernel. We recommend using cgroups to do container-local accounting.
LimitNOFILE=infinity
LimitNPROC=infinity
LimitCORE=infinity

# Comment TasksMax if your systemd version does not support it.
# Only systemd 226 and above support this option.
TasksMax=infinity

# set delegate yes so that systemd does not reset the cgroups of docker containers
Delegate=yes

# kill only the docker process, not all processes in the cgroup
KillMode=process
OOMScoreAdjust=-500

[Install]
WantedBy=multi-user.target
EOF

$ systemctl daemon-reload
$ systemctl start containerd
$ systemctl start docker
$ systemctl enable containerd
$ systemctl enable docker
$ docker info
3.验证是否正确安装
[root@localhost ~]# docker run  ccr.ccs.tencentyun.com/chijinjing/hello-world:latest
[root@localhost ~]# docker run -it ccr.ccs.tencentyun.com/chijinjing/ubuntu:24.04 bash

# 若使用以下两条拉取命令,需要镜像加速器
$ docker run hello-world
$ docker run -it ubuntu bash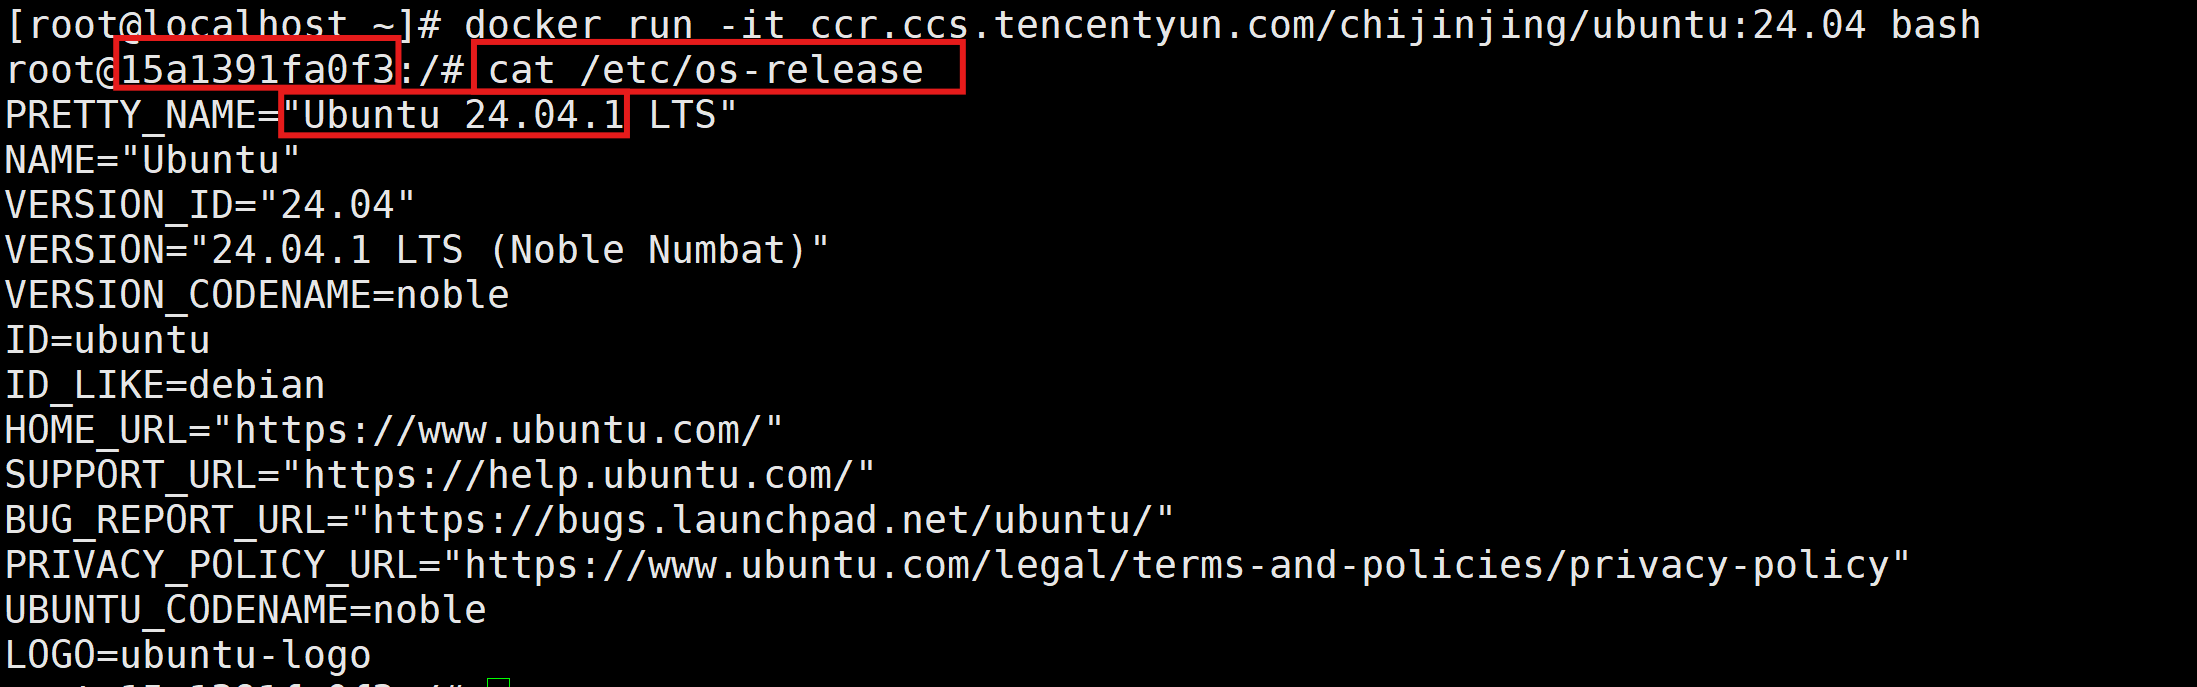
补充:hello-world和ubuntu这两个镜像的地址(一个是阿里云,一个是腾讯云)
Hello-world:
registry.cn-beijing.aliyuncs.com/xxhf/hello-world:latest
ccr.ccs.tencentyun.com/chijinjing/hello-world:latest

Ubuntu:
ccr.ccs.tencentyun.com/chijinjing/ubuntu:24.04
registry.cn-beijing.aliyuncs.com/xxhf/ubuntu:22.04
4.配置镜像加速器
[root@localhost ~]# tee /etc/docker/daemon.json << 'EOF'
{
  "registry-mirrors": [
    "https://docker.1ms.run",
    "https://docker.mybacc.com",
    "https://docker.m.daocloud.io",
    "https://bkr5wo56.mirror.aliyuncs.com"
  ]
}
EOF
[root@localhost ~]# systemctl daemon-reload
[root@localhost ~]# systemctl restart docker
5.添加Docker镜像
语法:docker run 选项 镜像 命令 参数...
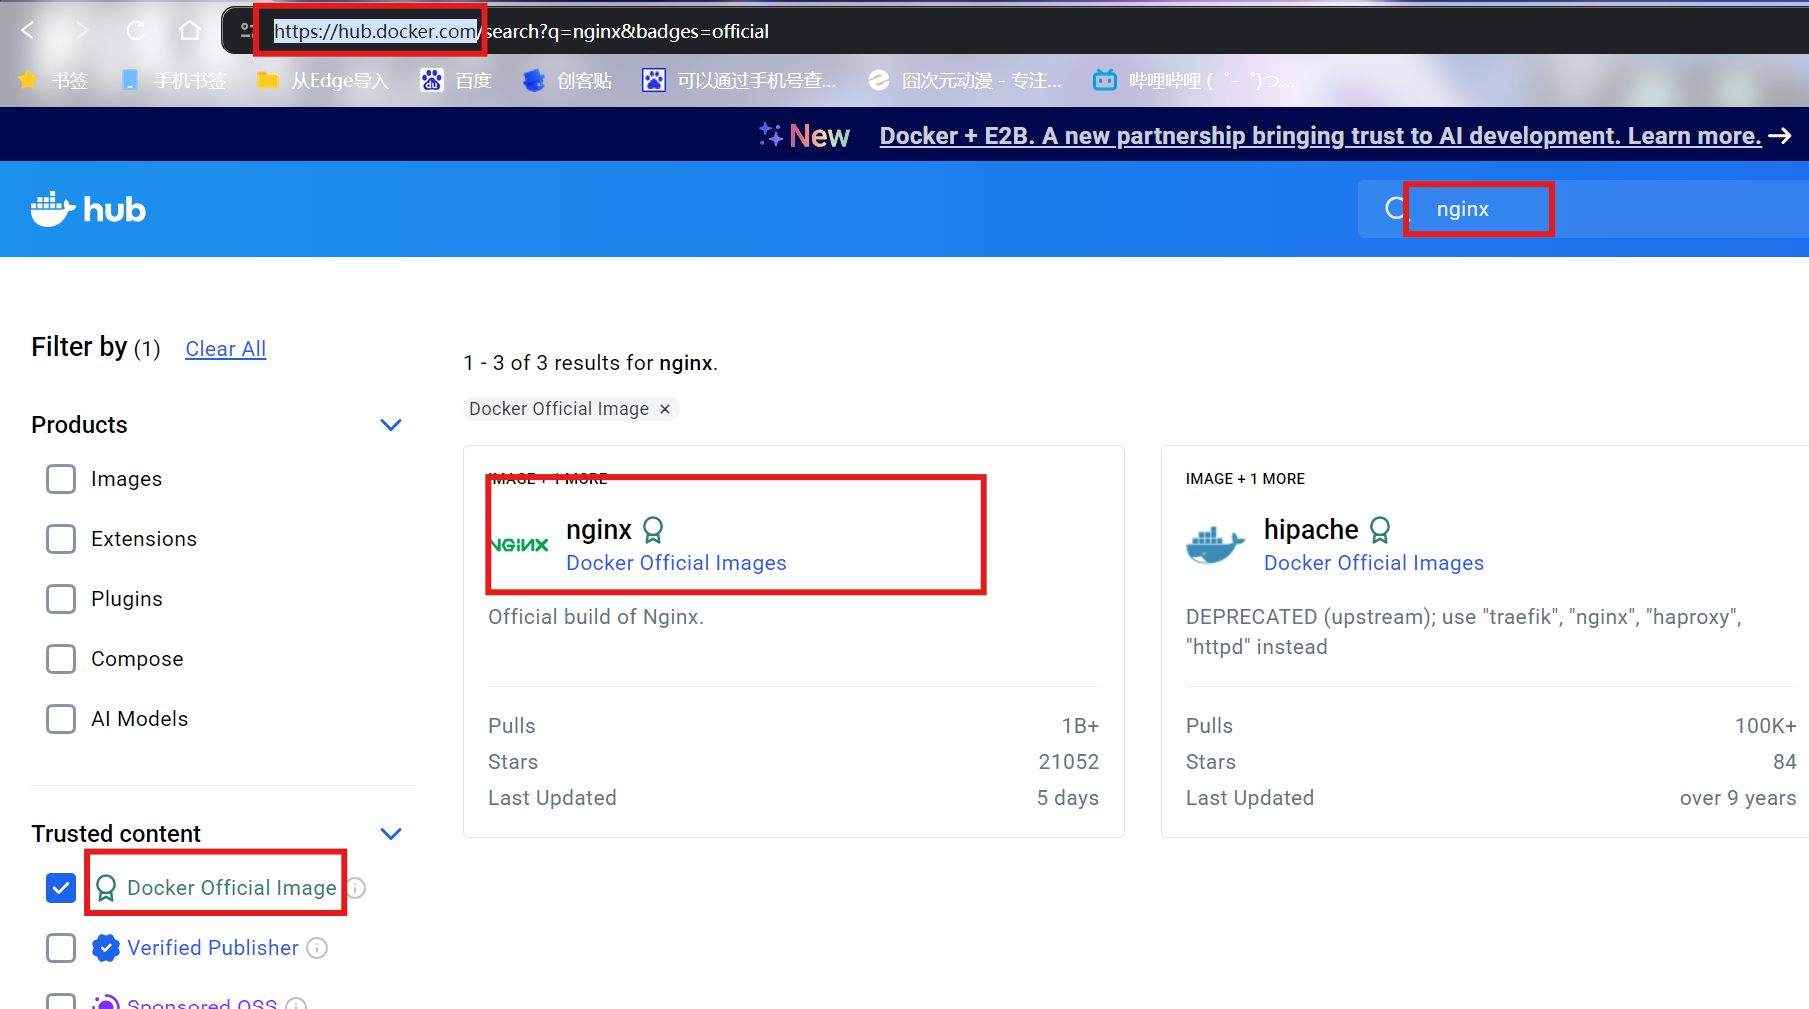
Docker镜像官网:https://hub.docker.com/(需要外网才能进去)
# 配置好镜像加速器
# 添加busybox工具箱
[root@localhost ~]# docker pull busybox
# 添加alpine,一个很小的Linux发行版本
[root@localhost ~]# docker pull alpine:3.22.2
# 添加rockylinux
[root@localhost ~]# docker pull rockylinux/rockylinux:9.4
6.基于镜像启动容器
# 在前台运行
[root@localhost ~]# docker run  -it rockylinux/rockylinux:9.4 bash
# 在后台运行
[root@localhost ~]# docker run  -d  nginx:1.22.1

[root@localhost ~]# docker run  -d  nginx:1.22.1
10e9001f1f45def17ee442df416b6ea15cf9600b075ba372f2d0c3088f760fbc

[root@localhost ~]# docker ps
CONTAINER ID   IMAGE          COMMAND                   CREATED          STATUS          PORTS     NAMES
10e9001f1f45 nginx:1.22.1 "/docker-entrypoint...." 13 seconds ago Up 12 seconds 80/tcp vigorous_napier注:容器一旦启动,就不能修改其参数
四、Docker补充命令
1.修改镜像名
[root@localhost ~]# docker images
REPOSITORY                                      TAG                         IMAGE ID       CREATED         SIZE
grafana/grafana                                 12.3.0-19020365962-ubuntu   3788bdf86865   2 days ago      792MB
alpine                                          3.22.2                      706db57fb206   3 weeks ago     8.32MB
ccr.ccs.tencentyun.com/chijinjing/ubuntu        24.04                       a04dc4851cbc   9 months ago    78.1MB
ccr.ccs.tencentyun.com/chijinjing/hello-world   latest                      74cc54e27dc4   9 months ago    10.1kB
busybox                                         latest                      08ef35a1c3f0   13 months ago   4.43MB
rockylinux/rockylinux                           9.4                         3c8f8ff398c0   17 months ago   230MB
nginx                                           1.22.1                      0f8498f13f3a   2 years ago     142MB
[root@localhost ~]# docker tag rockylinux/rockylinux:9.4  rocky:9.4
[root@localhost ~]# docker images
REPOSITORY                                      TAG                         IMAGE ID       CREATED         SIZE
grafana/grafana                                 12.3.0-19020365962-ubuntu   3788bdf86865   2 days ago      792MB
alpine                                          3.22.2                      706db57fb206   3 weeks ago     8.32MB
ccr.ccs.tencentyun.com/chijinjing/ubuntu        24.04                       a04dc4851cbc   9 months ago    78.1MB
ccr.ccs.tencentyun.com/chijinjing/hello-world   latest                      74cc54e27dc4   9 months ago    10.1kB
busybox                                         latest                      08ef35a1c3f0   13 months ago   4.43MB
rocky                                           9.4                         3c8f8ff398c0   17 months ago   230MB
rockylinux/rockylinux                           9.4                         3c8f8ff398c0   17 months ago   230MB
nginx                                           1.22.1                      0f8498f13f3a   2 years ago     142MB
2.查看完整镜像ID
[root@localhost ~]# docker images --no-trunc
REPOSITORY                                      TAG                         IMAGE ID                                                                  CREATED         SIZE
grafana/grafana                                 12.3.0-19020365962-ubuntu   sha256:3788bdf868652bf4570b99721b0e0d95d86a5ba164ea325482f352f7f53f4a80   2 days ago      792MB
alpine                                          3.22.2                      sha256:706db57fb2063f39f69632c5b5c9c439633fda35110e65587c5d85553fd1cc38   3 weeks ago     8.32MB
ccr.ccs.tencentyun.com/chijinjing/ubuntu        24.04                       sha256:a04dc4851cbcbb42b54d1f52a41f5f9eca6a5fd03748c3f6eb2cbeb238ca99bd   9 months ago    78.1MB
ccr.ccs.tencentyun.com/chijinjing/hello-world   latest                      sha256:74cc54e27dc41bb10dc4b2226072d469509f2f22f1a3ce74f4a59661a1d44602   9 months ago    10.1kB
busybox                                         latest                      sha256:08ef35a1c3f050afbbd64194ffd1b8d5878659f5491567f26d1c814513ae9649   13 months ago   4.43MB
rocky                                           9.4                         sha256:3c8f8ff398c0125ad595e3cfbc9e592e9c184e278e29ae3b8d70fbbd147e5989   17 months ago   230MB
rockylinux/rockylinux                           9.4                         sha256:3c8f8ff398c0125ad595e3cfbc9e592e9c184e278e29ae3b8d70fbbd147e5989   17 months ago   230MB
nginx                                           1.22.1                      sha256:0f8498f13f3adef3f3c8b52cdf069ecc880b081159be6349163d144e8aa5fb29   2 years ago     142MB
[root@localhost ~]#
3.查看运行的容器
[root@localhost ~]# docker run -d nginx:1.22.1
ec2b36125bad9e51ec3b11bcc34420dd58a1f1ef5dfa8eb6ad7293022a4db629
# 显示正常运行的容器
[root@localhost ~]# docker ps
CONTAINER ID   IMAGE          COMMAND                   CREATED          STATUS          PORTS     NAMES
ec2b36125bad   nginx:1.22.1   "/docker-entrypoint...."   17 seconds ago   Up 16 seconds   80/tcp    keen_fermat

# 显示所有的容器
[root@localhost ~]# docker ps -a注:rocky:9.4镜像生成的容器无法一直在后台运行,因为如果一个容器需要在后台运行,需要容器中有一个前台进程

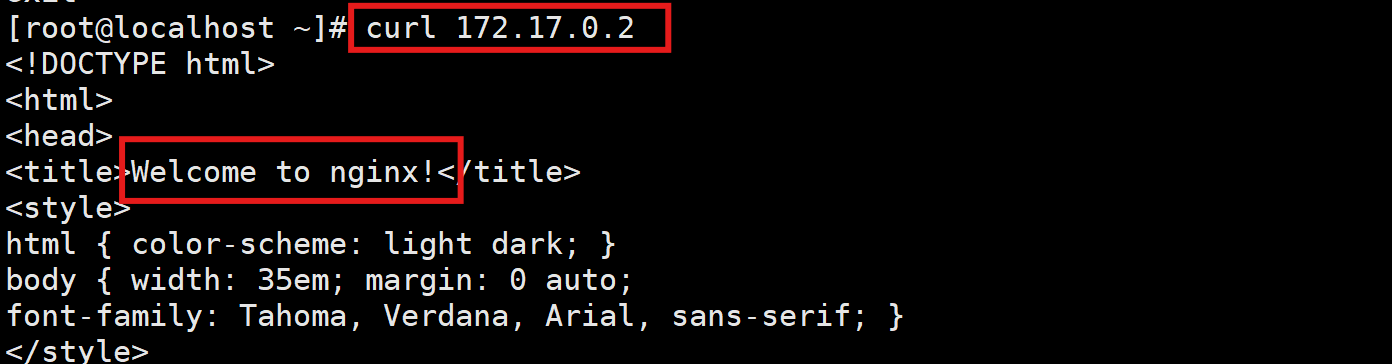
4.获取容器IP地址
(1)进入容器,更新命令包
[root@localhost ~]# docker exec -it ec2b36125bad bash
root@ec2b36125bad:/#
root@ec2b36125bad:/# apt update
root@ec2b36125bad:/# apt install iproute2

# 或在rocky:9.4中更新
[root@localhost ~]# docker run -it rocky:9.4
[root@1b81a73c59de /]# dnf -y install iproute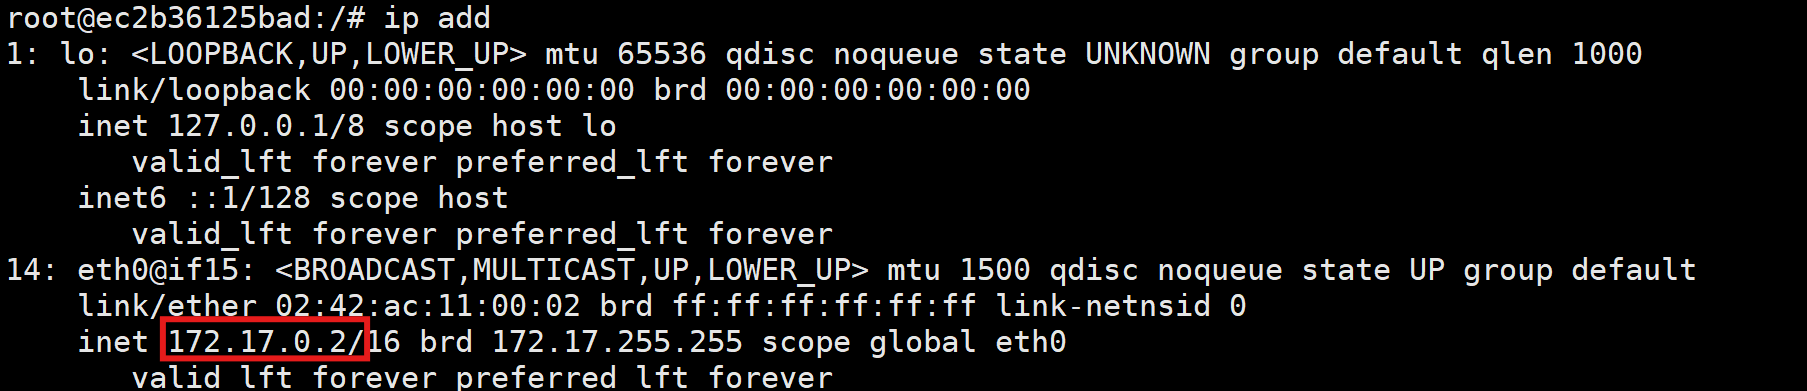
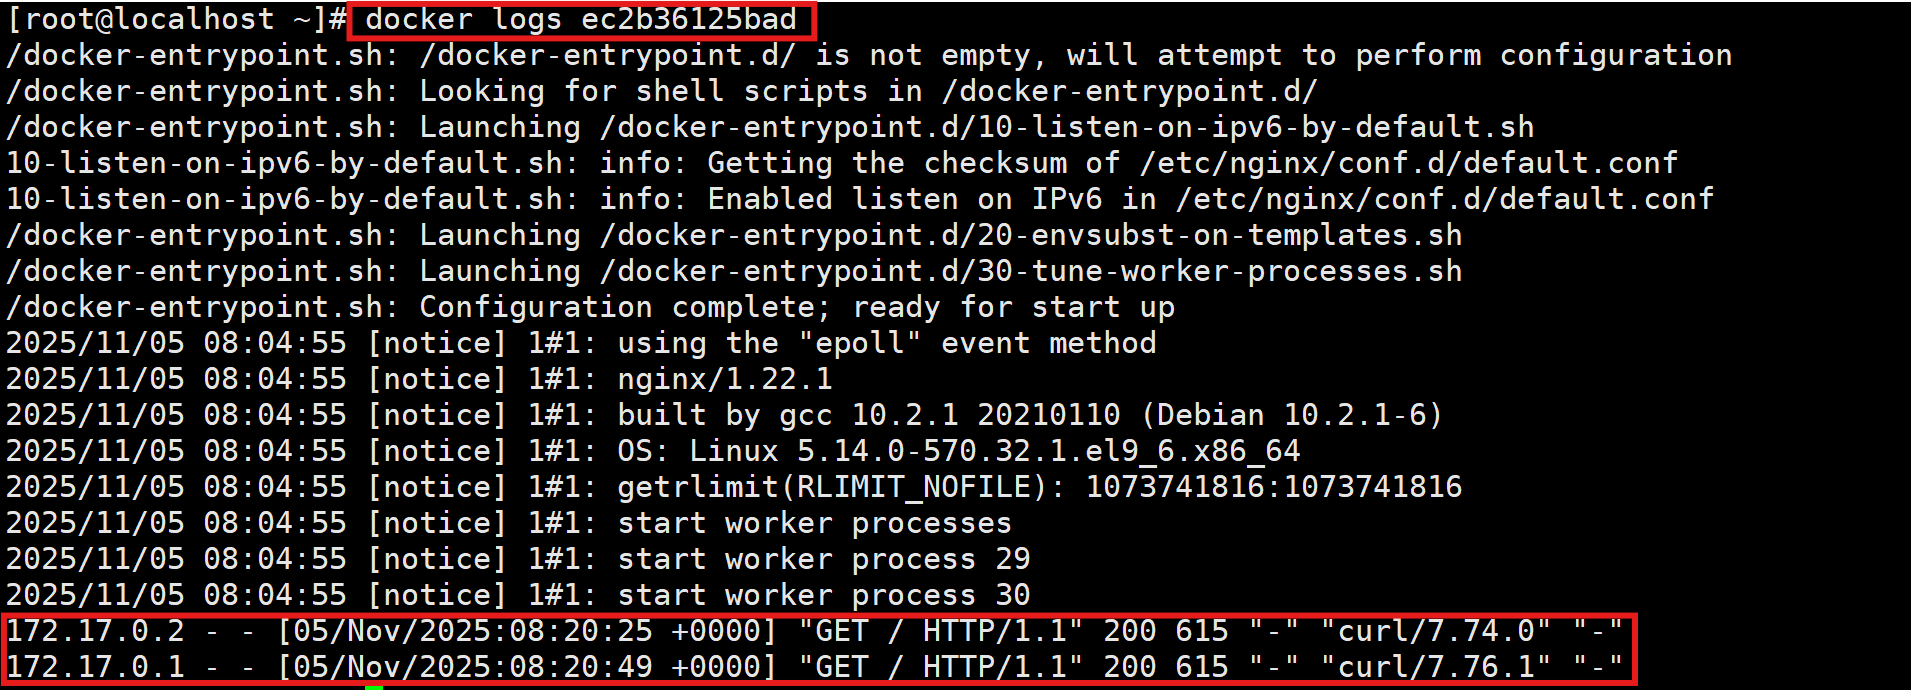
(2)查看当前日志,确保连接正常访问(最后加-f会显示实时的日志)
(3)其余查询IP地址的方法
[root@localhost /]# docker inspect  b8a667bc1577  | grep -i ipaddr
            "SecondaryIPAddresses": null,
            "IPAddress": "172.17.0.4",
                    "IPAddress": "172.17.0.4",
或
[root@localhost /]# docker inspect  -f '{{ .NetworkSettings.IPAddress  }}' b8a667bc1577
172.17.0.4
5.停止/启动容器
- 停止容器 ------docker stop 容器ID/容器名字
- 启动容器 ------docker start 容器ID/容器名字


6.修改容器名
[root@localhost /]# docker run --name nginx-01 -d nginx:1.22.1
b8a667bc15771b317f918d4e541375286b7e0fcbab2df06a3f6a0cbb274c1dbc
[root@localhost /]# docker ps
CONTAINER ID   IMAGE          COMMAND                   CREATED          STATUS         PORTS     NAMES
b8a667bc1577   nginx:1.22.1   "/docker-entrypoint...."   3 seconds ago    Up 2 seconds   80/tcp    nginx-01
1b81a73c59de   rocky:9.4      "/bin/bash"               7 minutes ago    Up 2 minutes             quizzical_hugle
ec2b36125bad   nginx:1.22.1   "/docker-entrypoint...."   28 minutes ago   Up 2 minutes   80/tcp    keen_fermat
7.删除容器
# 删除单个容器
[root@localhost /]# docker rm 7811766a792e eb1159860721 9714b14d5977
7811766a792e
eb1159860721
9714b14d5977

# 删除所有容器(-q可以显示所有的容器ID)
[root@localhost /]# docker rm  $(docker ps -a | awk '{print $1}' | grep -v CONTAINER) -f
或
[root@localhost /]# docker rm  $(docker ps -aq) -f

# 在容器关闭后,删除容器
[root@localhost /]# docker run --rm -it rocky:9.4
8.删除镜像
# 删除某个镜像
[root@localhost /]# docker rmi 706db57fb206
# 删除所有镜像
[root@localhost /]# docker rmi $(docker rmi -q) -f
9.查看容器资源使用情况
[root@localhost /]# docker stats
CONTAINER ID   NAME              CPU %     MEM USAGE / LIMIT     MEM %     NET I/O       BLOCK I/O        PIDS
b8a667bc1577   nginx-01          0.00%     3.145MiB / 3.538GiB   0.09%     1.22kB / 0B   4.1kB / 12.3kB   3
1b81a73c59de   quizzical_hugle   0.00%     1.48MiB / 3.538GiB    0.04%     1.22kB / 0B   0B / 0B          1
ec2b36125bad   keen_fermat       0.00%     3.113MiB / 3.538GiB   0.09%     1.44kB / 0B   0B / 4.1kB       3
10.容器开机自启动策略
# 设置容器开机自启动
[root@localhost /]# docker run  --restart=always  -d --name=nginx-02 nginx:1.22.1
11.配置容器主机名
[root@localhost /]# docker run -h busy-container -it busybox
/ # hostname
busy-container
/ # exit
[root@localhost /]# docker run -it busybox
/ # hostname
6a3d4abdbe1f
12.配置静态解析
[root@localhost /]# docker run --add-host  www.xxhf.cc:1.1.1.1 -it  busybox
/ # ping www.xxhf.cc
PING www.xxhf.cc (1.1.1.1): 56 data bytes
64 bytes from 1.1.1.1: seq=0 ttl=127 time=2.005 ms
64 bytes from 1.1.1.1: seq=1 ttl=127 time=1.080 ms
64 bytes from 1.1.1.1: seq=2 ttl=127 time=1.449 ms
64 bytes from 1.1.1.1: seq=3 ttl=127 time=1.060 ms
--- www.xxhf.cc ping statistics ---
4 packets transmitted, 6 packets received, 0% packet loss
round-trip min/avg/max = 0.687/1.192/2.005 ms
# 查看hosts配置文件
/ # cat /etc/hosts
127.0.0.1	localhost
1.1.1.1	www.xxhf.cc
注:容器没有办法修改hosts文件,只能在启动的时候去添加
13.配置域名解析
[root@localhost /]# docker run -h busy -it  --dns 223.5.5.5   busybox
/ # cat /etc/resolv.conf
# Generated by Docker Engine.
# This file can be edited; Docker Engine will not make further changes once it
# has been modified.

nameserver 223.5.5.5

# Based on host file: '/etc/resolv.conf' (legacy)
# Overrides: [nameservers]
注:如果没有配置,默认使用的是宿主机的域名地址
14.配置DNS搜索域
[root@localhost /]# docker run  --dns-search xxhf.cc  -it busybox
/ # ping www
PING www (192.168.11.1): 56 data bytes
64 bytes from 192.168.11.1: seq=0 ttl=127 time=5.660 ms
64 bytes from 192.168.11.1: seq=1 ttl=127 time=1.735 ms
64 bytes from 192.168.11.1: seq=2 ttl=127 time=1.859 ms
64 bytes from 192.168.11.1: seq=3 ttl=127 time=1.581 ms
^C
--- www ping statistics ---
4 packets transmitted, 4 packets received, 0% packet loss
round-trip min/avg/max = 1.581/2.708/5.660 ms

/ # cat /etc/resolv.conf
# Generated by Docker Engine.
# This file can be edited; Docker Engine will not make further changes once it
# has been modified.

nameserver 223.5.5.5
nameserver 8.8.8.8
search xxhf.cc    # 搜索域

# Based on host file: '/etc/resolv.conf' (legacy)
# Overrides: [search]
注:此时在容器中不管ping什么,都会在后面加上xxhf.cc的后缀
15.镜像的导出
[root@localhost /]# docker save -o nginx.tar nginx:1.22.1
[root@localhost /]# ll | grep nginx
-rw-------    1 root root 146533376 11月  5 18:41 nginx.tar
16.镜像的导入
[root@localhost /]# docker load  -i nginx.tar
Loaded image: nginx:1.22.1
五、镜像仓库
1.常用的镜像仓库
官方镜像仓库:https://hub.docker.com/(需加速器)
阿里云镜像仓库:https://cr.console.aliyun.com/
腾讯云镜像仓库
2.登录阿里云镜像仓库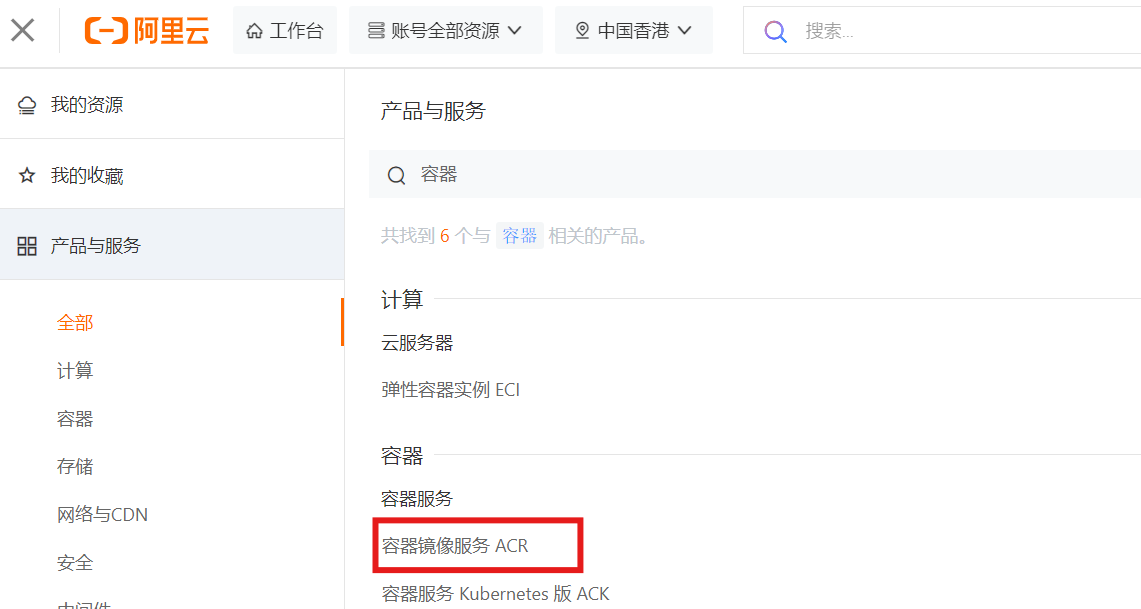
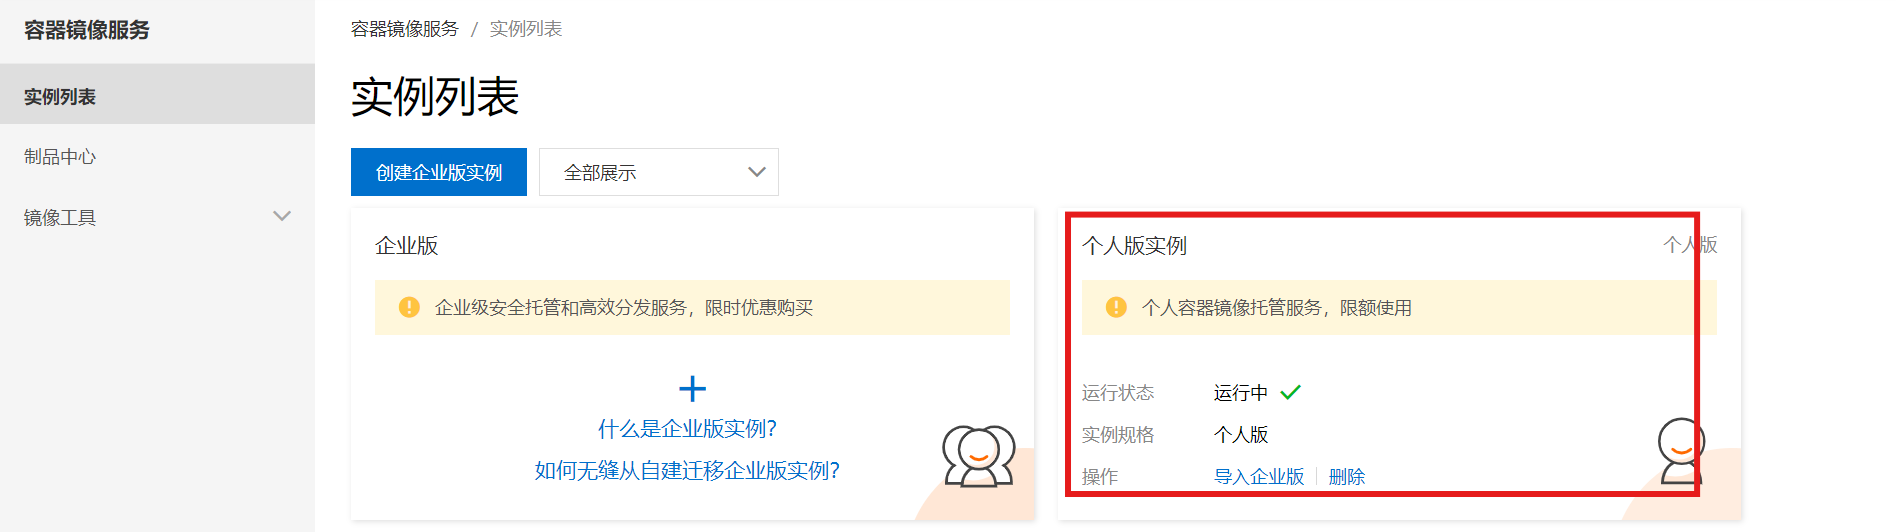
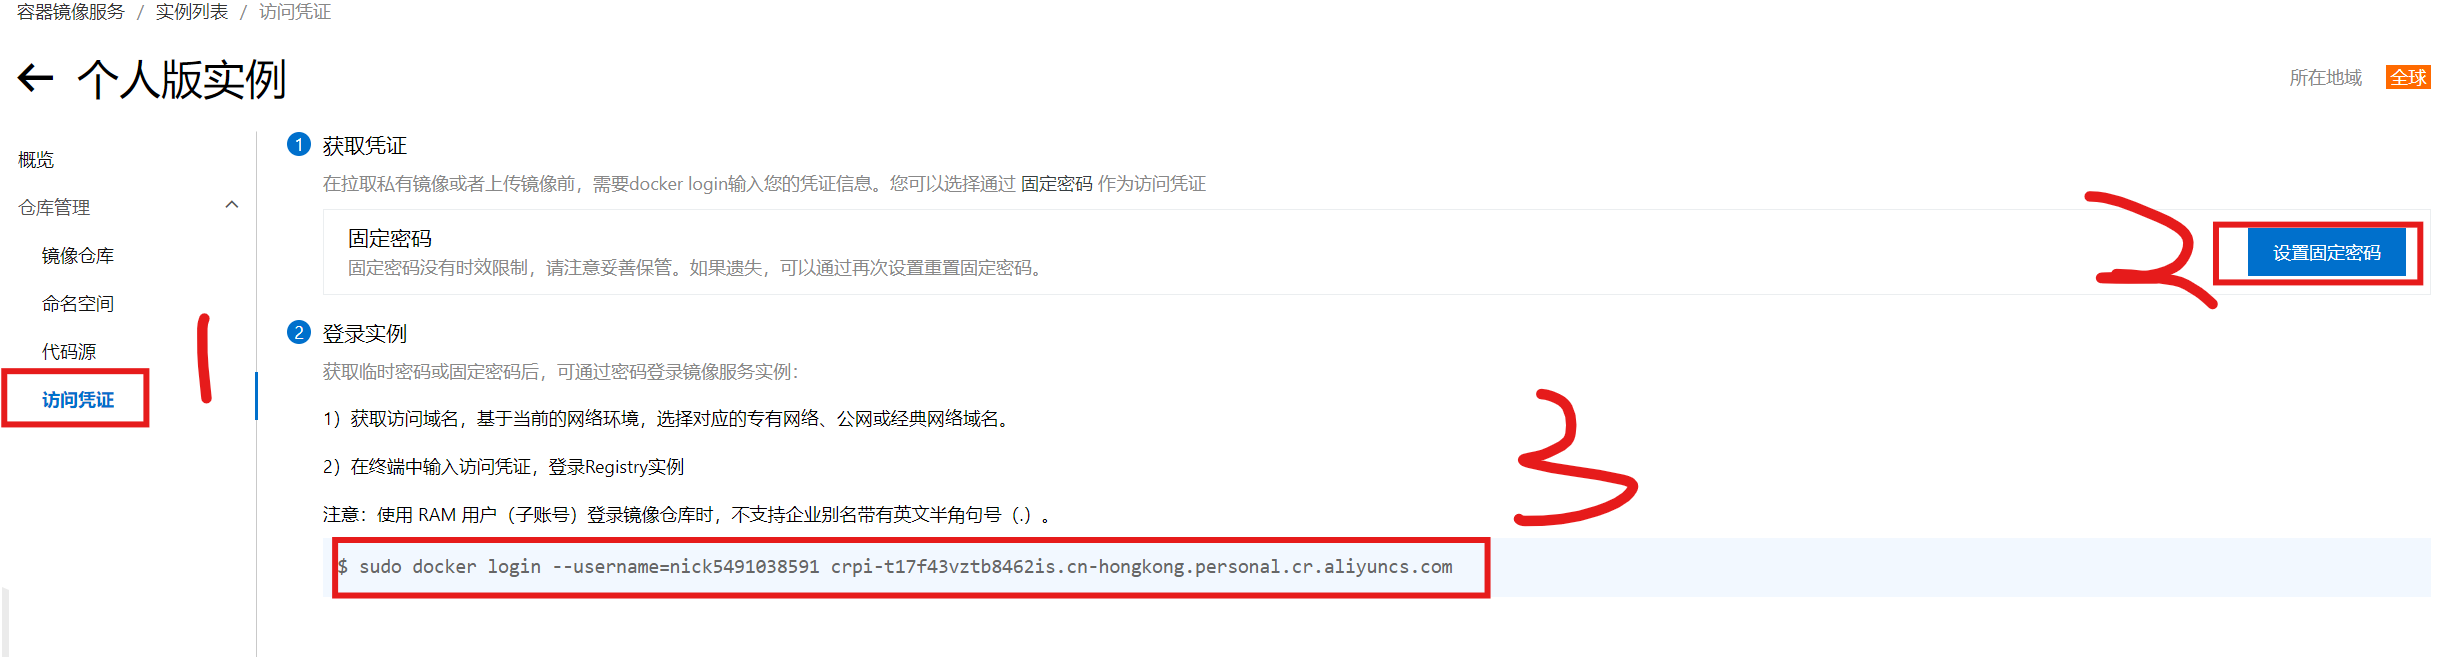
[root@localhost /]# docker login --username=nick5491038591 crpi-t17f43vztb8462is.cn-hongkong.personal.cr.aliyuncs.com
Password:
WARNING! Your password will be stored unencrypted in /root/.docker/config.json.
Configure a credential helper to remove this warning. See
https://docs.docker.com/engine/reference/commandline/login/#credential-stores

Login Succeeded
[root@localhost /]#
注:登录成功之后,密码会被保存到/root/.docker/config.json文件当中,方便下次登录
# 这里对账户名和密码做了base64编码,使其看起来像是被加密了一样
[root@localhost /]# cat /root/.docker/config.json
{
	"auths": {
		"crpi-t17f43vztb8462is.cn-hongkong.personal.cr.aliyuncs.com": {
			"auth": "bmljazU0OTEwMzg1OTE6QXNkd0AzNDI4ODg5MzQ="
		}
	}
}
# 解码
[root@localhost /]# echo bmljazU0OTEwMzg1OTE6QXNkd0AzNDI4ODg5MzQ=" | base64 -d
nick5491038591:Asdw@342888934[root@localhost /]#
3.Docker Registry仓库
注:Docker Registry是一种小型的镜像仓库,供小型项目中使用https://docs.docker.com/retired/#registry-now-cncf-distribution
特点:
- 不支持验证
- 没有图形界面
(1)连接到Registry仓库
[root@localhost /]# docker run -d -p 5000:5000 --name registry   registry:2

# -p:端口映射
# 前面的端口5000代表的是宿主机,后面的端口5000代表的是容器中的应用

[root@localhost /]# docker ps
CONTAINER ID   IMAGE          COMMAND                   CREATED             STATUS          PORTS                                       NAMES
b859f44c0629   registry:2     "/entrypoint.sh /etc..."   12 seconds ago      Up 10 seconds   0.0.0.0:5000->5000/tcp, :::5000->5000/tcp   registry
8c25d8d505a6   nginx:1.22.1   "/docker-entrypoint...."   About an hour ago   Up 3 minutes    80/tcp                                      nginx-02
(2)上传镜像到仓库
[root@localhost /]# docker push  127.0.0.1:5000/xxhf/nginx:1.22.1
The push refers to repository [127.0.0.1:5000/xxhf/nginx]
An image does not exist locally with the tag: 127.0.0.1:5000/xxhf/nginx
# 上传失败,因为不存在这个版本,我们手动修改一下
[root@localhost /]# docker tag nginx:1.22.1 127.0.0.1:5000/xxhf/nginx:1.22.1
# 再次上传,可以看到成功上传了镜像
[root@localhost /]# docker push  127.0.0.1:5000/xxhf/nginx:1.22.1
The push refers to repository [127.0.0.1:5000/xxhf/nginx]
9543dec06aa8: Pushed
ccf4f419ba49: Pushed
21f8452ebfb1: Pushed
25bbf4633bb3: Pushed
a4f34e6fb432: Pushed
3af14c9a24c9: Pushed
1.22.1: digest: sha256:9081064712674ffcff7b7bdf874c75bcb8e5fb933b65527026090dacda36ea8b size: 1570
# 在仓库中查看上传的镜像
[root@localhost /]# curl localhost:5000/v2/_catalog
{"repositories":["xxhf/nginx"]}
如果在其他服务器上上传,则需要使用仓库所在服务器本机的ip地址
[root@localhost /]# docker tag busybox 192.168.5.100:5000/xxhf/busybox
[root@localhost /]# docker push 192.168.5.100:5000/xxhf/busybox
Using default tag: latest
The push refers to repository [192.168.5.100:5000/xxhf/busybox]
Get "https://172.17.0.1:5000/v2/": http: server gave HTTP response to HTTPS client

# 第一次上传失败,因为在启动仓库的时候,没有设置证书,所以使用的是http,不是https
# 客户端推送镜像的时候,使用的就是https协议,因此无法上传,需要修改Docker配置文件
# Docker 默认不允许非 HTTPS 方式推送镜像。我们可以通过 Docker 的配置选项来取消这个限制

[root@localhost /]# vi /etc/docker/daemon.json
{
  "registry-mirrors": [
    "https://docker.1ms.run",
    "https://docker.mybacc.com",
    "https://docker.m.daocloud.io",
    "https://bkr5wo56.mirror.aliyuncs.com",
    "https://chdp0mbf.mirror.aliyuncs.com"
  ],
  "insecure-registries": ["192.168.5.100:5000"]
}
[root@localhost ~]# systemctl restart docker
# 再次推送就可以正常推送
[root@localhost /]#  docker push 192.168.5.100:5000/xxhf/busybox
Using default tag: latest
The push refers to repository [192.168.5.100:5000/xxhf/busybox]
e14542cc0629: Pushed
latest: digest: sha256:be49435f6288f9c5cce0357c2006cc266cb5c450dbd6dc8e3a3baec10c46b065 size: 527
[root@localhost /]# curl http://192.168.5.100:5000/v2/_catalog
{"repositories":["xxhf/busybox","xxhf/nginx"]}