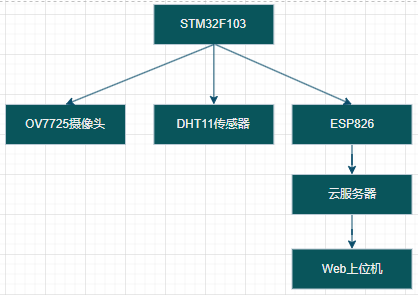
一、系统架构设计
二、硬件连接方案
| 模块 | 引脚连接 | 说明 |
|---|---|---|
| STM32 | ||
| PB0-PB7 | OV7725数据总线(D0-D7) | 24位RGB565数据传输 |
| PC4 | OV7725_SCL | SCCB总线时钟线 |
| PC5 | OV7725_SDA | SCCB总线数据线 |
| PA15 | OV7725_VSYNC | 帧同步信号 |
| PA0 | OV7725_PCLK | 像素时钟 |
| PD2 | OV7725_RST | 硬件复位 |
| DHT11 | ||
| VCC | 3.3V | 电源供电 |
| GND | GND | 地线 |
| DATA | PA3 | 单总线数据 |
| ESP8266 | ||
| TX | USART1_RX | 串口通信接收 |
| RX | USART1_TX | 串口通信发送 |
| CH_PD | 3.3V | 模块使能 |
| RST | GPIO0 | 模块复位 |
三、STM32代码实现
1. 外设初始化
c
// main.c
#include "stm32f10x.h"
#include "dht11.h"
#include "ov7725.h"
#include "esp8266.h"

int main(void)
{
    SystemInit();
    Delay_Init();

    // 外设初始化
    OV7725_Init();    // 摄像头初始化
    DHT11_Init();     // 温湿度传感器初始化
    ESP8266_Init();   // WiFi模块初始化

    // 连接WiFi
    ESP8266_ConnectAP("WIFI_SSID", "WIFI_PASSWORD");
    ESP8266_ConnectServer("192.168.1.100", 8080);

    while(1)
    {
        // 采集数据
        float temp, humi;
        DHT11_Read_Data(&temp, &humi);

        // 采集图像
        uint8_t image_buf[320 * 240 * 2];  // RGB565格式
        OV7725_Capture_Frame(image_buf);

        // 数据上传
        ESP8266_SendData(temp, humi, image_buf);

        Delay_ms(5000);  // 每5秒上传一次
    }
}
2. OV7725驱动
c
// ov7725.c
void OV7725_Init(void)
{
    SCCB_Init();  // 初始化SCCB总线

    // 配置寄存器
    SCCB_Write(0x12, 0x80);  // 软复位
    Delay_ms(100);

    // 设置QVGA分辨率(320x240)
    SCCB_Write(0x12, 0x04);  // 彩色模式
    SCCB_Write(0x17, 0x25);  // HREF起始位置
    SCCB_Write(0x18, 0xA0);  // HREF结束位置
    SCCB_Write(0x19, 0x04);  // VREF起始位置
    SCCB_Write(0x1A, 0x3D);  // VREF结束位置
    SCCB_Write(0x32, 0x09);  // HREF偏移
}

void OV7725_Capture_Frame(uint8_t *buf)
{
    // 启动FIFO
    OV7725_WRST = 0;
    OV7725_WRST = 1;
    OV7725_WREN = 1;

    // 读取图像数据
    for(int i=0; i<240; i++)
    {
        for(int j=0; j<320; j++)
        {
            while(!OV7725_VSYNC);  // 等待帧同步
            while(OV7725_HREF);    // 等待行同步

            *buf++ = (GPIOB->IDR & 0xFF00) >> 8;  // 高字节
            *buf++ = (GPIOB->IDR & 0x00FF);       // 低字节
        }
    }

    OV7725_WREN = 0;  // 关闭FIFO写入
}
3. ESP8266通信
c
// esp8266.c
void ESP8266_SendData(float temp, float humi, uint8_t *image)
{
    char cmd[100];
    sprintf(cmd, "AT+CIPSEND=%d\r\n", 20 + 320 * 240 * 2);
    USART_SendString(USART1, cmd);

    // 发送数据包
    sprintf(buffer, "{\"temp\":%.1f,\"humi\":%.1f}", temp, humi);
    USART_SendString(USART1, buffer);

    // 发送图像数据
    for(int i=0; i<320 * 240 * 2; i++)
    {
        sprintf(buffer, "%02X", image[i]);
        USART_SendString(USART1, buffer);
    }
}
四、上位机实现(Python示例)
1. 数据接收服务
python
# server.py
from flask import Flask, request
import json
import matplotlib.pyplot as plt
from datetime import datetime

app = Flask(__name__)
data_buffer = []

@app.route('/data', methods=['POST'])
def receive_data():
    raw_data = request.data.decode()
    temp = float(raw_data.split(',')[0].split(':')[1])
    humi = float(raw_data.split(',')[1].split(':')[1])

    # 存储数据
    data_buffer.append({
        'timestamp': datetime.now().strftime("%Y-%m-%d %H:%M:%S"),
        'temp': temp,
        'humi': humi
    })

    return "OK"

@app.route('/image', methods=['POST'])
def receive_image():
    image_data = request.data
    with open('captured.jpg', 'wb') as f:
        f.write(bytes.fromhex(image_data))
    return "OK"

if __name__ == '__main__':
    app.run(host='0.0.0.0', port=8080)
2. 数据可视化
python
# visualization.py
import matplotlib.pyplot as plt
from flask import render_template
import sqlite3

def plot_data():
    conn = sqlite3.connect('sensor_data.db')
    cursor = conn.cursor()
    cursor.execute("SELECT * FROM data ORDER BY timestamp DESC LIMIT 100")
    data = cursor.fetchall()

    timestamps = [row[1] for row in data]
    temps = [row[2] for row in data]
    humis = [row[3] for row in data]

    plt.figure(figsize=(10,5))
    plt.plot(timestamps, temps, label='Temperature (°C)')
    plt.plot(timestamps, humis, label='Humidity (%)')
    plt.xlabel('Time')
    plt.ylabel('Value')
    plt.legend()
    plt.savefig('chart.png')
    plt.close()
五、系统调试要点
- 摄像头调试 使用逻辑分析仪验证SCCB时序 调整曝光参数:修改
0x13寄存器值(0x00-0x0F) 验证图像数据:通过串口发送原始数据验证色彩正确性 - 网络传输优化 图像压缩:使用JPEG编码(需添加JPEG编码库) 数据分片:将图像数据拆分为多个TCP包传输 心跳机制:每30秒发送心跳包维持连接
- 上位机性能优化 使用WebSocket实现实时数据推送 图像显示采用渐进式加载 数据库使用SQLite进行本地存储
六、完整工程文件结构
├── STM32工程
│   ├── Core
│   │   ├── Startup
│   │   ├── Drivers
│   │   │   ├── CMSIS
│   │   │   └── STM32F1xx_HAL_Driver
│   │   └── Middlewares
│   │       └── USB_Device
│   └── Projects
│       ├── ov7725
│       ├── dht11
│       └── esp8266
├── 上位机
│   ├── server.py
│   ├── visualization.py
│   └── static
│       ├── css
│       └── js
└── 网页端
    ├── index.html
    └── chart.js
参考代码 STM32+OV7725+DHT11+ESP8266将温度和图片数据上传到上位机显示 www.youwenfan.com/contentcsk/73296.html
七、典型应用场景
- 智能家居监控 实时监测室内环境参数 异常情况自动推送告警信息
- 工业设备检测 通过摄像头识别设备运行状态 结合温湿度数据预测设备故障
- 农业环境监测 远程监控大棚环境参数 自动控制通风/灌溉系统
八、扩展功能建议
- 添加音频传输 使用VS1053模块实现语音采集 通过TCP流媒体传输
- 多节点组网 使用ESP8266的AP模式组建Mesh网络 实现分布式数据采集
- 边缘计算 在STM32端实现简单图像识别 仅上传异常图像数据