智能指针介绍
- 1.定义,作用,原理
- 2.三种常见的智能指针(模板类)
- 3.需要注意的问题
- 4.解释上面出现的新知识点
- 5.C++左值和右值介绍
-
- 基本概念
- C++11后的精细分类
-
- [1. 左值 (lvalue)](#1. 左值 (lvalue))
- [2. 纯右值 (prvalue)](#2. 纯右值 (prvalue))
- [3. 将亡值 (xvalue)](#3. 将亡值 (xvalue))
- 判断方法
-
- [1. 取地址测试](#1. 取地址测试)
- [2. 赋值测试](#2. 赋值测试)
- [3. 生命周期判断](#3. 生命周期判断)
- 实际应用示例
1.定义,作用,原理
定义:
\quad 智能指针是行为类似于指针的类对象
作用:
\quad 解决我们给指针分配堆空间的时候,有可能程序员粗心大意忘记delete,从而导致内存泄漏(可以使用的内存越来越少,不够用)
原理:
\quad 把指针分配堆空间以及释放堆空间操作封装到一个类(模板类)的构造函数和析构函数中,所谓的智能指针就是类的对象
\quad 智能指针对象的生命周期跟堆空间的生命周期保持一致
C++关键字:
nullptr表示空指针,nullptr是新增的关键字
nullptr不会被解释成0,但是NULL会被解释成0
#define NULL 0x00000000
2.三种常见的智能指针(模板类)
cpp
#include <memory>(1)auto_ptr
知识点1:使用语法
cpp
auto_ptr<模板类型> 对象(); //老版本的C++中使用智能指针例如:
cpp
auto_ptr<int> p(new int); //p这个对象申请了int大小的堆空间(多个int不行)
auto_ptr没有重载加法运算,所有*(p+i)是不正确的
auto_ptr没有重载中括号,所有p[i]也是不正确的
//new int是new返回的指针,指向新分配的内存块
//shared_ptr申请多个类型大小的堆空间也不行
好处:auto_ptr类的构造函数自动帮你new堆空间
auto_ptr类的析构函数自动帮你释放堆空间,完全不用操心
示例代码:auto_ptr的使用
cpp
#include <iostream>
#include <memory> //跟智能指针有关的头文件

using namespace std;

struct student
{
    string name;
    int age;
};

int main()
{
    //例子1:
    auto_ptr<int> a1(new int);

    //使用堆空间
    //错误:auto_ptr没有重载[]
    //a1[0]=15;
    //a1[9]=69;
    //错误:auto_ptr没有重载+
    //*(a1+0)=15;
    //*(a1+1)=45;

    //正确:auto_ptr重载了解引用
    //*a1=45;
    //cout<<"刚才你存放的数据: "<<*a1<<endl;

    //例子2:
    auto_ptr<struct student> a2(new struct student);
    a2->name="张三";
    a2->age=18;
    cout<<"刚才你存放的数据: "<<a2->name<<"  "<<a2->age<<endl;
    cout<<"刚才你存放的数据: "<<(*a2).name<<"  "<<(*a2).age<<endl;
}
示例代码:创建智能指针对象,参数不可以使用局部变量的地址
cpp
#include <iostream>
#include <memory> //跟智能指针有关的头文件
using namespace std;

struct student
{
    string name;
    int age;
};

int main()
{
    int n=56; //n是栈空间
    int *m=new int;  //m是堆空间
    /*
        class auto_ptr
        {
        public:
            auto_ptr(T *arg)
            {
                p=arg;
            }
            ~auto_ptr()
            {
                delete p;
            }
        private:
            T *p;
        }
    */
    //auto_ptr<int> a1(&n); // 错误,不能delete局部变量
    auto_ptr<int> a1(m);
}
示例代码:delete释放栈空间是错误的
cpp
#include <iostream>
#include <memory> //跟智能指针有关的头文件

using namespace std;

/*
    栈空间是不能用delete或者free释放
*/
int main()
{
    int n=56;
    delete &n;
}
示例代码:auto_ptr智能指针对象赋值
cpp
#include <iostream>
#include <memory> //跟智能指针有关的头文件

using namespace std;

/*
    三种智能指针对象之间赋值
*/
int main()
{
    auto_ptr<int> p1(new int);
    //存放数据到p1里面
    *p1=123;

    //再来新建一个智能指针对象
    auto_ptr<int> p2;  //野指针
    /*
        auto_ptr重载=
        重载=的源码做了如下事情:把p1的堆空间所有权转让给p2,确保永远只有一个智能指针对象拥有堆空间的所有权
        原因:同一个堆空间不能释放多次
    */
    p2=p1; //对象赋值,常规的理解,p2和p1指向同一个堆空间
    //打印数据
    //cout<<"p1里面存放的数据: "<<*p1<<endl; //段错误,p1不再拥有堆空间的所有权,是个野指针
    cout<<"p2里面存放的数据: "<<*p2<<endl;
    auto_ptr<int> p3;  //野指针
    p3=p2;
    cout<<"p3里面存放的数据: "<<*p3<<endl;
}
(2)unique_ptr
知识点1:使用语法
C++11新增的智能指针
cpp
unique_ptr<模板类型>  对象();
unique_ptr<int> p(new int);  //分配一个int
p=56; //不能写成p[0]=56;
unique_ptr<int[]> p(new int[10]); //分配多个int
p[0]=15;
p[1]=56;  //不能写成(p+1)=96
p[2]=89;
示例代码:unique_ptr智能指针对象赋值
cpp
#include <iostream>
#include <memory> //跟智能指针有关的头文件

using namespace std;

/*
    智能指针对象之间赋值
*/
int main()
{
    unique_ptr<int> p1(new int);
    //存放数据到p1里面
    *p1=123;

    //再来新建一个智能指针对象
    unique_ptr<int> p2;  //野指针
    p2=p1;  // 错误 unique_ptr& operator= (const unique_ptr&) = delete; 禁用了赋值

}
(3)shared_ptr
跟auto_ptr一模一样的写法用法
示例代码:shared_ptr智能指针对象赋值
cpp
#include <iostream>
#include <memory> //跟智能指针有关的头文件

using namespace std;

/*
    智能指针对象之间赋值
*/
int main()
{
    shared_ptr<int> p1(new int);
    //存放数据到p1里面
    *p1=123;

    //再来新建一个智能指针对象
    shared_ptr<int> p2;  //野指针
    p2=p1;
    cout<<"*p1 is: "<<*p1<<endl;
    cout<<"*p2 is: "<<*p2<<endl;

    shared_ptr<int> p3;  //野指针
    p3=p1;
    cout<<"*p1 is: "<<*p1<<endl;
    cout<<"*p2 is: "<<*p2<<endl;
    cout<<"*p3 is: "<<*p3<<endl;// 正确,
}
3.需要注意的问题
问题1:创建智能指针对象,参数不能用局部变量的地址
比如:
cpp
string str1("hello");  //局部变量
shared_ptr<string> ptrobj(&str1); //由于智能指针会在析构的时候调用delete释放指针的地址(但是&str1根本不是用的堆空间)
编译没有语法错误,逻辑不正确,会引起段错误
问题2:用一个智能指针对象去赋值给另外一个智能指针对象引发的问题(三种智能指针的区别)
比如:
cpp
auto_ptr<string> other(new string("我爱中国"));
auto_ptr<string> pwin;
pwin=other; //此时auto_ptr通过赋值运算把new string("我爱中国")的所有权转让给pwin,那么other里面就变成NULL了
                    //auto_ptr的策略是对于某个地址,只能有一个智能指针可拥有它

unique_ptr<string> other(new string("我爱中国"));
unique_ptr<string> pwin;
pwin=other; //此时编译器会报错

shared_ptr<string> other(new string("我爱中国"));
shared_ptr<string> pwin;
pwin=other; //shared_ptr会跟踪引用某个地址的智能指针数(称为引用计数),赋值时,计数将加1,而指针过期时,计数将减1,仅当最后一个指针过期时才调用delete
4.解释上面出现的新知识点
示例代码:C++11新增的语法禁止使用某些成员函数
cpp
#include <iostream>
#include <memory> //跟智能指针有关的头文件
using namespace std;


/*
    返回值 operator=(形参) = delete;  //禁止使用赋值运算
*/

class Cat
{
public:
    Cat(int _age=0)
    {
        age=_age;
    }
    void operator=(Cat &other)=delete;  //禁用赋值
    Cat(const Cat &other)=delete;       //禁用拷贝构造函数

private:
    int age;
};

int main()
{
    Cat c1(5);
    Cat c2;
    //c2=c1; //默认类对象可以赋值,现在不希望类对象之间赋值

    Cat c3=c1;
}
示例代码:右值引用
cpp
#include <iostream>
#include <memory> //跟智能指针有关的头文件
using namespace std;


/*
    左值引用: 传递参数的时候,需要传递左值,不能传递右值(const修饰的除外),前面学习的就是左值引用
               void fun(int &n)  //int &n就是左值引用
               {

               }
    右值引用:传递参数的时候,需要传递右值,不能传递左值
                void fun(int &&n)  //int &&n就是右值引用
               {

               }
*/
void fun(int &&n)  //int &&n就是右值引用
{
   cout<<n<<endl;
}
int main()
{
    int a=78;
    fun(10);
    fun(a+1);
    //fun(a);  //不能传递变量名,是个左值
}
5.C++左值和右值介绍
基本概念
左值 (lvalue)
有名称,可以取地址持久存在,生命周期超出当前表达式- 通常出现在
赋值号左边
cpp
int a = 10;        // a是左值
int* p = &a;       // 可以取地址

std::string s = "hello";  // s是左值
s = "world";              // s在赋值左边
右值 (rvalue)
临时对象,没有持久存储不能取地址- 通常出现在
赋值号右边
cpp
int a = 10;           // 10是右值
std::string s = "hello" + "world";  // 临时字符串是右值

int func() { return 42; }
int b = func();       // func()返回值是右值
C++11后的精细分类
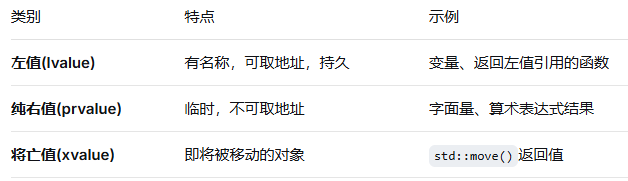
1. 左值 (lvalue)
cpp
int x = 5;           // x是左值
int& getRef() { return x; }
getRef() = 10;       // 函数返回左值引用,是左值
2. 纯右值 (prvalue)
- 传统的右值概念
- 字面量、临时对象、返回非引用类型的函数调用
cpp
42                  // 字面量是纯右值
x + 5               // 表达式结果是纯右值
std::string("temp") // 临时对象是纯右值
3. 将亡值 (xvalue)
- 即将被移动的对象
- 通过std::move转换或返回右值引用的函数
cpp
std::string str = "hello";
std::string other = std::move(str);  // std::move(str)是将亡值
判断方法
1. 取地址测试
cpp
int x = 10;
&x;        // 合法,x是左值
&(x + 1);  // 非法,(x + 1)是右值
2. 赋值测试
cpp
int a = 5;
a = 10;        // 合法,a是左值
10 = a;        // 非法,10是右值
3. 生命周期判断
cpp
std::string getString() { return "temp"; }

auto& ref1 = getString();  // 错误!右值不能绑定到非const左值引用
auto&& ref2 = getString(); // 正确!万能引用可以绑定右值
const auto& ref3 = getString(); // 正确!const左值引用可以延长右值生命周期
实际应用示例
cpp
#include <iostream>
#include <utility>

void process(int& val) {
    std::cout << "处理左值: " << val << std::endl;
}

void process(int&& val) {
    std::cout << "处理右值: " << val << std::endl;
}

int main() {
    int a = 10;

    process(a);             // 调用左值版本
    process(20);            // 调用右值版本
    process(std::move(a));  // 调用右值版本

    return 0;
}