内联变量(Inline Variables)是 C++17 引入的重要特性,主要用于解决头文件中的变量定义问题。
内联变量的使用:
cpp// 使用语法示例以及注释说明 inline int globalVar = 42; // 内联全局变量,不需要在 .cpp 文件中定义 //允许多次定义,链接器会合并 namespace Constants { // 内联常量 inline const int BUFFER_SIZE = 4096; inline constexpr double GRAVITY = 9.8; inline const std::string APP_NAME = "MyApplication"; // 内联非常量变量,不需要在 .cpp 文件中定义,全局共享 inline int globalVar = 42; // 内联数组 inline const std::array<int, 3> DEFAULT_SETTINGS{1, 2, 3}; } class Logger { private: inline static std::mutex log_mutex; // 内联静态成员,不需要在 .cpp 文件中定义 inline static int instance_count = 0; // 内联静态成员,不需要在 .cpp 文件中定义 public: Logger() { std::lock_guard lock(log_mutex); ++instance_count; } }; template<typename T> class Factory { private: inline static std::map<std::string, std::function<T*()>> registry; inline static std::atomic<int> next_id{0}; public: static int registerCreator(const std::string& name, std::function<T*()> creator) { registry[name] = std::move(creator); return next_id++; } static T* create(const std::string& name) { auto it = registry.find(name); return it != registry.end() ? it->second() : nullptr; } }; // 使用 - 不需要显式实例化模板 //class Widget {}; //Factory<Widget>::registerCreator("default", []() { return new Widget(); });
对比分析
下面我们先来看看在C++17之前我们是怎么声明全局变量的以及其中可能出现的一些问题。
假设我们在InlineTest1.h中做如下定义:
cpp// InlineTest1.h int MAX_SIZE = 100然后我们在main.cpp中实现如下代码:
cpp// main.cpp #include <iostream> #include "InlineTest1.h" int main() { std::cout << "addr:" << &MAX_SIZE << " valud:" << MAX_SIZE << std::endl; }编译运行,输出如下内容:
addr:00007FF7F327A004 valud:100
这看着好像没问题,但是实际应用中,我们会有很多cpp文件引用InlineTest1.h文件,这就会有问题了,比如常用的我们还会有一个InlineTest1.cpp问题,我们什么也不做,只是引用一下InlineTest1.h,我们看看会怎么样?
cpp//InlineTest1.cpp #include "InlineTest1.h"好吧,编译不通过,那如果我们只在h文件里面声明,在cpp里面定义呢?
cpp// InlineTest1.h int MAX_SIZE; //InlineTest1.cpp #include "InlineTest1.h" int MAX_SIZE = 100;好吧是编译不通过!!!
那样如何做才行呢?我们先来试试extern关键字吧
cpp// InlineTest1.h extern int MAX_SIZE = 100; //InlineTest1.cpp #include "InlineTest1.h"还是编译不通过
那如果我们只在h文件里面声明,在cpp里面定义呢?
cpp// InlineTest1.h extern int MAX_SIZE; //InlineTest1.cpp #include "InlineTest1.h" int MAX_SIZE = 100;编译成功了,我们继续修改InlineTest1.h、InlineTest1.cpp如下:
cpp// InlineTest1.h extern int MAX_SIZE; void printMAX_SIZE1(); //InlineTest1.cpp #include "InlineTest1.h" #include <iostream> int MAX_SIZE = 100; void printMAX_SIZE1() { std::cout << "addr:" << &MAX_SIZE << " valud:" << MAX_SIZE << std::endl; MAX_SIZE -= 20; }main.cpp修改如下:
cpp// main.cpp #include <iostream> #include "InlineTest1.h" int main() { printMAX_SIZE1(); std::cout << "addr:" << &MAX_SIZE << " valud:" << MAX_SIZE << std::endl; }编译运行,结果如下所示:
通过上面的一系列尝试,说明在C++17之前,我们如果需要定义一个全局变量,我们需要在h文件里面声明并使用extern关键字,然后在cpp里面定义,这样能够全局共享变量。
下面,我们再来试试const关键字:
修改InlineTest1.h、InlineTest1.cpp如下:
cpp// InlineTest1.h const int MAX_SIZE = 100; void printMAX_SIZE1(); //InlineTest1.cpp #include "InlineTest1.h" #include <iostream> void printMAX_SIZE1() { std::cout << "addr:" << &MAX_SIZE << " valud:" << MAX_SIZE << std::endl; }编译运行如下:
从结果中可以看出,变量地址不一样了,说明全局变量并没有共享,每个cpp编译生成的obj文件里面,都有一个自己的MAX_SIZE 变量地址。
如果加上extern 呢?
cpp// InlineTest1.h extern const int MAX_SIZE = 100; void printMAX_SIZE1(); //InlineTest1.cpp #include "InlineTest1.h" #include <iostream> void printMAX_SIZE1() { std::cout << "addr:" << &MAX_SIZE << " valud:" << MAX_SIZE << std::endl; }好吧,这又编译不过了。
还是需要只在h声明、在cpp进行定义,代码修改如下:
cpp// InlineTest1.h extern const int MAX_SIZE; void printMAX_SIZE1(); //InlineTest1.cpp #include "InlineTest1.h" #include <iostream> const int MAX_SIZE = 100; void printMAX_SIZE1() { std::cout << "addr:" << &MAX_SIZE << " valud:" << MAX_SIZE << std::endl; }


编译运行,结果如下:

地址一样了
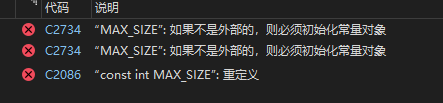
把extern去掉会咋样?
cpp// InlineTest1.h const int MAX_SIZE; void printMAX_SIZE1(); //InlineTest1.cpp #include "InlineTest1.h" #include <iostream> const int MAX_SIZE = 100; void printMAX_SIZE1() { std::cout << "addr:" << &MAX_SIZE << " valud:" << MAX_SIZE << std::endl; }好吧,还是重定义:
下面让我们总结一下吧:
总结:
1、直接在头文件中定义全局变量,当存在多个cpp文件引用该头文件时,编译出现重定义错误
编译 InlineTest1.cpp:
预处理器包含 InlineTest1.h,因为 MAX_SIZE 未定义,所以它定义了 MAX_SIZE 并定义了 int MAX_SIZE = 100;。
编译器将 MAX_SIZE .cpp 编译成目标文件 MAX_SIZE .obj。这个目标文件包含了一个名为 MAX_SIZE 的全局符号。
编译 main.cpp:
预处理器包含 InlineTest1.h,虽然 MAX_SIZE在 InlineTest1.cpp 的编译中被定义了,但每次编译一个新的 .cpp 文件都是全新的预处理过程,所以 MAX_SIZE在这里又是未定义的。
因此,它再次定义了 MAX_SIZE并再次定义了 int MAX_SIZE= 100;。
编译器将 main.cpp 编译成目标文件 main.obj。这个目标文件也包含了一个名为 MAX_SIZE的全局符号。
链接阶段(将 InlineTest1.obj 和 main.obj 合并成可执行文件):
链接器发现两个目标文件都提供了同一个强符号(MAX_SIZE)。
链接器不知道应该用哪一个,于是报出"重复定义"的错误。
2、使用extern关键字后,可以解决编译重定义问题,需要将声明和定义分离,即h文件中定义,cpp中声明
InlineTest1.cpp 定义了一个全局符号 MAX_SIZE。
main.cpp 通过包含 InlineTest1.h,获得了 extern int MAX_SIZE; 这个声明,知道这个变量是外部的。
链接时,main.obj 中关于 MAX_SIZE的引用,被正确地链接到了 InlineTest1.obj 中唯一的那个定义上。
3、使用const声明的全局变量,必须在h文件中里面初始化,否则编译不通过。但是在不同的cpp文件中,具有各自的副本,无法共享
4、const关键字与extern关键字共同使用,遵循extern的语法
上面是C++17前的语法,是不是很复杂?让我来看看内联变量的语法吧:
cpp// InlineTest1.h inline const int MAX_SIZE = 100; void printMAX_SIZE1(); //InlineTest1.cpp #include "InlineTest1.h" #include <iostream> void printMAX_SIZE1() { std::cout << "addr:" << &MAX_SIZE << " valud:" << MAX_SIZE << std::endl; }运行结果如下:
cpp// InlineTest1.h inline int MAX_SIZE = 100; void printMAX_SIZE1(); //InlineTest1.cpp #include "InlineTest1.h" #include <iostream> void printMAX_SIZE1() { std::cout << "addr:" << &MAX_SIZE << " valud:" << MAX_SIZE << std::endl; MAX_SIZE -=20; }运行结果如下:
怎么样?看出使用内联变量的优势了吗?
总结:使用内联变量的优势
开发效率:减少文件切换,代码更集中
维护性:配置集中,易于修改和理解,避免了繁琐的分离定义,实现一切在头文件中完成
性能:编译期优化,零运行时开销
安全性:解决静态初始化顺序问题
模板编程:极大简化模板静态成员,避免了显式实例化噩梦
代码质量:减少重复,提高一致性
inline关键字修饰变量时在类中的使用
1、inline只能修饰类的静态成员变量,不能修饰普通成员变量
2、使用inline修饰的成员变量,需要在头文件中完成一切,不需要在cpp里面定义了
cppclass Logger { private: inline static std::mutex log_mutex; // 内联静态成员,不需要在 .cpp 文件中定义 inline static int instance_count = 0; // 内联静态成员,不需要在 .cpp 文件中定义 public: Logger() { std::lock_guard lock(log_mutex); ++instance_count; } };


线程安全的单例模式
cppclass Logger { private: Logger() = default; public: static Logger& getInstance() { static Logger instance; // C++11起线程安全 return instance; } // 或者更简洁的内联版本 inline static Logger& instance = getInstance(); // 同样线程安全 void log(const std::string& message) { // 实现... } };
模板类静态成员的革命性改进
在C++17之前,我们如果在模板类中定义了一个模板变量,那么我们需要对可能的每一种类型进行显式实例化,否则将会编译不通过,这就是一个恶梦。
cpp// test.h template<typename T> class Factory { public: static std::map<std::string, T*> registry; // 声明 }; // test.cpp template<typename T> std::map<std::string, T> Factory<T>::registry; // main.cpp int main() { Factory<int>::registry["default"] = new int(42); }因为我们没有显示实例化int类型,所有编译不过,错误信息如下所示:
修改代码如下:
cpp// test.h template<typename T> class Factory { public: static std::map<std::string, T*> registry; // 声明 }; // test.cpp template<typename T> std::map<std::string, T> Factory<T>::registry; // 显式实例化需要的类型,每种数据类型都来一遍?烦琐! template class Factory<int>; // main.cpp int main() { Factory<int>::registry["default"] = new int(42); }想想,显式实例化所有需要的类型,这是不是很恐怖?
下面我们来看看C++17之后的用法吧!(自动处理)
cpp//test.h template<typename T> class Factory { public: inline static std::map<std::string, T*> registry; // 定义! }; // main.cpp int main() { Factory<int>::registry["default"] = new int(42); Factory<std::string>::registry["name"] = new std::string("test"); }怎么样,是不是简单很多了?
