一 Ansible简介
Ansilbe是一个部署一群远程主机的工具。远程的主机可以是远程虚拟机或物理机, 也可以是本地主机。
1.1 作用
Ansilbe通过SSH协议实现远程节点和管理节点之间的通信。理论上说,只要管理员通过ssh登录到一台远程主机上能做的操作,Ansible都可以做到。
- 自动化部署APP;
- 自动化管理配置项;
- 自动化的持续交互;
- 自动化的(AWS)云服务管理;
1.2 工作机制
Ansible 在管理节点将 Ansible 模块通过 SSH 协议(或者 Kerberos、LDAP)推送到被管理端执行,执行完之后自动删除,可以使用 SVN 等来管理自定义模块及编排
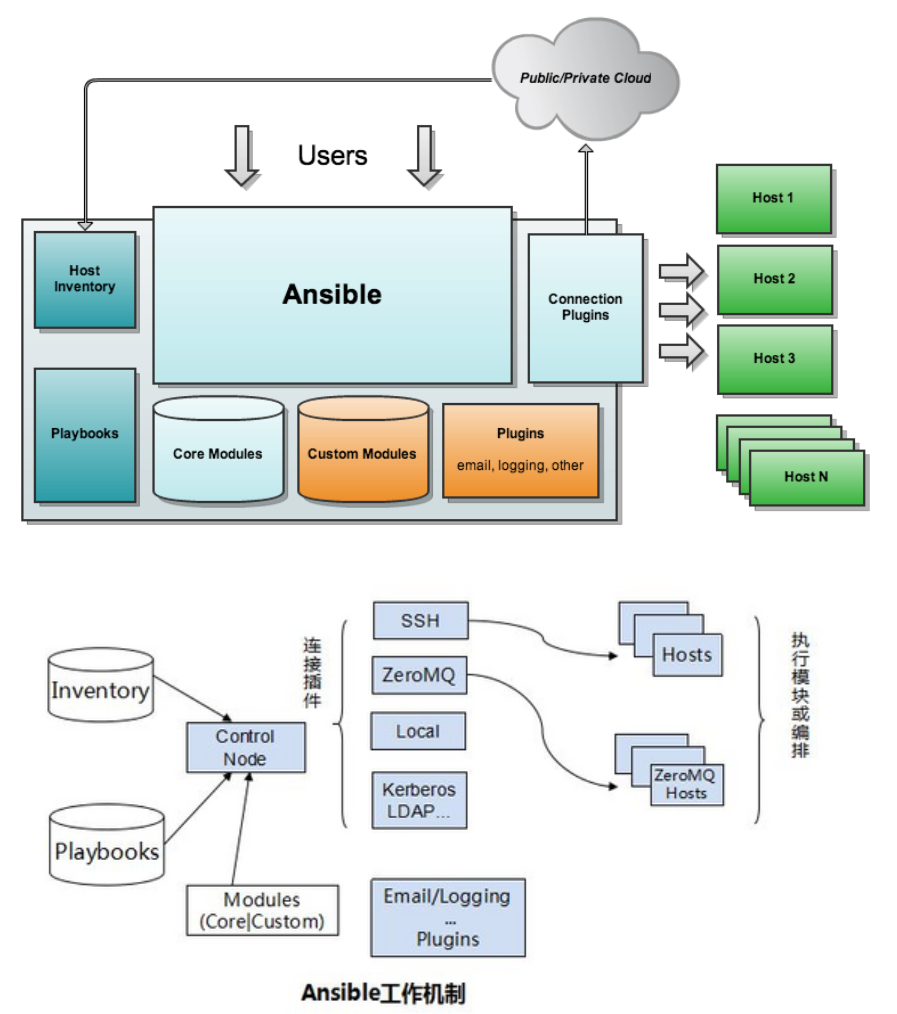
由上面的图可以看到 Ansible 的组成由 5 个部分组成:
- Ansible : 核心
- Modules : 包括 Ansible 自带的核心模块及自定义模块
- Plugins : 完成模块功能的补充,包括连接插件、邮件插件等
- Playbooks : 剧本;定义 Ansible 多任务配置文件,由Ansible 自动执行
- Inventory : 定义 Ansible 管理主机的清单
通俗讲:管理节点读取 Inventory 和 Playbooks,通过 Plugins(如 SSH 连接)将 Modules 推送到被管理节点执行任务,执行后结果返回管理节点,模块自动删除。
二 安装ansible
| 主机名 | IP | 用途 |
|---|---|---|
| ansible | 192.168.2.80/24 | Ansible控制节点 |
| serverA | 192.168.2.81/24 | 业务节点 |
| serverB | 192.168.2.82/24 | 业务节点 |
| serverC | 192.168.2.83/24 | 业务节点 |
2.1 配置软件仓库
添加 EPEL 仓库,确保系统能获取到 Ansible 的安装包(默认系统仓库可能没有 Ansible)。
bash
[root@ansible ~]# vim /etc/yum.repos.d/epel.repo
[epel]
name=epel
baseurl=https://mirrors.aliyun.com/epel-archive/9.3/Everything/x86_64/	# 仓库地址(阿里云镜像,速度快)
gpgcheck=0
2.2 安装软件并配置清单
安装 Ansible 软件,并创建主机清单(Inventory),告诉 Ansible 要管理哪些被控制节点。
bash
[root@ansible ~]# yum install ansible.noarch -y  # 安装Ansible(noarch表示通用架构)
[root@ansible ~]# mkdir ansible  # 创建Ansible工作目录
[root@ansible ~]# cd ansible/  # 进入工作目录
[root@ansible ansible]# vim inventory  # 编辑主机清单文件
[server]  # 定义主机组名称(方便批量操作)
192.168.2.81  # 被控制节点IP
192.168.2.82
192.168.2.83

# 验证清单:查看所有被管理主机
[root@ansible ansible]# ansible all --list-hosts -i inventory  # -i指定清单文件,all表示所有主机
  hosts (3):
    192.168.2.81
    192.168.2.82
    192.168.2.83
2.3 在被控主机中建立控制用户
在所有被控制节点创建统一的管理用户(devops),避免直接使用 root 操作,提高安全性。
bash
# 尝试在所有被控制节点创建devops用户(首次连接需确认SSH密钥,会交互询问)
[root@ansible ansible]# ansible all -m shell -a "useradd devops" -i inventory
...省略
Are you sure you want to continue connecting (yes/no/[fingerprint])?	# 需要手动输入yes,不适合自动化

# 解决交互问题:关闭SSH主机密钥检查(在ansible.cfg中配置)
[root@ansible ansible]# vim ansible.cfg
[defaults]
host_key_checking=False  # 关闭主机密钥检查,避免交互
inventory=/root/ansible/inventory  # 指定默认清单路径,后续命令可省略-i

# 重新创建用户:-k表示需要输入SSH密码(被控制节点root用户的密码)
[root@ansible ansible]# ansible all -m shell -a "useradd devops" -i inventory -k
SSH password:
192.168.2.83 | CHANGED | rc=0 >>	# CHANGED表示操作成功且状态改变

192.168.2.82 | CHANGED | rc=0 >>

192.168.2.81 | CHANGED | rc=0 >>

# 验证用户是否创建成功:查询devops用户信息
[root@ansible ansible]# ansible all -m shell -a "id devops" -i inventory -k
SSH password:
192.168.2.82 | CHANGED | rc=0 >>
用户id=1001(devops) 组id=1001(devops) 组=1001(devops)
192.168.2.83 | CHANGED | rc=0 >>
用户id=1001(devops) 组id=1001(devops) 组=1001(devops)
192.168.2.81 | CHANGED | rc=0 >>
用户id=1001(devops) 组id=1001(devops) 组=1001(devops)
2.4 在控制主机中设置控制用户提权功能
给 devops 用户设置密码并配置 sudo 权限,让 devops 用户能以 root 权限执行命令(无需输入密码),方便后续自动化操作。
bash
# 给所有被控制节点的devops用户设置密码(密码123)
[root@ansible ansible]# ansible all -m shell -a "echo 123 | passwd --stdin devops" -i inventory -k
SSH password:
192.168.2.82 | CHANGED | rc=0 >>
更改用户 devops 的密码 。
passwd:所有的身份验证令牌已经成功更新。
192.168.2.83 | CHANGED | rc=0 >>
更改用户 devops 的密码 。
passwd:所有的身份验证令牌已经成功更新。
192.168.2.81 | CHANGED | rc=0 >>
更改用户 devops 的密码 。
passwd:所有的身份验证令牌已经成功更新。

# 配置sudo权限:允许devops无需密码执行所有root命令
[root@ansible ansible]# ansible all -m shell -a 'echo "devops  ALL=(root) NOPASSWD: ALL" >> /etc/sudoers' -k
SSH password:
192.168.2.82 | CHANGED | rc=0 >>

192.168.2.83 | CHANGED | rc=0 >>

192.168.2.81 | CHANGED | rc=0 >>

# 验证当前用户:默认用root登录
[root@ansible ansible]# ansible all -m shell -a "whoami" -k
SSH password:
192.168.2.82 | CHANGED | rc=0 >>
root
192.168.2.81 | CHANGED | rc=0 >>
root
192.168.2.83 | CHANGED | rc=0 >>
root

# 验证devops用户登录:-u指定用户为devops
[root@ansible ansible]# ansible all -m shell -a "whoami" -u devops  -k
SSH password:
192.168.2.82 | CHANGED | rc=0 >>
devops
192.168.2.83 | CHANGED | rc=0 >>
devops
192.168.2.81 | CHANGED | rc=0 >>
devops

# 验证devops提权:-b表示切换到root(sudo)
[root@ansible ansible]# ansible all -m shell -a "whoami" -u devops  -b -k
SSH password:
192.168.2.83 | CHANGED | rc=0 >>
root
192.168.2.82 | CHANGED | rc=0 >>
root
192.168.2.81 | CHANGED | rc=0 >>
root通过passwd命令成功设置密码,sudoers配置让 devops 无需密码提权,whoami命令验证了登录用户和提权功能正常。
- asnible就是要记住模块,会查就简单容易
bash
[root@ansible ansible]# ansible-config init --disable | less2.5 为控制主机配置免密认证
总是输密码那也不行,所以接下来我们配置免密
bash
# 在控制节点生成SSH密钥对(无密码,一路回车)
[root@ansible ansible]# ssh-keygen
Generating public/private rsa key pair.
Enter file in which to save the key (/root/.ssh/id_rsa):
Enter passphrase (empty for no passphrase):
Enter same passphrase again:
Your identification has been saved in /root/.ssh/id_rsa
Your public key has been saved in /root/.ssh/id_rsa.pub
The key fingerprint is:
SHA256:gmFci0xuBkXje8rdiTOX4HgAdTxjbib9MAMPyDD4tmI root@ansible
The key's randomart image is:
+---[RSA 3072]----+
|+o.+*.o          |
|..oOo==.         |
| .. @B.o         |
|  o=.+X          |
| . .+++=S        |
|.E.. B =.o       |
|..  + B =        |
|     . +         |
|                 |
+----[SHA256]-----+

# 将公钥复制到控制节点本地(测试用,实际主要复制到被控制节点)
[root@ansible ansible]# ssh-copy-id -i /root/.ssh/id_rsa.pub  root@localhost
...省略
root@localhost's password:

Number of key(s) added: 1

Now try logging into the machine, with:   "ssh 'root@localhost'"
and check to make sure that only the key(s) you wanted were added.

# 查看生成的密钥文件
[root@ansible ansible]# ls /root/.ssh/
authorized_keys  # 存放允许登录的公钥
id_rsa  # 私钥(控制节点保留)
id_rsa.pub  # 公钥(需要复制到被控制节点)
known_hosts  # 已知主机密钥列表
建立目录,用到file模块
bash
# 在被控制节点为devops用户创建.ssh目录(权限700,确保SSH识别)
# -m file:使用file模块(管理文件/目录)
# path:目标路径;owner/group:所有者和组;mode:权限700(仅所有者可读写执行);state=directory:确保是目录
[root@ansible ansible]# ansible all -m file -a 'path=/home/devops/.ssh owner=devops group=devops mode=700 state=directory' -k

SSH password:
192.168.2.81 | CHANGED => {
    "ansible_facts": {
        "discovered_interpreter_python": "/usr/bin/python3"
    },
    "changed": true,
    "gid": 1001,
    "group": "devops",
    "mode": "0700",
    "owner": "devops",
    "path": "/home/devops/.ssh",
    "size": 6,
    "state": "directory",
    "uid": 1001
}
192.168.2.83 | CHANGED => {
    "ansible_facts": {
        "discovered_interpreter_python": "/usr/bin/python3"
    },
    "changed": true,
    "gid": 1001,
    "group": "devops",
    "mode": "0700",
    "owner": "devops",
    "path": "/home/devops/.ssh",
    "size": 6,
    "state": "directory",
    "uid": 1001
}
192.168.2.82 | CHANGED => {
    "ansible_facts": {
        "discovered_interpreter_python": "/usr/bin/python3"
    },
    "changed": true,
    "gid": 1001,
    "group": "devops",
    "mode": "0700",
    "owner": "devops",
    "path": "/home/devops/.ssh",
    "size": 6,
    "state": "directory",
    "uid": 1001
}

# 可以用这个命令来查看file模块具体使用方法,less之后过滤EXAMPLE
[root@ansible ~]# ansible-doc file | less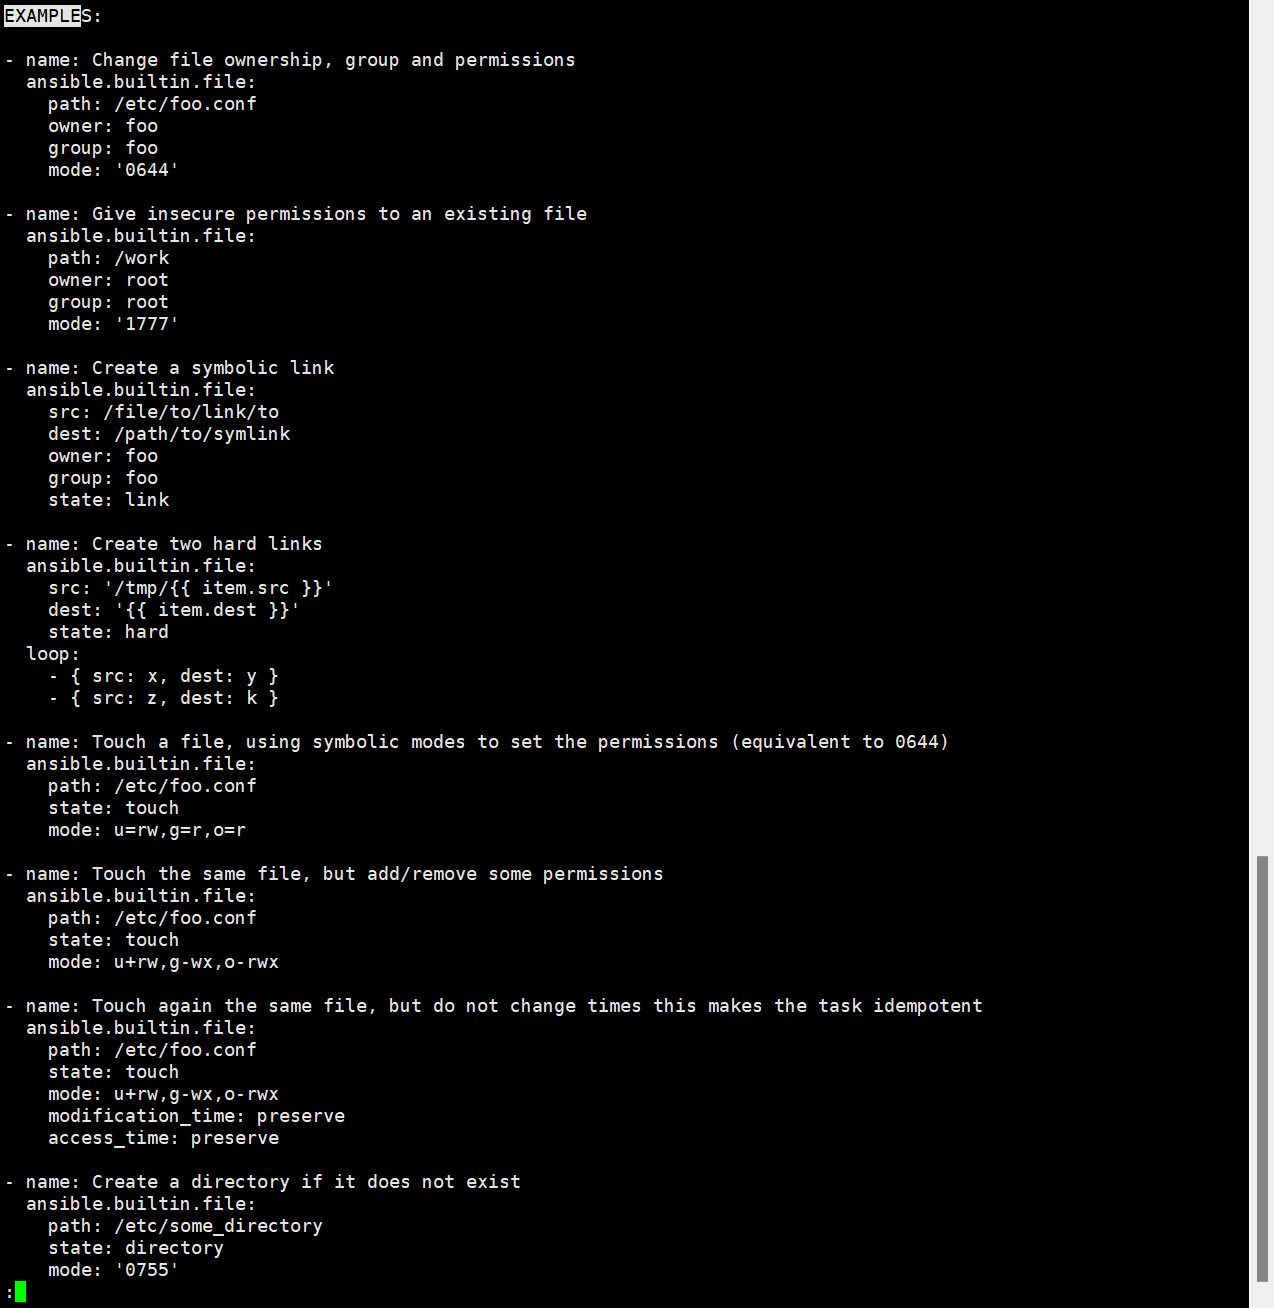
将控制节点的公钥复制到被控制节点devops用户的authorized_keys中
bash
# -m copy:使用copy模块(复制文件)
# src:控制节点的源文件;dest:被控制节点的目标路径;mode=600(仅所有者可读写,SSH要求)
[root@ansible ansible]# ansible all -m copy -a 'src=/root/.ssh/authorized_keys dest=/home/devops/.ssh/authorized_keys owner=devops group=devops mode=600' -k
SSH password:
192.168.2.82 | CHANGED => {
    "ansible_facts": {
        "discovered_interpreter_python": "/usr/bin/python3"
    },
    "changed": true,
    "checksum": "1b86770ffc464763ae3c44d05696799f88a72b42",
    "dest": "/home/devops/.ssh/authorized_keys",
    "gid": 1001,
    "group": "devops",
    "md5sum": "eb3d982e88729b5492068dfa30e7f119",
    "mode": "0600",
    "owner": "devops",
    "size": 566,
    "src": "/root/.ansible/tmp/ansible-tmp-1762854925.1130571-34837-55849556411830/source",
    "state": "file",
    "uid": 1001
}
...省略

#验证
[root@ansible ansible]# useradd devops
[root@ansible ansible]# echo 123 | passwd --stdin devops
[root@ansible ansible]# ssh devops@localhost
[devops@ansible ~]$ scp /root/.ssh/id_rsa devops@localhost:~/.ssh/id_rsa
Warning: Permanently added 'localhost' (ED25519) to the list of known hosts.
devops@localhost's password:
stat local "/root/.ssh/id_rsa": Permission denied

[devops@ansible ~]$ exit
注销
Connection to localhost closed.

[root@ansible ansible]# su - devops
[devops@ansible ~]$ ll .ssh
总用量 8
-rw------- 1 devops devops 825 11月 11 18:05 known_hosts
-rw-r--r-- 1 devops devops  91 11月 11 18:05 known_hosts.old
[devops@ansible ~]$ exit
注销
[root@ansible ansible]# scp /root/.ssh/id_rsa devops@localhost:~/.ssh/id_rsa
devops@localhost's password:
id_rsa                                                                        100% 2602     4.4MB/s   00:00


[root@ansible ansible]# su - devops
[devops@ansible ~]$ mkdir ansible
[devops@ansible ~]$ cd ansible/
[devops@ansible ansible]$ scp root@localhost:/root/ansible/* .
ansible.cfg                                                                   100%   69    90.3KB/s   00:00
inventory                                                                     100%   48    60.7KB/s   00:00
[devops@ansible ansible]$ ll
总用量 8
-rw-r--r-- 1 devops devops 69 11月 11 18:15 ansible.cfg
-rw-r--r-- 1 devops devops 48 11月 11 18:15 inventory

[devops@ansible ansible]$ vim ansible.cfg
[defaults]
host_key_checking=False
inventory=~/ansible/inventory	# 修改路径

[devops@ansible ansible]$ ansible all -m ping
192.168.2.83 | SUCCESS => {
    "ansible_facts": {
        "discovered_interpreter_python": "/usr/bin/python3"
    },
    "changed": false,
    "ping": "pong"	# 免密登录成功,节点响应正常
}
192.168.2.82 | SUCCESS => {
    "ansible_facts": {
        "discovered_interpreter_python": "/usr/bin/python3"
    },
    "changed": false,
    "ping": "pong"
}
192.168.2.81 | SUCCESS => {
    "ansible_facts": {
        "discovered_interpreter_python": "/usr/bin/python3"
    },
    "changed": false,
    "ping": "pong"
}通过ssh-keygen生成密钥,file模块创建目录,copy模块复制公钥,最终ansible all -m ping无需密码且返回pong,说明免密配置成功。
安装流程
| 子部分 | 核心作用 | 关键操作 |
|---|---|---|
| 配置软件仓库 | 提供 Ansible 安装源 | 编辑 epel.repo 配置镜像地址 |
| 配置清单 | 定义被管理主机列表 | 创建 inventory 文件并分组主机 |
| 建立控制用户 | 创建统一管理用户 | 使用 shell 模块执行 useradd |
| 配置提权功能 | 允许管理用户获取 root 权限 | 修改 sudoers 文件配置 NOPASSWD |
| 配置免密认证 | 取消密码输入,实现全自动化 | 生成 SSH 密钥对并复制公钥到被管理端 |
三 配置ansible
3.1 编写配置文件
自定义 Ansible 的默认行为(如默认用户、免密提权),避免每次执行命令都指定参数。
bash
优先级:当前目录配置文件 > 全局(/etc/ansible/ansible.cfg)
# 显示配置文件所有的参数
[devops@ansible ansible]$ ansible-config init --disable | less
bash
[devops@ansible ansible]$ vim ansible.cfg
[defaults]
host_key_checking=False  # 关闭主机密钥检查(已在2.3中配置,这里重复确保生效)
inventory=~/ansible/inventory  # 默认清单路径
remote_user=devops  # 默认远程登录用户(无需每次用-u指定)

[privilege_escalation]  # 提权配置
become=True  # 默认开启提权(无需每次用-b指定)
become_ask_pass=False  # 提权无需输入密码(配合sudoers配置)
become_method=sudo  # 提权方式为sudo
become_user=root  # 提权到root用户
3.2 编写清单
按功能分组被管理主机(如 haproxy 节点、web 节点),方便针对分组执行任务。
bash
[devops@ansible ansible]$ vim inventory  # 编辑清单
[haproxy]  # 负载均衡节点组
192.168.2.81

[realserver]  # 真实web服务器节点组
192.168.2.82
192.168.2.83

# 验证分组:查看haproxy组主机
[devops@ansible ansible]$ ansible haproxy --list-hosts
  hosts (1):
    192.168.2.81  # 正确显示haproxy组主机

# 验证分组:查看realserver组主机
[devops@ansible ansible]$ ansible realserver --list-hosts
  hosts (2):
    192.168.2.82
    192.168.2.83  # 正确显示realserver组主机
四 使用模块部署相应服务
4.1 ad-hoc方式使用模块
在shell中,我们把能在shell中执行的程序叫做命令,但是在ansible中我们把命令叫做模块
直接执行模块的方式叫做ad-hoc方式
bash
[devops@ansible ansible]$ ansible all -m ping如何查看系统中的模块
bash
[devops@ansible ansible]$ ansible-doc -l如何查看模块帮助
bash
[devops@ansible ansible]$ ansible-doc  -l |grep dnf
ansible.builtin.dnf                                                                              Manages packages with the...
community.general.dnf_versionlock                                                                Locks package versions ...

[devops@ansible ansible]$ ansible-doc  dnf  | less
4.2 使用playbook(剧本)方式执行模块
剧本的语言通常使用yaml语言,文件内容由列表和字典组成,在列表的每个元素前要加"-"
剧本通常包含最基本的三个元素:
name: 对剧本的功能进行说明
hosts: 指定剧本的执行清单
tasks: 剧本动作
bash
# 创建playbook文件(test.yml)
[devops@ansible ansible]$ vim test.yml
- name: test	# 剧本名称(描述功能)
  hosts: all 	# 目标主机(all表示所有节点)
  tasks:		# 任务列表
  - name: test ping  # 任务名称
    ping:  # 任务使用的模块(ping模块,无参数)

# 执行playbook
[devops@ansible ansible]$ ansible-playbook test.yml

PLAY [test] # 开始执行名为test的剧本	****************************************************************************************************

TASK [Gathering Facts] # 自动收集主机信息(事实变量,默认开启)*****************************************************************************************
ok: [192.168.2.82]
ok: [192.168.2.81]
ok: [192.168.2.83]

TASK [test ping] # 执行test ping任务(ping模块)***********************************************************************************************
ok: [192.168.2.82]
ok: [192.168.2.83]
ok: [192.168.2.81]

PLAY RECAP *****************************************************************************************************
192.168.2.81               : ok=2    changed=0    unreachable=0    failed=0    skipped=0    rescued=0    ignored=0
192.168.2.82               : ok=2    changed=0    unreachable=0    failed=0    skipped=0    rescued=0    ignored=0
192.168.2.83               : ok=2    changed=0    unreachable=0    failed=0    skipped=0    rescued=0    ignored=0

# 查看详细信息,v越多越详细
[devops@ansible ansible]$ ansible-playbook test.yml  -vvv
playbook 执行后,输出每个任务的状态(ok表示成功),PLAY RECAP显示所有节点无失败,说明剧本执行成功。-vvv可用于调试,查看详细的执行步骤。
模块使用方式
| 方式 | 特点 | 适用场景 |
|---|---|---|
| ad-hoc 方式 | 命令行直接执行,单模块单任务 | 临时检查、简单操作(如 ping、查看磁盘) |
| playbook 方式 | YAML 文件定义多任务,可包含条件、变量等 | 复杂部署(如安装服务 + 配置 + 启动)、重复执行 |
五 ansible中的变量
5.1 事实变量
在 Ansible 中,事实变量(Facts) 是 Ansible 自动收集的目标主机系统信息,无需用户手动定义,可直接在 Playbook 中使用。这些信息包括主机的硬件配置、网络参数、操作系统详情、软件环境等,相当于目标主机的 "系统指纹"。可以理解为主机的信息。
事实变量的核心特点:
-
自动收集
当 Playbook 运行时,Ansible 会默认执行
setup模块(隐含在 Play 的gather_facts: yes配置中,默认开启),自动从目标主机收集信息并转化为变量。 -
即拿即用
收集到的事实变量可直接通过
{``{ 变量名 }}在任务、模板、条件判断中使用,无需提前声明。 -
结构化数据
事实变量以字典(dictionary)形式组织,包含多层嵌套结构,可通过
.符号逐层取值(例如ansible_default_ipv4.address)。
| 变量名 | 含义 |
|---|---|
{``{ ansible_fqdn }} |
主机的完全限定域名(FQDN) |
{``{ ansible_hostname }} |
主机名 |
{``{ ansible_default_ipv4.address }} |
默认 IPv4 地址 |
{``{ ansible_os_family }} |
操作系统家族(如 RedHat、Debian) |
{``{ ansible_distribution }} |
操作系统发行版(如 CentOS、Ubuntu) |
{``{ ansible_distribution_version }} |
操作系统版本(如 7.9、20.04) |
{``{ ansible_memtotal_mb }} |
总内存大小(MB) |
{``{ ansible_processor_cores }} |
CPU 核心数 |
{``{ ansible_devices.sda.size }} |
磁盘sda的总容量 |
bash
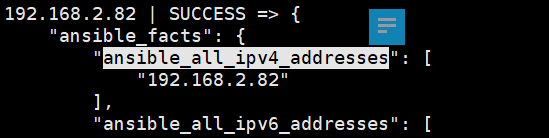
# 查看所有事实变量(setup模块收集)
[devops@ansible ansible]$ ansible all -m setup | less
192.168.2.83 | SUCCESS => {
    "ansible_facts": {
        "ansible_all_ipv4_addresses": [
            "192.168.2.83"
        ],
        "ansible_all_ipv6_addresses": [
            "fe80::20c:29ff:febe:8e32"
        ],
        "ansible_apparmor": {
            "status": "disabled"
        },
        ...省略

# 用debug模块输出自定义消息(类似echo)
[devops@ansible ansible]$ ansible all -m debug -a 'msg="hello world"'	# -a指定消息内容
192.168.2.83 | SUCCESS => {
    "msg": "hello world"
}
192.168.2.81 | SUCCESS => {
    "msg": "hello world"
}
192.168.2.82 | SUCCESS => {
    "msg": "hello world"
}

# 在playbook中使用事实变量(显示主机IP)
[devops@ansible ansible]$ vim test.yml
- name: test
  hosts: all
  tasks:
  - name: show IP
    debug:
      var: ansible_all_ipv4_addresses	# var参数:输出变量的完整内容

[devops@ansible ansible]$ ansible-playbook test.yml

PLAY [test] ****************************************************************************************************

TASK [Gathering Facts] *****************************************************************************************
ok: [192.168.2.82]
ok: [192.168.2.83]
ok: [192.168.2.81]

TASK [show IP] *************************************************************************************************
ok: [192.168.2.81] => {
    "ansible_all_ipv4_addresses": [	# 输出变量完整值(列表形式)
        "192.168.2.81"
    ]
}
ok: [192.168.2.82] => {
    "ansible_all_ipv4_addresses": [
        "192.168.2.82"
    ]
}
ok: [192.168.2.83] => {
    "ansible_all_ipv4_addresses": [
        "192.168.2.83"
    ]
}
bash
# 只输出IP地址(取列表中的值)
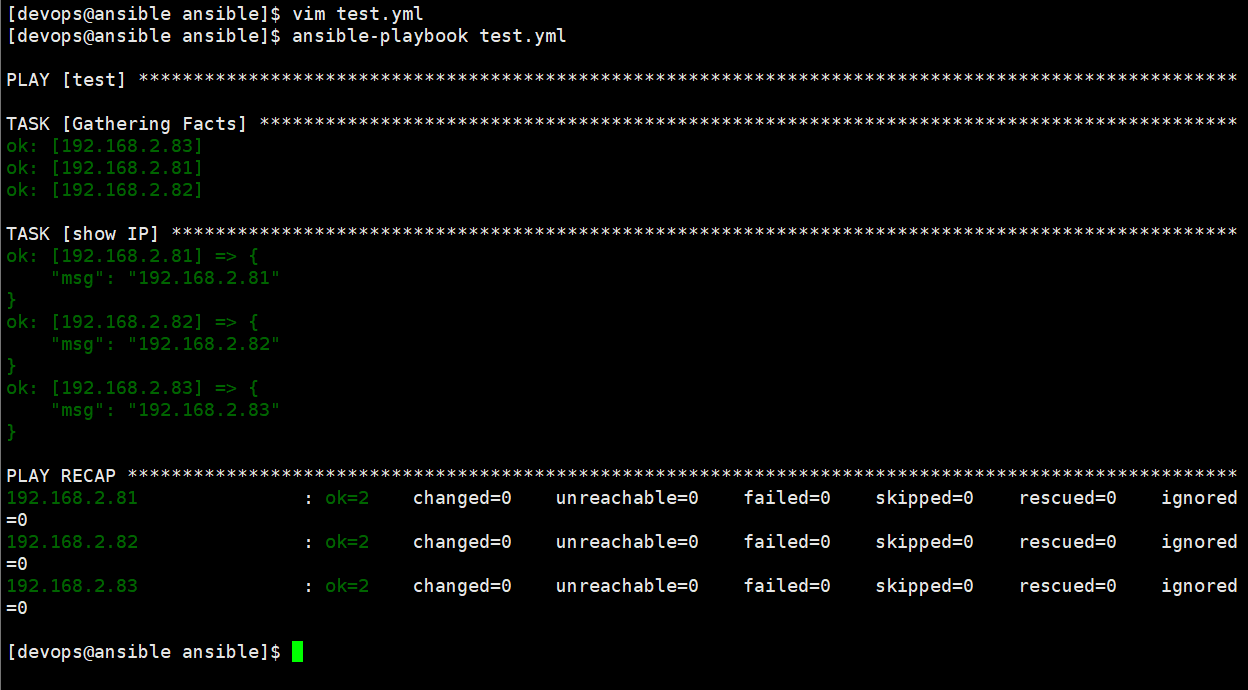
[devops@ansible ansible]$ vim test.yml
- name: test
hosts: all
tasks:
- name: show IP
debug:
msg: "{{ansible_default_ipv4.address}}" # msg参数:自定义消息,嵌入变量
[devops@ansible ansible]$ ansible-playbook test.yml
PLAY [test] ****************************************************************************************************
TASK [Gathering Facts] *****************************************************************************************
ok: [192.168.2.83]
ok: [192.168.2.81]
ok: [192.168.2.82]
TASK [show IP] *************************************************************************************************
ok: [192.168.2.81] => {
"msg": "192.168.2.81" # 正确输出IP地址
}
ok: [192.168.2.82] => {
"msg": "192.168.2.82"
}
ok: [192.168.2.83] => {
"msg": "192.168.2.83"
}var= 看全部msg= 看部分 + 加说明
- 系统执行剧本时会执行Gathering Facts,如果不想让他做,也就是不采集信息
bash
[devops@ansible ansible]$ vim test.yml
- name: test
  gather_facts: no
  hosts: all
  tasks:
  - name: show IP
    debug:
      msg: "{{ansible_default_ipv4.address}}"


[devops@ansible ansible]$ ansible-playbook test.yml

PLAY [test] ****************************************************************************************************

TASK [show IP] *************************************************************************************************
fatal: [192.168.2.81]: FAILED! => {"msg": "The task includes an option with an undefined variable. The error was: 'ansible_default_ipv4' is undefined. 'ansible_default_ipv4' is undefined\n\nThe error appears to be in '/home/devops/ansible/test.yml': line 5, column 5, but may\nbe elsewhere in the file depending on the exact syntax problem.\n\nThe offending line appears to be:\n\n  tasks:\n  - name: show IP\n    ^ here\n"}
fatal: [192.168.2.82]: FAILED! => {"msg": "The task includes an option with an undefined variable. The error was: 'ansible_default_ipv4' is undefined. 'ansible_default_ipv4' is undefined\n\nThe error appears to be in '/home/devops/ansible/test.yml': line 5, column 5, but may\nbe elsewhere in the file depending on the exact syntax problem.\n\nThe offending line appears to be:\n\n  tasks:\n  - name: show IP\n    ^ here\n"}
fatal: [192.168.2.83]: FAILED! => {"msg": "The task includes an option with an undefined variable. The error was: 'ansible_default_ipv4' is undefined. 'ansible_default_ipv4' is undefined\n\nThe error appears to be in '/home/devops/ansible/test.yml': line 5, column 5, but may\nbe elsewhere in the file depending on the exact syntax problem.\n\nThe offending line appears to be:\n\n  tasks:\n  - name: show IP\n    ^ here\n"}

PLAY RECAP *****************************************************************************************************
192.168.2.81               : ok=0    changed=0    unreachable=0    failed=1    skipped=0    rescued=0    ignored=0
192.168.2.82               : ok=0    changed=0    unreachable=0    failed=1    skipped=0    rescued=0    ignored=0
192.168.2.83 : ok=0 changed=0 unreachable=0 failed=1 skipped=0 rescued=0 ignored=0 - 当关闭事实收集(
gather_facts: no)时,变量未定义,任务失败,说明事实变量依赖setup模块的自动收集。
所以,事实变量指的是被控制主机的变量;除了事实变量还有魔法变量,魔法变量指的是ansible自己的内置变量
5.2 魔法变量
魔法变量(Magic Variables) 是 Ansible 内置的一组特殊变量,它们不依赖于目标主机的系统信息(区别于事实变量),而是与 Ansible 的 inventory 配置、主机分组、Playbook 执行上下文等相关,用于获取部署架构或执行过程中的元数据。
魔法变量的核心特点是:由 Ansible 自动维护,无需用户定义,可直接在 Playbook、模板、条件判断中使用,主要用于跨主机交互、分组管理、获取当前执行上下文等场景。
bash
# 查看所有魔法变量(以localhost为例)
[devops@ansible ansible]$ ansible localhost -m debug -a 'var=hostvars'  # hostvars是魔法变量之一(所有主机变量)
常用魔法变量及用途:
inventory_hostname- 目标主机在 inventory 文件中定义的名称(不是主机的实际 hostname),是魔法变量中最常用的一个。
- 示例:
debug: msg="当前处理的主机是{``{ inventory_hostname }}"
inventory_hostname_shortinventory_hostname的短名称(去掉域名部分)。- 若
inventory_hostname是webserver.example.com,则此变量值为webserver。
groups- 一个字典,包含 inventory 中所有主机组及其成员。键是组名,值是该组内所有主机的列表。
- 示例:获取
webservers组的所有主机:{``{ groups['webservers'] }}。
group_names- 当前主机所属的所有组的列表。
- 示例:判断主机是否属于
dbservers组:when: "'dbservers' in group_names"。
hostvars- 一个字典,包含所有主机的变量(包括事实变量、自定义变量等),可跨主机访问变量。
- 示例:获取主机
db01的 IP 地址:{``{ hostvars['db01']['ansible_default_ipv4']['address'] }}。
play_hosts- 当前 Play 中正在处理的所有主机列表(受
hosts参数限制)。 - 示例:遍历当前 Play 的所有主机:
{``{ play_hosts | join(',') }}。
- 当前 Play 中正在处理的所有主机列表(受
ansible_play_batch- 当前批次执行的主机列表(受
serial参数控制,用于滚动部署)。 - 若
serial: 2,则每次执行时此变量仅包含当前 2 台主机。
- 当前批次执行的主机列表(受
role_path- 在 Role 中使用,返回当前 Role 的绝对路径。
- 常用于在 Role 内部引用相对路径的文件(如模板、脚本)。
| 变量类型 | 来源 | 用途 | 示例 |
|---|---|---|---|
| 事实变量 | 被管理主机的系统信息(自动收集) | 获取主机硬件、网络、系统等详情 | ansible_default_ipv4.address |
| 魔法变量 | Ansible 内置(与 inventory 相关) | 获取主机组、执行上下文等元数据 | groups['realserver'] |
六 利用ansible部署项目
通过 playbook 实现完整项目部署(这里以 haproxy 七层负载均衡为例),整合前面学的变量、模块、分组等知识。
bash
# 准备工作:在控制节点搭建本地YUM源(提供安装包)
[root@ansible ansible]# yum install httpd -y
[root@ansible ansible]# mkdir /var/www/html/rhel9/
[root@ansible ansible]# mount /dev/cdrom /var/www/html/rhel9/
[root@ansible ansible]# su - devops

# 切换到devops用户,创建项目目录和清单
[devops@ansible ~]$ mkdir ansible/
[devops@ansible ~]$ cd ansible/
[devops@ansible ansible]$ cat inventory	# 清单(已在3.2中配置,haproxy和realserver分组)
[haproxy]
192.168.2.81

[realserver]
192.168.2.82
192.168.2.83

# 创建部署playbook(haproxy.yml)
[devops@ansible ansible]$ cat haproxy.yml
- name: haproxy cluster  # 部署haproxy集群
  hosts: all  # 所有节点都执行(但通过when条件区分任务)
  tasks:
  # 1. 配置YUM源(所有节点都需要)
  - name: create AppSteam
    yum_repository:  # 用yum_repository模块配置仓库
      name: AppSteam
      description: AppSteam
      baseurl: http://192.168.2.80/rhel9/AppStream/  # 控制节点的本地源
      gpgcheck: no
      file: rhel9  # 仓库配置文件前缀(/etc/yum.repos.d/rhel9.repo)
  - name: create BaseOS
    yum_repository:
      name: BaseOS
      description: BaseOS
      baseurl: http://192.168.2.80/rhel9/BaseOS/
      gpgcheck: no
      file: rhel9

  # 2. 安装软件(haproxy组安装haproxy,realserver组安装nginx)
  - name: install haproxy
    yum:  # yum模块安装软件
      name: haproxy
      state: latest
    when: inventory_hostname in groups.haproxy  # 条件:仅haproxy组主机执行

  - name: install nginx
    yum:
      name: nginx
      state: latest
    when: inventory_hostname in groups.realserver  # 条件:仅realserver组主机执行

  # 3. 配置服务(haproxy配置文件,web服务器首页)
  - name: setup haproxy.cfg
    copy:  # copy模块复制配置文件
      src: /etc/haproxy/haproxy.cfg  # 控制节点的配置文件(需提前准备)
      dest: /etc/haproxy/haproxy.cfg
      owner: root
      group: root
      mode: '0644'
    when: inventory_hostname in groups.haproxy

  - name: setup webserver
    copy:
      content: "{{ansible_default_ipv4.address}}\n"  # 用事实变量获取本机IP作为首页内容
      dest: /usr/share/nginx/html/index.html
    when: inventory_hostname in groups.realserver

  # 4. 启动服务并设置开机自启
  - name: start haproxy
    service:  # service模块管理服务
      name: haproxy
      state: started  # 启动服务
      enabled: yes  # 开机自启
    when: inventory_hostname in groups.haproxy

  - name: start webserver
    service:
      name: nginx
      state: started
      enabled: yes
    when: inventory_hostname in groups.realserver
测试
bash
[devops@ansible ansible]$ ansible-playbook haproxy.yml

PLAY [haproxy cluster] *****************************************************************************************

TASK [Gathering Facts] *****************************************************************************************
ok: [192.168.2.83]
ok: [192.168.2.82]
ok: [192.168.2.81]

TASK [create AppSteam] *****************************************************************************************
ok: [192.168.2.83]
ok: [192.168.2.82]
ok: [192.168.2.81]

TASK [create BaseOS] *******************************************************************************************
ok: [192.168.2.82]
ok: [192.168.2.81]
ok: [192.168.2.83]

TASK [install haproxy] *****************************************************************************************
skipping: [192.168.2.82]	# realserver组跳过
skipping: [192.168.2.83]
ok: [192.168.2.81]	# haproxy组成功安装

TASK [install nginx] *******************************************************************************************
skipping: [192.168.2.81]
ok: [192.168.2.82]
ok: [192.168.2.83]

TASK [setup haproxy.cfg] ***************************************************************************************
skipping: [192.168.2.82]
skipping: [192.168.2.83]
changed: [192.168.2.81]

TASK [setup webserver] *****************************************************************************************
skipping: [192.168.2.81]
ok: [192.168.2.82]
ok: [192.168.2.83]

TASK [start haproxy] *******************************************************************************************
skipping: [192.168.2.82]
skipping: [192.168.2.83]
changed: [192.168.2.81]

TASK [start webserver] *****************************************************************************************
skipping: [192.168.2.81]
ok: [192.168.2.82]
ok: [192.168.2.83]

PLAY RECAP *****************************************************************************************************
192.168.2.81               : ok=6    changed=2    unreachable=0    failed=0    skipped=3    rescued=0    ignored=0   # haproxy节点执行6个任务,2个状态改变
192.168.2.82               : ok=6    changed=0    unreachable=0    failed=0    skipped=3    rescued=0    ignored=0
192.168.2.83               : ok=6    changed=0    unreachable=0    failed=0    skipped=3    rescued=0    ignored=0  # realserver节点执行6个任务,无状态改变(已配置过)

# 测试负载均衡
[devops@ansible ansible]$ curl 192.168.2.81
192.168.2.82	# 返回第一个web节点IP
[devops@ansible ansible]$ curl 192.168.2.81
192.168.2.83	# 返回第二个web节点IP(负载均衡生效,轮询分发请求)
[devops@ansible ansible]$ curl 192.168.2.81
192.168.2.82
[devops@ansible ansible]$ curl 192.168.2.81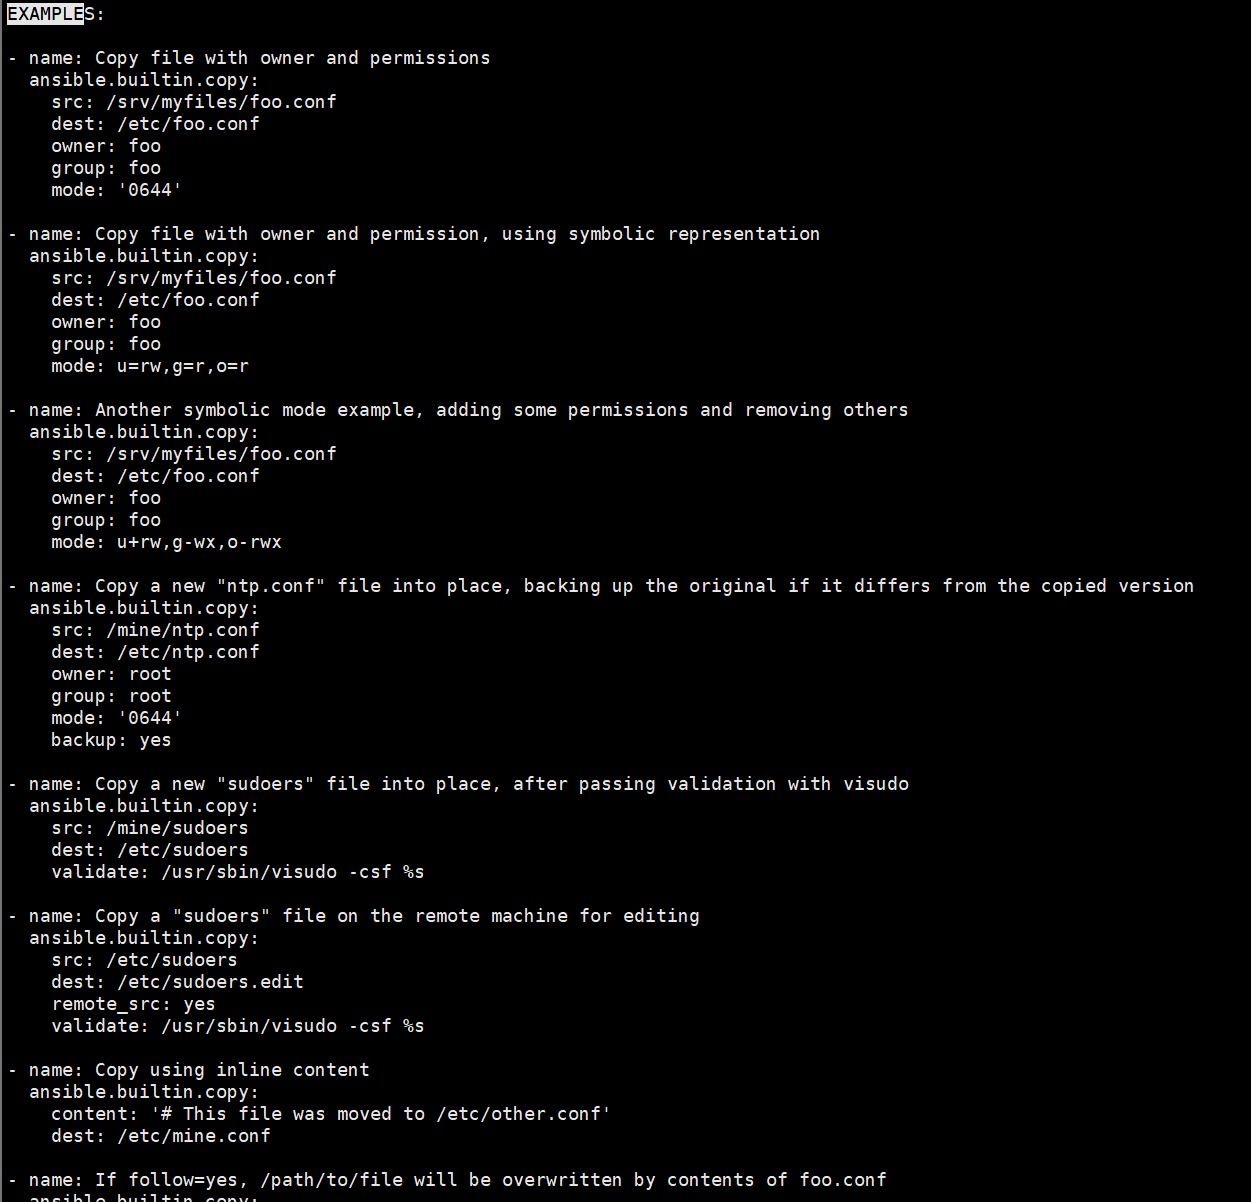
192.168.2.83这是ansible-doc copy的输出,包含模块的参数说明和示例(如src、dest、mode等)
bash
[devops@ansible ansible]$ ansible-doc copy #过滤EXAMPLE可以知道具体参数写法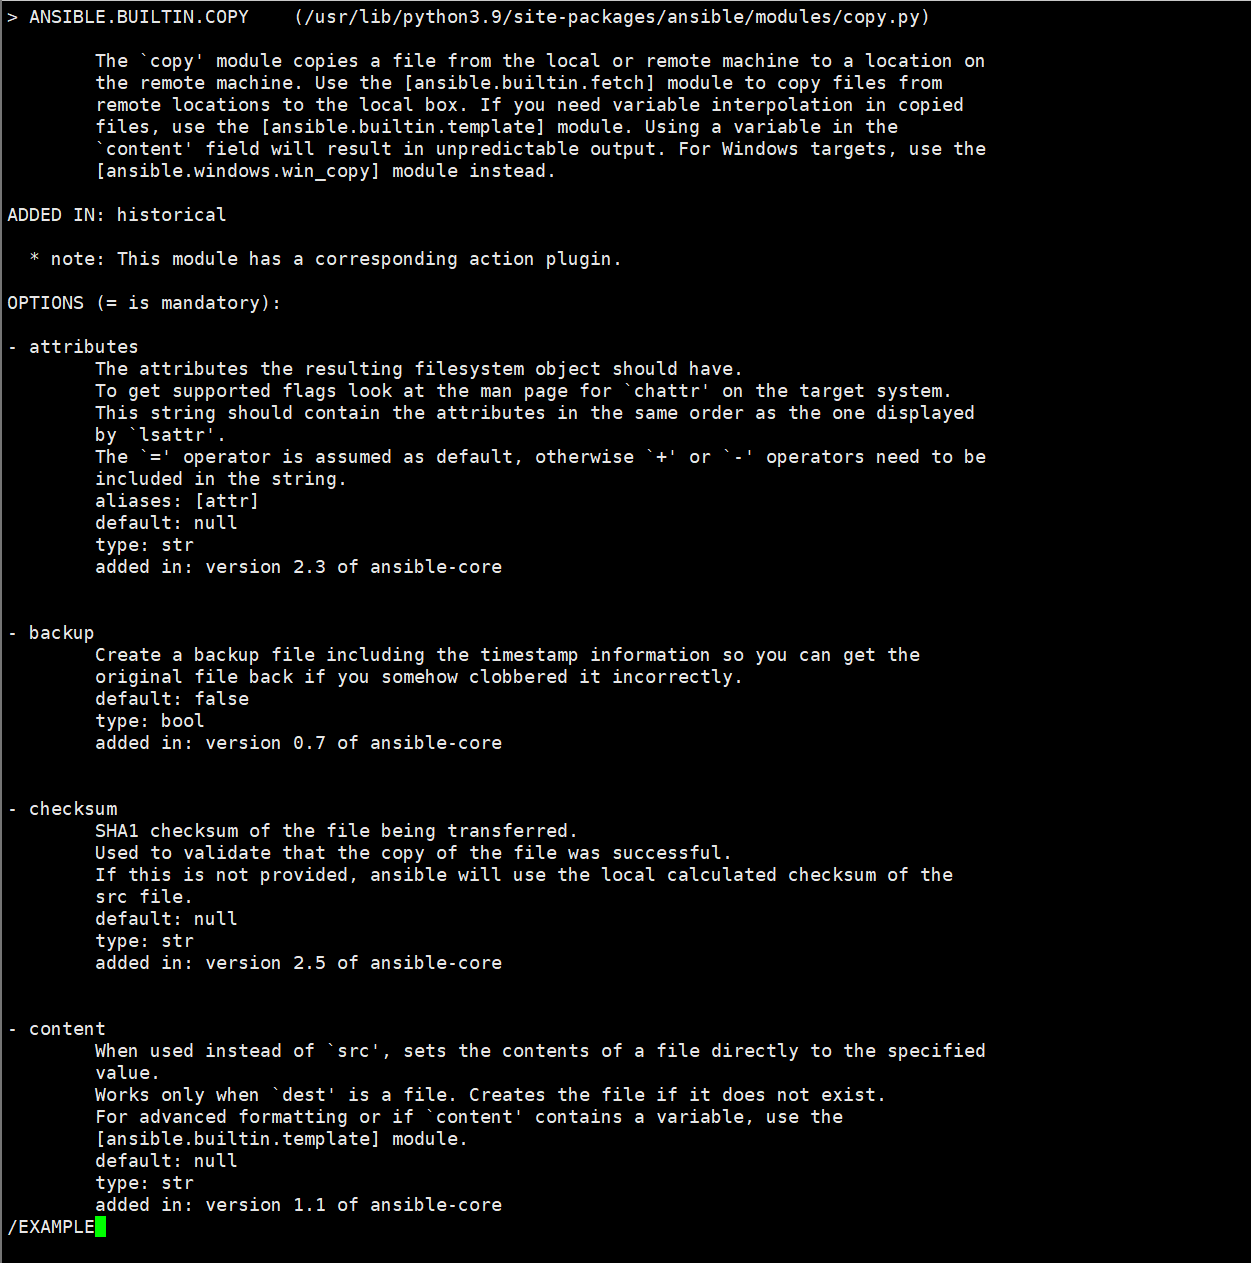
部署思路
- 先给所有节点配好 YUM 源,确保能装软件;
- 按分组装软件:haproxy 节点装负载均衡软件,web 节点装 nginx;
- 配置服务:haproxy 用准备好的配置文件,web 节点首页显示自己的 IP(方便测试);
- 启动服务并设为开机自启,确保服务持续运行;
- 最后用 curl 访问 haproxy 节点,看到轮询返回不同 web 节点的 IP,说明负载均衡部署成功。