Navigation3 相比 Navigation2 来说,区别主要有两点:
- 导航返回栈从由 Navigation 内部控制,变为由开发者控制。
- Navigation2 只适用于单页模式,一个屏幕只能显示一个路由对应的页面。而 Navigation3 可适配大屏。
添加依赖
kotlin
plugins {
    // Kotlin serialization plugin
    id("org.jetbrains.kotlin.plugin.serialization") version "2.0.21"
}

dependencies {
    // Navigation3
    implementation("androidx.navigation3:navigation3-runtime:1.0.0-rc01")
    implementation("androidx.navigation3:navigation3-ui:1.0.0-rc01")

    // Navigation3 Adaptive
    implementation("androidx.compose.material3.adaptive:adaptive-navigation3:1.3.0-alpha03")

    // Kotlin Serialization
    implementation("org.jetbrains.kotlinx:kotlinx-serialization-core:1.6.0")

    // Navigation3 ViewModel
    implementation("androidx.lifecycle:lifecycle-viewmodel-navigation3:2.10.0-rc01")
}
compileSdkVersion 需要 36 以上:
kotlin
android {
    compileSdk = 36
}
简单用法
我们以商品列表页和商品详情页为例:
kotlin
data object ProductList
data class ProductDetail(
    val name: String,
    val description: String
)

@Composable
fun ProductList(
    products: List<ProductDetail>,
    onProductClick: (ProductDetail) -> Unit,
    modifier: Modifier = Modifier
) {
    LazyColumn(modifier = modifier.fillMaxSize()) {
        items(products) { product ->
            Text(
                text = product.name,
                modifier = Modifier
                    .fillMaxSize()
                    .clickable { onProductClick(product) }
                    .padding(16.dp)
            )
        }
    }
}

@Composable
fun ProductDetail(
    product: ProductDetail,
    modifier: Modifier = Modifier
) {
    Column(
        modifier = modifier
            .fillMaxSize()
            .padding(16.dp),
        horizontalAlignment = Alignment.CenterHorizontally
    ) {
        Text(
            text = product.name,
            fontWeight = FontWeight.Bold,
            fontSize = 30.sp
        )
        Column(
            modifier = Modifier
                .fillMaxSize()
                .weight(1f),
            verticalArrangement = Arrangement.Center,
            horizontalAlignment = Alignment.CenterHorizontally
        ) {
            Text(
                text = product.description,
                fontSize = 26.sp
            )
        }
    }
}注意:ProductDetail 和 ProductList 有两重意思:既封装了页面的数据,又作为页面的导航节点。
然后是 MyApp 函数:
kotlin
class MainActivity : ComponentActivity() {
    override fun onCreate(savedInstanceState: Bundle?) {
        super.onCreate(savedInstanceState)
        enableEdgeToEdge()
        setContent {
            ComposeNavigation3TestTheme {
                MyApp()
            }
        }
    }
}

@Composable
fun MyApp(modifier: Modifier = Modifier) {
    // 返回栈,初始页面是商品列表
    // Navigation3 会自动展示栈顶页面
    val backStack = remember { mutableStateListOf<Any>(ProductList) }
    NavDisplay( // 入口函数
        backStack = backStack, // backStack参数是导航返回栈
        onBack = { // onBack回调是返回的监听
            // 返回逻辑为:移除栈顶元素
            backStack.removeLastOrNull()
        },
        entryProvider = { key -> // entryProvider回调用于定义每个页面的NavEntry
            when (key) {
                // 商品列表页面
                is ProductList -> NavEntry(key) {
                    val products = mutableListOf<ProductDetail>()
                    repeat(30) {
                        products.add(ProductDetail("Product $it", "Description of Product $it"))
                    }
                    ProductList(
                        products = products,
                        onProductClick = { product ->
                            // 跳转到商品详情页面
                            backStack.add(ProductDetail(product.name, product.description))
                        },
                        modifier
                    )
                }
                // 商品详情页面
                is ProductDetail -> NavEntry(key) {
                    ProductDetail(
                        product = key,
                        modifier
                    )
                }

                else -> error("Unknown key: $key")
            }
        }
    )
}
运行效果:

可以看到,商品列表页向商品详情页传递数据非常容易,只需将数据加入到返回栈,详情页自然能在 entryProvider 回调中收到。
保存和管理导航状态
现在,我们旋转屏幕,会导致 Activity 的重建,导致返回栈被清空。
解决方法也很简单:只需给每一个 data class 加上 @Serializable 注解,然后实现 NavKey 接口。
状态恢复要求数据是可序列化的
kotlin
@Serializable
data object ProductList : NavKey

@Serializable
data class ProductDetail(
    val name: String,
    val description: String
) : NavKey
再将返回栈的声明改为 val backStack = rememberNavBackStack(ProductList) 即可。
大屏适配
Navigation 3 中的场景(Scene)解决了大屏适配的问题,它可以显示一个或多个 NavEntry 实例,也就是同时显示多个 NavEntry 页面。
我们可以给 NavDisplay 函数传入一个 sceneStrategy 参数,来指定场景策略。默认策略是 SinglePaneSceneStrategy,单页场景模式。
我们来使用 ListDetailSceneStrategy,列表详情页面场景策略,它会自动根据当前屏幕大小进行页面分配。
kotlin
@OptIn(ExperimentalMaterial3AdaptiveApi::class)
@Composable
fun MyApp(modifier: Modifier = Modifier) {
val backStack = rememberNavBackStack(ProductList)
// 创建ListDetailSceneStrategy实例
val listDetailStrategy = rememberListDetailSceneStrategy<Any>()
NavDisplay(
backStack = backStack,
onBack = {
backStack.removeLastOrNull()
},
sceneStrategy = listDetailStrategy, // 使用ListDetailSceneStrategy
entryProvider = { key ->
when (key) {
is ProductList -> NavEntry(
key = key,
metadata = ListDetailSceneStrategy.listPane( // 修改处
detailPlaceholder = {
Column(
modifier = Modifier
.fillMaxSize(),
verticalArrangement = Arrangement.Center,
horizontalAlignment = Alignment.CenterHorizontally
) {
Text("Choose a product from the list", fontSize = 26.sp)
}
}
)
) {
val products = mutableListOf<ProductDetail>()
repeat(30) {
products.add(ProductDetail("Product $it", "Description of Product $it"))
}
ProductList(
products = products,
onProductClick = { product ->
backStack.add(ProductDetail(product.name, product.description))
},
modifier
)
}
is ProductDetail -> NavEntry(
key = key,
metadata = ListDetailSceneStrategy.detailPane() // 修改处
) {
ProductDetail(
product = key,
modifier
)
}
else -> error("Unknown key: $key")
}
}
)
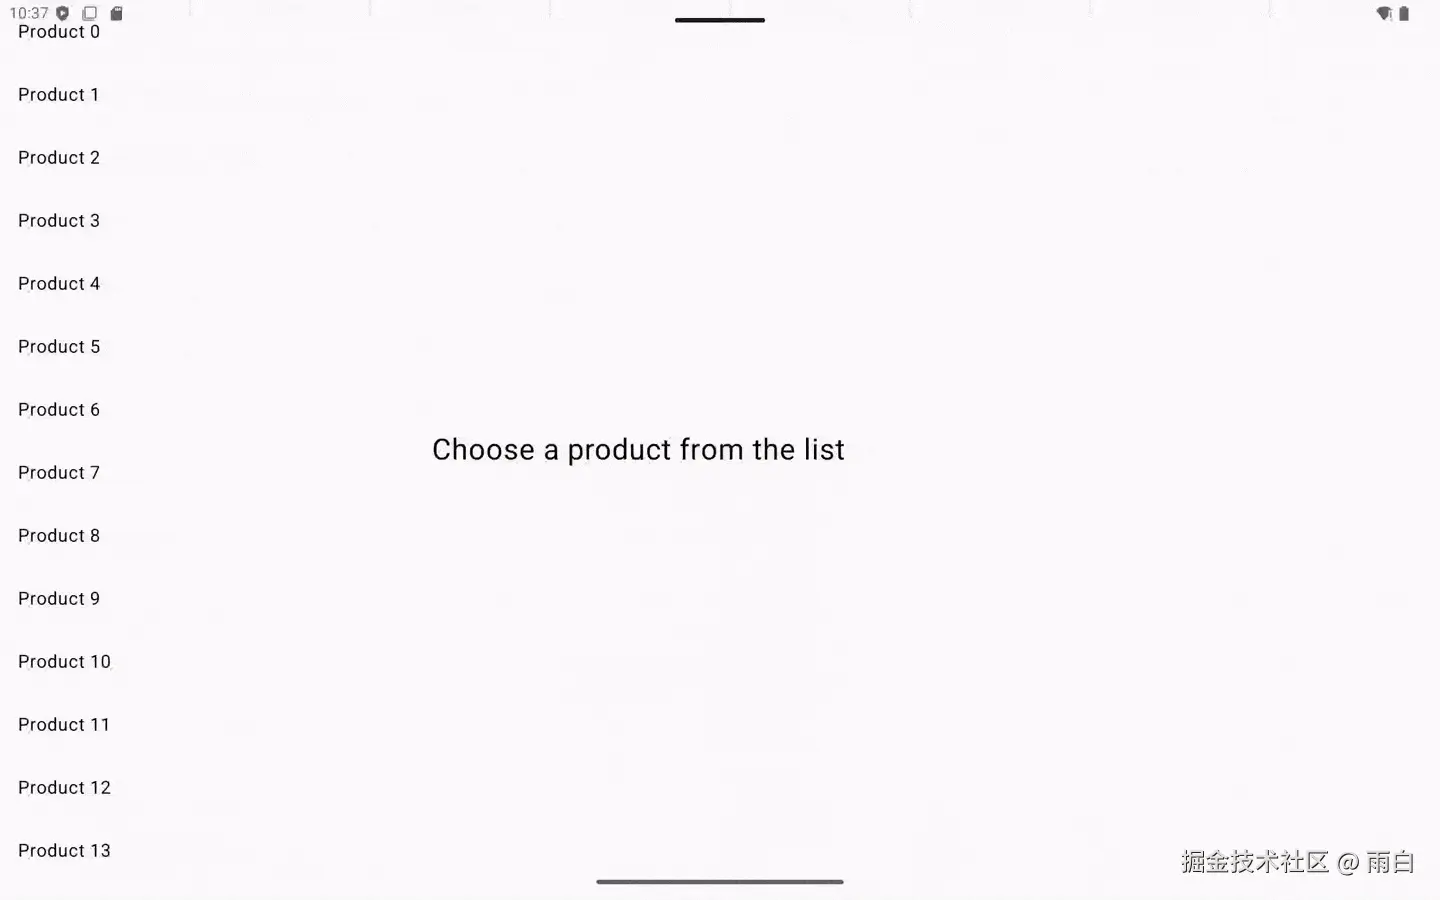
}我们给列表页和详情页的 NavEntry 都传入了 metadata 参数,通过 listPane() 和 detailPane() 来告知了 Navigation 列表页和详情页的 NavEntry 分别是哪个。
我们还给 listPane() 传入了 detailPlaceholder(详情页占位符)参数,这样未选中列表项时,会默认显示占位的内容。
运行效果:
自定义场景
为了完成自定义场景,我们先来简单看看内置的单页模式场景的源码:
kotlin
internal data class SinglePaneScene<T : Any>(
    override val key: Any, // 唯一标识符,用于动画
    val entry: NavEntry<T>, // 当前页的 NavEntry
    override val previousEntries: List<NavEntry<T>>,  // 添加当前页之前的 NavEntry 列表,用于预测性返回动画
) : Scene<T> { // 实现 Scene 接口
    override val entries: List<NavEntry<T>> = listOf(entry) // 当前场景需要显示的 NavEntry

    override val content: @Composable () -> Unit = { entry.Content() } // 当前场景的内容

    // equals、hashCode、toString 方法
}

public class SinglePaneSceneStrategy<T : Any> : SceneStrategy<T> {

    // 返回场景类实例,它决定了最终界面的显示内容
    override fun SceneStrategyScope<T>.calculateScene(entries: List<NavEntry<T>>): Scene<T> {
        return SinglePaneScene(
            key = entries.last().contentKey,
            entry = entries.last(),
            previousEntries = entries.dropLast(1),
        )
    }
}
简单了解过后,我们来完成双页模式场景:
kotlin
data class DoublePaneScene<T : Any>(
    override val key: Any,
    override val previousEntries: List<NavEntry<T>>,
    val startEntry: NavEntry<T>, // 左侧面板导航条目
    val endEntry: NavEntry<T> // 右侧面板导航条目
) : Scene<T> {
    override val entries: List<NavEntry<T>> = listOf(startEntry, endEntry)

    override val content: @Composable (() -> Unit) = {
        // 获取窗口大小信息
        val windowSizeClass = currentWindowAdaptiveInfo().windowSizeClass
        // 如果宽度大于等于中屏,则显示双列
        if (windowSizeClass.isWidthAtLeastBreakpoint(WIDTH_DP_MEDIUM_LOWER_BOUND)) {
            Row(modifier = Modifier.fillMaxSize()) {
                Column(modifier = Modifier.weight(0.22f)) {
                    startEntry.Content()
                }
                Column(modifier = Modifier.weight(0.78f)) {
                    endEntry.Content()
                }
            }
        } else {
            endEntry.Content()
        }
    }

    companion object {
        internal const val START_PANE_KEY = "StartPane"
        internal const val END_PANE_KEY = "EndPane"
        fun startPane() = mapOf(START_PANE_KEY to true)
        fun endPane() = mapOf(END_PANE_KEY to true)
    }
}
首先,我们接收了两个 NavEntry 实例,待会将会传递进来,分别代表了左侧和右侧的页面。
然后在 content 中,完成了页面的布局:如果是大屏设备,则双列显示;否则,只显示右侧页面。
kotlin
class DoublePaneSceneStrategy<T : Any> : SceneStrategy<T> {
    override fun SceneStrategyScope<T>.calculateScene(entries: List<NavEntry<T>>): Scene<T>? {
        // 过滤出拥有特定元数据的 NavEntry
        val startPane =
            entries.filter { it.metadata.containsKey(DoublePaneScene.START_PANE_KEY) }
        val endPane =
            entries.filter { it.metadata.containsKey(DoublePaneScene.END_PANE_KEY) }
        if (startPane.isEmpty() || endPane.isEmpty()) {
            // 不同时存在两个面板,说明当前场景策略无法处理
            // 默认会被单页模式场景策略处理
            return null
        }

        val startEntry = startPane.last()
        val endEntry = endPane.last()
        // 构建一个 Key 用于标识场景
        val sceneKey = Pair(startEntry, endEntry)
        return DoublePaneScene(
            key = sceneKey,
            previousEntries = entries.dropLast(1),
            startEntry = startEntry,
            endEntry = endEntry
        )
    }

}
我们找到特定的两个 NavEntry(待会使用时,需要将指定的元数据传入),然后创建 DoublePaneScene 实例返回即可。
具体使用:
kotlin
@Composable
fun MyApp(modifier: Modifier = Modifier) {
    val backStack = rememberNavBackStack(ProductList)
    NavDisplay(
        backStack = backStack,
        onBack = {
            backStack.removeLastOrNull()
        },
        sceneStrategy = DoublePaneSceneStrategy(), // 使用DoublePaneScene
        entryProvider = { key ->
            when (key) {
                is ProductList -> NavEntry(
                    key = key,
                    // 传递特定元数据
                    metadata = DoublePaneScene.startPane()
                ) {
                    val products = mutableListOf<ProductDetail>()
                    repeat(30) {
                        products.add(ProductDetail("Product $it", "Description of Product $it"))
                    }
                    ProductList(
                        products = products,
                        onProductClick = { product ->
                            backStack.add(ProductDetail(product.name, product.description))
                        },
                        modifier
                    )
                }

                is ProductDetail -> NavEntry(
                    key = key,
                    // 传递特定元数据
                    metadata = DoublePaneScene.endPane()
                ) {
                    ProductDetail(
                        product = key,
                        modifier
                    )
                }

                else -> error("Unknown key: $key")
            }
        }
    )
}
运行效果:
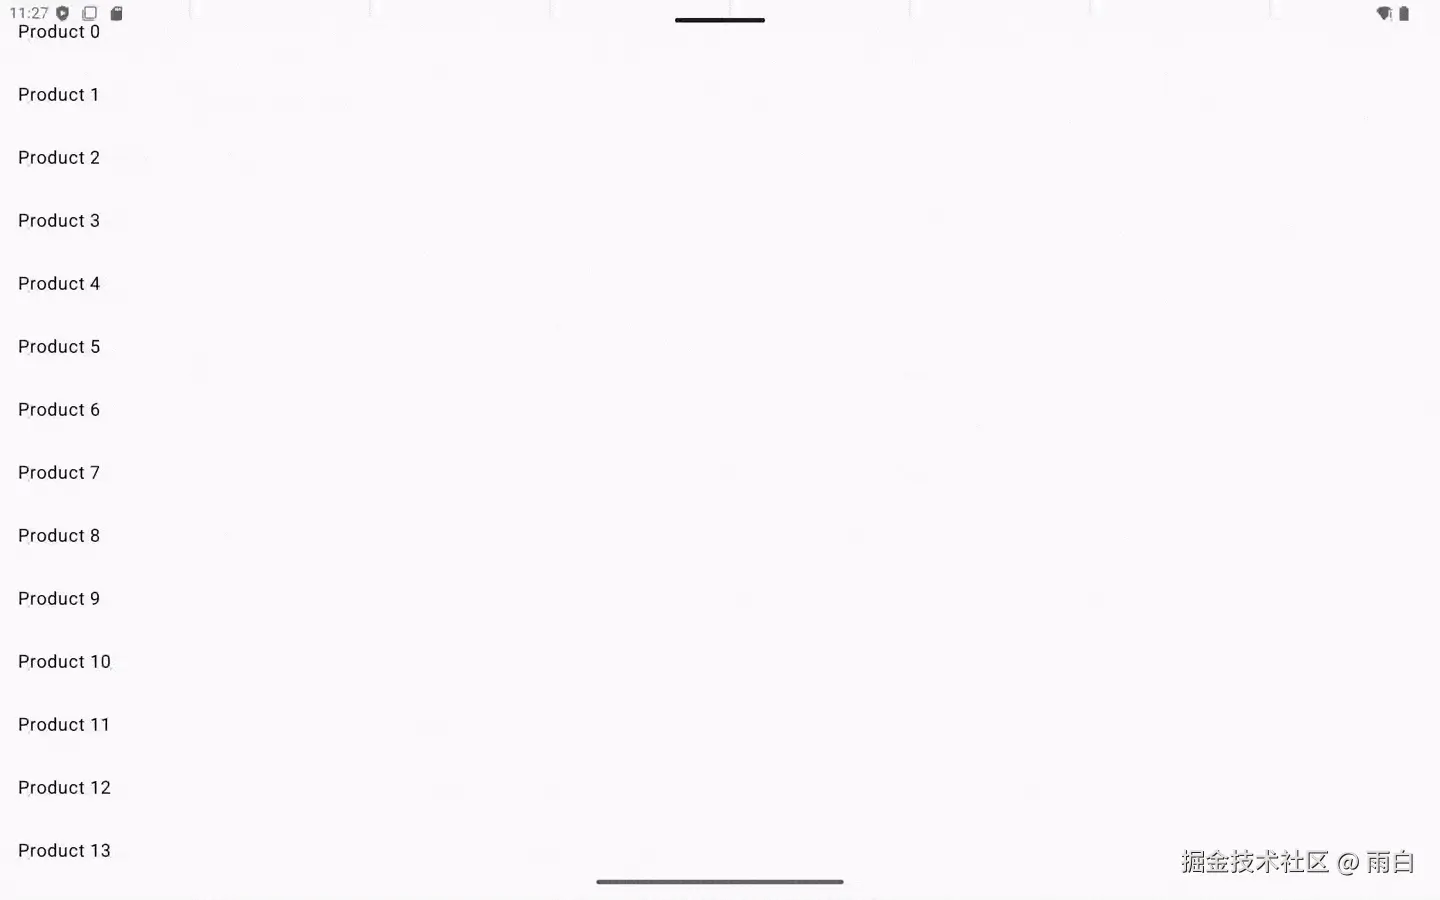
可以看到,每次点击列表项时,左侧的列表页都会"闪烁"一下。并且按下返回键时,会回到上一个详情页。
这与官方的 ListDetailSceneStrategy 效果并不同,这是因为官方的 ListDetailSceneStrategy 会安装自己的 BackHandler,在大屏幕设备上,按下返回键会直接清空堆栈。而我们的 DoublePaneSceneStrategy 只负责显示,并不会有额外的优化。
"闪烁"是因为 NavDisplay 依靠 sceneKey 来判断是否是同一个场景,当我们点击了新的列表项后,NavDisplay 发现场景已经变化,会销毁并重建整个场景,而这个过程就是我们看到的"闪烁"。
参考
参考郭霖大佬的博客:写给初学者的Jetpack Compose教程,Navigation 3。